Ubuntu 10.04 LTS Desktop Edition(64bit)のインストール [Ubuntu]
32bitの日本語Remixに続いて64bitのDesktop Editionをインストールしてみる。
次のページから64-bitを選択してStart downloadボタンを押してインストーラCDをダウンロードする。
http://www.ubuntu.com/desktop/get-ubuntu/download
簡易インストールを使用しないため、仮想マシン作成時には、「後でOSをインストール」を選択する。

ゲストOSはLinux→「Ubuntu 64 ビット」を選択する。

その他の仮想マシン設定は次の通り。
・ハードディスク容量:128GB
・メモリ:4096MB
・CPU :4コア
・CD/DVDドライブ:ダウンロードしたインストールCDイメージファイルを指定
・ディスプレイ:念のため、3Dグラフィックするアクセラレーションにチェックを入れる。
インストーラ起動時にはデフォルトでEnglishが選択されている。

日本語を選択し、「Ubuntu 10.04 LTS をインストールする」ボタンを押す。

タイムゾーンはデフォルトで日本時間が表示されているので、このまま進む。

キーボードはデフォルトでJapanが表示されているので、このまま進む。
キーボードの入力テストも可能である。

ディスクについては、今回は「ディスク全体を削除してから使用する」を選択して進める。

ユーザ情報を入力する。今回は「自動的にログインする」を選択しておく。

インストール内容を確認し、インストールを開始する。

インストールが完了すると再起動を求められるので、ボタンを押して再起動する。

インストールCDイメージが接続解除されていることを確認してEnterを入力する。

再起動後、自動ログインする。

続いてVMware Toolsをインストールする。
まず端末を開く。

Vmware Toolsのインストールはrootで行う必要があるが、Ubuntu 10.04では、
デフォルトでrootが使用できるようになっていない。
このため、次のコマンドでrootにスイッチする。
sudo su -
パスワードを求められるので入力する。

VMware Playerのメニューから、「仮想マシン」→「VMware Toolsのインストール」を選択する。
自動的にCD-ROMがマウントされる。

次のコマンドでワーキング ディレクトリに移動する。
cd /tmp

次のコマンドでインストーラを展開する。
tar zxpf "/media/VMware Tools/VMwareTools-8.4.2-261024.tar.gz"

インストーラを実行する。
cd vmware-tools-distrib
./vmware-install.pl

質問にはすべてEnterで答え、デフォルト値を使用する。

インストールが終了すると自動的にCD-ROMはunmountされる。

次のコマンドを実行。
/usr/bin/vmware-user

VMware Toolsのインストール完了。

モニタの設定で解像度を変更。

自動設定したディスクは次のようになっている。
スワップが5.6GB割り当てられているが、その他はすべてルートパーティションに割り当てているのは、希望に合っているので問題ない。

日本語Remixと比較をしてみる。
メニューに関しては、相違点は次のところである。
・日本語Remixは、システム→設定内に「Anthy辞書管理」がある。
・オリジナルはシステム→設定内に「既定のプログラム」があるが、日本語Remixは、システム→設定内に「お気に入りのアプリ」がある。
ただし、ウインドウの名称が違うのみで起動されるプログラムは同一である。
・日本語Remixは、システム→システム管理内に「日本語環境セットアップ・ヘルパ」がある。


「Anthy辞書管理」については、Ubuntuソフトウェアセンターから「kasumi」を検索して
インストールすれば、使用可能となる。

日本語セットアップヘルパは、日本語関連のソフトをインストールしやすくするためのものである。

その他、オリジナルと日本語Remixの差異については次のURLの下のほうに「オリジナル版からの変更点」として記載がある。
http://www.ubuntulinux.jp/products/JA-Localized/download
次のページから64-bitを選択してStart downloadボタンを押してインストーラCDをダウンロードする。
http://www.ubuntu.com/desktop/get-ubuntu/download
簡易インストールを使用しないため、仮想マシン作成時には、「後でOSをインストール」を選択する。

ゲストOSはLinux→「Ubuntu 64 ビット」を選択する。

その他の仮想マシン設定は次の通り。
・ハードディスク容量:128GB
・メモリ:4096MB
・CPU :4コア
・CD/DVDドライブ:ダウンロードしたインストールCDイメージファイルを指定
・ディスプレイ:念のため、3Dグラフィックするアクセラレーションにチェックを入れる。
インストーラ起動時にはデフォルトでEnglishが選択されている。

日本語を選択し、「Ubuntu 10.04 LTS をインストールする」ボタンを押す。

タイムゾーンはデフォルトで日本時間が表示されているので、このまま進む。

キーボードはデフォルトでJapanが表示されているので、このまま進む。
キーボードの入力テストも可能である。

ディスクについては、今回は「ディスク全体を削除してから使用する」を選択して進める。

ユーザ情報を入力する。今回は「自動的にログインする」を選択しておく。

インストール内容を確認し、インストールを開始する。

インストールが完了すると再起動を求められるので、ボタンを押して再起動する。

インストールCDイメージが接続解除されていることを確認してEnterを入力する。

再起動後、自動ログインする。

続いてVMware Toolsをインストールする。
まず端末を開く。

Vmware Toolsのインストールはrootで行う必要があるが、Ubuntu 10.04では、
デフォルトでrootが使用できるようになっていない。
このため、次のコマンドでrootにスイッチする。
sudo su -
パスワードを求められるので入力する。

VMware Playerのメニューから、「仮想マシン」→「VMware Toolsのインストール」を選択する。
自動的にCD-ROMがマウントされる。

次のコマンドでワーキング ディレクトリに移動する。
cd /tmp

次のコマンドでインストーラを展開する。
tar zxpf "/media/VMware Tools/VMwareTools-8.4.2-261024.tar.gz"

インストーラを実行する。
cd vmware-tools-distrib
./vmware-install.pl

質問にはすべてEnterで答え、デフォルト値を使用する。

インストールが終了すると自動的にCD-ROMはunmountされる。

次のコマンドを実行。
/usr/bin/vmware-user
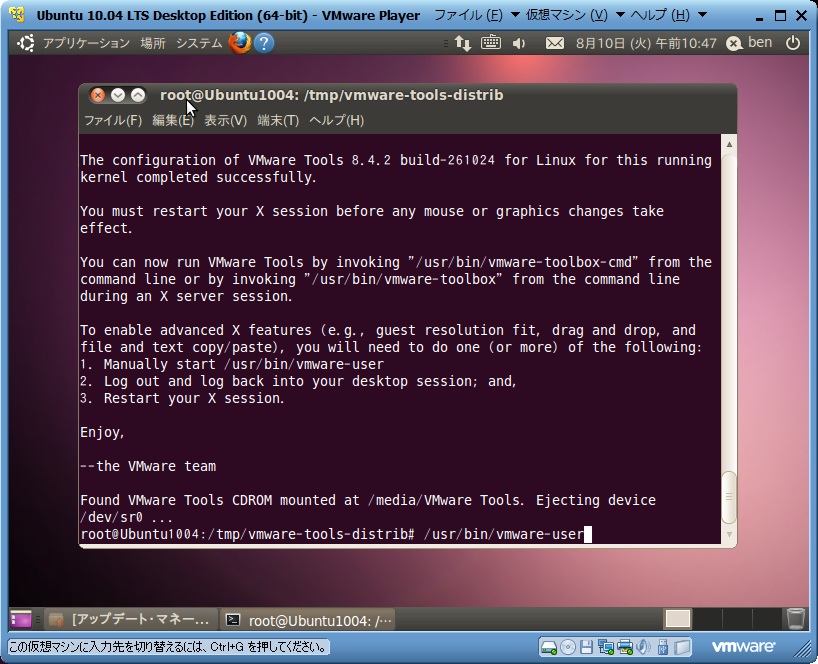
VMware Toolsのインストール完了。

モニタの設定で解像度を変更。

自動設定したディスクは次のようになっている。
スワップが5.6GB割り当てられているが、その他はすべてルートパーティションに割り当てているのは、希望に合っているので問題ない。

日本語Remixと比較をしてみる。
メニューに関しては、相違点は次のところである。
・日本語Remixは、システム→設定内に「Anthy辞書管理」がある。
・オリジナルはシステム→設定内に「既定のプログラム」があるが、日本語Remixは、システム→設定内に「お気に入りのアプリ」がある。
ただし、ウインドウの名称が違うのみで起動されるプログラムは同一である。
・日本語Remixは、システム→システム管理内に「日本語環境セットアップ・ヘルパ」がある。


「Anthy辞書管理」については、Ubuntuソフトウェアセンターから「kasumi」を検索して
インストールすれば、使用可能となる。

日本語セットアップヘルパは、日本語関連のソフトをインストールしやすくするためのものである。

その他、オリジナルと日本語Remixの差異については次のURLの下のほうに「オリジナル版からの変更点」として記載がある。
http://www.ubuntulinux.jp/products/JA-Localized/download
タグ:ubuntu
Ben さん

-
nice! 48
記事 164
テーマ パソコン・インターネット
プロフィール
ブログを紹介する


コメント 0