One of the common goals for administering any software system is to ensure that the principle of least privileges applies. Office 365 and Azure AD are no exception, and while in general we have some clear role separation to help us with this task and even cool features such as Azure AD Privileged Identity Management that help minimize the number of administrators with standing access, for years organizations have been asking for better granularity and more control over administrative functionalities. With the latest set of improvements, which we will cover in this article, things have gotten a tad better, and we’ve seen the first indications of proper RBAC (Role Based Access Control) support for Azure AD.
License admin
Every Office 365 administrator is familiar with the need to license users for the different services, an easy but boring task. Depending on the needs of the organization, licensing can be done manually by the helpdesk staff or an administrator, or in some cases handled by a different business unit altogether. Licensing can also automated via a PowerShell script, third-party tool or by using the group-based licensing feature. While managing licenses is generally a very common task, the permissions required to manage license assignments are only granted to the Global Administrator and User Account Administrator roles, which in turn created issues with adhering to the principle of least privilege. Until now that is, as we finally have access to the License admin role!
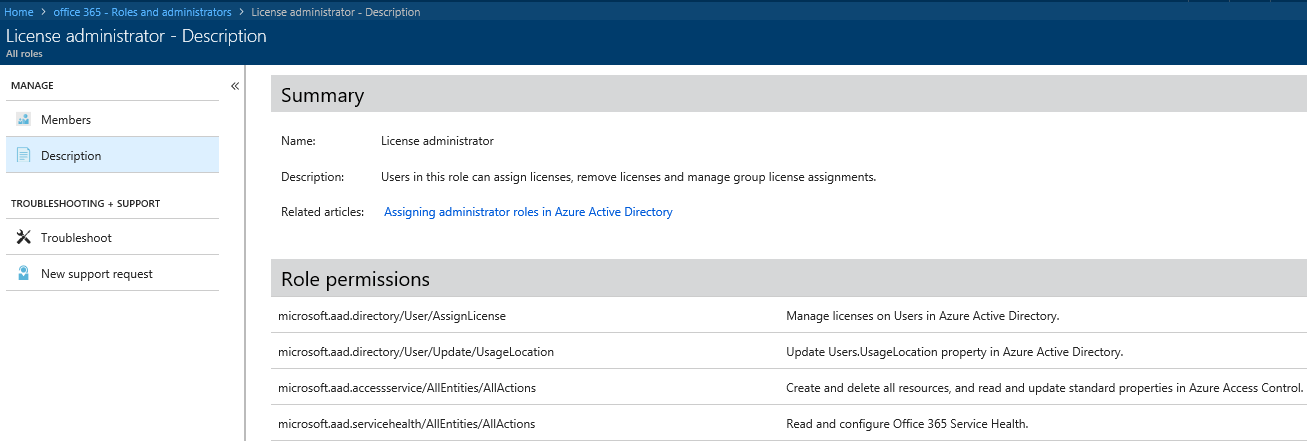
As the name suggests, the License admin role grants permissions to manage user licenses, without granting any excess permissions. Apart from managing license assignments, the only other actions that members of the License admin role can perform is to set the UsageLocation property for users, which is a prerequisite for assigning a license, and access the Service Health Dashboard part of the portal. In addition, users with the License admin role assigned can manage group-based licensing. They cannot however purchase new subscriptions, manage users or groups, or perform any other action.
The screenshot below shows the full list of Role permissions for the License admin role, as part of the new Roles and Administrator experience which we will discuss in a later section.

In terms of actually using the License admin role, things are very straightforward. Both the Azure AD blade and the Office 365 Admin Center can be used to assign the License role to users, or you can manage the assignments via the MSOnline or the Azure AD PowerShell module if you are a fan of the console approach. Once a user has been granted the role, he can access the Office 365 Admin center and the relevant actions will become available in the UI.
It is important to note that License administrators can manage license assignments for any user, Global administrators included. As this is not clarified in the documentation, I cannot be sure whether this is the expected behavior or a bug, but it’s certainly something to keep in mind. In addition, users with the License admin role assigned can also manage Office installs for any user in the organization.
Customer Lockbox access approver role
Another recently introduced role is the Customer Lockbox approver one. Similarly to the License admin role, it addresses the requirement for “excessive” permission needed to use the Customer Lockbox functionality, which until recently was only available to Global administrators. Due to the nature of the Customer Lockbox feature however, in many cases the decision of whether to approve a request lays with a different business role and not necessarily the IT department. Now, the Customer Lockbox access approver role allows for granular delegation of just the functionality related to the Lockbox feature, and nothing else.
Users that have been assigned the role can approve or deny Customer Lockbox requests, as well as to configure the feature. Assigning the role can be done from either the Azure AD blade or the Office 365 Admin Center, as well as by using PowerShell.
Revamped Roles and Administrators experience in the Azure AD blade
In other news, a preview of the new Roles and Administrators experience in the Azure AD blade was released at the end of July. This includes improvements in both the UI and documentation. For example, when you navigate to the user settings and click the Directory Role tab, you will be presented with a list of all currently assigned roles for that user, as well as the option to assign new ones by pressing the Add role button. This in turn will invoke the Directory roles pane on the right, where you can select one or more roles to assign, as shown on the below screenshot. If you want to remove a role instead, select it and press the Remove role button.

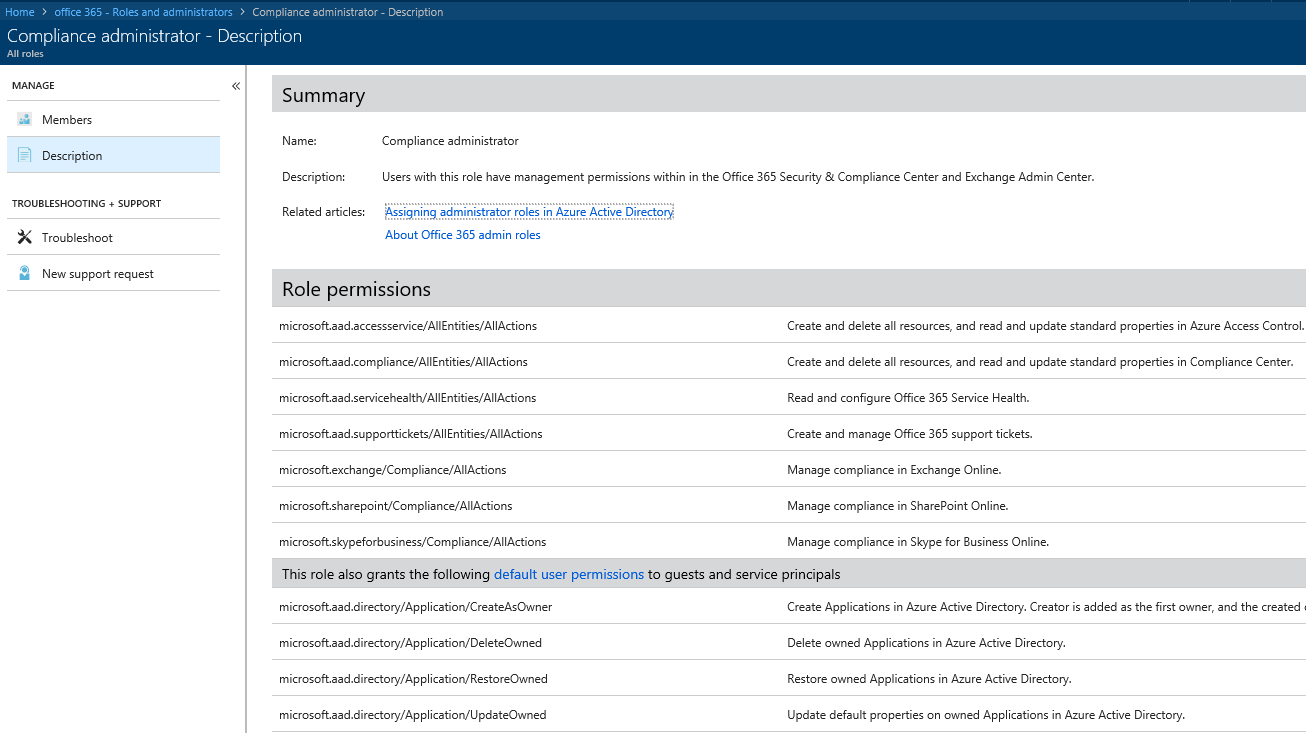
One of the best things to come out of this new experience is the very detailed list of Role permissions and default user permissions that can now be found in the description of each of the Admin roles. To access this information, navigate to the Azure AD blade, select Roles and Administrators, click the role in question (for example Compliance administrator) and then click the Description tab. You will be presented with the following view:

On top, under the Summary section, you will find the Name of the role, its Description and some related help articles. The Role permissions section lists all the individual (groups of) actions that a user will be able to perform once granted the role, broken down by the individual workload. So, for the current example of the Compliance administrator role, you will find entries such as “Manage compliance in Exchange Online” as well as full access to the Security and Compliance Center, the Office 365 Service Health Dashboard, and more.
In addition, the list includes all the individual actions that users can perform by default. The list of such actions is designated by “default user permissions” and its content will depend on the type of user (member vs guest), their assigned Azure AD roles, if any, and the ownership of the object in question (for example, an “owner” of Office 365 Group will be able to perform certain actions on it even without being granted an Azure AD admin role). The above screenshot has been cropped for brevity, so only the first four such entries are visible, and all of them relate to different management tasks of applications that the user has registered in Azure AD. The full list of default user permissions can be found in this article.
Going over the list of permissions for each role is a good way to familiarize yourself with the Azure AD permissions model and ensure you are not over-delegating. Personally, I’m very happy with this update and the increased visibility, although it can certainly feel like an information overload. Perhaps what we are seeing is the initial steps in preparation of getting proper RBAC controls for Azure AD? One can only hope!


Still no MFA role it appears, meaning only GA can administer user MFA settings…