Location via proxy:   [ UP ]  
[Report a bug]   [Manage cookies]                

Scott Hanselman

Use your own user @ domain for Mastodon discoverability with the WebFinger Protocol without hosting a server

December 19, 2022 Comment on this post [3] Posted in Musings
Sponsored By

Mastodon is a free, open-source social networking service that is decentralized and distributed. It was created in 2016 as an alternative to centralized social media platforms such as Twitter and Facebook.

One of the key features of Mastodon is the use of the WebFinger protocol, which allows users to discover and access information about other users on the Mastodon network. WebFinger is a simple HTTP-based protocol that enables a user to discover information about other users or resources on the internet by using their email address or other identifying information. The WebFinger protocol is important for Mastodon because it enables users to find and follow each other on the network, regardless of where they are hosted.

WebFinger uses a "well known" path structure when calling an domain. You may be familiar with the robots.txt convention. We all just agree that robots.txt will sit at the top path of everyone's domain.

The WebFinger protocol is a simple HTTP-based protocol that enables a user or search to discover information about other users or resources on the internet by using their email address or other identifying information. My is first name at last name .com, so...my personal WebFinger API endpoint is here https://www.hanselman.com/.well-known/webfinger

The idea is that...

  1. A user sends a WebFinger request to a server, using the email address or other identifying information of the user or resource they are trying to discover.

  2. The server looks up the requested information in its database and returns a JSON object containing the information about the user or resource. This JSON object is called a "resource descriptor."

  3. The user's client receives the resource descriptor and displays the information to the user.

The resource descriptor contains various types of information about the user or resource, such as their name, profile picture, and links to their social media accounts or other online resources. It can also include other types of information, such as the user's public key, which can be used to establish a secure connection with the user.

There's a great explainer here as well. From that page:

When someone searches for you on Mastodon, your server will be queried for accounts using an endpoint that looks like this:

GET https://${MASTODON_DOMAIN}/.well-known/webfinger?resource=acct:${MASTODON_USER}@${MASTODON_DOMAIN}

Note that Mastodon user names start with @ so they are @username@someserver.com. Just like twiter would be @shanselman@twitter.com I can be @shanselman@hanselman.com now!
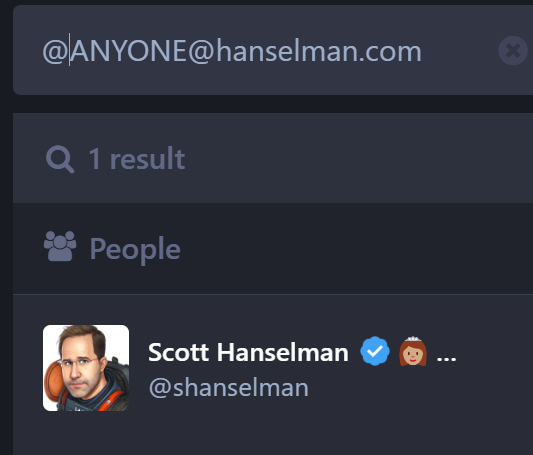
Searching for me with Mastodon

So perhaps https://www.hanselman.com/.well-known/webfinger?resource=acct:FRED@HANSELMAN.COM

Mine returns

{
"subject":"acct:shanselman@hachyderm.io",
"aliases":
[
"https://hachyderm.io/@shanselman",
"https://hachyderm.io/users/shanselman"
],
"links":
[
{
"rel":"http://webfinger.net/rel/profile-page",
"type":"text/html",
"href":"https://hachyderm.io/@shanselman"
},
{
"rel":"self",
"type":"application/activity+json",
"href":"https://hachyderm.io/users/shanselman"
},
{
"rel":"http://ostatus.org/schema/1.0/subscribe",
"template":"https://hachyderm.io/authorize_interaction?uri={uri}"
}
]
}

This file should be returned as a mime type of application/jrd+json

My site is an ASP.NET Razor Pages site, so I just did this in Startup.cs to map that well known URL to a page/route that returns the JSON needed.

services.AddRazorPages().AddRazorPagesOptions(options =>
{
options.Conventions.AddPageRoute("/robotstxt", "/Robots.Txt"); //i did this before, not needed
options.Conventions.AddPageRoute("/webfinger", "/.well-known/webfinger");
options.Conventions.AddPageRoute("/webfinger", "/.well-known/webfinger/{val?}");
});

then I made a webfinger.cshtml like this. Note I have to double escape the @@ sites because it's Razor.

@page
@{
Layout = null;
this.Response.ContentType = "application/jrd+json";
}
{
"subject":"acct:shanselman@hachyderm.io",
"aliases":
[
"https://hachyderm.io/@@shanselman",
"https://hachyderm.io/users/shanselman"
],
"links":
[
{
"rel":"http://webfinger.net/rel/profile-page",
"type":"text/html",
"href":"https://hachyderm.io/@@shanselman"
},
{
"rel":"self",
"type":"application/activity+json",
"href":"https://hachyderm.io/users/shanselman"
},
{
"rel":"http://ostatus.org/schema/1.0/subscribe",
"template":"https://hachyderm.io/authorize_interaction?uri={uri}"
}
]
}

This is a static response, but if I was hosting pages for more than one person I'd want to take in the url with the user's name, and then map it to their aliases and return those correctly.

Even easier, you can just use the JSON file of your own Mastodon server's webfinger response and SAVE IT as a static json file and copy it to your own server!

As long as your server returns the right JSON from that well known URL then it'll work.

So this is my template https://hachyderm.io/.well-known/webfinger?resource=acct:shanselman@hachyderm.io from where I'm hosted now.

If you want to get started with Mastodon, start here. https://github.com/joyeusenoelle/GuideToMastodon/ it feels like Twitter circa 2007 except it's not owned by anyone and is based on web standards like ActivityPub.

Hope this helps!

About Scott

Scott Hanselman is a former professor, former Chief Architect in finance, now speaker, consultant, father, diabetic, and Microsoft employee. He is a failed stand-up comic, a cornrower, and a book author.

facebook twitter subscribe
About   Newsletter
Hosting By
Hosted in an Azure App Service

I got tired

December 18, 2022 Comment on this post [31] Posted in Musings
Sponsored By

I got tired - photo by Elisa VenturI have been blogging here for the last 20 years. Every Tuesday and Thursday, quite consistently, for two decades. But last year, without planning it, I got tired and stopped. Not sure why. It didn't correspond with any life events. Nothing interesting or notable happened. I just stopped.

I did find joy on TikTok and amassed a small group of like-minded followers there. I enjoy my YouTube as well, and my weekly podcast is going strong with nearly 900 (!) episodes of interviews with cool people. I've also recently started posting on Mastodon (a fediverse (federated universe)) Twitter alternative that uses the ActivityPub web standard. I see that Mark Downie has been looking at ActivityPub as well for DasBlog (the blog engine that powers this blog) so I need to spend sometime with Mark soon.

Being consistent is a hard thing, and I think I did a good job. I gave many talks over many years about Personal Productivity but I always mentioned doing what "feeds your spirit." For a minute here the blog took a backseat, and that's OK. I filled that (spare) time with family time, personal projects, writing more code, 3d printing, games, taekwondo, and a ton of other things.

Going forward I will continue to write and share across a number of platforms, but it will continue to start here as it's super important to Own Your Words. Keep taking snapshots and backups of your keystrokes as you never know when your chosen platform might change or go away entirely.

I'm still here. I hope you are too! I will see you soon.

Related Links:

About Scott

Scott Hanselman is a former professor, former Chief Architect in finance, now speaker, consultant, father, diabetic, and Microsoft employee. He is a failed stand-up comic, a cornrower, and a book author.

facebook twitter subscribe
About   Newsletter
Hosting By
Hosted in an Azure App Service

Using Home Assistant to integrate a Unifi Protect G4 Doorbell and Amazon Alexa to announce visitors

December 15, 2021 Comment on this post [0] Posted in Home Server | Musings
Sponsored By

I am not a Home Assistant expert, but it's clearly a massive and powerful ecosystem. I've interviewed the creator of Home Assistant on my podcast and I encourage you to check out that chat.

Home Assistant can quickly become a hobby that overwhelms you. Every object (entity) in your house that is even remotely connected can become programmable. Everything. Even people! You can declare that any name:value pair that (for example) your phone can expose can be consumable by Home Assistant. Questions like "is Scott home" or "what's Scott's phone battery" can be associated with Scott the Entity in the Home Assistant Dashboard.

I was amazed at the devices/objects that Home Assistant discovered that it could automate. Lights, remotes, Spotify, and more. You'll find that any internally connected device you have likely has an Integration available.

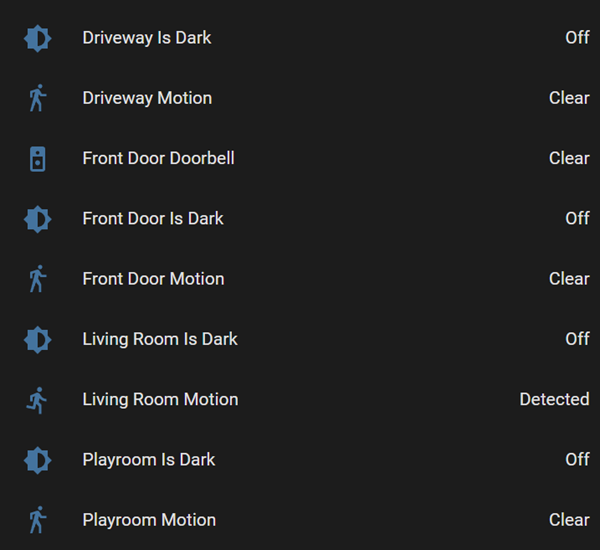
Temperature, Light Status, sure, that's easy Home Automation. But integrations and 3rd party code can give you details like "Is the Living Room dark" or "is there motion in the driveway." From these building blocks, you can then build your own IFTTT (If This Then That) automations, combining not just two systems, but any and all disparate systems.

What's the best part? This all runs LOCALLY. Not in a cloud or the cloud or anyone's cloud. I've got my stuff running on a Raspberry Pi 4. Even better I put a Power Over Ethernet (PoE) hat on my Rpi so I have just one network wire into my hub that powers the Pi.

I believe setting up Home Assistant on a Pi is the best and easiest way to get started. That said, you can also run in a Docker Container, on a Synology or other NAS, or just on Windows or Mac in the background. It's up to you. Optionally, you can pay Nabu Casa $5 for remote (outside your house) network access via transparent forwarding. But to be clear, it all still runs inside your house and not in the cloud.

Basic Home Assistant Setup

OK, to the main point. I used to have an Amazon Ring Doorbell that would integrate with Amazon Alexa and when you pressed the doorbell it would say "Someone is at the front door" on our all Alexas. It was a lovely little integration that worked nicely in our lives.

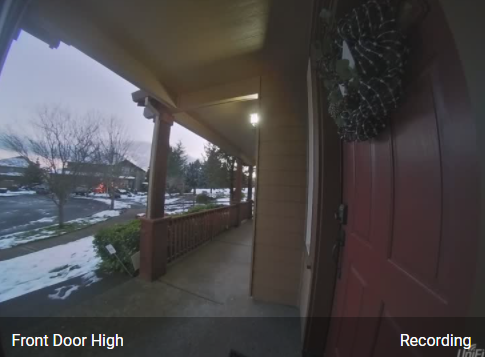
Front Door UniFi G4 Doorbell

However, I swapped out the Ring for a Unifi Protect G4 Doorbell for a number of reasons. I don't want to pump video to outside services, so this doorbell integrates nicely with my existing Unifi installation and records video to a local hard drive. However, I lose any Alexa integration and this nice little "someone is at the door" announcement. So this seems like a perfect job for Home Assistant.

Here's the general todo list:

  • Install Home Assistant
  • Install Home Assistant Community Store
    • This enables 3rd party "untrusted" integrations directly from GitHub. You'll need a GitHub account and it'll clone custom integrations directly into your local HA.
    • I also recommend the Terminal & SSH (9.2.2), File editor (5.3.3) add ons so you can see what's happening.
  • Get the UniFi Protect 3rd party integration for Home Assistant
    • NOTE: Unifi Protect support is being promoted in Home Assistant v2022.2 so you won't need this step soon as it'll be included.
    • "The UniFi Protect Integration adds support for retrieving Camera feeds and Sensor data from a UniFi Protect installation on either an Ubiquiti CloudKey+, Ubiquiti UniFi Dream Machine Pro or UniFi Protect Network Video Recorder."
    • Authenticate and configure this integration.
  • Get the Alexa Media Player integration
    • This makes all your Alexas show up in Home Assistant as "media players" and also allows you to tts (text to speech) to them.
    • Authenticate and configure this integration.

I recommend going into your Alexa app and making a Multi-room Speaker Group called "everywhere." Not only because it's nice to be able to say "play the music everywhere" but you can also target that "Everywhere" group in Home Assistant.

Go into your Home Assistant UI at http://homeassistant.local:8123/ and into Developer Tools. Under Services, try pasting in this YAML and clicking "call service."

service: notify.alexa_media_everywhere
data:
  message: Someone is at the front door, this is a test
  data:
    type: announce
    method: speak

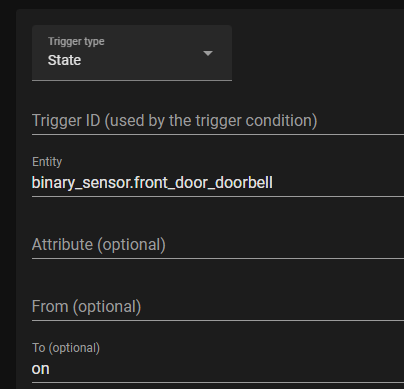
If that works, you know you can automate Alexa and make it say things. Now, go to Configuration, Automation, and Add a new Automation. Here's mine. I used the UI to create it. Note that your Entity names may be different if you give your front doorbell camera a different name.

Binary_sensor.front_door_doorbell

Notice the format of Data, it's name value pairs within a single field's value.

Alexa Action

...but it also exists in a file called Automations.yaml. Note that the "to: 'on'" trigger is required or you'll get double announcements, one for each state change in the doorbell.

- id: '1640995128073'
  alias: G4 Doorbell Announcement with Alexa
  description: G4 Doorbell Announcement with Alexa
  trigger:
  - platform: state
    entity_id: binary_sensor.front_door_doorbell
    to: 'on'
  condition: []
  action:
  - service: notify.alexa_media_everywhere
    data:
      data:
        type: announce
        method: speak
      message: Someone is at the front door
  mode: single

It works! There's a ton of cool stuff I can automate now!


Sponsor: Make login Auth0’s problem. Not yours. Provide the convenient login features your customers want, like social login, multi-factor authentication, single sign-on, passwordless, and more. Get started for free.

About Scott

Scott Hanselman is a former professor, former Chief Architect in finance, now speaker, consultant, father, diabetic, and Microsoft employee. He is a failed stand-up comic, a cornrower, and a book author.

facebook twitter subscribe
About   Newsletter
Hosting By
Hosted in an Azure App Service

JavaScript and TypeScript Projects with React, Angular, or Vue in Visual Studio 2022 with or without .NET

November 26, 2021 Comment on this post [1] Posted in ASP.NET | Javascript | Web Services
Sponsored By

I was reading Gabby's blog post about the new TypeScript/JavaScript project experience in Visual Studio 2022. You should read the docs on JavaScript and TypeScript in Visual Studio 2022.

If you're used to ASP.NET apps when you think about apps that are JavaScript heavy, "front end apps" or TypeScript focused, it can be confusing as to "where does .NET fit in?"

You need to consider the responsibilities of your various projects or subsystems and the multiple totally valid ways you can build a web site or web app. Let's consider just a few:

  1. An ASP.NET Web app that renders HTML on the server but uses TS/JS
    • This may have a Web API, Razor Pages, with or without the MVC pattern.
    • You maybe have just added JavaScript via <script> tags
    • Maybe you added a script minimizer/minifier task
    • Can be confusing because it can feel like your app needs to 'build both the client and the server' from one project
  2. A mostly JavaScript/TypeScript frontend app where the HTML could be served from any web server (node, kestrel, static web apps, nginx, etc)
    • This app may use Vue or React or Angular but it's not an "ASP.NET app"
    • It calls backend Web APIs that may be served by ASP.NET, Azure Functions, 3rd party REST APIs, or all of the above
    • This scenario has sometimes been confusing for ASP.NET developers who may get confused about responsibility. Who builds what, where do things end up, how do I build and deploy this?

VS2022 brings JavaScript and TypeScript support into VS with a full JavaScript Language Service based on TS. It provides a TypeScript NuGet Package so you can build your whole app with MSBuild and VS will do the right thing.

NEW: Starting in Visual Studio 2022, there is a new JavaScript/TypeScript project type (.esproj) that allows you to create standalone Angular, React, and Vue projects in Visual Studio.

The .esproj concept is great for folks familiar with Visual Studio as we know that a Solution contains one or more Projects. Visual Studio manages files for a single application in a Project. The project includes source code, resources, and configuration files. In this case we can have a .csproj for a backend Web API and an .esproj that uses a client side template like Angular, React, or Vue.

Thing is, historically when Visual Studio supported Angular, React, or Vue, it's templates were out of date and not updated enough. VS2022 uses the native CLIs for these front ends, solving that problem with Angular CLI, Create React App, and Vue CLI.

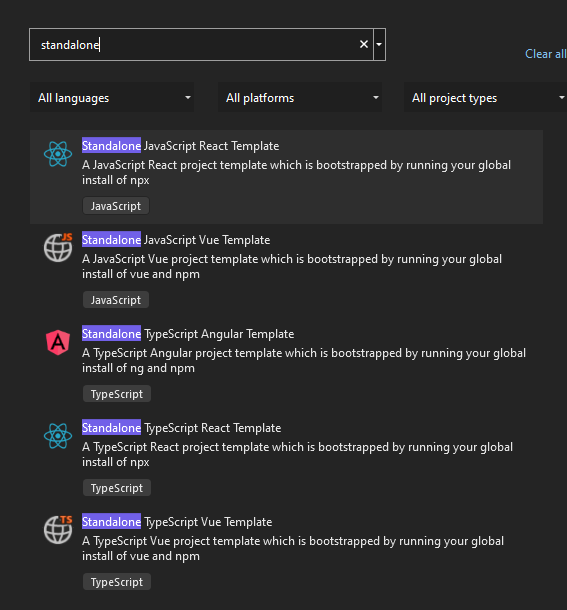
If I am in VS and go "File New Project" there are Standalone templates that solve Example 2 above. I'll pick JavaScript React.

Standalone JavaScript Templates in VS2022

Then I'll click "Add integration for Empty ASP.NET Web API. This will give me a frontend with javascript ready to call a ASP.NET Web API backend. I'll follow along here.

Standalone JavaScript React Template

It then uses the React CLI to make the front end, which again, is cool as it's whatever version I want it to be.

React Create CLI

Then I'll add my ASP.NET Web API backend to the same solution, so now I have an esproj and a csproj like this

frontend and backend

Now I have a nice clean two project system - in this case more JavaScript focused than .NET focused. This one uses npm to startup the project using their web development server and proxyMiddleware to proxy localhost:3000 calls over to the ASP.NET Web API project.

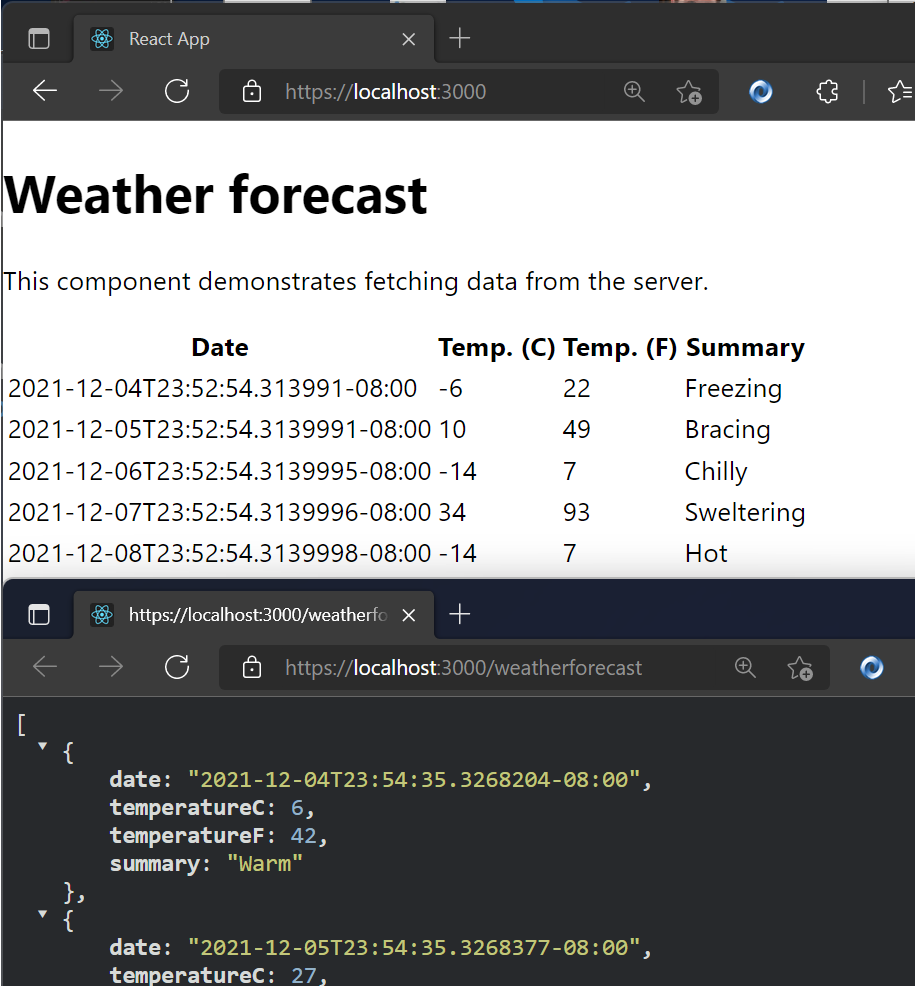
Here is a React app served by npm calling over to the Weather service served from Kestrel on ASP.NET.

npm app running in VS 2022 against an ASP.NET Web API

This is inverted than most ASP.NET Folks are used to, and that's OK. This shows me that Visual Studio 2022 can support either development style, use the CLI that is installed for whatever Frontend Framework, and allow me to choose what web server and web browser (via Launch.json) I want.

If you want to flip it, and put ASP.NET Core as the primary and then bring in some TypeScript/JavaScript, follow this tutorial because that's also possible!


Sponsor: Make login Auth0’s problem. Not yours. Provide the convenient login features your customers want, like social login, multi-factor authentication, single sign-on, passwordless, and more. Get started for free.

About Scott

Scott Hanselman is a former professor, former Chief Architect in finance, now speaker, consultant, father, diabetic, and Microsoft employee. He is a failed stand-up comic, a cornrower, and a book author.

facebook twitter subscribe
About   Newsletter
Hosting By
Hosted in an Azure App Service

A Nightscout Segment for OhMyPosh shows my realtime Blood Sugar readings in my Git Prompt

November 24, 2021 Comment on this post [3] Posted in Diabetes | Open Source
Sponsored By

I've talked about how I love a nice pretty prompt in my Windows Terminal and made videos showing in detail how to do it. I've also worked with my buddy TooTallNate to put my real-time blood sugar into a bash or PowerShell prompt, but this was back in 2017.

Now that I'm "Team OhMyPosh" I have been meaning to write a Nightscout "segment" for my prompt. Nightscout is an open source self-hosted (there are commercial hosts also like T1Pal) website and API for remote display of real-time and near-real-time glucose readings for Diabetics like myself.

Since my body has an active REST API where I can just do an HTTP GET (via curl or whatever) and see my blood sugar, it clearly belongs in a place of honor, just like my current Git Branch!

My blood sugar in my Prompt!

Oh My Posh supports configurable "segments" and now there's a beta (still needs mmol and stale readings support) Nightscout segment that you can setup in just a few minutes!

This prompt works in ANY shell on ANY os! You can do this in zsh, PowerShell, Bash, whatever makes you happy.

Here is a YouTube of Jan from OhMyPosh and I coding the segment LIVE in Go.

If you have an existing OhMyPosh json config, you can just add another segment like this. Make sure your Nightscout URL includes a secure Token or is public (up to you). Note also that I setup "if/then" rules in my background_templates. These are optional and up to you to change to your taste. I set my background colors to red, yellow, green depending on sugar numbers. I also have a foreground template that is not really used, as you can see it always evaluates to black #000, but it shows you how you could set it to white text on a darker background if you wanted.

{
"type": "nightscout",
"style": "diamond",
"foreground": "#ffffff",
"background": "#ff0000",
"background_templates": [
"{{ if gt .Sgv 150 }}#FFFF00{{ end }}",
"{{ if lt .Sgv 60 }}#FF0000{{ end }}",
"#00FF00"
],
"foreground_templates": [
"{{ if gt .Sgv 150 }}#000000{{ end }}",
"{{ if lt .Sgv 60 }}#000000{{ end }}",
"#000000"
],

"leading_diamond": "",
"trailing_diamond": "\uE0B0",
"properties": {
"url": "https://YOURNIGHTSCOUTAPP.herokuapp.com/api/v1/entries.json?count=1&token=APITOKENFROMYOURADMIN",
"http_timeout": 1500,
"template": " {{.Sgv}}{{.TrendIcon}}"
}
},

By default we will only go out and hit your Nightscout instance every 5 min, only when the prompt is repainted, and we'll only wait 1500ms before giving up. You can set that "http_timeout" (how long before we give up) if you feel this slows you down. It'll be cached for 5 min so it's unlikely  to b something you'll notice. The benefit of this new OhMyPosh segment over the previous solution is that it requires no additional services/chron jobs and can be setup extremely quickly. Note also that you can customize your template with NerdFonts. I've included a tiny syringe!

What a lovely prompt with Blood Sugar!

Next I'll hope to improve the segment with mmol support as well as strikeout style for "stale" (over 15 min old) results. You're also welcome to help out by watching our YouTube and submitting a PR!


Sponsor: Make login Auth0’s problem. Not yours. Provide the convenient login features your customers want, like social login, multi-factor authentication, single sign-on, passwordless, and more. Get started for free.

About Scott

Scott Hanselman is a former professor, former Chief Architect in finance, now speaker, consultant, father, diabetic, and Microsoft employee. He is a failed stand-up comic, a cornrower, and a book author.

facebook twitter subscribe
About   Newsletter
Hosting By
Hosted in an Azure App Service

Disclaimer: The opinions expressed herein are my own personal opinions and do not represent my employer's view in any way.