This Project
The purpose of this project is to provide the original flight software and emulations of the onboard guidance computers flown in historical spacecraft, so that the flight software can be run on computers commonly available to the public today. The particular emphasis is on the Apollo Guidance Computer (AGC) flown in lunar missions in the 1960's and 1970's. Since the resources available in this project have ballooned so much over the decades it has existed, exploring it for the first time can be quite intimidating. We invite you to look at our "kinder and gentler" but probably far out-of-date introductory page before immersing yourself in the full, gory detail presented by the bulk of the website.Also, if you have some specific interests and don't want to wade through a bunch of stuff unrelated to them, the search bar at the top of this page might help. Here's cheat sheet:
| Material |
Apollo (CM AGC) |
Apollo (LM AGC) |
Apollo (LM AGS) |
Saturn Rocket (LVDC) |
Gemini (OBC) |
Space Shuttle (GPC) |
|---|---|---|---|---|---|---|
| Flight software source code |
Almost all
missions |
Almost all
missions |
Several
missions |
Several missions |
Some
"math flow" only |
See Shuttle page* |
| Compiler/assemblers for source
code |
Block I,
Block II |
Yes |
Yes |
Yes |
Sort of ...† | Yes |
| Emulators for CPU |
Block
I, Block
II |
Yes |
Yes |
Yes |
Yes |
Work in progress |
| Simulators for peripherals |
Block I DSKYs, Block II DSKY, others |
DSKY, others |
DEDA |
No |
No |
No |
| Integration into spaceflight
simulators |
Orbiter/NASSP |
Orbiter/NASSP |
No |
No |
No |
|
| Electrical schematics |
Yes | No |
No |
No |
No |
|
| Mechanical drawings |
No |
No |
No |
No |
||
| Electrical simulation
(Verilog) |
Yes |
No |
No |
No |
No |
|
| Documentation |
Document Library |
Shuttle Library |
||||
| Currently-enforced access
limitations |
None |
None |
None |
ITAR😮 | None |
ITAR😮 + other* |
 *My apologies, but at present I don't care
to be too specific about non-ITAR related restrictions on
the surviving Space Shuttle flight software. It's
a first-rule-of-fight-club kind of thing.
*My apologies, but at present I don't care
to be too specific about non-ITAR related restrictions on
the surviving Space Shuttle flight software. It's
a first-rule-of-fight-club kind of thing.†Due to the limited information available when it was written, the syntax accepted by the Gemini OBC assembler is likely to differ from the syntax of actual OBC source code, if any is ever discovered.
😮Under ITAR, "export" of weapons systems from the U.S. is forbidden without a license, and in the sense contemplated by ITAR, it's theoretically possible to pretend that the Saturn and the Shuttle are "weapons systems". Of course, such a pretense is utterly ridiculous. It obviously makes no sense at all to think about it in this way, since: a) Nobody has a Saturn rocket or Space Shuttle; b) if they did, refurbishing and using it would be at enormous expense and difficulty relative to the other weapon-system alternatives available today; and c) nobody designing a new weapons system today would base it on 50+ year-old technology (hardware or software). Consequently, I hope to get around these restrictions eventually by legal means. Meanwhile, though, I don't feel it would be prudent to provide unlimited access to the LVDC or Shuttle flight software (as is my desire).
Regarding the original Apollo Guidance Computer (AGC) software source code, the image to the right (click to enlarge) is our probably-out-of-date roadmap for attaining full coverage of all missions.
Besides the summary given in the table above, it's also notable that we have many (though far from a complete set) of Grumman's Lunar Module engineering drawings. Unfortunately, the process of collecting these was interrupted by the Covid pandemic and for a number of reasons seems increasingly unlikely to be resumed.
The video clip above (courtesy of user Dean Koska and YouTube) illustrates some of the cute things you can do with Virtual AGC if you're of a mind to do so. Dean compiled our simulated AGC CPU to run on a Palm Centro—explaining that a regular Palm was too slow. He created his own simulated display/keypad (DSKY), presumably aided by the developer info we provide for just such a desire. (And sorry, Dean's Palm port isn't provided from our downloads page.)
Here are some other video clips (courtesy of Niklas Beug and YouTube) which take a little longer to watch (20 minutes), but are perhaps even more instructive. Our AGC CPU emulator has been integrated into the NASSP add-on for the Orbiter space-flight simulator, and is used there to fly simulated Apollo or Apollo-like missions. And you can fly such simulated missions too, using that software, as if you were Neil Armstrong yourself ... assuming you're up the challenge! The videos below show simulated Apollo 11 and 15 lunar landings, using our AGC and the actual original Apollo 11 and Apollo 15 guidance-computer software running on it. Of course, all the fancy graphics is NASSP/Orbiter's and not ours, but the AGC is behind the scenes, helping to run the spacecraft, and the accompanying text describes how the AGC is being used! The Apollo 15 video is quite exciting, as the LM swoops in over the Lunar Apennine Mountains to the landing site in Hadley Rille. (I suppose I should also mention that Nik provided these videos in full HD Quality, though you'll only see a much-reduced quality in the tiny boxes below, so you might want to head over to YouTube itself to watch them, if you want to get the full glory of the things.)
|
|
|
Contents
- What are the "AGC", "AGS", and "LVDC"?
- What "Virtual AGC" is
- What Virtual AGC is not
- Existing
Elements
of the Virtual AGC Project
- Licensing
- What if You Want to Help?
- Running the Emulator
... or, A Brief Introduction to the GUI
- Quick Start
- Running the Validation Suite
- Playing with Colossus
- Playing with Luminary
- Much more intensive playing with the LM
- Canned,
pre-recorded mission segments
- Playing
with
the Abort Guidance System
- Playing with AGC assembly language
- Modifying the LM software (for the truly brave)
- Final exam (for the advanced student)
- ... Or, for the silly mood
- Shall We Play a Game?
- A Challenge!
- Acknowledgements
What are "Block I",
"Block II", the "AGC", "AGS", "LVDC", and "OBC"?
"AGC" stands for Apollo Guidance Computer. The AGC was the
principal onboard computer for NASA's Apollo missions, including all
of the lunar landings. Both the Command Module (CM) and the
Lunar Module (LM) had AGCs, so two AGCs were used on most of the
Apollo missions, but with differing software. The
computer and its software were developed at MIT's Instrumentation
Laboratory, now known as Draper Labs.The "block II" AGC, employing the AGC4 instruction set, is the particular computer model in which we're interested, most of the time. The block II AGC was used not only on Apollo 7 through Apollo 17 (including all actual lunar landings), but also on three Skylab missions, on the Apollo-Soyuz test mission, and on a fly-by-wire research project using F-8 aircraft. Nevertheless, only 57 AGCs were constructed—and 138 display-keyboard units (DSKYs) for them—and all of the ones installed in the Lunar Modules were not returned to the Earth—so they are definitely collector's items.
There was also the "block I" model of the AGC, which predated the block II model. The block I model was supposed to fly in Apollo 1 and 2. But since Apollo 1 was tragically destroyed by fire, and Apollo 2 never flew, the block I model was never used in any manned mission. It was, nevertheless, used in the unmanned Apollo 3, 4, and 6 missions.
And of course, don't forget the "block III" model of the AGC, which ... wait just one second there, buddy! Anyone who has done any reading at all about Apollo, knows there's no such thing as the block III AGC. Okay, that's true, but one of the original AGC developers, Hugh Blair-Smith, developed some thoughts in his spare time about what a block III AGC might look like, and has been kind enough to send them to us. If you're an advanced student of the AGC who has already absorbed everything there is to know about the block II system, you might be interested in reading what Hugh has to say about it.
"AGS" stands for Abort Guidance System, of which the computer portion was known as the Abort Electronics Assembly (AEA). The AGS/AEA was a completely separate computer system from the AGC, with a different architecture, different instruction-set, different runtime software, and designed/manufactured by different groups than the AGC. It was in the LM as a kind of backup for the AGC, but was only supposed to be used (as the name implies) in case of an aborted landing. It's sole purpose was to get the LM from wherever it was back into lunar orbit, so that the CM could rendezvous with the LM.
The "LVDC" ( Launch Vehicle Digital Computer) had yet a different architecture, instruction set, software, and manufacturer. It was a computer mounted in the Saturn rocket itself, and its responsibility was to control the firing of the rocket engines to give the rocket the proper trajectory. It was discarded when the CSM discarded the rocket, and consequently was used during only a very short time interval relative to the total length of the mission.
The Gemini spacecraft also had an On Board Computer (OBC), having a similar functionality to the Apollo AGC, though with greatly reduced capabilities and sophistication, but with a computer architecture very similar to the Apollo LVDC.
Because we have much more information about the AGC than we do about the AGS, LVDC, and OBC, the bulk of this website and of the Virtual AGC project in general concentrates on the AGC. Coverage of the other computers is mostly confined to the AGS page, LVDC page, and the Gemini page of this website. And similarly, there is much more discussion of the block II AGC than of the block I AGC.
What "Virtual AGC" Is
Virtual AGC is a computer model of the AGC. It does not try to mimic the superficial behavioral characteristics of the AGC, but rather to model the AGC's inner workings. The result is a computer model of the AGC which is itself capable of executing the original Apollo software on (for example) a desktop PC. In computer terms, Virtual AGC is an emulator. Virtual AGC also provides an emulated AGS and (in the planning stages) an emulated LVDC and OBC. "Virtual AGC" is a catch-all term that comprises all of these.The current version of the Virtual AGC software has been designed to work in Linux (including Raspberry Pi), in Microsoft Windows, and in Mac OS X. It also works in at least some versions of FreeBSD.
What Virtual AGC Is Not
In and of itself, Virtual AGC is not a full-fledged flight simulator, nor a lunar-lander simulator, nor even a behavioral simulation of the Apollo Lunar Module (LM) or Command-Module (CM) control panels. (In other words, if download and run our software and expect a realistic LM control panel to suddenly appear on your computer screen, you'll be disappointed.) Virtual AGC can be used, however, as a component of such a simulated spacecraft, and developers of such software are encouraged to do so. Indeed, some developers already have, and you may have seen a sample video near the top of this page of such a simulation in operation! In particular, there is full support for our AGC and AGS emulations in the Orbiter space-flight simulator with the NASSP add-on.Existing Elements of the Virtual AGC Project
This isn't exactly an exclusive list, but some of the important
things we provide in the Virtual AGC project proper are listed
below.
AGC Elements
- yaAGC is an emulation of the AGC CPU. To
function, it requires a LM or CM "core rope" binary (see below).
- yaDSKY is a simulation of the Display/Keyboard used in Apollo. It supplies input to yaAGC, or receives output from it. The design of the emulator is modular, so the DSKY simulation may be easily replaced if you don't care for mine, or if you want to replace it with a complete control-panel simulation.
- LM_Simulator is a
simulation of various other Guidance & Navigation (G&N)
system components, such as the Inertial Measurement Unit (IMU),
an FDAI ball, an alternative simulated DSKY, and a monitor for
the AGC's i/o-channel activity.
- yaTelemetry is a dumb terminal on which telemetry downlinks from yaAGC may be viewed, similar to the way such telemetry from the AGC was originally viewed by Mission Control.
- yaACA is a program that emulates the LM's hand-controller (possibly with a joystick), and to communicate the desired pitch/roll/yaw changes to yaAGC.
- yaYUL is an assembler, capable of converting AGC4 assembly language programs like Luminary or Colossus (see below) into the binary executable format (a "core rope") needed by the AGC.
- Luminary is the name of the original 1960's and 1970's
software used for the Apollo Lunar Modules in the actual
missions. Both binary executable (needed by yaAGC) and source code
(needed by yaYUL) are
provided. We have many, many versions of this software,
for different missions.
- Colossus is the name of the original 1960's and 1970's software used for many (but not all) of the Apollo Command Modules. As with Luminary, both binary and source are provided, and we have many versions of the software.
- Validation is the name
of a newly-created AGC assembly-language program that provides a
validation suite for helping to assure that the implementation
of the virtual CPU is correct.
- We have 1000+ scans of many, many of the original Project Apollo documents in our document library.
- We're making an ongoing effort to provide hardware support (both electrical and mechanical) for the original AGC and DSKY designs, and for the Guidance & Navigation (G&N) system in general:
- Tens of thousands of scans of the original G&N
electrical and mechanical drawings.
- Many electrically-accurate transcriptions of AGC/DSKY electrical drawings in a modern CAD (Computer Aided Design) system.
- Translations of into AGC electrical design into the Verilog for simulation of the AGC electrical circuitry.
- (Coming real soon now.) 3D-models created from
AGC/DSKY mechanical design files, for 3D printing.
AGS Elements
- yaAGS is an emulation of the AGS CPU. To function, it requires a binary of one of the flight programs (see below).
- yaDEDA is a simulation of the AGS user interface.
- yaLEMAP is an assembler for AGS assembly language.
- The source code for the AGS flight program, in a couple of different versions.
- AGS scanned documentation, including specification, programmer's manuals, and so on.
LVDC and Gemini OBC Elements
- (Planning only.) yaLVDC, an emulation of the LVDC and Gemini OBC CPUs, and various programs emulating Gemini-spacecraft peripherals.
- yaASM, an assembler for the Apollo LVDC and Gemini OBC assembly language.
- Scans of all known existing LVDC and Gemini OBC documentation.
- Of course, the missing element here is that we have no
significant access to any true LVDC or Gemini OBC source code,
so having an assembler or simulator for it is of questionable
utility. We hope this situation will change, but that hope
fades with each passing year.
And to Tie It All together ...
- VirtualAGC is a GUI front-end that ties all of the stuff listed above together into an "easily" used bundle. (It should be obvious why "easily" is in quotes here.)
Licensing
In general, software not original to Project Apollo is copyrighted by the original author, usually Ron Burkey (me!), but is provided to you as "free software" under the GNU General Public License (GPL), though a few programs have been explicitly put into the public domain. Software originally from Project Apollo (such as Luminary and Colossus) is in the public domain, to the best of my non-lawyer understanding. Newly-written or revised documentation is being placed in the public domain.Note that if you want to use yaAGC or yaDSKY as components of a more-complete Apollo simulation, the modularity of the design allows them to be run as stand-alone programs (whilst communicating with your own software), and doing so does not force any particular licensing requirements upon your own code. However, if you choose instead to incorporate the code directly into your program or to link to it, your program will itself need to be licensed under the GPL unless you feel like negotiating an alternate license with me.
By "negotiate", I don't mean I'll charge you any money, but merely that I want to make sure it would be appropriate to give you an alternate license. By way of illustrating what I mean, the yaAGC source code license includes a "special exception" as allowed/required by the GPL, allowing linking to the non-free Orbiter spacecraft-simulator SDK libraries, which are free of charge but not under a GPL-compatible license. And as long as you are making your program freely available in the same way as Orbiter does, I would be very inclined to offer you such a special exception as well ... but you have to talk to me about it, and won't get it just by imagining it's okay. Refer to the Developer info page for more detail.
Of course, you could develop your own AGC simulator if you don't feel like asking me for a non-GPL license for mine. It's not as if it's rocket science ... oh, but wait ....
What If You Want To Help?
Check out the volunteering page.Running the Emulator ... or,
A Brief Introduction to the GUI
What I'll discuss here is merely how to run the pure Virtual AGC
software as provided directly by this project. If you want to
run a full-up spacecraft simulation like Orbiter with the NASSP
add-on, you'll have to look at the NASSP documentation
instead.The first step, of course, is to download the Virtual AGC software and install it or build it for the computer platform you're using, by following the instructions on the download page. While the Virtual AGC project provides many different programs that implement bits and pieces of the full emulation, and which can be run separately if you need to craft the various options for your own purposes, the only program you normally need to worry about running is the one that's actually called VirtualAGC. VirtualAGC is a GUI front-end which allows you to choose almost any reasonable set of options related to the emulation, and then to run all of the emulation programs needed, in a way that allows those programs to intercommunicate properly.
Hopefully, VirtualAGC is itself simple enough that it really requires very little explanation to use, and your troubles will really begin only after the emulation is actually running! But I'll provide a very brief overview here. There's also a more detailed explanation of VirtualAGC available for your enjoyment.
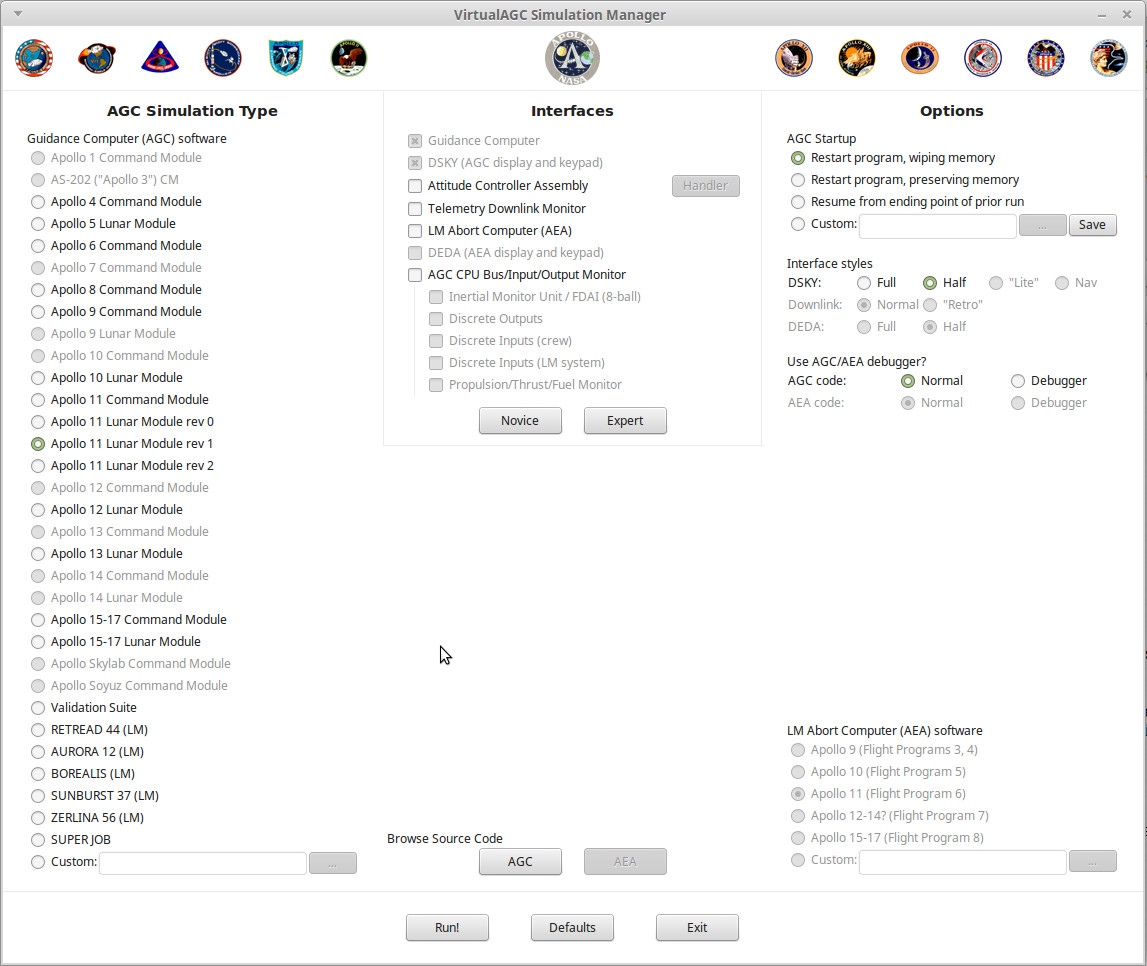
The screenshot above (or a reduced-size variation, depending on your screen size or the command-line options you use) depicts the one and only window of the VirtualAGC program. There are no menus, toolbars, hot-buttons, or other controls. While a large number of options are presented, you don't necessarily need to change any of the selected options. The defaults are as shown, and if you simply click the "Run!" button at the bottom of the window, the simulation will run, as which point various simulation windows will pop up. If you change any of the settings, the program will remember those changes and the settings you've selected will be the ones that appear the next time you run VirtualAGC. Or, you could click the "Defaults" button at the bottom of the window to restore all of the settings to their defaults. There's really very little reason for a complete newcomer to change any of the settings, but you will note that you can choose from among the several available sets of AGC software for different Apollo missions in the pane labeled "Simulation Type."
When the simulation runs, VirtualAGC's rather large window will courteously disappear to conserve space on your screen, to be replaced by a other popups such as the simulated DSKY or a telemetry window, and will only return when the simulation ends.
To end the simulation, simply exit from any of the visible elements of the simulation—though there's a bit of platform to platform variation as to which components are easily terminated, so I'd recommend closing the DSKY. Within a few seconds all of the other elements of the simulation will automatically terminate. Note, however, that the automatic closing of all the simulation windows isn't active until several seconds (5 in most versions, 30 in some) have passed from the time the simulation started up, so if you start a simulation and then immediately decide to shut it down, you'll still have to wait a little while for the process to complete. Also, on Mac OS X, there are various windows that simply may not close automatically, and these will simply have to be closed manually from their main menus.
Quick Start
I expect that anyone who would really use Virtual AGC would likely want to adapt it quite a bit, and so any simple instructions I might give wouldn't help much. Not to mention the burden of training yourself on the technical nitty-gritty of Apollo systems before you can actually use the AGC for anything! :-) But here are a few scenarios where you can quickly get to the point of seeing something happen, if not necessarily anything meaningful to our sad little earthbound minds. But there are still a few things you can try that are amusing in a geekish sense.Running the
Validation Suite
There is a "validation suite", which has been written from scratch
in AGC assembly language, that attempts to check that each CPU
instruction is implemented correctly in the AGC simulator. You
won't get the "Apollo experience" by running it, but at least you'll
be executing real AGC assembly-language code:- Run VirtualAGC as described above, select the "Validation Suite" choice in the "Simulation Type" area, and hit the "Run!" button.
- On the DSKY, you'll see 00 appear in the PROG and NOUN fields, and you'll see the OPR ERR annunciator will light. This means that the validation program is ready to start. Press the DSKY's PRO key to start the program. The OPR ERR annunciater will turn off to indicate that the command was accepted.
- After several tens of seconds, 77 will appear in the PROG
field and the OPR ERR annunciator will light. If anything
other than 77 appears in the PROG field, then the numbers in the
PROG and NOUN fields will indicate which area of the test
failed. (You can press PRO again to proceed with the
remaining tests.)
Playing
with
Colossus
(Actually, all of the things under " Playing
with
Luminary" work with Colossus also.)Run the VirtualAGC program as described earlier, select any of the Command Module choices in the "Simulation Type" area, and then try the following stuff:
 |
View the alarm codes |
Because of some current bugs
(07/19/04) in the way I initialize Colossus, there will be
some program alarms at startup, and the PROG indicator will
light to inform you of this. You can view the alarms
by keying in V05N09E at the DSKY. (In normal AGC
shorthand, 'V' is short for "VERB", 'N' is short for "NOUN",
and 'E' is short for "ENTR". So "V05N09E" means to hit
the keys VERB 0 5 NOUN 0 9 ENTR.) Program alarms 1105 and 1106 happen to be "downlink too fast" and "uplink too fast". Uplinks or downlinks refer to exchange of telemetry information with ground equipment. |
 |
DSKY lamp test | At the DSKY, key in
V35E. This will light up all of the DSKY annunciators,
display 88 or +88888 in all of the numerical registers, and
flash the 88's in the VERB and NOUN areas. After about
5 seconds, the test stops—you can tell, because the flashing
stops, though the numbers remain—and you can continue. When the accompanying screenshot was taken, I didn't yet know how the AGC controls the DSKY's STBY and RESTART indicators, so those weren't turned on by the test. Because of a bug in the simulator (as of 07/19/04), the PROG indicator doesn't re-light after the lamp-test completes. Therefore, you may or may not see the PROG indicator lit if you try the sample operations below. |
 |
Display memory-bank checksums | The core-rope (read-only)
memory is divided into 36 banks, numbered 00-43
(octal). A so-called "bugger word" has been stuck at
the end of each bank—no comments on this terminology,
please, since I didn't invent it; when I asked Don Eyles
some question that involved them, he somewhat-laconically
stated "we called them check sums"—which causes the checksum
of the bank to come out to a known value. This known
value is the same as the bank number when possible, and is
the logical complement of the bank number otherwise.
(For example, the checksum of Colossus bank 00007 is 00007, but the
checksum of bank 00006 is 77771. Both are
correct.) Colossus's
"show-banksum"
program can be used to display the bank numbers, one by
one. You can execute the show-banksum program by
keying in V91E on the DSKY. After a few seconds, the
statistics for bank 00 will be shown: R1 (the topmost
5-digit display) will contain the computed checksum; R2 will
contain the bank number; and R3 will contain the bugger
word. Each of the displays will be in octal, as
indicated by the fact that the +/- sign is blank. To
advance to the next bank, key in V33E. (Hitting the
PRO key does the same thing.) If you have the patience
to advance through each of the banks, the next V33E (or PRO)
after bank 43 will wrap-around to bank 00 again. To
terminate the show-banksum program, you can key in V34E. By the way, the bank-6 bugger word shown (05143) is for Colossus 249. If you ran the Artemis 072 program, it would have been 04275, while if you ran the Luminary 131 program, it would have been 63402. |
 |
Monitor the current time | If you key in V16N36E or
V16N65E, it will cause the current time to be
displayed. (Since we haven't set the time in any way,
this will be the time since AGC power-up). R1 (the
topmost 5-digit display) will be in hours, R2 will be in
minutes, and R3 will be in 100ths of a second. This
display is updated once per second. In the accompanying screenshot, the time is 06:58:33.86. |
 |
Setting the current time | If it annoys you to see the
time since power-up, you can change the time (for example,
to mission time) by keying in V25N36E. R1 will go
blank, enabling you to key in the current hour. Make
sure you start with a + sign (this is how the AGC knows
you're using decimal rather than octal), and make sure you
enter all five digits (including the leading zeroes).
In case you make a mistake, you can clear R1 any time before
pressing ENTR by using the CLR key. After you hit the
ENTR key, R2 will clear and you can enter the current
minutes. Finally, you can key in the number of seconds
in R3. Don't forget that the number of seconds is
actually in 100ths of seconds, so that if (for example) you
want 30 seconds you'd key in +03000E. In the accompanying screenshot, it just happened to be 06:55:25 am., so that's how I set the clock. |
 |
Examining the contents of the core-rope | Key in V27N02E. This
allows you to enter the address of a word in the core-rope
into R3. This address will generally be in octal, and
therefore should not be preceded by a + sign. Also,
unlike entry of decimal data, in octal you can enter just as
many digits as you need, and don't need to enter a full five
digits. The addresses will be 00000-01777 for memory
bank 00, 02000-03777 for memory bank 01, and so forth, up to
76000-77777 for memory bank 37. (I'm not sure how to
examine banks 40-43.) The binary listing of the core
rope is at the very back of the Colossus 249 assembly
listing, which can be downloaded from MIT if you have some
spare time and disk space. (See my Document Library page.) In the accompanying screenshot, we see that address 4000 (octal) of Luminary's core-rope contains the value 00004. This just happens to be the first instruction executed after power-up. It is an INHINT instruction, and disables interrupts. The contents of R2 (the middle 5-digit register) are not cleared, and thus are just whatever lingers from before. |
 |
Examining the contents of erasable memory | Key in V01N02E. This
allows you to enter the address of a word in erasable memory
into R3. The addresses will be 00000-00377 for
erasable bank E0, 00400-00777 for memory bank E1, and so
forth, up to 03400-03777 for memory bank E7.
Alternately, you can "monitor" a memory location (i.e., get
updates for it once per second) by using VERB 11 rather than
VERB 01. For example, V11N02E25E will monitor register
25, the "TIME1" register, which is an internal counter that
increments every 10 ms. In general, of course, the
numbers won't mean much unless you reference them to the
Colossus 249 assembly listing. In the accompanying screenshot, we actually do look at the TIME1 register, and discover that at that instant it contained the value 20245 (octal). Of course, you'll see something different. Display R2 is not changed, so it just contains whatever it contained before. |
 |
Altering the contents of erasable memory | Key in V21N02E, and enter an
octal address as above, and then enter a new value to be
stored at that address. It goes without saying that
you need to know what you're doing when you do this! In the accompanying screenshot, I've chosen to reload the TIME1 register with the value 12345 (octal), which probably won't cause too many adverse effects. Display R2 is not changed, so it just contains whatever it contained before. |
 |
Fresh start | Key in V36E. This
apparently restarts the "pinball" program—i.e., the program
that is responsible for accepting verbs and nouns and
displaying stuff on the DSKY—and it's useful for clearing
garbage from the DSKY's display, as the accompanying
screenshot demonstrates. In the accompanying screenshot, a side-effect of the fresh start is the thoughtful re-display of the PROG (program alarm) which the earlier DSKY lamp-test had wiped out. |
| (Your
picture here.) |
Do-it-yourself research | The file
yaAGC/Colossus249/ASSEMBLY_AND_OPERATION_INFORMATION.s lists
the verb and noun tables, so perhaps you can figure out some
neat stuff yourself. If you do, let me know and I'll
add it to this list. |
Playing
with
Luminary
You can do the same things as for Colossus
above . Or rather than trying stuff at random, you can try
stepping through a more realistic startup checklist. (Thanks
to Julian Webb.)
| Step 0 |
Run the simulator |
Run VirtualAGC as described above, select "Apollo 13 Lunar Module" in the "Simulation Type" area, and hit "Run!" |  |
| Step 1 |
V35E |
Starts the DSKY lamp
test. All of the indicator lamps are lit, the
numerical displays show 88 or +888888 as appropriate, and
things which are supposed to flash, flash. After about
5 seconds, the lamp test automatically terminates. |
 |
| Step 2 |
V37E 00E |
"Goto Pooh" — i.e., start
program P00, the idling program. The numeric area
under the PROG label will show 00. |
 |
| Step 3 |
V25E N01E 01365E 0E 0E 0E |
Set the count of total failed
self-tests, total started self-tests, and
successfully-completed division tests to 0. |
 |
| Step 4 |
V15 N01E 01365E |
Begin monitoring the
self-test counts. R1 (the top 5-digit display) shows
the number of failed tests, R2 shows the number of started
tests, and R3 the number of completed division tests.
Each should be +00000 ("all balls"). |
 |
| Step 5 |
V21 N27E 10E |
Begin background
self-tests. These tests will continue until the
astronaut (you!) terminates them. Continue at least
until the number of started tests (R2) reaches 3. |
 |
| Step 6 |
V21 N27E 0E |
Terminate the background
self-tests. |
(Looks the same, of course.) |
| ... |
(more later) |
Much more intensive playing with the LM
Stephan Hotto has provided a helpful tutorial that will let you do much more than the simple computer-maintenance activities described above. Following his tutorial you'll be able to control the LM using the hand-controller (joystick), see the orientation of the spacecraft change on the 8-Ball, fire the thrusters, etc. The instructions for his tutorial are actually build into the program itself, so I'll just tell you enough to read his tutorial rather than duplicating the tutorial's information here:- Since you will be using the ACA simulation (joystick) for
this, you may need
to do a little configuration of the joystick first, or
risk finding out that (say) you have no yaw control.
- Run VirtualAGC,
- Select the Apollo 13 Lunar Module AGC simulation in the Simulation Type pane.
- In the Interfaces pane, click the "Expert" button. (You can unclick the AEA simulation if you like. The Telemetry monitor won't be directly used either, but I like it so much I'd never advise you to deselect it.)
- Run!
- In the window titled "LM Simulator vN.N by Stephan Hotto", select Info/Tutorial from the menu bar.
- In the window titled "Tutorial for LM System Simulator" that
pops up, follow either
the instructions in Section 0.0 or else the instructions in Sections
0.1-1.4,2.0-2.3.
Canned, pre-recorded mission segments
 One nice thing about open-source software (which our
Virtual AGC Project is!) is that other people are free to
incorporate the software within their own projects, and thus it
can see a more-rapid diffusion into a wider sphere of usage than
would have been possible if (say) it was just me developing it by
myself. In the case of Virtual AGC, one thing that has been
done with it is that it has been incorporated into the Orbiter Space Flight
Simulator system, via the Project
Apollo NASSP add-on, which people then use to fly very
realistic or imagined Apollo missions. The NASSP folks have
been kind enough to incorporate the capability of logging
interactions between the simulated AGC and simulated DSKY, with
the result that we can "play back" (though not interact with) such
realistic logged activity on the simulated DSKY.
One nice thing about open-source software (which our
Virtual AGC Project is!) is that other people are free to
incorporate the software within their own projects, and thus it
can see a more-rapid diffusion into a wider sphere of usage than
would have been possible if (say) it was just me developing it by
myself. In the case of Virtual AGC, one thing that has been
done with it is that it has been incorporated into the Orbiter Space Flight
Simulator system, via the Project
Apollo NASSP add-on, which people then use to fly very
realistic or imagined Apollo missions. The NASSP folks have
been kind enough to incorporate the capability of logging
interactions between the simulated AGC and simulated DSKY, with
the result that we can "play back" (though not interact with) such
realistic logged activity on the simulated DSKY.
This capability is only available in Virtual AGC software
versions 2017-12-11 and later, and it works as follows: if
you left-click on the PROG lamp indicator with the mouse, a
file-dialog will open up. Of course, in the real
DSKY, PROG was not a button; it was merely a lamp. But we've
assigned it this additional function in our simulated DSKY.
In the file-dialog, select the pre-recorded script
Apollo8-launch.canned
As you may imagine, this is a recorded Apollo 8 launch sequence,
which takes about 15 minutes to play back. You'll see
various things in watching it:
- PROG 02, VERB 75. The script begin at T-40, i.e., 40
seconds prior to launch, and in this state the AGC simply waits
to receive an ignition signal from the Saturn rocket ... or
technically, what it will eventually receive is the "liftoff
discrete" from the S-IVB stage. Program 02 is the Gyro
Compassing Program, and its purpose is "to provide the stable
member orientation for launch". The "stable member" is a
part of the inertial measuring unit (IMU) which holds the
gyroscope (for determining the spacecraft orientation) and the
accelerometers. The astronaut doesn't actually have to
select Program 02, because it is automatically selected by
Program 01 (the initialization program), which was run prior to
T-40, and hence you won't see it in the playback.
- PROG 11, VERB 06, NOUN 62. At ignition, the AGC
automatically transitions from Program 02 to Program 11, the
Earth Orbit Insertion Monitor Program. Realize that the
AGC itself was not able to control the Saturn rocket itself,
other than the Saturn IVB stage, and the Saturn was controlled
instead by its own internal computer, the
LVDC. The AGC's real work began later! Nor did the AGC
receive any information from the LVDC as to the quantities it is
monitoring and displaying on the DSKY. The LVDC and AGC
separately each had access to their own inertial measurement
units (IMUs) that measured the acceleration and orientation of
the spacecraft, and by mathematically integrating this data from
the IMU, the LVDC and AGC could independently figure out
everything they needed to know about the current state of motion
of the rocket ... and hopefully the LVDC and AGC would come up
with very similar results. So this monitoring activity is
much less trivial that it may sound to you at first. As
for what's actually being monitored in this program, the AGC is
driving the FDAI (i.e., the "eight ball" or "attitude
indicator") is being driven to show the astronaut the
orientation of the rocket in a nice graphical way, though the
FDAI is not a part of the DSKY. But the AGC is also
computing trajectory parameters and displaying them on the
DSKY. Those parameters, from top to bottom, are "VI" (the
inertial velocity magnitude, in feet per second), "H DOT" (the
rate of change of altitude above the launch pad, also in feet
per second), and "H" (the height above the launch pad, in tenths
of a nautical mile).
- PROG 11, VERB 16, NOUN 50. After a few minutes, the
astronaut has initiated this monitoring command. You'll
notice that the KEY REL lamp is flashing, because the previous
monitoring (VERB 16, NOUN 62) wasn't actually terminated but
merely temporarily interrupted, and the astronaut is being
warned that when he terminates the VERB 16 NOUN 50 monitoring
he'll automatically return to the other monitoring. As for
what's being monitored here, from top to bottom, it's the
"splash error" (in tenths of a nautical mile), and a couple of
other items about which the documentation is inconsistent.
The "splash error" part sounds a bit confusing, but apparently
in Program 11 it has nothing to do with splash-down, but is
rather the negative of the range to target.
- ... and so on. Eventually, after this phase of the
mission is completed, the astronaut keys in VERB 37 ENTR 00 ENTR
to return to program 00, and then keys in VERB 66. I'm not
sure why the latter was done. It was for transferring
state vectors (i.e. the position, velocity, and orientation)
from the LM's AGC to the CM's, or vice-versa. But of
course, for Apollo 8 there was no LM. Oh well, I'm
inexcusably ignorant, so it's probably the correct thing to do!
If you get tired in the middle of all this and don't want to
watch it all the way to the end, just click PROG again to
terminate the script.
Playing with the Abort Guidance System
Now admittedly, I don't understand much you can do with the Abort Guidance System myself, nor do I claim that the program is complete, but there are some things you can try: |
CLR 4 1 2 READOUT |
View the results of the
self-test, which are stored in the AGS CPU at (octal)
location 412. A code of +10000 means the test has
passed. Oops! the test has failed. That's because the self-test is pretty thorough; it tests not only memory checksums, but also the operation of various CPU instructions. The possible error codes here are: +000000 Test still
in progress
+100000 Test passed +300000 Logic test failure +400000 Memory test failure +700000 Logic and memory test failure I was having a little problem with the instruction set when this screenshot was taken, thus the self-test failed. Fortunately, the AGS flight programs have been written to continue operating in the case of self-test failure, even though it is "not recommended". The current version of yaAGS actually does pass the self-test, and so you'll see a code of +100000 here. |
 |
CLR 3 7 7 + 0 0 0 0 0 ENTR |
Set the clock to 0. The
CPU uses address 377 (octal) as a counter that increments at
6-second intervals. Before using it, though, we want
to set it to a known value. In real life, the AGS time would be initialized by synchronizing with the AGC electronically. However, I'm not quite yet ready with that particular feature. |
 |
CLR 3 7 7 READOUT |
Watch the clock
incrementing. Although the counter changes at 6-second
intervals, and counts in units of 6 seconds, the CPU
actually updates the DEDA display every 1/2 second. |
The
operations listed above are very representative from the
user-interface perspective of all the other kinds of
operations you can perform on the DEDA. There are
basically two classes of DEDA-based operations:
|
||
Playing with
AGC assembly language
You can modify the validation-suite AGC assembly-language software
I've provided, and then run the modified software on yaAGC, as follows.- Copy the folder containing the
Validation Suite software to a new folder. (In the
developer snapshot, these are the files yaAGC/Validation/*.s; in
the binary installation, they'll still be the files *.s, but the
easiest way to find the name of the directory they're in is to
"Browse Source Code" from within the VirtualAGC program and to simply note down what
directory is being referenced by the browser.)
- Edit some of the validation-suite
source-code files. The assembly-language programmer's
manual is here.
- Run the VirtualAGC program, select "Custom" in the "Simulation
Type" area, choose Validation.s from the folder in which you've
been working. After VirtualAGC
automatically runs this through the assembler to create a binary
executable, just hit "Run!".
- You should now see the DSKY doing whatever you've programmed
it to do.
- On the chance that your program may not do what you expected
it to do, there is primitive debugging capability built into yaAGC which may be helpful
in tracking down the problems. Just select "Run with debug
monitor" under "AGC Debug" in the "Options" area of VirtualAGC.
Instructions for how to use the debugger are here.
Modifying the LM software (for the truly brave)
Same as "Playing with AGC assembly language", but start from the Luminary131 source code instead of the Validation Suite software, and note that the "custom" file you have to select is MAIN.s rather than Validation.s.Final exam (for the advanced student)
Prior to the descent of Apollo 14's LM to the lunar surface, a short in the LM control panel caused the abort switch to be triggered intermittently. If this actually happened during the landing, an abort would have automatically occurred (meaning that the lower stage of the LM would have been jettisoned and the upper stage would have blasted back into space). No landing would have been possible, and the astronauts would have faced the grave situation of needing rescue by the command module. It was therefore necessary, in the orbit or two before descent, for the some of the software designers to work out a fix for this problem that allowed a software lockout of the abort switch during the initial phase of the descent, but also allowed reenabling the abort switch later in the descent, in case the astronauts needed to use it. They did, in fact, work out such a fix. Your mission, should you choose to accept it, is this: Work out such a fix and send it to me. Remember, your fix can only involve erasable memory, since the core-rope containing the program cannot be altered. The fix needs to be keyed in at the DSKY by the astronauts. You have about 90 minutes to figure it out. Go!Click here for the solution.
... Or, for the silly mood
Use Virtual AGC as a clock for your PC desktop. (My word, this software is versatile!) I'd suggest using the "DSKY Type" of "Half-size" for this. Use the instructions given above for setting and monitoring the time. You'll have to reset the time very morning, because the "hours" will not wrap around to 0 after 24. (And besides, the timers will overflow after 228/100 seconds, or just over 31 days.)Hint: Once you get this working well, you'll want to be able to start this up automatically, and not have to run VirtualAGC every time. Well, when VirtualAGC runs the simulation, it does so by creating batch files (in Windows) or a shell script (in Linux or Mac OS X), then simply running those batch files or shell scripts. When you run a custom program in VirtualAGC, you use the "More" button in the simulation window to show you the contents of those batch files or shell scripts. So you can reuse or adapt those files for starting up your own simulation.
Actually, we now have a "do it yourself" page that gives a lot of helpful information on the topic of creating your own custom AGC code. In fact, it provides sample AGC code that actually implements the clock app, without requiring you to manually enter the time at power-up or every morning. Check it out!
Shall We Play a
Game?
 Write your own AGC or AEA
assembly language program for a calculator, or a game, or some other
purpose less serious than landing on the moon. Perhaps it's
not very respectful, but it will hone your skills for that next AGC
or AEA programmer opening you hear about.
Write your own AGC or AEA
assembly language program for a calculator, or a game, or some other
purpose less serious than landing on the moon. Perhaps it's
not very respectful, but it will hone your skills for that next AGC
or AEA programmer opening you hear about. Probably the best way to get a true taste of what it was like for the later AGC developers would be to create a new AGC subprogram that integrates into an existing AGC program and uses the facilities of the existing program as if it were an operating system; for example, one might create a new program P10 for Skylark 48, the AGC program for Skylab missions 2 through 4 and for the Apollo-Soyuz Test Project (ASTP). Skylark 48 would be a good choice, I think, since there should be plenty of available memory in it, and there are a lot of unused program numbers, such as P04, P05, P08, P09, P10, and so on.
The other way is to write what's known as a "bare metal" program that resides alone on the AGC and handles all of the nitty-gritty details of interacting with the AGC hardware itself. While you get less of the communal or organizational portion of the original developers' experience this way, you get a better idea of the issues confronting the earliest AGC developers. It's this bare-metal approach that was adopted by Neil Fraser and Lena Ku in developing a Tic-Tac-Toe game (among other things) for the AGC. Their Tic-Tac-Toe program is now one of the choices of "AGC Simulation Type" provided in the VirtualAGC program, so you can play this particular game right now if you like, if you have a version of our software 2025-01-11 or later! (By the way, don't fully trust the artist-conception graphic in the Vintage Computer Festival poster at the right. Except for the digits 0, 1, 4, and 7, neither the physical DSKY nor its modern software incarnation is actually capable of displaying any of the characters shown on the DSKY's numerical registers in the image, due to the nature of the DSKY's driver circuitry.
 Rules:
- The game has a 1-player mode and a 2-player mode. In 1-player mode, the PROG annunciator lamp is illuminated. The + button selects 1-player mode, and the - button selects 2-player mode.
- The PROG register area shows the player number whose move it is currently. In 1-player mode it always shows 1, while in 2-player mode it alternates between 1 and 0 from move to move.
- The buttons 1 through 9 are used to make your moves.
Since the DSKY can't display an X, moves are marked with the
player numbers (0 and 1) rather than O and X. I've edited
the screenshot to the right, adding blue lines in the picture to
show how the buttons correspond to positions in the playing
area.
- The RSET button resets the game at any point.
A Challenge!
In the early days of Virtual AGC, I used to occasionally hear
dismissive comments from what are technically known as obnoxious
online know-it-alls that the AGC was no more than a
calculator. Which I interpret as meaning that the CPU didn't
run very quickly by more-modern standards. Which is true, of
course, but overlooks certain basic facts, such as that the AGC
was running a multi-tasking, fail-safe executive in real time, as
well as providing real-time control over spacecraft.
Calculators do not do this. The magic, in other words, is in
the software! (There was magic in the hardware too,
in that computers with the power of an AGC were more-typically the
size of desks back then, but someone who has his mind set on a
comparison to handheld calculators is going to make fun of the
AGC's size as well.)
What irks me now is that I failed to even question the comparison
of the AGC's speed to a calculator. A more apt comparison
I've heard since then is AGC vs Apple II computer. In terms
of raw clock speed, there's not a terribly close comparison.
But when we start to take things into account like the AGC
performing 15-bit arithmetic while the Apple II performed 8-bit
arithmetic, and that the AGC performed a lot of number
crunching, the comparison no longer seems too ludicrous.
These two computers might actually be pretty close in terms of
their computing speed!
As it happens, I don't know the answer to this question. So
I'm putting a challenge out there, to anyone who's interested.
- Write programs in both AGC assembly-language and in 6502 assembly language that implement the sieve-of-Eratosthenes algorithm to find all prime numbers <10,000.
- Run the AGC program in our AGC emulator (yaAGC), and time how long it takes. (Devise also some way to extract the results and save them on your computer, outside of the simulation itself.)
- Run the 6502 program as well, and time it. There seem to be a variety of 6502 emulators available, and you can use any of them that are convenient ... just make very sure that the emulation runs at the same speed as the Apple II's CPU, namely at a clock-speed 1.023 MHz. (If the 6502 emulation instead runs at 50× the speed of an Apple II, your comparison isn't going to be worth anything!)
- Compare the numerical results of the two simulations, to make sure that the two programs produced the same list of primes! Or compare to any of the many online lists.
- Send us the results, and see your name up in lights in this spot!
You know, this might be an interesting class project, for anyone
who hasn't yet escaped the warm embrace of the schoolroom into the
bleak landscape of the workaday world.
Acknowledgements
(When I first added this section to the document, I thought it would be easy to keep up-to-date. It isn't. As it happens, so many people have stepped forward at one point or another that my mind simply isn't big enough to hold all of their names. So it's entirely possible that even very significant contributors may have been inadvertently omitted from the list below. Have no hesitation about reminding me if I've slighted you by forgetting to mention you!)AGC Software Developers
Of course, it goes without saying that the greatest thanks go to the
original software developers of the Apollo project, even if I've
never personally had any contact with most of them. Hugh
Blair-Smith needs to be specially mentioned, since his activities
had a special relevance to my own project, and since he has
patiently allowed me to pepper him with many questions. Don
Eyles as well has made himself especially available, and has
provided huge amount of software and documentation to us. But
we are told that as many as 300-400 programmers contributed to the Colossus and Luminary source code.
Though not specifically a software
developer, Eldon C. Hall also has been very specifically helpful to
me; Fred Martin, and Jim Kernan have also turned out be particular
heroes in terms of the operation of this project. I've not yet uncovered a "full" list of the AGC software developers. But we're not totally helpless in figuring out at least a partial list. A memo by Dan Lickly (a developer himself) about software testing gives us a list developers who were responsible for specific "programs", "routines", and "areas" within LUMINARY, as of October 1968, and another, more-abbreviated memo by George Cherry gives a similar list as of January 1968. Some of the folks in those memos are known not to have been AGC software developers, though, and I've factored them out where I knew to do so. At any rate, here's the list:
- Program P12: Larry Berman
- Program P06: Dana DeWolf
- Programs P10-P11: Phil Shakir
- Program P12: Larry Berman, Craig W. Schulenberg
- Program P20: Peter Volante, Virginia Dunbar
- Program P21: Ted Crocker
- Program P22: Peter Volante, Virginia Dunbar
- Program P25: Peter Volante, Jack Connor
- Program P27: Paul Fagin
- Program P30: Peter Adler
- Programs P31-P35: Pat White
- Programs P38-P39: Jane Goode
- Programs P40-P42: Peter Adler
- Progam P47: Bob Covelli, Ken Vincent
- Programs P51-P52: Don Millard
- Programs P57: Don Millard
- Programs P63-P67: Don Eyles
- Programs P66-P67: Don Eyles, Craig W. Schulenberg
- Programs P70-P71: Walter Bernikowich, Larry Berman, Craig W. Schulenberg
- Programs P72-P75: Pat White
- Program P76: Ted Crocker
- Programs P78-P79: Jane Goode
- Routines R00: Dana DeWolf
- Routines R02: Dana DeWolf
- Routine R03: Peter Weissman
- Routine R04: Jim Kernan
- Routine R05: Peter Volante
- Routine R10: Walter Bernikowich
- Routine R11: Don Eyles, Walter Bernikowich
- Routine R12: Bob Covelli
- Routine R13: Don Eyles
- Routine R21-R25, R29: Peter Volante
- Routine R30: Frank Gauntt
- Routine R31: Ted Crocker
- Routine R33: George Cox
- Routine R36: Ted Crocker
- Routine R47: Jim Kernan, Phyllis Rye
- Routines R50-R55, R59: Don Millard
- Routine R60: Frank Gauntt
- Routine R61: Virginia Dunbar, Jack Connor
- Routines R62-R63: Frank Gauntt
- Routine R65: Virginia Dunbar, Jack Connor
- Routine R77: Jim Kernan
- Pinball: John Vella, Marjorie Besas
- Display interface: Margaret Hamilton, Phyllis Rye
- Restarts, fresh start, and other service areas: Phyllis Rye, Dana DeWolf
- Integration: Bill Ostanek
Indeed, you can get a very different outlook if you look at the program comments within the software itself. For example, in the list above, John Vella and Marjorie Besas are responsible for PINBALL (the display/keyboard program); what does the source code for PINBALL itself tell us? Well, the software neglects to tell us who wrote PINBALL originally, but it does show a modification by "FILENE" in 1967, and another by "BARNERT" in 1969, but neither Filene nor Barnert is on the list above.
If we do poke around in the AGC software source code, we can come up with a competing list of the programmers who originally wrote or modified the code. But many in the seemingly faceless mob who wrote the software never thought to tell you who they were at all. Here's the list of the ones that did choose to identify themselves, along with a sprinkling of names that I got through personal correspondence with developers. There's some overlap with the list above, but not much!
| Jonathan D. Addelston, A.
Peter Adler, Rama M. Aiyawar, Ramón
Alonso, R. R. Bairnsfather, Ruth Birtwell, Hugh
Blair-Smith, Norm Brodeur, George W. Cherry, Edgar M.
Oshika, Ed Copps, Steve Copps, Bob Covelli, J. D. Coyne,
Danforth, Dana Densmore, DeWitt, Bart DeWolf, Stan Eliassen,
Al Engle, Don Eyles, Fagin, Filene, Naomi Fisher, Jim
Flanders, Follett, Gauntt, Richard D. Goss, John Green, Margaret
Hamilton (see also Hamilton
Technologies,
Inc.), R. Hirschkop, Mike Houston, Eileen T. Hughes,
Lowell G. Hull, T. James, G. Kalan, Don Keene, James E.
Kernan, Kilroy, Allan Klumpp, Tom Knatt, Alex Kosmala,
Krause, Dan Lickly, Lonske, Lu, Fred W. Martin, R. "Mel"
Melanson, Jim Miller, John Miller, Ray Morth, N. M. Neville,
Henry J. Noble, North, Olsson, Rhode, Robertson, S.
Rudnicki, Phyllis Rye, Jay A. Sampson, Joe Saponaro, Robert
Schlundt, George Schmidt, Craig W. Schulenberg, P. Shakir,
Smith, Robert
F. Stengel, Gilbert Stubbs, Sturlaugson, Richard
Talayco, W. H. Vandever, Ken Vincent, Peter Volante, P. S.
Weissman, P. White, Bill Widnall, Ron Wiggins, Willman,
Craig Work, Saydean Zeldin. |
It should go without saying that by singling out coders, I don't mean to imply that hardware design, system architecture, or even program management is not important. The AGC hardware was certainly pretty revolutionary for its time, in terms of miniaturization and reliability. And indeed, the electrical schematics we have are littered with signatures, initials, and dates of the responsible folks ... tiny, illegible smudges of names in our scans of them. So in the end, we only know a tiny (but important) subset of those involved.
A complete AGC honor roll would need to include names like Charles Stark Draper and many others. But the Virtual AGC project certainly emphasizes the software aspects of the AGC over the hardware aspects, so the software developers are the ones particularly being honored here. As it happens, developer Peter Volante has sent me a bunch of org charts showing a little bit about how the MIT Instrumentation Lab's internal Apollo organization evolved over time, and many of the names listed above appear in those org charts, though in a more-structured way:
 May 1962
|
 September 1968, Group 23B only
|
 February 1969 (18 pages)
|
 February 1972 (18 pages)
|
Others
- I don't want to forget the original developers of the AGS software either, but I don't yet know any of your names!
- Gemini software developers Gene Mertz, Charlie Leist, Alden
Minnick, and Don O'Neill have been of assistance to me, and
other references to the original developers appear on the Gemini page.
- I'm grateful to the folks at MIT's Dibner Institute's
now-discontinued History of Recent Science and Technology
website for making the scans of Luminary 131 and Colossus 249, along with scans of other related
documents, available online. I'm not sure who is
responsible for providing the online version of Colossus 249 (at MIT's
site), but a special thanks goes to you. Thanks to
David Mindell for helping me to move in the right direction with
my inquiries, and to Sandy Brown for giving me extremely
valuable information about the available AGC-related material at
MIT.
- Gary Neff deserves a big vote of gratitude for having the foresight (and presumably fortitude) to create the page scans of Luminary 131 software source code. Without those I wouldn't even have attempted this project. Mr. Neff has also been extremely helpful in supplying me with quite a lot of replacement scans for garbled pages (52 of them so far) in the currently-available online versions of Colossus 249. (Thanks also to Mr. Eric Jones, of the Apollo Lunar Surface Journal, for putting me into contact with Mr. Neff.)
- Thanks also to the many helpful people at NARA Southwest Region. Special thanks to Rodney Krajca and Meg Hacker.
- Thanks to Julian Webb for some very fruitful interactions, in comparing his AGC simulator to mine, for explaining some interactions between the AGC and DSKY, and for some helpful introductions.
- Acquisition of the Apollo 15-17 CM AGC software was a team
effort:
Apollo 15-17 CM Honor Roll- The anonymous donor of the Artemis 72 program
listing, who I have oh-so-amusingly previously
referred to as "D. Thrust". (It's a
Nixon/Watergate joke, folks!)
- (In alphabetical order) Steve Case, Hartmuth Gutshe, Onno Hommes, Jim Lawton, and Sergio Navarro, for converting the page images to source code.
- Jim Lawton for debugging the source code.
This is an enormous amount of effort, and since it
is the first time I didn't have to do it myself, I'm
very appreciative. Jim also did a lot of extra
editing and behind-the-scenes management.
- The anonymous donor of the Artemis 72 program
listing, who I have oh-so-amusingly previously
referred to as "D. Thrust". (It's a
Nixon/Watergate joke, folks!)
- Acquisition of the Apollo 11 LM & CM AGC software was a
team effort:
Apollo 11 Honor Roll
Organizational honors
Massachusetts Institute of Technology / MIT Museum
Building N51, 265 Massachusetts Avenue
Cambridge, MA 02139
web.mit.edu/museum/

Individual honors
- Deborah Douglas, the Museum's Curator of Science and Technology, who conceived the idea of making this material available to us, and without whom we had literally no chance of obtaining it.
- Paul Fjeld, for digitizing the hardcopy.
- (In alphabetical order) Fabrizio Bernardini, Hartmuth Gutshe, Onno Hommes, Jim Lawton, and Sergio Navarro, for converting the page images to source code.
- Steve Case and Dawn Masuoka for helping to proof
the LM binary.
- ... and those whose names I do not know at the
Charles Stark Draper Laboratory and NASA who allowed
us to do this.
- Thanks to Paul Fjeld, who has fed me extraordinary information on locating versions of Luminary and Colossus source code not otherwise known to me, and on various other related topics.
- Thanks to Fabrizio Bernardini for providing some unique documentation.
- Acquisition of the Apollo 6 CM AGC software was a team effort:
|
Apollo 6 Honor
Roll
Organizational honors
Individual honors
|

- Acquisition of the AURORA 12 and SUNBURST 120 (Apollo 5) LM AGC software was a team effort:
|
AURORA and
Apollo 5 Honor Roll
Organizational honors
Individual honors
|

- Acquisition of RETREAD 50 (unflown) LM AGC software was a team effort.
|
RETREAD 50 Honor
Roll
Organizational honors
Individual honors
|
- Thanks to Matteo Giani for figuring out how to get this beast
to compile in Mac OS X Panther.
- Thanks to ibiblio.org,
which began hosting the Virtual AGC project when my own meager
resources were exhausted. In latter days, The services of
The Internet Archive and GitHub have also become crucial.
- Thanks to John Pultorak of Block I AGC fame. John has provided not only documentation for his project that doesn't appear on the websites hosting his other materials, but also has digitized many AGS-related documents available nowhere else online (or not online, as far as I can tell).
- Thanks to Davis Peticolas, the donor for all of the scanned AGS documents.
- Thanks to Mark Grant and Markus Joachim for their work in integrating Virtual AGC into the Orbiter spacecraft simulator.
- Thanks to Stephan Hotto for the enormous amount of code he has contributed, and for finding various bugs in the simulation.
- Thanks to my core developer team:
- Onno Hommes for stepping in to add many features to the project, such as syntax highlighting, GUI debugging interfaces, subversion repository, wiki, etc.
- Jim Lawton especially but not exclusively for great infrastructural improvements such as tying the project's website to our GitHub repository and setting up continuous-integration for the latter, along with many other things.
- Mike Stewart for using his hardware-based AGC simulator to
track down and fix many subtle, lingering bugs in our software
AGC simulator (and vice-versa), as well as a number of other
innovations.
- Thanks to Shelly Kelly, archivist at the University of Houston at Clear Lake, for efforts (and patience) above and beyond the call of duty, and particularly for some GSOP scans appearing on our Document Library page.
- Thanks to Jordan Slott, for implementing symbol tables into
the debugging mode of the AGC simulator.
- And finally, thanks to my other correspondants who have contributed in ways that don't necessarily fall into any of the neat pigeonholes listed above. There are too many of you to note adequately here, but I've tried to acknowledge you throughout the website where your contributions are relevant. If I've unfairly overlooked you, attribute it to a 1201 alarm in my brain; let me know and I'll fix it.
Solution to the Apollo 14 "Final Exam" Problem
Above, we semi-jokingly proposed as a "final exam" problem a situation which actually occurred during Alan Shepard and Edgar Mitchell's attempt to land the LM during the Apollo 14 mission. Paul Fjeld has provided a lot of detail about this at the Apollo Lunar Surface Journal, by consulting mission transcripts. Our Onno Hommes has also gotten an explanation directly from Don Eyles, the AGC developer who solved the final exam problem in real time during the mission and, as far as I know, the only AGC coder ever to be dramatized (in the Apollo 14 episode of From the Earth to the Moon). And Don has written about it himself (among many other stories) pretty interestingly, in a fairly popularized way. But here's the detailed solution, in as nearly Don's words as we can make it:| The procedure developed to work around the
erroneous abort signal on Apollo 14 was as follows: (1) After the NOUN 62 countdown starts (an automatic display of the countdown toward engine ignition), but before ignition, key in VERB 21 NOUN 1 ENTER 1010
ENTER
107 ENTER to set the mode register to 71 to indicate that an abort had already occurred. Note that the numbers are in "octal" (i.e. based on the root of 8 not 10) so that the number "107" actually means "71". (2) Exactly 26 seconds after ignition, manually advance the descent engine throttle to 100%. (3) Key in VERB 25 NOUN 7 ENTER 101
ENTER
200 ENTER 1 ENTER to enable the landing guidance equations. The equations were prevented from starting automatically because the mode register is set to the phony value of 71. (4) Key in VERB 25 NOUN 7 ENTER 105
ENTER
400 ENTER 0 ENTER to explicitly disable the abort monitor. This clears the FLAGWORD bit that controls the abort monitor. (5) Key in VERB 21 NOUN 1 ENTER 1010
ENTER
77 ENTER to set the mode register to its proper value of 63. (6) Return the manual throttle to its minimum setting. The throttle stays at 100% because it is now being commanded by the guidance equations. But if this step were omitted the throttle would be forced to stay at 100% when the guidance equations later request partial thrust, with bad effects. |
Of course, I bet it seems pretty obvious now, right? ... right?
Nik Beug has made a YouTube video illustrating actual use of this fix, using our AGC simulation built into the Orbiter spacecraft simulator as part of the NASSP project. The video actually illustrates two scenarios:
- For the first couple of minutes, shows what would the actual spurious abort have looked like. (Answer: It separates the ascent and descent stages of the LM, and takes the ascent stage back into orbit. You don't die, but you don't land!)
- The remainder of the video shows how to enter the fix, prevent
the spurious abort, and proceed to the surface.
This page is available under the Creative Commons No Rights Reserved License
Last modified by Ronald Burkey on 2025-01-24