დახმარება:ვიზუალური რედაქტორი/მომხმარებლის სახელმძღვანელო
| შენიშვნა: ამ გვერდის რედაქტირებისას, თქვენ ეთანხმებით, რომ გაათავისუფლებთ თქვენი წვლილი CC0 ქვეშ. იხილეთ საჯარო დომენის დახმარების გვერდები დამატებითი ინფორმაციისთვის. |
| VisualEditor portal |
|---|
 |
| General |
| About |
| Help with the launch |
| თუ თქვენ გსურთ ვიზუალური რედაქტორის შემოწმება რომელიმე სტატიის რედაქტირების გარეშე, მაშინ გამოიყენეთ ეს გვერდი (ან [1]), სადაც მშვიდად შეძლებთ მის გამოცდას. ამ გვერდზე ვიზუალური რედაქტორის გამოსაყენებლად თქვენ რედაქტირებაც კი არ გჭირდებათ. |
ვიზუალური რედაქტორის გახსნა
მუშაობის დაწყება: ვიზუალური რედაქტორის ხელსაწყოების პანელი
| ვიზუალური რედაქტორის ხელსაწყოების პანელი მდებარეობს გვერდის თავში, როდესაც თქვენ იწყებთ რედაქტირებას ვიზუალური რედაქტორის საშუალებით. ის შეიცავს რამდენიმე ნაცნობ ხატულას: | |
| დაბრუნება და გამეორება თქვენი ცვლილებები. | |
 |
ვარდნილი მენიუ სათაური: თქვენ სათაურის ფორმატირების საშუალებას გაძლევთ. სათაურის სტილის შესაცვლელად, განათავსეთ კურსორი სათაურზე და ამ მენიუში აირჩიეთ პუნქტი (თქვენ არ დაგჭირდებათ რომელიმე ტექსტის მონიშვნა). განყოფილებების სათაურები ფორმირდება პუნქტით "$format", ქვეგანყოფილების - "$subheading2", "$subheading3", და ა.შ. To change the style of a paragraph, put your cursor in the paragraph and select an item in this menu (you don't have to highlight any text). Section titles are formatted "სათაური", and subsections are "ქვესათაური 1", "ქვესათაური 2", and so on. ტექსტის ნორმალური ფორმატია "პარაგრაფი". |
 |
ფორმატირება: "A"-ზე დაჭერა გახსნის მენიუს.
If you have not selected any text, then when you press the "A" to open the menu, and then select an item, that formatting will apply to the text that you start typing, from wherever your cursor is located. |
 |
Linking tool: The chain icon is the linking tool. Pressing on it (usually after selecting some text) opens the link dialog. |
 |
ციტირება menu: The "ციტირება" menu is used to add inline citations (also called "footnotes" or "references"). All projects have access to basic reference formatting and the ability to reuse citations by using this menu. |
 |
ციტირება ღილაკი: If the Citoid service and/or citation tool is enabled on your wiki, you will see a ციტირება button instead of a ციტირება menu.
Instructions for adding local citation templates to the "ხელით" tab at a specific wiki are available at ვიზუალური რედაქტორი/ციტირების ხელსაწყო. Instructions for enabling the ავტომატური tab are available at Enabling Citoid on your wiki The citoid service tries to fill out citation templates automatically. |
 |
სიები და დაშორებები: პირველი ორი პუნქტი საშუალებას იძლევა დააფორმატოთ ტექსტი როგორც „მარკირებული სია“ ან „დანომრილი სია“. ბოლო ორი პუნქტი საშუალებას გაძლევთ შეამციროთ ან გაზარდოთ სიის ელემენტების დაშორების დონე. |
 |
ჩასმა: მენიუ „ჩასმა“ ზოგიერთ პროექტში შესაძლოა განსხვავებული იყოს. ქვემოთ მოცემულია ყველა პარამეტრის სია, რომელიც შეიძლება იქ გამოჩნდეს.
|
| Special character insertion: The "სპეციალური სიმბოლოები" (Ω) icon is next to the "ჩასმა" menu. When pressed, it displays a dialog showing many special characters. By pressing on a specific character, you place it into the text. These special characters include some standard symbols, diacritics, and mathematical symbols. (This list may be customized locally. See ვიზუალური რედაქტორი/სპეციალური სიმბოლოები for instructions.) | |
| The Edit notices button displays any notices for the page. | |
 |
The გვერდის პარამეტრები menu is to the left of the ცვლილებების შენახვა button and the რედაქტორის გადართვა menu. On this menu there is a button to open an პარამეტრები dialog with the following (left side) tabs:
The tabs of the პარამეტრები dialog are also displayed in the გვერდის პარამეტრები menu and can be opened by clicking on it. Furthermore the გვერდის პარამეტრები menu contains the items View as left-to-right or ხედი მარჯვნიდან მარცხნივ and the item იპოვე და ჩაანაცვლე, which opens a bar, where you can insert words or regular expressions you are searching for and those to replace them with, together with several buttons for options. |
| The რედაქტორის გადართვა button is next to the ცვლილებების შენახვა button. It allows you to switch to the wikitext editor. | |
ცვლილებების შენახვა
ბმულების რედაქტირება
 |
ბმულების დამატება შესაძლებელია ღილაკით „ბმული“ (ჯაჭვის რგოლები) ხელსაწყოების პანელიდან ან სწრაფი ღილაკების საშუალებით Ctrl+K (ან ⌘ Command+K Mac-ზე).
If you select (highlight) text and then press the "ბმული" button, that text will be used in creating the link. For a link that involves only one word, you can either select that word or just put the cursor within that word. |
 |
თუ თქვენ იყენებთ ღილაკს ან მალსახმობს, გაიხსნება დიალოგური ფანჯარა, რომელშიც თქვენ შეგიძლიათ ბმულის შეყვანა (ბმულები ვიკიპედიის სხვა გვერდებზე). აკრეფვისას ვიზუალური რედაქტორი შეეცდება მოძებნოს ყველაზე მეტად მსგავსი ვარიანტები.
The link tool will try to help with internal links by searching for likely matches. როდესაც ბმული შეყვანილი ან არჩეულია, თქვენ შეგიძლიათ დააჭიროთ ღილაკს ↵ Enter, დააწკაპუნოთ დიალოგური ფანჯრის გარეთ ან დააჭიროთ დახურვის ხატულას (<). თქვენი ბმული გამოჩნდება ვიზუალური რედაქტორის გვერდზე, მაგრამ არ შეინახება, სანამ თქვენ არ მიუთითებთ ამას. |
 |
სხვა ვებ – გვერდზე ვებ – გვერდის დასაკავშირებლად, პროცესი მსგავსია: აირჩიეთ ჩანართი „გარე საიტი“ და ველში შეიტანეთ URL. |
 |
რესურსები ინტერნეტში წარწერის გარეშე ამგვარად გამოიყურება: [2]. You can add these by placing your cursor away from any word (e.g., after a space). Open the link tool by pressing on the button or pressing the shortcut keys. Type the URL in the box, and press the "გაკეთდა" button to insert the link. |
 |
To change or remove an existing link, press within the text for that link, then press the "ბმული" icon that appears near it. The dialog will appear, for editing. You can also get to the dialog with the Ctrl+K keyboard shortcut. When a link is selected, it appears as blue framed.
დიალოგური ფანჯრის მარჯვენა ზედა კუთხეში ხატულაზე „წაშლა“ (ნაგვის ურნა) დაჭერით, თქვენ აგრეთვე შეგიძლიათ დაარედაქტიროთ ბმულის სამიზნე ან წაშალოთ ის. You can also open the link's target in another window by pressing on the copy of the link in the dialog box. (You might want do this to check if an external link is valid.) If you want to exit the link label (the text displayed as a link) or continue to write after this link, you can press →:
To edit the link label of an existing link, press within the link label and type the new one. But if you want to replace the entire label, please note:
|
სქოლიოს რედაქტირება
- For further information, see Help using citation templates or Help using citoid's ავტომატური tab
Determining which system is in place | |
| Your wiki may use one of three footnote systems. The one shown on the right is the simplest system, where the "ციტირება" menu does not include any citation templates. If your wiki uses this system, then everything you need to know about footnotes is on this page. |  |
| In the second system, you again start by pressing the ციტირება button. Then a dialog box opens, which includes several popular citation templates set up for quick access in the "ხელით" tab. If your wiki uses this system, then you will find more details at Help:VisualEditor/User guide/Citations-Templates |  |
| In the third system, you again start by pressing the ციტირება button. Then a dialog box opens, which includes an automatic citation process using the citoid service under the Automatic tab. If your wiki uses this system, you will find more details at Help:VisualEditor/User guide/Citations-Full |  |
|
არსებული სქოლიოს რედაქტირება | |
| To edit an existing reference, press on it where it appears in the text (usually as a bracketed number). You will see either a "სქოლიო" icon (bookmark) or an icon (and name) for the template that was used to create this reference. In either case, pressing on the "რედაქტირება" button will open a dialog where you can edit the reference. |  |
| For the "სქოლიო" icon, pressing "რედაქტირება" opens the reference dialog. To start changing the reference information, press on it.
მრავალი ვიკი სქოლიოს თავისი სტანდარტების მიხედვით რედაქტირებისათვის იყენებს თარგებს. თუ თქვენ აირჩევთ მსგავს სქოლიოს, მაშინ თარგის გამოყენების შესახებ გაგაფრთხილებთ ლურჯი ფერი. If a template was used and you press on the reference information, then the თარგი icon (puzzle piece) will appear with some information. Press on the "რედაქტირება" button to edit the content of the template in the template editor dialog. |
 |
| If what appears when you press on a reference is an icon for a standard template for citations (an example is at right), then pressing "რედაქტირება" will open the template editor dialog. |  |
| Inside the template editor, you can add or remove types of information or change current content. Only fields (template parameters) that have content will show, initially. To add fields, press on "Add" at the bottom of the editor. |  |
| როდესაც ყველაფერი მზად იქნება, დააწკაპუნეთ ღილაკზე „ცვლილებების შენახვა“. | |
არსებული სქოლიოს ხელმეორედ გამოყენება | |
| If the page already contains a citation that applies to the text you want to source, then you can choose to re-use that existing citation.
სქოლიოს განმეორებითი გამოყენებისათვის კურსორი მოათავსეთ ტესტის იმ ადგილას, სადაც გსურთ მისი დამატება და დააწკაპუნეთ ხელსაწყოების პანელში არსებულ ხატულაზე „სქოლიო“ (სანიშნი). (Note: If your wiki has the second or third footnote system described above, you'll see a "ხელახლა გამოყენება" tab, in a dialog, instead of a "ხელახლა გამოყენება" item on the "ციტირება" menu.) |
 |
| თუკი სქოლიოები ბევრია, მაშინ თქვენ შეგიძლიათ გამოიყენოთ საძიებო ველი (ტექსტით „რისი ჩასმა გინდათ სქოლიოდ?“), რათა აჩვენოს მხოლოდ ის სქოლიოები, რომლებიც შეიცავენ მითითებულ ტექსტს. |  |
ახალი სქოლიოს დამატება | |
| ახალი სქოლიოს დასამატებლად, კურსორი მოათავსეთ ტესტის იმ ადგილას, სადაც გსურთ მისი დამატება და დააწკაპუნეთ ხელსაწყოების პანელში არსებულ ხატულაზე „სქოლიო“ (სანიშნი). Then click "საბაზისო". |  |
„ძირითადი“ ბმულის გამოყენება | |
| Shown here is what you will see if you select the basic references item. სქოლიოს რედაქტორში თქვენ შეგიძლიათ დაამატოთ თქვენი ციტატა, ფორმატირების ჩათვლით.
თქვენ შეგიძლიათ მიუთითოთ სქოლიოს კუთვნილება არჩეულ ჯგუფთან; ეს გამოიყენება სქოლიოს ჯგუფების გამოსახვისათვის განყოფილებაში „სქოლიოს სია“. |
 |
| თუ თქვენ ამატებთ ახალ სქოლიოს და გსურთ მასში თარგის დამატება, მაშინ სქოლიოს რედაქტორის ხელსაწყოების პანელში დააწკაპუნეთ ხატულაზე „ჩანართი“ (თავსატეხის ნაწილი). |  |
| შემდეგ მოძებნეთ თარგი რომლის გამოყენებაც გსურთ, დაამატეთ და დაარედაქტირეთ ის როგორც თქვენ გინდათ.
სქოლიოს სიაზე დასაბრუნებლად დააწკაპუნეთ ღილაკზე „ცვლილებების გამოყენება“ და შემდეგ გვერდზე დასაბრუნებლად კვლავ „ცვლილებების გამოყენება“. |
 |
| თუკი გვერდზე ჯერ არ არის სქოლიოს სია (მაგალითად, თუ თქვენ პირველი სქოლიო დაამატეთ გვერდზე), მაშინ თქვენ მოგიწევთ მისი დამატება, რათა თქვენი სქოლიო ხილული გახდეს.
კურსორი განათავსეთ იქ, სადაც გსურთ სქოლიოს გამოსახვა (ჩვეულებრივ — გვერდის ბოლოში) და სქოლიოს დასამატებლად დააწკაპუნეთ ხატულაზე „სქოლიოს სია“ (სამი წიგნი). |
 |
| თუკი თქვენ ქმნით სქოლიოს ჯგუფებს, მაშინ თქვენ შეგიძლიათ ჯგუფის მითითება ამ დიალოგურ ფანჯარაში, რათა შერჩევით აჩვენოს მასთან დაკავშირებული სქოლიოები.
სქოლიოს სიის დიალოგურ ფანჯარაში ბოლოს დააწკაპუნეთ ღილაკზე „ჩასმა“. |
 |
სტანდარტული წყაროს თარგების გამოყენება | |
| Your local wiki may have added extra citation templates to the "ციტირება" menu. If so, you have quick access to the most-used citation templates for your wiki. (Instructions for adding extra citation templates to your local wiki are available at ვიზუალური რედაქტორი/ციტირების ხელსაწყო.) |  |
| Pressing on a template icon such as "Cite book" will take you into the template editor for that template. Important information fields may be marked with an asterisk. While the most common fields will be shown, not all of them are required. |  |
| To add more parameters, scroll down in the template editor and press on the "Add" option.
დასრულების შემდეგ დააწკაპუნეთ „ჩასმა“-ზე. |
 |
სურათებისა და სხვა მედიაფაილების რედაქტირება
სურათები იტვირთება
მედია გალერეის რედაქტირება
თარგების რედაქტირება
The powerful MediaWiki template system lets you insert dynamic content, text from other pages, and much more. For a detailed explanation and examples, see the Templates help page.
In the VisualEditor you can search for a relevant template, add an invocation or transclusion on the page you’re editing and, if needed, add custom content using parameters.
Insert new template
| ახალი თარგის დასამატებლად, კურსორი მოათავსეთ იმ ადგილას, სადაც გსურთ მისი ჩასმა და დააწკაპუნეთ ხელსაწყოების პანელში არსებულ ხატულაზე „ჩანართი“ (თავსატეხის ნაწილი). Then open the ჩასმა menu and select " |
 |
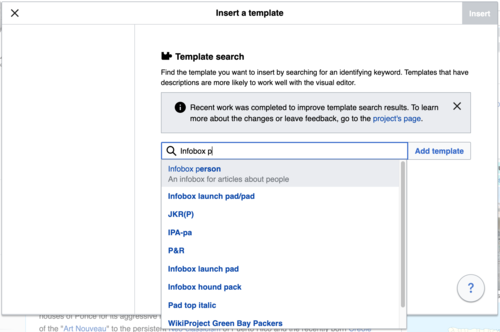
| Find the template you want to insert by typing either its name or a relevant keyword. Results containing the search term in either the name or description will display in a dropdown. This should help you find a relevant template, even if you don’t know its exact name.
If you’re having trouble finding the kind of template you want by using keywords, you can look on other wiki pages with similar content and view or edit the page source to see which templates are in use. When you find the desired template’s name, you can type it into this field to insert it here. |
 |
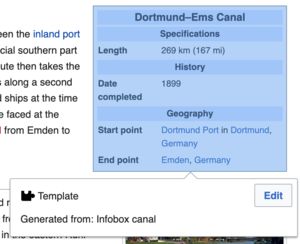
| You can also edit a template that’s already on a page. When you select the template you want to edit, it turns blue, and a box appears displaying " |
 |
| Some templates are not visible to someone reading a page. In the visual editor, such hidden templates are still shown so that you can click and edit or delete them. The name of the template will be shown next to the puzzle icon and both will be grayed out. |  |
|
თარგის პარამეტრები | |
| You’ll see this dialog box when you’re adding a new template or editing one already in place. What you see in the box depends on whether the template in question contains TemplateData, helpful metadata added by other editors to make it easier to edit templates in the Visual Editor.
When a template contains TemplateData, the VisualEditor can use it to present annotated fields for you to fill in.
|
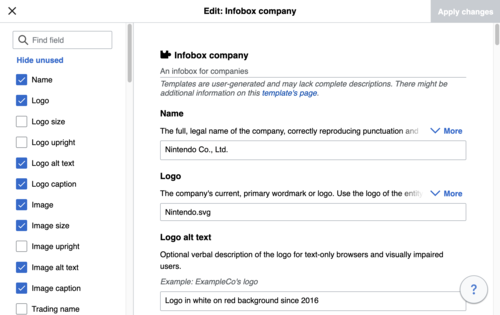 |
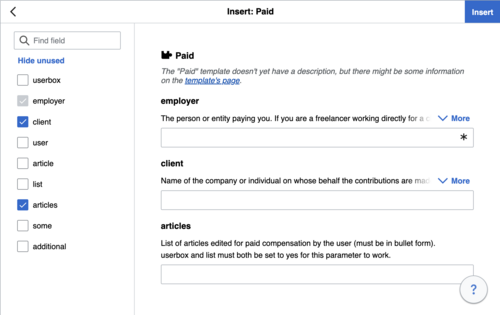
| You can disable any optional parameter (which have blue checkboxes on the left side). If a parameter’s checkbox is grayed out and not clickable, the template requires that parameter, so it can’t be disabled.
When you insert a new template, you may find that some optional parameters are pre-selected. That means the author(s) of the template recommends the use of those parameters. It’s best to review all parameters that will be used in a template to ensure you understand their use. Clicking an unchecked parameter adds it to the template. Clicking a parameter that’s already been added takes you to the parameter’s input field. Some template parameters will show as “deprecated”. Don’t use deprecated parameters when inserting a template; they’re only visible to you because those parameters are in use on older pages where this template was included. |
 |
Adding undocumented parameters | |
| If you’re inserting or editing a template whose author hasn’t laid out its parameters in TemplateData, it has what we call “undocumented” or “unnamed parameters”. In these cases, you should consult the page for the template itself. There you can learn how to correctly employ and work with all of the template’s parameters. This includes learning the exact names of the parameters as written by the template author.
If you find in the documentation that the template expects parameters without names, fill in numbers as placeholders for the parameter names using the undocumented parameter input, then add text to the values you want to provide as you normally would. Example:
If you accidentally include nonexistent, misspelled or erroneous parameters, the values you enter for those parameters won’t show up on the page you’re editing. |
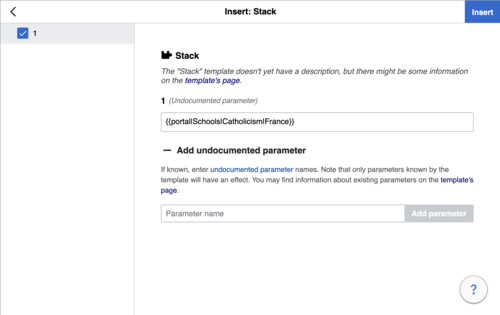 |
Autogenerated parameters | |
| In this example, the template in question lacks TemplateData but it was possible to autogenerate the parameters. This means that the undocumented parameters have already been added for you, but the names may not be easily understandable and the dialog cannot display any directions or descriptions. As a result the dialog box provides a link to the template’s documentation, which should help you deduce and fill in the template’s various parameters. |  |
Editing multi-part template content | |
| During editing, you may open template content consisting of multiple templates or a single template linked to some wikitext. This differs from the nested templates described below. In this case, the templates are better visualized as being stacked or connected.
This content often contains “unbalanced templates,” templates which are incomplete on their own and need to be paired with some wikitext or another template in order to function. These related pieces of template content must be created in wikitext, but can be edited in the VisualEditor. In these cases you will see a notice at the top of the dialog to signal the situation and a specialized toolbar will be visible at the bottom of the sidebar. There you can use the icon buttons to add additional templates, additional wikitext, delete elements or change their order. |
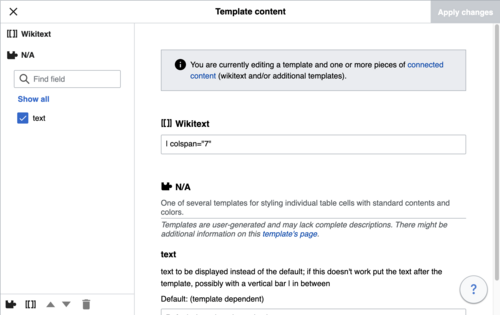 |
Nested templates | |
| Templates can include other templates as the value for parameters. You’ll recognize it when you see a parameter whose value contains the double curly braces ( {{ }} ) denoting a template.
The VisualEditor can’t present this template within a template (a nested template) using the editor’s easy-to-use interface, so if you want to nest a template yourself, you’ll need to understand how to add the template by hand in wikitext into the appropriate parameter field. |
 |
Completing your edit | |
| როდესაც დაასრულებთ თარგის დარედაქტირებას, დააწკაპუნეთ ღილაკზე „ცვლილებების შენახვა“, რათა დახუროთ დიალოგური ფანჯარა და დაუბრუნდეთ გვერდის რედაქტირებას. Then you can preview your edit and make sure it looks the way you want and expect.
You may also see an error message, which (like the other TemplateData mentioned above) is community-provided content and may vary in usefulness. You may need to consult the template’s own documentation to get to the bottom of some errors. If you’re still having trouble, consider posting about your problem on the template’s talk page. |
|
Removing a template | |
| To remove a template in the VisualEditor, click the template box. Press the "Delete" or "Backspace" key on your keyboard. The template will disappear from the page. | 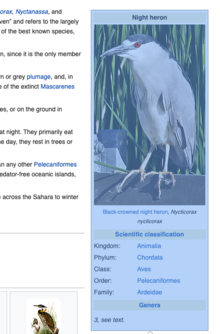 |
Editing on mobile | |
| When editing a template on a page using the VisualEditor on a mobile device, you’ll see that the sidebar starts out hidden. You can make it visible by pressing the “Show/hide options” button. | 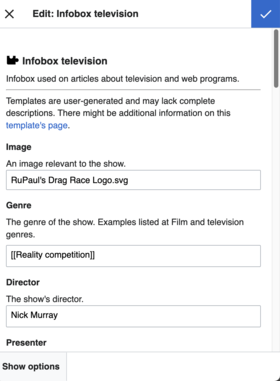 |
თარგების მიდგმა | |
| When you insert a template in a wiki page, its content and appearance are reevaluated every time the page loads, based on the template code and the values of its parameters. This means if someone updates the code of a template, then every page which uses that template will also get updated when they publish.
There’s another, much less common way to use templates, though, and that’s to substitute a template. Doing this permanently includes the template content just as it appears at the moment you insert it. It will not update if the template code is later changed. Most users won’t ever need to resort to substitution. Substitution is typically only useful when you need to capture the exact appearance of one version of a template, such as when content is under development and needs evaluation. To substitute a template in the VisualEditor, insert a template using the name syntax When you’re finished, press “ჩასმა”, which will insert the template content as you see it. |
 |
Editing lists
ცხრილების რედაქტირება
კატეგორიების რედაქტირება
 |
კატეგორიის რედაქტირებისთვის, „გვერდის პარამეტრები“ მენიუში, დააწკაპუნეთ ღილაკზე „კატეგორიები“. |
 |
ღილაკი „კატეგორიები“ ხსნის დიალოგურ ფანჯარას, რომელიც მოიცავს არსებულ კატეგორიებს და საშუალებას გაძლევთ დაამატოთ ახალი.
You also have the option of setting or changing the general (default) sorting key, which determines where the page appears when listed with other pages in the same category. For example, the default sorting key for the article "George Washington" is "Washington, George". In the category "Presidents of the United States", the article is listed under the letter "W", not the letter "G". |
 |
To add a category for a page, type the name of the category into the field "კატეგორიის დამატება". As you type, the visual editor will search for possible matching, existing categories. You can either select an existing category, or you can add a category that doesn't yet have its own category page. (Until that category page is created, your new category will show as a red link after you publish all your editing changes.) |
 |
უკვე არსებული კატეგორიის წასაშლელად, დააწკაპუნეთ მასზე და შემდეგ გახსნილ დიალოგურ ფანჯარაში დააწკაპუნეთ ხატულაზე „წაშლა“ (ნაგვის ურნა).
Pressing on a category also allows you to specify a sorting key for that specific category. Such a sorting key overrides the default sorting key. |
| როდესაც მორჩებით კატეგორიების რედაქტირებას, დააწკაპუნეთ ღილაკზე „ცვლილებების შენახვა“ რათა დაუბრუნდეთ გვერდის რედაქტორს. | |
გვერდის პარამეტრების რედაქტირება
Editing maps
 |
You can add and change maps. See Help:VisualEditor/Maps. |
მათემატიკური ფორმულის რედაქტირება
Editing musical scores
პოემებისა და სხვა სპეციალური ელემენტების რედაქტირება
Switching between the visual and wikitext editors
კლავიატურის მალსახმობები
მრავალი რედაქტორი უშუალოდ ვიკიტექსტის შესაყვანად გამოიყენება, განსაკუთრებით მუქი, კურსივი და ვიკიბმულებისთვის. კლავიატურის მალსახმობი საშუალებას მოგცემთ უფრო სწრაფად განახორციელოთ მსგავსი ფორმატირება ხელსაწყოების პანელის ღილაკების გამოყენების გარეშე. აი ვიზუალურ რედაქტორში გამოყენებადი ღილაკების კომბინაციები:
| PC-ის მალსახმობი | მოქმედება | Mac-ის მალსახმობი |
|---|---|---|
| Ctrl+B | მუქი | ⌘ Cmd+B |
| Ctrl+I | კურსივი | ⌘ Cmd+I |
| Ctrl+K | ბმულის ჩასმა | ⌘ Cmd+K |
| Ctrl+X | ამოჭრა | ⌘ Cmd+X |
| Ctrl+C | ასლი | ⌘ Cmd+C |
| Ctrl+V | ჩასმა | ⌘ Cmd+V |
| Ctrl+Z | გაუქმება | ⌘ Cmd+Z |
Also see the full list of all keyboard shortcuts.


