100% found this document useful (2 votes)
405 viewsExcel Intro Part 1
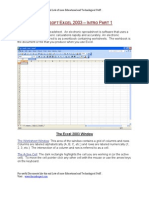
Excel is an electronic spreadsheet program used to perform calculations. It contains workbooks with worksheets made up of a grid of columns and rows. Each intersection of a column and row is called a cell. The document provides step-by-step instructions on how to create a basic worksheet to calculate projected student payroll expenses for the next year using sample data for four students. Key steps include entering labels, values, formulas, formatting data, inserting rows, and saving the worksheet.
Uploaded by
simply_cooolCopyright
© Attribution Non-Commercial (BY-NC)
Available Formats
Download as PDF, TXT or read online on Scribd
100% found this document useful (2 votes)
405 viewsExcel Intro Part 1
Excel is an electronic spreadsheet program used to perform calculations. It contains workbooks with worksheets made up of a grid of columns and rows. Each intersection of a column and row is called a cell. The document provides step-by-step instructions on how to create a basic worksheet to calculate projected student payroll expenses for the next year using sample data for four students. Key steps include entering labels, values, formulas, formatting data, inserting rows, and saving the worksheet.
Uploaded by
simply_cooolCopyright
© Attribution Non-Commercial (BY-NC)
Available Formats
Download as PDF, TXT or read online on Scribd
/ 13