


Andy warhol presentation
- 1. Guide To Andy Warhol yourself.
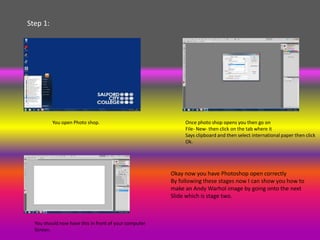
- 2. Step 1: You open Photo shop. Once photo shop opens you then go on File- New- then click on the tab where it Says clipboard and then select international paper then click Ok. Okay now you have Photoshop open correctly By following these stages now I can show you how to make an Andy Warhol image by going onto the next Slide which is stage two. You should now have this in front of your computer Screen.
- 3. Step 2: You now click on the tab File- Open and browse the image you want to Now you have your image on there Zoom out not to much just work on or example I have chosen this image of me to work with then till you can see the full screen so you can see better that’s you just click Open. What i do because it helps me see more clearly. So as you can See to your bottom right of the screen the highlighted layer What you do is drag that layer and drop it in the new layer. By doing that as you can see you should have two layers now. Change the layer that says background copy and rename it On the left of the screen there is a long tab with different tools right cut away. Just right click on the name click on layer properties Click on the fourth one down and select magic wand tool make sure you and rename it and click okay. Are on the cut away layer because that’s the one you are going to work On.
- 4. This time I want you to just click on ne layer Then do the same routine so right click layer Properties and rename it colour. If you clicked on the background of the image after selecting the magic wand tool or the selection too you should have small black dashed lines around the actual image Just like this if it is like this then your on track. What this does is deletes all the Pixels in the background.
- 5. Step 3: Now you need to make sure that you are on the cut away layer Now we are working on the contrast so you click It should now look exactly like this. On the tab Image- Adjustment- Threshold click on it… easy. Now play about with the slider till it show You should now have something like this. A good shadow to show the shape of the picture I would say round 90-100 and then just click ok.
- 6. Step 4: Now you no how to create a new layer. Create one and call it shirt – hold ctrl and alt j. And make sure you are on The shirt layer. Once you clicked on ctrl alt j this should appear After that has been done click on the layer you On your screen then you should change the layer Chose to work with and make sure you stay on that layer To shirt, hair what ever you would like to work on Till you have finished the edit on that same layer. Then select the First for example I have chosen shirt to work with. magic wand tool and go round the object you chose to work with so I will Be going round the shirt because that’s what I chose to work with first. After that you go on edit it’s the tab at the top Of the screen then go down click on fill then click You should no have something like this now I am going to do the other On colour then choose any colour you like I have Side of my shirt the same colour so now you know how to do this just Chosen blue as you can see. Follow the same procedures.
- 7. Now this is what it looks like if it is like this and then your keeping on track
- 8. Step 5: Now you are going to create several layers matching to the objects on the Picture the same way I did it for the shirt. I'm going to show you how. I'm going To show you for one of them then you can do the rest. This time I have highlighted the Vest so this Time I am going to be working on the vest simple… Now you hold ctrl-alt-j then a new layer bow should Appear in the middle of the screen. Then just name the layer After that make sure you are on The vest Anything you want to work on so for example I have highlighted layer then highlight the Vest part on the The vest so I am going to name the layer vest because that’s the image with the Magic wand or the polygon One I am working on. Then click on the arrow just below where tool Its entirely up to you. It says normal and go down click on multiply and click ok. Do this for every object in the picture weather its hair eyes anything that stands out. Always make sure you lock the layer you are not working on.
- 9. Then once you highlighted it click on the edit tab then fill then colour as show before With more detail you can go back to that slide… as you can see I have chosen a Bright yellow colour this is how it should look if you have followed the instructions Carefully.
- 10. You should now have something like this with all the seperate layers on the side Matching each part of the photo.
- 11. After being cropped here is the final product and a before and after. Before After To make this you must follow the easy set procedure in this PowerPoint Presentation.