Location via proxy:   [ UP ]  
[Report a bug]   [Manage cookies]                
SlideShare a Scribd company logo
UNDERSTANDING CSS:
CSS Forms
Why FORMS?
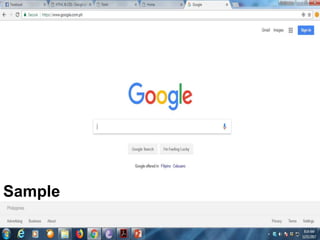
The best known form on the web is
probably the search box that sits right in
the middle of Google's homepage.
In addition to enabling users to search,
forms also allow users to perform other
functions online. You will see forms when
registering as a member of a website,
when shopping online, and when signing
up for newsletters or mailing lists.
Sample
Form Control
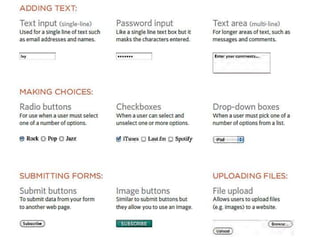
There are several types of form
controls that you can use to collect
information from visitors to your site.
CSS_Forms.pdf
The name of each form
control is sent to the
server along with the
value the user enters or
selects.
The server processes
the information using
a programming
language such as
PHP, C#, BV.net or
Java. It may also
store the information
in a database.
The server creates a
new page to send
back to the browser
based on the
information received.
A user fills in a form and then presses a button
to submit the information to the server.
How Form Works?
CSS_Forms.pdf
The <form> Structure
<form>
Form controls live inside a <form>
element. This element should always carry
the action attribute and will usually have a
method and id attribute too.
action
Every <form> element requires an action
attribute. Its value is the URL for the page
on the server that will receive the
information in the form when it
is submitted.
The <form> Structure
method
Forms can be sent using one of two
methods: get or post.
With the get method, the values from the
form are added to the end of the URL
specified in the action attribute. The get
method is ideal for:
●● short forms (such as search boxes)
●● when you are just retrieving data from
the web server (not sending information
that should be added to or deleted
from a database)
The <form> Structure
method
Forms can be sent using one of two
methods: get or post.
With the post method the values are
sent in what are known as HTTP headers.
As a rule of thumb you should use the
post method if your form:
●● allows users to upload a file
●● is very long
●● contains sensitive data(e.g. passwords)
●● adds information to, or deletes
information from, a database
Example:
The <form> Element
• The HTML <form> element defines a
form that is used to collect user input:
An HTML form contains Form elements.
Form elements are different types of
input elements like
• text fields
• checkboxes,
• radio buttons
• submit buttons
• and more
The <input> element
• is used to create several different form
controls. The value of the type attribute
determines what kind of input they will be
creating.
• The <input> element is the most
important form element.
• The <input> element can be displayed in
several ways, depending on
the type attribute.
Here are some examples:
Type Description
<input type="text"> Defines a one-line text input field
<input type="radio"> Defines a radio button (for selecting
one of many choices)
<input type="submit"> Defines a submit button (for
submitting the form)
Text Input
• <input type="text"> defines a one-line input
field for text input.
example:
CSS_Forms.pdf
Radio Button Input
• <input type="radio"> defines a radio button.
Radio buttons let a user select ONE of a limited
number of choices:
CSS_Forms.pdf
The Submit Button
• <input type="submit"> defines a
button for submitting the form data to
a form-handler.
• The form-handler is typically a server
page with a script for processing input
data.
• The form-handler is specified in the
form's action attribute:
CSS_Forms.pdf
The type="password"
When the type attribute has a value
of password it creates a text box
that acts just like a single-line text
input, except the characters are
blocked out.
They are hidden in this way so that if
someone is looking over the user's
shoulder, they cannot see sensitive
data such as passwords.
CSS_Forms.pdf
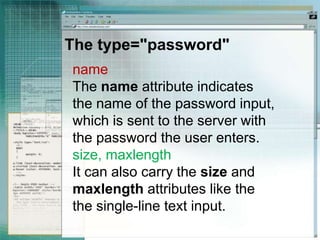
The type="password"
name
The name attribute indicates
the name of the password input,
which is sent to the server with
the password the user enters.
size, maxlength
It can also carry the size and
maxlength attributes like the
the single-line text input.
The <textarea>
The <textarea> element is used to create
a mutli-line text input. Unlike other input
elements this is not an empty element. It
should therefore have an opening and a
closing tag.
Any text that appears between the opening
<textarea> and closing </textarea> tags
will appear in the text box when the
page loads.
CSS_Forms.pdf
<input type="checkbox“>
type="checkbox"
Checkboxes allow users to select (and
unselect) one or more options in answer to
a question.
The name attribute is sent to the server with the value of the
option(s) the user selects. When a question provides users
with options for answers in the form of checkboxes, the
value of the name attribute should be the same for all of the
buttons that answer that question.
The value attribute indicates the value sent to the server if
this checkbox is checked.
The checked attribute indicates that this box should be
checked when the page loads. If used, its value should be
checked.
CSS_Forms.pdf
File Input Box
If you want to allow users to upload a file
(for example an image, video, mp3, or a
PDF), you will need to use a file input
box.
type="file“
This type of input creates a box that looks
like a text input followed by a browse
button. When the user clicks on the
browse button, a window opens up that
allows them to select a file from their
computer to be uploaded to the website.
CSS_Forms.pdf
File Input Box
type=“submit”
The submit button is used to send a form
to the server.
name
It can use a name attribute but it does not need to have one.
value
The value attribute is used to control the text that appears
on a button. It is a good idea to specify the words you want
to appear on a button because the default value of buttons
on some browsers is ‘Submit query’ and this might not be
appropriate for all kinds of form.
CSS_Forms.pdf
Drop Down List Box
<select>
A drop down list box (also known as a
select box) allows users to select one
option from a drop down list.
The <select> element is used to create a
drop down list box. It contains two or more
<option>elements.
name
The name attribute indicates the name of the form
control being sent to the server, along with the
value the user selected.
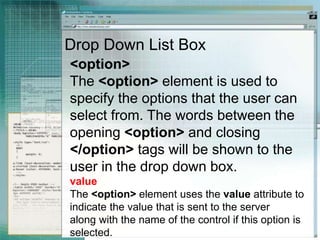
Drop Down List Box
<option>
The <option> element is used to
specify the options that the user can
select from. The words between the
opening <option> and closing
</option> tags will be shown to the
user in the drop down box.
value
The <option> element uses the value attribute to
indicate the value that is sent to the server
along with the name of the control if this option is
selected.
CSS_Forms.pdf
Grouping Form Elements
<fieldset>
You can group related form controls together inside
the <fieldset> element. This is particularly helpful
for longer forms.
Most browsers will show the fieldset with a line
around the edge to show how they are related. The
appearance of these lines can be adjusted using
CSS.
<legend>
The <legend> element can come directly after the
opening <fieldset> tag and contains a caption
which helps identify the purpose of that group of
form controls.
CSS_Forms.pdf
Sample Form:
<html>
<head>
<title>Forms</title>
</head>
<body>
<form action="http://www.example.com/review.php" method="get">
<fieldset>
<legend>
Your Details:
</legend>
<label>
Name:
<input type="text" name="name" size="30" maxlength="100">
</label>
<br />
<label>
Email:
<input type="email" name="email" size="30" maxlength="100">
</label>
<br />
</fieldset>
<br />
<fieldset>
<legend>
Sample Form:
Your Review:
</legend>
<p>
<label for="hear-about">
How did you hear about us?
</label>
<select name="referrer" id="hear-about">
<option value="google">Google</option>
<option value="friend">Friend</option>
<option value="advert">Advert</option>
<option value="other">Other</option>
</select>
</p>
<p>
Would you visit again?
<br />
<label>
<input type="radio" name="rating" value="yes" />
Yes
</label>
<label>
<input type="radio" name="rating" value="no" />
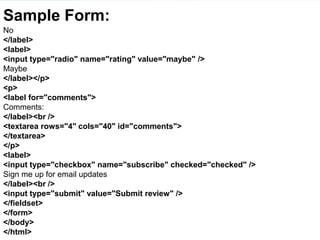
Sample Form:
No
</label>
<label>
<input type="radio" name="rating" value="maybe" />
Maybe
</label></p>
<p>
<label for="comments">
Comments:
</label><br />
<textarea rows="4" cols="40" id="comments">
</textarea>
</p>
<label>
<input type="checkbox" name="subscribe" checked="checked" />
Sign me up for email updates
</label><br />
<input type="submit" value="Submit review" />
</fieldset>
</form>
</body>
</html>
Output
CSS_Forms.pdf
Activity
• Create an Internal CSS Web page
with the following formats:
body
background-image: url("images/PNHSCHARCOAL2.png");
background-repeat: no-repeat;
background-position: center top;
color: maroon;
padding: 20px;
p
font-family:arial
font-size: 15px
Create this sample Form:
Transitional Page
Backdrops:
- These are full sized
backdrops, just scale them up!
- Can be Copy-Pasted out of
Templates for use anywhere!
www.animationfactory.com

More Related Content

CSS_Forms.pdf

  • 2. Why FORMS? The best known form on the web is probably the search box that sits right in the middle of Google's homepage. In addition to enabling users to search, forms also allow users to perform other functions online. You will see forms when registering as a member of a website, when shopping online, and when signing up for newsletters or mailing lists.
  • 4. Form Control There are several types of form controls that you can use to collect information from visitors to your site.
  • 6. The name of each form control is sent to the server along with the value the user enters or selects. The server processes the information using a programming language such as PHP, C#, BV.net or Java. It may also store the information in a database. The server creates a new page to send back to the browser based on the information received. A user fills in a form and then presses a button to submit the information to the server. How Form Works?
  • 8. The <form> Structure <form> Form controls live inside a <form> element. This element should always carry the action attribute and will usually have a method and id attribute too. action Every <form> element requires an action attribute. Its value is the URL for the page on the server that will receive the information in the form when it is submitted.
  • 9. The <form> Structure method Forms can be sent using one of two methods: get or post. With the get method, the values from the form are added to the end of the URL specified in the action attribute. The get method is ideal for: ●● short forms (such as search boxes) ●● when you are just retrieving data from the web server (not sending information that should be added to or deleted from a database)
  • 10. The <form> Structure method Forms can be sent using one of two methods: get or post. With the post method the values are sent in what are known as HTTP headers. As a rule of thumb you should use the post method if your form: ●● allows users to upload a file ●● is very long ●● contains sensitive data(e.g. passwords) ●● adds information to, or deletes information from, a database
  • 12. The <form> Element • The HTML <form> element defines a form that is used to collect user input: An HTML form contains Form elements. Form elements are different types of input elements like • text fields • checkboxes, • radio buttons • submit buttons • and more
  • 13. The <input> element • is used to create several different form controls. The value of the type attribute determines what kind of input they will be creating. • The <input> element is the most important form element. • The <input> element can be displayed in several ways, depending on the type attribute.
  • 14. Here are some examples: Type Description <input type="text"> Defines a one-line text input field <input type="radio"> Defines a radio button (for selecting one of many choices) <input type="submit"> Defines a submit button (for submitting the form)
  • 15. Text Input • <input type="text"> defines a one-line input field for text input. example:
  • 17. Radio Button Input • <input type="radio"> defines a radio button. Radio buttons let a user select ONE of a limited number of choices:
  • 19. The Submit Button • <input type="submit"> defines a button for submitting the form data to a form-handler. • The form-handler is typically a server page with a script for processing input data. • The form-handler is specified in the form's action attribute:
  • 21. The type="password" When the type attribute has a value of password it creates a text box that acts just like a single-line text input, except the characters are blocked out. They are hidden in this way so that if someone is looking over the user's shoulder, they cannot see sensitive data such as passwords.
  • 23. The type="password" name The name attribute indicates the name of the password input, which is sent to the server with the password the user enters. size, maxlength It can also carry the size and maxlength attributes like the the single-line text input.
  • 24. The <textarea> The <textarea> element is used to create a mutli-line text input. Unlike other input elements this is not an empty element. It should therefore have an opening and a closing tag. Any text that appears between the opening <textarea> and closing </textarea> tags will appear in the text box when the page loads.
  • 26. <input type="checkbox“> type="checkbox" Checkboxes allow users to select (and unselect) one or more options in answer to a question. The name attribute is sent to the server with the value of the option(s) the user selects. When a question provides users with options for answers in the form of checkboxes, the value of the name attribute should be the same for all of the buttons that answer that question. The value attribute indicates the value sent to the server if this checkbox is checked. The checked attribute indicates that this box should be checked when the page loads. If used, its value should be checked.
  • 28. File Input Box If you want to allow users to upload a file (for example an image, video, mp3, or a PDF), you will need to use a file input box. type="file“ This type of input creates a box that looks like a text input followed by a browse button. When the user clicks on the browse button, a window opens up that allows them to select a file from their computer to be uploaded to the website.
  • 30. File Input Box type=“submit” The submit button is used to send a form to the server. name It can use a name attribute but it does not need to have one. value The value attribute is used to control the text that appears on a button. It is a good idea to specify the words you want to appear on a button because the default value of buttons on some browsers is ‘Submit query’ and this might not be appropriate for all kinds of form.
  • 32. Drop Down List Box <select> A drop down list box (also known as a select box) allows users to select one option from a drop down list. The <select> element is used to create a drop down list box. It contains two or more <option>elements. name The name attribute indicates the name of the form control being sent to the server, along with the value the user selected.
  • 33. Drop Down List Box <option> The <option> element is used to specify the options that the user can select from. The words between the opening <option> and closing </option> tags will be shown to the user in the drop down box. value The <option> element uses the value attribute to indicate the value that is sent to the server along with the name of the control if this option is selected.
  • 35. Grouping Form Elements <fieldset> You can group related form controls together inside the <fieldset> element. This is particularly helpful for longer forms. Most browsers will show the fieldset with a line around the edge to show how they are related. The appearance of these lines can be adjusted using CSS. <legend> The <legend> element can come directly after the opening <fieldset> tag and contains a caption which helps identify the purpose of that group of form controls.
  • 37. Sample Form: <html> <head> <title>Forms</title> </head> <body> <form action="http://www.example.com/review.php" method="get"> <fieldset> <legend> Your Details: </legend> <label> Name: <input type="text" name="name" size="30" maxlength="100"> </label> <br /> <label> Email: <input type="email" name="email" size="30" maxlength="100"> </label> <br /> </fieldset> <br /> <fieldset> <legend>
  • 38. Sample Form: Your Review: </legend> <p> <label for="hear-about"> How did you hear about us? </label> <select name="referrer" id="hear-about"> <option value="google">Google</option> <option value="friend">Friend</option> <option value="advert">Advert</option> <option value="other">Other</option> </select> </p> <p> Would you visit again? <br /> <label> <input type="radio" name="rating" value="yes" /> Yes </label> <label> <input type="radio" name="rating" value="no" />
  • 39. Sample Form: No </label> <label> <input type="radio" name="rating" value="maybe" /> Maybe </label></p> <p> <label for="comments"> Comments: </label><br /> <textarea rows="4" cols="40" id="comments"> </textarea> </p> <label> <input type="checkbox" name="subscribe" checked="checked" /> Sign me up for email updates </label><br /> <input type="submit" value="Submit review" /> </fieldset> </form> </body> </html>
  • 42. Activity • Create an Internal CSS Web page with the following formats: body background-image: url("images/PNHSCHARCOAL2.png"); background-repeat: no-repeat; background-position: center top; color: maroon; padding: 20px; p font-family:arial font-size: 15px
  • 45. Backdrops: - These are full sized backdrops, just scale them up! - Can be Copy-Pasted out of Templates for use anywhere! www.animationfactory.com