


Devnet 1005 Getting Started with OpenStack
- 2. Getting Started with OpenStack Chris Ricker (chricker@cisco.com) Charles Eckel (eckelcu@cisco.com) DEVNET-1005
- 3. • What is OpenStack? • Use cases and work loads • Install and operate on your laptop • Where to go for help and additional resources? Agenda
- 5. Overview • Cloud computing platform for public/private clouds • Abstracts data centers into pools of resources • Provides management layer for efficient, automated allocation of resources • Empowers operators, admins, users via self service portals • Provides APIs to develop cloud-aware applications
- 6. • 24,000 developers • 500 companies • 20 million lines of code • Designed and developed in an open collaborative fashion • Releases every six months • Most recent “Kilo” release: • 1500 developers contributed • 150 companies involved • 20,000 patch sets The OpenStack Community
- 7. Extensible Software Architecture Applications / Services Physical and Virtualized Infrastructure OpenStack Service APIs, SDK, CLI Infrastructure Plugins Compute Service (Nova) Storage Services (Cinder and Swift) Network Service (Neutron) Many more Services Dashboard (Horizon) Identity (Keystone)
- 8. OpenStack Projects Compute (Nova) Telemetry (Ceilometer) Key Management (Barbican) Network (Neutron) Orchestration (Heat) DNS (Designate) Object Storage (Swift) Database (Trove) Shared File System (Manila) Block Storage (Cinder) Bare Metal (Ironic) Deployment (Triple O) Dashboard (Horizon) Data Processing (Sahara) Application Catalog (Murano) Image (Glance) Containers (Magnum) Policy (Congress) Identity (Keystone) Messaging (Zaqar) ….
- 9. Use Cases and Work Loads
- 10. • Public cloud • AWS style offerings • Private cloud • General purpose compute • Purpose-build for specific application • API-managed data center • Embedded • Application which needs data center orchestration • Workload-specific • Object storage OpenStack Use Cases
- 11. • Speed • Flexibility • Cost • Programmatic workflows OpenStack Adoption Drivers
- 12. Learning Lab Demo: OpenStack On Your Laptop
- 13. 1. Install package for your platform 2. Install extension pack Install VirtualBox
- 14. Host-only adapter • Allows the networking to be contained within the laptop and communicate with the host machine itself NAT adapter • Allows instances to connect to outside world Create Network Adaptors Laptop External Interface vboxnet0 192.168.56.1 CentOS Packstack VirtualBox eth1 NAT adapter interface IP 10.0.2.15eth0 Host only adapter interface IP from DHCP range 192.168.56.20- 192.168.56.100
- 15. Import “CentOS 7 Packstack VirtualBox.ova” file in VirtualBox via the File -> Import Appliance menu Import OVA File
- 16. • Click on “Settings” -> “Network” • Select tab for “Adapter 1”, the Host-only network adapter • Make sure “Enable Network Adapter” box is checked • Expand the “Advanced” tab. • Make sure “Promiscuous Mode” is set to “Allow All”. • Select the tab for “Adapter 2”, the NAT network adapter • Make sure the “Enable Network Adapter” box is checked Associates Networks with OVA File
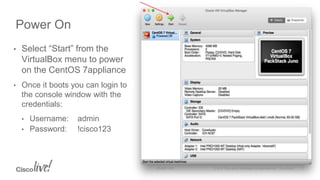
- 17. • Select “Start” from the VirtualBox menu to power on the CentOS 7appliance • Once it boots you can login to the console window with the credentials: • Username: admin • Password: !cisco123 Power On
- 18. • From the CentOS 7 Desktop, open “Firefox Web Browser” from the “Applications “dropdown menu • Within Firefox, access the OpenStack dashboard (a.k.a. Horizon UI) at: • http://192.168.56.10/ • Username: admin • Password: !cisco123 Access Horizon Dashboard
- 19. • The credentials have been preloaded and the system • They are stored in /root/keystonerc_admin • You can open a “Terminal” from the “Applications” drop down menu and have a look Access CLI
- 20. • There are two users available: admin and demo • The “admin” user should be used principally for administrative purposes, such as resetting network interfaces or loading “common” systems images • The “demo” user (with same password), is configured as a typical “user” of the system, with access to a shared public network Admin and Demo Users
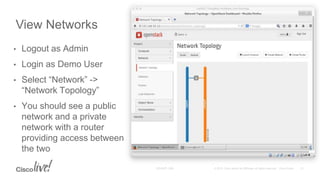
- 21. • Logout as Admin • Login as Demo User • Select “Network” -> “Network Topology” • You should see a public network and a private network with a router providing access between the two View Networks
- 22. • The same access illustrated previously from within VirtualBox is also available via your laptop using a browser or terminal application. • Open a browser on your laptop, and point it to the Horizon UI at: • http://192.168.56.10 • Username: demo • Password: !cisco123 • Running a VPN on your laptop may interfere with the routing necessary to access your local OpenStack environment. If you find this to be the case, power off the VM, restart your laptop, launch VirtualBox, and start the Cent OS 7 VM again Access from Laptop
- 23. • Within Horizon UI, select “Compute->Instances”, then click on “Launch Instance” button • Fill in instance name (e.g. first_vm) • Select boot from image • Select the “cirros” image • Select the Launch button on the bottom of the popup • It may take a minute or two for the VM to start • Once complete, the “Power State” will switch from “Spawning” to “Running” Deploy a VM within OpenStack
- 24. • Once “Running”, you click on the Instance Name of your new instance to see all the details about it • You can select the “Console” tab to login to your VM • The default credentials are generally noted in the VM when it first starts • username: “cirros” • password “cubswin:)” Console Into Your VM
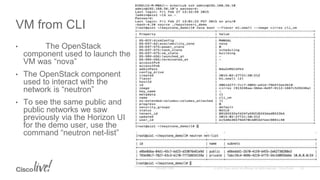
- 25. • You can SSH into the VM itself to get access to the local set of CLI tools (and the configuration files and application components.) • CLI access is restricted to the admin; however, once with the CLI you can execute OpenStack CLI command as either admin or demo • Let’s use the CLI to launch a second VM (e.g. cli_vm). • To access the CLI (you can do this either from a terminal on your laptop or via the graphical interface of the VM itself): • ssh admin@192.168.56.10 # password !cisco123 • sudo su - # password !cisco123 • source ./keystonerc_demo # configures access to CLI as demo • nova boot --flavor m1.small --image cirros cli_vm #launch VM Start another VM from the CLI
- 26. • The OpenStack component used to launch the VM was “nova” • The OpenStack component used to interact with the network is “neutron” • To see the same public and public networks we saw previously via the Horizon UI for the demo user, use the command “neutron net-list” VM from CLI
- 27. Where to go for help and additional resources?
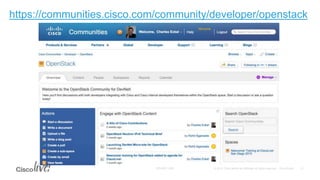
- 29. Open Source Dev Center Your Source for Open Source at Cisco https://developer.cisco.com/opensource • Contributions to open source • Use in products/solutions • Community forums, blogs • https://communities.cisco.com/communit y/developer/opensource • Developer VMs • Developer Events • IETF Hackathon featuring open source implementations of open standards
- 32. Thank you