Dot elis asat1
•
10 likes•9,751 views

The document describes the procedure for performing a Dot ELISA assay. It contains 6 sections - Introduction, Principle, Kit Components & Storage, Procedure, Flow Chart, and Result & Interpretation. The Principle section explains that in Dot ELISA, antigen is coated on a nitrocellulose membrane and detected using an enzyme-labeled secondary antibody, appearing as brown dots. The Procedure section provides instructions for preparing reagents and carrying out the assay, including blocking, antibody incubation, washing, and developing with substrate. The Flow Chart further illustrates the step-by-step process. Positive results appear as brown dots, while negative controls have no color.
Report
Share


Dot elis asat1
- 1. Page No. 1. Introduction 1 2. Principle 1 3. Kit components & Storage 2 4. Procedure 3 5. Flow Chart 6 6. Result & Interpretation 8
- 2. INTRODUCTION ELISA, also called Enzyme Linked Immunosorbent Assay, employs antigens or antobodies conjugated to enzymes in such a way that the immunological and enzymatic activity of each component is maintained. These assays are very sensitive and give accurate results. The estimation of results can be made either visually or spectrophotometrically. Various formats of ELISA are available. Depending on the need and availability of reagents different reaction format can be used in Dot ELISA. PRINCIPLE In DOT ELISA antigen is coated on a nitrocellulose membrane (Instead of an ELISA plate). After incubation unadsorbed antigens are washed out, then rest of the reaction sites are blocked on the membrane. Specific antibody bind with antigen in the NC membrane, unbound antibodies get washed out. The antibodies which are bound then detected by the addition of enzyme labelled with secondary antibody. This complex appears as clear brown dot after addition of specific substrate.
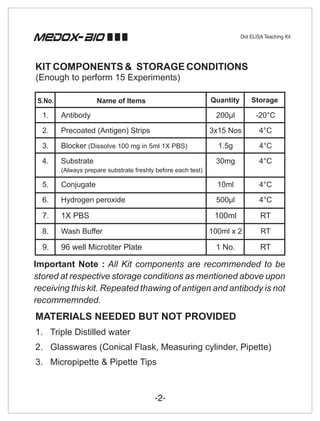
- 3. (Enough to perform 15 Experiments) S.No. Name of Items Quantity Storage 1. Antibody 200µl -20°C 2. Precoated (Antigen) Strips 3x15 Nos 4°C 3. Blocker (Dissolve 100 mg in 5ml 1X PBS) 1.5g 4°C 4. Substrate 30mg 4°C (Always prepare substrate freshly before each test) 5. Conjugate 10ml 4°C 6. Hydrogen peroxide 500µl 4°C 7. 1X PBS 100ml RT 8. Wash Buffer 100ml x 2 RT 9. 96 well Microtiter Plate 1 No. RT Important Note : All Kit components are recommended to be stored at respective storage conditions as mentioned above upon receiving this kit. Repeated thawing of antigen and antibody is not recommemnded. MATERIALS NEEDED BUT NOT PROVIDED 1. Triple Distilled water 2. Glasswares (Conical Flask, Measuring cylinder, Pipette) 3. Micropipette & Pipette Tips
- 4. WORKING SOLUTION PREPARATION 1. BLOCKING SOLUTION To prepare 2% blocking solution take of 1X PBS and add 100mg of blocker provided and mix well. Note: Prepare freshly everytime before each experiment. 2. SUBSTRATE - Stock Solution Preparation With the given total quantity of substrate bottle add 1ml of triple distilled water and mix well by repeat pipetting. Transfer this 1ml to 29ml of triple distilled water. Aliquot this 30 ml stock solution into 3 separate 10 ml storage tubes and wrap it with aluminium foil and store at -20°C for subsequent usage. This will avoid the loss of effectiveness of the substrate stock solution at the time of thawing for the subsequent usage of each test. SUBSTRATE - Working Standard Preparation Take 1ml of the substrate stock solution and mix with 1µl of hydrogen peroxide. The working Standard from substrate stock thus prepared is sufficient for one experiment. (Prepare this step freshly before each test.) PROCEDURE NOTE : All the micropipettes should be well calibrated and the pipetting should be accurate to get optimum results. Any small variations would lead to major differences in the optical density values. PRECOATED (ANTIGEN) STRIPS Precoated Antigen strips are provided in the kit as given in the figure
- 5. Bring the strips to room temperature and incubate at 37°C for 10-15min. Please note that these precoated strips are used throughout the procedure of following steps.
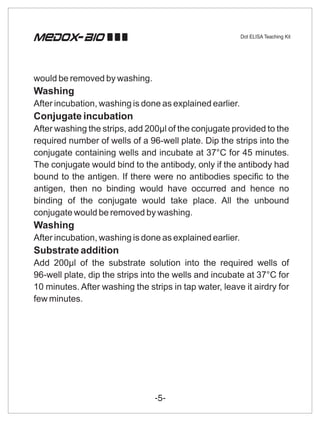
- 7. DOT ELISA Incubate the strips at 37° C for 10 - 15 mins. BLOCKING Place the strips in 3 wells of microtitre plate Add 300 µl of Blocker solution Incubate at 37° C for 45 mins. WASHING Immerse the strips in 300 µl of wash buffer Shake vigourously ANTIBODY INCUBATION Take 200 µl of diluted antibody in three wells Dip the strips and incubate at 37° C for 45 mins. Repeat Washing step
- 8. CONJUGATE Dip the strips in 200 µl of conjugate in three wells Incubate at 37° C for 45 mins. Repeat Washing Step SUBSTRATE Dip the strips in 200 µl of substrate in three wells Incubate at 37° C for 10 mins. Stop the reaction using tap water Air dry for few mins. Observe the Result
- 9. RESULT AND INTERPRETATION The appearance of brown dot indicates the presence of antigen whereas nothing appears in negative control (NC). No colour is appeared in the (NC)membrane due to presence of non-specific antigen in the strip and hence no reaction took place.