


Evaluation 4
- 1. How did you use media technologies in the construction, research, planning and evaluation stages? Several programs were used during the construction of our music video, ancillary tasks and in the research and planning behind each of these tasks. I have continued to use different technologies when presenting my evaluation.
- 2. Research One of the most used websites I used for my initial research was YouTube as this gives access to basically all music videos, meaning I could easily look for particular videos. It also gives similar suggestions making it easier for me to find other music videos which are appropriate to the genre we I was researching. The most obvious website for carrying out research was Google which allowed us to look up digipaks and magazine adverts of different bands/ artists as well as look up clothing etc. Another useful source for research was magazines (both music and celebrity ones) as these meant we could observe clothing and style as well as looking at magazine adverts for our second ancillary task.
- 3. Making the Music Video To make our music video, we needed a camcorder for the filming and so borrowed the schools handheld Canon (fs406) video camera. We found it easy to operate and carry around due to its size, while the fold out screen could be turned at various angles, therefore making filming, for example at a birds eye view, easy to do and ensure the whole of the character could be seen in the frame. In addition to this camera, we used a tripod to keep the camera steady when it would have to be held for a long time, for example filming Ellie from across the road after the first flashback scene.
- 4. Editing the Film To edit the music video, we used Adobe Premiere Elements which meant we could cut down clips, add effects and insert transitions to give the music video a professional look and ensure it met our expectations. This shows the list of video effects we could use during editing; we used both, inserting cross fade effects between certain clips, while using a black and white colour change effect to separate the flashback scenes from the present. This shows part of the timeline where we inserted each of the video clips, while the soundtrack was placed and edited in the ‘audio’ line.
- 5. Constructing Ancillary Tasks One of the main pieces of technology we needed to construct our ancillary tasks was a professional camera to carry out photo shoots. My dad lent us his which is a Canon eos 7D which produces clear, un- pixelated images. I learnt how to adjust the aperture, exposure time, sensitivity ISO and flash settings to get the photos we wanted. had a separate flash which could also We be used from different angles along with the camera flash to prevent shadowing on the model. In addition to the camera and flash, we used two large lamps to increase the brightness of the photo shoots, making the model clear to see and overall reduced the amount of editing we had to do to make the photographs look attractive and meet our ancillary task plans.
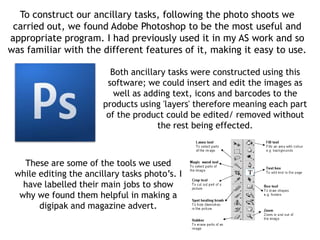
- 6. To construct our ancillary tasks, following the photo shoots we carried out, we found Adobe Photoshop to be the most useful and appropriate program. I had previously used it in my AS work and so was familiar with the different features of it, making it easy to use. Both ancillary tasks were constructed using this software; we could insert and edit the images as well as adding text, icons and barcodes to the products using 'layers' therefore meaning each part of the product could be edited/ removed without the rest being effected. These are some of the tools we used while editing the ancillary tasks photo’s. I have labelled their main jobs to show why we found them helpful in making a digipak and magazine advert.
- 7. Presenting and Evaluating My Coursework Blogger is obviously a very important program in presenting my coursework, however, other programs and websites have been involved which I believe make my blog both more interesting and more attractive. I used Microsoft Publisher quite a lot during my coursework as it is suitable for images to be pasted to and then saved as pictures or edited (such as being cropped) before inserting them into blogger. Slide share allows you to insert PowerPoint presentations or Microsoft publisher documents into blogger posts. These make posts more interesting than just writing it straight out. This allows you to create animations, which I have done in a few posts. Rather than inserting loads of pictures next to each other, they flick through one after another like a slide show.
- 8. Prezi is a website which allows you to make presentations, inserting both images and text. I found it useful to present my feedback as it showed my train of thought and the steps I took to make changes more efficiently than could be done in a simple post. This is a brainstorming website which I have made a couple of mind map's using. It is easy to use as it sets out the mind map automatically, allowing you to just write out the information you want. I have carried out part of my evaluation using the 'Glogster' poster making website. I found it a very creative and interesting way to present my thoughts as text, images and animations can all be used on it.