GeeCON Prague : Building a Smart Security Camera with Raspberry Pi Zero, Java and AWS
•Download as PPTX, PDF•
0 likes•381 views

In this session, I’ll share how I transformed a lowly Raspberry Pi Zero W webcam into a smart security camera (with motion detection, threat analysis and alert notifications) by combining open source software with cloud based image analysis. Attendees can expect a short explanation of how to set up their own motion activated webcam and a demonstration of how they can use Java and a range of AWS Services (including Rekognition, Lambda Functions and Step Functions) to help their camera distinguish between an unwanted guest and the neighbour’s cat. Finally we’ll compare Node.js and Java versions of this solution and compare them in terms of execution speed, operating cost and ease of development.
Report
Share


GeeCON Prague : Building a Smart Security Camera with Raspberry Pi Zero, Java and AWS
- 1. BUILDING A SMART SECURITY CAMERA WITH A PI ZERO, NODE.JS & THE CLOUD MARK WEST @markawest Kraków, 17-19 May 2017 BUILDING A SMART SECURITY CAMERA WITH PI ZERO, JAVA AND AWS MARK WEST Prague, 19-20 October 2017
- 2. Who Am I? • IT Consultant at Bouvet. • Hacker and Maker. • Java, JavaScript, AI, Cloud & IoT. • Active member of javaBin - the Norwegian JUG. @markawest
- 3. Talk Outline Motivation and Requirements Building a Motion Activated Camera Adding Smart Image Analysis with AWS Evaluation and Tips Node.js vs Java Lambda Functions @markawest
- 4. Motivation and Requirements Input from Stakeholder Motivation and Requirements Building a Motion Activated Camera Adding Smart Image Analysis with AWS Evaluation and Tips Node.js vs Java @markawest
- 6. Project Requirements Functional • Monitor activity in the garden. • Send warning when activity detected. • Live video stream. Non-functional • In place as soon as possible. • Low cost. • Portable. @markawest
- 7. Functional Design 1. Activity in garden 2. Camera detects movement 3. Camera sends alert email with snapshot @markawest
- 8. Building a Motion Activated Camera Motivation and Requirements Building a Motion Activated Camera Adding Smart Image Analysis with AWS Evaluation and Tips Node.js vs Java Lambda Functions @markawest
- 9. Pi Zero W Essentials Kit: €30 Camera Module: €28 Camera Adapter: €6 ZeroView: €9 Total Cost: €73 Hardware Shopping List @markawest
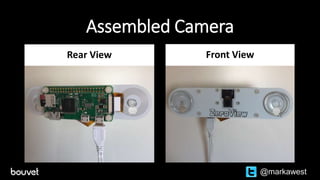
- 10. Assembled Camera Rear View Front View @markawest
- 11. Implementing the Functional Design 1. Activity in garden 2. Camera detects movement 3. Camera sends alert email with snapshot @markawest
- 12. Motion (https://motion-project.github.io) • Open source motion detection software. • Excellent performance on the Raspberry Pi Zero. • Built-in Web Server for streaming video. • Detected activity or ‘motion’ triggers events. • Works out of the box. No need for additional programming. @markawest
- 14. How the Motion Software works 1 2 3 4 @markawest 1 2 3
- 15. How the Motion Software works 1 2 3 4 1 2 3 @markawest 1 2 3
- 16. How the Motion Software works 1 2 3 4 1 2 3 @markawest 1 2 3
- 17. Alarm Snapshots from Web Camera @markawest
- 18. Project Requirements : Evaluation Functional • Monitor activity in the garden. • Send warning when activity detected. • Live video stream. Non-functional • In place as soon as possible. • Low cost. • Portable. @markawest
- 19. False Alarms from Web Camera cat cloud @markawest
- 20. The Motion Software focuses on the amount of changed pixels, and not the cause of the changed pixels! @markawest
- 21. Adding Smart Image Analysis with AWS Motivation and Requirements Building a Motion Activated Camera Adding Smart Image Analysis with AWS Evaluation and Tips Node.js vs Java Lambda Functions @markawest
- 22. Improving Alarm Accuracy with Smart Image Analysis person @markawest cat
- 23. Project Requirements Reloaded Functional • Monitor activity in our garden. • Send warning when activity detected. • Live video stream. Non-functional • In place as soon as possible. • Low cost. • Portable. @markawest
- 24. Project Requirements Reloaded Functional • Monitor activity in our garden. • Send warning when human activity detected. • Live video stream. Non-functional • In place as soon as possible. • Low cost. • Portable. @markawest
- 25. AWS Rekognition • Part of Amazon Web Services suite of Cloud based services. • Image Analysis as a Service, offering a range of API’s. • Built upon Deep Neural Networks. • Officially launched in November 2016. • Alternatives: Google Vision, MicroSoft Computer Vision, Clarafai. @markawest
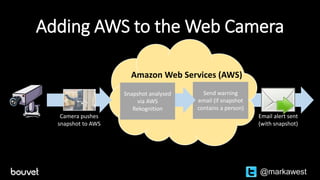
- 27. Adding AWS to the Web Camera Amazon Web Services (AWS) Send warning email (if snapshot contains a person) Snapshot analysed via AWS Rekognition @markawest Camera pushes snapshot to AWS Email alert sent (with snapshot)
- 28. AWS IAM AWS Rekognition AWS Simple Email Service AWS S3 (storage) Amazon Web Service Flow Overview AWS Step Function (workflow) Upload Trigger 1 2 4 5 6 calls 3 uses uses @markawest
- 29. AWS IAM AWS Rekognition AWS Simple Email Service AWS S3 (storage) AWS Lambda Functions Code Building Blocks (aka Microservices) AWS Step Function (workflow) Upload Trigger calls uses uses @markawest
- 30. AWS Lambda Functions • Code units based on Java, C#, Python or Node.js • Serverless, no infrastructure to manage. • High availability out of the box. • Pay as you go model based on total invocations and duration - with a generous free tier. • Native AWS SDK gives easy access to other AWS services. @markawest
- 32. AWS IAM AWS S3 (storage) AWS Step Functions Orchestration of Lambda Functions AWS Step Function (workflow) Upload Trigger calls AWS Rekognition AWS Simple Email Service uses uses @markawest
- 33. AWS Step Functions • Coordinate and orchestrate Lambda Functions into Workflows or State Machines. • Launched in December 2016. • Defined via JSON files, displayed as visual workflows. • Provide the same benefits as AWS Lambda (Highly Available, Serverless, Scalable, “Pay as you go” pricing model). @markawest
- 34. Step Function for Image Processing Error Handler (sends Error Email via AWS SES) Sends snapshot to AWS Rekognition Evaluate AWS Rekognition response Send Alert Email? Send Alert Email via AWS SES Archive image in AWS S3 1 2 3 4 5 6 1 2 3 4 5 6 @markawest
- 35. Smart Camera (plus AWS Step Function) Demo @markawest
- 36. Evaluation and Lessons Learned Motivation and Requirements Building a Motion Activated Camera Adding Smart Image Analysis with AWS Evaluation and Tips Node.js vs Java Lambda Functions @markawest
- 37. Project Requirements : Evaluation Functional • Monitor activity in the garden. • Send warning when human activity detected. • Live video stream. Non-functional • In place as soon as possible. • Low cost. • Portable. @markawest
- 38. “Fun project, but has it caught any real criminals?” @markawest
- 39. @markawest
- 40. AWS Monthly Cost : August 2017 @markawest Rekognition: EUR 2.89 SES: EUR 0.01S3: EUR 0.30 Step Functions: EUR 0.99 Tax: EUR 0.96 (Based on 8093 images processed) Lambda: EUR 0.00
- 41. Activity Timeline Which Image Should Motion Upload? @markawest Activity Event Start 1 Activity Event Stop 2 3 4 5
- 42. Activity Timeline @markawest Activity Event Start 1 Activity Event Stop 2 3 4 5 First Picture Which Image Should Motion Upload?
- 43. Activity Timeline @markawest Activity Event Start 1 Activity Event Stop 2 3 4 5 Most Pixels Changed Which Image Should Motion Upload?
- 44. Activity Timeline @markawest Activity Event Start 1 Activity Event Stop 2 3 4 5 Most Central Activity Which Image Should Motion Upload?
- 45. Activity Timeline @markawest Activity Event Start 1 Activity Event Stop 2 3 4 5 Upload all snapshots Which Image Should Motion Upload?
- 46. Choosing an Image Upload Strategy Upload One Snapshot to Rekognition when activity detected •Lower cost, due to less calls to the AWS stack. •Potentially lower hit rate. Upload Many Snapshots to Rekognition when activity detected •Higher cost due to increased calls to AWS. •Potentially higher hit rate. @markawest
- 47. Node.js vs Java Motivation and Requirements Building a Motion Activated Camera Adding Smart Image Analysis with AWS Evaluation and Tips Node.js vs Java Lambda Functions @markawest
- 48. Java 8 vs. Node.js 6.10 1. Artefact Sizes 2. Memory Requirements 3. Performance and Cost @markawest
- 49. AWS Lambda Functions @markawest Lambda Function Purpose AWS Service Calls rekognition-image- assessment Uses AWS Rekognition to generate a list of labels describing each uploaded picture. AWS Rekognition rekognition-evaluate-labels Evaluates labels to find out if an alarm email should be sent. - ses-send-notification Sends an alarm email via AWS SES when the smart security camera detects a person. AWS SES s3-archive-image Moves the processed image to the correct archive location in S3. AWS S3
- 50. Artefact Sizes 3 Reasons for the difference: 1. Java is generally more verbose. 2. Unused JAR’s in Java Deployments. 3. AWS SDK is natively available to Node.js Lambda Functions. @markawest Lambda Function Java Node rekognition-image- assessment 7.9 MB 813 bytes rekognition-evaluate- labels 7.6 MB 677 bytes ses-send-notification 8.7 MB 4.8 MB s3-archive-image 7.6 MB 943 bytes
- 51. Memory Requirements Memory Allocated AWS Free Seconds Per Month AWS Price Per Second 128 MB 3 200 000 $0.00000208 192 MB 2 133 333 $0.00000313 256 MB 1 600 000 $0.00000417 1536 MB 266 667 $0.00002501 @markawest • My Node.js 6.10 Lambda Functions were happy with 128 MB memory. • My Java 8 Lambda Functions required 256 MB to avoid OutOfMemory Errors.
- 52. Testing Cost & Performance : Method • Simulate 1500 alerts (not false alarms). • Triggered in batches of 30, with a 60 second pause. • Memory set to 256 MB for both Node.js and Java. • Prior to testing, Lambda Functions “rested” for 90 minutes. • Ran tests 5 times to ensure consistency of results. @markawest
- 53. Test Results @markawest Lambda Function Average Duration Java Average Duration Node.js rekognition-image-assessment 2250 ms 1720 ms rekognition-evaluate-labels 6.57 ms 1.61 ms ses-send-notification 3040 ms 996 ms s3-archive-image 1050 ms 364 ms
- 54. Why was Java slower on AWS Lambda? • Cold Starts (5-10 times longer on Java). • Lack of JVM tuning options on AWS. • Different underlying implementations. • Use Case for Project Jigsaw? @markawest
- 55. Does Java belong on AWS Lambda? • Of course it does! • Evaluate your use case and potential costs first. • Try different memory settings to reduce costs. • Remember the Free Tier! @markawest
- 56. Would you like to know more? markwest1972/smart- security-camera @markawest slideshare.net/markawest Slides Code
Editor's Notes
- But before I go any further I’d like to tell you a couple of things about me. In my day job I am a manager in Bouvet’s Oslo offices, where I work with a range of technologies based upon Java and JavaScript. My current focus is upon AI, Cloud and the Internet of Things. When I’m not at work I can often be found working on a range of hobby projects – often using the Raspberry Pi and Arduino platforms. In addition I am also involved in the organisation of the JavaZone conference, where I primarily work with the program committee. I’m on twitter under the handle @markawest, so feel free to contact me if there is anything you’d like to talk about!
- Ok, so lets look at the outline of todays talk. We’ll start in a second with a run through of the motivation for building this camera, along with the requirements. These should always be clear and defined for any project, whether it is a multi million kroner project for NAV, or a hobby project undertaken by an englishman living in Oslo. Then we’ll look at the first version of the camera, evaluate how it worked and discuss it’s weaknesses. The second version of the camera is where we introduce Amazon Web Services to the mix and will take up the majority of the presentation time. Finally I’ll evaluate the project and talk about what I learned.
- Ok, so lets get started by looking at why I did this project!
- The motivation for creating my camera was simple enough. A large amount of break-ins had recently taken plan in the area where I live. The thieves targeted houses with secluded gardens, as the chance of being spotted by passers by was lower. My garden is not visible from the road, making it a prime target for the thieves.
- When undertaking any project you need to identify the stakeholders, or those who will be affected by the project outcome. These stakeholders will have their expectations of the project, and your requirements should always take the stakeholders expectations into account. For this project my wife was my primary stakeholder, so the requirements reflected her wishes. (Go through requirements)
- Once I’d gathered the requirements I realized that I needed to implement the above, in a cost effective and speedy manner.
- Ok, so lets get started by looking at why I did this project!
- We’ll begin by looking at the hardware I used for creating the Camera and how much this costs. The Pi Zero is a cut down version of the Raspberry Pi. They cost about 50kr, but you’ll also need to buy an SD card, power supply and HDMI and USB adapters. Therefore I recommend a starter kit such as the one sold by the Pi Hut. This costs 300 kr, and gives you all you need to get started with the Pi Zero. In addition to the Pi Zero board I needed a camera. I choose the Raspberry Pi Camera module, at around 250 kr. To fit this to the Pi Zero I also had to buy a Pi Zero Camera adapter, which cost an additional 50 kr. The camera I chose was the Pi NoIR, which work better in low conditions. To truly provide night vision it requires an IR light source, which I didn’t buy for this project. Finally I needed a mount for the Camera. I choose the ZeroView at 80 kr. The total cost for all equipment (if bought new) would be therefore approximately 680kr. If this seems a lot of money, remember that you can easily reuse the components for other projects at a later point!
- Here you can see the fully assembled camera, from the front and the back. The white cable is a USB Wi Fi adapter and the black cable is for power.
- Once I’d gathered the requirements I realized that I needed to implement the above, in a cost effective and speedy manner.
- After some consideration, I decided to use the Linux Motion software. Motion is open source, and is purpose built for motion detection. It has excellent performance on the Raspberry Pi Zero, plus a built in web server for streaming video. Detected activity triggers an “event” in Motion, which can be used to send email alerts. Motion works out of the box and is highly configurable. With no need for additional programming it would take no time at all to get up and running.
- So how does Motion work? Well it basically monitors the video stream from the camera. Each frame is compared to the previous, in order to find out how many pixels (if any) differ. If the total number of changed pixels is greater than a given threshold, a motion alarm is then triggered.
- So how does Motion work? Well it basically monitors the video stream from the camera. Each frame is compared to the previous, in order to find out how many pixels (if any) differ. If the total number of changed pixels is greater than a given threshold, a motion alarm is then triggered.
- So how does Motion work? Well it basically monitors the video stream from the camera. Each frame is compared to the previous, in order to find out how many pixels (if any) differ. If the total number of changed pixels is greater than a given threshold, a motion alarm is then triggered.
- I was initially very happy with the first version of the Pi Zero Camera. The camera monitored my garden for the whole of July, whilst I was in England with my family. The results from the camera were quite boring, and mostly showed the neighbor's watering our flowers, plus me testing out the camera before we left.
- Ok, lets revisit my project requirements. My camera: Would monitor activity in the garden. It would be able to send an email when acitivity was detected. It included a live video stream. It was quick to build and program. It had a one of cost of 680kr. And it was portable. All this led to a happy stakeholder! But was the project completely successful?
- False alerts : why problematic? Loads of emails, that’s why!
- Ok, let us try a quick demo of the Pi Camera Version 1.
- Ok, so lets get started by looking at why I did this project!
- You’ll remember these project requirements from earlier on in this presentation. Lets just revisit them all! They are all still just as relevant. But by adding one word to one of the functional requirements we can address the issue of false positives. Any guesses?
- Yep. The missing word is “Human”! We only want to send warnings when human activity is detected.
- Why cloud based?
- Perhaps the best way of understanding what Amazon Rekognition is, is to run a quick demo. DetectLabels use Burglar picture from NTNU folder on my Desktop.
- My next challenge was to find out how I would trigger the image processing from my Pi Zero Camera. After some thought I decided to move the whole image processing and email handling to The Cloud, and specifically Amazon Web Services. My planned solution basically looked as follows: The PiZero Camera monitors the garden. On detecting movement, a snapshot is taken and pushed to Amazon Web Services. Amazon web services handles the image analysis and the eventual sending of an alert emails. This solution had some benefits: 1. The Pi Zero could now focus on running the motion software. 2. The Camera and Image Processing would be seperated, making it easy to replace either at a later date. I also tweaked the Motion configuration file to provide multiple snapshots for each detected activity. More pictures would increase the chance of Motion correctly detecting movement.
- Ok, so how did the AWS processing work? Here’s a simplified run through. Firstly an image is pushed from the PiZero Camera to Amazon’s s3 storage. A small unit of code or Lambda Function is triggered by the upload. It in turn triggers a Step Function. The Step Function orchestrates further Lambda Functions into a workshop. The first Lambda Function makes a call to Rekognition to evaluate the picture. The second Lambda Function uses the Simple Email Service to send the alert email. Finally, all components in the workflow use Identity Access management to make sure that they have access to the components they need to use. For example, the Lambda Function that sends an email needs access to both the Simple Email Service and to s3 in order to attach the image file to the email
- On upload to s3, a Lambda Function is triggered, which in turn triggers a step function, which contains more Lambda Functions. Lets look at AWS Lambda Functions and their role in our solution.
- A Lambda Function is essentially a unit of code. As today it is possible to implement Lambda Function using Java, C#, Python and Node.js. Lamba Functions are serverless. This doesn’t mean that they run without servers, but that the business or person running the code doesn’t have to worry about provisioning or managing the servers. In other word, Amazon has responsibility for making sure that the servers are up and running. Lambda Functions are also stateless. By not storing state they are more easily scaled up and down. This scalability is an important part of the Cloud paradigm, as it allows one to scale Lambda Functions rapidly up and down according to demand. The AWS Lambda platform is engineered to be highly available, making it suitable for running applications that need to be up all of the time. AWS Lambda utilises a Pay as you go model. This means that you pay only for the processing time you use. This means that an application with low traffic will be relatively cheap compared to one with lots of traffic. ASW Lambda also has a free tier for those who want to get started with AWS. This provides free usage up to a given threshold. AWS Lambda also has the SDK natively available, making it simple to call other AWS services and resources.
- { "s3Bucket": "smart-security-camera-upload", "sendAlert": false, "rekognitionLabels": {}, "s3ArchivedKey": null, "stepFunctionID": "60331694-7476-43c8-b866-8f0ca3d9db2e", "s3key": "archive/falsepositives/gardenCam1/20170904/131601-6069-01.jpg” }
- On upload to s3, a Lambda Function is triggered, which in turn triggers a step function, which contains more Lambda Functions. Lets look at AWS Lambda Functions and their role in our solution.
- Here is the actual Step Function for my Camera, rendered by the AWS Step Function interface. It’s not necessarily easy to see the flow here, so let me try to shed some light on how this works. The first step submits the snapshot to AWS Rekognition. The second step then evaluates the response from AWS Rekognition. It looks for labels such as “Person” and ”Human” and sets a flag to indicate whether a person has been found. The third step uses this flag to decide whether or not to send an email. Unlike all the other steps this is not calling a Lambda Function. The fourth step sends the alert email if. This will be skipped if the alert flag is set to false. The fifth step archives the snapshot – either in an alert folder or a false positive folder. The final step is an all purpose error handler. Any errors during processing will result in an email being sent to me.
- Ok, let us try a quick demo of the Pi Camera Version 2. Show happy case and unhappy case. Show Step Function flow If camera NOT working, try upload from PC : cd '/Users/mark.west/Documents/GitHub Repositories/smart-security-camera/s3-upload/' s3-upload mark.west$ node s3-upload-image-file.js smart-security-camera-upload /Users/mark.west/Desktop/ntnu/burglar.png
- Ok, so lets get started by looking at why I did this project!
- Ok, lets revisit my project requirements. My camera: Would monitor activity in the garden. It would be able to send an email when human activity was detected. It included a live video stream. It was quick to build and program. It had a one of cost of 680kr. And a yearly cost of 600kr after the first year. And it was portable. All this led to a happy stakeholder! But was the project completely successful?
- Ok, let us try a quick demo of the Pi Camera Version 1.
- The first figure is based on usage in March, where approximately 3750 images where processed – approximately 125 a day. During this period I received less than 100 real alarms. The second figure is based on the same usage amounts once the free tier is expired. The extra costs will mostly arise from costs of Step Functions and Rekognition, which as new services come at a premium rate. Other than that, additional costs will be incurred by S3 usage.
- VAT is 23-25% from what I can see. Some services have a level of free usage for the first year. For example Rekognition allows 5000 pictures a month. S3 also has a certain amount of free usage for the first year. I’m still in my first year, but from december my monthly price will rise by 5-10 dollars a month, including tax. Note that I don’t pay anything for Lambda Function usage – we’ll come to that some.
- Ok, so lets get started by looking at why I did this project!
- Remind people that we are comparing apples and oranges here, and that both Java and Node.js have places in a modern solution architecture
- Reason 2: The AWS Toolkit for Eclipse When creating the Java version of my Smart Security Camera project I used the AWS Toolkit for Eclipse, which provides support for creating, packaging and uploading AWS Lambda Functions. Functions are packaged into ZIP files which also include a set of dependancy JAR files (including the AWS SDK). Unfortunately the AWS Toolkit isn't selective about which JAR's it adds. A quick analysis of a deployed ZIP file revealed that it included a set of AWS Client JAR's that were not required for that specific Lambda Function to run. Amending the Maven POM file to remove these unneeded JAR's helped reduce the size of the Java Functions by up to 2MB. Reason 3: Writing Node.js Code Directly in the Browser If your Node.js based AWS Lambda Function doesn't require any 3rd party libraries, you can choose to write your code directly in the browser and avoid the packaging and upload steps. If you do this, the AWS SDK is implicitly available (no need to upload it). In the above table, the four "smallest" functions were all written in this way, which explains their small size. The "largest" Node based AWS Lambda Function was packaged as a ZIP file due to it's dependancy on the Nodemailer library.
- Node.js – more free seconds and cheaper price per second. This made me wonder how the costs would differ. Note that my monthly lambda costs are well below the threshold for charging – my total duration per month is normally 10 000 – 15 000 seconds with 40 000 -50 000 executions. Well below the free thresholds.
- Remind people that we are comparing apples and oranges here, and that both Java and Node.js have places in a modern solution architecture. Tested 10 times, results remarkably similar from time to time. Have summarized the results and created an average.
- Lambda provides the Amazon Linux build of openjdk 1.8.
- Thanks very much for attending my talk! You can find more information about this project at the Bouvet blog. And you’ll find all the code on my GitHub. If anyone wants to have a chat I’ll be on the Bouvet stand for the rest of the day and will be joining some of you for food this evening!