Location via proxy:
[ UP ]
[Report a bug]
[Manage cookies]
No cookies
No scripts
No ads
No referrer
Show this form
Submit Search
Submit Search
Upload
Google Cloud Platform專案建立說明
•
5 likes
•
1,529 views
Simon Su
Follow
本文件提供Google Cloud Platform專案建立說明,包含專案建立與Billing帳號開通的提示
Read less
Read more
Report
Share
Related slideshows
GCS - Java to store data in Cloud Storage
GCS - Java to store data in Cloud Storage
JCConf 2016 - Dataflow Workshop Labs
JCConf 2016 - Dataflow Workshop Labs
雲端運算20150521
雲端運算20150521
Report
Share
1 of 4
Download now
Download to read offline
More Related Content
Google Cloud Platform專案建立說明
1.
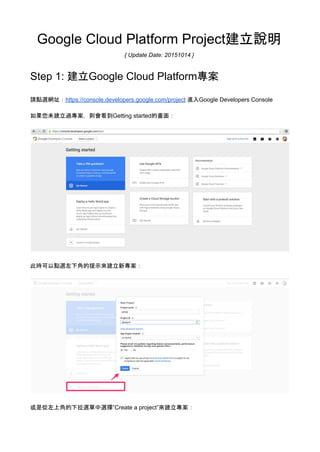
Google Cloud Platform Project建立說明 { Update Date: 20151014 } Step 1: 建立Google Cloud Platform專案 請點選網址:https://console.developers.google.com/project 進入Google Developers Console 如果您未建立過專案,則會看到Getting started的畫面: 此時可以點選左下角的提示來建立新專案: 或是從左上角的下拉選單中選擇”Create a project”來建立專案:
2.
如果您已經有其他專案,應該會看到類似下面的畫面: 此時進入Console後,點選左上角的”Create Project”來建立新專案 專案的名稱可以依您的需求任意取,另外,可以點選Edit鏈結,指定專案的ID… 專案ID必須是全球 唯一的一組設定值,不可與其他人專案重複...
3.
必要時,可以點選”Show advanced options”,可以指定App Engine的Location位置。 Step 2: Enable Billing 在Developer Console右上角的齒輪圖示中,可以選擇”Billing accounts”來進入Billing account的設定 畫面... 在設定畫面中,依照指示填入相關資訊,即可開通完成...
4.
如您是第一次建立專案,則可以在開通後得到$300USD的免費試用額度(如上圖所示),同時間, Google也會在其它頁面提醒您開通Free Trial喔~ .
Download now