Location via proxy:   [ UP ]  
[Report a bug]   [Manage cookies]                
SlideShare a Scribd company logo
Document:
                   Oracle Data Integrator 11g (11.1.1)
                   Integration with Hyperion Planning


Description:
This Document shows step by step Process to load Meta data
and hierarchy from different data sources to Planning.


History:
       Version                  Description              Author                 Publish Date
                                 Change
         0.1                  Initial Draft       Gourav Atalkar              23-Jan-2011


                                Reviewed By: Amit Sharma


Business Intelligence solutions Providers     |   Hyperion Planning Integration with ODI   1
Oracle Data Integrator
    Title                                                                     Page No.
   1) Extracting Hyperion Planning Metadata to Oracle Data Integrator…….3

   2) Building Hierarchies in Hyperion Planning from Flat File using ODI…12


Business Intelligence solutions Providers   |   Hyperion Planning Integration with ODI   2
Extracting Hyperion Planning Metadata to Oracle
                 Data Integrator
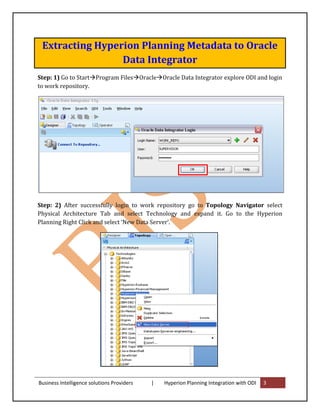
Step: 1) Go to Start Program Files Oracle Oracle Data Integrator explore ODI and login
to work repository.


Step: 2) After successfully login to work repository go to Topology Navigator select
Physical Architecture Tab and select Technology and expand it. Go to the Hyperion
Planning Right Click and select ‘New Data Server’.


Business Intelligence solutions Providers   |   Hyperion Planning Integration with ODI   3
Step: 3) In the definition tab enter the following details as shown in the picture below:


Step: 4) Click on Save it will ask you to create physical schema press ‘OK’.


Step:5) In Technology Tab go to Hyperion Planning expand it and select newly create data
server Right Click and select ‘New Physical schema’.


Business Intelligence solutions Providers   |   Hyperion Planning Integration with ODI   4
Step:7) In the definition tab enter the Planning Application name to which you want to
connect.


Step: 8) Click on Save it will ask you to specify the context press ‘OK’.


Step: 9) Go to the Logical Architecture tab Expand Technologies and select Hyperion
Planning Right-click and select ‘New Logical Schema’.


Business Intelligence solutions Providers   |     Hyperion Planning Integration with ODI   5
Step: 10) Give appropriate name to logical schema and set the Context to Hyperion
planning physical schema.


Step: 11) Click on ‘Save’.

Step: 12) Go to the ODI Designer and create new Project with appropriate name.


Step: 13) Click on ‘Save’. You can check in the project tab


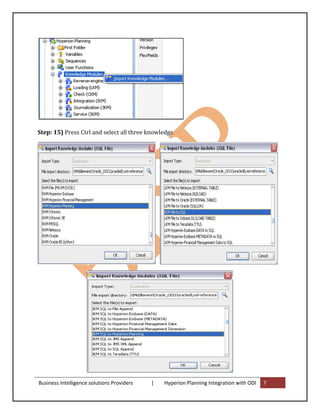
Step: 14) Expand project go to knowledge module right click and import following
knowledge modules.

RKM Hyperion Planning

LKM File to SQL

IKM SQL to Hyperion Planning


Business Intelligence solutions Providers   |   Hyperion Planning Integration with ODI   6
Step: 15) Press Ctrl and select all three knowledge


Business Intelligence solutions Providers   |   Hyperion Planning Integration with ODI   7
Step: 16) ‘Save’.


Business Intelligence solutions Providers   |   Hyperion Planning Integration with ODI   8
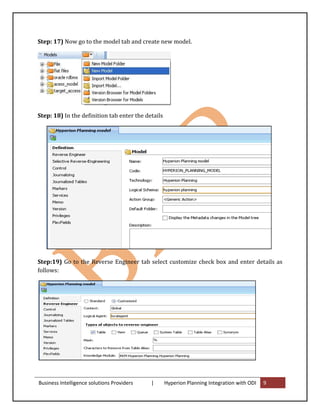
Step: 17) Now go to the model tab and create new model.


Step: 18) In the definition tab enter the details


Step:19) Go to the Reverse Engineer tab select customize check box and enter details as
follows:


Business Intelligence solutions Providers   |       Hyperion Planning Integration with ODI   9
Step:20) ‘Save’

Step:21) Newly created Model will be available for Reverse Engineering go to Model tab
select Hyperion planning model and Right Click and select Reverse Engineers. Before
Reverse Engineer the models make sure your agent services are running if not start it with
following command:

C:oracleMiddlewareOracle_ODI1oraclediagentbin>agent –NAME=localagent


Step: 22) Now you can reverse engineer it.


Business Intelligence solutions Providers   |   Hyperion Planning Integration with ODI   10
Press ‘OK’.

Step: 23) Go to the Operator Tab check whether the Execution run successfully or not.


        If all the checks are green that means your model reversed successfully.


Step: 24) Go to the Designer and open model tab expand Hyperion planning model again.
You can check all the dimensions are visible there from your planning application.


Business Intelligence solutions Providers     |    Hyperion Planning Integration with ODI   11
Dimension Loading to Hyperion Planning
                      Application
Pre-Requisite Steps

       ODI cannot create the Planning Application
       The application will have to be created in Planning first
       All the dimensions will have to be defined first in Planning
       One dimension load per interface
       Chained interfaces in Packages to do multiple dimension loads
       Uses Hyperion RMI Service
       Loads into interface tables
       Refresh to Essbase available


Once you have completed the file make sure you save it in the file store directory you set up
in the topology manager, in my case:
“C:oracleMiddlewareOracle_ODI1oraclediDemoPlanningAccount_Dim_Load.csv”

Now we have to create a model and datastore that will pick up the file. Insert a new
DataStore and give it a name and if you click browse for file button it should open up in the
correct directory and you can select the csv file.


Business Intelligence solutions Providers   |   Hyperion Planning Integration with ODI   12
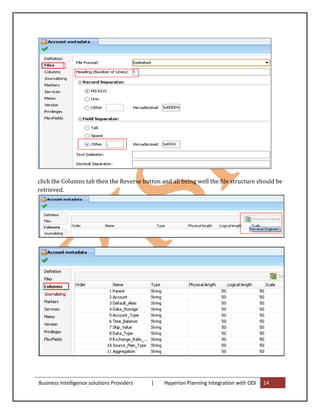
In the files tab as we are using a CSV file then choose Fie Format as delimited, the file has a
header row so it was set to 1, the field separator was set to other and as a comma (,)


Business Intelligence solutions Providers   |    Hyperion Planning Integration with ODI   13
click the Columns tab then the Reverse button and all being well the file structure should be
retrieved.


Business Intelligence solutions Providers   |   Hyperion Planning Integration with ODI   14
Ok we have created the source and target elements so now we have to put them together to
bring them together and this is done by creating an interface, back to the projects tab and
insert a new interface. Give it a name and make sure the context is selected, next check
“Staging Area Different from Target” and choose “SUNOPSIS_MEMORY_ENGINE”.


This allows any transformations between the source and target to be handled by the
memory engine, an example being if you have a column header named DS in the source file
and in the planning target it goes to Data Storage then the memory engine will handle this
mapping.

Go to mapping tab first drag you Account Flat file datastore from the models window into
the source window and then drag the reversed account dimension datastore into the target
window, select yes for the automatic mapping. What this will do is automatically map the
column headings of your file to the target planning dimension, if you create the file with
exactly the same headings as the dimension properties then you will have less work to do.


Once you have completed the entire mappings click on the Flow tab and a diagram should
be displayed outlining the process.


Business Intelligence solutions Providers   |   Hyperion Planning Integration with ODI   15
If you click on the Target there are a number of options available like setting up error
logging and the ability to refresh to Essbase after the load has completed.


After applying changes you can execute the interface and the data in the file should be
loaded into planning, you can check in the Operator to see how the process went.


Business Intelligence solutions Providers   |   Hyperion Planning Integration with ODI   16
Business Intelligence solutions Providers   |   Hyperion Planning Integration with ODI   17

More Related Content

Hyperion planning integration with odi

  • 1. Document: Oracle Data Integrator 11g (11.1.1) Integration with Hyperion Planning Description: This Document shows step by step Process to load Meta data and hierarchy from different data sources to Planning. History: Version Description Author Publish Date Change 0.1 Initial Draft Gourav Atalkar 23-Jan-2011 Reviewed By: Amit Sharma Business Intelligence solutions Providers | Hyperion Planning Integration with ODI 1
  • 2. Oracle Data Integrator Title Page No. 1) Extracting Hyperion Planning Metadata to Oracle Data Integrator…….3 2) Building Hierarchies in Hyperion Planning from Flat File using ODI…12 Business Intelligence solutions Providers | Hyperion Planning Integration with ODI 2
  • 3. Extracting Hyperion Planning Metadata to Oracle Data Integrator Step: 1) Go to Start Program Files Oracle Oracle Data Integrator explore ODI and login to work repository. Step: 2) After successfully login to work repository go to Topology Navigator select Physical Architecture Tab and select Technology and expand it. Go to the Hyperion Planning Right Click and select ‘New Data Server’. Business Intelligence solutions Providers | Hyperion Planning Integration with ODI 3
  • 4. Step: 3) In the definition tab enter the following details as shown in the picture below: Step: 4) Click on Save it will ask you to create physical schema press ‘OK’. Step:5) In Technology Tab go to Hyperion Planning expand it and select newly create data server Right Click and select ‘New Physical schema’. Business Intelligence solutions Providers | Hyperion Planning Integration with ODI 4
  • 5. Step:7) In the definition tab enter the Planning Application name to which you want to connect. Step: 8) Click on Save it will ask you to specify the context press ‘OK’. Step: 9) Go to the Logical Architecture tab Expand Technologies and select Hyperion Planning Right-click and select ‘New Logical Schema’. Business Intelligence solutions Providers | Hyperion Planning Integration with ODI 5
  • 6. Step: 10) Give appropriate name to logical schema and set the Context to Hyperion planning physical schema. Step: 11) Click on ‘Save’. Step: 12) Go to the ODI Designer and create new Project with appropriate name. Step: 13) Click on ‘Save’. You can check in the project tab Step: 14) Expand project go to knowledge module right click and import following knowledge modules. RKM Hyperion Planning LKM File to SQL IKM SQL to Hyperion Planning Business Intelligence solutions Providers | Hyperion Planning Integration with ODI 6
  • 7. Step: 15) Press Ctrl and select all three knowledge Business Intelligence solutions Providers | Hyperion Planning Integration with ODI 7
  • 8. Step: 16) ‘Save’. Business Intelligence solutions Providers | Hyperion Planning Integration with ODI 8
  • 9. Step: 17) Now go to the model tab and create new model. Step: 18) In the definition tab enter the details Step:19) Go to the Reverse Engineer tab select customize check box and enter details as follows: Business Intelligence solutions Providers | Hyperion Planning Integration with ODI 9
  • 10. Step:20) ‘Save’ Step:21) Newly created Model will be available for Reverse Engineering go to Model tab select Hyperion planning model and Right Click and select Reverse Engineers. Before Reverse Engineer the models make sure your agent services are running if not start it with following command: C:oracleMiddlewareOracle_ODI1oraclediagentbin>agent –NAME=localagent Step: 22) Now you can reverse engineer it. Business Intelligence solutions Providers | Hyperion Planning Integration with ODI 10
  • 11. Press ‘OK’. Step: 23) Go to the Operator Tab check whether the Execution run successfully or not. If all the checks are green that means your model reversed successfully. Step: 24) Go to the Designer and open model tab expand Hyperion planning model again. You can check all the dimensions are visible there from your planning application. Business Intelligence solutions Providers | Hyperion Planning Integration with ODI 11
  • 12. Dimension Loading to Hyperion Planning Application Pre-Requisite Steps ODI cannot create the Planning Application The application will have to be created in Planning first All the dimensions will have to be defined first in Planning One dimension load per interface Chained interfaces in Packages to do multiple dimension loads Uses Hyperion RMI Service Loads into interface tables Refresh to Essbase available Once you have completed the file make sure you save it in the file store directory you set up in the topology manager, in my case: “C:oracleMiddlewareOracle_ODI1oraclediDemoPlanningAccount_Dim_Load.csv” Now we have to create a model and datastore that will pick up the file. Insert a new DataStore and give it a name and if you click browse for file button it should open up in the correct directory and you can select the csv file. Business Intelligence solutions Providers | Hyperion Planning Integration with ODI 12
  • 13. In the files tab as we are using a CSV file then choose Fie Format as delimited, the file has a header row so it was set to 1, the field separator was set to other and as a comma (,) Business Intelligence solutions Providers | Hyperion Planning Integration with ODI 13
  • 14. click the Columns tab then the Reverse button and all being well the file structure should be retrieved. Business Intelligence solutions Providers | Hyperion Planning Integration with ODI 14
  • 15. Ok we have created the source and target elements so now we have to put them together to bring them together and this is done by creating an interface, back to the projects tab and insert a new interface. Give it a name and make sure the context is selected, next check “Staging Area Different from Target” and choose “SUNOPSIS_MEMORY_ENGINE”. This allows any transformations between the source and target to be handled by the memory engine, an example being if you have a column header named DS in the source file and in the planning target it goes to Data Storage then the memory engine will handle this mapping. Go to mapping tab first drag you Account Flat file datastore from the models window into the source window and then drag the reversed account dimension datastore into the target window, select yes for the automatic mapping. What this will do is automatically map the column headings of your file to the target planning dimension, if you create the file with exactly the same headings as the dimension properties then you will have less work to do. Once you have completed the entire mappings click on the Flow tab and a diagram should be displayed outlining the process. Business Intelligence solutions Providers | Hyperion Planning Integration with ODI 15
  • 16. If you click on the Target there are a number of options available like setting up error logging and the ability to refresh to Essbase after the load has completed. After applying changes you can execute the interface and the data in the file should be loaded into planning, you can check in the Operator to see how the process went. Business Intelligence solutions Providers | Hyperion Planning Integration with ODI 16
  • 17. Business Intelligence solutions Providers | Hyperion Planning Integration with ODI 17