Creating A Waterwise Landscape - Conservation Garden Park, Utah
- 1. Creating A Waterwise Landscape Conservation Garden Park www.ConservationGardenPark.org 8215 South 1300 West West Jordan, UT 801-565-4300
- 2. Adjusting your landscape to be Conserving water for future generations W more water-efficient The majority of Utah homeowners own and maintain a ith ten people added to our population each hour traditional European landscape consisting of a bluegrass through both in-migration and natural increase, Utah lawn and annual flowers. While this style of landscaping has an anticipated population increase of 1.5 million people by the year 2030. Current rates of water use will not sustain is well suited for areas of the country with large amounts projected growth. Water conservation is not only important in of annual rainfall, it is not sustainable here in the response to droughts, but is essential in providing for future water semi-arid region in which we live without significant needs. supplemental watering. Population growth in the Salt On average, Utah homeowners use 44 inches of water on their Lake Valley continues to increase steadily, placing more outdoor landscaping each summer. While this guide will teach you reliance on limited water sources. Studies show that Utah simple things you can do to make your landscape and sprinklers homeowners use an average of 44 inches of water on more water-efficient, we’d like to invite you to the Conservation their landscapes each year, when only 30 inches or less Garden Park to see these principles in action. are needed to maintain a healthy lawn. For this reason, The landscapes represented in the graph at right can all be found at homeowners are encouraged to take an active part the Conservation Garden Park, and as you can see, require much in conserving our precious water resource. Using this less water than what is currently being used on the average Utah brochure will help you get started. landscape. Naturally, this translates into not only water savings, but a lower water bill. And wouldn’t we all like to have a lower water bill?
- 3. Getting started This brochure is designed to give the average Stop by and see how beautiful your landscape can be. We know homeowner some general information on how to create you’ll be pleasantly surprised, and your wallet will thank you, too. a more water-efficient landscape, thereby helping to conserve our precious resource. With budget limitations Average Water Application in mind, this can be accomplished over time or all at once. Table of Contents 1: Time for a Tune-up! Assessing Your Landscape & Making Simple Adjustments . . . . . . . . . . . . . . . . . . . . . . . . . . . . . . . . . . . . 2 2: Performance Upgrades Improving Problem Areas in Your Yard . . . . . . . . . . . . . . . . . 8 3: Making the Transition Applying Waterwise Principles in Your Landscape . . . . . 12 *Homeowner average is based on data from 1998-2006 for Published April 2008. © 2008 residential sites in the Salt Lake County “Water Check” program. Jordan Valley Water Conservancy District
- 4. 1 Time for a Tune-up! Tip 1: Visually inspect your irrigation system zone by zone. Activate one valve at a time and inspect each sprinkler head individually. Look for the following possible problems, marking any needed repairs: Assessing Your Landscape and Making Simple Adjustments Inadequate coverage. Each sprinkler head should spray to the next head (see diagram below). Dry areas in turf are an indication This section focuses on improving the irrigation of poor coverage. Sprinkler heads may have to be added, moved, efficiency of your existing landscape and making or adjusted to improve behavioral changes for long-term water savings. All coverage (see section 2, measures in this section are either no-cost or low-cost “Performance Upgrades”). changes you can make. Using a different nozzle (see diagram, next page) may also improve coverage. Arrange sprinkler heads so the spray patterns overlap each other. How much will I save? Depending on your previous watering Broken or leaking sprinkler heads. If any water is observed habits, making the changes recommended immediately around the sprinkler head (other than the water in “Time for a Tune-up” could result in up spraying from the nozzle), it may be broken, loose or worn out. to 15% water savings.
- 5. Replace or repair any leaking sprinkler heads you find. Sprinkler heads too high, too low, or tilted to one side. Heads should be straight and flush with the ground. If the head is too low, the spray may be blocked by surrounding turf. It could also become easily clogged by debris. If the head is too high it becomes an obstacle to mowing and edging, as well as a trip hazard. If the head is tilted, the uniformity of the spray is compromised. Dig up the head and use a swing joint to set the head at the proper grade. Diagram of a sprinkler head with swing joint. Improper nozzles. If a sprinkler is spraying onto a wall, house, More Information Contact Jordan Valley Water Conservancy District for more information about water-efficient landscaping: • www.ConservationGardenPark.org • www.slowtheflow.org • www.jvwcd.org Many nozzle patterns, like those above, are available for fixed-spray sprinklers. • 1-877-728-3420
- 6. 1 Time for a Tune-up! sidewalk, street, or anywhere other than the turf, changing to a different nozzle may correct the problem. Many nozzle patterns are available for fixed-spray sprinklers, as shown in the image on the previous page. Tip 2: “Cycle and Soak” to avoid runoff. This is done by setting multiple start times for a certain zone. For example, watering three times for five minutes in each zone may allow water to penetrate deeper into the soil than watering fifteen minutes all at once. Water will run off from clay soil or sloped areas, where flat, sandy areas will soak up water quickly. Determine the length of time it takes for runoff to occur and never water longer than the runoff time during any watering cycle. Regular turf maintenance such as fertilization and aeration will create healthy turf and also reduce runoff by opening the soil for better water penetration. 4
- 7. Tip 3: Create a zone chart and attach it in or near the sprinkler timer (also called the clock or controller). Assign a number to each valve/station/zone. Next, include a description of each zone being watered. The chart could also include scheduling information such as number of start times per day, number of minutes per day, and number of watering days per week. Another easy way to get a customized watering schedule is to sign up for a free Water Check by calling 1-877-728-3420. Tip 4: Evaluate the capability of your sprinkler timer to water efficiently. Look for the following waterwise features in a modern sprinkler timer: • The ability to water in single-minute increments. • The ability to set multiple start times for each zone (this will For best efficiency, consider replacing allow you to “cycle and soak” as discussed in Tip 2). old-style sprinkler timers such as this one. • The ability to water on specific days or day intervals. 5
- 8. 1 Time for a Tune-up! • Multiple programs (allows you to water certain zones independently). • Backup battery (prevents scheduling information from being erased in the event of a power interruption). For added efficiency, try looking for these additional options: How Often to Water ~ A Guide* • Station test features (allows you to quickly check each zone for broken heads or leaks). Month Interval • Cycle and soak feature (allows you to set the run and soak time Startup to Once every 6 days for any zone). April 30 May Once every 4 days • Rain shut-off device. June • Weather-based watering technology. July Once every 3 days August September Once every 6 days October 1 to Tip 5: Make seasonal adjustments to your watering Once every 10 days schedule depending on temperature, wind and shutdown *Your water needs may be different based rain. Plants require more water when it’s hot or windy, and less on soil type and other conditions. Call for water when it’s rainy or humid. Delay watering in the spring until a free Water Check to get your customized your lawn actually needs water, then start the system manually and watering schedule. 1-877-728-3420.
- 9. run it only as needed. Use your regular watering schedule when the hot summer months arrive (before 10 a.m. or after 6 p.m. to minimize evaporation), but remember to water less often in the fall. Making frequent adjustments to your watering schedule based on changing seasons and weather will save a significant amount of water. Tip 6: Call 1-877-728-3420 for a free Water Check to determine a proper watering schedule. After a series of tests and observations of your irrigation system, water checkers Water Checks are a good way to determine if your will make recommendations and provide you with a customized watering is efficient. Call today to make an appointment. 1-877-728-3420. watering schedule. 7
- 10. 2 Performance Upgrades Tip 1: Improve spacing of sprinkler heads to improve uniformity. Sprinkler heads that are too close together will create soggy areas in the lawn, and heads that are too far apart will cause dry areas. Assuming your water pressure is adequate, Improving Problem Areas in this problem can be corrected by adding or moving heads to create Your Yard better uniformity in the zone. This section focuses on areas of the landscape that may require more extensive work to improve. Tip 2: Use the same type of sprinkler heads within each zone to improve uniformity. Performance character- istics vary widely between different types and brands of sprinkler heads. For example, a rotor head will generally spray farther than a fixed spray head, but its precipitation rate is lower because it is rotating. For the most consistent coverage, use only one type of How much will I save? sprinkler head per zone. Making changes based on the recommendations in this section could result in water savings of 5 to 10% (for a total of up to 25% if combined with changes in section 1, “Time for A Tune-up”).
- 11. Tip 3: Improve uniformity by maintaining system pres- sure. High pressure causes misting, which results in water loss due to evaporation and wind drift. It can also cause dam- age to your sprinkler system. Low pressure can cause poor cover- age and runoff. Check your water pressure. A plumber can do this for you, or you can schedule a free Water Check, which includes a pressure test. Check with the sprinkler manufacturer to verify the recommended operating pressure range for your sprinklers (available online or from sprinkler supply stores). To reduce high pressure, install a pressure regulator for the sprin- kler system. To increase pressure that is too low, eliminate one or more heads on the zone, change out nozzles to some with lower flow rates, eliminate any obstructions in the pipe or valves, or reduce the size of the zone by adding a valve to create an additional zone. Misting created by high water pressure causes water loss.
- 12. 2 Performance Upgrades Tip 4: Improve irrigation zones. Check to make sure each zone contains plants with similar water needs (hydro- zoning). For instance, lawn and thirsty annuals could be in one zone, and natives or drought-tolerant species in another. Use only one type of sprinkler or one type of drip irrigation product to ensure even and consistent watering. Zonal watering is the most efficient means of irrigating a landscape that consists of plants with varying water needs. Most plants, including lawn, are healthiest when watered deeply but infrequently. Lawns and annuals, however, require more frequent watering than trees and shrubs because of their relatively shallow root zones. Therefore, watering time and frequency should vary greatly between turf and other plants. 10
- 13. Tip 5: Correct any valve problems. Common automatic Dry spots caused by low water pressure. control valve malfunctions include valves leaking externally (water leaking from the valve itself), valves leaking in- ternally (water leaking through the valve, into the pipe, and out the lowest sprinkler head), valves that are stuck open, and valve wiring problems. These malfunctions can generally be repaired simply by replacing the valve or its components. For more technical valve troubleshooting, contact a certified irriga- tion professional. Debris in valves can cause leakage by prevent- ing the valve from closing properly. 11
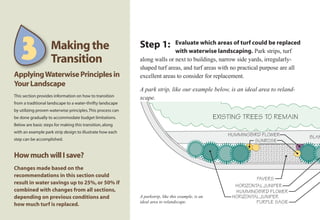
- 14. 3 Making the Transition Step 1: Evaluate which areas of turf could be replaced with waterwise landscaping. Park strips, turf along walls or next to buildings, narrow side yards, irregularly- shaped turf areas, and turf areas with no practical purpose are all Applying Waterwise Principles in excellent areas to consider for replacement. Your Landscape A park strip, like our example below, is an ideal area to reland- This section provides information on how to transition scape. from a traditional landscape to a water-thrifty landscape by utilizing proven waterwise principles. This process can be done gradually to accommodate budget limitations. Below are basic steps for making this transition, along with an example park strip design to illustrate how each step can be accomplished. How much will I save? Changes made based on the recommendations in this section could result in water savings up to 25%, or 50% if combined with changes from all sections, depending on previous conditions and A parkstrip, like this example, is an ideal area to relandscape. how much turf is replaced.
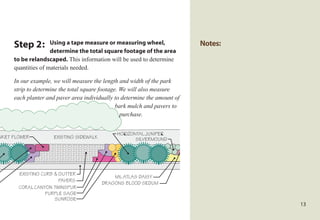
- 15. Step 2: Using a tape measure or measuring wheel, Notes: determine the total square footage of the area to be relandscaped. This information will be used to determine quantities of materials needed. In our example, we will measure the length and width of the park strip to determine the total square footage. We will also measure each planter and paver area individually to determine the amount of bark mulch and pavers to purchase. HORIZONTAL JUNIPER 13
- 16. 3 Making the Transition Step 3: Review your city’s landscape ordinances so you can comply with any limitations and/or guidelines. Make sure your plans comply before going any further. Step 4: Prepare a landscape design on paper using native and low-water-use plants. As you visualize the design, consider the following: The functional use of the Seasonal characteristics including landscape. months the plants will bloom. The look and feel you desire for Selection of plants based on the the area. amount of sun or shade the area receives. The shape, color and mature size Watering requirements due to soil of the plant materials you wish to conditions and plant needs. use. 14
- 17. In your design, group plants with similar watering needs in each Notes: zone (hydrozoning). Visit our plant database at www.Conservation- GardenPark.org to search for plants by water requirement, bloom time, or other criteria. In addition, a wide variety of low-water-use plants are displayed at the Conservation Garden Park located at 8215 South 1300 West in West Jordan. In our example, the park strip will be watered on one zone since all the plants will have a relatively low water requirement. Because vis- ibility is important along the street, all the plants will be fairly small while still providing various colors throughout the year. The paver areas will provide areas for people to cross the park strip. Step 5: Use existing turf valves for new drip systems— one valve per hydrozone. This park strip was watered on one zone prior to relandscaping, so the same valve will be used after the retrofit. 15
- 18. 3 Making the Transition Step 6: Locate buried utility lines before you dig. Hit- ting a buried utility line such as a gas or electrical line can be both dangerous and costly. Call your local utility locat- ing service (Blue Stakes) at least two days prior to digging. The number for Blue Stakes is 1-800-662-4111, or visit their web site at www.bluestakes.org for more information. Step 7: Remove turf and enough soil to accommodate mulch and hardscaping. 16
- 19. We will dig three to four inches below sidewalk level for the whole Notes: length of the park strip. Step 8: If using existing sprinkler pipe, remove sprin- kler heads and cap all unused pipe fittings. In our park strip we will use existing sprinkler pipe. In planter areas we will replace sprinkler heads with multi-outlet emitters. All other sprinkler heads will be removed and pipe fittings will be capped. 17
- 20. 3 Making the Transition Step 9: Install hardscaping (pavers, concrete, path- ways, retaining walls) according to your design. Remember to install sleeves under hardscapes if installing new irrigation lines. In our example, we will install cobblestone brick pavers across two sections of the park strip. Step 10: Install other landscape features such as boul- ders, edging, extra soil, rock, etc. according to design plans. In our example there are no additional landscape features. Step 11: Install a drip irrigation system. Methods of drip irrigation may vary depending on the landscape design. In our park strip we will install multi-outlet drip emitters designed 18
- 21. for retrofitting an existing sprinkler system. Multi-outlet drip de- vices will be used in place of sprinkler heads in the planter areas. Other methods of drip irrigation include subsurface inline drip, point source emitters, soaker hoses, and bubblers. Some of these may require additional drip components such as filters, pressure regulators, air relief valves, or flush valves. Note: If planting will be done in segments or over a long period of time, rock or bark mulch can be installed as a “placeholder.” One type of multi-outlet drip emitter. These can be used to retrofit existing sprinkler heads to drip irrigation. Step 12: Install plants in appropriate hydrozones. This can be done over time to defer costs. All the plants in our example have similar water needs and will be watered as one zone. 19
- 22. 3 Making the Transition Step 13: Finish installing drip system components as necessary (emitters, distribution tubing, etc.). Emitters should be distributed throughout the root zone of the plant, not just at the base of the plant. Small plants may only need one or two emitters to adequately wet the root zone, while larger shrubs and trees may need several. Step 14: Install mulch if not done previously. We will install shredded wood/bark to a three-inch depth. Step 15: Program drip zones to water deeply but infre- quently. In our example, using low-water-use plants in clay soil will require deep watering only once every week in the summer and twice a month in spring and fall. 20
- 23. Typical grass park strips are difficult to water efficiently, and keeping them green can use a lot of water. Below is an example of a park strip that has been relandscaped for water efficiency using low-water-use plants, drip emitters, and mulch. How much will I save? By making the changes recommended in this guide, you may be able to save 50% or more water while maintaining a beautiful, healthy landscape. Remember, if we each save a little, we’ll all save a lot.
- 24. Congratulations! Implementing these simple adjustments will put you on your way to saving water and money. Additional information is available at the Conservation Garden Park, where you’ll find examples of beautiful, water-thrifty landscaping. Summer hours: Monday - Saturday, 8 a.m. to 8 p.m. ; Sunday noon to 8. Winter hours: Monday - Friday, 8 a.m. to 5 p.m. 8215 South 1300 West West Jordan, UT 84088 801.565.4300 www.ConservationGardenPark.org Inspiring and empowering water conservation

