Ps training mannual ( configuration )
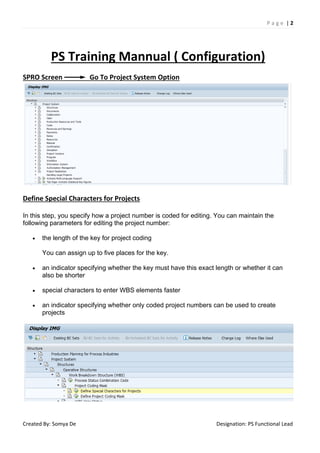
- 2. P a g e | 2 Created By: Somya De Designation: PS Functional Lead PS Training Mannual ( Configuration) SPRO Screen Go To Project System Option Define Special Characters for Projects In this step, you specify how a project number is coded for editing. You can maintain the following parameters for editing the project number: • the length of the key for project coding You can assign up to five places for the key. • an indicator specifying whether the key must have this exact length or whether it can also be shorter • special characters to enter WBS elements faster • an indicator specifying whether only coded project numbers can be used to create projects
- 3. P a g e | 3 Created By: Somya De Designation: PS Functional Lead Menu Path SPRO Project System Structures Operative Structures Work Breakdown Structure (WBS) Project Coding Mask Define Special Characters for Projects Define Project Coding Mask In this step, you create masks for editing the project number. Masks help display complex project numbers. They can also be used to indicate the position of a WBS element in the project hierarchy. You can create a mask for every key you want to use in project coding. The following characters are available for editing: • X for alphanumeric characters • 0 for numeric characters • special characters to organize the project numbers In addition, you can maintain a block indicator for standard (LkS) and operative (Lck) structures. If you maintain the indicator, you cannot create new projects with this coding key. Menu Path SPRO Project System Structures Operative Structures Work Breakdown Structure (WBS) Project Coding Mask Define Project Coding Mask
- 4. P a g e | 4 Created By: Somya De Designation: PS Functional Lead Create Project Profile The project profile contains default values and other control parameters such as the planning method for dates and costs. The data that you enter in the project profile will be copied into a project in its project definition or in the WBS elements which can later be overwritten. Examples • To call up the graphic, you must first have specified various graphic profiles in the project profile. • To carry out cost planning you must specify a planning profile. • To carry out financial budgeting you must specify a financial planning profile. You can maintain the various profiles which must be present in the project profile in the implementation guide for the Project System and also in the cross-application IMG. For example, the settings for the graphic are made by choosing Basis -> Frontend Services -> Network/Hierarchy. Notes The values in the project profile determine the functionality of certain areas of the Project System and cannot be changed without careful thought. Do not change profiles and key from related functions which are defined in the project profile, such as the costing sheet or the results analysis key. These changes could effect existing objects. You must maintain the following sections for the project profile: • Basic data • Time scheduling • Costs/revenues/finances • Organizational data Standard settings In the standard system, SAP has predefined a project profile containing the most important control parameters. Activities 1. Determine the organizational and control criteria for you company. 2. Create the project profiles reflecting these criteria and enter the relevant data.
- 5. P a g e | 5 Created By: Somya De Designation: PS Functional Lead Menu Path SPRO Project System Structures Operative Structures Work Breakdown Structure (WBS) Create Project Profile Double click on Project Profile and fill detail and required fields under all tabs of Control , Organization , Plg Board/Dates , Controlling
- 6. P a g e | 6 Created By: Somya De Designation: PS Functional Lead Maintain Validations In this step you can create and maintain validations. You can use validations to check values and value combinations that users enter in the Project System. Validation can be carried out at various points in time. In addition, you can define several interdependent checks and validations for future use, during the data check. Actions 1. Enter a name for the validation. 2. The application area is proposed by the system. 3. Enter a call up point when the validation should be carried out. 4. Create a validation step or select an existing one. 5. Select the field that you want to use for the validation. 6. Enter a prerequisite and specify how the validation should be carried out. 7. For each validation step enter a prerequisite, a check and a validation message. The message is issued when the prerequisite is met and when the value does not check. Menu Path SPRO Project System Structures Operative Structures Work Breakdown Structure (WBS) Maintain Validations
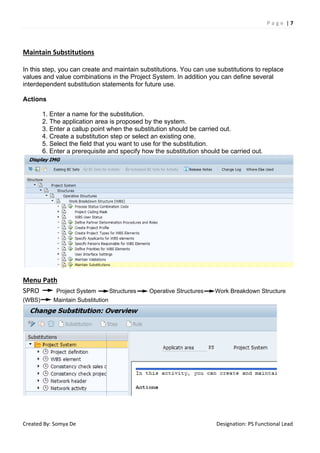
- 7. P a g e | 7 Created By: Somya De Designation: PS Functional Lead Maintain Substitutions In this step, you can create and maintain substitutions. You can use substitutions to replace values and value combinations in the Project System. In addition you can define several interdependent substitution statements for future use. Actions 1. Enter a name for the substitution. 2. The application area is proposed by the system. 3. Enter a callup point when the substitution should be carried out. 4. Create a substitution step or select an existing one. 5. Select the field that you want to use for the substitution. 6. Enter a prerequisite and specify how the substitution should be carried out. Menu Path SPRO Project System Structures Operative Structures Work Breakdown Structure (WBS) Maintain Substitution
- 8. P a g e | 8 Created By: Somya De Designation: PS Functional Lead Maintain network types The network type contains information for controlling and managing networks. In the SAP System, the network is a special form of the work order which has a structure in common with production, maintenance and inspection orders. Every network you create must have a network type allocated to it. The network type determines: • the order category • the CO (controlling) partner update With the indicator, you specify whether a summary record should be written per network if a CO partner object (for example, cost center) is settled with a network of this type. • whether the network is used for planning and does not add to the assigned values • residence times 1 and 2 for the archival and deletion of networks • a default value for the settlement profile • a default value for a status profile, if you want to use the user status in status management • allocation of the network type to a number range You have to allocate a number range to every network type. Default Settings Network types are created in the standard system. Menu Path SPRO Project System Structures Operative Structures Network Settings for Networks Maintain Network Types
- 9. P a g e | 9 Created By: Somya De Designation: PS Functional Lead
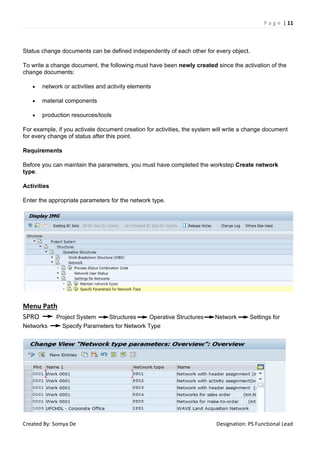
- 10. P a g e | 10 Created By: Somya De Designation: PS Functional Lead Specify Parameters for Network Type In this step, you define the parameters per plant and network type. Parameters for network types: • a standard distribution rule for settlement • a reduction strategy for scheduling • a results analysis key • the costing variants for planned costs and actual costs • a strategy for determining the settlement rule • whether the network has header or activity account assignment • indicator whether a workflow is to be created for changes to quantities or dates of non-stock components, externally processed activities and external elements and whether a purchase order already exists. • indicator whether the net price is to be copied from the purchase requisition into the purchase order without any changes. Status Changes In this part of the screen, you determine per network type and plant whether change documents are to be written if status changes occur and on which level the change documents are written. A status change document records: • the status that was changed • who changed the status • whether the status was activated or deactivated • the transaction in which the status change was made Status change documents can be written in the network for the following objects: • network header • activity and activity elements • material components • production resources/tools
- 11. P a g e | 11 Created By: Somya De Designation: PS Functional Lead Status change documents can be defined independently of each other for every object. To write a change document, the following must have been newly created since the activation of the change documents: • network or activities and activity elements • material components • production resources/tools For example, if you activate document creation for activities, the system will write a change document for every change of status after this point. Requirements Before you can maintain the parameters, you must have completed the workstep Create network type. Activities Enter the appropriate parameters for the network type. Menu Path SPRO Project System Structures Operative Structures Network Settings for Networks Specify Parameters for Network Type
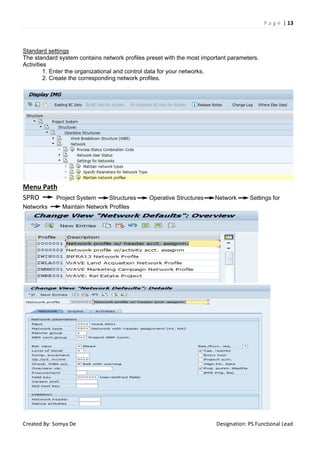
- 12. P a g e | 12 Created By: Somya De Designation: PS Functional Lead Maintain network profiles The network profile contains default values and parameters for controlling the processing of networks, such as control keys for activities. The data which you enter here in the network profile is copied into the header, activities, and activity elements when you create a network. You can overwrite these values in each new network. You should maintain the following sections in the network profile: • Network parameters • Activity parameters
- 13. P a g e | 13 Created By: Somya De Designation: PS Functional Lead Standard settings The standard system contains network profiles preset with the most important parameters. Activities 1. Enter the organizational and control data for your networks. 2. Create the corresponding network profiles. Menu Path SPRO Project System Structures Operative Structures Network Settings for Networks Maintain Network Profiles
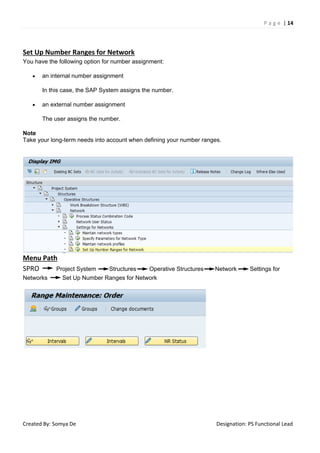
- 14. P a g e | 14 Created By: Somya De Designation: PS Functional Lead Set Up Number Ranges for Network You have the following option for number assignment: • an internal number assignment In this case, the SAP System assigns the number. • an external number assignment The user assigns the number. Note Take your long-term needs into account when defining your number ranges. Menu Path SPRO Project System Structures Operative Structures Network Settings for Networks Set Up Number Ranges for Network
- 15. P a g e | 15 Created By: Somya De Designation: PS Functional Lead Specify MRP Controller In this step, you assign a number to the MRP controller. You use the MRP controller to specify a person or a group of people responsible for the network. You can assign authorizations in the network for the MRP controller. You can use the MRP controller as a selection and filter criterion. In addition, you can specify a certain person who is notified by mail whenever a goods receipt was posted for a missing part in backorder processing. Actions Create the MRP controller and maintain mail recipients, if necessary. Menu Path SPRO Project System Structures Operative Structures Network Settings for Networks Specify MRP Controller
- 16. P a g e | 16 Created By: Somya De Designation: PS Functional Lead Milestones This is used to capture Specific Points of a Project Either in terms of Value Or Percentage. Define Milestone Usage In this step you define milestone usages. Example With the usage, you can specify: • what the milestone is used for, such as a trigger for milestone functions or for earned value analysis • the area in which the milestone is used, for example in engineering or design You can also use the value for usage for selection in the information system. Activities Define the appropriate usages. SPRO Project System Structures Operative Structures Milestones Define Milestone Usage
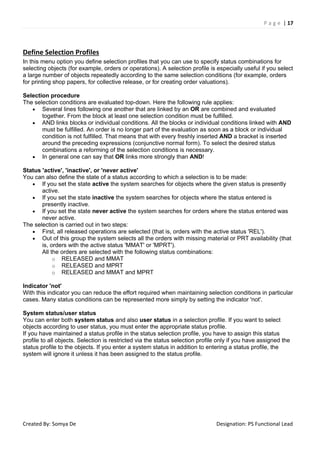
- 17. P a g e | 17 Created By: Somya De Designation: PS Functional Lead Define Selection Profiles In this menu option you define selection profiles that you can use to specify status combinations for selecting objects (for example, orders or operations). A selection profile is especially useful if you select a large number of objects repeatedly according to the same selection conditions (for example, orders for printing shop papers, for collective release, or for creating order valuations). Selection procedure The selection conditions are evaluated top-down. Here the following rule applies: • Several lines following one another that are linked by an OR are combined and evaluated together. From the block at least one selection condition must be fulfilled. • AND links blocks or individual conditions. All the blocks or individual conditions linked with AND must be fulfilled. An order is no longer part of the evaluation as soon as a block or individual condition is not fulfilled. That means that with every freshly inserted AND a bracket is inserted around the preceding expressions (conjunctive normal form). To select the desired status combinations a reforming of the selection conditions is necessary. • In general one can say that OR links more strongly than AND! Status 'active', 'inactive', or 'never active' You can also define the state of a status according to which a selection is to be made: • If you set the state active the system searches for objects where the given status is presently active. • If you set the state inactive the system searches for objects where the status entered is presently inactive. • If you set the state never active the system searches for orders where the status entered was never active. The selection is carried out in two steps: • First, all released operations are selected (that is, orders with the active status 'REL'). • Out of this group the system selects all the orders with missing material or PRT availability (that is, orders with the active status 'MMAT' or 'MPRT'). All the orders are selected with the following status combinations: o RELEASED and MMAT o RELEASED and MPRT o RELEASED and MMAT and MPRT Indicator 'not' With this indicator you can reduce the effort required when maintaining selection conditions in particular cases. Many status conditions can be represented more simply by setting the indicator 'not'. System status/user status You can enter both system status and also user status in a selection profile. If you want to select objects according to user status, you must enter the appropriate status profile. If you have maintained a status profile in the status selection profile, you have to assign this status profile to all objects. Selection is restricted via the status selection profile only if you have assigned the status profile to the objects. If you enter a system status in addition to entering a status profile, the system will ignore it unless it has been assigned to the status profile.
- 18. P a g e | 18 Created By: Somya De Designation: PS Functional Lead SPRO Project System Structures Operative Structures Milestones Define Selection Profiles Project Planning Board The project planning board is based on the SAP Gantt chart. In the following steps make only those settings, which you require specifically or additionally for working with it in the Project System. Notes You can make all other general settings for the project planning board in Customizing for SAP graphics. From the project planning board in the Project System, you can access other SAP graphics (hierarchy graphic, network graphic) as well as the graphical planning table for capacity leveling. You must make all system settings that do not apply specifically to the Project System in Customizing for SAP graphics or in Customizing for capacity planning. Define Time Profiles With a time profile you specify the various time periods for working in the project planning board. Evaluation period The evaluation period defines the time frame for working with and displaying data in the project planning board. Outside of the evaluation period in the project planning board, you can no longer work with or display data. The evaluation period is always calculated based on the project duration and the float times defined in the time profile.
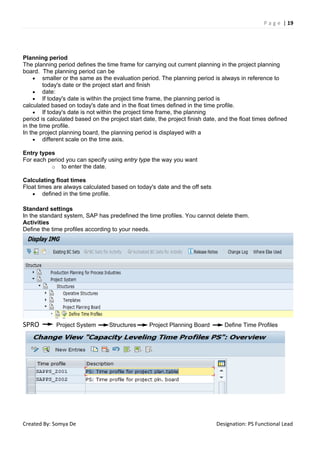
- 19. P a g e | 19 Created By: Somya De Designation: PS Functional Lead Planning period The planning period defines the time frame for carrying out current planning in the project planning board. The planning period can be • smaller or the same as the evaluation period. The planning period is always in reference to today's date or the project start and finish • date: • If today's date is within the project time frame, the planning period is calculated based on today's date and in the float times defined in the time profile. • If today's date is not within the project time frame, the planning period is calculated based on the project start date, the project finish date, and the float times defined in the time profile. In the project planning board, the planning period is displayed with a • different scale on the time axis. Entry types For each period you can specify using entry type the way you want o to enter the date. Calculating float times Float times are always calculated based on today's date and the off sets • defined in the time profile. Standard settings In the standard system, SAP has predefined the time profiles. You cannot delete them. Activities Define the time profiles according to your needs. SPRO Project System Structures Project Planning Board Define Time Profiles
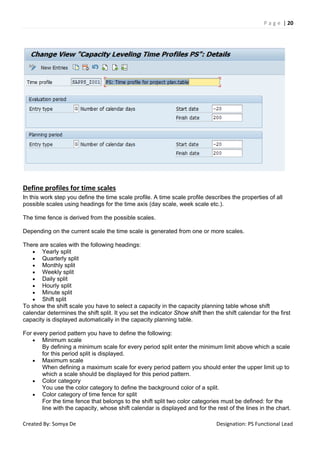
- 20. P a g e | 20 Created By: Somya De Designation: PS Functional Lead Define profiles for time scales In this work step you define the time scale profile. A time scale profile describes the properties of all possible scales using headings for the time axis (day scale, week scale etc.). The time fence is derived from the possible scales. Depending on the current scale the time scale is generated from one or more scales. There are scales with the following headings: • Yearly split • Quarterly split • Monthly split • Weekly split • Daily split • Hourly split • Minute split • Shift split To show the shift scale you have to select a capacity in the capacity planning table whose shift calendar determines the shift split. It you set the indicator Show shift then the shift calendar for the first capacity is displayed automatically in the capacity planning table. For every period pattern you have to define the following: • Minimum scale By defining a minimum scale for every period split enter the minimum limit above which a scale for this period split is displayed. • Maximum scale When defining a maximum scale for every period pattern you should enter the upper limit up to which a scale should be displayed for this period pattern. • Color category You use the color category to define the background color of a split. • Color category of time fence for split For the time fence that belongs to the shift split two color categories must be defined: for the line with the capacity, whose shift calendar is displayed and for the rest of the lines in the chart.
- 21. P a g e | 21 Created By: Somya De Designation: PS Functional Lead • Major interval Here you can define the heading frequency. For example, every 8 hours => 0 hours, 8 hours, 16 hours, 0 hours, etc. • Heading type For example, you can define January, February or January 1995, February 1995 as the heading. Note • By defining the scale as a unit of time the scales of all the period patterns are in a fixed relation to one another. Standard settings Time scale profiles are predefined in the standard SAP package. Recommendation You should use the standard settings. Do not change them. SPRO Project System Structures Project Planning Board Define profiles for time scales
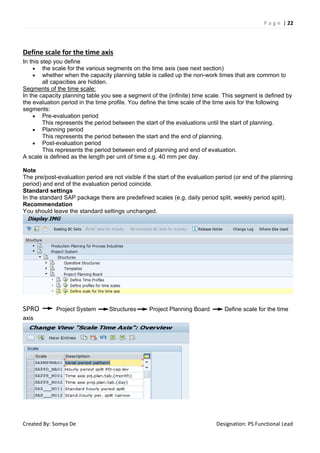
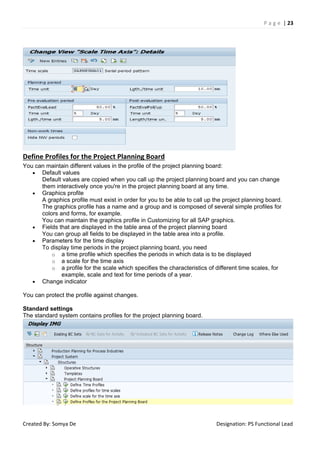
- 22. P a g e | 22 Created By: Somya De Designation: PS Functional Lead Define scale for the time axis In this step you define • the scale for the various segments on the time axis (see next section) • whether when the capacity planning table is called up the non-work times that are common to all capacities are hidden. Segments of the time scale: In the capacity planning table you see a segment of the (infinite) time scale. This segment is defined by the evaluation period in the time profile. You define the time scale of the time axis for the following segments: • Pre-evaluation period This represents the period between the start of the evaluations until the start of planning. • Planning period This represents the period between the start and the end of planning. • Post-evaluation period This represents the period between end of planning and end of evaluation. A scale is defined as the length per unit of time e.g. 40 mm per day. Note The pre/post-evaluation period are not visible if the start of the evaluation period (or end of the planning period) and end of the evaluation period coincide. Standard settings In the standard SAP package there are predefined scales (e.g. daily period split, weekly period split). Recommendation You should leave the standard settings unchanged. SPRO Project System Structures Project Planning Board Define scale for the time axis
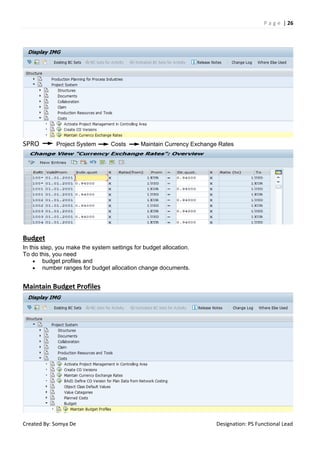
- 23. P a g e | 23 Created By: Somya De Designation: PS Functional Lead Define Profiles for the Project Planning Board You can maintain different values in the profile of the project planning board: • Default values Default values are copied when you call up the project planning board and you can change them interactively once you're in the project planning board at any time. • Graphics profile A graphics profile must exist in order for you to be able to call up the project planning board. The graphics profile has a name and a group and is composed of several simple profiles for colors and forms, for example. You can maintain the graphics profile in Customizing for all SAP graphics. • Fields that are displayed in the table area of the project planning board You can group all fields to be displayed in the table area into a profile. • Parameters for the time display To display time periods in the project planning board, you need o a time profile which specifies the periods in which data is to be displayed o a scale for the time axis o a profile for the scale which specifies the characteristics of different time scales, for example, scale and text for time periods of a year. • Change indicator You can protect the profile against changes. Standard settings The standard system contains profiles for the project planning board.
- 24. P a g e | 24 Created By: Somya De Designation: PS Functional Lead SPRO Project System Structures Project Planning Board Define Profiles for the Project Planning Board Maintain Report Assignment from the Planning Board In this activity, you stipulate which hierarchy reports you can access from the project planning board using the report/report interface. Activities 1. Specify the application class KP for projects. 2. Specify a controlling area. Regardless of what you enter, the assignments are by report, not by controlling area. 3. Create report type project report. 4. Specify the technical name of the report you want to add as the receiver report.
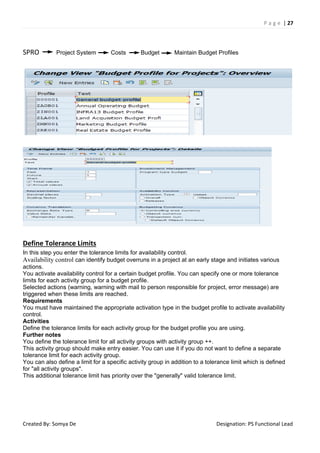
- 25. P a g e | 25 Created By: Somya De Designation: PS Functional Lead SPRO Project System Structures Project Planning Board Maintain Report Assignment from the Planning Board Costs In the following steps you configure the system for controlling costs in the Project System. Maintain Currency Exchange Rates You use this step to stipulate how currencies are translated. The exchange rates are required for plan and actual postings to, among other things: • translate foreign currency amounts on posting or clearing • verify rates entered manually • determine the profit/loss on exchange rate differences • value open items in foreign currency • value foreign currency account balances • determine the controlling area currency equivalents of amounts posted in different company code currencies • allow project settlement to take account of different controlling area, sender and receiver currencies The currency translation rates are time-dependent, coming into force on the date entered.
- 26. P a g e | 26 Created By: Somya De Designation: PS Functional Lead SPRO Project System Costs Maintain Currency Exchange Rates Budget In this step, you make the system settings for budget allocation. To do this, you need • budget profiles and • number ranges for budget allocation change documents. Maintain Budget Profiles
- 27. P a g e | 27 Created By: Somya De Designation: PS Functional Lead SPRO Project System Costs Budget Maintain Budget Profiles Define Tolerance Limits In this step you enter the tolerance limits for availability control. Availability control can identify budget overruns in a project at an early stage and initiates various actions. You activate availability control for a certain budget profile. You can specify one or more tolerance limits for each activity group for a budget profile. Selected actions (warning, warning with mail to person responsible for project, error message) are triggered when these limits are reached. Requirements You must have maintained the appropriate activation type in the budget profile to activate availability control. Activities Define the tolerance limits for each activity group for the budget profile you are using. Further notes You define the tolerance limit for all activity groups with activity group ++. This activity group should make entry easier. You can use it if you do not want to define a separate tolerance limit for each activity group. You can also define a limit for a specific activity group in addition to a tolerance limit which is defined for "all activity groups". This additional tolerance limit has priority over the "generally" valid tolerance limit.
- 28. P a g e | 28 Created By: Somya De Designation: PS Functional Lead SPRO Project System Costs Budget Define Tolerance Limits Specify Exempt Cost Elements In this step, you can specify cost elements that are not taken into account in availability control.
- 29. P a g e | 29 Created By: Somya De Designation: PS Functional Lead SPRO Project System Costs Budget Specify Exempt Cost Elements Reconstruct Availability Control you reconstruct all the data for availability control. The assigned values are recalculated and references are created to the objects that have budget.The new budget profile settings are copied into the budget table. Recommendation SAP recommends that you reconstruct the PS Info Database with transaction CJEN before activating availability control SPRO Project System Costs Budget Reconstruct Availability Control
- 30. P a g e | 30 Created By: Somya De Designation: PS Functional Lead Dates In the following steps, you make the necessary settings • for scheduling in the network • for time scheduling in the work breakdown structure. Scheduling Define Scheduling Types The following scheduling types are used for networks: • forward scheduling • backward scheduling • "today" scheduling • determine capacity requirements only You can specify the scheduling type you want as a default when you create a network depending on the network type in the scheduling control parameters. Standard settings Scheduling types are predefined in the standard system. SPRO Project System Dates Scheduling Define Scheduling Types
- 31. P a g e | 31 Created By: Somya De Designation: PS Functional Lead Date Planning in WBS In the following steps you can make all of the settings necessary to configure time scheduling in the work breakdown structure. Define Parameters for WBS Scheduling SPRO Project System Dates Date Planning in WBS Define Parameters for WBS Scheduling
- 32. P a g e | 32 Created By: Somya De Designation: PS Functional Lead Specify Graphics Profile for WBS Date Planning In the time scheduling profile, you enter parameters for the display and the colored indicators of WBS elements and activities in the hierarchy graphic. The colored indicators are only displayed in the hierarchy graphic if you have chosen the extended display. Notes • Please note that the extended display of WBS elements and actitivities can affect system performance. • You cannot have an extended display of WBS elements in the information system. When you choose the extended display, the system automatically uses the large display in the graphic. Standard settings The standard system graphics profiles for time scheduling. SPRO Project System Dates Date Planning in WBS Specify Graphics Profile for WBS Date Planning
- 33. P a g e | 33 Created By: Somya De Designation: PS Functional Lead Project Versions In the following steps you can make the settings you need to configure project versions. Create Profile for Project Version You require profiles for project versions if you are working with status-dependent project versions: You stipulate the following in the profiles: • The objects which appear in the project version, such as WBS elements, activities, PRT, or costs • User and/or system statuses which trigger the storage of a project version • The version key for the project version You can define as many user and/or system statuses in a profile as you want. Standard settings We do not delivery any profiles for project version in the standard system. SPRO Project System Project Versions Create Profile for Project Version
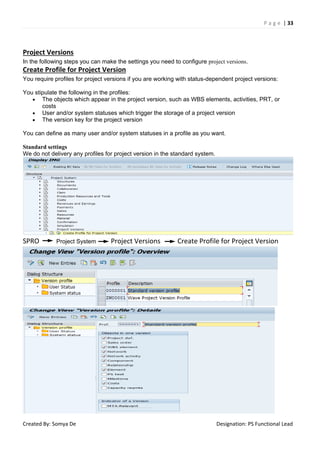
- 34. P a g e | 34 Created By: Somya De Designation: PS Functional Lead Progress In the following steps you configure the system as required for: • Earned value analysis • Statistical key figures Progress Analysis In the following steps you can configure progress analysis. An isolated consideration of costs, resources or dates is not sufficient for successful project control. Useful statements on deviations from objectives can only be made in connection with actual performance values. Progress analysis supports these tasks. It is suitable for both internal progress control as well as a progress report to a customer. For individual project objects, you can calculate a percentage of completion or derive it from information already available in the system. You can summarize these values using the project structure by means of an appropriate weighting factor, for example, planned costs. The system uses a base, such as, planned costs, in calculating earned values from the percentage of completion. In addition, you can derive key figures and see deviations to objectively monitor your progress and control your project. The development of these values over time can also be seen. You carry out progress analysis for an progress version as part of period-end closing. You can take these values and design your own lists to display them in the information system or display them graphically. You can use earned values in results analysis and billing. Standard settings Measurement methods, fields and defaults are provided with the standard system and you can use them to carry out progress analysis. In addition, you can define an individual measurement method and assign it to an object. Maintain Progress Version In this step, you maintain the progress version. You define the control data for calculating the percentage of completion and earned value. You enter this setting for each controlling area. SPRO Project System Progress Progress Analysis Maintain Progress Version
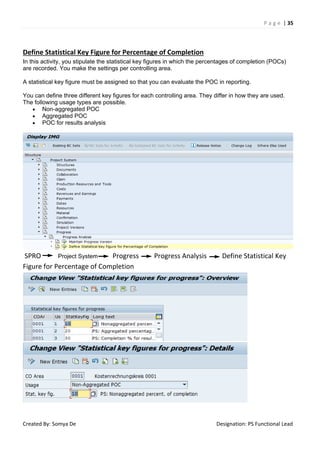
- 35. P a g e | 35 Created By: Somya De Designation: PS Functional Lead Define Statistical Key Figure for Percentage of Completion In this activity, you stipulate the statistical key figures in which the percentages of completion (POCs) are recorded. You make the settings per controlling area. A statistical key figure must be assigned so that you can evaluate the POC in reporting. You can define three different key figures for each controlling area. They differ in how they are used. The following usage types are possible. • Non-aggregated POC • Aggregated POC • POC for results analysis SPRO Project System Progress Progress Analysis Define Statistical Key Figure for Percentage of Completion
- 36. P a g e | 36 Created By: Somya De Designation: PS Functional Lead Define Measurement Methods In this step, you can define the measurement methods to be used for determining a percentage of completion. A measurement method is made up of a measurement technique that is predefined in the SAP System, and additional parameters, such as a starting percentage of completion. SPRO Project System Progress Progress Analysis Define Measurement Methods
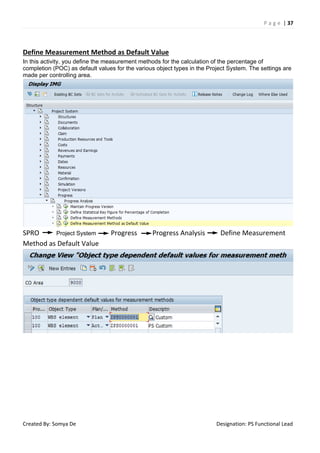
- 37. P a g e | 37 Created By: Somya De Designation: PS Functional Lead Define Measurement Method as Default Value In this activity, you define the measurement methods for the calculation of the percentage of completion (POC) as default values for the various object types in the Project System. The settings are made per controlling area. SPRO Project System Progress Progress Analysis Define Measurement Method as Default Value
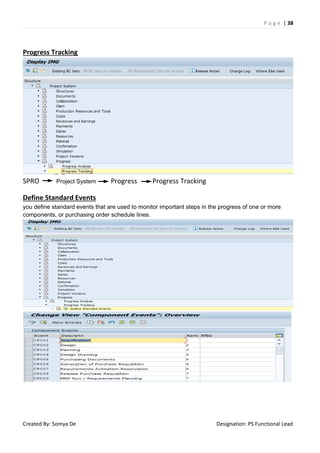
- 38. P a g e | 38 Created By: Somya De Designation: PS Functional Lead Progress Tracking SPRO Project System Progress Progress Tracking Define Standard Events you define standard events that are used to monitor important steps in the progress of one or more components, or purchasing order schedule lines.
- 39. P a g e | 39 Created By: Somya De Designation: PS Functional Lead Define Event Scenarios you define event scenarios to which you can then assign events, Maintain Relationships Between Events in a Scenario. SPRO Project System Progress Progress Tracking Define Event Scenarios
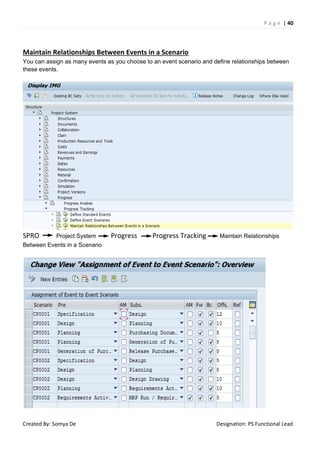
- 40. P a g e | 40 Created By: Somya De Designation: PS Functional Lead Maintain Relationships Between Events in a Scenario You can assign as many events as you choose to an event scenario and define relationships between these events. SPRO Project System Progress Progress Tracking Maintain Relationships Between Events in a Scenario
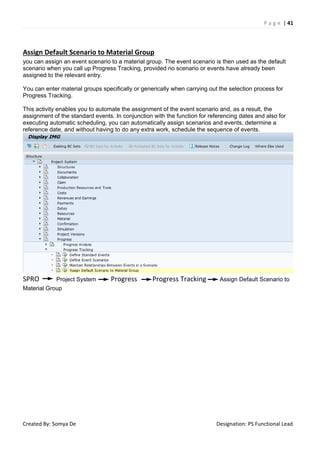
- 41. P a g e | 41 Created By: Somya De Designation: PS Functional Lead Assign Default Scenario to Material Group you can assign an event scenario to a material group. The event scenario is then used as the default scenario when you call up Progress Tracking, provided no scenario or events have already been assigned to the relevant entry. You can enter material groups specifically or generically when carrying out the selection process for Progress Tracking. This activity enables you to automate the assignment of the event scenario and, as a result, the assignment of the standard events. In conjunction with the function for referencing dates and also for executing automatic scheduling, you can automatically assign scenarios and events, determine a reference date, and without having to do any extra work, schedule the sequence of events. SPRO Project System Progress Progress Tracking Assign Default Scenario to Material Group
- 42. P a g e | 42 Created By: Somya De Designation: PS Functional Lead Define Progress Tracking Profile You define profiles containing default values for Progress Tracking. You must define at least one profile for Progress Tracking. SPRO Project System Progress Progress Tracking Define Progress Tracking Profile


