Location via proxy:   [ UP ]  
[Report a bug]   [Manage cookies]                
SlideShare a Scribd company logo
Public speaking for_geeks_succinctly
By
Lorenzo Barbieri
Foreword by Daniel Jebaraj
3
Copyright © 2018 by Syncfusion, Inc.
2501 Aerial Center Parkway
Suite 200
Morrisville, NC 27560
USA
All rights reserved.
Important licensing information. Please read.
This book is available for free download from www.syncfusion.com on completion of a
registration form.
If you obtained this book from any other source, please register and download a free copy from
www.syncfusion.com.
This book is licensed for reading only if obtained from www.syncfusion.com.
This book is licensed strictly for personal or educational use.
Redistribution in any form is prohibited.
The authors and copyright holders provide absolutely no warranty for any information provided.
The authors and copyright holders shall not be liable for any claim, damages, or any other
liability arising from, out of, or in connection with the information in this book.
Please do not use this book if the listed terms are unacceptable.
Use shall constitute acceptance of the terms listed.
SYNCFUSION, SUCCINCTLY, DELIVER INNOVATION WITH EASE, ESSENTIAL, and .NET
ESSENTIALS are the registered trademarks of Syncfusion, Inc.
Technical Reviewer: James McCaffrey
Copy Editor: Courtney Wright
Acquisitions Coordinator: Tres Watkins, content development manager, Syncfusion, Inc.
Proofreader: Graham High, senior content producer, Syncfusion, Inc.
4
Table of Contents
The Story behind the Succinctly Series of Books ................................................................. 8
About the Author ....................................................................................................................10
Chapter 1 Introduction...........................................................................................................11
Public speaking is not about you ..........................................................................................11
A necessary premise .......................................................................................................11
How do you find and define value?.......................................................................................11
So if public speaking is not about you, why are you afraid of it? ...........................................12
Have you defined your standard? ....................................................................................12
The talk doesn’t end with the final applause.....................................................................13
Chapter 2 Choosing the Topic and Creating the Flow.........................................................14
You have some slide decks that you can use.......................................................................14
How to reorganize your slides..........................................................................................14
You need or want to start from scratch .................................................................................15
The importance of stories and emotions...............................................................................16
Stories vs. facts ...............................................................................................................16
How to choose your stories ..................................................................................................17
Where do you find stories? ..............................................................................................18
How to create a story.......................................................................................................18
Influence without authority....................................................................................................19
Start with value.....................................................................................................................20
Chapter 3 Knowing Our Tools...............................................................................................21
Never underestimate an impeccable presentation................................................................21
Slide templates and conference templates ...........................................................................22
Slide masters and slide layouts........................................................................................23
5
Slide animations and transitions...........................................................................................26
Animation Pane ...............................................................................................................26
Common animation pitfalls...............................................................................................27
Morph transition....................................................................................................................28
Selection Pane .....................................................................................................................29
Finishing touches .................................................................................................................30
Improve the quality of printed slides.................................................................................30
Arrange items ..................................................................................................................31
Spelling and grammar......................................................................................................33
Chapter 4 Preparing the Presentation: To Geek or Not to Geek?.......................................34
What to do with all these tools?............................................................................................34
Must-have slides and slides to avoid ....................................................................................34
Slide refactoring examples ...................................................................................................35
Improving a text-heavy slide ............................................................................................36
Less is more: simplifying a complicated slide...................................................................38
Visualize your lists, avoid bullet points.............................................................................39
Reduce elements, keep some variance ...........................................................................40
One idea per slide: is it possible for a technical presentation? .........................................41
Reduce source code to the minimum...............................................................................42
Is my presentation accessible to everyone? .........................................................................42
Chapter 5 What to Do Before the Talk: Stage Fright, Introversion, and Saber-Toothed
Tigers.......................................................................................................................................44
Stage fright is real! ...............................................................................................................44
Introverts and extroverts.......................................................................................................44
Anxiety can be an energy drain or can be a great source of power.......................................45
Don’t rehearse in front of a mirror.........................................................................................45
Synchronize yourself with your content ................................................................................46
6
Put the pedal to the metal!....................................................................................................46
Chapter 6 During the Talk: Be a Better You!........................................................................48
“Just be yourself” is not enough............................................................................................48
How to be a better you.....................................................................................................48
Rituals ..................................................................................................................................50
Know the environment .....................................................................................................50
Relaxation and power posing...........................................................................................51
Clean your mess..............................................................................................................52
Eye contact is the key to audience involvement...............................................................53
Powerful or powerless communication .................................................................................53
How to express vulnerability without losing trust ..............................................................55
How to finish a presentation when everything goes wrong ...................................................55
Learn how to breathe in difficult situations .......................................................................56
Help someone in need.....................................................................................................57
Work hard to exceed your limits ...........................................................................................57
Never learn a presentation by heart......................................................................................57
Close your session with style................................................................................................58
Chapter 7 After the Talk: Relax, Evaluate, and Connect .....................................................59
Many ways to connect..........................................................................................................59
Don’t forget side events........................................................................................................59
Feedback is essential to your growth—reward it!..................................................................60
Relax after the talk ...............................................................................................................60
Always go back to your standards ........................................................................................60
Appendix A: Responding to a CFP (Call for Papers)............................................................61
Where to go to start speaking...............................................................................................61
How to speak at bigger events .............................................................................................61
7
Blind CFP.............................................................................................................................61
Fine-tune both title and abstract ...........................................................................................62
Fine-tune your reputation and personal brand ......................................................................62
Be present............................................................................................................................63
Don’t flood the organizers.....................................................................................................63
Always remember the code of conduct.................................................................................64
Appendix B: Some Notes about Keynote..............................................................................65
Opening a PowerPoint presentation in Keynote and vice versa............................................65
Slide masters and slide layouts ............................................................................................66
Slide animations and transitions...........................................................................................68
Magic Move transition......................................................................................................69
8
The Story behind the Succinctly Series
of Books
Daniel Jebaraj, Vice President
Syncfusion, Inc.
taying on the cutting edge
As many of you may know, Syncfusion is a provider of software components for the
Microsoft platform. This puts us in the exciting but challenging position of always
being on the cutting edge.
Whenever platforms or tools are shipping out of Microsoft, which seems to be about every other
week these days, we have to educate ourselves, quickly.
Information is plentiful but harder to digest
In reality, this translates into a lot of book orders, blog searches, and Twitter scans.
While more information is becoming available on the Internet and more and more books are
being published, even on topics that are relatively new, one aspect that continues to inhibit us is
the inability to find concise technology overview books.
We are usually faced with two options: read several 500+ page books or scour the web for
relevant blog posts and other articles. Just as everyone else who has a job to do and customers
to serve, we find this quite frustrating.
The Succinctly series
This frustration translated into a deep desire to produce a series of concise technical books that
would be targeted at developers working on the Microsoft platform.
We firmly believe, given the background knowledge such developers have, that most topics can
be translated into books that are between 50 and 100 pages.
This is exactly what we resolved to accomplish with the Succinctly series. Isn’t everything
wonderful born out of a deep desire to change things for the better?
The best authors, the best content
Each author was carefully chosen from a pool of talented experts who shared our vision. The
book you now hold in your hands, and the others available in this series, are a result of the
authors’ tireless work. You will find original content that is guaranteed to get you up and running
in about the time it takes to drink a few cups of coffee.
Free forever
Syncfusion will be working to produce books on several topics. The books will always be free.
Any updates we publish will also be free.
S
9
Free? What is the catch?
There is no catch here. Syncfusion has a vested interest in this effort.
As a component vendor, our unique claim has always been that we offer deeper and broader
frameworks than anyone else on the market. Developer education greatly helps us market and
sell against competing vendors who promise to “enable AJAX support with one click,” or “turn
the moon to cheese!”
Let us know what you think
If you have any topics of interest, thoughts, or feedback, please feel free to send them to us at
succinctly-series@syncfusion.com.
We sincerely hope you enjoy reading this book and that it helps you better understand the topic
of study. Thank you for reading.
Please follow us on Twitter and “Like” us on Face-book to help us spread the
word about the Succinctly series!
10
About the Author
Increasing partners’ ROI on cloud investments with the right
architecture is one my objectives as a Cloud Solution Architect
working for Microsoft. Improving people’s public speaking skills is
one of my personal goals. Living a full life with my family and
friends is what drives me every day.
I specialize in Cloud Application Development for both Azure and
Office 365; Windows and cross-platform applications; Visual Studio;
ALM (application lifecycle management) and DevOps; and I like to
talk with people and communities about technology, food, and funny things.
I'm a speaker, a trainer, and a public speaking coach. I've helped many students, developers,
colleagues, and other professionals improve their stage presence and deliver exceptional
presentations.
I work for Microsoft Western Europe in the One Commercial Partner SI Alps division, helping
partners (system integrators), developers, communities, and customers in Italy, Austria, and
Switzerland, and supporting software development on Microsoft and OSS technologies.
I've managed teams of more than twenty people, and I now enjoy leading virtual teams to drive
specific results. I've been a Microsoft Certified Trainer since 2000, and am a former Microsoft
MVP for ALM, DevOps, and virtual machines. I write articles for Italian IT magazines, and I
speak at conferences in Italy and Europe.
When this book is published, I can finally change my headline on LinkedIn from “Would-Be Book
Author” to…something different!
Let’s connect!
Good luck with your career and with your future presentations. Feel free to connect with me on
LinkedIn or Twitter, or send me an email and tell me what you think about this book, what I can
improve, and send me your feedback—just like if I delivered a session in person!
• LinkedIn: https://www.linkedin.com/in/geniodelmale
• Twitter: https://www.twitter.com/_geniodelmale
• Email: geniodelmale@outlook.com
Note: “Genio del male” in Italian means “evil genius.” Please, don’t judge me by
my nickname. I don’t want to conquer the world or anything like that! If you’re
wondering why I use it as my nickname, it’s a long story. Perhaps someday I’ll decide
to post about it! I can only tell you that my friends gave it to me many years ago.
11
Chapter 1 Introduction
Public speaking is not about you
Let’s start with the essential concept of this book. Repeat after me:
“Public speaking is not about me, the speaker! Public speaking is about the value that I
want to transmit to the public.”
Most speakers—beginners and experienced ones—think people are there to listen to them, but
they are just messengers of the value. If a presentation or a talk doesn’t have any value, the
speaker can do their best to entertain people, but in the end, the audience will feel that
something is missing.
Always remember that your audience is investing its time listening to you—don’t waste it! It
doesn’t matter if it’s a five-day course, a long or a short presentation, a meeting with colleagues
or customers, an elevator pitch, or a water cooler talk.
A necessary premise
This book will help you present your ideas without falling into the typical pitfalls of public
speaking, but all the suggestions that you can find here are ineffective if you cannot define and
describe the value of your presentation. You need to know the subject that you’re presenting
very well, too. We’ll also talk about the presentation for when there are no slides, or when the
context is informal.
How do you find and define value?
When people have to prepare a presentation, they’ll open PowerPoint (or Keynote, or whatever
tool they like) and start creating slides, spending a lot of time defining styles, animations, and a
lot of details that are important for a curated presentation.
Note: We’ll use PowerPoint for the rest of the book. Appendix B is dedicated to
Keynote.
People should do those things after having identified the value of the presentation, followed by
the structure that shows the value with a story (or more than one if the value is complex), some
examples, and all the necessary details. We’ll see the process in Chapter 2, and we’ll see how
slides can complement a presentation in Chapter 3 and Chapter 4.
12
So if public speaking is not about you, why are you afraid of
it?
One of the most common clichès about public speaking is this one: “According to most studies,
people’s number one fear is public speaking. Number two is death.” (cit. Jerry Seinfeld). Do you
really think people would choose death over public speaking?
The truth is that people fear public speaking more frequently than many other things1
. In
Chapter 5 and Chapter 6, we’ll see what to do before and during the talk. But remember: people
are not there for you; they’re there for the value you will give them.
Have you defined your standard?
Standards are essential in the technology field, but having a personal standard for our
presentations is important, too!
It doesn’t matter if you’re doing a presentation for yourself or for the company you work for—it’s
your face that people are seeing, and it’s your personal brand and reputation that are affected
by every presentation that you do, every talk, and every meeting.
If you decide to talk about a topic that you don’t know very well, people will remember. Perhaps,
years after its delivery, you’ll regret having done a session, because people will find it on the
Internet.
Are your slides okay or perfect? Is your dress code appropriate for the event? What about your
demos? Is your body language in line with your message? Everything counts for a memorable
presentation!
Note: There are many quotes about reputation, but this one sums them up: “It
takes 20 years to build a reputation and five minutes to ruin it. If you think about that,
you’ll do things differently.” –Warren Buffet
It’s important that you check if your current level is in line with your standard, and that you
define a path to reach your desired level.
Sometimes it’s better to refuse to deliver a talk, especially if you aren’t ready yet. I’m not saying
that you should wait indefinitely, but don’t trade in your reputation too early! When I became a
Cloud Solutions Architect, I was asked to deliver a session about serverless computing in a
community meetup where there was also a session about a real use case of a competing
technology. It was too early for me, so I declined the invitation and suggested a more
experienced colleague. Some months later, with real-world experience on the topic, I called
back to see if there were other opportunities, and we agreed to do a new session.
1 See https://www.quora.com/Is-there-any-real-evidence-that-people-are-more-afraid-of-public-speaking-
than-dying
13
The talk doesn’t end with the final applause
Of course, you have to earn your applause—you shouldn’t just expect it!
Do yourself a favor and don’t close your presentation by asking the audience if they have
questions, leaving the stage to random people. Go for the questions after stating your final
message, and let people know that you’ve finished your talk. You could wait some seconds to
see if people start applauding. If there is an awkward silence, go on immediately with the Q&A.
Questions are an important part of your talk—you shouldn’t underestimate them. You should
think about problematic questions in advance, and you should anticipate them in the talk, or you
can have some materials in an appendix to back your answers.
After the talk, you need to understand what you could improve, both in the content and in the
delivery. Sometimes obtaining the right feedback is not so easy, but you could ask specific
questions to gather desired information.
Finally, don’t forget to nurture all the useful connections that you’ve created with your
presentation. In Chapter 7 we’ll see how to do all of these things and how to prepare for the next
round!
14
Chapter 2 Choosing the Topic and Creating
the Flow
Say you have to deliver a presentation at a conference, during a meeting with customers or
colleagues, or to a professor.
Where do you start? Usually, people will open their presentation tool and start creating slides, or
they’ll go to some websites (internal to the company or external, like SlideShare) to find some
decks and start assembling a presentation.
This technique leads to presentations that are full of details, but fail to deliver some value
because they weren’t thought out in advance.
You have some slide decks that you can use
Let’s suppose that you have a slide deck (or more than one) that you could use to deliver your
presentation. This is often the case with corporations. It can save you a lot of time, but people
will immediately know if you aren’t feeling the slides as yours, if you don’t agree with the
content, or if you could have used a different order or a different example.
If you’re in a hurry (because your boss told you the day before about the presentation) or if the
slides are mandatory, you could use them without modifications. Try to visualize the flow in your
mind and do a dry run to see if you can tell the right stories, or if you need some different
examples (for example, to replace slides that don’t work well in your culture).
Slides are important, but you can still deliver a great session if you don’t have great slides. You
could describe the value at the beginning of the presentation, even on the title slide, if you don’t
have supporting slides at the beginning. In this way, you’ve set the playing field, and then you
can follow the slides, using the right stories to deliver the value.
How to reorganize your slides
If you can create new slides, or rearrange existing slides, it’s your job to create the right flow.
Always start with the value, and try to remove all the details that aren’t important. Don’t
immediately delete slides; you can hide them, or move them to the appendix. If slides are too
complicated or too wordy, try to apply the techniques that you’ll see in Chapter 4 to simplify
them.
Use the Slide Sorter with the right zoom to visualize the flow of the presentation.
15
Figure 1: Slide Sorter
In Figure 1, the core value of the presentation is about “making a great show.” To do it,
everything starts with defining your standard. The presentation continues by stating that
everybody could improve if they follow the right suggestions, like avoiding introducing yourself at
the beginning instead of starting immediately with the value. (People should ask your name
because they’re interested.) And so on.
You can exercise your ability to organize and rearrange slides by downloading existing
presentations on a topic that you know, and trying to make your version of the deck. You can
always improve a presentation, even a good one, by making it yours. Sometimes there are no
modifications that you can make; in that case, you can still learn something from that
presentation.
You can also exercise during meetings: try to visualize how you could have done the
presentation that is being delivered.
You need or want to start from scratch
Before creating a new presentation from scratch, you should have delivered many presentations
with slides created by somebody else that you’ve modified or rearranged. Studying the work of
others and improving on it is a good way to exercise and nurture your creativity.2
When you’re ready to create your first presentation from scratch, my suggestion is to open a
text editor and write the value of the presentation, which could be the only sentence that the
audience should remember after your talk.
2 See https://www.amazon.com/Stages-Creativity-Developing-Your-Creative/dp/1541192079
16
Then you can start to brainstorm ideas and stories, research facts around your core value, and
write them down. Do you know your audience? Try to visualize them to help you understand
their needs and why your value should be important for them. Try to brainstorm stories that will
resonate with them.
Once you’ve done this activity, you can look at the items that you wrote and try to prioritize them
and give them a logical order. At this point, you can start creating your slides. You don’t have to
fit all the things that you’ve brainstormed; you should only add the most important one that
allows you to deliver your stories to support the core value of your presentation.
The importance of stories and emotions
Stories (real or invented) are one of the most useful tools that you can use to improve your
presentation. You can use a story to explain the value of your presentation. You can use a story
to introduce your product or to create the need to understand more of it.
You can use stories in a technical presentation to explain why you’re using a specific technique,
why you’re optimizing the performance of some code, or why it’s important to focus on usability.
Stories vs. facts
Facts don’t stick in our brain if we don’t already have a place for them. You can throw a lot of
facts at your audience, but if people won’t remember them after some time, the effectiveness of
your presentation was very low.
Emotions are a powerful way to recall facts that are stored in your memory. Stories are normally
used to create or associate emotions with the facts that will follow.
As a geek, you might be tempted to use facts as your only weapon to impress your audience,
creating slides and demos to show how good your work is, and how much you know a specific
technology. That doesn’t stick.
Do you remember Bing Bong from the Disney/Pixar movie Inside Out?3
At some point, he’s lost
in the Memory Dump with all the disappearing memories. It’s an excellent image4
to help you
remember that facts will fade away without a good story.
Consider that many courses to improve your memory use strong emotions to connect facts and
make them stick.
3 See http://pixar.wikia.com/wiki/Bing_Bong
4 See https://iamavig.files.wordpress.com/2015/06/bing-bong.jpg
17
How to choose your stories
There’s a good book called Life Zones5
that, among other things, explains that there are four
zones in our lives.
Figure 2: Four life zones
The public zone is open to anyone. You’re in the public zone when you look around to find
information and stimulation, when you’re completely anonymous, or when you’re together with a
lot of people and interacting with them.
The social zone is where you perform an activity, like working or playing a sport, together with
people that interact with you.
The personal zone is where you are sharing what you feel with people you trust. In the personal
zone, you feel vulnerable because of this sharing.
The intimate zone is the innermost zone, where you’re more vulnerable because you’re with the
people you care about most.
You can relate these zones to the kind of performance you’re delivering.
If you’re presenting facts to complete strangers without interaction and without questions from a
powerful position (for example, as a professor behind a lectern), you could be in the public zone,
where you’re not vulnerable (or just a little bit).
If you’re presenting to people you know, or you open yourself and interact with attendees,
sharing information and generic stories, you’re in the social zone. This is the place where you’re
more vulnerable, but where people start feeling a better connection.
5 See https://www.amazon.com/Life-Zones-Tools-place-yourself-
ebook/dp/B00ILG3WQ4/ref=asap_bc?ie=UTF8
18
If you’re presenting using personal stories, like how you used a product with your son, you’re in
the personal zone where you’re more vulnerable, because it’s difficult to separate criticism from
our personal experiences.
A presentation could contain a mix of those stories; you can start from the public zone and
move to the social or the personal.
Be cautious: you could take a product remark as a personal criticism if you’re in the personal
zone, and the audience (or part of it) is in the public or social zone. To become a better speaker,
you need to handle this zone mismatch. Always ask for feedback from friends and other
attendees about a remark that you felt was rude; perhaps other people didn’t feel the same.
Where do you find stories?
Stories are everywhere, all around us. Just pay attention to people, to strangers—on the way to
work, at a park, anywhere.
A good story can be genuine, or you can modify it in some way to support your point. Just be
sure to tell the truth if asked by some attendees.
Do you need help? The Storyteller’s Spellbook by James Whittaker6
is a great book that helps
you craft your stories.
How to create a story
If you need a story but can’t find one, The Hero’s Journey7
is a good template to create a new
story. As you can see, many movies follow the path highlighted in the following figure.
6 See https://www.amazon.com/Storytellers-Spellbook-compelling-career-magical-
ebook/dp/B073Q5X4BX
7 See https://en.wikipedia.org/wiki/Hero%27s_journey
19
Figure 3: The hero's journey. Source: Wikipedia.
The Harry Potter books, Star Wars, and The Lord of the Rings are just a few examples. Also,
one particular Dilbert cartoon by Scott Adams was inspired by the hero’s journey some years
ago .8
Influence without authority
Let’s explore a topic that is critical in most contexts. Sometimes, you need to present to people
that are at your level or above you, and your presentation should influence them to take some
action like sponsor your project, adopt your product, or change something in the company.
To prepare such a presentation, you can choose or create stories that are essential to let your
message stick.
You need to understand why people resist change (for example, you’re proposing cloud to a
company that still has all its servers on-premises), and when they’re receptive. You need to find
the right emotions and motivations to understand different perspectives.
Another essential thing is understanding stakeholders’ challenges and motivations. Sometimes
money isn’t the only drive; a good project could lead to being respected by other colleagues or
managers.
You need to be receptive to their needs and discuss the benefits of the change. If they can be
open with you, you can understand their point of view.
8 See http://dilbert.com/strip/2014-01-02
eturn
all to
Adventure Supernatural
aid
KN WN
NKN WN
Threshold
)s(uardian
Threshold
(beginning of
transformation)
elper
Mentor
elper
Atonement
Transformation
( ift of
the oddess)
Abyss
death rebirth
The
ero s
Journey
20
Adam rant’s book Give and Take9
has an entire chapter about using the right motivation to
induce a change in people or organizations. Sometimes you need to question the status quo
before presenting your solution, because it’s easier to remain static if you don’t feel the pain.
Start with value
Speakers who introduce themselves and their company, then move to the agenda slide, then
start with a long trip around the topic that they want to explain usually do this because it’s the
typical way to start a presentation—and when they’re anxious, they’ll go back to their comfort
zone.
Being able to start directly with value requires some preparation. There are many possible ways
to do it:
• Tell a story that shows the value. We’ve already covered why stories are important, so
no need to explain this.
• Ask a question that allows you to uncover the value. Questions are a powerful tool if
you can handle all the possible answers, and not just the answers that you expect.
• Go around the table. If there are fewer than ten to fifteen people, you can start by
asking people to answer a simple question related to the value. You must keep control of
the time, and you shouldn’t let an attendee steal your focus.
• Arouse curiosity. If you can use a prop during your presentation, it could help you
arouse curiosity about the value. Bill Gates released mosquitos during a TED talk to
raise awareness about malaria.10
Tip: Try to have more than one way to start your presentation. You need to master
all of them and choose the one that better suits your mood or your audience. The first
few minutes of a presentation are essential for getting people’s attention and keeping
it for the rest of the session. Use this time in the best way possible!
9 See https://www.amazon.com/Give-Take-Helping-Others-Success/dp/0143124986/
10 See https://www.ted.com/talks/bill_gates_unplugged
21
Chapter 3 Knowing Our Tools
Never underestimate an impeccable presentation
There are two types of geeks: those who hate using slides and do only demos, and those who
create too many slides and fill them with too many details.
While there is a place for the first type of geek (the NoSlidesConf, for example), the second type
tends to have bad results most of the time.
There is a golden rule in the public speaking field:
Two minutes per slide, five minutes per demo.
So, let’s say that you have 40 minutes: you can have 20 slides or 15 slides and two demos, and
so on. It’s not a hard rule; you could break it and still deliver a great on-time presentation. But if
you follow this rule, it’s easy to finish in time, especially at the beginning of your public speaking
career.
Now that we’ve defined how long a presentation should be, let’s talk about its content. A
presentation must be curated; you have to choose the right colors, the right images, the right
logos, and so on. You should always remember that people could find your presentations years
later, and they will be associated with your name. Always remember to follow your standards.
Some years ago, I delivered a live online presentation about public speaking for the Italian
TecHeroes on Microsoft Channel 9. The show was curated in many aspects, with green-screen
effects, two virtual locations, pre-recorded videos to fill blank times, and so on. I didn’t have time
to curate the slides specifically for the event; I thought I could reuse a previous deck,
considering that slides were used only in the first location and just for a few minutes. At the end
of the live event, I received lots of feedback that it was very well executed, but some of the
slides were poor. Never underestimate the effect of a curated presentation!
Figure 4: Public speaking live event on Microsoft Channel 9
22
In this chapter, we’ll see some PowerPoint features that are often overlooked, leading to low-
quality slides. In the next chapter, we’ll see how to solve some common pitfalls when geeks
design slides. If you prefer to use Keynote to prepare and deliver your presentations, you can
find some Keynote-specific notes in Appendix B.
Slide templates and conference templates11
A curated presentation starts with a good template. PowerPoint includes many built-in
templates.12
You can also search online for additional ones. Once you find some useful
templates, it’s difficult to discard them.
What about conference templates? There are mixed feelings about conference templates.
People agree that they’re essential for the brand of the conference, but sometimes they’re too
intrusive and force speakers to adapt presentations to every different conference template,
losing a lot of time.13
Years ago, the situation was complicated because PowerPoint only supported one master
template for the entire presentation, but now, you can use multiple templates.14
This means you
can keep your beloved template and insert the first and last slides from the conference one. If
the conference logo is mandatory on every slide, you can embed it into your template just for
that presentation.
When you’re pasting slides from one presentation to another, you can right-click and decide if
you want to use the destination theme, keep existing formatting, or paste as a picture.
If you choose to keep existing formatting while pasting the slide, the original template of the
slide is copied in the new presentation.
Figure 5: Different paste options when copying slides
11 Conference templates are often sent by conference organizers some time before the conference, and
include a mandatory welcome slide, sponsor slides, conference logo on every slide, fonts, color sets,
conference contacts, copyright information, and so on.
12 PowerPoint uses the term “theme” to refer to layouts that contain colors, fonts, and effects. Then there
are slide masters and slide layouts that are covered in the rest of this chapter. “Template” is a more
general industry term for referring to all these things.
13 Sometimes conference templates are curated, with readable fonts, visible colors with a good contrast,
and so on. In this case, if the copyright notice allows reuse, think about using it (without conference logos
and other specific information) for your future presentations. It’s difficult to find good templates!
14 See these articles on using multiple themes and using multiple slide masters in one presentation.
23
Note: Always check your entire deck in presentation mode when you modify a
template, when you apply a new one, or when you mix two templates. Subtle things
can change, leading to incorrect animations, wrong colors, text size changes, words
or images outside of the projected area, and so on.
When you create a new slide, you can choose the slide layout from the different templates that
you have in the slide deck, like in the following figure. You can change the slide layout using the
Layout button, and you can reset a slide with the Reset option.15
Figure 6: Different layouts to choose from
Tip: If you start mixing slides with different templates, you can end up having huge
presentation files because you’re importing all the slide masters, all the background
images, logos, and so on. You can reduce file size by using a macro that keeps only
the slide layouts that are actually used in the presentation.
Slide masters and slide layouts
A lot of speakers, beginners and experienced ones, don’t know how to use, create, and modify
a template. Have you ever tried the Slide Master option on the Views tab?
15 Sometimes when you apply a different layout to a slide, elements that were previously repositioned
remain in the old layout. The Reset button fixes the problem.
24
Figure 7: Slide Master in PowerPoint
Every template starts with a slide master,16
which, as you can see in Figure 7, allows you to
choose between a 4:3 or 16:9 slide size, add standard title and footers in the slide, change
colors, fonts, background styles, and so on.
Slide Master is chosen by default when you create a new slide (if you have more templates in
the slide deck, the slide master of the previous slide is used), and should contain common items
like title, logos, text areas, and so on.
Slide layouts17
are children of a slide master. You can insert common items in the slide masters,
and they’re inherited in every slide layout. Slide layouts could be used to define other layouts,
like a two-column layout, demo slide layout, presentation title layout, announcement slide
layout, and so on.
In the following figure, you can see that the author’s logo was added to the slide master, and all
the child slide layouts are inheriting it.
16 See https://support.office.com/en-us/article/What-is-a-slide-master-b9abb2a0-7aef-4257-a14e-
4329c904da54
17 See https://support.office.com/en-us/article/What-is-a-slide-layout-99da5716-92ee-4b6a-a0b5-
beea45150f3a
25
Figure 8: Slide master with many slide layouts
You can also set up transitions and animations inside the slide master or slide layouts that will
be inherited by the slides that use that template; remember that you can always change an
inherited behavior inside a slide.
Tip: Sometimes you find slides that advance automatically after x seconds, or that
don’t do anything when you click the mouse. If you look at the slide master or
specific slide layouts, you’ll find that somebody has customized the transition
properties. If you change them over there, all the slides will be fixed!18
Slide masters and layouts don’t have to be plain white. You can create different templates (a
slide master with related slide layouts) with various color sets, or you can create many slide
layouts under the same slide master with different colors or different background pictures to
highlight parts of the presentation.
You can give a name to the slide master and every slide layout; this is important if you plan to
use different templates in the same presentation.
18 Remember to use the Reset button in Normal view if you modify the slide master or the slide layout and
your slide had a custom layout where you moved items.
26
Slide animations and transitions
Animations occur inside a slide; transitions connect one slide to another. There are many of
each, as you can see in the following figure. Some are subtle, and some are very dynamic but
could be perceived as invasive. Usually, you should keep exciting transitions only for a few
slides in the presentation, like announcements. If you don’t have exciting news to share, refrain
from using those transitions, or at least change the duration.
Figure 9: Animations (left) and transitions (right)
Tip: If you want all your announcements slides to use a specific transition, you can
set it up in the corresponding slide layout. This way you won’t forget it!
Animation Pane
The Animation Pane is useful when you have a complex slide with a lot of animations. In the
Animation Pane, you can see the temporal flow of the animated sequence; you can also see
animations that co-occur. When you select an item in the pane, you can see it selected in the
slide and vice versa. You can add, remove, and reorder animated items.
27
Figure 10: An animated slide with many moving objects
Common animation pitfalls
Many things could go wrong when you animate your slides:
• People could be easily distracted by animations.
• The speaker could forget to advance the animation while talking, and then have to fast-
forward at the end, which looks unprofessional.
• Animated slides could need much more time than the canonical two minutes, and could
lead to going overtime.
• Animated slides are often impossible to print, export to PDF, or share on
https://www.slideshare.net/.19
• Animations (but also transitions to the next slide) could be configured to occur
automatically; therefore, you need to accurately test a slide deck built by someone else
in presentation mode. Otherwise, you could end up with a bad performance.
Despite these potential problems, animations are a powerful tool to explain complex ideas and
processes, such as long-running transactions, protocols with many steps, and so on.
Note: If you can’t describe all the actions of an animated slide, it’s better to
remove some parts or make it static. You can also split an overly complicated
animated slide into two or more simple slides, with the positive side effect that it’s
easier to estimate time, print or share the slide deck, and so on.
19 See https://www.linkedin.com/pulse/publishing-effective-presentations-slideshare-lorenzo-barbieri/
28
Morph transition
The Morph transition is a new feature of PowerPoint that allows you to create smooth
animations in the transition between one slide and the next.
Note: At the time of writing, the Morph transition is only available in PowerPoint
2016 for Office 365 subscribers. If you don’t see it, update PowerPoint to the latest
available version. If you’re using PowerPoint Online, the Morph transition is only
possible for files hosted on SharePoint Online.
The easiest way to try the Morph transition is to start with a slide containing some text and
objects, duplicate it, and then move objects around, changing their sizes, fonts, colors, words,
and so on. Then you can apply the Morph transition to the second slide and play the
presentation to see the results. As you can see, all the objects and texts move and morph
smoothly without you having to create complex animations.
Tip: In one presentation, I added my avatar to all the slides and used the Morph
Transition to animate between one and another, changing size, position, orientation,
and so on. It’s not something that you should abuse because it distracts people, but
in this case, it was done to show the power of this tool!
Figure 11: Presentation with a moving avatar
With Morph transitions, you can animate objects, words, or characters,20
but you can also:21
• Create motion and emphasis animations.
• Create entrance and exit animations.
• Zoom, scroll, and crop images.
• Rotate, 3D rotate, and change the shape of an image.
20 See this article for an introduction to the Morph transition.
21 See this article for more advanced effects.
29
Tip: You can also combine slide layouts with Morph transitions to create advanced
templates with moving parts. For example, you can create a layout with a grid of
objects, and another layout with an expanded object and text description. Then you
can morph between them to create the effect of an animated catalog.
Selection Pane
The Selection Pane is a little-known feature that allows viewing the object hierarchy of a slide,
selecting an object to hide or show again, and changing the viewing order relative to other
objects. It’s found under the Select menu, as shown in the following figure.
Figure 12: Enabling the Selection Pane
Figure 13: Selection Pane
30
Finishing touches
Many other tools and features could be used to improve the quality of the presentation. Let’s
see the last three of them.
Improve the quality of printed slides
Sometimes you need to print slides and make sure that all important items are readable. You
need to use the View menu, shown in the following figure.
Figure 14: View menu with options for changing the format of printed slides highlighted
If you’re printing your slides in black and white or in grayscale, you can select the appropriate
option in the View menu to see the slides as they will be printed. With the Grayscale and Black
and White views, you can select items in the slide to hide them, invert colors, or improve the
slide visibility for printing using the commands shown in the following figure.
Figure 15: Control how slides will be printed in grayscale or black and white
In the View menu, you can select Handout Master to change the template of printed slides,
including headers and footers, printed pages, page numbers, and so on. You can also add
custom logos to the slides, like in the following figure.
31
Figure 16: Handout master with two slides per page and a custom logo
Arrange items
People like to spot problems on slides, especially during boring presentations. Images, graphs,
and text blocks that aren’t perfectly aligned or spaced are an indicator of poor quality in a
presentation.
You don’t have to be a designer to align everything correctly. The Arrange menu has all the
tools that you need!
32
Figure 17: Arrange items
Tip: Aligning everything in the center could lead to annoying presentations. Better
results can often be obtained using the rule of thirds.22
You could use Ruler, Gridlines,
and Guides from the View menu to have a better understanding of the dimensions and
proportions of a slide. You can also insert a dummy object, use Distribute Horizontally
or Distribute Vertically from the Arrange Items menu to better align your original object,
and then remove the dummy one.
22 See https://en.wikipedia.org/wiki/Rule_of_thirds
33
Spelling and grammar
You don’t need to be a grammar pedant to spot errors and typos. The Review menu has all the
tools that you need, as shown in the following figure.
Figure 18: Spelling and grammar tools
34
Chapter 4 Preparing the Presentation: To
Geek or Not to Geek?
What to do with all these tools?
Do you remember the second type of geek that we mentioned at the beginning of the previous
chapter? Have you ever seen presentations with these qualities?
• Too much text on the slide, with a tiny font.
• Too many bullet points (more than four), with many subitems.
• Entire pieces of documentation pasted on the slides, with a very long link at the end.
• Source code pasted on the slides using a tiny font or shown inside the editor without
increasing the font or using a tool like ZoomIt.23
• Too many graphs, pictures, and diagrams that are difficult to read.
• Disturbing transitions that are slow and time consuming.
Always remember that people tend to read everything you put on a slide. If you need to add
reference slides, you can hide them during the presentation or move them to the appendix.
Tip: A dry run with a non-technical person can help you improve slide quality,
reduce distracting content, and increase readability of the presentation.
The next time you’re attending a presentation with the previous qualities, pay attention to your
reactions to every slide, how much time you spend reading them, and how much time you’re
distracted by complex graphs or schemas that aren’t necessary.
Must-have slides and slides to avoid
The only slides that you must have are the first and the last. The first is the one that’s projected
while people are entering the room, before you start presenting, with the title of the session,
your name, contact details (optional), conference logos, etc.
Showing a title slide while people are entering the room is important. It gives a positive
impression that the speaker is ready, helps people understand if they’re in the right room, and
allows them to take note of your contact information if present on the slide.
Tip: Sometimes it’s useful to create a little (three or four slides maximum) rolling
presentation with important information that people should know before attending the
talk. You can create a separate deck with the title slide and some informative slides
(with “Before we begin” or a similar title) that cycle on the screen. Keep the official
presentation ready so you won’t lose time when it’s time to begin.
23 See https://docs.microsoft.com/en-us/sysinternals/downloads/zoomit
35
The last slide is essential: it should have your contact details (mandatory), requests for
feedback, and the session code or session title if conference organizers are collecting feedback.
You should keep it on the screen while doing Q&A, unless you need some slide to answer a
question.
If you’re presenting at a “no slides conference,” or if you’ve decided to avoid slides completely,
you can open a text editor, increase the font size to 40 or more, and write your contact details at
the end of the presentation. You can also use your contact details and the presentation title as
the desktop background during the presentation—it’s not a slide, it’s the background!
You should avoid “About Me” and “Agenda” slides that are often in conference templates
because people care about the value of the presentation, not about the speaker, and because
an agenda is useful only for day-long or multi-day courses. You can keep the “About Me” and
“Agenda” slides in the downloadable or printed version of your presentation if you’d like.
If you really want to use an “About Me” slide, it’s better to put it after the main value of the
presentation. First, tell the audience why they should listen to you, and then you can spend a
few seconds talking about you if you cannot avoid it.
A better “Agenda” slide, if you’re presenting a day-long or multi-day courses, could be designed
as a time line, instead of a boring bullet-point list.
Keep resources and other “boring” slides in the appendix, and show them only if requested.
“ ecap” slides are better than “Agenda” ones, but sometimes there is a risk of losing time by
repeating the same concepts. It’s better to use them only if there are many important topics in
the presentation and you need to clarify your call to action explicitly.
Note: If you should avoid using “About Me” and “Agenda” slides, why do
conference templates keep using them? “We’ve always done it this way” is the typical
answer. Remember, life begins at the end of your comfort zone.
Slide refactoring examples
“Code refactoring is the process of restructuring existing computer code—changing the factoring—
without changing its external behavior.”24
Similarly, we’ll use slide refactoring to improve the readability and understandability of a typical
geek slide.
Note: You cannot oversimplify a technical slide without losing information, but
you can try to improve it using the right fonts, colors, animations, and pictures.
24 See https://en.wikipedia.org/wiki/Code_refactoring
36
Improving a text-heavy slide
Let’s start with the following slide, taken from a real presentation about microservices and IoT.
Figure 19: A text-heavy slide
We can start by highlighting the most important words.
Figure 20: Highlighting words using bold
We can better highlight important parts using Convert to SmartArt from the context menu, as
shown in the following figure.
37
Figure 21: Converting bullet points to SmartArt
nce you’ve converted a bulleted list to SmartArt, you can play with its properties, shapes,
colors, and animations to obtain a more readable slide.
Figure 22: Slide refactoring completed!
38
Less is more: simplifying a complicated slide
In the previous example, we decided to keep the slide complexity, but used typography and
SmartArt to improve readability.
In the next example, we’ll try to simplify a complicated slide where the key idea is not obvious,
while keeping the original meaning.
Figure 23: Too much text, no clear separation, no clear value
A better slide could have a clear definition (a light-weight framework…) and a clear separation
between the two different types of services (stateless and stateful), each with its main properties
and an image.
39
Figure 24: Clear definition, clear separation between stateless and stateful
The slide shown in Figure 24, with the right animations, could be more effective than the
original.
Depending on the audience, we can decide to cut some more text from the slide, or we can split
the slide into two different slides with larger pictures.
Note: SmartArt wizards are available only in PowerPoint at the time of writing.
You can create them in Keynote or other tools by aligning different objects, but the
overall result could be more difficult to emulate.
Visualize your lists, avoid bullet points
Bullet points are bad—they kill people’s attention. Most of the time you cannot avoid them, but
you can try to add some pictures and colors to the slide to engage your audience.
It’s easy to imagine the ugly boring bullet point list that was used to create the following slide.
40
Figure 25: A better way to present a list
Which one do you prefer?
Can we do better? Of course we can! The last item is too wordy, and the font is smaller than the
one used in the other items, but as we stated before, sometimes you cannot oversimplify a
slide—it depends on the audience.
Tip: You don’t need to read your slides, but sometimes having the detailed list on
the screen can help your memory. It’s better to have more items on the screen if it
helps you remember important stuff. You can always remove them the next time you
present to another audience.
Reduce elements, keep some variance
Look at the following two slides.
Figure 26: How to reduce complexity without reducing variance
41
The slide on the left is more complete; it describes many elements and has 20 logos on it. The
slide on the right is simpler and has fewer logos, but offers the same general information. The
important thing when you work on simplifying a slide is to keep some variability to increase
interest. For example, on the right slide, there are consumer and commercial services, personal
and enterprise ones, and so on.
If you know that one or more items are important for your audience, keep them! If you know that
some items are unexpected by your audience, add them, or even better—animate them to
create a “wow” effect.
One idea per slide: is it possible for a technical presentation?
One way to avoid using bullet points, SmartArt, and similar components is by creating slides
with just one idea per slide. The advantage is clear: you can use a BIG font, with a nice picture,
and talk for a few seconds about the idea, and then you can move on to the next slide.
In practice, it’s tough to have just one idea per slide because people tend to speak too much
about a topic, and too little about the next one, making it difficult to estimate the time needed for
the presentation without a proper dry run.
Sometimes it’s useful to show a slide full of stuff, just to highlight a specific part and let people
know the complexity of the subject, like in the following slide.
Figure 27: A complex slide with a highlighted subset
If the next slide is a deep dive on the highlighted subject, you can use a Morph transition to
better connect the two slides.
42
Reduce source code to the minimum
Figure 28: Slide with only the relevant source code is shown
In Figure 28, you can see that important information is highlighted, that error handling code is
removed (it’s not important in the context), and only relevant comments are left in the code. Try
to limit the amount of source code you put on slides, and always check that it’s visible from the
last rows of the audience.
Is my presentation accessible to everyone?
As a presenter, you have to ask yourself this simple question.25
Disabilities could be permanent, or temporary. When presenting to someone, people with
different learning styles or people speaking other languages26
could have problems similar to
people with disabilities.
Every image in your presentation should have a written description that could be read by a
screen reader, every video should have captioning, fonts should be readable, and the speaker
should try to give context to graphs and pictures that are difficult to understand.
25 See https://www.youtube.com/watch?v=4uiBYqW4mj8 for a detailed explanation.
26 Microsoft’s Presentation Translator is a tool that can help with real-time translations.
43
Tip: PowerPoint offers a Check Accessibility command inside the Review tab. Use it
to check your presentations and make them more accessible.
Note: The terms “accessibility” and “inclusion” are closely related. Loosely
speaking, accessibility refers to aspects related to disabilities (such as vision
impairment), and inclusion is a slightly broader term related to usability by the
greatest number of people.
44
Chapter 5 What to Do Before the Talk:
Stage Fright, Introversion, and Saber-
Toothed Tigers
Stage fright is real!
You can’t avoid stage fright—you need to handle it.27
Different people have different responses
to it, but nobody feels safe on stage, in front of a lot of people. Experienced speakers and
performers still suffer from stage fright.
That’s natural, because our brain was trained over thousands of years to pay attention to
possible risks, and to fight or flee. Have you ever heard of saber-toothed tigers that in our
imagination are the natural enemies of our ancestors, the cavemen?
To keep our feline-inspired metaphor, we need to think about our audience like kittens that need
to be fed with stories and knowledge, not saber-toothed tigers ready to eat us.
If you think about your presentation more as a conversation and less as a performance, it’s
easier to handle stage fright.
Introverts and extroverts
Introverts and extroverts can both be excellent public speakers. The only difference between
them is that introverts need time for themselves to charge their batteries before the session, and
time to recharge them after it. Extroverts can charge their batteries while being with the public,
and after a session they have a high level of energy.
This means that if you’re an introvert, you probably need some time alone before and after the
session. You can go to the speaker’s room, you can go outside the conference venue, or you
can find an empty room and sit there.
“Public speaking for quiet people”28
is a great talk that can help you understand how to be a
great speaker while being an introvert.
By the way, if you’re an introvert, you need to enjoy your conference, too. Conferences for
Introverts by Alan Mendelevich29
is a great book with a lot of practical advice.
27 See https://medium.com/@docjamesw/the-stage-is-the-new-jungle-909fd32515ba for a process to
handle stage fright.
28 See https://www.youtube.com/watch?v=Egq6IPUMgh4
29 See https://www.amazon.com/Conferences-Introverts-Looking-Thrive-Optimized/dp/1549954059/
45
Note: Many conferences have a speaker room, sometimes called the “green
room.” There are many reasons why it’s called this,30
but one reason could be that
anxious speakers suffer, and green is the color they become in those situations.
Anxiety can be an energy drain or can be a great source of
power
In his book Originals,31
Adam Grant has a great chapter about handling anxiety. He shows
results from many studies that demonstrate that if you try to calm anxious people before the
performance, their results will be worse than if you try to energize them and convert their anxiety
into positive energy.
In the book, there are examples of people who use visualization to see positive outcomes to
drive them, but there are people who like to visualize bad or terrible outcomes, too.
Sometimes visualizing a bad outcome could help you prevent it, or you could just think about
people who were negative about your initiative who are now happy that you didn’t succeed.
Some people could find the right motivation from those negative images.
Note: I’ve seen a great talk by @N1c0l_3 about anxiety-driven development, which
was delivered with a lot of anxiety, but with an intense energy, too.32
I was impressed
by the way she used her breath difficulties (induced by anxiety) to create suspense in
the audience and to enhance the content.
Don’t rehearse in front of a mirror
Rehearsing is one of the best tools for avoiding stupid errors, proving that you can do
something, and testing different ways to present the same topic. However, rehearsing in front of
a mirror is a terrible idea. You’ll concentrate on your physical appearance and small defects,
and lose contact with the flow of your talk. Instead, you can simply use your phone or camera to
record your performance, or you can do a video call and record it.
People usually find a lot of excuses to not rehearse, something like:
• I’d like to improvise.
• I want to keep it as a conversation.
• I don’t have time.
30 See https://en.wikipedia.org/wiki/Green_room
31 See https://www.amazon.com/Originals-How-Non-Conformists-Move-World/dp/014312885X/
32 See https://www.slideshare.net/NicoleBartolini/the-forerunner-of-best-practices-anxiety-driven-
development
46
You can easily spot people who have rehearsed their presentations—not because they don’t
improvise, or because they are presenting like an actor on stage—but because they can
anticipate bad things that could happen during the presentation.
Always remember that your goal in rehearsing is not to be perfect; it’s about better preparation
and handling your stage fright.
When you’re good at it, you can also rehearse in your mind, visualizing the presentation, the
flow, and workarounds for potential problems. But you need a lot of practice!
Synchronize yourself with your content
Do you look at the Date Modified field of presentations? If you’re in the room when someone is
preparing to present, and you can see the desktop, try to look at the modified date of the
presentation.
Most of the time, you’ll find that speakers have updated their presentations the same day of the
delivery. It’s a good thing to review your material and to synchronize yourself with the content.
You have to think about the stories—perhaps you’ve met somebody at the conference, and now
you have a better knowledge of your audience. Sometimes you just have to modify something
so that your brain thinks the content is fresh, and your body language will be consistent with
that.
Note: Have you ever felt that a presentation was old, that the content wasn’t
fresh? Sometimes, especially if it’s the first time you’re learning something, you’ll
have a gut feeling that the content is stale. That’s because the body language of the
presenter gives you that message. Making little changes to a presentation before
doing it helps to solve this problem.
Put the pedal to the metal!
The final advice of this chapter is: Stay away from your comfort zone, take risks, and be bold!
It’s easy to play it safe when you’re worried or have stage fright. There are many WRONG ways
to play it safe, including:
• Introducing yourself, losing time on the agenda, and using boring slides.
• Using facts and data only, without stories.
• Staying away from hot topics, trying to please everyone.
Why should someone be on the stage in front of a lot of people and not give their best? At the
end of the presentation, you’ll regret it if you don’t. Even if it was okay, you didn’t give your best
and didn’t make a good impression.
f course, you should take controlled risks, but, if you know your audience, if you’ve done your
dry runs and you know your topic, if you have a great story, and if you’ve anticipated critical
questions, you could exit your comfort zone and try to impress everyone!
47
Some suggestions:
• Turn off the projector. Go to the whiteboard and discuss your topic without slides.
• Use a prop—something unexpected. Don’t speak. pen Notepad in full-screen mode
with a big font and start writing questions and annotating answers. Then, at the end of
the presentation, review the questions and answers to see if you’ve covered everything,
or if you’ve left out something.
• If the event is not recorded, move around the stage and go into the audience.
Remember to keep good eye contact with every part of the audience.
In any case, trust your gut.
Note: During my career, I’ve used a lightsaber, a cape, a small rocket launcher,
and a drone for props. Of course, props have to enhance your story, so don’t use
one just for the sake of using it.
48
Chapter 6 During the Talk: Be a Better You!
“Just be yourself” is not enough
How many times have people told you, “Just be yourself, and everything will be fine!” This is
some of the most-used advice out there, something that everybody tends to say to someone
before letting them enter the lion’s den. And it’s wrong!
Being yourself is not enough—being yourself lowers your energy because you’re not leaving
your comfort zone. “Don’t try to be somebody else” could be better advice, but as you probably
know, in those moments our brain prefers to receive a positive order instead of a negative one.
“Be the better version of you” should be the advice given to someone before a presentation. It’s
excellent advice because it pushes you out of your comfort zone. It says that you can always
improve, even after many years as a public speaker.
Being the better version of you means that you’re in the best state for that moment. It means
people can see that fire in your eyes, and that you’re there to transfer the value to them in the
best way.
You have to work to reach your best state, and it’s normal if your best state is different from one
presentation to another.
Note: A personal story: During the Visual Studio 2010 launch, I was doing a tour
around Italy, and my grandfather was in the hospital. Just before my session in
Venice, my sister told me on the phone that he died in the early morning. I didn’t
expect that. I was shocked, but I decided to deliver my session and then go home.
We were far from home, so I decided to present my session even if I wasn’t in the
right mood. I decided to do that for the people that were attending the event, and a
little bit for myself, too.
It wasn’t easy. It wasn’t my best performance, but I still remember those moments. I
tried to give my best, even if my best wasn’t the same person that delivered many
other sessions before and after that moment.
How to be a better you
If you’ve recorded your dry run, it’s easy to start. Watch it and find something in your posture,
voice, dress, or body language that makes you feel uncomfortable, and work on it.
Talk with people and ask for direct feedback. Ask them what makes them uncomfortable during
your sessions. Perhaps it’s a little thing, or maybe they don’t know what the exact problem is,
but you should try to understand what could be improved.
Begin by being conscious of what is not good. There is no manual to be a better you; it’s trial
and error.
49
Note: Breath is essential. I knew a young speaker who did solid performances,
but, during her sessions, there was something that made people uncomfortable.
Many people told me “she is a good speaker, but I didn’t completely enjoy her
session.” I went to some of her sessions to try to understand what was going wrong
and I discovered that her breath was very anxious at the beginning of the
presentation, and that anxiety ruined the session for some of the audience. My
suggestion was easy: start speaking with somebody about the session’s topic some
minutes before the beginning to let the anxiety go away.
If you need some more inspiration, you can look at James Whittaker’s post “Just Suck Less”33
for some direct tips.
You can also start by avoiding some of the sentences that you’ve heard many times during
presentations:
• “Sorry, it’s my first time speaking in public.” Don’t do it. You don’t have to be sorry in
advance; it lowers your confidence and the confidence that the audience has in you.
• “I’ll keep this short.” Nobody will trust you. The presentation has to give value and must
stay in the allotted time. Length is not the key.
• “I have a lot of information and not enough time, so I’ll go fast, really fast!” You have to
give value in the allotted time; you don’t have to enumerate all the things that you know.
Create an appendix in the presentation with all the things that don’t fit in, and tell people
that you can discuss those things later.
• “I’m fatigued,” “My plane was late,” or “I didn’t have time to prepare.” This is the first
thing to avoid. People are there to receive value and to trust you. It’s your fault if you
don’t do everything well; they won’t believe you anymore after these sentences.
Tip: You shouldn’t use profane or crude language during your presentations.
They make you sound unprofessional, and you should avoid them at all costs. If your
sessions contain stories that use curse words, and you can’t avoid it, it’s better to
say it at the beginning. If you are an exceptional speaker, you could be the exception
that proves the rule.
Note: Many conferences and user groups have adopted a code of conduct that
speakers and attendees should follow both during meetings and online. Ask the
organizers for it, or look for it on their website. If you aren’t comfortable with it, tell
them in advance. If they don’t have a code of conduct, just be professional and avoid
doing something that could upset people, especially if the audience members are
from different countries.
If you want to be a better you every time you deliver a presentation, you can do many things,
but the best thing to do is to create your set of rituals.
33 https://medium.com/@docjamesw/just-suck-less-256c3f9f430d. You may have to sign in with a Google
or Facebook account.
50
Rituals
In the beginning, you have to find your routines and figure out what works for you. It’s a good
idea to write your routines down as a checklist.
Know the environment
Your session should start directly with the value, with a lot of energy—it should captivate
people.
You must avoid sentences like “ an you hear me?” You should have checked the audio before
the beginning of the presentation. You should arrive at least fifteen minutes in advance and
check the audio and the video connection, make sure your presentation remote works, check if
the floor is creaking when you walk, and so on.
You need to master the room and figure out where you can go without losing eye contact. If you
need to do a demo and you have a hand microphone, you should rehearse it; you cannot just
put the mic on the table.
If you must talk at the podium because the mic is wired there, you should know that ahead of
time. If you need a lectern, a whiteboard, or something like that, it’s better to check with the
organizers well in advance and multiple times.
Can people see your slides and fonts from the back of the room? Check in advance. If you
aren’t used to tools, like ZoomIt, don’t trust them. During the session, you’ll just forget to use
them. It’s better to increase the font size.
Do you have a big timer available? Can you ask somebody to track time and alert you in the
middle of the session, and then when you have 15, 10, or 5 minutes left? Don’t trust a small
watch, like your phone. If you keep looking at it, you will send the wrong message to your
audience, telling them that you’re in a hurry because you have something better to do.
Tip: Some people fear arriving early and setting up everything in advance because
they don’t want to stay in front of the audience for some minutes without talking, with
an increasing sense of anxiety. You can avoid this by using the extra minutes to chat
with people in the front rows, asking questions about their expectations, trying to
understand their level of knowledge of the matter, and so on.
As we’ve seen in the previous chapters, you should avoid starting with who you are—get
directly to the point. Later, you could introduce yourself during the talk when it fits better, and
you can also explain why you’re delivering this presentation. Sometimes it’s better to break this
rule; for example, if you’re talking in a formal environment, it’s better to introduce yourself at the
beginning. Perhaps you can ask the organizers to present you.
51
Relaxation and power posing
There are many relaxation techniques that you could study and that you could use before the
session. But how do you overcome the anxiety just before the session’s start or during the
performance?
One trick that you could use to elicit relaxation is the following: while you’re studying and
applying your favorite relaxation technique, use a simple gesture like keeping three fingers
together during the relaxation time.
Figure 29: A simple gesture to elicit relaxation
Then, when you’re anxious, you can recall your relaxed state by using this simple gesture.
Usually, a gesture like this one is easy to use and can be done without other people knowing
about it.
Another way to get in your best state is with power posing. Studies have shown that adopting a
power pose can put you in a better state. One of the best power poses is the so-called Wonder
Woman power pose: put your hands on your hips, feet wide apart, and shoulders back.
You can look at Amy uddy’s TED talk about power posing,34
and then you can read a recent
Q&A35
with her for updates on the subject.
Note: When I asked one of my colleagues to draw my avatar, she chose to
represent me with the power pose that I always use before delivering a session.
34 See https://www.ted.com/talks/amy_cuddy_your_body_language_shapes_who_you_are
35 See https://ideas.ted.com/inside-the-debate-about-power-posing-a-q-a-with-amy-cuddy/
52
Figure 30: Author's avatar in the Wonder Woman power pose
Clean your mess
Don’t let the clutter on your desktop or your fancy wallpaper distract your audience when you
switch from the presentation to the demo or vice versa.
Choose a standard wallpaper, or, even better, a background color. You can hide all your icons
with a simple command, like in the following figure.
Figure 31: Showing or hiding desktop icons in Windows 10
If you need to switch from the presentation to the demo, or to multiple sets of demos, you can
create many virtual desktops and switch from one to another with a simple gesture. With this
trick, you can keep PowerPoint running while moving to the demo; it’s especially useful when
you’re in the middle of an animated slide.
Note: MacOS has supported virtual desktops (called “Spaces” back then) since
2007, available in OS X Leopard and later. Microsoft added virtual desktops support
natively in Windows 10; with previous versions, you needed a third-party tool. Virtual
desktops support in Linux and other Unix-like OSes has been available since the
1990s. You can always switch between virtual desktops with a shortcut or with a
trackpad gesture (if available).
Remember to turn off notifications, both on your desktop and on your mobile phone.
53
Eye contact is the key to audience involvement
It doesn’t matter if you’re an introvert or extrovert, if you’re sitting behind a desk or standing in
front of your audience: without eye contact, you’ll lose most people within few minutes. You
need to have a ritual regarding eye contact. You should ask your friends to look at you and to
tell you at the end of the session if you looked like a robot, or like a sprinkler. They can let you
know if you stared at your feet or at the ceiling, or, like most people do, at the slides the whole
time.
You have to exercise eye contact in one-on-one conversations, small meetings, and
presentations in front of big audiences.36
Tip: You can improve eye contact in one-on-one discussions with a simple
exercise. You look your interlocutor in the eyes and tell them a list of things without
losing eye contact, using filler words, or pausing. The other party chooses the first
subject; then, it’s your turn to select a topic, and your partner should do the same.37
Tip: In big rooms, you can use a trick to show eye contact without having to look
at everyone in the room. You can simply focus some rows in front of you, and look at
people there. All the people in your line of sight will feel connected with you.
Powerful or powerless communication
Many people think that one always needs to adopt a powerful communication style to impress
attendees and have better chances of success. Sometimes, powerless communication can give
better results.38
Note: You can use poewrful or powerless communication with the same slides,
the same demos, the same content; this is why this paragraph is in this chapter and
not in Chapter 3.
Let’s see what the differences between the two styles are.
36 See https://www.wikihow.com/Look-People-in-the-Eye
37 I learned this technique in a seminar with Jenna Lange, author of Please Don't Picture Them Naked.
38 Adam rant’s book Give and Take is full of examples of powerless communication and its impact on
people’s success.
54
Table 1: Differences Between Communication Styles
Powerful Style Powerless Style
Useful when we have authority, when
people trust us, when we have credibility or
status that allows us to state facts without
doubts.
Useful when attendees are skeptical of our
expertise, when there’s a significant
difference between us and the audience
(age, role, etc.), or when there are
problematic attendees that try to undermine
our credibility.
Based on precise affirmations, facts, rules,
directives. Uses powerful words.
Based on questions, advice seeking, talking
tentatively, and sometimes, expressing
vulnerability.
You’re there to teach them something. You’re there to understand and to create
something with the audience.
Imagine that you need to present something to a more experienced audience, and they don’t
know you.
You can try establishing trust, but it will be a long process, and sometimes it could backfire. Or
you can start with a powerless style, acknowledging the differences between you and them, and
setting the bar by saying that you would like to better understand their views on the topic, how to
adapt it using their experience, and so on.
Nobody can guarantee that the second approach works better, but most of the time it’s the
easiest one, at least when the audience is very cohesive (for example, at a workshop for a
company).
If you’re doing a series of sessions for similar audiences, you can use the feedback on the first
one to adapt your communication style for the following classes. Suppose you received
feedback like “lacks confidence.” You can try to adopt a more powerful style. If you received
feedback like “his content doesn’t fit with our context,” it’s better to adopt a powerless style,
starting with questions on the attendees’ environment, and trying to give practical examples
related to their context.
Tip: You can talk tentatively on a slide full of bullet points, facts, and directives.
You can use a powerful style on a slide full of question marks. The most important
thing is that your communication style, your body language, and your tone of voice
should match.
You can switch styles many times during the talk. For example, when you need to define the
problem, you can use a powerless style, and when you’re framing the solution, you can switch
to a powerful one. You can also move from a powerless style to a powerful one during the time
in a multi-day engagement when you feel that the audience trusts you.
55
How to express vulnerability without losing trust
In the section titled “How to be a better you,” we told you to avoid sentences like “Sorry, it’s my
first time speaking in public.”
So, how can you express vulnerability without compromising your credibility? You can try to use
some humor, and anticipate comments from the audience. For example, if you’re a forty-
something presenter and you’re speaking in front of millennial startup types, you can begin with
a joke about your age, asking if they know some famous film or series from the 80s, and then
you can move to the 90s.
Note: As an Italian, I always joke about my body language, hand gestures, my
tone of voice, and other typical stereotypes, especially when presenting abroad.
Anticipating comments about age differences, cultural differences, and technical background
can be a good way to express vulnerability and find a connection with the audience without
losing trust or using weak sentences.
Always remember to be authentic. You cannot use powerless communication if you don’t care
about your audience, if your presentation tries to sell something in a very arrogant way, if you
wear a powerful t-shirt, or if your body language doesn’t match your powerless style.39
How to finish a presentation when everything goes wrong
Demos fail, projectors fail, your voice could fail—a lot of things could go wrong during a
presentation.
Do you have a backup copy of your slides? And another one in the cloud?
Tip: Print a copy of your presentation, with two or three slides per page. You can
use it for annotations. Don’t depend on the presenter view and its notes section—
you’re more credible when looking at printed slides than when you’re staring at the
screen.
Can you do your session without the Internet? Can you deliver value when the technology
doesn’t help? Do you have a working solution for your code or a deployed website to show if
everything goes wrong?
Tip: Draw the flow of your demos on paper and keep it near the keyboard. If
somebody is recording the session, check that it’s not visible in the camera.
If the presentation is crucial, you can record your demos in advance as a backup, especially if
they involve external hardware, the Internet, or cloud access.
39 See this article for additional tips.
56
Remember, you don’t need slides to deliver value. You also don’t need props, demos, or
anything else. You could transmit value with just your voice, body language, and presence. It’s
difficult, but sometimes it’s worth it!
Note: A personal story: Some years ago, during a big conference in Rome, I
prepared two sets of presentations on two different PCs. The first one, with few
slides, was connected to the projector and ended with a “broken screen” slide. I used
that slide as the excuse to turn off the projector and continue without it. The second
set of slides that were on a PC in the first row and visible only by me were used to
follow the flow that I prepared. The session went well and ended with two standing
ovations!
Learn how to breathe in difficult situations
Do you remember Napoléon Bonaparte, who was often portrayed with one hand inside his
waistcoat? That position, with the hand over the stomach, allows you to breathe with the
diaphragm easily.
Figure 32: The painting “The Emperor Napoleon in His Study at the Tuileries” by Jacques-Louis David,
1812. Source: Wikipedia.
When you’re in trouble and your voice starts to tremble, breathing with the diaphragm could help
a lot. It’s much better to look like an emperor from the past than being unable to finish your talk!
57
Help someone in need
If you’re the conference organizer, room manager, or the next speaker, and somebody is in
trouble during their session, please step up and help the speaker. You can start a round of
applause, as encouragement. You can give him or her a bottle of water. It’s a great way to save
a speaker and a presentation from disaster.
You can also help the speaker at the end of a presentation, during Q&A, by being the first
person to ask a (simple) question to break the ice.
Work hard to exceed your limits
Many things could ruin your presentation, but you can overcome most of them:
• Some people find it very complicated to give a session with a hand mic. Get over it! Most
of the time you’re forced to use them, so do your homework, pick a small bottle, and do
a lot of practice.
• Some people like to walk a lot during their presentations. Walking can be a good thing,
but you shouldn’t go too far. If a session is recorded, it’s better to limit speaker
movements. In this case, talk with the cameraperson to understand the range. If you
prefer, draw an X on the floor with some masking tape, and stay behind it.
• Doing a talk in another language requires much more preparation. You need at least
three or four more dry runs; you should check the grammar (you should always check it,
but it’s even more critical in a foreign language). You should listen carefully to your dry
runs to understand if some words or sentences are difficult to remember, and change
them or create a meaningful slide to communicate the point effectively.
• If a talk format has auto-advance slides,40
you need to rehearse many times. It’s
embarrassing when slides go on, and the speaker starts imploring the organizers to roll
back to the previous slide. If a concept doesn’t fit in the allotted slide time, you should
duplicate the slide (losing a slot) or simplify it.
Never learn a presentation by heart
You aren’t an actor who should deliver something word-for-word. You just have to transmit
value, credibly. Learning a presentation by heart is very difficult, and prone to errors, pauses,
and filler words that give your audience the wrong impression.
If you memorize your presentation, there's a risk that you'll focus on recalling it exactly, rather
than being natural and flexible.
Some speakers like to use teleprompters, secondary displays with notes, or something like that.
You can easily spot them because their performance sounds recorded. The same thing
happens when you learn everything by heart; it doesn’t feel natural.
40 With the common availability of handheld wireless controls to advance your presentation to the next
slide, you might want to avoid auto-advance altogether.
58
What you should do is to learn two things by heart:
• Open your presentation in the best way, going directly to the value. One method is to
craft some very powerful openings and start with one of them, word for word. Not the
entire presentation—just the first sentences to skyrocket your talk!
• Close your presentation in the best way. Most of the speakers do sound performances,
but they fade away at the end, without giving an explicit call to action, giving instructions
on how to leave feedback, or letting attendees know that the session is finished.
Close your session with style
Never finish a presentation by immediately starting the Q&A. Doing the Q&A leaves the destiny
of your performance in the hands of the audience. Some people could ask annoying questions
or try to undermine your presentation. As in the previous paragraph, you should close the
session by delivering your messages and taking in the applause, and only then should you start
the Q&A. People have to know that the session is finished and that Q&A is something extra.
You might want to announce that you'll be happy to take additional questions immediately after
the Q&A, outside the presentation room, so that attendees won't be frantic to ask their question
immediately.
If the conference is collecting feedback, remember to ask people to submit their input, and show
them the code or title of your session so they don’t have to do the extra work to find that
information.
As a courtesy, be sure to end your presentation and clear the podium or stage with plenty of
time for the next speaker to set up their talk.
59
Chapter 7 After the Talk: Relax, Evaluate,
and Connect
The talk doesn’t end with the final applause! Sometimes, it’s just the beginning.
Many ways to connect
Is your session a single-shot event, or is it something that you’re cultivating?
Do you have business cards to hand out to people at the end of the talk, especially to people
who surround you to ask questions? Have you put your contact details on the final slide of the
presentation, the one that’s projected during the Q&A?
If your presentation is part of something bigger, like a project that you’re growing or a subject
that you want to master, you can create a Facebook page, a LinkedIn group, or a Yammer
group (depending on the topic and the audience) to stay in contact with people. You can also
use the channel to inform them about other initiatives, to let them share their experiences, and
so on.
You can link to a forum or a social page (related to the subject) if you’re active on it and you
don’t want to create another resource that you have to maintain.
Are you accepting LinkedIn connections but not Facebook requests? Tell them at the end of
your session, or message people before denying a friendship request.
Are your slides online for everybody or just for conference attendees? If you can post them
online, do it when people are still interested in your talk and share the news. Use the slides to
connect with more people.
Was the session recorded? When it’s online, share the video so you can increase your
connections and ask for more feedback.
Don’t forget side events
Sometimes it’s easier, especially for introverts, to skip conference side events like dinners,
parties, and so on. They’re important because you can ask for feedback in an informal setting
from people that attended your session, or, if yours is after the event, you can introduce your
talk to people and other speakers and ask for feedback regarding your ideas, the flow that
you’ve created, and so on.
60
Feedback is essential to your growth—reward it!
Did you ask for feedback at the end of the presentation? If people sent you an email or posted
something on social networks, take some time at the end of the session, and at the end of the
day, to respond, retweet, “heart,” or “like.”
Did you receive some criticism? Analyze your criticism and respond quietly, letting people know
what your reasons were, and if you accept their suggestions. If you don’t agree with them, thank
them anyway, and then try to explain your reasons.
Use all feedback as an opportunity to grow and connect. If people spend their precious time
giving feedback, perhaps they care about the topic. Use their knowledge to expand your own.
Try to understand their point of view.
If the session is not a single event, try to incorporate relevant feedback in the slides
immediately, or at least, try to record them somewhere for future use. If you see that people
keep asking the same questions after your sessions, try to incorporate the answers into the
presentation.
Note: I post online all the evaluation scores from conference feedback forms
when organizers send them to me—and not just positive ones. When I receive
negative or neutral results, I use that post or tweet to ask for additional feedback from
people that were at the session, something like: “I scored 60/100 at the XYZ session.
If you were there, please send me your thoughts on how to improve my
performance.”
Relax after the talk
How was the talk? Very good? You can enjoy a well-deserved rest after you’ve connected with
people.
Was it not so good? This is not the right time to worry—first, try to relax, and think about what to
improve after some hours or the day after.
Especially the first few times that you deliver a talk, there could be many things that you don’t
like, but you need time to address them, and you need a fresh mind to do it the right way!
Always go back to your standards
Was your session in line with your standards? Is it time to raise them a little bit? Is it time to
change gears and propose something at a bigger conference?
Just remember, standards are essential to your growth as a public speaker, so don’t forget to
reflect on them after every session!
61
Appendix A: Responding to a CFP
(Call for Papers)
Where to go to start speaking
Local user groups and meet-ups are perfect places to share knowledge and talk about a topic
that you like. Most of the time, organizers love to find new speakers, and sometimes they
organize a call for papers (CFP) or call for contents.
Usually, you cannot just contact the group and propose yourself as a speaker. It’s much better
to participate in group activities for a while, know the organizers and participants, see how
different people present, and understand what attendees like and don’t like. Then you can start
proposing topics.
Sometimes it’s better to record a little presentation (five minutes or more) to share with your
proposal, so organizers can see your speaking style and see how well you know the subject.
How to speak at bigger events
Going from a local user group or meet-up to a big event is like moving from minor league to
major league. Sometimes you’re invited to speak because of your involvement in local activities,
but most of the time, large events and conferences use a call for papers to recruit speakers.
Most of the speakers (old and new) are requested to fill a nomination form on the conference
website, and then there is a selection process.
Some conferences have public CFPs, while others do it by invitation only. Usually, events
organized by vendors are closed or by invitation, while industry events are open to everybody.
Being invited to an event or participating in an open FP doesn’t mean that it’s easy to be
selected. You have to work on your proposal, your public image, and your reputation.
Note: I’ve organized many events with hundreds of people attending, and I’ve
selected and trained a lot of speakers, but, before writing this Appendix, I interviewed
other conference organizers to gather a broader point of view on the topic.
Blind CFP
Some conferences prefer a blind CFP approach, where the team that is selecting session
proposals doesn’t know the author of the submission. In this way, talks are evaluated based on
title, abstract, and difficulty level, and nothing more is shared with reviewers. A famous speaker
might be rejected because they didn’t meet the criteria for submissions.
Public speaking for_geeks_succinctly

More Related Content

Public speaking for_geeks_succinctly

  • 3. 3 Copyright © 2018 by Syncfusion, Inc. 2501 Aerial Center Parkway Suite 200 Morrisville, NC 27560 USA All rights reserved. Important licensing information. Please read. This book is available for free download from www.syncfusion.com on completion of a registration form. If you obtained this book from any other source, please register and download a free copy from www.syncfusion.com. This book is licensed for reading only if obtained from www.syncfusion.com. This book is licensed strictly for personal or educational use. Redistribution in any form is prohibited. The authors and copyright holders provide absolutely no warranty for any information provided. The authors and copyright holders shall not be liable for any claim, damages, or any other liability arising from, out of, or in connection with the information in this book. Please do not use this book if the listed terms are unacceptable. Use shall constitute acceptance of the terms listed. SYNCFUSION, SUCCINCTLY, DELIVER INNOVATION WITH EASE, ESSENTIAL, and .NET ESSENTIALS are the registered trademarks of Syncfusion, Inc. Technical Reviewer: James McCaffrey Copy Editor: Courtney Wright Acquisitions Coordinator: Tres Watkins, content development manager, Syncfusion, Inc. Proofreader: Graham High, senior content producer, Syncfusion, Inc.
  • 4. 4 Table of Contents The Story behind the Succinctly Series of Books ................................................................. 8 About the Author ....................................................................................................................10 Chapter 1 Introduction...........................................................................................................11 Public speaking is not about you ..........................................................................................11 A necessary premise .......................................................................................................11 How do you find and define value?.......................................................................................11 So if public speaking is not about you, why are you afraid of it? ...........................................12 Have you defined your standard? ....................................................................................12 The talk doesn’t end with the final applause.....................................................................13 Chapter 2 Choosing the Topic and Creating the Flow.........................................................14 You have some slide decks that you can use.......................................................................14 How to reorganize your slides..........................................................................................14 You need or want to start from scratch .................................................................................15 The importance of stories and emotions...............................................................................16 Stories vs. facts ...............................................................................................................16 How to choose your stories ..................................................................................................17 Where do you find stories? ..............................................................................................18 How to create a story.......................................................................................................18 Influence without authority....................................................................................................19 Start with value.....................................................................................................................20 Chapter 3 Knowing Our Tools...............................................................................................21 Never underestimate an impeccable presentation................................................................21 Slide templates and conference templates ...........................................................................22 Slide masters and slide layouts........................................................................................23
  • 5. 5 Slide animations and transitions...........................................................................................26 Animation Pane ...............................................................................................................26 Common animation pitfalls...............................................................................................27 Morph transition....................................................................................................................28 Selection Pane .....................................................................................................................29 Finishing touches .................................................................................................................30 Improve the quality of printed slides.................................................................................30 Arrange items ..................................................................................................................31 Spelling and grammar......................................................................................................33 Chapter 4 Preparing the Presentation: To Geek or Not to Geek?.......................................34 What to do with all these tools?............................................................................................34 Must-have slides and slides to avoid ....................................................................................34 Slide refactoring examples ...................................................................................................35 Improving a text-heavy slide ............................................................................................36 Less is more: simplifying a complicated slide...................................................................38 Visualize your lists, avoid bullet points.............................................................................39 Reduce elements, keep some variance ...........................................................................40 One idea per slide: is it possible for a technical presentation? .........................................41 Reduce source code to the minimum...............................................................................42 Is my presentation accessible to everyone? .........................................................................42 Chapter 5 What to Do Before the Talk: Stage Fright, Introversion, and Saber-Toothed Tigers.......................................................................................................................................44 Stage fright is real! ...............................................................................................................44 Introverts and extroverts.......................................................................................................44 Anxiety can be an energy drain or can be a great source of power.......................................45 Don’t rehearse in front of a mirror.........................................................................................45 Synchronize yourself with your content ................................................................................46
  • 6. 6 Put the pedal to the metal!....................................................................................................46 Chapter 6 During the Talk: Be a Better You!........................................................................48 “Just be yourself” is not enough............................................................................................48 How to be a better you.....................................................................................................48 Rituals ..................................................................................................................................50 Know the environment .....................................................................................................50 Relaxation and power posing...........................................................................................51 Clean your mess..............................................................................................................52 Eye contact is the key to audience involvement...............................................................53 Powerful or powerless communication .................................................................................53 How to express vulnerability without losing trust ..............................................................55 How to finish a presentation when everything goes wrong ...................................................55 Learn how to breathe in difficult situations .......................................................................56 Help someone in need.....................................................................................................57 Work hard to exceed your limits ...........................................................................................57 Never learn a presentation by heart......................................................................................57 Close your session with style................................................................................................58 Chapter 7 After the Talk: Relax, Evaluate, and Connect .....................................................59 Many ways to connect..........................................................................................................59 Don’t forget side events........................................................................................................59 Feedback is essential to your growth—reward it!..................................................................60 Relax after the talk ...............................................................................................................60 Always go back to your standards ........................................................................................60 Appendix A: Responding to a CFP (Call for Papers)............................................................61 Where to go to start speaking...............................................................................................61 How to speak at bigger events .............................................................................................61
  • 7. 7 Blind CFP.............................................................................................................................61 Fine-tune both title and abstract ...........................................................................................62 Fine-tune your reputation and personal brand ......................................................................62 Be present............................................................................................................................63 Don’t flood the organizers.....................................................................................................63 Always remember the code of conduct.................................................................................64 Appendix B: Some Notes about Keynote..............................................................................65 Opening a PowerPoint presentation in Keynote and vice versa............................................65 Slide masters and slide layouts ............................................................................................66 Slide animations and transitions...........................................................................................68 Magic Move transition......................................................................................................69
  • 8. 8 The Story behind the Succinctly Series of Books Daniel Jebaraj, Vice President Syncfusion, Inc. taying on the cutting edge As many of you may know, Syncfusion is a provider of software components for the Microsoft platform. This puts us in the exciting but challenging position of always being on the cutting edge. Whenever platforms or tools are shipping out of Microsoft, which seems to be about every other week these days, we have to educate ourselves, quickly. Information is plentiful but harder to digest In reality, this translates into a lot of book orders, blog searches, and Twitter scans. While more information is becoming available on the Internet and more and more books are being published, even on topics that are relatively new, one aspect that continues to inhibit us is the inability to find concise technology overview books. We are usually faced with two options: read several 500+ page books or scour the web for relevant blog posts and other articles. Just as everyone else who has a job to do and customers to serve, we find this quite frustrating. The Succinctly series This frustration translated into a deep desire to produce a series of concise technical books that would be targeted at developers working on the Microsoft platform. We firmly believe, given the background knowledge such developers have, that most topics can be translated into books that are between 50 and 100 pages. This is exactly what we resolved to accomplish with the Succinctly series. Isn’t everything wonderful born out of a deep desire to change things for the better? The best authors, the best content Each author was carefully chosen from a pool of talented experts who shared our vision. The book you now hold in your hands, and the others available in this series, are a result of the authors’ tireless work. You will find original content that is guaranteed to get you up and running in about the time it takes to drink a few cups of coffee. Free forever Syncfusion will be working to produce books on several topics. The books will always be free. Any updates we publish will also be free. S
  • 9. 9 Free? What is the catch? There is no catch here. Syncfusion has a vested interest in this effort. As a component vendor, our unique claim has always been that we offer deeper and broader frameworks than anyone else on the market. Developer education greatly helps us market and sell against competing vendors who promise to “enable AJAX support with one click,” or “turn the moon to cheese!” Let us know what you think If you have any topics of interest, thoughts, or feedback, please feel free to send them to us at succinctly-series@syncfusion.com. We sincerely hope you enjoy reading this book and that it helps you better understand the topic of study. Thank you for reading. Please follow us on Twitter and “Like” us on Face-book to help us spread the word about the Succinctly series!
  • 10. 10 About the Author Increasing partners’ ROI on cloud investments with the right architecture is one my objectives as a Cloud Solution Architect working for Microsoft. Improving people’s public speaking skills is one of my personal goals. Living a full life with my family and friends is what drives me every day. I specialize in Cloud Application Development for both Azure and Office 365; Windows and cross-platform applications; Visual Studio; ALM (application lifecycle management) and DevOps; and I like to talk with people and communities about technology, food, and funny things. I'm a speaker, a trainer, and a public speaking coach. I've helped many students, developers, colleagues, and other professionals improve their stage presence and deliver exceptional presentations. I work for Microsoft Western Europe in the One Commercial Partner SI Alps division, helping partners (system integrators), developers, communities, and customers in Italy, Austria, and Switzerland, and supporting software development on Microsoft and OSS technologies. I've managed teams of more than twenty people, and I now enjoy leading virtual teams to drive specific results. I've been a Microsoft Certified Trainer since 2000, and am a former Microsoft MVP for ALM, DevOps, and virtual machines. I write articles for Italian IT magazines, and I speak at conferences in Italy and Europe. When this book is published, I can finally change my headline on LinkedIn from “Would-Be Book Author” to…something different! Let’s connect! Good luck with your career and with your future presentations. Feel free to connect with me on LinkedIn or Twitter, or send me an email and tell me what you think about this book, what I can improve, and send me your feedback—just like if I delivered a session in person! • LinkedIn: https://www.linkedin.com/in/geniodelmale • Twitter: https://www.twitter.com/_geniodelmale • Email: geniodelmale@outlook.com Note: “Genio del male” in Italian means “evil genius.” Please, don’t judge me by my nickname. I don’t want to conquer the world or anything like that! If you’re wondering why I use it as my nickname, it’s a long story. Perhaps someday I’ll decide to post about it! I can only tell you that my friends gave it to me many years ago.
  • 11. 11 Chapter 1 Introduction Public speaking is not about you Let’s start with the essential concept of this book. Repeat after me: “Public speaking is not about me, the speaker! Public speaking is about the value that I want to transmit to the public.” Most speakers—beginners and experienced ones—think people are there to listen to them, but they are just messengers of the value. If a presentation or a talk doesn’t have any value, the speaker can do their best to entertain people, but in the end, the audience will feel that something is missing. Always remember that your audience is investing its time listening to you—don’t waste it! It doesn’t matter if it’s a five-day course, a long or a short presentation, a meeting with colleagues or customers, an elevator pitch, or a water cooler talk. A necessary premise This book will help you present your ideas without falling into the typical pitfalls of public speaking, but all the suggestions that you can find here are ineffective if you cannot define and describe the value of your presentation. You need to know the subject that you’re presenting very well, too. We’ll also talk about the presentation for when there are no slides, or when the context is informal. How do you find and define value? When people have to prepare a presentation, they’ll open PowerPoint (or Keynote, or whatever tool they like) and start creating slides, spending a lot of time defining styles, animations, and a lot of details that are important for a curated presentation. Note: We’ll use PowerPoint for the rest of the book. Appendix B is dedicated to Keynote. People should do those things after having identified the value of the presentation, followed by the structure that shows the value with a story (or more than one if the value is complex), some examples, and all the necessary details. We’ll see the process in Chapter 2, and we’ll see how slides can complement a presentation in Chapter 3 and Chapter 4.
  • 12. 12 So if public speaking is not about you, why are you afraid of it? One of the most common clichès about public speaking is this one: “According to most studies, people’s number one fear is public speaking. Number two is death.” (cit. Jerry Seinfeld). Do you really think people would choose death over public speaking? The truth is that people fear public speaking more frequently than many other things1 . In Chapter 5 and Chapter 6, we’ll see what to do before and during the talk. But remember: people are not there for you; they’re there for the value you will give them. Have you defined your standard? Standards are essential in the technology field, but having a personal standard for our presentations is important, too! It doesn’t matter if you’re doing a presentation for yourself or for the company you work for—it’s your face that people are seeing, and it’s your personal brand and reputation that are affected by every presentation that you do, every talk, and every meeting. If you decide to talk about a topic that you don’t know very well, people will remember. Perhaps, years after its delivery, you’ll regret having done a session, because people will find it on the Internet. Are your slides okay or perfect? Is your dress code appropriate for the event? What about your demos? Is your body language in line with your message? Everything counts for a memorable presentation! Note: There are many quotes about reputation, but this one sums them up: “It takes 20 years to build a reputation and five minutes to ruin it. If you think about that, you’ll do things differently.” –Warren Buffet It’s important that you check if your current level is in line with your standard, and that you define a path to reach your desired level. Sometimes it’s better to refuse to deliver a talk, especially if you aren’t ready yet. I’m not saying that you should wait indefinitely, but don’t trade in your reputation too early! When I became a Cloud Solutions Architect, I was asked to deliver a session about serverless computing in a community meetup where there was also a session about a real use case of a competing technology. It was too early for me, so I declined the invitation and suggested a more experienced colleague. Some months later, with real-world experience on the topic, I called back to see if there were other opportunities, and we agreed to do a new session. 1 See https://www.quora.com/Is-there-any-real-evidence-that-people-are-more-afraid-of-public-speaking- than-dying
  • 13. 13 The talk doesn’t end with the final applause Of course, you have to earn your applause—you shouldn’t just expect it! Do yourself a favor and don’t close your presentation by asking the audience if they have questions, leaving the stage to random people. Go for the questions after stating your final message, and let people know that you’ve finished your talk. You could wait some seconds to see if people start applauding. If there is an awkward silence, go on immediately with the Q&A. Questions are an important part of your talk—you shouldn’t underestimate them. You should think about problematic questions in advance, and you should anticipate them in the talk, or you can have some materials in an appendix to back your answers. After the talk, you need to understand what you could improve, both in the content and in the delivery. Sometimes obtaining the right feedback is not so easy, but you could ask specific questions to gather desired information. Finally, don’t forget to nurture all the useful connections that you’ve created with your presentation. In Chapter 7 we’ll see how to do all of these things and how to prepare for the next round!
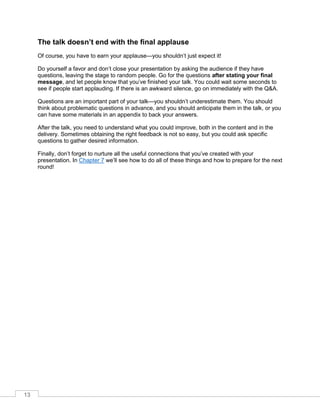
  • 14. 14 Chapter 2 Choosing the Topic and Creating the Flow Say you have to deliver a presentation at a conference, during a meeting with customers or colleagues, or to a professor. Where do you start? Usually, people will open their presentation tool and start creating slides, or they’ll go to some websites (internal to the company or external, like SlideShare) to find some decks and start assembling a presentation. This technique leads to presentations that are full of details, but fail to deliver some value because they weren’t thought out in advance. You have some slide decks that you can use Let’s suppose that you have a slide deck (or more than one) that you could use to deliver your presentation. This is often the case with corporations. It can save you a lot of time, but people will immediately know if you aren’t feeling the slides as yours, if you don’t agree with the content, or if you could have used a different order or a different example. If you’re in a hurry (because your boss told you the day before about the presentation) or if the slides are mandatory, you could use them without modifications. Try to visualize the flow in your mind and do a dry run to see if you can tell the right stories, or if you need some different examples (for example, to replace slides that don’t work well in your culture). Slides are important, but you can still deliver a great session if you don’t have great slides. You could describe the value at the beginning of the presentation, even on the title slide, if you don’t have supporting slides at the beginning. In this way, you’ve set the playing field, and then you can follow the slides, using the right stories to deliver the value. How to reorganize your slides If you can create new slides, or rearrange existing slides, it’s your job to create the right flow. Always start with the value, and try to remove all the details that aren’t important. Don’t immediately delete slides; you can hide them, or move them to the appendix. If slides are too complicated or too wordy, try to apply the techniques that you’ll see in Chapter 4 to simplify them. Use the Slide Sorter with the right zoom to visualize the flow of the presentation.
  • 15. 15 Figure 1: Slide Sorter In Figure 1, the core value of the presentation is about “making a great show.” To do it, everything starts with defining your standard. The presentation continues by stating that everybody could improve if they follow the right suggestions, like avoiding introducing yourself at the beginning instead of starting immediately with the value. (People should ask your name because they’re interested.) And so on. You can exercise your ability to organize and rearrange slides by downloading existing presentations on a topic that you know, and trying to make your version of the deck. You can always improve a presentation, even a good one, by making it yours. Sometimes there are no modifications that you can make; in that case, you can still learn something from that presentation. You can also exercise during meetings: try to visualize how you could have done the presentation that is being delivered. You need or want to start from scratch Before creating a new presentation from scratch, you should have delivered many presentations with slides created by somebody else that you’ve modified or rearranged. Studying the work of others and improving on it is a good way to exercise and nurture your creativity.2 When you’re ready to create your first presentation from scratch, my suggestion is to open a text editor and write the value of the presentation, which could be the only sentence that the audience should remember after your talk. 2 See https://www.amazon.com/Stages-Creativity-Developing-Your-Creative/dp/1541192079
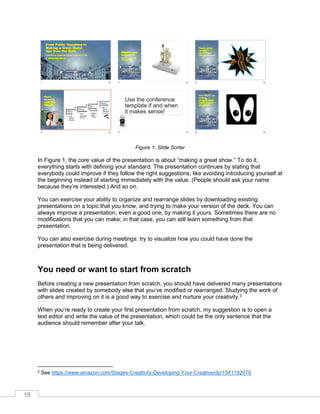
  • 16. 16 Then you can start to brainstorm ideas and stories, research facts around your core value, and write them down. Do you know your audience? Try to visualize them to help you understand their needs and why your value should be important for them. Try to brainstorm stories that will resonate with them. Once you’ve done this activity, you can look at the items that you wrote and try to prioritize them and give them a logical order. At this point, you can start creating your slides. You don’t have to fit all the things that you’ve brainstormed; you should only add the most important one that allows you to deliver your stories to support the core value of your presentation. The importance of stories and emotions Stories (real or invented) are one of the most useful tools that you can use to improve your presentation. You can use a story to explain the value of your presentation. You can use a story to introduce your product or to create the need to understand more of it. You can use stories in a technical presentation to explain why you’re using a specific technique, why you’re optimizing the performance of some code, or why it’s important to focus on usability. Stories vs. facts Facts don’t stick in our brain if we don’t already have a place for them. You can throw a lot of facts at your audience, but if people won’t remember them after some time, the effectiveness of your presentation was very low. Emotions are a powerful way to recall facts that are stored in your memory. Stories are normally used to create or associate emotions with the facts that will follow. As a geek, you might be tempted to use facts as your only weapon to impress your audience, creating slides and demos to show how good your work is, and how much you know a specific technology. That doesn’t stick. Do you remember Bing Bong from the Disney/Pixar movie Inside Out?3 At some point, he’s lost in the Memory Dump with all the disappearing memories. It’s an excellent image4 to help you remember that facts will fade away without a good story. Consider that many courses to improve your memory use strong emotions to connect facts and make them stick. 3 See http://pixar.wikia.com/wiki/Bing_Bong 4 See https://iamavig.files.wordpress.com/2015/06/bing-bong.jpg
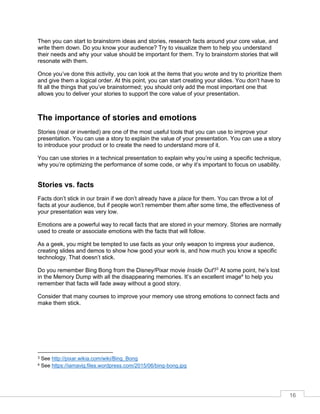
  • 17. 17 How to choose your stories There’s a good book called Life Zones5 that, among other things, explains that there are four zones in our lives. Figure 2: Four life zones The public zone is open to anyone. You’re in the public zone when you look around to find information and stimulation, when you’re completely anonymous, or when you’re together with a lot of people and interacting with them. The social zone is where you perform an activity, like working or playing a sport, together with people that interact with you. The personal zone is where you are sharing what you feel with people you trust. In the personal zone, you feel vulnerable because of this sharing. The intimate zone is the innermost zone, where you’re more vulnerable because you’re with the people you care about most. You can relate these zones to the kind of performance you’re delivering. If you’re presenting facts to complete strangers without interaction and without questions from a powerful position (for example, as a professor behind a lectern), you could be in the public zone, where you’re not vulnerable (or just a little bit). If you’re presenting to people you know, or you open yourself and interact with attendees, sharing information and generic stories, you’re in the social zone. This is the place where you’re more vulnerable, but where people start feeling a better connection. 5 See https://www.amazon.com/Life-Zones-Tools-place-yourself- ebook/dp/B00ILG3WQ4/ref=asap_bc?ie=UTF8
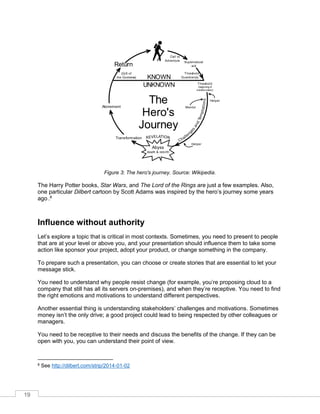
  • 18. 18 If you’re presenting using personal stories, like how you used a product with your son, you’re in the personal zone where you’re more vulnerable, because it’s difficult to separate criticism from our personal experiences. A presentation could contain a mix of those stories; you can start from the public zone and move to the social or the personal. Be cautious: you could take a product remark as a personal criticism if you’re in the personal zone, and the audience (or part of it) is in the public or social zone. To become a better speaker, you need to handle this zone mismatch. Always ask for feedback from friends and other attendees about a remark that you felt was rude; perhaps other people didn’t feel the same. Where do you find stories? Stories are everywhere, all around us. Just pay attention to people, to strangers—on the way to work, at a park, anywhere. A good story can be genuine, or you can modify it in some way to support your point. Just be sure to tell the truth if asked by some attendees. Do you need help? The Storyteller’s Spellbook by James Whittaker6 is a great book that helps you craft your stories. How to create a story If you need a story but can’t find one, The Hero’s Journey7 is a good template to create a new story. As you can see, many movies follow the path highlighted in the following figure. 6 See https://www.amazon.com/Storytellers-Spellbook-compelling-career-magical- ebook/dp/B073Q5X4BX 7 See https://en.wikipedia.org/wiki/Hero%27s_journey
  • 19. 19 Figure 3: The hero's journey. Source: Wikipedia. The Harry Potter books, Star Wars, and The Lord of the Rings are just a few examples. Also, one particular Dilbert cartoon by Scott Adams was inspired by the hero’s journey some years ago .8 Influence without authority Let’s explore a topic that is critical in most contexts. Sometimes, you need to present to people that are at your level or above you, and your presentation should influence them to take some action like sponsor your project, adopt your product, or change something in the company. To prepare such a presentation, you can choose or create stories that are essential to let your message stick. You need to understand why people resist change (for example, you’re proposing cloud to a company that still has all its servers on-premises), and when they’re receptive. You need to find the right emotions and motivations to understand different perspectives. Another essential thing is understanding stakeholders’ challenges and motivations. Sometimes money isn’t the only drive; a good project could lead to being respected by other colleagues or managers. You need to be receptive to their needs and discuss the benefits of the change. If they can be open with you, you can understand their point of view. 8 See http://dilbert.com/strip/2014-01-02 eturn all to Adventure Supernatural aid KN WN NKN WN Threshold )s(uardian Threshold (beginning of transformation) elper Mentor elper Atonement Transformation ( ift of the oddess) Abyss death rebirth The ero s Journey
  • 20. 20 Adam rant’s book Give and Take9 has an entire chapter about using the right motivation to induce a change in people or organizations. Sometimes you need to question the status quo before presenting your solution, because it’s easier to remain static if you don’t feel the pain. Start with value Speakers who introduce themselves and their company, then move to the agenda slide, then start with a long trip around the topic that they want to explain usually do this because it’s the typical way to start a presentation—and when they’re anxious, they’ll go back to their comfort zone. Being able to start directly with value requires some preparation. There are many possible ways to do it: • Tell a story that shows the value. We’ve already covered why stories are important, so no need to explain this. • Ask a question that allows you to uncover the value. Questions are a powerful tool if you can handle all the possible answers, and not just the answers that you expect. • Go around the table. If there are fewer than ten to fifteen people, you can start by asking people to answer a simple question related to the value. You must keep control of the time, and you shouldn’t let an attendee steal your focus. • Arouse curiosity. If you can use a prop during your presentation, it could help you arouse curiosity about the value. Bill Gates released mosquitos during a TED talk to raise awareness about malaria.10 Tip: Try to have more than one way to start your presentation. You need to master all of them and choose the one that better suits your mood or your audience. The first few minutes of a presentation are essential for getting people’s attention and keeping it for the rest of the session. Use this time in the best way possible! 9 See https://www.amazon.com/Give-Take-Helping-Others-Success/dp/0143124986/ 10 See https://www.ted.com/talks/bill_gates_unplugged
  • 21. 21 Chapter 3 Knowing Our Tools Never underestimate an impeccable presentation There are two types of geeks: those who hate using slides and do only demos, and those who create too many slides and fill them with too many details. While there is a place for the first type of geek (the NoSlidesConf, for example), the second type tends to have bad results most of the time. There is a golden rule in the public speaking field: Two minutes per slide, five minutes per demo. So, let’s say that you have 40 minutes: you can have 20 slides or 15 slides and two demos, and so on. It’s not a hard rule; you could break it and still deliver a great on-time presentation. But if you follow this rule, it’s easy to finish in time, especially at the beginning of your public speaking career. Now that we’ve defined how long a presentation should be, let’s talk about its content. A presentation must be curated; you have to choose the right colors, the right images, the right logos, and so on. You should always remember that people could find your presentations years later, and they will be associated with your name. Always remember to follow your standards. Some years ago, I delivered a live online presentation about public speaking for the Italian TecHeroes on Microsoft Channel 9. The show was curated in many aspects, with green-screen effects, two virtual locations, pre-recorded videos to fill blank times, and so on. I didn’t have time to curate the slides specifically for the event; I thought I could reuse a previous deck, considering that slides were used only in the first location and just for a few minutes. At the end of the live event, I received lots of feedback that it was very well executed, but some of the slides were poor. Never underestimate the effect of a curated presentation! Figure 4: Public speaking live event on Microsoft Channel 9
  • 22. 22 In this chapter, we’ll see some PowerPoint features that are often overlooked, leading to low- quality slides. In the next chapter, we’ll see how to solve some common pitfalls when geeks design slides. If you prefer to use Keynote to prepare and deliver your presentations, you can find some Keynote-specific notes in Appendix B. Slide templates and conference templates11 A curated presentation starts with a good template. PowerPoint includes many built-in templates.12 You can also search online for additional ones. Once you find some useful templates, it’s difficult to discard them. What about conference templates? There are mixed feelings about conference templates. People agree that they’re essential for the brand of the conference, but sometimes they’re too intrusive and force speakers to adapt presentations to every different conference template, losing a lot of time.13 Years ago, the situation was complicated because PowerPoint only supported one master template for the entire presentation, but now, you can use multiple templates.14 This means you can keep your beloved template and insert the first and last slides from the conference one. If the conference logo is mandatory on every slide, you can embed it into your template just for that presentation. When you’re pasting slides from one presentation to another, you can right-click and decide if you want to use the destination theme, keep existing formatting, or paste as a picture. If you choose to keep existing formatting while pasting the slide, the original template of the slide is copied in the new presentation. Figure 5: Different paste options when copying slides 11 Conference templates are often sent by conference organizers some time before the conference, and include a mandatory welcome slide, sponsor slides, conference logo on every slide, fonts, color sets, conference contacts, copyright information, and so on. 12 PowerPoint uses the term “theme” to refer to layouts that contain colors, fonts, and effects. Then there are slide masters and slide layouts that are covered in the rest of this chapter. “Template” is a more general industry term for referring to all these things. 13 Sometimes conference templates are curated, with readable fonts, visible colors with a good contrast, and so on. In this case, if the copyright notice allows reuse, think about using it (without conference logos and other specific information) for your future presentations. It’s difficult to find good templates! 14 See these articles on using multiple themes and using multiple slide masters in one presentation.
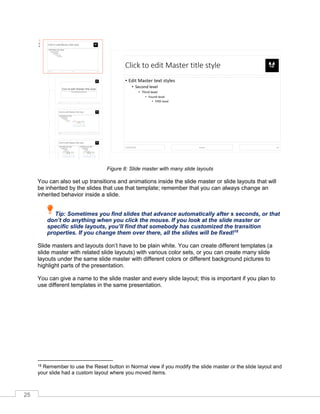
  • 23. 23 Note: Always check your entire deck in presentation mode when you modify a template, when you apply a new one, or when you mix two templates. Subtle things can change, leading to incorrect animations, wrong colors, text size changes, words or images outside of the projected area, and so on. When you create a new slide, you can choose the slide layout from the different templates that you have in the slide deck, like in the following figure. You can change the slide layout using the Layout button, and you can reset a slide with the Reset option.15 Figure 6: Different layouts to choose from Tip: If you start mixing slides with different templates, you can end up having huge presentation files because you’re importing all the slide masters, all the background images, logos, and so on. You can reduce file size by using a macro that keeps only the slide layouts that are actually used in the presentation. Slide masters and slide layouts A lot of speakers, beginners and experienced ones, don’t know how to use, create, and modify a template. Have you ever tried the Slide Master option on the Views tab? 15 Sometimes when you apply a different layout to a slide, elements that were previously repositioned remain in the old layout. The Reset button fixes the problem.
  • 24. 24 Figure 7: Slide Master in PowerPoint Every template starts with a slide master,16 which, as you can see in Figure 7, allows you to choose between a 4:3 or 16:9 slide size, add standard title and footers in the slide, change colors, fonts, background styles, and so on. Slide Master is chosen by default when you create a new slide (if you have more templates in the slide deck, the slide master of the previous slide is used), and should contain common items like title, logos, text areas, and so on. Slide layouts17 are children of a slide master. You can insert common items in the slide masters, and they’re inherited in every slide layout. Slide layouts could be used to define other layouts, like a two-column layout, demo slide layout, presentation title layout, announcement slide layout, and so on. In the following figure, you can see that the author’s logo was added to the slide master, and all the child slide layouts are inheriting it. 16 See https://support.office.com/en-us/article/What-is-a-slide-master-b9abb2a0-7aef-4257-a14e- 4329c904da54 17 See https://support.office.com/en-us/article/What-is-a-slide-layout-99da5716-92ee-4b6a-a0b5- beea45150f3a
  • 25. 25 Figure 8: Slide master with many slide layouts You can also set up transitions and animations inside the slide master or slide layouts that will be inherited by the slides that use that template; remember that you can always change an inherited behavior inside a slide. Tip: Sometimes you find slides that advance automatically after x seconds, or that don’t do anything when you click the mouse. If you look at the slide master or specific slide layouts, you’ll find that somebody has customized the transition properties. If you change them over there, all the slides will be fixed!18 Slide masters and layouts don’t have to be plain white. You can create different templates (a slide master with related slide layouts) with various color sets, or you can create many slide layouts under the same slide master with different colors or different background pictures to highlight parts of the presentation. You can give a name to the slide master and every slide layout; this is important if you plan to use different templates in the same presentation. 18 Remember to use the Reset button in Normal view if you modify the slide master or the slide layout and your slide had a custom layout where you moved items.
  • 26. 26 Slide animations and transitions Animations occur inside a slide; transitions connect one slide to another. There are many of each, as you can see in the following figure. Some are subtle, and some are very dynamic but could be perceived as invasive. Usually, you should keep exciting transitions only for a few slides in the presentation, like announcements. If you don’t have exciting news to share, refrain from using those transitions, or at least change the duration. Figure 9: Animations (left) and transitions (right) Tip: If you want all your announcements slides to use a specific transition, you can set it up in the corresponding slide layout. This way you won’t forget it! Animation Pane The Animation Pane is useful when you have a complex slide with a lot of animations. In the Animation Pane, you can see the temporal flow of the animated sequence; you can also see animations that co-occur. When you select an item in the pane, you can see it selected in the slide and vice versa. You can add, remove, and reorder animated items.
  • 27. 27 Figure 10: An animated slide with many moving objects Common animation pitfalls Many things could go wrong when you animate your slides: • People could be easily distracted by animations. • The speaker could forget to advance the animation while talking, and then have to fast- forward at the end, which looks unprofessional. • Animated slides could need much more time than the canonical two minutes, and could lead to going overtime. • Animated slides are often impossible to print, export to PDF, or share on https://www.slideshare.net/.19 • Animations (but also transitions to the next slide) could be configured to occur automatically; therefore, you need to accurately test a slide deck built by someone else in presentation mode. Otherwise, you could end up with a bad performance. Despite these potential problems, animations are a powerful tool to explain complex ideas and processes, such as long-running transactions, protocols with many steps, and so on. Note: If you can’t describe all the actions of an animated slide, it’s better to remove some parts or make it static. You can also split an overly complicated animated slide into two or more simple slides, with the positive side effect that it’s easier to estimate time, print or share the slide deck, and so on. 19 See https://www.linkedin.com/pulse/publishing-effective-presentations-slideshare-lorenzo-barbieri/
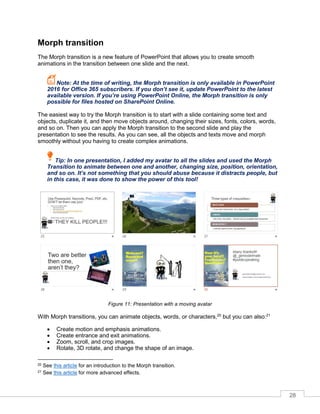
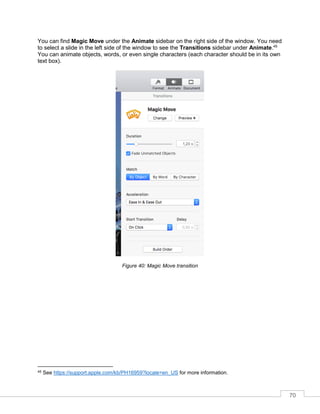
  • 28. 28 Morph transition The Morph transition is a new feature of PowerPoint that allows you to create smooth animations in the transition between one slide and the next. Note: At the time of writing, the Morph transition is only available in PowerPoint 2016 for Office 365 subscribers. If you don’t see it, update PowerPoint to the latest available version. If you’re using PowerPoint Online, the Morph transition is only possible for files hosted on SharePoint Online. The easiest way to try the Morph transition is to start with a slide containing some text and objects, duplicate it, and then move objects around, changing their sizes, fonts, colors, words, and so on. Then you can apply the Morph transition to the second slide and play the presentation to see the results. As you can see, all the objects and texts move and morph smoothly without you having to create complex animations. Tip: In one presentation, I added my avatar to all the slides and used the Morph Transition to animate between one and another, changing size, position, orientation, and so on. It’s not something that you should abuse because it distracts people, but in this case, it was done to show the power of this tool! Figure 11: Presentation with a moving avatar With Morph transitions, you can animate objects, words, or characters,20 but you can also:21 • Create motion and emphasis animations. • Create entrance and exit animations. • Zoom, scroll, and crop images. • Rotate, 3D rotate, and change the shape of an image. 20 See this article for an introduction to the Morph transition. 21 See this article for more advanced effects.
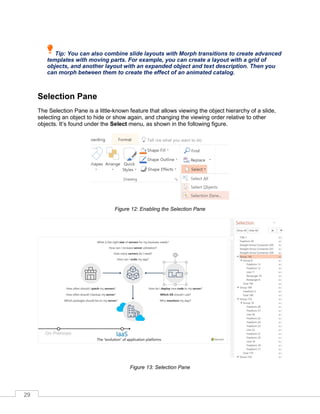
  • 29. 29 Tip: You can also combine slide layouts with Morph transitions to create advanced templates with moving parts. For example, you can create a layout with a grid of objects, and another layout with an expanded object and text description. Then you can morph between them to create the effect of an animated catalog. Selection Pane The Selection Pane is a little-known feature that allows viewing the object hierarchy of a slide, selecting an object to hide or show again, and changing the viewing order relative to other objects. It’s found under the Select menu, as shown in the following figure. Figure 12: Enabling the Selection Pane Figure 13: Selection Pane
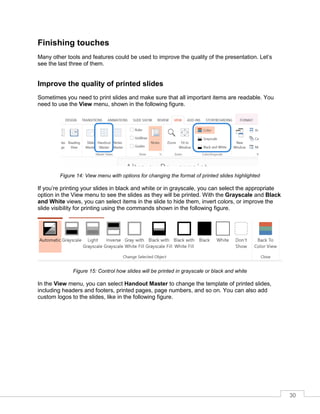
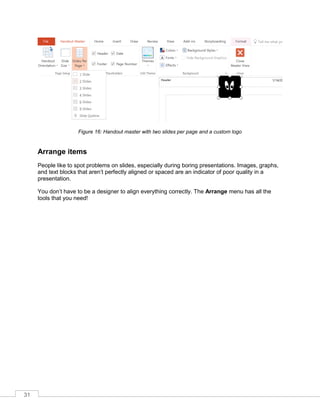
  • 30. 30 Finishing touches Many other tools and features could be used to improve the quality of the presentation. Let’s see the last three of them. Improve the quality of printed slides Sometimes you need to print slides and make sure that all important items are readable. You need to use the View menu, shown in the following figure. Figure 14: View menu with options for changing the format of printed slides highlighted If you’re printing your slides in black and white or in grayscale, you can select the appropriate option in the View menu to see the slides as they will be printed. With the Grayscale and Black and White views, you can select items in the slide to hide them, invert colors, or improve the slide visibility for printing using the commands shown in the following figure. Figure 15: Control how slides will be printed in grayscale or black and white In the View menu, you can select Handout Master to change the template of printed slides, including headers and footers, printed pages, page numbers, and so on. You can also add custom logos to the slides, like in the following figure.
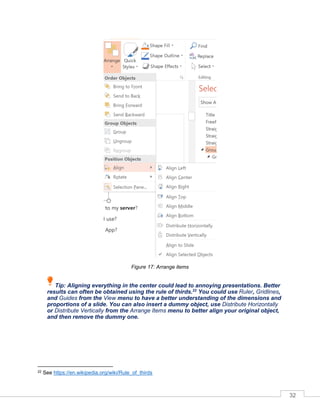
  • 31. 31 Figure 16: Handout master with two slides per page and a custom logo Arrange items People like to spot problems on slides, especially during boring presentations. Images, graphs, and text blocks that aren’t perfectly aligned or spaced are an indicator of poor quality in a presentation. You don’t have to be a designer to align everything correctly. The Arrange menu has all the tools that you need!
  • 32. 32 Figure 17: Arrange items Tip: Aligning everything in the center could lead to annoying presentations. Better results can often be obtained using the rule of thirds.22 You could use Ruler, Gridlines, and Guides from the View menu to have a better understanding of the dimensions and proportions of a slide. You can also insert a dummy object, use Distribute Horizontally or Distribute Vertically from the Arrange Items menu to better align your original object, and then remove the dummy one. 22 See https://en.wikipedia.org/wiki/Rule_of_thirds
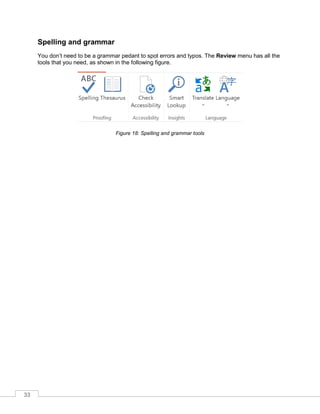
  • 33. 33 Spelling and grammar You don’t need to be a grammar pedant to spot errors and typos. The Review menu has all the tools that you need, as shown in the following figure. Figure 18: Spelling and grammar tools
  • 34. 34 Chapter 4 Preparing the Presentation: To Geek or Not to Geek? What to do with all these tools? Do you remember the second type of geek that we mentioned at the beginning of the previous chapter? Have you ever seen presentations with these qualities? • Too much text on the slide, with a tiny font. • Too many bullet points (more than four), with many subitems. • Entire pieces of documentation pasted on the slides, with a very long link at the end. • Source code pasted on the slides using a tiny font or shown inside the editor without increasing the font or using a tool like ZoomIt.23 • Too many graphs, pictures, and diagrams that are difficult to read. • Disturbing transitions that are slow and time consuming. Always remember that people tend to read everything you put on a slide. If you need to add reference slides, you can hide them during the presentation or move them to the appendix. Tip: A dry run with a non-technical person can help you improve slide quality, reduce distracting content, and increase readability of the presentation. The next time you’re attending a presentation with the previous qualities, pay attention to your reactions to every slide, how much time you spend reading them, and how much time you’re distracted by complex graphs or schemas that aren’t necessary. Must-have slides and slides to avoid The only slides that you must have are the first and the last. The first is the one that’s projected while people are entering the room, before you start presenting, with the title of the session, your name, contact details (optional), conference logos, etc. Showing a title slide while people are entering the room is important. It gives a positive impression that the speaker is ready, helps people understand if they’re in the right room, and allows them to take note of your contact information if present on the slide. Tip: Sometimes it’s useful to create a little (three or four slides maximum) rolling presentation with important information that people should know before attending the talk. You can create a separate deck with the title slide and some informative slides (with “Before we begin” or a similar title) that cycle on the screen. Keep the official presentation ready so you won’t lose time when it’s time to begin. 23 See https://docs.microsoft.com/en-us/sysinternals/downloads/zoomit
  • 35. 35 The last slide is essential: it should have your contact details (mandatory), requests for feedback, and the session code or session title if conference organizers are collecting feedback. You should keep it on the screen while doing Q&A, unless you need some slide to answer a question. If you’re presenting at a “no slides conference,” or if you’ve decided to avoid slides completely, you can open a text editor, increase the font size to 40 or more, and write your contact details at the end of the presentation. You can also use your contact details and the presentation title as the desktop background during the presentation—it’s not a slide, it’s the background! You should avoid “About Me” and “Agenda” slides that are often in conference templates because people care about the value of the presentation, not about the speaker, and because an agenda is useful only for day-long or multi-day courses. You can keep the “About Me” and “Agenda” slides in the downloadable or printed version of your presentation if you’d like. If you really want to use an “About Me” slide, it’s better to put it after the main value of the presentation. First, tell the audience why they should listen to you, and then you can spend a few seconds talking about you if you cannot avoid it. A better “Agenda” slide, if you’re presenting a day-long or multi-day courses, could be designed as a time line, instead of a boring bullet-point list. Keep resources and other “boring” slides in the appendix, and show them only if requested. “ ecap” slides are better than “Agenda” ones, but sometimes there is a risk of losing time by repeating the same concepts. It’s better to use them only if there are many important topics in the presentation and you need to clarify your call to action explicitly. Note: If you should avoid using “About Me” and “Agenda” slides, why do conference templates keep using them? “We’ve always done it this way” is the typical answer. Remember, life begins at the end of your comfort zone. Slide refactoring examples “Code refactoring is the process of restructuring existing computer code—changing the factoring— without changing its external behavior.”24 Similarly, we’ll use slide refactoring to improve the readability and understandability of a typical geek slide. Note: You cannot oversimplify a technical slide without losing information, but you can try to improve it using the right fonts, colors, animations, and pictures. 24 See https://en.wikipedia.org/wiki/Code_refactoring
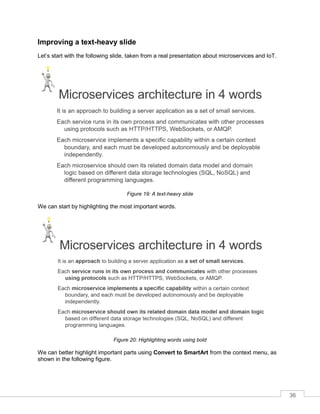
  • 36. 36 Improving a text-heavy slide Let’s start with the following slide, taken from a real presentation about microservices and IoT. Figure 19: A text-heavy slide We can start by highlighting the most important words. Figure 20: Highlighting words using bold We can better highlight important parts using Convert to SmartArt from the context menu, as shown in the following figure.
  • 37. 37 Figure 21: Converting bullet points to SmartArt nce you’ve converted a bulleted list to SmartArt, you can play with its properties, shapes, colors, and animations to obtain a more readable slide. Figure 22: Slide refactoring completed!
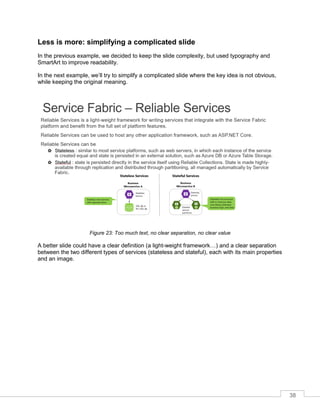
  • 38. 38 Less is more: simplifying a complicated slide In the previous example, we decided to keep the slide complexity, but used typography and SmartArt to improve readability. In the next example, we’ll try to simplify a complicated slide where the key idea is not obvious, while keeping the original meaning. Figure 23: Too much text, no clear separation, no clear value A better slide could have a clear definition (a light-weight framework…) and a clear separation between the two different types of services (stateless and stateful), each with its main properties and an image.
  • 39. 39 Figure 24: Clear definition, clear separation between stateless and stateful The slide shown in Figure 24, with the right animations, could be more effective than the original. Depending on the audience, we can decide to cut some more text from the slide, or we can split the slide into two different slides with larger pictures. Note: SmartArt wizards are available only in PowerPoint at the time of writing. You can create them in Keynote or other tools by aligning different objects, but the overall result could be more difficult to emulate. Visualize your lists, avoid bullet points Bullet points are bad—they kill people’s attention. Most of the time you cannot avoid them, but you can try to add some pictures and colors to the slide to engage your audience. It’s easy to imagine the ugly boring bullet point list that was used to create the following slide.
  • 40. 40 Figure 25: A better way to present a list Which one do you prefer? Can we do better? Of course we can! The last item is too wordy, and the font is smaller than the one used in the other items, but as we stated before, sometimes you cannot oversimplify a slide—it depends on the audience. Tip: You don’t need to read your slides, but sometimes having the detailed list on the screen can help your memory. It’s better to have more items on the screen if it helps you remember important stuff. You can always remove them the next time you present to another audience. Reduce elements, keep some variance Look at the following two slides. Figure 26: How to reduce complexity without reducing variance
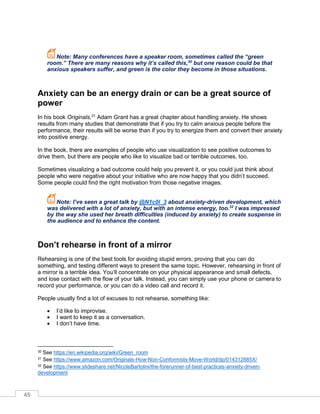
  • 41. 41 The slide on the left is more complete; it describes many elements and has 20 logos on it. The slide on the right is simpler and has fewer logos, but offers the same general information. The important thing when you work on simplifying a slide is to keep some variability to increase interest. For example, on the right slide, there are consumer and commercial services, personal and enterprise ones, and so on. If you know that one or more items are important for your audience, keep them! If you know that some items are unexpected by your audience, add them, or even better—animate them to create a “wow” effect. One idea per slide: is it possible for a technical presentation? One way to avoid using bullet points, SmartArt, and similar components is by creating slides with just one idea per slide. The advantage is clear: you can use a BIG font, with a nice picture, and talk for a few seconds about the idea, and then you can move on to the next slide. In practice, it’s tough to have just one idea per slide because people tend to speak too much about a topic, and too little about the next one, making it difficult to estimate the time needed for the presentation without a proper dry run. Sometimes it’s useful to show a slide full of stuff, just to highlight a specific part and let people know the complexity of the subject, like in the following slide. Figure 27: A complex slide with a highlighted subset If the next slide is a deep dive on the highlighted subject, you can use a Morph transition to better connect the two slides.
  • 42. 42 Reduce source code to the minimum Figure 28: Slide with only the relevant source code is shown In Figure 28, you can see that important information is highlighted, that error handling code is removed (it’s not important in the context), and only relevant comments are left in the code. Try to limit the amount of source code you put on slides, and always check that it’s visible from the last rows of the audience. Is my presentation accessible to everyone? As a presenter, you have to ask yourself this simple question.25 Disabilities could be permanent, or temporary. When presenting to someone, people with different learning styles or people speaking other languages26 could have problems similar to people with disabilities. Every image in your presentation should have a written description that could be read by a screen reader, every video should have captioning, fonts should be readable, and the speaker should try to give context to graphs and pictures that are difficult to understand. 25 See https://www.youtube.com/watch?v=4uiBYqW4mj8 for a detailed explanation. 26 Microsoft’s Presentation Translator is a tool that can help with real-time translations.
  • 43. 43 Tip: PowerPoint offers a Check Accessibility command inside the Review tab. Use it to check your presentations and make them more accessible. Note: The terms “accessibility” and “inclusion” are closely related. Loosely speaking, accessibility refers to aspects related to disabilities (such as vision impairment), and inclusion is a slightly broader term related to usability by the greatest number of people.
  • 44. 44 Chapter 5 What to Do Before the Talk: Stage Fright, Introversion, and Saber- Toothed Tigers Stage fright is real! You can’t avoid stage fright—you need to handle it.27 Different people have different responses to it, but nobody feels safe on stage, in front of a lot of people. Experienced speakers and performers still suffer from stage fright. That’s natural, because our brain was trained over thousands of years to pay attention to possible risks, and to fight or flee. Have you ever heard of saber-toothed tigers that in our imagination are the natural enemies of our ancestors, the cavemen? To keep our feline-inspired metaphor, we need to think about our audience like kittens that need to be fed with stories and knowledge, not saber-toothed tigers ready to eat us. If you think about your presentation more as a conversation and less as a performance, it’s easier to handle stage fright. Introverts and extroverts Introverts and extroverts can both be excellent public speakers. The only difference between them is that introverts need time for themselves to charge their batteries before the session, and time to recharge them after it. Extroverts can charge their batteries while being with the public, and after a session they have a high level of energy. This means that if you’re an introvert, you probably need some time alone before and after the session. You can go to the speaker’s room, you can go outside the conference venue, or you can find an empty room and sit there. “Public speaking for quiet people”28 is a great talk that can help you understand how to be a great speaker while being an introvert. By the way, if you’re an introvert, you need to enjoy your conference, too. Conferences for Introverts by Alan Mendelevich29 is a great book with a lot of practical advice. 27 See https://medium.com/@docjamesw/the-stage-is-the-new-jungle-909fd32515ba for a process to handle stage fright. 28 See https://www.youtube.com/watch?v=Egq6IPUMgh4 29 See https://www.amazon.com/Conferences-Introverts-Looking-Thrive-Optimized/dp/1549954059/
  • 45. 45 Note: Many conferences have a speaker room, sometimes called the “green room.” There are many reasons why it’s called this,30 but one reason could be that anxious speakers suffer, and green is the color they become in those situations. Anxiety can be an energy drain or can be a great source of power In his book Originals,31 Adam Grant has a great chapter about handling anxiety. He shows results from many studies that demonstrate that if you try to calm anxious people before the performance, their results will be worse than if you try to energize them and convert their anxiety into positive energy. In the book, there are examples of people who use visualization to see positive outcomes to drive them, but there are people who like to visualize bad or terrible outcomes, too. Sometimes visualizing a bad outcome could help you prevent it, or you could just think about people who were negative about your initiative who are now happy that you didn’t succeed. Some people could find the right motivation from those negative images. Note: I’ve seen a great talk by @N1c0l_3 about anxiety-driven development, which was delivered with a lot of anxiety, but with an intense energy, too.32 I was impressed by the way she used her breath difficulties (induced by anxiety) to create suspense in the audience and to enhance the content. Don’t rehearse in front of a mirror Rehearsing is one of the best tools for avoiding stupid errors, proving that you can do something, and testing different ways to present the same topic. However, rehearsing in front of a mirror is a terrible idea. You’ll concentrate on your physical appearance and small defects, and lose contact with the flow of your talk. Instead, you can simply use your phone or camera to record your performance, or you can do a video call and record it. People usually find a lot of excuses to not rehearse, something like: • I’d like to improvise. • I want to keep it as a conversation. • I don’t have time. 30 See https://en.wikipedia.org/wiki/Green_room 31 See https://www.amazon.com/Originals-How-Non-Conformists-Move-World/dp/014312885X/ 32 See https://www.slideshare.net/NicoleBartolini/the-forerunner-of-best-practices-anxiety-driven- development
  • 46. 46 You can easily spot people who have rehearsed their presentations—not because they don’t improvise, or because they are presenting like an actor on stage—but because they can anticipate bad things that could happen during the presentation. Always remember that your goal in rehearsing is not to be perfect; it’s about better preparation and handling your stage fright. When you’re good at it, you can also rehearse in your mind, visualizing the presentation, the flow, and workarounds for potential problems. But you need a lot of practice! Synchronize yourself with your content Do you look at the Date Modified field of presentations? If you’re in the room when someone is preparing to present, and you can see the desktop, try to look at the modified date of the presentation. Most of the time, you’ll find that speakers have updated their presentations the same day of the delivery. It’s a good thing to review your material and to synchronize yourself with the content. You have to think about the stories—perhaps you’ve met somebody at the conference, and now you have a better knowledge of your audience. Sometimes you just have to modify something so that your brain thinks the content is fresh, and your body language will be consistent with that. Note: Have you ever felt that a presentation was old, that the content wasn’t fresh? Sometimes, especially if it’s the first time you’re learning something, you’ll have a gut feeling that the content is stale. That’s because the body language of the presenter gives you that message. Making little changes to a presentation before doing it helps to solve this problem. Put the pedal to the metal! The final advice of this chapter is: Stay away from your comfort zone, take risks, and be bold! It’s easy to play it safe when you’re worried or have stage fright. There are many WRONG ways to play it safe, including: • Introducing yourself, losing time on the agenda, and using boring slides. • Using facts and data only, without stories. • Staying away from hot topics, trying to please everyone. Why should someone be on the stage in front of a lot of people and not give their best? At the end of the presentation, you’ll regret it if you don’t. Even if it was okay, you didn’t give your best and didn’t make a good impression. f course, you should take controlled risks, but, if you know your audience, if you’ve done your dry runs and you know your topic, if you have a great story, and if you’ve anticipated critical questions, you could exit your comfort zone and try to impress everyone!
  • 47. 47 Some suggestions: • Turn off the projector. Go to the whiteboard and discuss your topic without slides. • Use a prop—something unexpected. Don’t speak. pen Notepad in full-screen mode with a big font and start writing questions and annotating answers. Then, at the end of the presentation, review the questions and answers to see if you’ve covered everything, or if you’ve left out something. • If the event is not recorded, move around the stage and go into the audience. Remember to keep good eye contact with every part of the audience. In any case, trust your gut. Note: During my career, I’ve used a lightsaber, a cape, a small rocket launcher, and a drone for props. Of course, props have to enhance your story, so don’t use one just for the sake of using it.
  • 48. 48 Chapter 6 During the Talk: Be a Better You! “Just be yourself” is not enough How many times have people told you, “Just be yourself, and everything will be fine!” This is some of the most-used advice out there, something that everybody tends to say to someone before letting them enter the lion’s den. And it’s wrong! Being yourself is not enough—being yourself lowers your energy because you’re not leaving your comfort zone. “Don’t try to be somebody else” could be better advice, but as you probably know, in those moments our brain prefers to receive a positive order instead of a negative one. “Be the better version of you” should be the advice given to someone before a presentation. It’s excellent advice because it pushes you out of your comfort zone. It says that you can always improve, even after many years as a public speaker. Being the better version of you means that you’re in the best state for that moment. It means people can see that fire in your eyes, and that you’re there to transfer the value to them in the best way. You have to work to reach your best state, and it’s normal if your best state is different from one presentation to another. Note: A personal story: During the Visual Studio 2010 launch, I was doing a tour around Italy, and my grandfather was in the hospital. Just before my session in Venice, my sister told me on the phone that he died in the early morning. I didn’t expect that. I was shocked, but I decided to deliver my session and then go home. We were far from home, so I decided to present my session even if I wasn’t in the right mood. I decided to do that for the people that were attending the event, and a little bit for myself, too. It wasn’t easy. It wasn’t my best performance, but I still remember those moments. I tried to give my best, even if my best wasn’t the same person that delivered many other sessions before and after that moment. How to be a better you If you’ve recorded your dry run, it’s easy to start. Watch it and find something in your posture, voice, dress, or body language that makes you feel uncomfortable, and work on it. Talk with people and ask for direct feedback. Ask them what makes them uncomfortable during your sessions. Perhaps it’s a little thing, or maybe they don’t know what the exact problem is, but you should try to understand what could be improved. Begin by being conscious of what is not good. There is no manual to be a better you; it’s trial and error.
  • 49. 49 Note: Breath is essential. I knew a young speaker who did solid performances, but, during her sessions, there was something that made people uncomfortable. Many people told me “she is a good speaker, but I didn’t completely enjoy her session.” I went to some of her sessions to try to understand what was going wrong and I discovered that her breath was very anxious at the beginning of the presentation, and that anxiety ruined the session for some of the audience. My suggestion was easy: start speaking with somebody about the session’s topic some minutes before the beginning to let the anxiety go away. If you need some more inspiration, you can look at James Whittaker’s post “Just Suck Less”33 for some direct tips. You can also start by avoiding some of the sentences that you’ve heard many times during presentations: • “Sorry, it’s my first time speaking in public.” Don’t do it. You don’t have to be sorry in advance; it lowers your confidence and the confidence that the audience has in you. • “I’ll keep this short.” Nobody will trust you. The presentation has to give value and must stay in the allotted time. Length is not the key. • “I have a lot of information and not enough time, so I’ll go fast, really fast!” You have to give value in the allotted time; you don’t have to enumerate all the things that you know. Create an appendix in the presentation with all the things that don’t fit in, and tell people that you can discuss those things later. • “I’m fatigued,” “My plane was late,” or “I didn’t have time to prepare.” This is the first thing to avoid. People are there to receive value and to trust you. It’s your fault if you don’t do everything well; they won’t believe you anymore after these sentences. Tip: You shouldn’t use profane or crude language during your presentations. They make you sound unprofessional, and you should avoid them at all costs. If your sessions contain stories that use curse words, and you can’t avoid it, it’s better to say it at the beginning. If you are an exceptional speaker, you could be the exception that proves the rule. Note: Many conferences and user groups have adopted a code of conduct that speakers and attendees should follow both during meetings and online. Ask the organizers for it, or look for it on their website. If you aren’t comfortable with it, tell them in advance. If they don’t have a code of conduct, just be professional and avoid doing something that could upset people, especially if the audience members are from different countries. If you want to be a better you every time you deliver a presentation, you can do many things, but the best thing to do is to create your set of rituals. 33 https://medium.com/@docjamesw/just-suck-less-256c3f9f430d. You may have to sign in with a Google or Facebook account.
  • 50. 50 Rituals In the beginning, you have to find your routines and figure out what works for you. It’s a good idea to write your routines down as a checklist. Know the environment Your session should start directly with the value, with a lot of energy—it should captivate people. You must avoid sentences like “ an you hear me?” You should have checked the audio before the beginning of the presentation. You should arrive at least fifteen minutes in advance and check the audio and the video connection, make sure your presentation remote works, check if the floor is creaking when you walk, and so on. You need to master the room and figure out where you can go without losing eye contact. If you need to do a demo and you have a hand microphone, you should rehearse it; you cannot just put the mic on the table. If you must talk at the podium because the mic is wired there, you should know that ahead of time. If you need a lectern, a whiteboard, or something like that, it’s better to check with the organizers well in advance and multiple times. Can people see your slides and fonts from the back of the room? Check in advance. If you aren’t used to tools, like ZoomIt, don’t trust them. During the session, you’ll just forget to use them. It’s better to increase the font size. Do you have a big timer available? Can you ask somebody to track time and alert you in the middle of the session, and then when you have 15, 10, or 5 minutes left? Don’t trust a small watch, like your phone. If you keep looking at it, you will send the wrong message to your audience, telling them that you’re in a hurry because you have something better to do. Tip: Some people fear arriving early and setting up everything in advance because they don’t want to stay in front of the audience for some minutes without talking, with an increasing sense of anxiety. You can avoid this by using the extra minutes to chat with people in the front rows, asking questions about their expectations, trying to understand their level of knowledge of the matter, and so on. As we’ve seen in the previous chapters, you should avoid starting with who you are—get directly to the point. Later, you could introduce yourself during the talk when it fits better, and you can also explain why you’re delivering this presentation. Sometimes it’s better to break this rule; for example, if you’re talking in a formal environment, it’s better to introduce yourself at the beginning. Perhaps you can ask the organizers to present you.
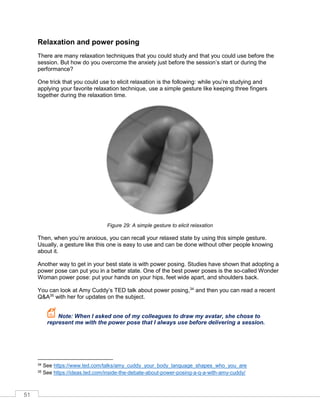
  • 51. 51 Relaxation and power posing There are many relaxation techniques that you could study and that you could use before the session. But how do you overcome the anxiety just before the session’s start or during the performance? One trick that you could use to elicit relaxation is the following: while you’re studying and applying your favorite relaxation technique, use a simple gesture like keeping three fingers together during the relaxation time. Figure 29: A simple gesture to elicit relaxation Then, when you’re anxious, you can recall your relaxed state by using this simple gesture. Usually, a gesture like this one is easy to use and can be done without other people knowing about it. Another way to get in your best state is with power posing. Studies have shown that adopting a power pose can put you in a better state. One of the best power poses is the so-called Wonder Woman power pose: put your hands on your hips, feet wide apart, and shoulders back. You can look at Amy uddy’s TED talk about power posing,34 and then you can read a recent Q&A35 with her for updates on the subject. Note: When I asked one of my colleagues to draw my avatar, she chose to represent me with the power pose that I always use before delivering a session. 34 See https://www.ted.com/talks/amy_cuddy_your_body_language_shapes_who_you_are 35 See https://ideas.ted.com/inside-the-debate-about-power-posing-a-q-a-with-amy-cuddy/
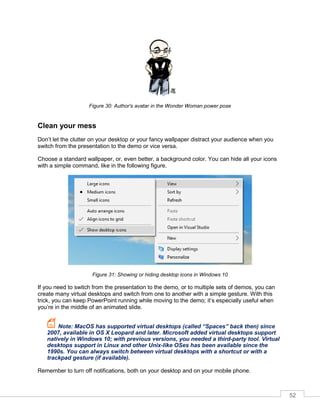
  • 52. 52 Figure 30: Author's avatar in the Wonder Woman power pose Clean your mess Don’t let the clutter on your desktop or your fancy wallpaper distract your audience when you switch from the presentation to the demo or vice versa. Choose a standard wallpaper, or, even better, a background color. You can hide all your icons with a simple command, like in the following figure. Figure 31: Showing or hiding desktop icons in Windows 10 If you need to switch from the presentation to the demo, or to multiple sets of demos, you can create many virtual desktops and switch from one to another with a simple gesture. With this trick, you can keep PowerPoint running while moving to the demo; it’s especially useful when you’re in the middle of an animated slide. Note: MacOS has supported virtual desktops (called “Spaces” back then) since 2007, available in OS X Leopard and later. Microsoft added virtual desktops support natively in Windows 10; with previous versions, you needed a third-party tool. Virtual desktops support in Linux and other Unix-like OSes has been available since the 1990s. You can always switch between virtual desktops with a shortcut or with a trackpad gesture (if available). Remember to turn off notifications, both on your desktop and on your mobile phone.
  • 53. 53 Eye contact is the key to audience involvement It doesn’t matter if you’re an introvert or extrovert, if you’re sitting behind a desk or standing in front of your audience: without eye contact, you’ll lose most people within few minutes. You need to have a ritual regarding eye contact. You should ask your friends to look at you and to tell you at the end of the session if you looked like a robot, or like a sprinkler. They can let you know if you stared at your feet or at the ceiling, or, like most people do, at the slides the whole time. You have to exercise eye contact in one-on-one conversations, small meetings, and presentations in front of big audiences.36 Tip: You can improve eye contact in one-on-one discussions with a simple exercise. You look your interlocutor in the eyes and tell them a list of things without losing eye contact, using filler words, or pausing. The other party chooses the first subject; then, it’s your turn to select a topic, and your partner should do the same.37 Tip: In big rooms, you can use a trick to show eye contact without having to look at everyone in the room. You can simply focus some rows in front of you, and look at people there. All the people in your line of sight will feel connected with you. Powerful or powerless communication Many people think that one always needs to adopt a powerful communication style to impress attendees and have better chances of success. Sometimes, powerless communication can give better results.38 Note: You can use poewrful or powerless communication with the same slides, the same demos, the same content; this is why this paragraph is in this chapter and not in Chapter 3. Let’s see what the differences between the two styles are. 36 See https://www.wikihow.com/Look-People-in-the-Eye 37 I learned this technique in a seminar with Jenna Lange, author of Please Don't Picture Them Naked. 38 Adam rant’s book Give and Take is full of examples of powerless communication and its impact on people’s success.
  • 54. 54 Table 1: Differences Between Communication Styles Powerful Style Powerless Style Useful when we have authority, when people trust us, when we have credibility or status that allows us to state facts without doubts. Useful when attendees are skeptical of our expertise, when there’s a significant difference between us and the audience (age, role, etc.), or when there are problematic attendees that try to undermine our credibility. Based on precise affirmations, facts, rules, directives. Uses powerful words. Based on questions, advice seeking, talking tentatively, and sometimes, expressing vulnerability. You’re there to teach them something. You’re there to understand and to create something with the audience. Imagine that you need to present something to a more experienced audience, and they don’t know you. You can try establishing trust, but it will be a long process, and sometimes it could backfire. Or you can start with a powerless style, acknowledging the differences between you and them, and setting the bar by saying that you would like to better understand their views on the topic, how to adapt it using their experience, and so on. Nobody can guarantee that the second approach works better, but most of the time it’s the easiest one, at least when the audience is very cohesive (for example, at a workshop for a company). If you’re doing a series of sessions for similar audiences, you can use the feedback on the first one to adapt your communication style for the following classes. Suppose you received feedback like “lacks confidence.” You can try to adopt a more powerful style. If you received feedback like “his content doesn’t fit with our context,” it’s better to adopt a powerless style, starting with questions on the attendees’ environment, and trying to give practical examples related to their context. Tip: You can talk tentatively on a slide full of bullet points, facts, and directives. You can use a powerful style on a slide full of question marks. The most important thing is that your communication style, your body language, and your tone of voice should match. You can switch styles many times during the talk. For example, when you need to define the problem, you can use a powerless style, and when you’re framing the solution, you can switch to a powerful one. You can also move from a powerless style to a powerful one during the time in a multi-day engagement when you feel that the audience trusts you.
  • 55. 55 How to express vulnerability without losing trust In the section titled “How to be a better you,” we told you to avoid sentences like “Sorry, it’s my first time speaking in public.” So, how can you express vulnerability without compromising your credibility? You can try to use some humor, and anticipate comments from the audience. For example, if you’re a forty- something presenter and you’re speaking in front of millennial startup types, you can begin with a joke about your age, asking if they know some famous film or series from the 80s, and then you can move to the 90s. Note: As an Italian, I always joke about my body language, hand gestures, my tone of voice, and other typical stereotypes, especially when presenting abroad. Anticipating comments about age differences, cultural differences, and technical background can be a good way to express vulnerability and find a connection with the audience without losing trust or using weak sentences. Always remember to be authentic. You cannot use powerless communication if you don’t care about your audience, if your presentation tries to sell something in a very arrogant way, if you wear a powerful t-shirt, or if your body language doesn’t match your powerless style.39 How to finish a presentation when everything goes wrong Demos fail, projectors fail, your voice could fail—a lot of things could go wrong during a presentation. Do you have a backup copy of your slides? And another one in the cloud? Tip: Print a copy of your presentation, with two or three slides per page. You can use it for annotations. Don’t depend on the presenter view and its notes section— you’re more credible when looking at printed slides than when you’re staring at the screen. Can you do your session without the Internet? Can you deliver value when the technology doesn’t help? Do you have a working solution for your code or a deployed website to show if everything goes wrong? Tip: Draw the flow of your demos on paper and keep it near the keyboard. If somebody is recording the session, check that it’s not visible in the camera. If the presentation is crucial, you can record your demos in advance as a backup, especially if they involve external hardware, the Internet, or cloud access. 39 See this article for additional tips.
  • 56. 56 Remember, you don’t need slides to deliver value. You also don’t need props, demos, or anything else. You could transmit value with just your voice, body language, and presence. It’s difficult, but sometimes it’s worth it! Note: A personal story: Some years ago, during a big conference in Rome, I prepared two sets of presentations on two different PCs. The first one, with few slides, was connected to the projector and ended with a “broken screen” slide. I used that slide as the excuse to turn off the projector and continue without it. The second set of slides that were on a PC in the first row and visible only by me were used to follow the flow that I prepared. The session went well and ended with two standing ovations! Learn how to breathe in difficult situations Do you remember Napoléon Bonaparte, who was often portrayed with one hand inside his waistcoat? That position, with the hand over the stomach, allows you to breathe with the diaphragm easily. Figure 32: The painting “The Emperor Napoleon in His Study at the Tuileries” by Jacques-Louis David, 1812. Source: Wikipedia. When you’re in trouble and your voice starts to tremble, breathing with the diaphragm could help a lot. It’s much better to look like an emperor from the past than being unable to finish your talk!
  • 57. 57 Help someone in need If you’re the conference organizer, room manager, or the next speaker, and somebody is in trouble during their session, please step up and help the speaker. You can start a round of applause, as encouragement. You can give him or her a bottle of water. It’s a great way to save a speaker and a presentation from disaster. You can also help the speaker at the end of a presentation, during Q&A, by being the first person to ask a (simple) question to break the ice. Work hard to exceed your limits Many things could ruin your presentation, but you can overcome most of them: • Some people find it very complicated to give a session with a hand mic. Get over it! Most of the time you’re forced to use them, so do your homework, pick a small bottle, and do a lot of practice. • Some people like to walk a lot during their presentations. Walking can be a good thing, but you shouldn’t go too far. If a session is recorded, it’s better to limit speaker movements. In this case, talk with the cameraperson to understand the range. If you prefer, draw an X on the floor with some masking tape, and stay behind it. • Doing a talk in another language requires much more preparation. You need at least three or four more dry runs; you should check the grammar (you should always check it, but it’s even more critical in a foreign language). You should listen carefully to your dry runs to understand if some words or sentences are difficult to remember, and change them or create a meaningful slide to communicate the point effectively. • If a talk format has auto-advance slides,40 you need to rehearse many times. It’s embarrassing when slides go on, and the speaker starts imploring the organizers to roll back to the previous slide. If a concept doesn’t fit in the allotted slide time, you should duplicate the slide (losing a slot) or simplify it. Never learn a presentation by heart You aren’t an actor who should deliver something word-for-word. You just have to transmit value, credibly. Learning a presentation by heart is very difficult, and prone to errors, pauses, and filler words that give your audience the wrong impression. If you memorize your presentation, there's a risk that you'll focus on recalling it exactly, rather than being natural and flexible. Some speakers like to use teleprompters, secondary displays with notes, or something like that. You can easily spot them because their performance sounds recorded. The same thing happens when you learn everything by heart; it doesn’t feel natural. 40 With the common availability of handheld wireless controls to advance your presentation to the next slide, you might want to avoid auto-advance altogether.
  • 58. 58 What you should do is to learn two things by heart: • Open your presentation in the best way, going directly to the value. One method is to craft some very powerful openings and start with one of them, word for word. Not the entire presentation—just the first sentences to skyrocket your talk! • Close your presentation in the best way. Most of the speakers do sound performances, but they fade away at the end, without giving an explicit call to action, giving instructions on how to leave feedback, or letting attendees know that the session is finished. Close your session with style Never finish a presentation by immediately starting the Q&A. Doing the Q&A leaves the destiny of your performance in the hands of the audience. Some people could ask annoying questions or try to undermine your presentation. As in the previous paragraph, you should close the session by delivering your messages and taking in the applause, and only then should you start the Q&A. People have to know that the session is finished and that Q&A is something extra. You might want to announce that you'll be happy to take additional questions immediately after the Q&A, outside the presentation room, so that attendees won't be frantic to ask their question immediately. If the conference is collecting feedback, remember to ask people to submit their input, and show them the code or title of your session so they don’t have to do the extra work to find that information. As a courtesy, be sure to end your presentation and clear the podium or stage with plenty of time for the next speaker to set up their talk.
  • 59. 59 Chapter 7 After the Talk: Relax, Evaluate, and Connect The talk doesn’t end with the final applause! Sometimes, it’s just the beginning. Many ways to connect Is your session a single-shot event, or is it something that you’re cultivating? Do you have business cards to hand out to people at the end of the talk, especially to people who surround you to ask questions? Have you put your contact details on the final slide of the presentation, the one that’s projected during the Q&A? If your presentation is part of something bigger, like a project that you’re growing or a subject that you want to master, you can create a Facebook page, a LinkedIn group, or a Yammer group (depending on the topic and the audience) to stay in contact with people. You can also use the channel to inform them about other initiatives, to let them share their experiences, and so on. You can link to a forum or a social page (related to the subject) if you’re active on it and you don’t want to create another resource that you have to maintain. Are you accepting LinkedIn connections but not Facebook requests? Tell them at the end of your session, or message people before denying a friendship request. Are your slides online for everybody or just for conference attendees? If you can post them online, do it when people are still interested in your talk and share the news. Use the slides to connect with more people. Was the session recorded? When it’s online, share the video so you can increase your connections and ask for more feedback. Don’t forget side events Sometimes it’s easier, especially for introverts, to skip conference side events like dinners, parties, and so on. They’re important because you can ask for feedback in an informal setting from people that attended your session, or, if yours is after the event, you can introduce your talk to people and other speakers and ask for feedback regarding your ideas, the flow that you’ve created, and so on.
  • 60. 60 Feedback is essential to your growth—reward it! Did you ask for feedback at the end of the presentation? If people sent you an email or posted something on social networks, take some time at the end of the session, and at the end of the day, to respond, retweet, “heart,” or “like.” Did you receive some criticism? Analyze your criticism and respond quietly, letting people know what your reasons were, and if you accept their suggestions. If you don’t agree with them, thank them anyway, and then try to explain your reasons. Use all feedback as an opportunity to grow and connect. If people spend their precious time giving feedback, perhaps they care about the topic. Use their knowledge to expand your own. Try to understand their point of view. If the session is not a single event, try to incorporate relevant feedback in the slides immediately, or at least, try to record them somewhere for future use. If you see that people keep asking the same questions after your sessions, try to incorporate the answers into the presentation. Note: I post online all the evaluation scores from conference feedback forms when organizers send them to me—and not just positive ones. When I receive negative or neutral results, I use that post or tweet to ask for additional feedback from people that were at the session, something like: “I scored 60/100 at the XYZ session. If you were there, please send me your thoughts on how to improve my performance.” Relax after the talk How was the talk? Very good? You can enjoy a well-deserved rest after you’ve connected with people. Was it not so good? This is not the right time to worry—first, try to relax, and think about what to improve after some hours or the day after. Especially the first few times that you deliver a talk, there could be many things that you don’t like, but you need time to address them, and you need a fresh mind to do it the right way! Always go back to your standards Was your session in line with your standards? Is it time to raise them a little bit? Is it time to change gears and propose something at a bigger conference? Just remember, standards are essential to your growth as a public speaker, so don’t forget to reflect on them after every session!
  • 61. 61 Appendix A: Responding to a CFP (Call for Papers) Where to go to start speaking Local user groups and meet-ups are perfect places to share knowledge and talk about a topic that you like. Most of the time, organizers love to find new speakers, and sometimes they organize a call for papers (CFP) or call for contents. Usually, you cannot just contact the group and propose yourself as a speaker. It’s much better to participate in group activities for a while, know the organizers and participants, see how different people present, and understand what attendees like and don’t like. Then you can start proposing topics. Sometimes it’s better to record a little presentation (five minutes or more) to share with your proposal, so organizers can see your speaking style and see how well you know the subject. How to speak at bigger events Going from a local user group or meet-up to a big event is like moving from minor league to major league. Sometimes you’re invited to speak because of your involvement in local activities, but most of the time, large events and conferences use a call for papers to recruit speakers. Most of the speakers (old and new) are requested to fill a nomination form on the conference website, and then there is a selection process. Some conferences have public CFPs, while others do it by invitation only. Usually, events organized by vendors are closed or by invitation, while industry events are open to everybody. Being invited to an event or participating in an open FP doesn’t mean that it’s easy to be selected. You have to work on your proposal, your public image, and your reputation. Note: I’ve organized many events with hundreds of people attending, and I’ve selected and trained a lot of speakers, but, before writing this Appendix, I interviewed other conference organizers to gather a broader point of view on the topic. Blind CFP Some conferences prefer a blind CFP approach, where the team that is selecting session proposals doesn’t know the author of the submission. In this way, talks are evaluated based on title, abstract, and difficulty level, and nothing more is shared with reviewers. A famous speaker might be rejected because they didn’t meet the criteria for submissions.