SEEDLING RAISING METHODS DAY 3.pptx
- 2. PLANT STOCK RAISED IN THE NURSERY BALL ROOTED BARE ROOTED
- 3. FACTORS ON TYPE OF PLANT STOCK •CLIMATE •FIELD CONDITIONS •LABOUR AVAILABILTY •ECONOMIC CONSIDERATIONS •PLANTING SUCCESS •TENDING OPERATIONS REQUIRED
- 4. SEEDLING RAISING METHODS 1. POLYTHENE SLEEVE/TUBE METHOD 2. BED & BOX METHOD/SWAZI METHOD 3. PLANTER FLAT METHOD 4. HYDROPONICS
- 5. POLYTHENE SLEEVE/POT METHOD a) CONTAINER •MATERIAL USED •OPEN BOTH ENDS/OPEN ONE END •CONTAINER SIZE
- 6. POLYTHENE SLEEVE/POT METHOD b) CONTAINER FILLING: SOIL TYPE •Species to be raised •Location of soil supply •Clay loam •Soil sieving •Soil mixing
- 7. POLYTHENE SLEEVE/POT METHOD b) CONTAINER FILLING PROCESS • PARTIAL FILLING • CONSOLIDATION (plug) • COMPLETE FILLING ( smooth, firm, filled, drainage holes) AIDS: • Soil funnel • Moist soil TARGET 500 – 1000/day USE: sowing/receive pricked out seedlings.
- 9. POT LINING
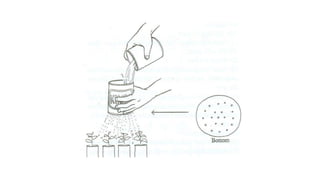
- 10. POLYTHENE SLEEVE/POT METHOD c) SEED SOWING PROCESS: •Indentation to required seed depth •Seed sown individually / in small quantities •Seed covered with soil •Watering of seed
- 11. SEED SOWING
- 14. POLYTHENE SLEEVE/POT METHOD PLANTING •At end of nursery period, seedlings ready to be planted in the field. •Polythene tube sliced open down one/two sides using planting trowel. •Seedling placed with ball of soil into prepared planting hole. •Discarded polythene material collected and disposed by burning.
- 15. ADVANTAGES • the planting season can be extended • suited to use with all major commercial species • Ball of soil holds more moisture in marginal areas • Good undisturbed ball of soil around the roots • Can quarantine diseased plants • Easy to transport to field • Easy tending operations • Visible root : shoot ratio ( 1:2) • Plants can survive for longer periods in the field after planting without rain
- 16. DISADVANTAGES •There are higher costs •Root systems can be restricted or distorted where constant care is not taken or plants are kept in the nursery for too long. •The containers are not bio-degradable which causes pollution if they are not collected and destroyed.
- 17. BED & BOX / SWAZI BED METHOD • Seedlings are produced in raised beds and when ready for planting out they are transported to the field in clumps carried in boxes. • This method is more commonly used to raise seedlings from seed which is large enough to handled individually, e.g. Pine spp
- 18. BED & BOX METHOD/SWAZI METHOD BED CONSTRUCTION • Beds of required dimensions are laid out in the nursery by using bricks or planks as an edging to contain the soil. ??? • Nursery terraces of surfaces should be cleared of weeds, raked and firmed down and the edging erected, depth of bed is usually around 10cm. • Previously prepared and sieved nursery soil is then brought in, each bed is filled to the required depth and then raked carefully to level the surface.
- 19. BED CONSTRUCTION
- 20. BED & BOX METHOD/SWAZI METHOD SEED SOWING/PRICKING OUT • Spacing between plants spots is normally 5cm x 5cm and this can be marked out either a dibble stick or more commonly by using a sowing template. • A sowing template consists of a board of convenient size fitted with handles on the upper surface indentation is controlled by length of peg.
- 23. BED & BOX METHOD/SWAZI METHOD
- 24. BED & BOX METHOD/SWAZI METHOD LIFTING AND PACKING • Lifting: A spade or a flat-pronged fork is inserted vertically at about 10 cm from the plant. It is pushed deep enough to permit lifting the plant with the entire root system. • Packing: After grading (and possibly root pruning), plants are packed. The roots have to be well protected against drying. Sacking, banana leaves, plastic bags with ventilation holes or cans may be used. To preserve moisture, the roots should be covered with wet grass, leaves, sawdust or mosses, where available.
- 27. BED & BOX METHOD/SWAZI METHOD SPECIAL EQUIPMENT: •Large flat shovel •Transport boxes •Sowing template
- 28. ADVANTAGES •With careful separation from the clump the root system will be relatively undisturbed with a ball of soil around the roots. •costs are far lower as beds can be filled rapidly and root pruning is far quicker. •More plants occupy less area as growing space is smaller this economise on nursery space and requires less transport. •Less soil is required per plant as unit volume is less than with individuals container, this saves on the overall amount of soil required for the nursery programme.
- 29. DISADVANTAGES •More moderate climatic conditions are required for planting •Workers required to be more skilled •Isolation of diseased plants difficult •there can be an excessive loss of soil. •Specialised tools and boxes are required which cannot be used for other nursery raising methods.
- 30. PLANTER FLAT METHOD •Planter flats are re-usable, rigid polystyrene (Kaylite) trays of multiple cavities. •Each individual cavity in a planter flat is an inverted, pyramid shaped cell with square cross section and is open ended.
- 31. CONTAINER
- 32. IMPORTANCE OF SHAPE •It allows easy removal of the plants •It ensures continuous air pruning •It prevents root spiralling •It makes filling easy •
- 34. CONTAINER TREATMENT DIP TANK •Flats washed with water spray •Dipped in mixture of 100l water, 25Kg copper oxychloride and 40l PVA white paint for a few seconds •Leave to drip dry
- 35. TRAY FILLING DECOMPOSED PINE BARK •The bark is watered •Tray is filled, levelled off and watered again
- 36. SEED SOWING •Dibbler/spiking board used to make 5mm sowing hole in the middle of each cavity •Two seeds placed in each hole in first 3 lines and one seed in following lines. •Seeds covered loosely with pine bark and watered thoroughly.
- 37. SOWING TEMPLATE
- 38. STACKING & DESTACKING •Planter flats stacked one on top of the other •Stacks covered with tent and left for 7-21 days. •When seeds have germinated, trays removed from stacks and placed on suspended wire beds.
- 40. WATERING •Micro-jet system best. •Done soon after tabling. •Seedlings watered everyday for 30-45mins twice/once per day.
- 41. FERTILIZING •Pine bark poor in nutrients. •Compound D applied in granular form at rate of 14g/tray per fortnight. •Seedling leaves are brushed after fertilizer application.
- 42. PRICKING OUT •Carried out when seedlings reach matchstick height or are 3-4cm height before secondary roots develop. •Its done for transplanting or to waste. •Seedlings are watered thoroughly and weeded before pricking out. •J-rooting should be avoided when transplanting.
- 44. ROOT PRUNING •Air pruning •Contact with the pesticide
- 45. PLANTING •Trays well watered and transported to planting site •Seedlings held by first leaves and gently pulled out of cavity •The top of the plug is planted well below soil level
- 46. ADVANTAGES •Smaller nursery area •Low labour input •Faster and more predictable seedling production •Planter flats re-usable for several seasons •Soilless growing media can be used
- 47. •less raw material is required •No root pruning •Plants are light making planting alight task and requiring less labour units •Less and little weeding is done. •No environmental disturbance as no soil excavation is done. •Reduces the burden/ eye sore caused by dumps of pine bark
- 48. DISADVANTAGES •Planter flats are fragile •Need constant careful supervision •Chemicals are expensive •Watering equipment is expensive •Not suitable for all areas
- 49. HYDROPONICS Defn: The method of growing plants without soil, using mineral nutrient solutions in a water solvent. •Terrestrial plants may be grown with only their roots exposed to the mineral solution, or the roots may be supported by an inert medium, such as perlite or gravel
- 51. GROWING MEDIA •Inert soilless material is used i.e. it can’t/won’t decay or breakdown quickly. •The growing media is not used to provide nutrients but for anchorage i.e. to enable the roots to support the plant weight and hold it upright.
- 52. Properties of the Growing Media •Inert •Soilless •Good water holding properties •Permeable
- 53. MEDIA FOR SEED GERMINATION Media for germination should have: •High water holding capacity •Good drainage •Good aeration Suitable Media for Germination: •Mixture of peat moss & river sand (1:1) •Shredded sphagnum moss •Vermiculite and Pine bark mixture
- 54. Preparation of Mother Bed •Prepare a 1m width x 10 m length bed. •Line the bed with bricks/ wooden planks. •Add growing media to level with the brick top. •Water the bed.
- 55. GERMINATION • Add seed to water in a watering can and use mixture to broadcast the seed over mother bed. • Broadcast Compound C/D fertilizer over seed at rate of 1Kg/square metre. • Initially, water twice a day with can fitted with fine rose, reduce to once/day after two weeks. • Cover bed with nappy liner material at a height of 0.5m. • Weed as soon as weeds appear. • Prick out after 1-2 months when seedlings have 4 leaves.
- 56. TRAY FILLING •Moisten the soilless growing media evenly. •Pour into clean tray. •Compact the media by throwing onto the ground once from a height of 0.3m. •Level off growing media. •Use sowing template/dibbler to mark 5mm sowing hole in the middle of each cavity.
- 57. FLOAT BED PREPARATION •Level the ground such that water will not flow when watering. •Lay down thick plastic for the dimension of four tray width x 10 m length. •Edge the bed with bricks/wooden planks. The plastic should be loose but secure. •Pour in water to fill the bed. •Place the filled trays onto the float bed to absorb water. Make sure there is no space for algae growth.
- 58. • Build a rectangular frame using treated lumber. The frame should be 1,2m wide by 10mlong. • Line the frame with a 6mm polyethylene plastic sheet to form a trough to contain the nutrient solution. Be sure the site is level and free of any debris, which could puncture the plastic liner. • Fill the water garden with approximately 20 gallons of water. The water will fill the plastic sheeting to the sides of the frame. Secure the other end and side of the liner to the top edge of the frame. • • Continue filling the water garden with water to a total depth of at least 20cm.
- 59. TRANSPLANTING •Prick out seedlings from mother bed into a small tin of water. Do not remove the soilless media from around the transplants. •Transplant seedlings into submerged tray using dibbler/refill/lollypop stick to avoid J-rooting. •Pack additional media around the root ball to root collar level only.
- 61. FERTILIZING - Recommended fertilizer programmed is as follows Application period – days after sowing Fertilizer Rate mg n/L Amount 7 Floatfert 25 160 ml 14 Floatfert 50 320 ml 21 Floatfert 75 480 ml 4th Application Ammonium nitrate 100 83 g Application of fertilizer is done in three points of the bed, one first corner, second middle and third corner of the bed
- 62. ROOT PRUNING •Hydroponic Root System
- 63. ROOT PRUNING •Lift trays occasionally and remove any roots hanging down by hand.
- 64. WATERING •Check for water quantity frequently. •Top up every day in the morning.
- 65. DISEASES •The common disease of the seedlings is Pythium root rot. •The symptom of the disease is the dying of the seedlings with black roots. •This is controlled with the following chemicals, ACOMIL or REDOMILL.
- 66. HARDENING OFF •When the seedlings are 35 cm to 40 cm tall, you can then start hardening off and do the planting. •Cut back the seedlings to 15-20 cm and stop fertilizing.
- 67. TRANSPLANTS
- 68. ADVANTAGES • Any plant seedlings can be grown as long as their growth requirements are met. • It uses only 1/20th of water compared to traditional (soil based) methods. • It provides a sterile environment for plant production • Seedlings grow two times faster. Nursery period is reduced from 3 months to 2 months for Eucs. • It needs 20% of less space in comparison to soil based nurseries.
- 69. ADVANTAGES • Involves less labour. Upkeep is also minimal. • It’s simple to get complete control over nutrient balance • There are no soil setup and testing hassles. • Seedlings grown through this technique are healthy and have better nutritional value. • Seedlings can be grown all year round.
- 70. DISADVANTAGES • Initial set up cost of hydroponic system is high. • It requires constant supervision. • Water-based microorganism can be easily introduced. • Technical knowledge is required for growing plants through hydroponics. • Overgrown seedlings will damage the planter flats.


