SPLINT FABRICATION AND POST SURGICAL ORTHODONTICS
- 1. SPLINT FABRICATION & POST SURGICAL ORTHODONTICS DR.SHEHNAZ JAHANGIR FINAL YEAR PG DEPT. OF ORTHODONTICS
- 2. CONTENTS • INTRODUCTION • SPLINT FABRICATION MODEL SURGERY- 2 JAW SURGERY 1. STEPS IN FABRICATION 2. REQUIREMENTS OF SPLINT PIGGY BACK SPLINT IN SEGMENTED PROCEDURES 1. STEPS IN MAKING FINAL SPLINT 2. MAKING OF INTERMEDIATE SPLINT
- 3. • POST OPERATIVE EVENTS • POST OPERATIVE CARE • POST OPERATIVE PHYSIOTHERAPY • POST SURGICAL ORTHODONTICS STEPS 1. ARCHWIRES 2. ELASTICS GOALS OF POST SURGICAL ORTHODONTICS • RETENTION • CONCLUSION • REFERENCES
- 4. INTRODUCTION • Dentofacial deformity refers to deviations from normal facial proportions and dental relationships that are severe enough to be handicapping. • Patients with dentofacial deformity almost always have severe malocclusion. • Orthodontic treatment ,even if successful in bringing the teeth into proper relationships, may not correct the underlying skeletal problems. • For this reason orthognathic surgery often is required for successful treatment & soft tissue surgical procedures also may be needed.
- 6. Model surgery-2 jaw surgery • The patients’ impressions are taken after final rectangular wire- atleast 3 weeks-passive. • To ensure proper fit of the splint.
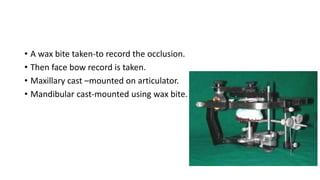
- 7. • A wax bite taken-to record the occlusion. • Then face bow record is taken. • Maxillary cast –mounted on articulator. • Mandibular cast-mounted using wax bite.
- 8. • During mounting of the cast 5 mm acrylic spacer is used. • maxillary model is mounted with the spacer interposed. • The spacer is then removed. Grooves are created in the plaster. The grooves are coated with petroleum jelly, and another layer of blue coloured plaster is poured. This can be easily removed subsequently. • Advantage of the spacer: it eliminates or at least reduces the drudgery of cutting plaster to simulate maxillary impaction.
- 9. • Blue plaster used for initial mounting
- 10. • Maxillary procedure-Done first. • The vertical distance of each crown’s cusp tip to the mounting ring is marked and measured. • This will later help in determining the amount of movement carried out.
- 11. • The plate of the jig –oriented to maxillary occlusal plane. • Maxillary cast is stabilized-with putty consistency rubber material. • The plaster is then easily removed.it creates a space above the maxillary cast for impaction.
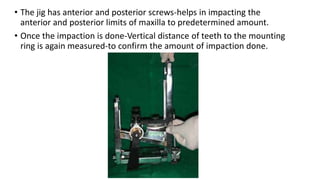
- 12. • The jig has anterior and posterior screws-helps in impacting the anterior and posterior limits of maxilla to predetermined amount. • Once the impaction is done-Vertical distance of teeth to the mounting ring is again measured-to confirm the amount of impaction done.
- 13. • With maxilla and jig still in the same position-a layer of pink plaster is poured to stabilize maxilla. • After the plaster sets – incisal pin loosened-maxillary cast drops-till it touches mandibular cast. • This simulates autorotation. • In this position of maxillary and mandibular casts, the intermediate splint is made.
- 15. • If transverse stability of arch required-TPA in upper arch/Lingual Arch in lower can be fabricated just before splint fabrication. • Also a 19 guage wire can be fabricated from one headgear tube to other. • These are to be inserted after the expansion has been done.
- 16. • After the intermediate splint is ready, the blue plaster is removed from the mandibular mounting and the mandible is repositioned to the desired position. • The final Splint is then made.
- 17. • The splints are made with E links incorporated in them-to aid in intermaxillary fixation.
- 18. Requirements of the splint • It should fit the teeth accurately. • There shouldn’t be distortion of the resin. • Should be of minimum thickness with adequate strength(not more than 2mm). • Excess acrylic should be trimmed off the buccal aspect. • Should allow for ease in IMF. • If rigid internal fixation to be used-patient will have to function into the splint soon after surgery.
- 19. PIGGY BACK SPLINT IN SEGMENTED PROCEDURES • First few steps are the same. • After the casts have been mounted on semi adjustable articulator – reference lines are marked on the cast. • Jig cannot be used in procedures involving differential movement of multiple segments of maxilla.
- 20. • Marking the mountings before performing the mock surgery. This helps in measuring the amount of repositioning and impaction, when a jig is not being used.
- 21. STEPS • Maxillary cast is sectioned-segments placed in appropriate occlusion- as determined by cephalometric prediction. • Once the segments are positioned-in all three planes of space-they are secured to each other in wax. • Upper cast –Duplicated using alginate • Two casts are needed-one for final splint and another for intermediate.
- 22. MAKING OF THE FINAL SPLINT • Final splint is made first-intermediate splint later. • The duplicated Maxillary and mandibular models are mounted on a hinge articulator-in the desired occlusion. • Final splint is made in this position. • If transverse stability of arch required after surgery(A TPA in upper or a Lingual Arch in lower) can be fabricated just before splint fabrication.
- 24. • Splint should have only the indentations of the mandibular teeth in it- to allow for lateral movements during functioning. • There should be holes in the lateral margins of the splint(or E links) to aid in IMF.
- 25. MAKING OF THE INTERMEDIATE SPLINT • The segmented maxillary cast is placed back on the semi adjustable articulator. • Any mandibular auto rotation is simulated. • Final splint is fixed on to the maxillary cast. • Separating media is placed over the splint. • And the final stage splint is prepared in this position.
- 26. • After splints have been made, they are polished, they should easily fit in and out of each other. • Its preferable to have a color code-easy identification for the surgeon between the intermediate and final splint.
- 28. Post Operative Events • Hospitalization • 2-3 days for single jaw • 4-5 days for double jaw • Facial edema – 2-3 weeks • Resumes partial function in 2 weeks • Mastication after 6-8 weeks • Complete bone healing – 6 months
- 29. Post Operative Care • 1 week soft diet • Milk, mashed potatoes, scrambled eggs • After 2 weeks – more chewing • Chapattis, vegetables, and meat in small pieces • Progress to normal diet • Normal diet in 6-8 weeks
- 30. Post Operative Physiotherapy • 1st week after surgery – open and close mouth gently within comfortable limits. • Over next 2 – 3 weeks- 10-15 minute sessions of opening and closing and lateral movements. • 3rd – 8th weeks, range of motion is increased, and should be normal in 8 weeks.
- 31. Post Operative Care • Orthodontist should see the pt within the 1st week – review the occlusal status and check the status of the orthodontic appliance. • Post surgical orthodontics • adequate bone healing • adequate mouth opening
- 32. Post Surgical Orthodontics • After adequate healing of bone (surgeon’s opinion). • Splint and stabilizing wires should be removed together. • Splint and wires provide solid occlusion & Prevent CO-CR discrepancy.
- 33. • If there is any doubt about healing of the surgical site, it is better to delay the start of post-surgical orthodontics for a few weeks, rather than to deal with complications later.
- 34. STEPS • The first step is to remove the splint and the stabilizing arch wires. Any repair to the appliance can then be made. Then the working orthodontic wires can be placed.
- 35. • The splint and stabilizing wires must be removed at the same time. • The purpose of the stabilizing arch wire was to prevent the movement of teeth. • The combination of the heavy arch wire and the inter-occlusal splint gives the patient a solid occlusion with multiple contacts. • Hence, the patient will have maximum inter-cuspation in the occlusion established during surgery (which is in centric relation or very close to it).
- 36. • When the splint is removed but the stabilizing arch wire is still in place, the teeth are held rigidly, often In a position where only two or three teeth contact when the condyles are seated. • The patient unconsciously searches for a new habitual occlusal position that gives greater intercuspation. • Hence a CO-CR discrepancy can develop, which can complicate post- surgical orthodontics.
- 37. ARCHWIRES • The working arch wires are usually light wires – 0.016” steel, which are flexible enough to provide adequate extrusion of teeth as is required. • If good torque control of the max. incisors is needed, it may be better to use a flexible rectangular wire like braided wires or NiTi.
- 38. • If movement of teeth in the lower arch is only needed, the maxillary stabilizing wires can be left in place and a flexible wire can be placed in the mandible only.
- 39. ELASTICS • Finally, the patient should be given light vertical elastics, to the posterior segments and also to the anterior segments if there is an open bite tendency. • Box elastics (green or yellow) are preferred, as patients find them easier to put as compared to many smaller elastics. • The elastics should be worn full time, including while eating.
- 40. Elastics serve 2 purposes – • This help in settling of the teeth, bringing them into a good, solid occlusion • And Override the patient’s proprioceptive drive towards positioning the mandible in maximum inter-cuspation. • As long as elastics are worn, there will not be a tendency to shift the mandible away from CR.
- 41. • The elastics can be run in a class II or Class III direction, depending on the requirements of the occlusion. • Cross elastics can also be used.
- 42. • By the second postsurgical appointment considerable settling would have occurred, as there are no occlusal interferences to the teeth, and they extrude quite easily.
- 43. • If the occlusion has settled well, the elastics can be worn only during the night. • Usual sequence of elastic wear is – • Full time, including while eating for the first month. • Full time except for eating for the next month • Only at night for the 3rd month.
- 44. • Vertical step bends may be placed in the arch wire to allow the rest of the teeth to come into occlusion. At this time, elastics may or may not be placed. • If it is desired to use heavier inter-maxillary elastics, heavier rectangular arch wires should be placed. Otherwise, light wires can be used until the occlusion has properly settled.
- 45. • In patients who have had transverse skeletal expansion, the corrections have a tendency to relapse for approx. 6 months. • Hence along with finishing wires, a labial overlay wire – 36 or 40 mil should be placed from one headgear tube to the other to help in transverse stabilization.
- 46. • Min. time of post surgical orthodontics is usually 3 months. If it takes more than 6 months, it means some complications have occurred during surgery.
- 47. • Positioners are usually not needed for post-surgical patients. They have some difficulty due to the following reasons. • Some parasthesia may still be present in the gingiva and lips for a few months post treatment. • Biting force is variable after surgery, and if biting force decreases, the positioners are not very effective.
- 48. Goals of post surgical orthodontics can be summed up as follows – • Establishment of final occlusion, including final alignment, inter-digitation, torque, artistic positioning. • Establishment of correct root parallelism, especially at osteotomy sites, where roots of adjacent teeth may have been left divergent.
- 49. Retention • Retention considerations are not very different from routine orthodontics, except for stabilization in the transverse plane. • Retainers should be worn full time, except while eating for 3-4 months, the time required for the pdl fibers to reorganize. • In case of periodontally compromised patients, splinting of the teeth together is preferred.
- 50. conclusion • “It is easy to destroy, yet equally difficult to build”. • Reconstruction of the face and the resulting beauty of it all are too well known to be elaborated upon. Major thrust to this field came from neurosurgeons and plastic surgeons in the past. Today, the major role is played by oral surgeon. The orthodontist and oral surgeon should work in coordination to achieve a constructive goal.
- 51. REFERENCES • Surgical Orthodontic Treatment – Proffit and White • Orthognathic surgery: A hierarchy of Stability – Proffit et al - Int. J or Adult Orthod Orthognath Surg 1996 • Contemporary Treatment Of Dentofacial Deformity- W.R.Proffit, R.P.White , David.M.Sarver. • Contemporary Orthodontics – W.R. Proffit • Esthetic Orthodontics & Orthognathic Surgery - David.M.Sarver • Orthodontics ; Current Principles & Techniques – T.M.Graber & R.I.Vanarsdall.Jr • Introduction To Orthognathic Surgery - J.P.Reyneke & W.G.Evans.
- 52. THANK YOU
