User Management
Managing users
This section provides details on different user types and the instructions for creating and managing user assignments.
User types
"Settings" allows you to create users by specifying their email addresses and manage their permissions.
You can create the following user types:
- Global users: User can access all data within all tenants.
- Subtenant users: These users are assigned to a subtenant and only have access to the assets of a specific subtenant.
Subtenant user
A subtenant user needs the role <mdsp:core:SubTenantUser> to get access to applications on the Launchpad. For more information, refer to:
"Settings" provides the option to create user group for better user management and streamlined role assignment to multiple users at once.
User interface "Users"
The following screenshot shows the "Users" user interface:
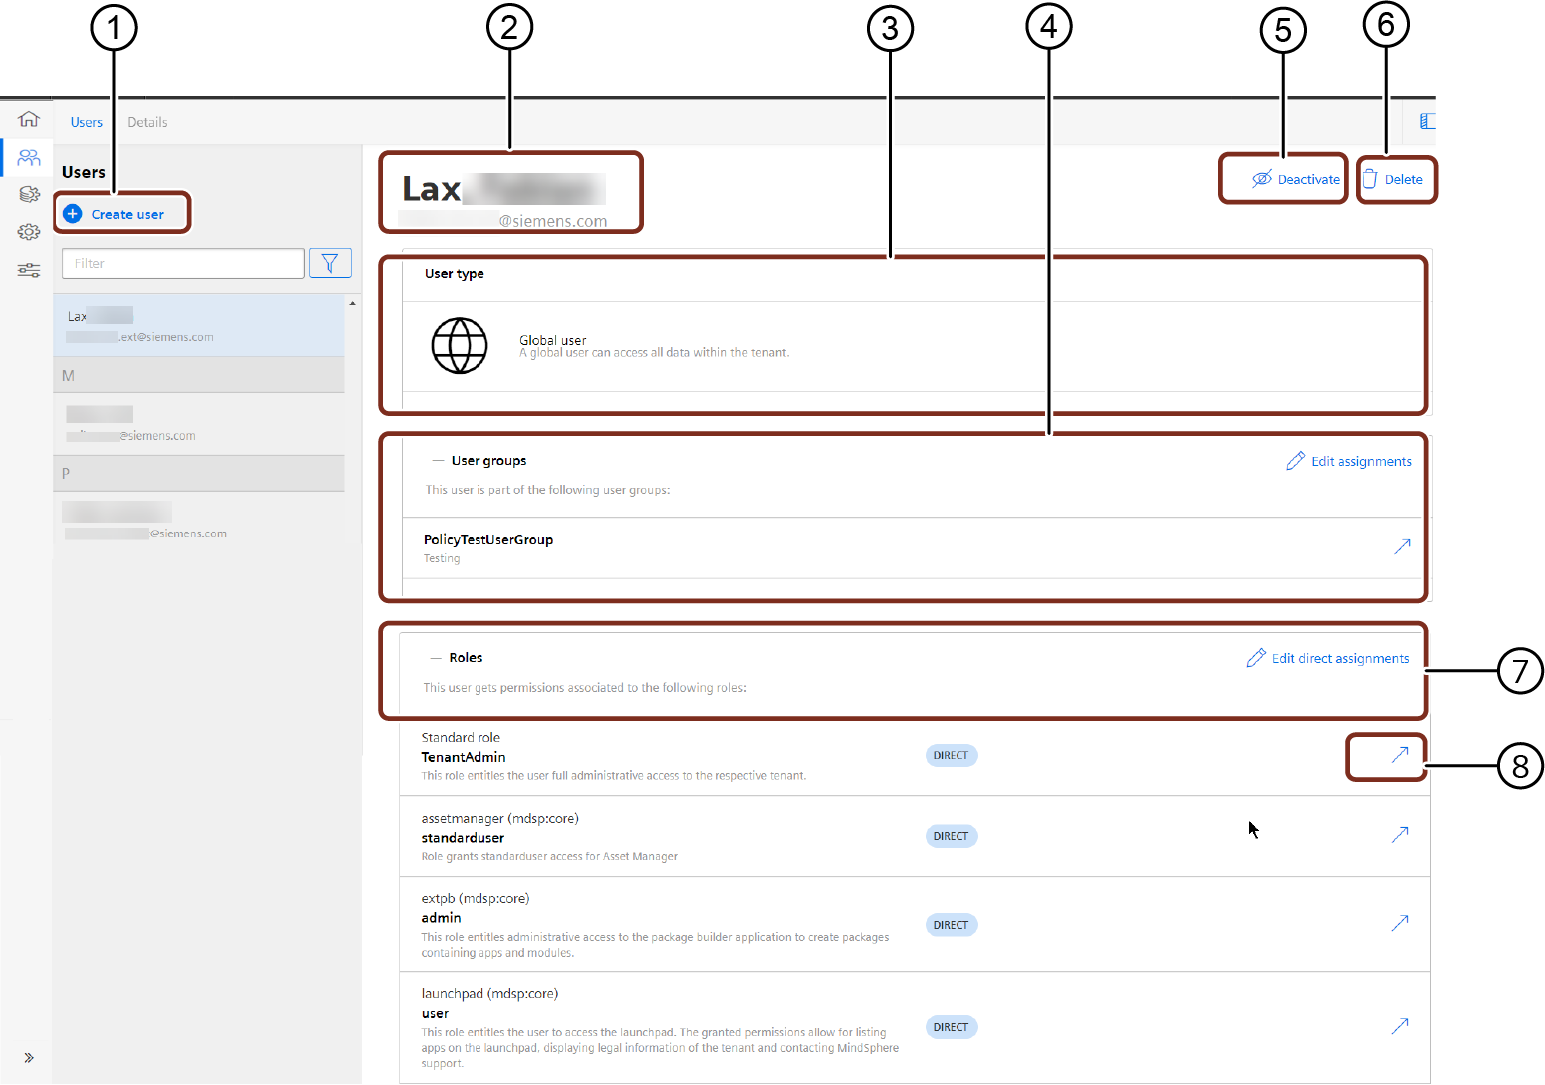
① Creates a new user
② Displays the name and email address of the user
③ Displays the user type
④ Displays the user groups assigned to the user
⑤ Activates or deactivates the user
⑥ Deletes the selected user
⑦ Switches to the "Roles" tab
⑧ Displays the roles assigned to the user
Creating users
You can create global users or subtenant users.
Quota consumption
The creation of a user reduces your quota.
Creating the subtenant
You can create a new subtenant for new users. For more information on subtenants, refer to the section Using subtenants.
Procedure
To create a new user in "Settings", proceed as follows:
- In the left navigation, click "User Management", select "Users" and then click
 "Create user".
 - Enter the email address of the user.
- Choose the user type, such as "Global user" or "Subtenant user".
- If there is no subtenant option available, click "Create subtenant" to create a new subtenant.
- If you choose "Subtenant user" as the user type, select the required subtenant from the "Choose a subtenant" drop-down menu.
- Click "Create user".
- Click "Assign roles" to assign a role to a user.
- Select the role that you want to assign to the user and click "Next".
For more information on roles, refer to Standard roles. - Click "Save" to save the latest changes and then click "Close".
Once you have successfully created a new user and assigned a role, the new user will be activated and will receive an email that contains access instructions for the tenant. After the user logs in for the first time, the first name and last name of the user will be displayed in the Settings section.
Activate or deactivate users
You have an option to activate or deactivate users within "Settings". Activated users have access to their assigned apps and services. You can temporarily restrict their access to the Insights Hub and its associated services by deactivating users. Reactivated users get their previously assigned permissions automatically.
Procedure
To activate or deactivate a user, proceed as follows:
- In the left navigation, click "User Management", and then select "Users".
- Select the user you want to activate or deactivate from the list.
- Click "Activate" or "Deactivate" based on your requirement.
- Confirm your choice to "Activate" or "Deactivate" the user from the list.
Deleting users
It is possible to permanently remove users who are no longer needed from the designated apps and services, which streamlines the user management process more effectively.
Procedure
Data security notice
Delete users immediately if they are no longer part of your business.
To delete a user, proceed as follows:
- In the left navigation, click "User Management", and then select "Users".
- Select the user to be deleted from the selection list.
- Click "Delete".
- Confirm deletion with "Yes" to delete a user permanently.
Edit user role assignment
There are two options available for assigning roles to a user within "Settings". You can either assign roles to a user using the "Users" tab or assign a user to a role directly from the "Roles" tab. For more information about roles, refer to the section Roles.
Procedure
To assign or remove roles from a user, proceed as follows:
- In the left navigation, click "User Management", and then select "Users".
- Select the user from the selection list.
- Click "Edit direct assignment".
- Select or deselect the desired role checkboxes to assign or unassign roles to the selected user.
- Click "Next" to confirm your changes.
- Click "Save" to save the latest changes and then click "Close".
The selected user will be assigned to or removed from the specified role.
Note
The corresponding user has to log in again to make the changes effective.