Location via proxy:   [ UP ]  
[Report a bug]   [Manage cookies]                

Get This Free Cheat Sheet Guaranteed To Help Your Next Mix

Showing posts with label Ultimate Guitar Tone Handbook. Show all posts

Wednesday, March 2, 2016

The Two Schools Of Thought On Guitar Effects Order

Guitar Pedal Order #1
As part of finding the best tone, guitar players are constantly juggling the order of their effects pedals to find the best combination of low noise and great sound. It's a never ending search, but there are some guidelines that come from come from pedalboard experts like Bob Bradshaw.

Here's an excerpt from my Ultimate Guitar Tone Handbook (written with the great Rich Tozzoli) that looks at the two basic schools of thought on pedal order.

"There are two things that will directly affect how your effects interface with your amp; the effects order and gain staging. Effects order means the order that each pedal appears in the the signal chain between the guitar and amplifier. There are several schools of thought on effects order, and they each have a different result.

School Of Thought #1
This effects chain is the order generally recommended by most of the pedal gurus. There are several rules that make up this order:

• Any distortion pedal must come first right after the guitar. The exception is if you’re using a compressor pedal, which will be first in the chain. Do not put a volume pedal first, as this can alter the way a compressor or distortion pedal sounds.

• Any modulation or tone devices like wahs should come next. This enables you to keep the sustain coming from your distortion or overdrive devices and alter an already harmonically rich signal.

• Delays come almost last in the chain, since you want to be delaying your already effected signal.

• A volume pedal comes either last in the chain, or directly in front of any delay.

• In situations where a pedal is providing a lot of clean gain, that will come last in the chain so as not to overload any of the other pedals.

So a typical effects order might go something like compressor --> distortion --> wah --> chorus --> delay --> volume pedal (see the graphic on the left). While this might not be the quietest order, it does sound really good because any distortion, overdrive, or sustain is being affected by the effects that come behind it.

School Of Thought #2
If we’re talking about recording, we may want the least amount of noise going into the amp. With that in mind, there are two rules:

• The noisiest pedal goes last in the chain before the amp.

• The one with the most gain goes last before the amp.

The reason for both of the above is simple; if the noisiest pedal is first in the chain, that noise will be affected and amplified further by every other pedal in the chain that you switch on. Same with the pedal with the most gain; if it’s at the beginning of the chain, it could possibly overload any other effect that comes after it, since most pedals only want to see a typical guitar signal and nothing greater (see the graphic below). Also, any noise caused by increasing the gain on a pedal will be amplified downstream by any other pedal switched on.

Guitar Pedal Order #2
Generally, you’ll try to keep the basic order as in School of Thought #1 in order to be sure that any distortion or sustain is affected by the effects placed later in the chain. That being said, this order won’t sound the same as order #1, especially if a distortion pedal is placed last in the chain (which isn’t recommended) because of its gain, so it might not be for everyone."


Wednesday, January 27, 2016

3 Reasons To Use Your Amplifier Tone Controls

Amplifier controlsAs a general rule, most musicians (especially guitar players) have no idea how to use anything that adjusts the frequency bands of their instrument, meaning the amplifier tone controls.

The reason is that they're never taught what tone controls are there for, and there's not a lot of information in the manuals that comes with amplifiers either (if anyone actually reads them).

This excerpt from the Ultimate Guitar Tone Handbook shows the 3 general reasons to use the amplifier EQ.

1) Many stringed instruments (like bass and guitar) have dead spots on the neck where a few notes can drop in level. A bit of EQing can help smooth things out if you can zero in on the frequency band of the notes that are dropping out.

2) You need to compensate for a frequency range deficiency. This could mean a situation where a Strat might not have enough bottom when played through a Marshall Jubilee so you’d add some low end with the tone controls to compensate. On the other hand, a Les Paul through the same amp might be too bottom heavy so you’d subtract some bottom. And then that same Strat might just have a mid-range that’s like an ice pick through the eardrums on certain notes, so you’d back off on the mid-range a bit and pull the pick out of the ears.

3) And finally, to keep the instruments from clashing in a scenario where 2 players use the same model instruments and amplifiers (like two Les Paul into two Marshalls). In order to fit well together frequency-wise, one player would adjust his tone to have a bit more bottom and maybe scoop out the lower midrange while the other player would go for more top end with a midrange peak just where the other guy scooped it out. There you have it - instant blend.

Of course things are never quite that easy in real life. Most guitar players never get to audio nirvana with their sound in the first place (it's like finding the perfect wave - it's out there but rarely experienced), and once found, it's difficult to get them to deviate from anything they’re comfortable with, even if it makes the band sound better. But if a player hears how successful the above techniques work in a controlled environment like the studio, they’re usually a bit more open to experimentation afterwards. Of course you can always tell them that xxx (fill in their favorite artist) does it that way to get his or her attention, because he probably does.

Whatever the method used, a judicious use of the amplifier tone controls can make a huge difference in how a band blends together both on-stage and in the studio.

Wednesday, December 2, 2015

How Effects Can Negatively Affect Your Guitar Tone

World's Largest Pedal Board
I was in the studio with a guitar player recently who was having a difficult time getting the tone he wanted. As I looked at his setup, the first thing that got my attention was the maze of stomp boxes he was using.

Although that wasn't the only problem with his rig, it was a good place to start, since everything was connected more or less haphazardly.

Here's some info taken from The Ultimate Guitar Tone Handbook (written with the great player/composer/writer Rich Tozzoli), that can help you get a handle on your effects.

"A couple of the common negative side effects that occur with some stomp boxes is how much they change the sound when you don’t want them to. Here’s are 4 things that can happen: 

1. Tone Suck
Tone suck is a term that means the tone of your guitar changes by simply inserting a pedal in between your guitar and amp, even if it isn’t turned on. The reason this happens is because your guitar signal still runs through some of the pedal’s circuitry even without the effect switched in. That circuitry degrades the signal either by changing the frequency response a bit, or by decreasing the volume a bit. Either way, this is not something we want if we’re to maintain that great tone that we hopefully started with. 

There are two answers for this:
  • True-Bypass means that when the effect is switch off, the signal totally bypasses all the circuitry so the pedal has zero influence on the sound as long as it’s not switched in. This is a rather recent development in the grand scheme of pedal building (since about the late 90’s) and just about all boutique pedal manufacturers use True Bypass as a sales feature these days.
One of the problems with true-bypass is that it gives the illusion that the volume and tone of the signal won’t ever change, but that’s not necessarily true. If you have a 15 foot cable from your guitar to your pedalboard, a one foot cable between each of your 15 stomp boxes, and another 15 foot cable to your amp, that’s 45 combined feet of cable, which will degrade your signal! There are ways around this with buffers (a unity gain amplifier) and loop-switching systems like the ones mentioned above, but many players never consider the consequences of just what could happen by the simple fact of connecting all those pedals together.

2. Noise Buildup
The next problem that happens with effects in the signal chain is the noise buildup that occurs when you switch them on (or even when they’re switched off if they don’t have true bypass). This can be anywhere from a slight escalation in the noise floor to the sound of a full-on hurricane, depending upon the gain of the device or devices. There are three reasons why this happens.
  • Each device adds a bit of it’s own inherent noise. Some devices are designed better than others (they’re usually more expensive as a result) and keeping the noise floor down is one of the byproducts of a better design.
  • The type of power being used. Although many effects can run on a 9 volt battery, they’re actually designed for 12 volt use. If you use an external AC supply, the noise level can drop considerably. Be aware that the noise floor can also rise in some pedals as the voltage drops from a weak battery.
  • The input stage of the amplifier. A typical amp input stage is looking for the relatively small signal coming directly from a guitar, which it will then boost up as much as 50 times. If the gain from a pedal is cranked up, it will still be boosted by that 50 times despite where the volume control is set at on some amps. This means that your noise floor just went down the drain.
3. The Wrong Effects Order
There are two things that will directly affect how your effects interface with your amp; the effects order and gain staging. Effects order means the order that each pedal appears in the the signal chain between the guitar and amplifier. There are several schools of thought on effects order, and they each have a different result.

School Of Thought #1
This effects chain is the order generally recommended by most of the pedal gurus. There are several rules that make up this order:
  • Any distortion pedal must come first right after the guitar. The exception is if you’re using a compressor pedal, which will be first in the chain. Do not put a volume pedal first, as this can alter the way a compressor or distortion pedal sounds.
  • Any modulation or tone devices like wahs should come next. This enables you to keep the sustain coming from your distortion or overdrive devices and alter an already harmonically rich signal.
  • Delays come almost last in the chain, since you want to be delaying your already effected signal.
  • A volume pedal comes either last in the chain, or directly in front of any delay.
  • In situations where a pedal is providing a lot of clean gain, that will come last in the chain so as not to overload any of the other pedals.
Effects Order #1 image from Bobby Owsinski's Big Picture blog
Effects Order #1
So a typical effects order might go something like:

 compressor --> distortion --> wah --> chorus --> delay --> volume pedal (see the graphic on the left)

While this might not be the quietest order, it does sound really good because any distortion, overdrive, or sustain is being affected by the effects that come behind it.

School Of Thought #2
If we’re talking about recording, we may want the least amount of noise going into the amp. With that in mind, there are two rules in this scenario:
  • The noisiest pedal goes last in the chain before the amp.
  • The one with the most gain goes last before the amp.
The reason for both of the above points is simple; if the noisiest pedal is first in the chain, that noise will be affected and amplified further by every other pedal in the chain that you switch on. Same with the pedal with the most gain; if it’s at the beginning of the chain, it could possibly overload any other effect that comes after it, since most pedals only want to see a typical guitar signal and nothing greater (see Figure 4). Also, any noise caused by increasing the gain on a pedal will be amplified downstream by any other pedal switched on.

Generally, you’ll try to keep the basic order as in School of Thought #1 in order to be sure that any distortion or sustain is affected by the effects placed later in the chain. That being said, this order won’t sound the same as Order #2, especially if a distortion pedal is placed last in the chain (which isn’t recommended) because of its gain, so it might not be for everyone.

4. Improper Gain Staging 
Proper gain staging means adjusting the gain of each effects device to keep the noise at it’s lowest and prevent overloading of any device after it. Since almost all pedals have output gain controls these days, the best way is to adjust all the output controls so the gain is exactly the same whether they’re switched on or off. If you’re running a distortion or overdrive pedal, put that last in the order, and increase the output level of that one pedal up to the sound that you like.

If you follow the above suggestions, you’ll find that your signal chain should clean up quite a bit and your recordings should benefit greatly as a result."

Wednesday, November 18, 2015

Here's Why The Sound Of Gibson Pickups Changed Through The Years

Gibson PAF Humbucker image from Bobby Owsinski's Big Picture production blog
A Gibson PAF Humbucker
A number of readers recently asked some questions regarding the sound of vintage instruments, which prompted me to think about this excerpt from The Ultimate Guitar Tone Handbook (written with writer, composer and good buddy Rich Tozzoli) that describes some of the intangibles that went into manufacturing Gibson humbucking pickups in the 50's and 60's.

As you'll see, there are a lot of external factors that went into making a pickup back then, and those factors pretty much be applied to all instruments in one way or another.

"As if the known factors in building a pickup weren’t enough, consider the many intangible factors as well. For instance, most pickups loose their magnetic strength over time because of environment and electrical interference. Pickups can become weakened or demagnetized completely by leaning your guitar against an amplifier with large transformers, or even from taking your guitar too close to the train motor of a subway (as happened with Andy Summers of The Police).

Another intangible is the fact that tolerances of just about every component were much looser until the 90’s. While the difference was indeed subtle, add enough components at the edge of their tolerances together and you suddenly get a pickup that sounds different even though it’s made the same.

Manufacturing intangibles are a whole other story and for that we’re going to go a bit into the history of the Gibson humbucker.

The Changes In The Humbucker
The first humbucking pickups on the 1957 models of Gibson guitars had a sticker on them saying “Patent Applied For” as the design was in the review cue before being granted a patent (see the figure on the upper left). These became known as PAF pickups (“Patent Applied For”) and have become highly sought after today for their great sound. The problem is that most PAFs sound different from one another due to manufacturing process of the time.

Until 1961 when Gibson standardized the selection process, they randomly used different strength magnets (grade 2 through 5) in their pickups, which accounts for some of the reasons for the different sounds. To make matters worse, sometimes a shorter magnet was selected (mostly seen in gold-plated guitars for some reason), which decreased the power of the magnet as well. 

In July of 1961, Gibson consistently began to use all short Alnico 5 magnets, although occasionally a few Alnico 2’s showed up. In 1965, Alnico 5’s became standard in all pickups, which finally brought about a bit of consistency to the process and the sound.

If that weren’t enough, the number of windings on the pickup varied enormously as well, especially in PAFs. The early coil winding machines didn’t have an auto shut-off so the workers would shut off the machine when the bobbin looked full, which was at about 5000 turns. As a result, no two pickups were ever the same.

Even when Gibson bought a winder with an auto-stop, there continued to be problems even though the pickups became more consistent. The stop mechanism was controlled by a fiber wheel which would wear out and break, at which point the workers would approximate the number of winds by timing the wind, which resulted in more inaccuracies.

Since the humbucker is made up of two coils, sometimes the windings of each coil were different even though the total number of turns were correct. This would cause certain mid-range frequencies to stand out and give it more bite.

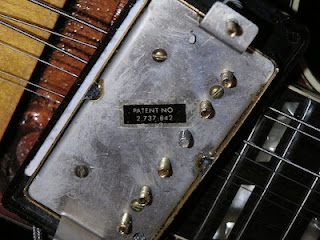
Gibson Patent Number Pickup image from Bobby Owsinski's Big Picture production blog
Figure 3.28: A Gibson Patent Number Pickup
By mid-1962, the patent for the humbucker was granted and Gibson changed the sticker to read “PATENT NO 2,737,842” which was actually the patent number for Les Paul’s trapeze tailpiece. No one knows for sure if printing the wrong number was merely a mistake or a way to throw off the competition. 

From 1963 to 1975, these “Patent number” pickups are very consistent, as are the ones thereafter when new, more precise winding machines were used (see Figure 3.28).

In the 1990’s, Gibson further refined their manufacturing and began to manufacture pickups based on the original PAF design. 

Thanks to precision modern manufacturing techniques, these pickups are remarkably consistent, which also means that a “magic” pickup made as a result of loose tolerances is no longer possible to get. That being said, most experts agree that you can now get 90% of the way there sound-wise for 10% of the cost of a vintage PAF."


Wednesday, September 16, 2015

Good Things Happen With Alternate Guitar Tunings

Alternate Guitar Tunings image
I received a few requests lately about alternate guitar tunings, so I thought it was time for a repost on the subject from 4 or 5 years ago (since Blogger doesn't make looking through the archives easy).

Sometimes changing the tuning of a guitar from standard to some alternate tuning can create a different sound that really makes a song sparkle or a guitar stand out from the track. In this excerpt from The Ultimate Guitar Tone Handbook, we'll take a look at the different types of tunings available as well as provide a few examples on songs that you've probably heard before.

"Like an electric, the standard tuning for an acoustic guitar is E-A-D-G-B-E (low to high), where the pitch of each note is referenced to a standard pitch (A = 440.0Hz). However, the guitar is an easy instrument to change tunings with in order to create a whole new palate of sonic possibilities. These tunings can be placed into several subcategories, such as open tunings, lower tunings, higher tunings, dropped tunings and double drop tunings.

Open Tunings
Open tunings allow the guitarist to play a chord without any fretting, and has long been a favorite of the blues greats, especially those specializing in the slide guitar. You’ve heard Open G tuning, D-G-D-G-B-D, on many of the Rolling Stones hits including "Start Me Up," "Brown Sugar" and "Honkey Tonk Women." It was also a favorite tuning of Mississippi Delta bluesmen Son House, Charlie Patton and Robert Johnson.

Open A tuning, E-A-C#-E-A-E, was famously used by The White Stripes on "Seven Nation Army" (although that’s not acoustic), and Open D, D-A-D-F#-A-D, is favored by 60’s folk giant Richie Havens.

Another popular tuning, D-A-D-G-A-D, is sometimes called D modal or Celtic tuning. You’ve heard it on Led Zeppelin’s "Kashmir" and "Black Mountainside," and the Doobie Brothers’ "Black Water."

Drop Tunings
Drop tunings lower just the 6th string of the standard tuning, with Drop D being one of the most popular. Drop D is tuned as D-A-D-G-B-E and is used by Soundgarden ("Spoonman"), Creed ("Higher"), Radiohead ("Optimistic") and Led Zeppelin ("Moby Dick"). Drop C, C-G-C-F-A-D, would be a full step down from Drop D.

With double drop tunings, the 1st and 6th strings are dropped a full step, so Double Drop D is laid out as D-A-D-G-B-D. This was used by Neil Young on his hits "Cinnamon Girl," "When You Dance," "The Loner" and Crosby, Stills, Nash and Young’s "Ohio." Double Drop C, C-G-C-F-A-C, is a full step down from Double Drop D.

Lower Tunings
With lower tunings, all six strings are tuned down. An Eb tuning drops each string down a half-step and has been very popular with some of the greatest guitar players of our time such as Edward Van Halen, Stevie Ray Vaughn, Jimi Hendrix and Slash.

D tuning, D-G-C-F-A-D, where each string is tuned down a full step, is a favorite of John Fogarty, Dream Theater and the Nirvana hit "Come As You Are."

C tuning would be down two full steps to C-F-Bb-Eb-C-G, and has been used by Queens of the Stone Age and other metal bands. Tunings even lower are favored by Swedish death metal bands, but string tension will be quite low on some of these tunings, causing tuning and intonation problems.

High Tunings
Higher tunings, which are not used as much with acoustic guitars, will increase the string tension. F# tuning would be one full step up from standard with the strings at F#-B-E-A-C#-F# and G tuning (also sometimes called Third tuning) is G-C-F-A#-D-G. Not all acoustic instruments can handle these tunings, so it might be better to use a capo instead."

To read additional excerpts on this and my other books, check out the excerpts page on my website.


Wednesday, July 29, 2015

What Is A Speaker Baffle And Why Is It So Important?

Whether it's a guitar or bass cabinet, your monitor speakers or the speakers in your car, one of the most important elements to how a speaker ultimately sounds is the way it's mounted. Here's an excerpt from "The Ultimate Guitar Tone Handbook," which I wrote with Rich Tozzoli, about one of the more important parts of a speaker cabinet - the baffle.

A Typical Speaker Baffle
"One of the most overlooked parts of a cabinet is the baffle (seen on the left), which is the board that the speaker is directly mounted on. Perhaps more than any one piece of the cabinet, this has the most influence on the sound. The type of material (pine, birch, MDF), the thickness, and the way it’s mounted all contribute to the sound.

Thin plywood tends to be louder and have better low end than pine of the same thickness. 3/4 inch birch has more projection and gives you more of the speaker sound and less of the cabinet itself. Closed-back cabinets will be tighter and have a slight edge with birch baffles.

The thickness of the baffle has a great deal to do with the sound. For instance, most tweed amps from the 50’s used either ¼ inch or 5/16 inch pine, which sounds open and loose. Amps made in the 60’s generally have a thicker baffle and have a tighter, cleaner sound as a result.


The way the baffle is connected to the cabinet also makes a big difference. Fender used what’s known as a “floating baffle” for a long time, which provided a bigger, more “organic” tone. 
  • A floating baffle is attached at 2 points either top and bottom or side and side. The 1959 Fender Bassman is a good example of a top and bottom floating baffle while the Super Reverb is a good example of a side to side floating baffle. 
  • The Bandmaster 2×12″ speaker cabinet does not have a floating baffle. It is attached on all 4 sides to be very rigid and tight.
  • A thinner baffle works best for a floating baffle because it vibrates more and those vibrations blend with those of the speakers.
Center Stabilizer Piece

If you ever open up a closed-back cabinet, you’ll notice that there’s a piece of wood in the center of the cabinet that connects the baffle to the back panel (seen on the left). That’s designed to allow the baffle and back panel resonate in phase, and without it you’d have a lot of phase cancellation, and a cabinet with a lot of frequency response peaks and dips as a result."


Wednesday, May 20, 2015

6 Mic Placement Tips For Electric Guitars

Guitar cab miking with 2 mics image
When it comes to recording electric guitars (or any other instrument, for that matter) so often we rely on experience or sight when placing the mic. That might be a good place to start, but there's a more thorough way to get a great sound.

Here's an excerpt from my Ultimate Guitar Tone Handbook (written with Rich Tozzoli) that outlines 6 mic placement tips for making sure that the mic placement will capture the right sound for the track.

"A common recording process has an engineer EQing, compressing, and adding multiple mics in trying to capture a sound, yet never taking into account what the sound in the room at the source is like. That’s why it’s imperative that every engineer use the following steps in any serious microphone placement:

1. Go out into the room, stand in front of the amp or acoustic guitar player, and listen to them play the part from the song you’re about to record. Playing the song is important because you might be deceived if it’s another song or just random playing. Listen for the tonal balance from the amp or instrument as well as the way the room responds. Listening to the amp or acoustic guitar in the room will give you a reference point to the way it really sounds so you have a better idea of what you’re trying to capture.

2. Find the sweet spot. There are several ways to find the sweet spot.
  • To place an omnidirectional mic, cover one ear and listen with the other. Move around the mic or player until you find the spot that sounds best. That’s where to place the mic to begin.
  • To place a cardioid mic, cup your hand behind your ear (instead of covering it) and move around the player or amp until you find the place that sounds best.
  • To place a stereo mic or stereo pair, cup both ears and move around the player or amp until you find the place that sounds best.
  • As an alternate method, crank the amp until it’s noisy, then put on headphones and listen to the mic as you move it around until the noise has the best combination of highs and lows.
3. You can’t place the mic by sight. The best mic position must always be found, not predicted. It’s okay to have a starting place, but it’s usually never what ends up being the best spot.

4. Change the mic position instead of reaching for the EQ. Chances are that you can adjust the quality of the sound enough by simply moving the mic in order to avoid using any equalization. The EQ will add a least a small amount of phase shift at some frequency and can’t be undone later. Moving the mic (which amounts to an acoustic EQ) will usually sound smoother and more pleasing to the ear.

5. Give the mic some distance. Remember, distance creates depth. The guitar and amp will sound a lot more natural than using artificial ambience. If possible, leave just enough distance between the mic and the source to get a bit of room reflection to it.

6. Be careful miking multi-speaker cabinets. 4x12 cabinets like the typical Marshall 1960 pose a special challenge in that at a certain distance you have phase anomalies from the multiple speakers that you really don’t want to capture.

The cabinet will sound fine when close miked from right against the grill cloth to approximately three inches away from the best sounding speaker in the cabinet, but until you get to a distance of 18 inches where the sound of all the speakers converge, you may be capturing some speaker interaction that’s not all that pleasant sounding. That distance varies with the make and model of speaker cabinet.

Also, be careful about buzzes and rattles from the cabinet, which could sound very much like distortion or a blown speaker. Finding it may take some time, but a bit of tape should do the trick to quiet things down."


Wednesday, March 25, 2015

9 Reasons A Guitar Pickup Sounds The Way It Does

Strat pickup image
As any electric string instrument player knows, there are a number of different types of pickups, and within each category there's a tremendous variation in possible tone.

This excerpt from The Ultimate Guitar Tone Handbook explains the 9 factors that affect how a pickup sounds. The next time you're in the market for one, keep these in mind so you can better tailor the pickup to your needs.

"Just like most things in life, something that seems so simple on the outside is very intricate on the inside and a pickup is no exception. Here are the numerous factors that contribute to a pickup’s sound.
1. The number of turns or winding. This is the number of turns of wire around the bobbin of the pickup. The more turns, the louder the pickup, but the worse the high-frequency response becomes. The number of turns is measured by the electronic resistance of the wire, which is measured in ohms. The higher the ohms value, the hotter the pickup but the less high-frequency response you’ll have. Humbucking pickups have more resistance than a single coil because there are more turns of wire, which is why they’re hotter and have less high end. 
2. Type of wire used. The diameter and insulation determines the number of windings that can fit on a bobbin, which will determine the resistance, which determines the output, etc. 
3. Type of winding method used. We’ll look at this a bit closer in a bit, but many of the pickups in the early days of the electric guitar were wound by hand, which meant that there were more or less than the required number of windings on the bobbin, and an uneven wind would also affect the capacitance of the pickup, which can cause a peak in the frequency response. This problem was virtually eliminated when manufacturers switched to machine winding (see above), but while every pickup was now the same, some of the magic that occasionally came from a hand-wound pickup also disappeared. 
4. The type of magnets used. Although Alnico (a blend of aluminum, nickel and cobalt) is the alloy of choice for most pickups, occasionally you’ll find pickups made of other materials such as ceramic or neodymium. This will affect the strength of the magnetic field which we’ll cover next. 
5. The strength of the magnets used. Magnets used for pickups are categorized by strength on a scale of two to five with five being the strongest. A stronger magnet will produce a louder and brighter sound  while a weaker one will produce one that’s warmer. 
6. The magnet height. How close the individual magnets are to the strings will determine how loud that string is. On pickups that have adjustable pole pieces that’s not so much of a problem, but on pickups with fixed pole pieces (like a Fender Strat or Tele) that could cause a slight imbalance in the string output. As an example, prior to the late 60’s, most guitarists used a wound G string, so the fixed height of the magnets on a Strat were different to compensate. 
7. Pickup Cover. Metal covers on humbuckers can cause a resonance that results in feedback problems at high volumes. That’s why many of the early rockers removed their pickup covers, and why many guitars and pickups are sold that way today. 
8. Pickup potting. Many pickups are sealed in wax to eliminate vibration induced signals that make a pickup microphonic. The heat from the hot wax can weaken the magnet though, thereby changing the pickup’s sound. 
9. Potentiometers. Although not exactly a part of the pickup itself, the volume and tone pots are part of the electronic circuit along with the pickup and can affect the sound. The higher the resistance of the pot, the more high end will pass. Fenders use 250k ohm pots, Gibson uses 500k, and many other manufacturers use 1 Meg pots.
There are other factors such as winding direction, magnetic polarity, and the type of bobbins used, but their contribution to the final sound is subtle at best."

You can read additional book excerpts from The Ultimate Guitar Tone Handbook and my other books at bobbyowsinski.com.
----------------------------------

Don't forget to check out my Music 3.0 blog for tips and tricks on navigating social media and the new music business.

Tuesday, December 30, 2014

Explaining The Sound Of Guitar Speakers

Guitar Speaker image
Most guitar players are blissfully unaware of the details of the speakers they're playing through. Sure, they may know what size the speakers are and how many are in the cabinet, but other than that, they have no idea about how much of an effect the make of the speaker can have on the sound. Here's a brief excerpt from The Ultimate Guitar Tone Handbook (written with Rich Tozzoli) that explains why they sound the way they do.

"Size
The size of a speaker has a great deal to do with the way it sounds. As you’ve probably noticed, an 8 inch sounds different than a 10 inch, which sounds different from a 12 inch, which sounds different from a 15 inch speaker. The reason is simple physics; the larger the cone, the more energy it takes to get it moving so the high end and the attack time won’t be as good as a speaker that’s smaller. Conversely, a smaller speaker has poorer low frequency response because it has less cone area to move air.

As a result, you’ll notice that an 8 inch speaker won’t have nearly as much bottom end as a 15 inch speaker, and the 15 with have quite the top end of a 10 inch speaker. That’s why 12 inch speakers are mostly used for guitar rigs; they’re a nice compromise between the two.

Number Of Speakers
That being said, the number of speakers in a cabinet can also have an affect on both the volume level and the low end. The more speakers that acoustically couple together, the more effective cone mass you have. As a result, a cabinet with two 12 inch speakers  gives you 24 inches of cone mass while a a cabinet with four 10’s (like Fender’s original Bassman) gives you 40 inches. Of course, other factors like resonant frequency are involved, but this is a simple way to look at it.

Speaker Wattage
Contrary to what you might think, lower wattage speakers usually sound better than high-wattage ones. High-wattage speakers have heavier cones and surrounds that change the response of the speaker and therefore the tone. Because the cone is heavier, it slower to move when a signal is applied so the high frequency response isn’t as good as one with a thinner cone.

Other things that change in a higher wattage speaker is the diameter of the voice coil and the type of wire used for it are usually larger, which again changes the speaker’s response. A heavier magnet is also required because the voice coil is a bit heavier to move.

As a result, what you have is a speaker that’s harder to blow up, but also one that has a different frequency response and doesn’t break up as easily, which may be an important trait of your sound.

Magnet Structure
There are three different types of materials used in speaker magnets, Alnico, Ceramic, and Neodymium, with each material having a distinctly different effect on the tonal characteristics of the speaker.
  • Alnico, an alloy of aluminum, nickel and cobalt, is the magnetic material used in the original speakers in all the vintage amps. It produces a classic tone that’s warmer and sweeter at lower volumes that many players feel reacts faster to the touch. Alnico was used for decades because of its strong magnetic field, but once the alloy became a bit pricey, many manufacturers opted for speakers with the less expensive ceramic magnets.
  • Ceramic magnets were developed as an inexpensive alternative to Alnico and have the advantage of being more versatile with a wider range of tones. Speakers with ceramic magnets tend to weigh more, but generally handle more power and sound better at high volumes. 
  • Neodymium is the latest development in speaker magnet material. It’s not as expensive as Alnico but costs a bit more than ceramic magnet speakers. It has the advantages of both weighing about 50% less than other speakers and having stronger magnetic properties. Speakers made from neodymium respond to a player's touch similar to Alnicos and have a well balanced frequency response."

Tuesday, November 25, 2014

Making A Great Guitar String

Guitar Strings image
Most guitar players settle on a brand of strings without even realizing why, usually only changing when they can't get their favorite brand. In this excerpt from The Ultimate Guitar Tone Handbook (written with my good buddy Rich Tozzoli), Jim D'Addario, the CEO and chairman of D’Addario & Company, Inc. (the world’s largest maker of musical instrument strings), describes what makes a great string as well as some of the differences between the way manufacturers make their strings to help you make a choice next time it's time to buy strings.

"What do you think makes a great guitar string?
Certainly, that’s a matter of opinion. It comes down to what tone you are looking for, however there are some common denominators that are key ingredients for making a great string. The most important things are consistency in diameter, shape, and the mass of the string from one end of the vibrating length to the other. If there are fluctuations as you’re winding or making the string, and the mass of the string varies at any point along its length, the intonation is going to be horrible and the harmonics will not be true.

As we developed the expertise to design and build our own machinery in the 70’s, we developed ways of controlling the variables that are involved with the manufacturing process. One of the most important variables is the tension that you put on the wire as you wrap it around the core. I would say it’s one of the most critical variables in string making. Because we use soft temper wires you can actually elongate the wire significantly during the process and end up with a completely different diameter finished string. Tension is a critical aspect of making a string!

What are some of the innovations you came up with in string manufacturing?
Twenty years ago we developed a closed loop system where we actually measure the tension on the wire just before it goes on the string. Utilizing a load cell and a digital control that adjusts the tension, we always maintain perfect tension specifications. You can’t do that when you wind a string by hand, and you can’t do that with a mechanical tension device. It has to be closed loop and digital. It’s really very similar to an autopilot in a plane. Our machines are constantly making minute corrections to hit the tension target.

The other breakthrough innovation we developed was a way of tracking the angle that the wire was being fed onto the core, which is also extremely critical. Many competitors are still using machinery with mechanical drives that feed the wire, but back in 1979 we developed a system that tracks the wire feed angle and makes adjustments on the fly to ensure the windings are perfectly spaced. It is one of the reasons why our strings are so consistent. We designed this in 1979. You can imagine how expensive the electronics for that was back then.

If you control the basics, core tension, wrap tension and feed angle, then it’s a question of designing the string properly. Here’s where we create your choices for string tone. A flat wound string is very mellow sounding, a half round string is a little brighter and a round wound string is even brighter. A nickel-plated steel round wound string is bright; a stainless steel string is a little brighter, etc., etc.
It’s like going to a restaurant and looking at the menu. What flavor would you like? You want the chef to do a great job at cooking all the things on the menu, but you want to be able to select the flavor that you’re looking for. Picking and designing the materials that should go into the strings is like picking what you like off the menu. Personally, I like very bright sounding strings. I like uncoated phosphor bronze strings on acoustic, but because I have so many guitars and can’t change strings often enough, I use coated EXP strings. I actually like our 80-20 coated strings better than coated phosphor bronze. I don’t know why, but I do. Over the last ten years we’ve gotten the coating process on our EXP’s down to be so thin that I can’t even hear the difference between a coated and a uncoated string anymore.

EXP is a micro coating on the wrap wire that’s only 2/10,000ths of an inch in thickness. What it does is seal it from the environment so it doesn’t corrode and doesn’t get affected by your body chemistry. Those are the key elements that break a string down and make it lose its tone prematurely."

To read additional excerpts from The Ultimate Guitar Tone Handbook and my other books, go to the excerpts section of bobbyowsinski.com.

Here's a great video from the How It's Made program showing the making of a D'Addario string.

----------------------------------

Tuesday, September 16, 2014

Getting The Most From Amp Tone Controls

Tone controls image
I'm always kind of baffled when I hear a band live and there's no separation between instruments, especially between guitar players. Then I think back to when I was a young player and remember, "They just don't know how to set their tone controls yet."

For too many players, setting those amp tone controls is such a random act with little thought behind it. Here's an excerpt from my Ultimate Guitar Tone Handbook (written with the excellent guitar player, composer and author Rich Tozzoli) that gives some context as to how to get those most out of these controls.

"So often players are confused by the tone controls on their amps. What’s the best way to set them? Is there a method for doing so? In order to get the most out of them, it’s best to understand the reasons why they’re there in the first place.

The biggest reason for having tone controls is so that all the frequencies of your instrument speak evenly so no particular range is louder or softer than any other. Shortly after the first amps were developed with only a single “Tone” control, manufacturer’s noticed that players might be using guitars with different types of pickups with their amps, so more sophisticated tonal adjustments were really necessary. A guitar with a humbucking pickup might sound too boomy through an amp, but if you roll off the low-end with the bass control, the frequencies even out. Likewise, a Strat might be too light on the low-end or have too much top-end, but a simple adjustment would make all frequencies come out at roughly the same level.

Another place where tone controls come in handy is if you have a frequency that really jumps out, as compared to all the rest, either because of the way the amp is overdriven or because of a pedal. Often a slight adjustment of the Treble, Middle or Presence control can alleviate the problem, although these controls will also adjust all the frequencies around the offending one as well.

Where tone controls are especially effective is how the guitar fits within the context of the mix of the song. You want to be sure that every instrument is distinctly heard and the only way to do that is to be sure that each one sits in it's own particular frequency range, and the tone controls will help shape this. It's especially important with two guitar parts that use similar instruments and amps (like two Strats through two Fender Super Reverbs). If this occurs, it’s important to be able to shape your sound so that each guitar occupies a different part of the frequency spectrum. To make our example work in the mix, one guitar would occupy more of a higher frequency register while the other would be in a lower register, which would mean that one guitar has more high end while the second guitar is fatter sounding, or both guitars might have different mid-range peaks. 

Not only do guitars have to sonically stay out of the way of each other, but they have to sit in a different frequency space than the bass and drums (and vocals, keys, percussion, and horns if you have them) too. As a result, you either adjust the tone controls on your amp or try another guitar so it fits better in the sonic space with everything else. While the engineer can do this with equalization either during recording or mixing, it’s always better if you get as close to the sound as possible out in the studio first because it will save time and sound better too.


The best way to get an ear for how guitars are sonically layered is to listen carefully to a number of hit songs in almost any genre and really dissect how everything fits together. Of course, the producer, engineer or artist (if you’re playing on someone else’s recording) will also have specific ideas as to the sound they’re looking for in the track, and will guide you in that direction."

To read additional excerpts from the Ultimate Guitar Tone Handbook and my other books, go to the excerpts section of bobbyowsinski.com.
----------------------------------

Friday, June 6, 2014

Rich Tozzoli On Today's Inner Circle Podcast

Television composer Rich Tozzoli image
The next Inner Circle Podcast has been posted and this one's guest is television composer and author Rich Tozzoli. Rich and I will discuss the ins and outs of writing and recording music for television as well as some of the gear that he uses.

Rich was also my co-author on The Ultimate Guitar Tone Handbook and you probably know him for his columns in Pro Sound News and Premier Guitar.

To catch the podcast, click on BobbyOInnerCircle.com or go directly to iTunes.

Also, if you dig the podcast, be sure to leave a short comment on iTunes. It's very helpful.

And please, let me know what you like or don't like about the show as well.
----------------------------------

Tuesday, April 15, 2014

3 Advanced Techniques For Miking An Acoustic Guitar

Miking the guitar neck and body image
Figure 1: Miking the guitar neck and body
Many times it's surprising the difference an extra mic can make when miking an instrument. A second mic can add depth and ambiance even without resorting to a stereo configuration, which can be perfect for the right track. Here are 3 techniques for using two mics when recording an acoustic guitar, culled from The Ultimate Guitar Tone Handbook that I wrote with my good buddy Rich Tozzoli.

"The use of a second microphone on an acoustic guitar opens up numerous tonal options. Remember, the sound does not come from the soundhole alone; it’s a combination of all the elements of the instrument – its body, neck, strings, and the integration of the overall design. 

The two mic option has many alternatives in terms of positioning, where each mic can be placed on a different part of the guitar. Several mics can be also be placed directly next to each other in order to create a wider sound field. You can also separate them where one captures the direct sound of the instrument and another records the room ambience or is placed over the guitarists shoulder. 

Although the mics can be grouped onto just a single track, recording the mics on individual tracks provides more options during mixing.

Two Mic Technique #1 - Recording Different Parts of the Guitar 
Many excellent recordings have been made by placing a single mic where the soundhole and neck meet, and another on the body (see the Figure 1 on the left). For example, you could place a small diaphragm condenser such as the AKG C451 on the soundhole/neck to capture the brightness of a guitar, while placing a ribbon such as the Royer 121 near the body of the instrument. Or, you could choose to place the ribbon on the soundhole and the condenser on the body – or any combination of mics. 

You can also experiment by moving the soundhole mic further up the neck to increase the brightness captured by that mic, or further towards the bridge to darken the tone. When placing a mic on the body, it’s best to listen to the instrument first, as every guitar has it’s own unique projection. Once you’ve listened and found what you think is a sweet spot, place each mic the same distance away from the instrument.

The reason you should try to place both mics at the same distance from the guitar is so that they record in time with each other. Any slight time delay between the mics, even if not noticed during recording, can cause the mics to be slightly out-of-phase with each other, which will cancel out certain frequencies and cause an almost ‘washy’ effect. An easy way to check phase is to listen to one of the channels in and out of phase, either by applying a plug-in (with delay compensation!) that has phase reversal or selecting it on your mixing console or microphone preamp. If you notice one of the mics is out of phase, you can either move the mics or try to visually adjust the waveforms in your DAW.

With the old adage ‘there are no rules’ in mind, the above information should be taken with open ears. Some very cool guitar sounds can be had by actually recording out of phase, or better yet, by sliding separately recorded tracks on your DAW by a few milliseconds. This can create a short delay sound, which in certain productions, may actually work sonically to lift the guitar louder in the mix. A few minutes of experimenting should tell you what works and what doesn’t.

One last thing to think about with recording separate parts of the guitar. If you have one high quality mic and one that’s simply mediocre, it makes sense to put the good mic in the most important position, which is usually the neck/soundhole. By letting the quality mic do the ‘heavy lifting’ of capturing most of the sound, the other mic can then be placed either on the body or the strings to complete the overall sound.

Close and ambient miking image
Figure 2: Close and ambient miking
Technique #2 - Close And Ambient Miking
Another technique using more than one microphone involves placing a mic close to the guitar and another in the room to record the ambience (see Figure 2). The first mic, which can be placed either at the usual fretboard/soundhole position or near the body, will capture the more direct sound of the instrument. The second mic should be placed at least three feet further away from the first mic (out in the room) to maintain proper phase integrity. 

This method is quite effective when using either a small diaphragm condenser or ribbon mic up close, and a large diaphragm or omni mic as the distant mic. Make sure to achieve a good recording level on the room mic, as the sound level will obviously be less due to the distance from the source. This technique depends upon the quality of the room and the actual amount of room space that’s available. 

Two Mic Variation #1

Another optional placement of the second mic in the room is to position it above the shoulder or head of the player, facing towards the front of the guitar. This approximates what the guitarist hears at the playing position and can add a nice sense of depth to an acoustic recording. Try using a shotgun mic, if available, placed above the player’s head or shoulders. By virtue of its design, shotgun microphones are highly directional and will minimize the recording sensitivity to the left, right and rear, focusing on the sound projecting in front of the guitar."

To read additional excerpts from The Ultimate Guitar Tone Handbook and my other books, go to the excerpts section of bobbyowsinski.com.

Thursday, April 25, 2013

The 9 Factors In Pickup Sound

Seymour Duncan's vintage pickup winder from the Gibson Factory
As any electric string instrument player knows, there are a number of different types of pickups, and within each category there's a tremendous variation in possible tone. This excerpt from The Ultimate Guitar Tone Handbook explains the 9 factors that affect how a pickup sounds. The next time you're in the market for one, keep these in mind so you can better tailor the pickup to your needs.

"Just like most things in life, something that seems so simple on the outside is very intricate on the inside and a pickup is no exception. Here are the numerous factors that contribute to a pickup’s sound.
  • The number of turns or winding. This is the number of turns of wire around the bobbin of the pickup. The more turns, the louder the pickup, but the worse the high-frequency response becomes. The number of turns is measured by the electronic resistance of the wire, which is measured in ohms. The higher the ohms value, the hotter the pickup but the less high-frequency response you’ll have. Humbucking pickups have more resistance than a single coil because there are more turns of wire, which is why they’re hotter and have less high end.
  • Type of wire used. The diameter and insulation determines the number of windings that can fit on a bobbin, which will determine the resistance, which determines the output, etc.
  • Type of winding method used. We’ll look at this a bit closer in a bit, but many of the pickups in the early days of the electric guitar were wound by hand, which meant that there were more or less than the required number of windings on the bobbin, and an uneven wind would also affect the capacitance of the pickup, which can cause a peak in the frequency response. This problem was virtually eliminated when manufacturers switched to machine winding (see above), but while every pickup was now the same, some of the magic that occasionally came from a hand-wound pickup also disappeared.
  • The type of magnets used. Although Alnico (a blend of aluminum, nickel and cobalt) is the alloy of choice for most pickups, occasionally you’ll find pickups made of other materials such as ceramic or neodymium. This will affect the strength of the magnetic field which we’ll cover next.
  • The strength of the magnets used. Magnets used for pickups are categorized by strength on a scale of two to five with five being the strongest. A stronger magnet will produce a louder and brighter sound  while a weaker one will produce one that’s warmer.
  • The magnet height. How close the individual magnets are to the strings will determine how loud that string is. On pickups that have adjustable pole pieces that’s not so much of a problem, but on pickups with fixed pole pieces (like a Fender Strat or Tele) that could cause a slight imbalance in the string output. As an example, prior to the late 60’s, most guitarists used a wound G string, so the fixed height of the magnets on a Strat were different to compensate.
  • Pickup Cover. Metal covers on humbuckers can cause a resonance that results in feedback problems at high volumes. That’s why many of the early rockers removed their pickup covers, and why many guitars and pickups are sold that way today.
  • Pickup potting. Many pickups are sealed in wax to eliminate vibration induced signals that make a pickup microphonic. The heat from the hot wax can weaken the magnet though, thereby changing the pickup’s sound.
  • Potentiometers. Although not exactly a part of the pickup itself, the volume and tone pots are part of the electronic circuit along with the pickup and can affect the sound. The higher the resistance of the pot, the more high end will pass. Fenders use 250k ohm pots, Gibson uses 500k, and many other manufacturers use 1 Meg pots.
There are other factors such as winding direction, magnetic polarity, and the type of bobbins used, but their contribution to the final sound is subtle at best."


----------------------------------

You should follow me on Twitter for daily news and updates on production and the music business.

Don't forget to check out my Music 3.0 blog for tips and tricks on navigating social media and the new music business.

Sunday, July 22, 2012

4 Reasons For Effects Problems

Effects Order #1 image from Bobby Owsinski's Big Picture blog
Effects Order #1
I was asked by a guitar player recently why his tone wasn't what he wanted, and the first thing that got my attention was the maze of stomp boxes he was using.

Although that wasn't the only problem with his rig, it was a good place to start, since everything was connected more or less haphazardly. Here's some info taken from The Ultimate Guitar Tone Handbook (written with the great player/composer/writer Rich Tozzoli), that can help you get a handle on your effects.

"A couple of the common negative side effects that occur with some stomp boxes is how much they change the sound when you don’t want them to. Here’s are 4 things that can happen: 

1. Tone Suck
Tone suck is a term that means the tone of your guitar changes by simply inserting a pedal in between your guitar and amp, even if it isn’t turned on. The reason this happens is because your guitar signal still runs through some of the pedal’s circuitry even without the effect switched in. That circuitry degrades the signal either by changing the frequency response a bit, or by decreasing the volume a bit. Either way, this is not something we want if we’re to maintain that great tone that we hopefully started with. 
There are two answers for this:
  • True-Bypass means that when the effect is switch off, the signal totally bypasses all the circuitry so the pedal has zero influence on the sound as long as it’s not switched in. This is a rather recent development in the grand scheme of pedal building (since about the late 90’s) and just about all boutique pedal manufacturers use True Bypass as a sales feature these days.
One of the problems with true-bypass is that it gives the illusion that the volume and tone of the signal won’t ever change, but that’s not necessarily true. If you have a 15 foot cable from your guitar to your pedalboard, a one foot cable between each of your 15 stomp boxes, and another 15 foot cable to your amp, that’s 45 combined feet of cable, which will degrade your signal! There are ways around this with buffers (a unity gain amplifier) and loop-switching systems like the ones mentioned above, but many players never consider the consequences of just what could happen by the simple fact of connecting all those pedals together.

2. Noise Buildup
The next problem that happens with effects in the signal chain is the noise buildup that occurs when you switch them on (or even when they’re switched off if they don’t have true bypass). This can be anywhere from a slight escalation in the noise floor to the sound of a full-on hurricane, depending upon the gain of the device or devices. There are three reasons why this happens.
  • Each device adds a bit of it’s own inherent noise. Some devices are designed better than others (they’re usually more expensive as a result) and keeping the noise floor down is one of the byproducts of a better design.
  • The type of power being used. Although many effects can run on a 9 volt battery, they’re actually designed for 12 volt use. If you use an external AC supply, the noise level can drop considerably. Be aware that the noise floor can also rise in some pedals as the voltage drops from a weak battery.
  • The input stage of the amplifier. A typical amp input stage is looking for the relatively small signal coming directly from a guitar, which it will then boost up as much as 50 times. If the gain from a pedal is cranked up, it will still be boosted by that 50 times despite where the volume control is set at on some amps. This means that your noise floor just went down the drain.
3. The Wrong Effects Order
There are two things that will directly affect how your effects interface with your amp; the effects order and gain staging. Effects order means the order that each pedal appears in the the signal chain between the guitar and amplifier. There are several schools of thought on effects order, and they each have a different result.

School Of Thought #1
This effects chain is the order generally recommended by most of the pedal gurus. There are several rules that make up this order:
  • Any distortion pedal must come first right after the guitar. The exception is if you’re using a compressor pedal, which will be first in the chain. Do not put a volume pedal first, as this can alter the way a compressor or distortion pedal sounds.
  • Any modulation or tone devices like wahs should come next. This enables you to keep the sustain coming from your distortion or overdrive devices and alter an already harmonically rich signal.
  • Delays come almost last in the chain, since you want to be delaying your already effected signal.
  • A volume pedal comes either last in the chain, or directly in front of any delay.
  • In situations where a pedal is providing a lot of clean gain, that will come last in the chain so as not to overload any of the other pedals.
So a typical effects order might go something like:

 compressor --> distortion --> wah --> chorus --> delay --> volume pedal (see the graphic on the left)

While this might not be the quietest order, it does sound really good because any distortion, overdrive, or sustain is being affected by the effects that come behind it.

School Of Thought #2
If we’re talking about recording, we may want the least amount of noise going into the amp. With that in mind, there are two rules in this scenario:
  • The noisiest pedal goes last in the chain before the amp.
  • The one with the most gain goes last before the amp.
The reason for both of the above points is simple; if the noisiest pedal is first in the chain, that noise will be affected and amplified further by every other pedal in the chain that you switch on. Same with the pedal with the most gain; if it’s at the beginning of the chain, it could possibly overload any other effect that comes after it, since most pedals only want to see a typical guitar signal and nothing greater (see Figure 4). Also, any noise caused by increasing the gain on a pedal will be amplified downstream by any other pedal switched on.

Generally, you’ll try to keep the basic order as in School of Thought #1 in order to be sure that any distortion or sustain is affected by the effects placed later in the chain. That being said, this order won’t sound the same as Order #2, especially if a distortion pedal is placed last in the chain (which isn’t recommended) because of its gain, so it might not be for everyone.

4. Improper Gain Staging 
Proper gain staging means adjusting the gain of each effects device to keep the noise at it’s lowest and prevent overloading of any device after it. Since almost all pedals have output gain controls these days, the best way is to adjust all the output controls so the gain is exactly the same whether they’re switched on or off. If you’re running a distortion or overdrive pedal, put that last in the order, and increase the output level of that one pedal up to the sound that you like.

If you follow the above suggestions, you’ll find that your signal chain should clean up quite a bit and your recordings should benefit greatly as a result."

----------------------------------

You should follow me on Twitter for daily news and updates on production and the music business.

Don't forget to check out my Music 3.0 blog for tips and tricks on navigating social media and the new music business.

LinkWithin

Related Posts Plugin for WordPress, Blogger...