WebSphere Application Server Performance Cookbook
Introduction
The IBM® WebSphere® Application Server Performance Cookbook covers performance tuning for WebSphere Application Server traditional, WebSphere Liberty, Java™, and other topics. Review the notices for terms of use.
Start with the recipes and review details in supporting chapters as needed.
Table of Contents
- Introduction
- Recipes
- General Recipes
- Operating System Recipes
- Java Recipes
- WAS traditional Recipes
- General WAS traditional Performance Problem
- Large Topologies Recipe
- Request Metrics Recipe
- Tune a Thread Pool
- HTTP Sessions Recipe
- Security Recipe
- Connection Pool Hangs in createOrWaitForConnection
- Threads in socketRead0 in JDBC calls
- Slow or Hung Application
- Threads in java.io.FileOutputStream.writeBytes
- Logging PMI Data
- Logging Custom PMI Data with Dynacache
- General WAS traditional Performance Problem
- WebSphere Liberty Recipes
- Web Server Recipes
- Container Recipes
- Caching Recipes
- General Recipes
- Troubleshooting Recipes
- Troubleshooting Operating System Recipes
- Troubleshooting Linux Recipes
- Troubleshooting AIX Recipes
- Troubleshooting Windows Recipes
- Troubleshooting OpenJ9 and IBM J9 Recipes
- Troubleshooting HotSpot Recipes
- Troubleshooting Memory Leaks
- Troubleshooting WAS traditional Recipes
- WAS traditional Dynamic Diagnostic Trace Recipe
- WAS traditional Diagnostic Trace from Startup Recipe
- WAS traditional Hung Thread Detection Recipe
- WAS traditional HTTP Access Log Recipe
- WAS traditional Dynamic verbosegc Recipe
- WAS traditional verbosegc from Startup Recipe
- WAS traditional Common Diagnostic Files Recipe
- WAS traditional collector Recipe
- WAS traditional runtime diagnostic trace script
- WAS traditional Dynamic Diagnostic Trace Recipe
- Troubleshooting WebSphere Liberty Recipes
- Troubleshooting Web Servers Recipes
- Troubleshooting Kubernetes Recipes
- Troubleshooting OpenShift Recipes
- OpenShift Login Recipe
- OpenShift General Troubleshooting Recipe
- OpenShift Use Image Registry Recipe
- OpenShift Remote into Container Recipe
- OpenShift Analyze a Pod Recipe
- OpenShift Analyze a Node Recipe
- OpenShift Investigate ImagePullBackOff Recipe
- OpenShift Review Logs Recipe
- OpenShift Download Container Files Recipe
- OpenShift Investigate Source of Signal
- Liberty in OpenShift Get Javacore Recipe
- Liberty in OpenShift Get Heapdump Recipe
- Liberty in OpenShift Get System Dump Recipe
- Replace Container Directory in OpenShift
- Execute a Script in a Container on Startup in OpenShift
- OpenShift Login Recipe
- Cookbook General
- Operating Systems
- Java
- WebSphere Application Server
- WAS traditional
- Scaling and Large Topologies
- Performance Monitoring
- Logging and Tracing
- Thread Pools
- Java Database Connectivity (JDBC)
- HTTP
- Startup
- Database Persistence
- Dynamic Cache
- EJBs
- Messaging
- Web Services
- Asynchronous Beans
- Intelligent Management
- Security
- Administration
- Session Initiation Protocol (SIP)
- WAS traditional on zOS
- Scaling and Large Topologies
- WebSphere Liberty
- Configuration Analysis
- Log Analysis
- Resiliency
- WAS traditional
- Major Tools
- Web Servers
- Applications
- Containers
- Virtualization
- Databases
- Caching and WebSphere eXtreme Scale
- IBM MQ
- Authentication
- Competition and Migration
- IBM App Connect Enterprise
- IBM Business Automation Workflow
- IBM InfoSphere Master Data Management
- IBM Maximo
- IBM Operational Decision Manager
- Troubleshooting
- HCL Commerce
- HCL Portal
- Appendix
Recipes
- General Recipes
- Operating System Recipes
- Java Recipes
- WebSphere Application Server traditional Recipes
- WebSphere Liberty Recipes
- Web Server Recipes
- Container Recipes
- Caching Recipes
- Troubleshooting Recipes
General Performance Recipes
- Performance tuning is usually about focusing on a few key variables. The recipes will highlight the most common variables that often improve the speed of the average application by 100% or more relative to the default configuration. Additional tuning should be guided by evidence using the scientific method. Gather data, analyze it and create hypotheses. Then test and evaluate your hypotheses. Repeat.
- There is a seemingly daunting number of tuning knobs. We try to document everything in detail in case you hit a problem in that area; however, unless you are trying to squeeze out every last drop of performance, we do not recommend a close study of every point.
- In general, we advocate a bottom-up and integrated approach. Bottom-up means, for example, start with the operating system, then Java, then WebSphere, then the application, etc. Integrated means gather data on all layers at the same time, if possible.
- One of the most difficult aspects of performance tuning is understanding whether or not the architecture of the system, or even the test itself, is valid and/or optimal.
- Meticulously describe and track the investigation, each test and its results.
- Use statistics (minimums, maximums, averages, medians, and standard deviations) instead of spot observations.
- When benchmarking, use a repeatable test that accurately models production behavior, and avoid short term benchmarks which may not have time to warm up.
- To investigate bottlenecks, consider the key variables including request arrivals, concurrent threads, and response times.
- Take the time to automate as much as possible: not just the testing itself, but also data gathering and analysis. This will help you iterate and test more hypotheses.
- Make sure you are using the latest version of every component because there are often performance or tooling improvements available.
- When researching issues, you can either analyze or isolate them. Analyzing means taking particular symptoms and generating hypotheses on how to change those symptoms. Isolating means finding an issue through the process of elimination. In general, we have found through experience that analysis is preferable to isolation.
- Review the full end-to-end architecture. Certain internal or external products, devices, content delivery networks, etc. may artificially limit performance (e.g. Denial of Service protection), periodically mark services down (e.g. network load balancers, WAS plugin, etc.), or become bottlenecks themselves (e.g. CPU on load balancers, etc.).
For details, see the General chapter.
Operating System Recipes
- Linux Recipes
- AIX Recipes
- z/OS Recipes
- IBM i Recipes
- Windows Recipes
- Solaris Recipes
- HP-UX Recipes
- macOS Recipes
Linux Recipes
- Generally, all CPU cores should not be
consistently saturated. Check CPU
100 - idle%with tools such asvmstat,top,nmon, etc. - Review snapshots of process activity using tools such as
top,nmon, etc., and for the largest users of resources, review per thread activity using tools such astop -H -p $PID. - Generally, swapping of program memory from RAM to disk should rarely
happen. Check that current swapping is 0 with
vmstatso/sicolumns and use tools such asvmstatortopand check if swap amount is greater than 0 (i.e. swapping occurred in the past). - Consider using TuneD and applying the
latency-performance,network-latency,throughput-performance, ornetwork-throughputprofile. - Unless power consumption is important, change the CPU
speed governors to
performance. - Unless power consumption is important, ensure processor boosting is enabled in the BIOS.
- Monitor TCP
retransmissions with
nstat -saz *Retrans*. Ideally, for LAN traffic, they should be 0. - Monitor network interface packet drops, errors, and buffer overruns. Ideally, for LAN traffic, they should be 0.
- For systems with low expected usage of file I/O, set vm.swappiness=0 to reduce the probability of file cache driving program memory swapping.
- If there is extra network capacity and a node has extra CPU
capacity, test permanently disabling TCP delayed acknowledgments
using
quickack 1. - Review saturation, response time, and errors of input/output interfaces such as network cards and disks.
- If the operating system is running in a virtualized guest, review the configuration and whether or not resource allotments are changing dynamically. Review CPU steal time in tools such as vmstat, top, etc.
- Check if CPU is being throttled:
grep nr_throttled /sys/fs/cgroup/cpu.stat - Consider testing explicitly tuned TCP/IP network buffer sizes.
- Review CPU instructions per cycle and tune appropriately.
- For hosts with incoming LAN network traffic from clients
using persistent TCP connection pools (e.g. a reverse HTTP proxy to an
application server such as IHS/httpd to WAS), set
net.ipv4.tcp_slow_start_after_idle=0to disable reducing the TCP congestion window for idle connections. - General operating system statistics and process (and thread) statistics should be periodically monitored and saved for historical analysis.
- Review
sysctl -afor any uncommon kernel settings. - If there are firewall idle timeouts between two hosts on a LAN utilizing a connection pool (e.g. between WAS and a database), consider tuning TCP keep-alive parameters.
- Linux on IBM Power CPUs:
- Test with the IBM Java parameter -Xnodfpbd
- Test with hardware prefetching disabled
- Test with idle power saver disabled
- Test with adaptive frequency boost enabled
- Test with dynamic power saver mode enabled
- Use 64-bit DMA adapter slots for network adapters
- Linux on IBM System z CPUs:
- Use QUICKDSP for production guests
For details, see the Linux chapter.
AIX Recipes
- CPU core(s) should not be consistently saturated.
- Unless energy saving features are required, ensure Power Management is set to Maximum Performance mode.
- Generally, physical memory should never be saturated with computational memory and the operating system should not page computational memory out to disk.
- If you're not tight on RAM, tune Virtual Ethernet Adapter minimum and maximum buffers on all AIX LPARs (including VIO) to maximum possible values to avoid TCP retransmits.
- Test disabling TCP delayed ACKs
- Monitor for TCP retransmissions and test tuning TCP/IP network buffer sizes.
- Use
netstat -vto ensure that network switches are not sending PAUSE frames. - In some situations, enabling network dog threads on multi-processor nodes may avoid a network processing bottleneck with the default single-CPU interrupt processing model.
- Operating system level statistics and optionally process level statistics should be periodically monitored and saved for historical analysis.
- Review operating system logs for any errors, warnings, or high volumes of messages.
- Review snapshots of process activity, and for the largest users of resources, review per thread activity.
- If the operating system is running in a virtualized guest, review the configuration and whether or not resource allotments are changing dynamically.
- If there are firewall idle timeouts between two hosts on a LAN utilizing a connection pool (e.g. between WAS and a database), consider tuning TCP keep-alive parameters.
- Bind your processes properly based on system topology.
- Use MCM memory affinity where appropriate.
- Find the optimal SMT configuration for the machine.
- Find the optimal hardware prefetching setting for your workload.
- Apply recommended tuning for Java applications.
- For large multi-threaded apps, use profiling to make sure that work is allocated equally amongst threads.
- For apps that use a lot of network I/O, tune networking parameters.
- For apps that make heavy use of native memory, experiment with and use the optimal malloc algorithm.
- Use profiling to evaluate the effects of tuning other parameters.
For details, see the AIX chapter.
z/OS Recipes
- CPU core(s) should not be consistently saturated.
- Generally, physical memory should never be saturated and the operating system should not page memory out to disk.
- Input/Output interfaces such as network cards and disks should not be saturated, and should not have poor response times.
- TCP/IP and network tuning, whilst sometimes complicated to investigate, may have dramatic effects on performance.
- Consider tuning TCP/IP network buffer sizes.
- Collect and archive various RMF/SMF records on 10 or 15 minute
intervals:
- SMF 30 records
- SMF 70-78 records
- SMF 113 subtype 1 (counters) records
- With recent versions of z/OS, Correlator SMF 98.1 records
- SMF 99 subtype 6 records
- If not active, activate HIS and collect hardware counters:
- Review
ps -p $PID -mandD OMVS,PID=$PIDoutput over time for processes of interest. - Operating system level statistics and optionally process level statistics should be periodically monitored and saved for historical analysis.
- Review system logs for any errors, warnings, or high volumes of messages.
- Review snapshots of process activity, and for the largest users of resources, review per thread activity.
- If the operating system is running in a virtualized guest, review the configuration and whether or not resource allotments are changing dynamically.
- Use the Workload Activity Report to review performance.
- If there is sufficient network capacity for the additional packets, consider reducing the default TCP keepalive timer (TCPCONFIG INTERVAL) from 2 hours to a value less than intermediate device idle timeouts (e.g. firewalls).
- Review
SYS1.PARMLIB(andSYS1.IPLPARMif used) - Test disabling delayed ACKs
For details, see the z/OS and WAS traditional on z/OS chapters.
IBM i Recipes
- CPU core(s) should not be consistently saturated.
- Generally, physical memory should never be saturated and the operating system should not page memory out to disk.
- Input/Output interfaces such as network cards and disks should not be saturated, and should not have poor response times.
- TCP/IP and network tuning, whilst sometimes complicated to investigate, may have dramatic effects on performance.
- Operating system level statistics and optionally process level statistics should be periodically monitored and saved for historical analysis.
- Review operating system logs for any errors, warnings, or high volumes of messages.
- Review snapshots of process activity, and for the largest users of resources, review per thread activity.
- If the operating system is running in a virtualized guest, review the configuration and whether or not resource allotments are changing dynamically.
- Enable Collection Services for performance data.
- If there is sufficient network capacity for the additional packets, consider reducing the default TCP keepalive timer (CHGTCPA TCPKEEPALV) from 2 hours to a value less than intermediate device idle timeouts (e.g. firewalls).
- Test disabling delayed ACKs
For details, see the IBM i chapter.
Windows Recipes
- CPU core(s) should not be consistently saturated.
- Generally, physical memory should never be saturated and the operating system should not page memory out to disk.
- Input/Output interfaces such as network cards and disks should not be saturated, and should not have poor response times.
- TCP/IP and network tuning, whilst sometimes complicated to investigate, may have dramatic effects on performance.
- Consider changing Processor Performance Management (PPM) to the "High Performance" setting or disabling it.
- Operating system level statistics and optionally process level statistics should be periodically monitored and saved for historical analysis.
- Review operating system logs for any errors, warnings, or high volumes of messages.
- Review snapshots of process activity, and for the largest users of resources, review per thread activity.
- If the operating system is running in a virtualized guest, review the configuration and whether or not resource allotments are changing dynamically.
- Use Perfmon to review performance activity.
- Use the Windows Performance Toolkit to review sampled native processor usage.
- If there is sufficient network capacity for the additional packets, consider reducing the default TCP keepalive timer (HKLM\System\CurrentControlSet\Services\Tcpip\Parameters\KeepAliveTime) from 2 hours to a value less than intermediate device idle timeouts (e.g. firewalls).
- Test disabling delayed ACKs
For details, see the Windows chapter.
Solaris Recipes
- CPU core(s) should not be consistently saturated.
- Program memory should not page out of RAM.
- Input/Output interfaces such as network cards and disks should not be saturated, and should not have poor response times.
- TCP/IP and network tuning, whilst sometimes complicated to investigate, may have dramatic effects on performance.
- Operating system level statistics and optionally process level statistics should be periodically monitored and saved for historical analysis.
- Review operating system logs for any errors, warnings, or high volumes of messages.
- Review snapshots of process activity, and for the largest users of resources, review per thread activity.
- If the operating system is running in a virtualized guest, review the configuration and whether or not resource allotments are changing dynamically.
- If there is sufficient network capacity for the additional packets, consider reducing the default TCP keepalive timer (tcp_keepalive_interval) from 2 hours to a value less than intermediate device idle timeouts (e.g. firewalls).
- Test disabling delayed ACKs
For details, see the Solaris chapter.
HP-UX Recipes
- CPU core(s) should not be consistently saturated.
- Generally, physical memory should never be saturated and the operating system should not page memory out to disk.
- Input/Output interfaces such as network cards and disks should not be saturated, and should not have poor response times.
- TCP/IP and network tuning, whilst sometimes complicated to investigate, may have dramatic effects on performance.
- Operating system level statistics and optionally process level statistics should be periodically monitored and saved for historical analysis.
- Review operating system logs for any errors, warnings, or high volumes of messages.
- Review snapshots of process activity, and for the largest users of resources, review per thread activity.
- If the operating system is running in a virtualized guest, review the configuration and whether or not resource allotments are changing dynamically.
- If there is sufficient network capacity for the additional packets, consider reducing the default TCP keepalive timer (tcp_keepalive_interval) from 2 hours to a value less than intermediate device idle timeouts (e.g. firewalls).
- Test disabling delayed ACKs
For details, see the HP-UX chapter.
macOS Recipe
- CPU core(s) should not be consistently saturated.
- Generally, physical memory should never be saturated and the operating system should not page memory out to disk.
- Input/Output interfaces such as network cards and disks should not be saturated, and should not have poor response times.
- Operating system level statistics and optionally process level statistics should be periodically monitored and saved for historical analysis.
- Review operating system logs for any errors, warnings, or high volumes of messages.
- Review snapshots of process activity, and for the largest users of resources, review per thread activity.
- If there is sufficient network capacity for the additional packets, consider reducing the default TCP keepalive timer (tcp_keepalive_time) from 2 hours to a value less than intermediate device idle timeouts (e.g. firewalls).
- Test disabling delayed ACKs
For details, see the macOS Chapter.
Java Recipes
- Review the Operating System recipe for your OS.
- Tune the maximum Java heap size (
-Xmxor-XX:MaxRAMPercentage):- Enable verbose garbage collection (-verbose:gc) which prints statistics on garbage collection to files and generally has an overhead less than 1%. Use a tool such as the IBM Garbage Collection and Memory Visualizer to analyze the verbosegc output. The proportion of time spent in garbage collection versus application processing time should generally be less than 10% and ideally less than 1%.
- In general, a place to start is to set -Xmx to 43% larger than the maximum occupancy of the application, although the latter is largely a function of workload and thread pool size, so this is just a heuristic.
- If the node only uses IPv4 and does not use IPv6, then add the JVM
parameters
-Djava.net.preferIPv4Stack=true -Djava.net.preferIPv6Addresses=false - Consider the particular type of garbage collector to use (see the comparison tables in the JVM sub-chapters).
- Ensure there is no memory leak with long running tests.
- If using a generational collector (which most modern default
collectors are):
- Ensure tests run through full/tenured collections and ensure those pause times are not too long.
- Ensure that there is a sawtooth pattern in the heap usage after collection. Otherwise, the heap size may be too small or the nursery too big.
- A heuristic is that the sawtooth should drop about 25% of the heap size on full collections.
- Total pause times over a few seconds should be routinely investigated.
- Use a profiler such as IBM Java Health Center or OpenJDK Mission Control with a particular focus on the profiling and lock contention analysis. Otherwise, use periodic thread dumps to review JVM activity with the IBM Thread and Monitor Dump Analyzer tool.
- If heavily using XML, consider explicitly configuring JAXP ServiceLoader properties to avoid unnecessary classloading activity.
- Object allocation failures for objects greater than 5MB should generally be investigated.
- Take a system dump or HPROF heapdump during peak activity and review it with the Eclipse Memory Analyzer Tool to see if there are any areas in the heap for optimization.
- If using RMI (e.g. EJBs over RMI), then consider avoiding periodic
full GCs from the RMI engine that are generally considered obsolete:
-Dsun.rmi.dgc.client.gcInterval=3600000000000 -Dsun.rmi.dgc.server.gcInterval=3600000000000 - Review the stderr and stdout logs for any errors, warnings, or high volumes of messages (e.g. OutOfMemoryErrors).
- If running multiple JVMs on the same machine, consider pinning JVMs to sets of processor cores and tuning -Xgcthreads/-XcompilationThreads or -XX:ParallelGCThreads.
- In general, if memory usage is very flat and consistent, it may be optimal to fix -Xms = -Xmx. For widely varying heap usage, -Xms < -Xmx is generally recommended. You may get the best of both worlds by setting -Xms to the lowest steady state memory usage, -Xmaxf1.0 to eliminate shrinkage, -Xminf to avoid compaction before expansion, and -Xmine to reduce expansions.
- Request a thread dump and search its output for "deadlock" to ensure that no threads are deadlocked (thus reducing throughput).
For details, see the Java chapter and the chapter for your particular JVM.
OpenJ9 and IBM J9 JVMs Recipe
- In most cases, the default
-Xgcpolicy:gencongarbage collection policy works best, with the key tuning being the maximum heap size (-Xmxor-XX:MaxRAMPercentage) and maximum nursery size (-Xmn). - Upgrade to the latest version and fixpack as there is a history of making performance improvements and fixing issues or regressions over time.
- Take a javacore and review the Java arguments (UserArgs) and Environment Variables sections and remove any unnecessary debug options.
- Take a javacore and review if the JIT code
cache is full or nearly full; if so, and there's available physical
memory, test increasing it with
-Xcodecachetotal384m -Xcodecache32m - Take a javacore and review if the shared
class cache is full or nearly full; if so, and there's available
physical memory, consider increasing
-Xscmx - If using
-Xgcpolicy:genconand you want to reduce average nursery pause times at some throughput and CPU cost, consider concurrent scavenge. - Consider setting
-XX:+CompactStringswhere available, applicable, and not already the default. - Review the performance tuning topics in the OpenJ9 or IBM Java documentation.
- When running benchmarks or comparing performance to other JVMs, consider testing various benchmark ideas.
- If using IBM Semeru Runtimes:
- If JIT CPU or memory usage are a concern, consider using the remote JITServer on available platforms.
- For AIX and Linux, ensure OpenSSL is on the system path for maximum security performance.
- On z/OS, consider enabling IBM Java Health Center
(
-Xhealthcenter:level=headless) for post-mortem CPU and lock profiling data, although this has an overhead of about 2%. - On z/OS, consider using the "pauseless" garbage collection option
-Xgc:concurrentScavengeif usinggenconand on recent software and hardware.
- If using IBM Java (does not apply to IBM Semeru Runtimes):
- Consider setting
-XX:MaxDirectMemorySizeto avoid some unnecessary full garbage collections. - Consider using the IBMJCEPlus security provider that may offer large performance improvements in encryption. This is now the default except on z/OS since 8.0.7.0.
- If the node is using a static IP address that won't be changed while
the JVM is running, use the JVM
option
-Dcom.ibm.cacheLocalHost=true. - Consider enabling IBM Java Health Center
(
-Xhealthcenter:level=headless) for post-mortem CPU and lock profiling data, although this has an overhead of about 2%.
- Consider setting
For details, see the OpenJ9 and IBM J9 JVMs chapter.
HotSpot JVM Recipe
- In most cases, the default
-XX:+UseG1GCor-XX:+UseParallelOldGCgarbage collection policies (depending on version) work best, with the key tuning being the maximum heap size (-Xmx). - Set
-XX:+HeapDumpOnOutOfMemoryError. - Enable verbose
garbage collection and use a tool such as the Garbage
Collection and Memory Visualizer to confirm the proportion of time
in stop-the-world garbage collection pauses is less than ~10% and
ideally less than 1%.
- Check for long individual pause times (e.g. greater than 400ms or whatever response time expectations are)
- For G1GC, check for humongous allocations.
- Review the latest garbage collection tuning guidance.
For details, see the HotSpot JVM chapter.
Java Profilers Recipe
- In most cases, sampling profilers are used first and tracing profilers are only used for fine grained tuning or deep dive analysis.
- Analyze any methods that use more than 1% of the reported time in themselves.
- Analyze any methods that use more than 10% of the reported time in themselves and their children.
- Analyze any locks that have large contention rates, particularly those with long average hold times.
Enabling profilers:
- J9 Health Center Enable at Startup
- J9 Health Center Enable at Startup of Limited Duration
- J9 Health Center Enable at Runtime
- J9 Health Center Enable at Runtime of Limited Duration
- J9 Health Center Enable at Runtime of Limited Duration on z/OS
- HotSpot Mission Control Enable at Startup
J9 Health Center Enable at Startup
The Health Center agent is shipped with IBM Java and IBM Semeru Runtimes on z/OS (though not z/Linux), but it is not currently shipped with IBM Semeru Runtimes on other platforms, though there are some unsupported workarounds. The Health Center agent neither ships with nor works with HotSpot JVMs.
- Stop the JVM
- Append the following JVM options:
- WebSphere Liberty jvm.options:
-Xhealthcenter:level=headless - WAS traditional generic
JVM arguments:
-Xhealthcenter:level=headless
- WebSphere Liberty jvm.options:
- Start the JVM
- Reproduce the issue (at least 5 minutes worth because Health Center is a sampling profiler)
- Gracefully stop the JVM (i.e. don't kill it)
- Gather
*.hcdfiles from the working directory of the process. By default:- WebSphere Liberty:
$LIBERTY/usr/servers/$SERVER/ - WAS traditional:
$TWAS/profiles/$PROFILE/
- WebSphere Liberty:
Warnings and notes:
- Sometimes HCDs gathered during startup may fail performing method
address to method name lookups due to
JVMTI_ERROR_CLASS_NOT_PREPARED (22). On subsequent HCDs, healthcenter should find all those methods, so, if the user is not interested in profiling startup, then they can delay starting the first HCD until the JVM has loaded all (or at least most) of its classes with-Dcom.ibm.java.diagnostics.healthcenter.headless.delay.start=$MINUTES. Alternatively, append later HCDs into the Health Center client that have the method name mappings. - If the JVM could not be stopped gracefully, gather the temporary
files from a subdirectory of the output called
tmp_${STARTDAY}${STARTMONTH}${STARTYEAR}_${STARTHOUR}${STARTMINUTES}${STARTSECONDS}_ - Use the additional JVM option
-Dcom.ibm.java.diagnostics.healthcenter.headless.output.directory=$DIRto redirect Health Center files to a different directory instead of the working directory. - If using Liberty and you specify
-Xtrace:buffers={2m,dynamic}to minimize Health Center method metadata loss, since Liberty defaults to an unlimited maximum thread pool designed to maximize throughput, consider capping this with<executor maxThreads="N" />based on available native memory to avoid native memory exhaustion, or use a smaller-Xtracebuffer size such as-Xtrace:buffers={128k,dynamic}(or lower). - We have observed that some monitoring agents cause problems with
Health Center. Consider removing other monitoring agents that use
-agentpathwhile using HealthCenter, engage IBM and the agent company support teams to investigate, or use-Xbootclasspath/ptohealthcenter.jarand-agentpathtolibhealthcenter.so.
For details, see the Health Center chapter.
J9 Health Center Enable at Startup of Limited Duration
The Health Center agent is shipped with IBM Java and IBM Semeru Runtimes on z/OS (though not z/Linux), but it is not currently shipped with IBM Semeru Runtimes on other platforms, though there are some unsupported workarounds. The Health Center agent neither ships with nor works with HotSpot JVMs.
- Stop the JVM
- Append the following JVM options and change the number of minutes
after which Health Center will stop (two runs so multiply duration times
2 for total gathering time; see notes below for why 2 runs are
suggested):
- WebSphere Liberty jvm.options:
-Xhealthcenter:level=headless -Dcom.ibm.java.diagnostics.healthcenter.headless.run.number.of.runs=2 -Dcom.ibm.java.diagnostics.healthcenter.headless.run.duration=15 - WAS traditional generic
JVM arguments:
-Xhealthcenter:level=headless -Dcom.ibm.java.diagnostics.healthcenter.headless.run.number.of.runs=2 -Dcom.ibm.java.diagnostics.healthcenter.headless.run.duration=15
- WebSphere Liberty jvm.options:
- Start the JVM
- After the number of minutes specified, gather
*.hcdfiles from the working directory of the process. By default:- WebSphere Liberty:
$LIBERTY/usr/servers/$SERVER/ - WAS traditional:
$TWAS/profiles/$PROFILE/
- WebSphere Liberty:
Warnings and notes:
- Sometimes HCDs gathered during startup may fail performing method
address to method name lookups due to
JVMTI_ERROR_CLASS_NOT_PREPARED (22). All method name mappings are re-gathered at the start of each new HCD. For this reason, the above example uses two runs and then the second HCD may be appended in the client to evaluate all methods. - If the JVM could not be stopped gracefully, gather the temporary
files from a subdirectory of the output called
tmp_${STARTDAY}${STARTMONTH}${STARTYEAR}_${STARTHOUR}${STARTMINUTES}${STARTSECONDS}_ - Use the additional JVM option
-Dcom.ibm.java.diagnostics.healthcenter.headless.output.directory=$DIRto redirect Health Center files to a different directory instead of the working directory. - If using Liberty and you specify
-Xtrace:buffers={2m,dynamic}to minimize Health Center method metadata loss, since Liberty defaults to an unlimited maximum thread pool designed to maximize throughput, consider capping this with<executor maxThreads="N" />based on available native memory to avoid native memory exhaustion, or use a smaller-Xtracebuffer size such as-Xtrace:buffers={128k,dynamic}(or lower). - We have observed that some monitoring agents cause problems with
Health Center. Consider removing other monitoring agents that use
-agentpathwhile using HealthCenter, engage IBM and the agent company support teams to investigate, or use-Xbootclasspath/ptohealthcenter.jarand-agentpathtolibhealthcenter.so.
For details, see the Health Center chapter.
J9 Health Center Enable at Runtime
The Health Center agent is shipped with IBM Java and IBM Semeru Runtimes on z/OS (though not z/Linux), but it is not currently shipped with IBM Semeru Runtimes on other platforms, though there are some unsupported workarounds. The Health Center agent neither ships with nor works with HotSpot JVMs.
- On z/OS (though not z/Linux), the JVM must have late attach
explicitly enabled with
-Dcom.ibm.tools.attach.enable=yes(restart required). On other operating systems, late attach is enabled by default, but check if it has been explicitly disabled with-Dcom.ibm.tools.attach.enable=no - Log on as the same user that's running the JVM
- Execute the following, replacing
$JAVA_HOMEtwice, and$PIDwith the process ID:$JAVA_HOME/bin/java -jar $JAVA_HOME/jre/lib/ext/healthcenter.jar ID=$PID level=headless - Reproduce the issue (at least 5 minutes worth because Health Center is a sampling profiler)
- Gracefully stop the JVM (i.e. don't kill it)
- Gather
*.hcdfiles from the working directory of the process. By default:- WebSphere Liberty:
$LIBERTY/usr/servers/$SERVER/ - WAS traditional:
$TWAS/profiles/$PROFILE/
- WebSphere Liberty:
Warnings and notes:
- Every time a new HCD collection is started, the agent starts to look
up method address to method name mappings for all loaded methods at the
start of the HCD. By default, the agent queries up to 3,000 unresolved
method name mappings every 5 seconds. Therefore, for proper profiled
method name evaluation, the minimum duration per-HCD should be specified
based on the number of loaded methods. It is common for an enterprise
application to load hundreds of thousands of methods, so a minimum of
5-10 minutes is a good start. Tracing to show this behavior and the
number of methods is
-Dcom.ibm.diagnostics.healthcenter.logging.methodlookup=debug -Dcom.ibm.diagnostics.healthcenter.logging.MethodLookupProvider=debugand search forcom.ibm.diagnostics.healthcenter.methodlookup.debug DEBUG: N methods to lookup. Methods created during the HCD interval are captured seperately. - If the JVM could not be stopped gracefully, gather the temporary
files from a subdirectory of the output called
tmp_${STARTDAY}${STARTMONTH}${STARTYEAR}_${STARTHOUR}${STARTMINUTES}${STARTSECONDS}_ - Use the additional JVM option
-Dcom.ibm.java.diagnostics.healthcenter.headless.output.directory=$DIRto redirect Health Center files to a different directory instead of the working directory. - Note that this does not work with Liberty if some jndi-1.0-related features are loaded and there is a request for enhancement.
- If using Liberty and you specify
-Xtrace:buffers={Xm,dynamic}to minimize Health Center method metadata loss, since Liberty defaults to an unlimited maximum thread pool designed to maximize throughput, consider capping this with<executor maxThreads="N" />based on available native memory to avoid native memory exhaustion, or use a smaller-Xtracebuffer size such as-Xtrace:buffers={128k,dynamic}(or lower). - We have observed that some monitoring agents cause problems with
Health Center. Consider removing other monitoring agents that use
-agentpathwhile using HealthCenter, engage IBM and the agent company support teams to investigate, or use-Xbootclasspath/ptohealthcenter.jarand-agentpathtolibhealthcenter.so.
For details, see the Health Center chapter.
J9 Health Center Enable at Runtime of Limited Duration
The Health Center agent is shipped with IBM Java and IBM Semeru Runtimes on z/OS (though not z/Linux), but it is not currently shipped with IBM Semeru Runtimes on other platforms, though there are some unsupported workarounds. The Health Center agent neither ships with nor works with HotSpot JVMs.
The following instructions are for non-z/OS platforms (in this context, z/Linux is considered non-z/OS). For z/OS, see alternate instructions.
- By default, late attach is enabled but double check that the
following option has not been set to disable it:
-Dcom.ibm.tools.attach.enable=no - Log on as the same user that the JVM is running under.
- Execute the following, replacing
$JAVA_HOMEtwice,$PIDwith the process ID, and change30to the number of minutes to run (see notes below on duration considerations):$JAVA_HOME/bin/java -jar $JAVA_HOME/jre/lib/ext/healthcenter.jar ID=$PID level=headless -Dcom.ibm.java.diagnostics.healthcenter.headless.run.number.of.runs=1 -Dcom.ibm.java.diagnostics.healthcenter.headless.run.duration=30 - After the number of minutes elapses, gather the
*.hcdfile from the current working directory of the process. By default:- WebSphere Liberty:
$LIBERTY/usr/servers/$SERVER/ - WAS traditional:
$TWAS/profiles/$PROFILE/
- WebSphere Liberty:
Warnings and notes:
- Every time a new HCD collection is started, the agent starts to look
up method address to method name mappings for all loaded methods at the
start of the HCD. By default, the agent queries up to 3,000 unresolved
method name mappings every 5 seconds. Therefore, for proper profiled
method name evaluation, the minimum duration per-HCD should be specified
based on the number of loaded methods. It is common for an enterprise
application to load hundreds of thousands of methods, so a minimum of
5-10 minutes is a good start. Tracing to show this behavior and the
number of methods is
-Dcom.ibm.diagnostics.healthcenter.logging.methodlookup=debug -Dcom.ibm.diagnostics.healthcenter.logging.MethodLookupProvider=debugand search forcom.ibm.diagnostics.healthcenter.methodlookup.debug DEBUG: N methods to lookup. Methods created during the HCD interval are captured seperately. - If the JVM could not be stopped gracefully, gather the temporary
files from a subdirectory of the output called
tmp_${STARTDAY}${STARTMONTH}${STARTYEAR}_${STARTHOUR}${STARTMINUTES}${STARTSECONDS}_ - Use the additional JVM option
-Dcom.ibm.java.diagnostics.healthcenter.headless.output.directory=$DIRto redirect Health Center files to a different directory instead of the working directory. - Note that this does not work with Liberty if some jndi-1.0-related features are loaded and there is a request for enhancement.
- If using Liberty and you specify
-Xtrace:buffers={2m,dynamic}to minimize Health Center method metadata loss, since Liberty defaults to an unlimited maximum thread pool designed to maximize throughput, consider capping this with<executor maxThreads="N" />based on available native memory to avoid native memory exhaustion, or use a smaller-Xtracebuffer size such as-Xtrace:buffers={128k,dynamic}(or lower). - We have observed that some monitoring agents cause problems with
Health Center. Consider removing other monitoring agents that use
-agentpathwhile using HealthCenter, engage IBM and the agent company support teams to investigate, or use-Xbootclasspath/ptohealthcenter.jarand-agentpathtolibhealthcenter.so.
For details, see the Health Center chapter.
J9 Health Center Enable at Runtime of Limited Duration on z/OS
The Health Center agent is shipped with IBM Java and IBM Semeru Runtimes on z/OS.
The following instructions are for z/OS (in this context, z/Linux is not considered z/OS). For non-z/OS platforms, see alternate instructions.
- By default, late attach is disabled. Restart the target process with
the additional generic JVM argument
-Dcom.ibm.tools.attach.enable=yes - Find the decimal
PIDof the target JVM. WebSphere traditional shows thePIDinSYSPRINTin theBBOJ0051Imessage. In the following example, it is16843066:Trace: 2024/01/04 16:18:54.968 02 t=7E5E78 c=UNK key=P8 tag= (13007004) SourceId: com.ibm.ws390.orb.CommonBridge ExtendedMessage: BBOJ0051I: PROCESS INFORMATION: STC00089/BBOS001S, ASID=76(0x4c), PID=16843066(0x101013a) - Find the path to Java of the target JVM. WebSphere traditional shows
this path in
SYSPRINTin aBBOJ0077Imessage forjava.home. In the following example, it is/WebSphere/ND/AppServer/java64:Trace: 2024/01/04 16:18:54.972 02 t=7E5E78 c=UNK key=P8 tag= (13007004) SourceId: com.ibm.ws390.orb.CommonBridge.printProperties ExtendedMessage: BBOJ0077I: java.home = /WebSphere/ND/AppServer/java64 - Find the owner of the started task of the target JVM. In the
following example in
D.DA, it isASSR1:NP JOBNAME StepName ProcStep JobID Owner C Pos DP Real Paging SIO BBOS001S BBOS001S BBOPASR STC00089 ASSR1 IN C9 93T 0.00 35.64 - Create the following JCL, replacing
USER_REPLACEMEwith the owner of the started task, both instances ofJAVAPATH_REPLACEMEwith the path to Java,PID_REPLACEMEwith the PID, and30with the number of minutes to run (see notes below on duration considerations). EnsureCAPS OFFwhen editing and that every line of theSTDPARMexcluding the last line ends with a space (//SHLLJOB1 JOB (ACCOUNT),NOTIFY=&SYSUID,REGION=0M,CLASS=A,MSGCLASS=H, // MSGLEVEL=(1,1),USER=USER_REPLACEME //SHLLSTEP EXEC PGM=BPXBATCH //BPXPRINT DD SYSOUT=* //STDOUT DD SYSOUT=* //STDERR DD SYSOUT=* //STDPARM DD * SH /JAVAPATH_REPLACEME/bin/java -jar /JAVAPATH_REPLACEME/lib/ext/healthcenter.jar ID=PID_REPLACEME level=headless -Dcom.ibm.java.diagnostics.healthcenter.headless.run.number.of.runs=1 -Dcom.ibm.java.diagnostics.healthcenter.headless.run.duration=30 /* - Submit the job.
- If you receive the error,
LOGON/JOB INITIATION - SUBMITTER IS NOT AUTHORIZED BY USER, then consider allowing surrogate job submission; for example:RDEFINE SURROGAT ASSR1.SUBMIT UACC(NONE) OWNER(ASSR1) PERMIT ASSR1.SUBMIT CLASS(SURROGAT) ID(MSTONE1) ACCESS(READ) SETROPTS RACLIST(SURROGAT) REFRESH
- If you receive the error,
- Confirm in
D.STin theSHLLJOB1job that the output at the bottom looks similar to the following, specifically theSuccessfully enabled Health Center agentline:IEF033I JOB/SHLLJOB1/STOP 2024004.1259 CPU: 0 HR 00 MIN 00.00 SEC SRB: 0 HR 00 MIN 00.00 SEC Successfully enabled Health Center agent in VM: 16843066 Health Center properties used by agent in target VM: -- listing properties -- com.ibm.java.diagnostics.healthcenter.agent.port=1972 com.ibm.java.diagnostics.healthcenter.data.collection.level=HEADLESS - Confirm in
D.DAof the target JVM inSYSOUTthat Health Center has started. For example:[Thu Jan 4 17:59:09 2024] com.ibm.diagnostics.healthcenter.headless INFO: 4.0.7 [Thu Jan 4 17:59:09 2024] com.ibm.diagnostics.healthcenter.headless INFO: Headless data collection has started [Thu Jan 4 17:59:09 2024] com.ibm.diagnostics.healthcenter.headless INFO: Each data collection run will last for 30 minutes [Thu Jan 4 17:59:09 2024] com.ibm.diagnostics.healthcenter.headless INFO: Agent will run for 1 collections [Thu Jan 4 17:59:09 2024] com.ibm.diagnostics.healthcenter.headless INFO: Agent will keep last 5 hcd files [Thu Jan 4 17:59:09 2024] com.ibm.diagnostics.healthcenter.headless INFO: Headless collection output directory is /SY1/var/WebSphere/home/WSSR1 - After the time has elapsed, refresh the JVM's
SYSOUTto confirm that theHCDfile was created. For example:[Thu Jan 4 18:29:09 2024] com.ibm.diagnostics.healthcenter.headless INFO: Creating hcd import file /SY1/var/WebSphere/home/WSSR1/healthcenter040124_175909_16843066_1.hcd [Thu Jan 4 18:29:09 2024] com.ibm.diagnostics.healthcenter.headless INFO: hcd import file /SY1/var/WebSphere/home/WSSR1/healthcenter040124_175909_16843066_1.hcd created - FTP the
HCDfile(s) inBINmode.
Warnings and notes:
- Every time a new HCD collection is started, the agent starts to look
up method address to method name mappings for all loaded methods at the
start of the HCD. By default, the agent queries up to 3,000 unresolved
method name mappings every 5 seconds. Therefore, for proper profiled
method name evaluation, the minimum duration per-HCD should be specified
based on the number of loaded methods. It is common for an enterprise
application to load hundreds of thousands of methods, so a minimum of
5-10 minutes is a good start. Tracing to show this behavior and the
number of methods is
-Dcom.ibm.diagnostics.healthcenter.logging.methodlookup=debug -Dcom.ibm.diagnostics.healthcenter.logging.MethodLookupProvider=debugand search forcom.ibm.diagnostics.healthcenter.methodlookup.debug DEBUG: N methods to lookup. Methods created during the HCD interval are captured seperately. - If the JVM could not be stopped gracefully, gather the temporary
files from a subdirectory of the output called
tmp_${STARTDAY}${STARTMONTH}${STARTYEAR}_${STARTHOUR}${STARTMINUTES}${STARTSECONDS}_ - Use the additional JVM option
-Dcom.ibm.java.diagnostics.healthcenter.headless.output.directory=$DIRto redirect Health Center files to a different directory instead of the working directory. - Note that this does not work with Liberty if some jndi-1.0-related features are loaded and there is a request for enhancement.
- If using Liberty and you specify
-Xtrace:buffers={2m,dynamic}to minimize Health Center method metadata loss, since Liberty defaults to an unlimited maximum thread pool designed to maximize throughput, consider capping this with<executor maxThreads="N" />based on available native memory to avoid native memory exhaustion, or use a smaller-Xtracebuffer size such as-Xtrace:buffers={128k,dynamic}(or lower). - We have observed that some monitoring agents cause problems with
Health Center. Consider removing other monitoring agents that use
-agentpathwhile using HealthCenter, engage IBM and the agent company support teams to investigate, or use-Xbootclasspath/ptohealthcenter.jarand-agentpathtolibhealthcenter.so.
For details, see the Health Center chapter.
HotSpot Mission Control Enable at Startup
The Java Flight Recorder (JFR) agent is shipped with many recent distributions of HotSpot Java. JFR neither ships with nor works with IBM Java nor IBM Semeru Runtimes.
- Stop the JVM
- Append the following JVM options:
- WebSphere Liberty jvm.options:
-XX:+FlightRecorder -XX:StartFlightRecording=name=jfr,filename=recording.jfr,settings=profile -XX:FlightRecorderOptions=defaultrecording=true,dumponexit=true,dumponexitpath=path - WAS traditional generic
JVM arguments:
-XX:+FlightRecorder -XX:StartFlightRecording=name=jfr,filename=recording.jfr,settings=profile -XX:FlightRecorderOptions=defaultrecording=true,dumponexit=true,dumponexitpath=path
- WebSphere Liberty jvm.options:
- Start the JVM
- Reproduce the issue (at least 5 minutes worth because Mission Control is a sampling profiler)
- Gracefully stop the JVM (i.e. don't kill it)
- Gather
*.jfrfiles from the working directory of the process. By default:- WebSphere Liberty:
$LIBERTY/usr/servers/$SERVER/ - WAS traditional:
$TWAS/profiles/$PROFILE/
- WebSphere Liberty:
For details, see the Mission Control chapter.
WAS traditional Recipes
- Review the Operating System recipe for your OS. The highlights are to ensure CPU, RAM, network, and disk are not consistently saturated.
- Review the Java recipe for your JVM.
The highlights are to tune the maximum heap size (
-Xmx), the maximum nursery size (-Xmn) and enable verbose garbage collection and review its output with the GCMV tool. - Ensure that the application thread pools are not consistently saturated: HTTP = WebContainer, EJB = ORB.thread.pool, JMS activation specifications over MQ = WMQJCAResourceAdapter, JMS over SIBus = SIBJMSRAThreadPool, z/OS = ORB workload profile setting, etc.
- Consider reducing the default Hung Thread Detection threshold and interval which will print a warning and stack trace when requests exceed a time threshold.
- If receiving HTTP(S) requests:
- For HTTP/1.0 and HTTP/1.1, avoid client keepalive socket churn by
setting
Unlimited persistent requests per connection. - For servers with incoming LAN HTTP traffic from clients
using persistent TCP connection pools with keep alive (e.g. a reverse
proxy like IHS/httpd or web service client), consider increasing the
Persistent timeoutto reduce keepalive socket churn. - For HTTP/1.0 and HTTP/1.1, minimize the number of application responses with HTTP codes 400, 402-417, or 500-505 to reduce keepalive socket churn.
- If using HTTP session database persistence, tune the write frequency.
- For increased resiliency, if using HTTPS, set
-DtimeoutValueInSSLClosingHandshake=1. - If possible, configure and use servlet caching/Dynacache for HTTP response caching.
- Consider enabling the HTTP NCSA access log with response times for post-mortem traffic analysis.
- If the applications don't use resources in
META-INF/resourcesdirectories of embedded JAR files, then setcom.ibm.ws.webcontainer.SkipMetaInfResourcesProcessing = true. - Consider reducing each TCP Transport's
Maximum open connectionsto the hundreds range to avoid excessive request queuing under stress and test with a saturation test.
- For HTTP/1.0 and HTTP/1.1, avoid client keepalive socket churn by
setting
- If using databases (JDBC):
- Connection pools should not be consistently saturated. Tune each pool's Maximum connections.
- Consider tuning each data source's statement cache size and isolation level.
- Consider disabling idle and age connection timeouts by setting reap time to 0 (and tune any firewalls, TCP keep-alive, and/or database connection timeouts, if needed).
- Compare relative results of globalConnectionTypeOverride=unshared.
- If using JMS MDBs without a message ordering requirement, tune activation specifications' maximum concurrency to control the maximum concurrent MDB invocations and maximum batch size to control message batch delivery size.
- If using authentication:
- Consider tuning the authentication cache and LDAP sizes.
- Test the relative performance of disabling horizontal security attribute propagation.
- If using EJBs, consider tuning
the ORB such as
-Dcom.ibm.CORBA.ConnectionMultiplicity,-Dcom.ibm.CORBA.FragmentSize, and-Dcom.ibm.CORBA.MaxOpenConnections. - If none of the Intelligent
Management or Intelligent
Management for Web Server features are used nor planned to be used,
set
LargeTopologyOptimization=falseto reduce unnecessary CPU usage and PMI overhead. - Review logs for any errors,
warnings, or high volumes of messages, and use
-Dcom.ibm.ejs.ras.disablerasnotifications=trueif you're not listening to JMX log notifications. - Monitor, at minimum, response times, number of requests, thread pools, connection pools, and CPU and Java heap usage using TPV/PMI and/or a third party monitoring program.
- Upgrade to the latest version and fixpack of WAS and Java as there is a history of making performance improvements over time.
- Consider running with a sampling profiler such as Health Center for post-mortem troubleshooting.
- If using Dynacache replication:
- If using memory-to-memory HTTP session replication, weigh whether the costs and complexity are better than simple sticky sessions with re-login, or consider using a linearly scalable external cache provider, or the Dynacache client/server replication model.
- Install and use the Cache Monitor sample application to watch cache hit rates and cache exhaustion.
- If using
SHARED_PUSHreplication, consider usingSHARED_PUSH_PULLto reduce replication volume.
- If the application writes a lot to SystemOut.log, consider switching to binary HPEL for improved performance.
- Review the performance tuning topic in the WAS traditional documentation.
For details, see the WAS traditional chapter.
Additional Recipes
- General WAS traditional Performance Problem
- Large Topologies Recipe
- Request Metrics Recipe
- Tune a Thread Pool
- HTTP Sessions Recipe
- Security Recipe
- Connection Pool Hangs in createOrWaitForConnection
- Threads in socketRead0 in JDBC calls
- Threads in java.io.FileOutputStream.writeBytes
- Logging PMI Data
- Logging Custom PMI Data with Dynacache
General WAS traditional Performance Problem
- Make sure the logs are capturing as much as possible:
- Administrative Console } Troubleshooting } Logs and Trace } server name } JVM Logs. These can also be changed dynamically on the Runtime tab.
- For example, Maximum size = 100MB and Maximum Number of Historical Log Files = 5
- Ensure verbose garbage collection is enabled. This may be enabled at runtime. Otherwise, you will need to restart to apply the change.
- Ensure that PMI is enabled either with the "Basic" level (this is the default) or with a "Custom" level (see WAS chapter on which counters are recommended)
- Enable PMI logging to files, either with a monitoring product or
with the
built-in TPV logger:
- Important note: all of these steps must be done after every application server restart. This can be automated with a wsadmin script
- Login to the Administrative Console and go to: Monitoring and Tuning } Performance Viewer } View Logs
- Select all relevant application servers and click "Start Monitoring"
- Click each application server
- Click on server } Settings } Log
- Duration = 300000
Maximum File Size = 50
Maximum Number of Historical Files = 5
Log Output Format = XML - Click Apply
- Click server } Summary Reports } Servlets
- Click "Start Logging"
- For IBM Java, enable IBM Health Center in headless mode:
- Choose one of these methods to start Health Center:
- Restart the JVM adding the following generic JVM arguments:
-Xhealthcenter:level=headless -Dcom.ibm.java.diagnostics.healthcenter.headless.files.max.size=104857600 -Dcom.ibm.java.diagnostics.healthcenter.headless.files.to.keep=10 - Start it dynamically:
$WEBSPHERE/java/bin/java -jar $WEBSPHERE/java/jre/lib/ext/healthcenter.jar ID=$PID -Dcom.ibm.java.diagnostics.healthcenter.data.collection.level=headless -Dcom.ibm.java.diagnostics.healthcenter.headless.files.max.size=104857600 -Dcom.ibm.java.diagnostics.healthcenter.headless.files.to.keep=10
- Restart the JVM adding the following generic JVM arguments:
- Choose one of these methods to start Health Center:
- If there is a web server in front of WAS, see the Web Server recipes.
- Archive and truncate any existing logs for each server in
$WEBSPHERE/profiles/$PROFILE/logs/$SERVER/* - Reproduce the problem.
- Gather the Performance, Hang, or High CPU issue MustGather for your operating system:
- After the problem has been reproduced, gracefully stop the application servers (to produce Health Center HCD files).
- Gather:
- Server logs under
$WEBSPHERE/profiles/$PROFILE/logs/$SERVER/:SystemOut*.log SystemErr*.log native_stderr.log native_stdout.log - FFDC logs under
$WEBSPHERE/profiles/$PROFILE/logs/ffdc/* - Javacores, heapdumps, and system dumps, if any:
$WEBSPHERE/profiles/$PROFILE/javacore* $WEBSPHERE/profiles/$PROFILE/heapdump* $WEBSPHERE/profiles/$PROFILE/core* - PMI logs:
$WEBSPHERE/profiles/$PROFILE/logs/tpv/* - Health Center logs, if any:
$WEBSPHERE/profiles/$PROFILE/*.hcd server.xmlfor each server:$WEBSPHERE/profiles/$PROFILE/config/cells/$CELL/nodes/$NODE/servers/$SERVER/server.xml- The output of the Performance MustGather
- Server logs under
Reviewing the data
- Review all WAS logs for any errors, warnings, etc.
- Review verbosegc for garbage collection overhead.
- Review thread dumps
- Review patterns and check for deadlocks and monitor contention (e.g. the TMDA tool).
- Review operating system data for WAS and IHS nodes
- If CPU time is high, review if it's user or system.
- Review per-process and per-thread CPU data for details.
- Check virtualization steal time
- Check run queue length and any blocked threads
- Check for memory swap-ins
- If high, check memory statistics such as file cache, free memory, etc.
- If CPU time is high, review if it's user or system.
- Review PMI data for the key performance indicators such as the
WebContainer thread pool ActiveCount, database connection pool usage,
servlet response times, etc. (see WAS - PMI). Try to isolate the problem
to particular requests, database queries, etc (duration or volume).
- If using a database, review the response times in the connection pool. Try to isolate the problem to particular queries (duration or volume).
- Review Health Center data
- If using web servers, review IHS messages in
access_log,error_log, and the plugin log to see if requests are coming in and if there are errors (i.e. HTTP response codes). Also reviewmpmstatsinerror_logto see what the threads are doing.
Large Topologies Recipe
- Use clusters to scale horizontally and vertically, and to support
failover and easier administration. If using WAS >= 8.5, consider
using dynamic clusters.
- Very large topologies also employ multiple cells for the same application(s). This allows for deployment of new application versions or configurations to only one of the cells; if the change breaks, it affects only that cell. Multiple cells can be problematic if significant database schema changes are made.
- If using the High Availability Manager or any functions that require
it (e.g. EJB WLM, SIB, etc.):
- Processes such as application servers and node agents must be in the same core group, or part of bridged core groups.
- In general, the number of processes in a single core group should not exceed 200. Practically, this number is limited by the CPU usage, heartbeat intervals, and number of available sockets.
- The members of a core group should be on the same LAN.
- The members of a cell should not communicate with one another across firewalls as that provides no meaningful additional security and complicates administration.
- Create dedicated preferred coordinators for a core group with a large default maximum heap size (e.g. -Xmx1g).
- If using core group bridges, create dedicated bridge servers with a large default maximum heap size (e.g. -Xmx1g).
- Start or stop groups of processes at the same time to reduce the effects of view changes.
- Change the HAM protocols to the latest versions: IBM_CS_WIRE_FORMAT_VERSION and IBM_CS_HAM_PROTOCOL_VERSION
- If you are not using the High Availability Manager, it is not recommended to disable it, but instead to create multiple cells or bridged core groups.
For details, see the Scaling and Large Topologies section of the WAS traditional Profile chapter.
Request Metrics Recipe
- In addition to the General WAS traditional Performance Problem recipe, enable WAS Request Metrics to standard logs. This will have a significant performance overhead.
- WebSphere Administrative Console > Monitoring and Tuning > Request Metrics
- Ensure "Prepare Servers for Request metrics collection" is checked (by default, it is).
- Under "Components to be instrumented," select "All"
- Under "Trace level," select "Performance_Debug"
- Under "Request Metrics Destination," check "Standard Logs"
- Click "OK," save and synchronize. If "Prepare Servers for Request metrics collection" was already checked (the default), then the application server does not need to be restarted.
Tune a Thread Pool
Tuning a thread pool is one of the most important performance exercises. The optimal maximum thread pool size is the point at which throughput is maximized and resource utilizations (such as CPU) are at comfortable levels. The key thing to remember is that you can only conclude anything when observing a thread pool running at its maximum concurrency (i.e. nothing can be concluded if there is a lesser load than that which fills up the thread pool coming in), and when the mix of work is representative of normal user behavior.
- Start at a maximum thread pool size of X.
- Observe the system running with X concurrent threads and gather diagnostics such as throughput, response times, processor usage, monitor contention, and any other relevant resource usage.
- If one of the resources exceeds (or is significantly below) a comfortable utilization level (for example, average CPU more than 90% utilized, or it is only 5%), then perform a binary search on X.
For example, let's say we start at 50 WebContainer threads and load the system to 50 concurrent threads. Let's say we're focused on CPU and we want it to be no more than 90% in the worst case. We run a test and CPU is 100%, so we take half and go to 25 maximum threads. We run another test and CPU is still 100%, so we go to 12. With 12, CPU is 50% which is no longer saturated but now it's not utilizing the CPU as much as we'd like, so we increase by half the difference: CEILING(12 + (25-12)/2) = 19. With 19, CPU is 95%, so we subtract half the difference again: CEILING(18 - (18-12)/2) = 15. With 15, CPU is 90% and we're done.
Here is some pseudo code showing the algorithm:
# Target and TargetWindow are in terms of the Measurement, e.g. CPU %
# Minimum, Maximum, and X are in terms of the thread pool size
Target = T
TargetWindow = W
Minimum = N
Maximum = M
Measurement = PerformTest(X)
loop {
  if (Measurement < (T - W)) {
    N = X
    X = CEILING((M - X) / 2)
  } else if (Measurement > (T + W)) {
    M = X
    X = CEILING((X - N) / 2)
  } else {
    Target met. Print X, Measurement
    BreakLoop()
  }
  Measurement = PerformTest(X)
}
HTTP Sessions
- Consider reducing the session timeout (default 30 minutes) and average session size to reduce memory and processing pressures.
- Consider if session failover is required as it increases complexity and decreases performance. The alternative is to affinitize requests and surgically store any critical state into a database.
- Use session persistence (database) or WebSphere eXtreme Scale over memory-to-memory replication.
- Consider using timed updates to save session state.
For more information, see the HTTP section of the WAS traditional Profile chapter.
Security Recipe
- Consider disabling Java 2 security if you can guarantee, to a high confidence, that you know what code is being put on the server and who has access.
- If end-to-end encryption is not required, consider eliminating secure communications on an already secure part of the LAN. For example, if a web server is in the DMZ, the connection to the application servers may be secured, but all other connections behind the DMZ may be unsecured.
- Monitor the utilization of the authentication cache and increase its size if it's full and there's heap space available. Also consider increasing the cache timeout.
- Consider changing administrative connectors from SOAP to RMI to utilize persistent connections.
- If using LDAP:
- Select the reuse connection option.
For more details, see the Security section of the WAS traditional Profile chapter.
Connection Pool Hangs in createOrWaitForConnection
This recipe provides 3 possible strategies for dealing with connection pool hangs.
Strategy 1: Increase connection pool size maximum to 2x+1 (x = thread pool size maximum)
When an application is using multiple, simultaneous connections in the same thread, ensure the connection pool size is at least one more than the maximum number of threads so that the threads should never run out of available connections in the pool.
If the application opens 3 or more simultaneous connections you may have to experiment and try 3x+1 or 4x+1 as necessary.
Monitor
From the command line execute the above command periodically to capture the number of open connections to the database port number on the same node the application server(s) are running on.
netstat -an | grep ESTABLISHED | grep <port#> | wc -lCaveat
This increases the number of overall database connections from each individual application server. Make sure the database is configured and capable of handling the total number of connections for the sum of all JVMs.
Strategy 2: Disable "shareable" connections
Test setting globalConnectionTypeOverride=unshared to
disable shareable
connections.
Monitor
Check application and SystemOut.logs to see if any unexpected exceptions or logic errors occur.
Caveat
This will cause application problems for applications using container managed EJBs. Typically this strategy works for Web Container applications accessing databases directly through JDBC.
Strategy 3: Fix the application code
The previous two strategies are operational - run time changes to try to deal with an application that uses multiple simultaneous connections in the same thread request execution. The previous two strategies may not be operationally possible due to resource limitations in the environment. In this case the only way to fix the problem is to fix the application code to never have more than one connection open at a time within the same thread request execution.
Monitor
Javacore files to ensure that there are no threads stuck in
createOrWaitForConnection.
Caveat
This may require extensive re-design of the application code and can be a time consuming fix.
Threads in socketRead0 in JDBC calls
JDBC calls can sometimes get stuck on socket read calls to the database if some rather nasty network problems exist or if there is a firewall, between the application server and the database, that aggressively closes long-lived connections (some organizations have security reasons to prevent long-lived connections).
The way to determine if network problems exist is to use tcpdump (AIX, Linux) or snoop (Solaris) to capture the packets into files. One can then use Wireshark to read the capture files. If you see issues like "unreassembled packets", "lost segments" or "duplicate ACK" errors then most likely the network is experiencing serious difficulties affecting the server.
WebSphere Application Server is reporting hung threads in the SystemOut.log and a hung thread message as follows:
[1/2/12 1:23:45:678 EDT] 0000001c ThreadMonitor W WSVR0605W: Thread "WebContainer : 15" (00000045) has been active for 722010 milliseconds and may be hung. There is/are 1 thread(s) in total in the server that may be hung.
  at java.net.SocketInputStream.socketRead0(Native Method)
  at java.net.SocketInputStream.read(SocketInputStream.java:141)
  at com.ibm.db2.jcc.t4.z.b(z.java:199)
  at com.ibm.db2.jcc.am.nn.executeQuery(nn.java:698) [...]
There exists no deadlock or timeout recorded in the logs, even when there are lock timeout (LOCKTIMEOUT) and deadlock check time (DLCHKTIME) settings defined that are greater than 0.
Strategy 1: Apply socketRead timeouts
If threads hang on socketRead0 calls that never seem to
get a response then the only way to deal with them is by applying
timeouts.
- IBM DB2:
blockingReadConnectionTimeout - Oracle:
oracle.jdbc.ReadTimeout
Set the timeout to a reasonable value. The actual value depends on how long is the longest running transaction for the particular application connected to a specific database. If the longest transaction is, for example, 10 seconds then a reasonable value for the timeout could be 12 seconds.
Monitor
Watch the SystemOut.log file and ensure that hung thread messages do not appear again.
Caveats
If the timeout is set too low for the longest running transactions then those transactions will fail.
Slow or Hung Application
The SystemOut.log contains entries of:
WSVR0605W: Thread <threadname> has been active for <time> and may be hung. There are <totalthreads> in total in the server that may be hung.Recommendations
Review the WSVR0605W stacks
The WSVR0605W stacks are good hints of where the issue
might be.
Automatically generate thread dumps
Enable javacore thread dumps to be generated when a hung thread has been detected.
Open a Support Case
Analyzing thread dumps requires a certain level of proficiency with tooling. If no one at the organization knows how to analyze the thread dump open a support case with IBM Support who can provide the data analysis necessary to help pinpoint where the hang occurred, although note that you are only entitled to product defect search rather than general troubleshooting or performance tuning.
Strategy 1: Ran out of disk space OR Slow file system I/O OR Anti-Virus Protection OR Active backup
A thread dump (javacore) shows a lot of threads in a stack that looks like
"WebContainer : 89" daemon prio=10 tid=0x01683c58 runnable (0x73f7d000..0x73f7faf0)
  at java.io.FileOutputStream.writeBytes(Native Method)
  at java.io.FileOutputStream.write(FileOutputStream.java:260)
  at com.ibm.ejs.ras.WrappingFileOutputStream.write(WrappingFileOutputStream.java:364)
  - locked (0x97ff0230) (a com.ibm.ejs.ras.WrappingFileOutputStream)
  at java.io.PrintStream.write(PrintStream.java:412)
Threads in java.io.FileOutputStream.writeBytes
Strategy 2: JDBC Connection Pool hang
Strategy 3: Check trace levels
It is not unusual for someone to enable trace, then not turn it off.
Strategy 4: Check PMI levels
It is not unusual for someone to enable all PMI counters which can severely degrade performance. Enable only the PMI metrics necessary to gauge the health of the system.
Threads in java.io.FileOutputStream.writeBytes
A thread dump (javacore) shows a lot of threads in a stack that looks like
"WebContainer : 89" daemon prio=10 tid=0x01683c58 runnable (0x73f7d000..0x73f7faf0)
  at java.io.FileOutputStream.writeBytes(Native Method)
  at java.io.FileOutputStream.write(FileOutputStream.java:260)
  at com.ibm.ejs.ras.WrappingFileOutputStream.write(WrappingFileOutputStream.java:364)
  - locked (0x97ff0230) (a com.ibm.ejs.ras.WrappingFileOutputStream)
  at java.io.PrintStream.write(PrintStream.java:412)
Strategy 1: Ran out of disk space OR Slow file system I/O OR Anti-Virus Protection OR Active backup
Can be due to either running out of disk space on the file system or the file system I/O is slow (i.e. high latency connection to a SAN).
- Check if the file system is full. If the file system is full then archive and delete unnecessary files.
- If the file system is slow then change the application configuration to point to a more robust file system.
- Anti-Virus protection may be aggressively scanning the file system providing limited access to all other applications to the file system.
- Active backup that is aggressively accessing the file system providing limited access to all other applications to the file system.
Monitor
- If the disk is highly utilized (for example, 80%), notify the appropriate system administrators.
- File system performance. If aggressive disk usage is detected above
your threshold, notify the appropriate system administrators.
- Investigate re-architecting the environment so that not all the applications are pointed to the same file system.
- If the problem is related to local disk speed replace local disks
with faster disks.
- If this is due to too many vertically deployed application servers consider expanding the infrastructure horizontally.
- If Anti-Virus protection is aggressively accessing the file system then reconfigure the process not to aggressively access the file system.
- If a backup is aggressively accessing the file system then either reconfigure the process not to aggressively access the file system or investigate using other disk replication techniques.
Caveats
May require restarting the application servers which may require an outage.
Some of the recommended re-architecture/infrastructure can be quite extensive and time/labor consuming. Plan appropriately.
Logging PMI Data
- Configure any PMI data that is required for each server. PMI Basic is enabled by default and it's a good place to start.
- Administrative Console } Monitoring and Tuning } Performance Viewer } Current Activity
- Select all application servers you want to log and click "Start Monitoring"
- Click each monitored application server link and:
- Click on server } Settings } Log
- Duration = 999999
- Maximum File Size = 50
- Maximum Number of Historical Files = 5
- Log Output Format = XML
- Click Apply
- Click server } Summary Reports } Servlets
- Click "Start Logging"
- Click on server } Settings } Log
- Reproduce the problem
- Click "Stop Logging"
- The TPV files are in
$WAS/profiles/$PROFILE/logs/tpv/
Notes:
- The PMI component must be enabled for the above steps to work. It is enabled by default and configured with PMI Basic. To check if it has been disabled, double check if "Enable Performance Monitoring Infrastructure (PMI)" is checked.
- There is no way to automatically start PMI logging when a JVM is restarted. Logging must be manually restarted after a JVM restart either through the steps above or through wsadmin scripts.
- For details on metrics and analysis, see the Performance Monitoring chapter.
Logging Custom PMI Data with Dynacache
- Administrative Console } Servers } Server types } WebSphere Application Servers
- For each server you will monitor: $SERVER } Performance } Peformance
Monitoring Infrastructure (PMI)
- Click the Runtime tab
- Click the Custom link
- Click the Dynamic Caching link
- All Dynacache counters are considered low overhead, so select all checkboxes and click Enable (there's a little box at the top that selects all checkboxes)
- Administrative Console } Monitoring and Tuning } Performance Viewer } Current Activity
- Select all application servers you want to log and click "Start Monitoring"
- Click each monitored application server link and:
- Click on server } Settings } Log
- Duration = 300000
- Maximum File Size = 50
- Maximum Number of Historical Files = 5
- Log Output Format = XML
- Click Apply
- Click server } Summary Reports } Servlets
- Click "Start Logging"
- Click on server } Settings } Log
- Reproduce the problem
- To stop logging, either stop/restart the application servers or go back into the links above and click "Stop Logging"
- The TPV files are in
$WAS/profiles/$PROFILE/logs/tpv/
Notes:
- The PMI component must be enabled for the above steps to work. It is enabled by default and configured with PMI Basic. To check if it has been disabled, double check if "Enable Performance Monitoring Infrastructure (PMI)" is checked. By changing the configuration at runtime, this will enable PMI Basic statistics plus the other statistics explicitly enabled above.
- There is no way to automatically start PMI logging when a JVM is restarted. Logging must be manually restarted after a JVM restart either through the steps above or through wsadmin scripts.
- For details on metrics and analysis, see the Performance Monitoring chapter.
WebSphere Liberty Recipes
- Review the Operating System recipe for your OS. The highlights are to ensure CPU, RAM, network, and disk are not consistently saturated.
- Review the Java recipe for your JVM.
The highlights are to tune the maximum heap size (
-Xmx), the maximum nursery size (-Xmn) and enable verbose garbage collection and review its output with the GCMV tool. - Liberty has a single
thread pool where most application work occurs and this pool is
auto-tuned based on throughput. In general, it is not recommended to
tune nor specify this element; however, if there is a throughput problem
or there are physical or virtual memory constraints, test with
<executor maxThreads="X" />. If an explicit value is better, consider opening a support case to investigate why the auto-tuning is not optimal. - If receiving HTTP(S) requests:
- If using the
servletfeature less than version 4, then consider explicitly enabling HTTP/2 withprotocolVersion="http/2". - For HTTP/1.0 and HTTP/1.1, avoid client keepalive socket churn by
setting
maxKeepAliveRequests="-1". This is the new default as of Liberty 21.0.0.6. - For servers with incoming LAN HTTP traffic from clients using
persistent TCP connection pools with keep alive (e.g. a reverse proxy
like IHS/httpd or web service client), consider increasing
persistTimeoutto reduce keepalive socket churn. - For HTTP/1.0 and HTTP/1.1, minimize the number of application responses with HTTP codes 400, 402-417, or 500-505 to reduce keepalive socket churn or use HTTP/2.
- If using HTTP session database persistence, tune the
<httpSessionDatabase />element. - If possible, configure and use HTTP response caching.
- If using TLS, set
-DtimeoutValueInSSLClosingHandshake=1. - Consider enabling the HTTP NCSA access log with response times for post-mortem traffic analysis.
- If there is available CPU, test enabling HTTP response compression.
- If the applications don't use resources in
META-INF/resourcesdirectories of embedded JAR files, then set<webContainer skipMetaInfResourcesProcessing="true" />. - Consider reducing each HTTP endpoint's
tcpOptions maxOpenConnectionsto the hundreds range to avoid excessive request queuing under stress and test with a saturation test.
- If using the
- If using databases (JDBC):
- Connection
pools generally should not be consistently saturated. Tune
<connectionManager maxPoolSize="X" />. - Consider tuning each connectionManager's
numConnectionsPerThreadLocalandpurgePolicy, and each dataSource'sstatementCacheSizeandisolationLevel. - Consider disabling idle and aged connection timeouts (and tune any firewalls, TCP keep-alive, and/or database connection timeouts, if needed).
- Connection
pools generally should not be consistently saturated. Tune
- If using JMS
MDBs without a message ordering requirement, tune activation
specifications'
maxConcurrencyto control the maximum concurrent MDB invocations andmaxBatchSizeto control message batch delivery size. - If using EJBs:
- If using non-
@Asynchronousremote EJB interfaces in the application for EJBs available within the same JVM, consider using local interface or no-interface equivalents instead to avoid extra processing and thread usage. - If an EJB is only needed to be accessed locally within the same server, then use local interfaces (pass-by-reference) instead of remote interfaces (pass-by-value) which avoids serialization.
- If using non-
- If using security, consider tuning the authentication cache and LDAP sizes.
- Use the minimal feature set needed to run your application to reduce startup time and footprint.
- Upgrade to the latest version and fixpack as there is a history of making performance improvements and fixing issues or regressions over time.
- Consider enabling request timing which will print a warning and stack trace when requests exceed a time threshold.
- Review logs for any errors, warnings, or high volumes of messages.
- Monitor, at minimum, response times, number of requests, thread pools, connection pools, and CPU and Java heap usage using mpMetrics-2.3, monitor-1.0, JAX-RS Distributed Tracing, and/or a third party monitoring program.
- Consider enabling event logging which will print a message when request components exceed a time threshold.
- Consider running with a sampling profiler such as Health Center or Mission Control for post-mortem troubleshooting.
- Disable automatic configuration and application update checking if such changes are unexpected.
- If the application writes a lot to messages.log, consider switching to binary logging for improved performance.
- Review the performance tuning topics in the OpenLiberty and WebSphere Liberty documentation.
- If running on z/OS:
- Consider enabling SMF 120 records.
- Consider WLM classification: zosWlm-1.0
- Enable hardware cryptography for Java 8, Java 11, or Java 17
For details, see the WebSphere Liberty chapter.
Web Servers Recipes
- The maximum concurrency variables (e.g.
MaxClientsfor IHS) are the key tuning variables. Ensure such variables are not saturated through tools such asmpmstatsormod_status, while at the same time ensuring that the backend server resources (e.g. CPU, network) are not saturated (this can be done by scaling up the backend, sizing thread pools to queue, optimizing the backend to be faster, or limiting maximum concurrent incoming connections and the listen backlog). - Clusters of web servers are often used with IP sprayers or caching proxies balancing to the web servers. Ensure that such IP sprayers are doing "sticky SSL" balancing so that SSL Session ID reuse percentage is higher.
- Load should be balanced evenly into the web servers and back out to
the application servers. Compare access log hit rates for the former,
and use WAS plugin
STATStrace to verify the latter. - Review snapshots of thread activity to find any bottlenecks. For
example, in IHS, increase the frequency of
mpmstatsand review the state of the largest number of threads. - Review the keep alive timeout. The ideal value is where server
resources (e.g. CPU, network) are not saturated, maximum concurrency is
not saturated, and the average number of keepalive requests has peaked
(in IHS, review with
mpmstatsormod_status). - Check the access logs for HTTP response codes (e.g.
%sfor IHS) >= 400. - Check the access logs for long response times (e.g.
%Dfor IHS). - For the WebSphere Plugin, consider setting
ServerIOTimeoutRetry="0"to avoid retrying requests that time out due toServerIOTimeout(unlessServerIOTimeoutis very short). - Enable mod_logio and add
%^FBto LogFormat for time until first bytes of the response - Review access and error logs for any errors, warnings, or high volumes of messages.
- Check http_plugin.log for
ERROR: ws_server: serverSetFailoverStatus: Marking .* down - Use WAS plugin
DEBUGorTRACElogging to dive deeper into unusual requests such as slow requests, requests with errors, etc. Use an automated script for this analysis.
For details, see the Web Servers chapter. Also review the operating systems chapter.
Additional Recipes
IHS & WAS Plugin Performance
- In the
conf/httpd.conffile, find the section formod_mpmstats.cand changeReportIntervalto:ReportInterval 30 - In the
conf/httpd.conffile, find the CustomLog directive for youraccess_log. By default this is:
The last part of that line, in this example "common" is the name of the LogFormat to use. Find this LogFormat. By default, this may be:CustomLog logs/access_log common
Change this to, for example:LogFormat "%h %l %u %t \"%r\" %>s %b" commonLogFormat "%h %l %u %t \"%r\" %>s %b %D \"%{WAS}e\" %X %I %O %^FB" common - Archive and truncate existing
access.log,error.log, andhttp_plugin.logfiles. - Save
httpd.confand restart the IHS servers (either gracefully or fully). - Reproduce the problem.
- Gather
access.logerror.loghttp_plugin.loghttpd.confplugin-cfg.xml
- Review all logs for any errors, warnings, etc.
- Review the response times. Try to isolate the problem to particular requests (duration or volume).
- Review mpmstats.
- Review incoming rate and distribution of requests (see Web Servers).
- Review
http_plugin.log:- scanplugin.pl can help find "interesting" Plugin requests (timeouts, bad status codes, non-WAS delays)
Some Users Reporting Bad Performance
This recipe provides a strategy for identifying which JVM a user is on in order to track down performance issues reported by that user.
Strategy 1: Add Logging of JSESSIONID in IHS to Identify the clone-id of the JVM the user is on
- In the
conf/httpd.conffile, find the CustomLog directive for youraccess_log. By default this is:
The last part of that line, in this example "common" is the name of the LogFormat to use. Find this LogFormat. By default, this may be:CustomLog logs/access_log common
Change this to, for example:LogFormat "%h %l %u %t \"%r\" %>s %b %D \"%{WAS}e\" %X %I %O %^FB" commonLogFormat "%h %l %u %t \"%r\" %>s %b %D \"%{WAS}e\" %X %I %O %^FB JSESSIONID=\"%{JSESSIONID}C\"" common - Save
httpd.confand restart the IHS servers (either gracefully or fully).
This will print out the cookie due to
JSESSIONID=\"%{JSESSIONID}C\". This is helpful because the
JSESSIONID string contains the clone/JVM the user has
established their session with. This way if a user is having problems
the administrator will know which clone the user was pinned to. This
helps immensely with troubleshooting because the administrator knows
which log file they need to look at when the error occurs. Test this out
in the test environment first. Then in production make sure disk space
is monitored to ensure that the disk does not run out of space because
of the additional logging data.
Monitor
access.log on the IHS server. Use the clone-id in the
JSESSIONID cookie to identify the JVM. Conduct appropriate
troubleshooting steps on that JVM to understand the users' performance
problems.
Caveat
Whilst the JSESSIONID is only an identifier, the
administrators need to ensure that file system security is locked down
so that other users on the node do not have access to the IHS logs.
Container Recipes
- Java in Containers Recipes
- Liberty in Containers Recipe
- WebSphere Application Server traditional in Containers Recipe
Java in Containers Recipes
IBM and Semeru Java in Containers Recipe
- Review and test different CPU limits. Steady state requirements may be different from startup requirements, particularly due to JIT compilation (unless using JITServer).
- In general, tune
-XX:MaxRAMPercentageand-XX:InitialRAMPercentageinstead of-Xmxand-Xms, respectively, to allow for more flexibility with sizing of containers at the host level. Default values depend on any container memory limit. - Consider using
-XX:+ClassRelationshipVerifierto improve start-up time. - If using Semeru Java >= 11 and memory in the pod is limited, consider using the remote JITServer on available platforms to avoid potential throughput issues.
For details, see the Java J9 in Containers chapter.
Liberty in Containers Recipe
- Review the Java in Containers recipes
- Execute
configure.shas the last step in your Containerfile to make it fit-for-purpose and initialize the shared class cache. - Review the Configuring Security best practices
- If using IBM or Semeru Java, mount a shared volume for the shared
class cache in
${WLP_OUTPUT_DIR}/.classCache - Consider logging in JSON format for consumption by centralized logging.
- If using IBM or Semeru Java and startup time is highly variable, review the potential impact of the maximum heap size on the shared class cache.
- OpenShift:
- Review the Application Monitoring options.
- Review the Liberty recipe
- Review the Java recipes
- Review the Operating System Recipes
For details, see the Liberty in Containers chapter.
WebSphere Application Server traditional in Containers Recipe
- Review the Java in Containers recipes
- Execute
/work/configure.shas the last step in your Containerfile - Review the WAS traditional recipes
- Review the Java recipe
- Review the Operating System Recipes
For details, see the WebSphere Application Server traditional in Containers chapter.
Caching Recipes
The costs and benefits of caching are discussed in the Caching chapter. This recipe is a checklist of caching to review in a typical WAS installation:
- If available, enable the Java shared class and ahead-of-time compilation caches. WAS enables this by default, but you can increase the size if you have available memory. See the Java chapter.
- Pre-compile Java Server Pages (JSPs). See the WAS chapter.
- If possible, utilize the WAS Dynacache feature to cache servlet responses. See the HTTP section in the WAS chapter.
- The application should set standardized response headers that
indicate caching (e.g. Cache-Control in HTTP).
- An alternative is to use a web server such as IHS to apply cache headers to responses based on rules. See the Web Servers chapter.
- If possible, use the WebSphere eXtreme Scale (WXS) product to maximize data caching (see below).
- Consider using an edge cache such as the WebSphere Caching Proxy. See the Web Servers chapter.
- If using WebSphere Commerce, set Dynacache caches' sharing modes to NOT_SHARED.
Troubleshooting Recipes
- Troubleshooting Operating System Recipes
- Troubleshooting Java Recipes
- Troubleshooting WAS traditional Recipes
- Troubleshooting WebSphere Liberty Recipes
- Troubleshooting Web Servers Recipes
- Troubleshooting OpenShift Recipes
Troubleshooting Operating System Recipes
Additional Recipes
Process Crash Recipe
- On POSIX-based operating systems:
- Ensure the process was started with unlimited
coreandfileulimits.
- Ensure the process was started with unlimited
- On Linux:
- Ensure core piping is configured properly or disabled.
- Review the system log (e.g.
journalctl) to see if the crash was caused by the Linux OOM killer.
- Load the core dump in the operating system debugger and review the stack trace of the crashing thread.
- Check if the RAM is non-ECC RAM in which case the cause may have been due to atmospheric radiation. Non-ECC RAM is more common in consumer hardware rather than production hardware.
- Review the possibility of mercurial CPU cores.
Looping Shell Script Recipe
- Change directory to where you would like to store the script output.
- Create a file named
diagscript.shwith contents based on the following:#!/bin/sh set -e outputfile="diag_ps_$(date +"%Y%m%d_%H%M%S").log" while true; do date >> "${outputfile}" 2>&1 # Change the command here, update '_ps_' in the file name above to match, and update the example in the next step: ps -elfyww >> "${outputfile}" 2>&1 # Change the sleep time (in seconds) as needed: sleep 30 done - Manually confirm the looped command works (as some distributions
support different flags). For example:
ps -elfyww - Make the script executable:
chmod +x diagscript.sh - Execute the script with
nohupso that it's not interrupted if the user that started the script logs out (on some versions of Linux, you may needsystemd-runinstead), and send to the background with&:nohup ./diagscript.sh & - After the script starts in the background, press
ENTERto continue with the shell. If you'd like to watch the script output, you maytailit:tail -f diag*log - When you are ready to stop the script, kill it by finding the
process ID and then using that:
Alternatively, on Linux, usekill ${PID}pkill:pkill -f diagscript.sh - Upload
diag*log
Looping Batch Script Recipe
- Create a file named
diagscript.batwith contents based on the following. Add your desired commands between theecho ... Iterationand thetimeoutlines.@echo off SETLOCAL ENABLEDELAYEDEXPANSION :loop echo [%date% %time%] Iteration timeout /t 30 > NUL goto loop - Open a command prompt and change directory to where you would like
to store the script output:
cd C:\ - Execute the script and redirect output to a file:
C:\diagscript.bat > diagstdlogs.txt 2>&1 - When you are ready to stop the script, kill it by typing
Ctrl^Cin the command prompt window. - Upload
diagstdlogs.txtand any other relevant logs.
Troubleshooting Linux Recipes
- Linux General Recipe
- Linux tcpdump Recipe
- Linux tcpdump on a port Recipe
- Linux vmstat Recipe
- Linux nmon Recipe
- Linux perf Recipe
- Linux netstat Recipe
- Linux basics Recipe
- Linux X11 Forwarding
- Linux Override Core Dump Processing
Linux General Recipe
- Print error messages since last boot:
journalctl -b -p err
Linux tcpdump Recipe
- Review the security and performance implications of network trace.
- Install
tcpdumpif it's not already installed. - As root, run the following command, replacing
$INTERFACEwith the target network interface (e.g. an explicit interface such aseth0oranyfor all interfaces; preferably, the former):sh -c "date >> nohup.out && (nohup tcpdump -nn -v -i $INTERFACE -B 4096 -s 80 -C 100 -W 10 -Z root -w diag_capture_$(hostname)_$(date +%Y%m%d_%H%M%S).pcap &) && sleep 1 && cat nohup.out"- This captures up to 10 files of 100MB each of up to 80 bytes per
packet. Change
-sto 0 if you want to capture full packets although this has a higher overhead.
- This captures up to 10 files of 100MB each of up to 80 bytes per
packet. Change
- Check for any errors running the above commands in your terminal.
- Reproduce the problem.
- Stop the capture:
pkill -INT tcpdump - Upload
diag_capture*pcap*, a list of IP addresses that are relevant to the captured conversations and what each IP address represents (e.g. web server, WebSphere, database, etc.), andnohup.out
For background, see Linux tcpdump.
Linux tcpdump on a port Recipe
- Review the security and performance implications of network trace.
- Install
tcpdumpif it's not already installed. - As root, run the following command, replacing
$PORTwith the port of interest and$INTERFACEwith the target network interface (e.g. an explicit interface such aseth0oranyfor all interfaces; preferably, the former):sh -c "date >> nohup.out && (nohup tcpdump -nn -v -i $INTERFACE -B 4096 -s 80 -C 100 -W 10 -Z root -w diag_capture_$(hostname)_$(date +%Y%m%d_%H%M%S).pcap 'port $PORT' &) && sleep 1 && cat nohup.out"- This captures up to 10 files of 100MB each of up to 80 bytes per
packet. Change
-sto 0 if you want to capture full packets although this has a higher overhead.
- This captures up to 10 files of 100MB each of up to 80 bytes per
packet. Change
- Check for any errors running the above commands in your terminal.
- Reproduce the problem.
- As root, stop the capture:
pkill -INT tcpdump - Upload
diag_capture*pcap*, a list of IP addresses that are relevant to the captured conversations and what each IP address represents (e.g. web server, WebSphere, database, etc.), andnohup.out
For background, see Linux tcpdump.
Linux vmstat Recipe
- Run vmstat in the background with a 5 second interval:
sh -c "date >> nohup.out && (nohup vmstat -tn 5 > diag_vmstat_$(hostname)_$(date +%Y%m%d_%H%M%S).txt &); sleep 1; cat nohup.out" - Check for any errors running the above commands in your terminal.
Some versions of Linux do not support the
-tflag so the above command will give an error. If so, change to-n. - Reproduce the problem.
- To stop collection, kill the vmstat process. For example:
pkill -f vmstat - Upload
diag_vmstat_*andnohup.out
For background, see Linux vmstat.
Linux nmon Recipe
- Install
nmonif it's not installed. - Run nmon in the background with a 60 second interval:
sh -c "date >> nohup.out && nohup nmon -fT -s 60 -c 1000000 -t && sleep 1 && cat nohup.out" - Check for any errors running the above commands in your terminal
- Reproduce the problem.
- To stop collection, kill the nmon process. For example:
pkill -USR2 nmon - Upload
*.nmonandnohup.out
For background, see Linux nmon.
Linux perf Recipe
- Install
perfif it's not installed. - Prepare the Java process:
- For IBM Java >= 8.0.7.20 or Semeru >= v8.0.352 / 11.0.17.0 /
17.0.5.0, restart the Java process with
-XX:+PerfTool - For older versions of IBM Java and Semeru, restart the Java process
with
-Xjit:perfToolwhile making sure to combine with commas with any pre-existing-Xjitoptions - For a HotSpot JVM, restart the Java process with
-XX:+PreserveFramePointerandperf-map-agentor, for Java >= 16, restart with-XX:+DumpPerfMapAtExitto create/tmp/perf-$PID.mapon graceful JVM exit.
- For IBM Java >= 8.0.7.20 or Semeru >= v8.0.352 / 11.0.17.0 /
17.0.5.0, restart the Java process with
- During the performance problem, run one of the following commands as
root. Change60to the number of seconds you want to gather data for:- For IBM Java/Semeru running on top of an Intel processor that is
Haswell or later (see
cat /proc/cpuinfoand reference Intel.com), use the following, although note that LBR has a limited stack depth, so use the next option if you need longer stacks:date +'%Y-%m-%d %H:%M:%S.%N %Z' &>> diag_starttimes_$(hostname).log; cat /proc/uptime &>> diag_starttimes_$(hostname).log; perf record --call-graph lbr -F 99 -a -g -- sleep 60 - For IBM Java/Semeru running on any other processor or if you're not
sure what the processor is:
date +'%Y-%m-%d %H:%M:%S.%N %Z' &>> diag_starttimes_$(hostname).log; cat /proc/uptime &>> diag_starttimes_$(hostname).log; perf record --call-graph dwarf,65528 -F 99 -a -g -- sleep 60 - For a HotSpot JVM:
date +'%Y-%m-%d %H:%M:%S.%N %Z' &>> diag_starttimes_$(hostname).log; cat /proc/uptime &>> diag_starttimes_$(hostname).log; perf record --call-graph fp -F 99 -a -g -- sleep 60
- For IBM Java/Semeru running on top of an Intel processor that is
Haswell or later (see
- After the above completes, run the following command:
perf script > diag_perfscript_$(hostname)_$(date +%Y%m%d_%H%M%S_%N).txt - After the above completes, gather a thread dump so that thread IDs
may be mapped to thread names. This is very low overhead with the
process pausing for generally about 10ms to 100ms.
kill -3 $PID - Similarly, gather an operating sytem core dump of the process if the
security,
disk and
performance
risks are acceptable (the process may pause for up to 30 seconds or
more) and the process and operating system are configured for it (e.g.
core and file
ulimits,
kernel.core_patterntruncation settings, etc.) using one of various mechanisms and then runjextract(IBM Java) orjpackcore(Semeru) on it; for example:$JAVA/bin/jextract core*.dmp - As root (needed to access
/proc/kallsyms), run the following commands to archive theperfdata; replace$THREAD_DUMPS_DIRwith the location where thread dumps were produced, and include the packed operating system core dump if produced:# perf archive # tar czvf diag_perf_$(hostname)_$(date +%Y%m%d_%H%M%S).tar.gz perf.data* diag_perfscript* diag_perfscript* perf.data.tar.bz2 /proc/kallsyms /boot/System.map-$(uname -r) /tmp/perf*map $THREAD_DUMPS_DIR/javacore*.txt $OS_CORE_DUMPS_DIR/core*.dmp.zip - Upload
diag_perf_*.tar.gzand any Java/WAS logs, particularly verbosegc if enabled
If you want to do basic analysis of the perf output
yourself:
- Top 10 CPU-using stack frames:
cat diag_perfscript*txt | awk 'go { go=0; print; } /cpu-clock:/ || /cycles:/ { go=1; }' | sort | uniq -c | sort -nr | head - Create FlameGraphs:
git clone https://github.com/brendangregg/FlameGraphcd FlameGraphcat diag_perfscript*txt | ./stackcollapse-perf.pl > out.perf-folded./flamegraph.pl --width 1024 out.perf-folded > perf.svg./flamegraph.pl --reverse --width 1024 out.perf-folded > perf-reverse.svg- Open
perf.svgandperf-reverse.svgin your browser
Notes:
- If not all symbols are resolved, try again with the additional
option
-Xlp:codecache:pagesize=4k
For background, see Linux perf.
Linux netstat Recipe
- Create
diag_netstat.sh:#!/bin/sh OUTPUTFILE="diag_netstat_$(hostname)_$(date +"%Y%m%d_%H%M%S").log" INTERVAL="${1:-30}" # First argument or a default of 30 seconds while true; do echo "diag: $(date +"%Y%m%d %H%M%S %N %Z") iteration" >> "${OUTPUTFILE}" 2>&1 netstat -antop >> "${OUTPUTFILE}" 2>&1 sleep ${INTERVAL} done - Make it executable:
chmod +x diag_netstat.sh - Start it (default interval of 30 seconds or specify an alternate
interval as the first argument):
nohup ./diag_netstat.sh & - Reproduce the problem
- If at any point you need to reduce this disk usage of the output
file during the test, truncate the file:
cat /dev/null > diag_netstat*log
- If at any point you need to reduce this disk usage of the output
file during the test, truncate the file:
- Stop the script:
pkill -f diag_netstat - Upload
diag_netstat_*andnohup.out
Linux basics Recipe
- Execute the following:
cat /proc/cpuinfo &>> diag_linux_$(hostname).txt; cat /proc/meminfo &>> diag_linux_$(hostname).txt; sysctl -a &>> diag_linux_$(hostname).txt; netstat -i &>> diag_linux_$(hostname).txt; netstat -s &>> diag_linux_$(hostname).txt; journalctl -p warning -n 500 &>> diag_linux_$(hostname).txt - Upload
diag_linux_*
Linux X11 Forwarding Recipe
- Client:
- macOS:
- (First time) Install XQuartz:
brew install --cask xquartz - Start XQuartz:
open -a XQuartz.app
- (First time) Install XQuartz:
- macOS:
- Server:
- Ubuntu:
sshnormally into the server:ssh root@host- Make sure X11 apps are installed:
apt-get update && DEBIAN_FRONTEND=noninteractive TZ=${TZ:-UTC} apt-get -y install x11-apps - Update the sshd config to allow remote X11:
sed -i 's/.*X11Forwarding no/X11Forwarding yes/g' /etc/ssh/sshd_config && sed -i 's/.*X11UseLocalhost yes/X11UseLocalhost no/g' /etc/ssh/sshd_config - Update the sshd runtime configuration:
kill -HUP $(cat /var/run/sshd.pid) exitthesshsessionsshagain with X11 forwarding:ssh -Y root@host- Test some X11 app
xclock
- Ubuntu:
Linux Override Core Dump Processing
If you are facing troubles configuring a Linux core dump processing program, temporarily use the following technique to use a shell script as the core dump processing program which simply writes the core dump to a target directory.
- Create
writecore.sh. In general, well known executable directories are recommended in case of SELinux restrictions. In the following example,/usr/local/binis used but change as needed. Also change the destination directory of/tmp/to where you want to write the cores and the log. Ensure the target directory has sufficient disk space.cat > /usr/local/bin/writecore.sh <<"EOF" #!/bin/sh /usr/bin/echo "[$(/usr/bin/date)] Asked to create core for ${1}.${2}.${3}" >>/tmp/writecore.log /usr/bin/cat - > /tmp/core.${1}.${2}.${3}.dmp 2>>/tmp/writecore.log /usr/bin/echo "[$(/usr/bin/date)] Finished writing core for ${1}.${2}.${3}" >>/tmp/writecore.log EOF - Make the script executable:
chmod +x /usr/local/bin/writecore.sh - If SELinux is in use, change the security context. For example:
chcon --reference=/usr/bin/cat /usr/local/bin/writecore.sh - Print the current
core_patternfor later reversion:sysctl kernel.core_pattern - Update the
core_pattern:sysctl -w "kernel.core_pattern=|/usr/local/bin/writecore.sh %p %P %t" - Now core dumps should be processed through
writecore.shand written to the destination directory. - Reproduce the issue and find the core dumps in
/tmp/. - Revert to the old
core_patternfrom step 4 above.
Potential issues:
- Potential issues may be seen in the kernel logs such as
journalctl -f.- In the following example, SELinux denied executing
writecore.sh
A rule could be added with a tool such asSep 06 10:41:52 localhost.localdomain audit[4985]: AVC avc: denied { map } for pid=4985 comm="writecore.sh" path="/usr/bin/bash" dev="vda4" ino=201689627 scontext=system_u:system_r:kernel_generic_helper_t:s0 tcontext=system_u:object_r:shell_exec_t:s0 tclass=file permissive=0 Sep 06 10:41:52 localhost.localdomain kernel: audit: type=1400 audit(1694014912.395:806): avc: denied { map } for pid=4985 comm="writecore.sh" path="/ usr/bin/bash" dev="vda4" ino=201689627 scontext=system_u:system_r:kernel_generic_helper_t:s0 tcontext=system_u:object_r:shell_exec_t:s0 tclass=file permissive=0 Sep 06 10:41:52 localhost.localdomain kernel: Core dump to |/usr/local/bin/writecore.sh pipe failedsemanageor SELinux may be temporarily disabled:setenforce Permissive
- In the following example, SELinux denied executing
Troubleshooting AIX Recipes
- AIX nmon Recipe
- AIX perfpmr Recipe
- AIX iptrace Recipe
- AIX iptrace on a port Recipe
- AIX vmstat Recipe
- WAS traditional on AIX Recipe
AIX nmon Recipe
- Run nmon in the background with a 60 second interval:
nohup nmon -fT -s 60 -c 1000000 && sleep 1 && cat nohup.out - Check for any errors running the above commands in your terminal.
- Reproduce the problem.
- To stop collection, kill the nmon process. For example:
ps -elf | grep nmon | grep -v grep | awk '{print $4}' | xargs kill -USR2 - Upload
$HOST_$STARTDAY_$STARTTIME.nmonandnohup.out
For background, see AIX nmon.
AIX perfpmr Recipe
- Download perfpmr to the node(s)
- Extract it somewhere:
zcat perf72.tar.Z | tar -xvf - - As
root, execute perfpmr in a directory with at least(45MB * $LOGICAL_CPUs)of disk space:perfpmr.sh 600- Note: this executes for about 30 minutes. Alternatively, the minimum
execution is 10 minutes with the argument
60instead of600.
- Note: this executes for about 30 minutes. Alternatively, the minimum
execution is 10 minutes with the argument
- Reproduce the problem.
- Collect the data:
pax -xpax -vw perfdata | gzip -c > perfpmr_collection.pax.gz - Upload
perfpmr_collection.pax.gz
For background, see AIX perfpmr.
AIX iptrace Recipe
- Review the security and performance implications of network trace.
- As
root, start the capture:startsrc -s iptrace "-a -b -B -L 2147483648 -S 80 aixiptrace.bin"- This captures up to 2 files of 2GB each of up to 80 bytes per
packet. Set
-S 1500if you want to capture full packets although this has a higher overhead.
- This captures up to 2 files of 2GB each of up to 80 bytes per
packet. Set
- Check for any errors running the above commands in your terminal.
- Reproduce the problem.
- Stop the capture:
stopsrc -s iptrace - Upload
aixiptrace*.bin*
For background, see AIX iptrace.
AIX iptrace on a port Recipe
- Review the security and performance implications of network trace.
- As
root, start the capture and replace$PORT:startsrc -s iptrace "-a -b -B -p $PORT -L 2147483648 -S 80 aixiptrace.bin"- This captures up to 2 files of 2GB each of up to 80 bytes per
packet. Set
-S 1500if you want to capture full packets although this has a higher overhead.
- This captures up to 2 files of 2GB each of up to 80 bytes per
packet. Set
- Check for any errors running the above commands in your terminal.
- Reproduce the problem.
- Stop the capture:
stopsrc -s iptrace - Upload
aixiptrace*.bin*
For background, see AIX iptrace.
AIX vmstat Recipe
- Run vmstat in the background with a 5 second interval:
sh -c "date >> nohup.out && (nohup vmstat -t 5 > diag_vmstat_$(hostname)_$(date +%Y%m%d_%H%M%S).txt &); sleep 1; cat nohup.out" - Check for any errors running the above commands in your terminal.
- Reproduce the problem.
- To stop collection, kill the vmstat process. For example:
ps -elf | grep vmstat | grep -v grep | awk '{print $4}' | xargs kill - Upload
diag_vmstat_*andnohup.out
For background, see AIX vmstat.
WAS traditional on AIX Recipe
- Download aixperf.sh
- Edit
aixperf.shthen changeSCRIPT_SPANto greater than or equal to the duration of the test. Also ensureJAVACORE_INTERVALis changed so thatSCRIPT_SPANis evenly divisible by it. For example:SCRIPT_SPAN=43200 JAVACORE_INTERVAL=60 - Find the process IDs (PIDs) of each application server:
ps -elf | grep java - Start aixperf.sh as root:
# su # cd /var/tmp/ # nohup ./aixperf.sh ${WASPIDS} & - Reproduce the problem
- The
aixperf.shscript will gather a tprof sample just once when it first starts. Also gather a tprof sample at the peak of the problem:# su # cd /var/tmp/ # LDR_CNTRL=MAXDATA=0x80000000 tprof -Rskex sleep 60 >> tprof.out 2>&1 - Once the reproduction is complete:
- If
aixperf.shhasn't completed, you can manually stop it:ps -elf | grep $(ps -elf | grep aixperf | grep -v grep) | awk '{print $4}' | xargs kill- Gather any
javacore*txtfiles produced in each WAS JVM's profile directory.
- Gather
/var/tmp/aixperf/*and/var/tmp/tprof/*
Troubleshooting Windows Recipes
Windows pktmon Recipe
- Review the security and performance implications of network trace.
- Right-click Command Prompt } Run as Administrator
- Start the capture:
pktmon start --capture --pkt-size 80 --file-size 2048 --log-mode circular- This command captures up to 2GB of total data. Change file-size in MB as needed.
- It also captures up to 80 bytes per packet. Set
--pkt-size 0if you want to capture full packets although this has a higher overhead. - If you receive the error, "Packet monitor is already started," then
first run
pktmon stopand then re-run the command.
- Check for any errors running the previous commands in your terminal.
- Reproduce the problem.
- Stop the capture:
pktmon stop - Convert the capture to pcapng format:
pktmon etl2pcap PktMon.etl - Upload
PktMon.etlandPktMon.pcapng
Windows pktmon on a port Recipe
- Review the security and performance implications of network trace.
- Right-click Command Prompt } Run as Administrator
- Configure the filtered port; replace
%PORT%with the target port (for example, 80, 443, and so on):pktmon filter add -t tcp -p %PORT% - Start the capture:
pktmon start --capture --pkt-size 80 --file-size 2048 --log-mode circular- This command captures up to 2GB of total data. Change file-size in MB as needed.
- It also captures up to 80 bytes per packet. Set
--pkt-size 0if you want to capture full packets although this has a higher overhead. - If you receive the error, "Packet monitor is already started," then
first run
pktmon stopand then re-run the command.
- Check for any errors running the previous commands in your terminal.
- Reproduce the problem.
- Stop the capture:
pktmon stop - Convert the capture to pcapng format:
pktmon etl2pcap PktMon.etl - Upload
PktMon.etlandPktMon.pcapng
Windows 11 perfmon Recipe
- Start } Run } perfmon (a.k.a. Performance Monitor)
- Expand Performance } Data Collector Sets } System
- Right click System Performance } Start
- This runs for 60 seconds.
- Upload the output files noted on the right pane. For example,
c:\PerfLogs\System\Performance\*\Performance Counter.blg
Notes:
- If you would like to change the duration from 60 seconds or
otherwise customize the collector, then:
- Expand Performance } Data Collector Sets
- Right click User Defined } New } Data Collector Set
- Next
- Select System Performance
- Click Next until finished
- Right click on the new data collector } Properties
- Change properties such as the Stop Condition Overall duration
Troubleshooting OpenJ9 and IBM J9 Recipes
- Write verbosegc to rotating log files; for example, -Xverbosegclog:verbosegc.%Y%m%d.%H%M%S.%pid.log,5,51200
- On recent versions of IBM Java, enable Health Center to write to rotating log files; for example, -Xhealthcenter:level=headless -Dcom.ibm.java.diagnostics.healthcenter.headless.files.max.size=268435456 -Dcom.ibm.java.diagnostics.healthcenter.headless.files.to.keep=4
- Periodically monitor stderr (native_stderr.log in WAS Classic, console.log in WebSphere Liberty) for "JVM" messages, including those noting the production of javacores, heapdumps, core dumps, and snap dumps.
- Create a dedicated filesystem for JVM artifacts such as javacores, heapdumps, Snaps, and core dumps (so that if it fills up, the program directories are not affected) and use the -Xdump directory option to change the default directory of these artifacts; for example, -Xdump:directory=${SOME_DIRECTORY} and also set -Xdump:nofailover if there is any concern about filling up the temporary directory.
- In recent versions, a core dump is produced on the first OutOfMemoryError. Assuming core dumps are configured correctly to be untruncated (see the Troubleshooting Operating System Recipes), then the core dump is sufficient to investigate OutOfMemoryErrors (a PHD may always be extracted from a core) and you should disable heapdumps with -Xdump:heap:none
- Enable large object allocation tracking and monitor stderr for JVMDUMP039I messages; for example, -Xdump:stack:events=allocation,filter=#10m
- Consider setting the excessive garbage collection threshold (at which point the JVM is considered to be out of Java memory) to something more aggressive; for example, -Xgc:excessiveGCratio=80
- A well-tuned JVM is a better-behaving JVM, so also review the Java tuning recipes.
- Review the Troubleshooting Operating System Recipes.
Java OutOfMemoryError (OOM)
- If you have verbosegc enabled (you should), then review the
verbosegc log:
- Review the allocation failure right before the OOM to see its size. The cause of the OOM may be an abnormally large allocation request.
- Review the pattern of heap usage to see if there are signs of a leak.
- By default, an OutOfMemoryError should produce a javacore.txt file.
Review the javacore:
- Review the reason code for the OutOfMemoryError at the top of the
javacore. For example:
1TISIGINFO Dump Event "systhrow" (00040000) Detail "java/lang/OutOfMemoryError" "Java heap space" received - Review the maximum heap size in the javacore. In general, if -Xmx is
<= 512M, a sizing exercise may not have been done. For example:
2CIUSERARG -Xmx3800m - Search for the word "deadlock." If you find "Deadlock detected !!!" then investigate the cause of the deadlock. A deadlock often indirectly causes an OutOfMemory because the deadlocked threads and any threads waiting for a monitor owned by the deadlocked threads are hung indefinitely and this may hold a lot of memory on those threads or impede other processing that cleans up memory.
- In some cases, the thread that proximately causes the OOM is
reported as the "Current thread." Review the stack for anything
abnormal. For example:
1XMCURTHDINFO Current thread
- Review the reason code for the OutOfMemoryError at the top of the
javacore. For example:
- Review the coredump or heapdump in the Eclipse Memory Analyzer Tool.
Additional Recipes
- J9 Native OutOfMemoryError Recipe
- J9 Java Dump Recipe
- J9 System Dump Recipe
- Javacore Overhead
- Sizing OpenJ9 Native Memory
J9 Native OutOfMemoryError Recipe
In the most common cases of IBM Java and Semeru/OpenJ9 JVMs, compressed
references are enabled by default for -Xmx less than
57GB in recent versions of Java. When compressed references are enabled,
native structures backing classes, classloaders, threads, and monitors
(CTM) must be allocated in the 0-4GB virtual address space
range (or 0-2GB on z/OS). For the purposes of this discussion, we will
call this space "below the bar". If there is insufficient space below
the bar for a new CTM due to excessive usage of these structures,
competition with other native memory allocations, or native memory
fragmentation, then a native OutOfMemoryError (NOOM) is thrown even if
there is available physical and virtual memory for the process.
- Confirm from the javacore.txt file produced by the OutOfMemoryError
that it is a non-Java heap OOM by observing text after
Detail "java/lang/OutOfMemoryError". Examples of NOOMs are the following although note that such issues may also be caused by physical memory exhaustion, virtual memory exhaustion, ulimit settings or other causes unrelated to compressed references:1TISIGINFO Dump Event "systhrow" (00040000) Detail "java/lang/OutOfMemoryError" "native memory exhausted"1TISIGINFO Dump Event "systhrow" (00040000) Detail "java/lang/OutOfMemoryError" "Failed to create a thread: retVal -1073741830, errno 112 (0x70), errno2 0xb510292" received
- Confirm in the javacore.txt file that compressed references are
enabled by checking that 1CIOMRVERSION or 1CIGCVERSION contains CMPRSS
(or check for "Compressed References" in
!coreinfoinjdmpviewfor a system dump). - On non-z/OS platforms, review the
1STHEAPTYPE Object Memorysection in the javacore.txt file to confirm that all Java heap regionstartcolumn values are0x1_0000_0000or above (or0x8000_0000on z/OS). If they aren't, use-Xgc:preferredHeapBase=0x100000000although this will have a slight performance impact.1STHEAPTYPE Object Memory NULL id start end size space/region 1STHEAPSPACE 0x000000501B4EA810 -- -- -- Generational 1STHEAPREGION 0x000000501B4EAB40 0x0000000100000000 0x000000017C000000 0x00000000FC000000 Generational/Tenured Region 1STHEAPREGION 0x000000501B4EAA30 0x0000000230000000 0x00000002AC000000 0x000000007C000000 Generational/Nursery Region 1STHEAPREGION 0x000000501B4EA920 0x00000002AC000000 0x00000002C0000000 0x0000000014000000 Generational/Nursery Region - If you have a system dump, you can get the most accurate
understanding of below the bar storage by walking the J9HeapWrapper
linked list rooted in j9javavm } portLibrary } omrPortLibrary }
portGlobals } platformGlobals } subAllocHeapMem32 } firstHeapWrapper.
Consider the an example
!belowthebarcommand to do this. - Otherwise, review the
NATIVEMEMINFOsection of the javacore.txt file and focus on the following lines (or run the!nativememinfocommand injdmpviewon a core dump):3MEMUSER | +--Classes: 1,223,940,328 bytes / 162364 allocations- A subset of these data structures are below the bar. Use
get_memory_use.pland observeClass Memoryin 256MB segments less than0x10. For example:
If this usage is excessive, check for class or classloader leaks or excessive class usage. UseVirtual Address Segments (split 0x10000000/256.00 MB) == 0x2 = Class Memory (RAM) (182.71 MB), Segment Total (191588400) 0x3 = Class Memory (RAM) (5.51 MB), Segment Total (5774504) 0x4 = Class Memory (RAM) (64.07 MB), Segment Total (67182008) 0x5 = Class Memory (RAM) (8.02 KB), Segment Total (8208)-Dsun.reflect.inflationThreshold=0if there are a large number ofsun/reflect/DelegatingClassLoaderinstances.- A subset of these data structures are below the bar. Use
4MEMUSER | | +--Java Stack: 17,656,576 bytes / 345 allocations- These are thread stacks below the bar (the "Native Stacks" line are
allocated by the operating system and are usually high in the address
space). Important note: these are allocated from the J9 segments even
though they are not printed in the 1STSEGMENT lines. If there are many,
try to reduce the number of threads or check for thread leaks, and check
for any excessively large stack size (
-Xss).
- These are thread stacks below the bar (the "Native Stacks" line are
allocated by the operating system and are usually high in the address
space). Important note: these are allocated from the J9 segments even
though they are not printed in the 1STSEGMENT lines. If there are many,
try to reduce the number of threads or check for thread leaks, and check
for any excessively large stack size (
4MEMUSER | | +--Unused <32bit allocation regions: 73,580,197 bytes / 19 allocations- This is free segment memory below the bar although some of it may be fragmented.
5MEMUSER | | | +--Direct Byte Buffers: 7,945,600 bytes / 562 allocations- On non-z/OS platforms, these might compete with CTM or drive
fragmentation. If there are many, try to reduce them, search for leaks,
or drive more frequent cleanup of their PhantomReferences with GC tuning
(or
-XX:MaxDirectMemorySize). On WAS traditional, try channelwritetype=sync.
- On non-z/OS platforms, these might compete with CTM or drive
fragmentation. If there are many, try to reduce them, search for leaks,
or drive more frequent cleanup of their PhantomReferences with GC tuning
(or
- Run
get_memory_use.pland observe any other usage in 256MB segments less than0x10.
- If using a type 2 JDBC driver which uses native memory that may compete with CTM (and must compete with CTM with the type 2 DB2 on z/OS driver), consider switching to the type 4 driver.
- On Windows, consider setting
HKLM\System\CurrentControlSet\Control\Session Manager\Memory Management\AllocationPreference=0x100000 (REG_DWORD)to avoid any tendency of allocating non-CTM native memory below the bar. - Check that the operating system has sufficient free physical memory at the time of the NOOM.
- If the NOOM might be related to competition from non-CTM source,
consider increasing
-Xmcrs. - Set
-Dcom.ibm.dbgmalloc=trueand review 4MEMUSER Zip, 4MEMUSER Wrappers, and 5MEMUSER Malloc usage in NATIVEMEMINFO which may compete with CTM or drive fragmentation. If there are many, try to reduce them or search for leaks. - If native memory usage below the bar cannot be accounted for using
the above items, then review any other native memory users by reviewing
-agentpath,-agentlib, and-Xrunlibraries, any other loaded shared objects as seen in native operating system core debuggers, or run a native leak tracker such as eBPF, LinuxNativeTracker, etc. - If a temporary workaround is needed, test using
-Xnocompressedrefsalthough this may have a performance impact of up to 10-20% and increase Java heap usage significantly.
For background, see J9 Compressed References.
J9 Java Dump Recipe
A J9 Java
Dump is a text file that includes a thread dump and other useful
information about a running Java process. A Java Dump is often called a
javacore because its name defaults to
javacore*.txt although javacores should not be confused
with operating system process core dumps (OS cores) which are large and
heavy.
In general, javacores have a low overhead and pause the proceess for less than a few hundred milliseconds, although there are pathological exceptions of ~20 second pauses that are potential risks to be aware of. In general, javacores are less than a few MB each although they can reach dozens of MBs if there are a lot of loaded classes.
- On non-Windows operating systems, unless default
-Xdump...events=usersettings have been changed, replace$PIDwith the process ID in the following (despite the signal name "QUIT", by default, unless-Xrsis specified, the JVM gracefully handles this signal and continues without quitting):kill -QUIT $PID - For Semeru Java, replace
$JAVA_HOMEwith the path to Java, and$PIDwith the process ID in (if running under a Windows Service, use a technique to run the command as the SYSTEM user):$JAVA_HOME/bin/jcmd $PID Dump.java - For IBM Java >= 8.0.6.25 that is a JDK, replace
$JAVA_HOMEwith the path to Java, and$PIDwith the process ID in (if running under a Windows Service, use a technique to run the command as the SYSTEM user):java -Xbootclasspath/a:$JAVA_HOME/lib/tools.jar openj9.tools.attach.diagnostics.tools.Jcmd $PID Dump.java - With WebSphere Application Server traditional:
- Administrative Console } Troubleshooting } Java dumps and cores } Check the server(s) } Java core
$WEBSPHERE/bin/wsadmin -lang jythonand the commandAdminControl.invoke(AdminControl.completeObjectName("type=JVM,process=$SERVER,*"), "dumpThreads")- On z/OS,
MODIFY $JOB,JAVACORE - On IBM i, use
WRKJVMJOB - Install the
twasdiagapplication and execute the/IBMJavaDumpservlet.
- With WebSphere Liberty:
- Using the
serverutility:$LIBERTY/bin/server javadump $SERVER - Install the
libertydiagapplication and execute the/servlet/ThreadDumpservlet.
- Using the
- For IBM Java >= 8.0.7.20 and IBM Semeru Runtimes >= 11.0.17.0
on non-Windows platforms, restart with:
Then request the javacore with:-Xdump:java:events=user2,request=exclusive+prepwalkkill -USR2 $PID - For IBM Java, use Java
Surgery:
java -jar surgery.jar -pid $PID -command JavaDump - Use code
within the JVM that executes
com.ibm.jvm.Dump.triggerDump("java:request=exclusive+prepwalk")using reflection - The IBM Java
javaDump Agent can take a javacore on various events. For example, the following will create a javacore when theExample.badmethod throws aNullPointerException:-Xdump:java:events=throw,range=1..1,request=exclusive+prepwalk,filter=java/lang/NullPointerException#com/ibm/example/Example.bad - The trace
engine may be used to request a javacore on method entry and/or
exit. The following example JVM argument produces a javacore when the
Example.trigger()method is called:-Xtrace:maximal=mt,trigger=method{com/ibm/example/Example.trigger,javadump,,,1}
J9 System Dump Recipe
The following are instructions to gather a reliable operating system (OS) process core dump of an OpenJ9 JVM (IBM Java, IBM Semeru Runtimes, etc.). Although the instructions are long and complicated, OS core dumps are one of those most powerful diagnostics and they are worth the time to understand and properly gather.
Note that an OS process core dump is referred to as a "system dump" in J9 documentation but this is the same as an operating system core dump of a single process (despite "system" being in the name). These names may be used interchangeably.
Also, an OS core dump should not be confused with a javacore despite both having "core" in the name. In contrast to an OS core dump, a javacore is lightweight and small whereas an OS core dump is heavyweight and big and they serve different purposes.
Always gather a system dump using a mechanism that uses the JVM
system dump API with request=exclusive+prepwalk as shown
below. Gathering a system dump using operating system utilities is not
reliable (e.g. gcore, gencore, Windows Task
Manager, z/OS manual console dump, etc.). For example, if you get
unlucky and happen to grab it during a garbage collection, it will
likely be essentially useless for Java heap analysis. Even if it's not
taken during such a critical event, some thread stacks may not be
walkable.
Before gathering an operating sytem core dump, review the security,
disk and
performance
risks and ensure that the process and operating system are configured
for it (e.g. Unix core and file
ulimits, Linux kernel.core_pattern
truncation settings, etc.).
After gathering a core dump, if it will be used for Java heap
analysis with the Eclipse
Memory Analyzer Tool, then no post-processing is needed (just ensure
it's extracted and ends with the .dmp extension). If it
will be used for native memory or crash analysis, run
$JAVA/bin/jextract on it for IBM Java and
$JAVA/bin/jpackcore for Semeru Java.
Examples requesting a system dump using the JVM system dump API with
request=exclusive+prepwalk:
- For Semeru Java, replace
$JAVA_HOMEwith the path to Java, and$PIDwith the process ID in (if running under a Windows Service, use a technique to run the command as the SYSTEM user):$JAVA_HOME/bin/jcmd $PID Dump.system - For IBM Java >= 8.0.6.25 that is a JDK, replace
$JAVA_HOMEtwice with the path to Java, and$PIDwith the process ID in (if running under a Windows Service, use a technique to run the command as the SYSTEM user):$JAVA_HOME/bin/java -Xbootclasspath/a:$JAVA_HOME/lib/tools.jar openj9.tools.attach.diagnostics.tools.Jcmd $PID Dump.system - Starting with WebSphere Application Server traditional 8.5.5.17 and
9.0.5.2:
- Administrative Console } Troubleshooting } Java dumps and cores } Check the server(s) } System dump
$WEBSPHERE/bin/wsadmin -lang jythonand the commandAdminControl.invoke(AdminControl.completeObjectName("type=JVM,process=$SERVER,*"), "generateSystemDump")- On z/OS,
MODIFY $JOB,JAVATDUMP - On IBM i,
WRKJVMJOBwith Type=SYSTEM
- Starting with WebSphere Liberty 20.0.0.2:
$LIBERTY/bin/server javadump $SERVER --include=system - For IBM Java >= 8.0.7.20 and Semeru >= 11.0.17.0 on
non-Windows platforms, restart with:
Then request the system dump with:-Xdump:system:events=user2,request=exclusive+prepwalkkill -USR2 $PID - For IBM Java, use Java
Surgery:
java -jar surgery.jar -pid $PID -command SystemDump - Use code within the JVM that executes
com.ibm.jvm.Dump.triggerDump("system:request=exclusive+prepwalk")using reflection - Use
-Xdump:java+system:events=user,request=exclusive+prepwalkto take one onkill -3/Ctrl+Break. Note that we do not recommend running with this option permanently because the default handler only produces javacores which are often used for performance investigations whereas a system dump causes its own significant performance overhead. - Use
-Xdump:system:defaults:request=exclusive+prepwalkto change the system dump default to requestexclusive+prepwalkand then use some mechanism that requests a system dump within the JVM. Note that we do not recommend running with this option permanently because then investigating JVM crashes may be problematic. - Use
-Xdump:tool:events=user,request=exclusive+prepwalk,exec="gcore %pid"to execute a program (e.g.gcore) that requests the core dump onkill -3/Ctrl+Break. Note that we do not recommend running with this option permanently because the default handler only produces javacores which are often used for performance investigations whereas a system dump causes its own significant performance overhead. - The IBM Java
systemDump Agent can take a system dump on various events. For example, the following will create a system dump when theExample.badmethod throws aNullPointerException:-Xdump:system:events=throw,range=1..1,request=exclusive+prepwalk,filter=java/lang/NullPointerException#com/ibm/example/Example.bad - The trace
engine may be used to request a system dump on method entry and/or
exit. The following example JVM argument produces a system dump when the
Example.trigger()method is called:-Xtrace:maximal=mt,trigger=method{com/ibm/example/Example.trigger,sysdump,,,1}
Javacore Overhead
By default, when a Java
Dump (javacore*.txt) is requested under normal
conditions (unless something else already has
exclusive access), the Java Dump waits for exclusive
access meaning that all threads have paused themselves. Therefore, the
javacore pauses the JVM for this time plus the time to produce the
javacore itself and thus has a direct impact on performance. In general,
the duration of this pause is less than a few hundred milliseconds.
Starting with OpenJ9 0.36.0 on non-Windows operating systems (IBM Java 8.0.8.0, IBM Semeru Runtimes 11.0.18.0 & 17.0.6.0) and OpenJ9 0.40.0 on Windows (IBM Java 8.0.8.10, IBM Semeru Runtimes 11.0.20.0 & 17.0.8.0), a line at the end of the javacore shows how long the JVM was paused. For example:
1TIDMPDURATION Approximate time to produce this dump: X msThe overhead of javacores may be gauged in a performance test
environment by adding up these 1TIDMPDURATION values and
dividing by the sum of intervals between javacores.
There have been rare observed cases on Linux of javacores causing 20
second pauses with high system/kernel CPU time during the first 10
seconds. As observed with Linux perf On-CPU
sampling with wall-clock times, the Signal Reporter
thread consumes most of that CPU (with stack frames in various places
such as _raw_spin_unlock_irqrestore,
system_call_after_swapgs, __sigqueue,
do_send_sig_info, __sched_yield, and
__GI___getuid). There is a timeout
of 20 seconds waiting for threads to quiesce and observed cases of
unreliable
Linux sigqueue. If you observe this behavior, please
open a support case to help us understand this issue.
There have been similar observed cases of javacores taking about 20 seconds to produce although with low system/kernel CPU time. Again, if you observe this behavior, please open a support case to help us understand this issue.
A workaround for these long pauses may be to remove the request=preempt
option from the javacore agents which will avoid trying to gather native
stack traces where this signal processing is done:
-Xdump:java:defaults:request=exclusiveSizing OpenJ9 Native Memory
If running in a memory-constrained environment, review the following diagnostic and sizing guidance for OpenJ9 native memory.
It's not uncommon for a heavy application to use 500MB or more of native memory outside the Java heap. In such cases, this can be reduced as discussed below but that may come at a performance cost.
Diagnostics
- On Linux, consider limiting
arenas with the environment variable
MALLOC_ARENA_MAX=1and restart. - If using IBM Java 8 and there's an opportunity to restart the JVM,
restart with the following option for additional "Standard Class
Libraries" native memory accounting in javacores (minimal performance
overhead):
-Dcom.ibm.dbgmalloc=true - Gather operating system statistics on resident process memory usage.
A single snapshot at peak workload is an okay start but periodic
snapshots over time using a
script provide a better picture.
- Linux examples:
- With
/proc:$ PID=... $ grep VmRSS /proc/$PID/status VmRSS: 201936 kB - With
ps(in KB):$ PID=... $ ps -p $PID -o rss RSS 201936 - With
topand review theREScolumn in KB (change-dfor the interval been outputs in seconds and-nfor the number of intervals):$ PID=... $ top -b -d 1 -n 1 -p $PID top - 19:10:46 up 5:43, 0 users, load average: 0.01, 0.05, 0.02 Tasks: 1 total, 0 running, 1 sleeping, 0 stopped, 0 zombie %Cpu(s): 0.0 us, 0.0 sy, 0.0 ni,100.0 id, 0.0 wa, 0.0 hi, 0.0 si, 0.0 st MiB Mem : 15950.9 total, 13429.6 free, 473.5 used, 2047.8 buff/cache MiB Swap: 0.0 total, 0.0 free, 0.0 used. 15239.3 avail Mem PID USER PR NI VIRT RES SHR S %CPU %MEM TIME+ COMMAND 1 default 20 0 7832760 201936 55304 S 6.2 1.2 0:06.86 java
- With
- Linux examples:
- Gather javacores of the process. A single javacore at peak workload
is an okay start but periodic javacores over time using a script provide a
better picture.
- Linux examples:
- Use
kill -QUIT(assuming default settings that only produce a javacore):$ PID=... $ kill -QUIT $PID
- Use
- Linux examples:
- Gather detailed per-process memory mappings. A single snapshot at
peak workload is an okay start but periodic snapshots over time using a script provide a
better picture.
- Linux example:
$ PID=...
$ cat /proc/$PID/smaps
- Linux example:
- If possible, ensure verbose garbage collection is enabled; for
example:
-Xverbosegclog:verbosegc.%seq.log,20,50000
Review and Sizing
- Review the
NATIVEMEMINFOsection in the javacores. Note that these are virtual memory allocations and not necessarily resident. Review all of them with a particular focus on:Java Heap: The native allocation(s) for the Java heap itself (-Xmx/-XX:MaxRAMPercentage). Even if-Xms(or-XX:InitialRAMPercentage) is less than-Xmx/-XX:MaxRAMPercentageand heap usage is less than-Xmx/-XX:MaxRAMPercentage, you should always assume the entire-Xmx/-XX:MaxRAMPercentagenative memory will be touched (and thus resident) at some point because even if application workload never reaches that amount of live Java heap usage, most modern garbage collectors are generational which almost always means trash will accumulate in the tenured region until a full GC, and thus most or all of the Java heap is likely to become resident given enough time.Classes: This is the native backing of classes loaded in the Java heap. If this is excessively large, gather a system dump of the process and check for classloader memory leaks with the Eclipse Memory Analyzer Tool.Threads: Each thread has two stacks both of which live in native memory. In some cases, very large stacks and/or a customized maximum stack size (-Xss) can inflate this number, but more often a large value here simply reflects a large number of threads that can be reduced or may be due to a thread leak. Review threads and thread stacks in the javacore and consider reducing thread pool maximums. To investigate a thread leak, gather a system dump of the process and review with the Eclipse Memory Analyzer Tool).JIT: Some growth in this is expected over time but should level out at the maximum specified by-Xcodecachetotal,-Xjit:dataTotaland-Xjit:scratchSpaceLimit(see below). Note that defaults in recent versions are relatively large (upwards of 550MB or more at peak, primarily driven by the code cache and spikes in JIT compilation).Direct Byte Buffers: These are native memory allocations driven by Java code and may have different drivers. To investigate what's holding on to DirectByteBuffers, gather a system dump of the process, review with the Eclipse Memory Analyzer Tool) and run the query, IBM Extensions } Java SE Runtime } DirectByteBuffers.Unused <32bit allocation regions: Available space within the-Xmcrsvalue (for compressed references)
- Review the
1STSEGMENTlines in the javacores usingget_memory_use.plto break down some the resident amounts of some of the above virtual amounts. - Review verbose garbage collection for a lot of phantom reference
processing which may be a symptom of spikes in DirectByteBuffers. Even
if Direct Byte Buffer usage in
NATIVEMEMINFOabove is relatively low, there may have been a spike in DirectByteBuffer memory usage which, in general, will only be returned to libc free lists rather than going back to the operating system. - Check the javacore and per-process memory mappings for non-standard
native libraries (e.g. loaded with
-agentpath,-agentlib, and-Xrun) and consider testing without each library. - Consider tuning the following options:
- Maximum Java heap size:
-Xmx_mor-XX:MaxRAMPercentage=_ - Maximum size of threads and thread pools (e.g.
<executor coreThreads="_" />for Liberty or maximum thread pool sizes for WebSphere Application Server traditional) - Maximum JIT code cache:
-XX:codecachetotalMaxRAMPercentage=Xor-Xcodecachetotal_m(default 256MB) - Maximum JIT data size (in KB):
-Xjit:dataTotal=_ - JIT scratch space limit (in KB):
-Xjit:scratchSpaceLimit=_(default 256MB) - Maximum shared class cache size (though it must be destroyed
first to reduce an existing one):
-Xscmx_m - Number of garbage collection helper threads:
-Xgcthreads_ - Number of JIT compilation threads:
-XcompilationThreads_ - Maximum stack size:
-Xss_k
- Maximum Java heap size:
- Consider using a JITServer (a.k.a. IBM Semeru Cloud Compiler) to move most JIT compilation memory demands to another process.
Detailed Diagnostics
- If you suspect a leak, monitor unfreed native memory allocations:
- Linux >= 4.1: eBPF
memleak.py - IBM
Java 8 LinuxNativeTracker
- For IBM Semeru Runtimes, open a support case to ask for a custom build of LinuxNativeTracker.
- Linux >= 4.1: eBPF
- If unaccounted memory remains, gather all of the same information
above as well as a system dump of
the process and cross-reference per-process memory maps to known JVM
virtual memory allocations to find unaccounted for memory.
- Note that
NATIVEMEMINFOmay be dumped from a system dump using the!nativememinfocommand injdmpview. - Fragmentation in C libraries is also possible. Use a native debugger script (e.g. for Linux glibc) to walk the in-use and free lists and search for holes in memory.
- Note that
Troubleshooting HotSpot Recipes
HotSpot Native Memory Usage Recipe
HotSpot Native Memory Tracking has an overhead of ~5-10%.
- Ideally, restart with verbosegc (e.g. WebSphere Liberty)
- Restart with
-XX:NativeMemoryTracking=detail - Let the JVM warm-up for some time (ideally, at least some number of hours and taking significant workload). This is because it's normal for significant memory usage increase as the JIT code cache warms up.
- Register a native memory baseline (replace
$PIDwith the target process ID):jcmd $PID VM.native_memory baseline - If the overhead is acceptable, gather an HPROF heapdump (replace
$PIDwith the target process ID):jcmd $PID GC.heap_dump dump1_$(hostname)_$(date +%Y%m%d_%H%M%S).hprof - Let the JVM increase native memory significantly (at least a few hundred MB and ideally 1GB or more).
- Register a native memory baseline (replace
$PIDwith the target process ID):jcmd $PID VM.native_memory detail.diff > diag_nmt2_$(hostname)_$(date +%Y%m%d_%H%M%S).txt - If the overhead is acceptable, gather an HPROF heapdump (replace
$PIDwith the target process ID):jcmd $PID GC.heap_dump dump2_$(hostname)_$(date +%Y%m%d_%H%M%S).hprof - Restart the JVM and remove
-XX:NativeMemoryTrackingor stop the native tracker at runtime with (replace$PIDwith the target process ID):jcmd $PID VM.native_memory shutdown - Upload
diag_nmt*.txt, both*.hproffiles if taken, and any other JVM logs (e.g. stdout/stderr logs, verbosegc if captured, application logs, etc.).
Notes:
- Overhead may be reduced (with less effective diagnostics) by
switching
detailtosummaryin steps 1 and 7. - There are orthogonal, OS-specific tools that can augment or replace the above steps (e.g. eBPF on Linux, etc.).
Troubleshooting Memory Leaks
- Analyze verbosegc in GCMV.
If there is a positive slope in the plot "Used heap (after global
collection)", then there may be a leak.
- The default plot of "Used heap (after collection)" for generational collectors may sometimes look like a leak if there hasn't been a global collection recently, thus why it's best to only look at heap usage after global collections.
- There are cases where a positive slope after global collections is not a leak such as SoftReference caches
- Consider the magnitude of the heap growth relative to the heap size. Small relative growths may be reasonable. Caches may need to be populated up to some limit before they stabilize.
- If there's evidence of a leak, take an OS core dump (IBM Java) or
HPROF dump (HotSpot Java) and load into the Eclipse Memory Analyzer
Tool. Things to consider:
- Review the largest objects (e.g. a leak in some cache)
- Run the leak suspect report
- Run the IBM Extensions for Memory Analyzer Classloader Leak Detection under WAS } ClassLoaders
- Perform a general review of the dump (class histogram, top consumers, etc.)
- If a single core dump is inconclusive, take two or more OS core dumps (IBM Java) or HPROF dumps (HotSpot Java) from the same process and compare them in MAT to find the growth(s). The more time between dumps the better to make finding the growth(s) easier. Ideally, use a monitoring tool to track heap usage after full GC and take the second dump after a relative growth of > 10%.
- The most common leaks are:
- Large objects (byte arrays, etc.)
- Java collections such as Maps and Lists, often a bug removing items or a cache. One technique the tool uses in the leak suspect report, but which can also be run manually under Leak Identification > Big Drops in Dominator Tree, is to find a large difference between the retained heap of an object and its largest retained reference. For example, imagine a HashMap that retains 1GB and the leak is due to a bug removing objects so objects continue to be added to the HashMap. It is common in such a case for every individual object to be small.
- Proactive:
- Use a monitoring tool to track heap usage after full GC and alert if heap usage is above 70% and gather dumps.
- If using WAS traditional, Memory Leak and Excessive Memory Usage Health Condition
- If using Java ODR, Configure Memory Overload Protection and put a server into maintenance mode to investigate
- If using WAS traditional, Application ClassLoader Leak Detection
Troubleshooting WAS traditional Recipes
- Periodically monitor WAS logs for warning and error messages.
- Set the maximum size of JVM logs to 256MB and maximum number of historical files to 4.
- Set the maximum size of diagnostic trace to 256MB and maximum number of historical files to 4.
- Change the hung thread
detection threshold and interval to something smaller that is
reasonable for the application, and enable a limited number of thread
dumps when these events occur. For example:
com.ibm.websphere.threadmonitor.threshold=30com.ibm.websphere.threadmonitor.interval=1com.ibm.websphere.threadmonitor.dump.java=15com.ibm.websphere.threadmonitor.dump.java.track=3
- Enable periodic thread
pool statistics logging with the diagnostic trace
*=info:Runtime.ThreadMonitorHeartbeat=detail - Monitor for increases in the
Countcolumn in the FFDC summary file (${SERVER}_exception.log) for each server, because only the first FFDC will print a warning to the logs. - Review relevant timeout values such as JDBC, HTTP, etc.
- A well-tuned WAS is a better-behaving WAS, so also review the WAS tradtional tuning recipes.
- Review the Troubleshooting Operating System Recipes and Troubleshooting Java Recipes.
- Review all warnings and errors in
System*.log(or usinglogViewerif HPEL is enabled) before and during the problem. A regular expression search is" [W|E] ". One common type of warning is an FFDC warning which points to a matching file in the FFDC logs directory.- If you're on Linux or use cygwin, use the following command:
find . -name "*System*" -exec grep " [W|E] " {} \\; | grep -v -e known_error
- If you're on Linux or use cygwin, use the following command:
- Review all
JVMmessages innative_stderr.logbefore and during the problem. This may include things such as OutOfMemoryErrors. The filename of such artifacts includes a timestamp of the formYYYYMMDD. - Review any strange messages in
native_stdout.logbefore and during the problem. - If verbose garbage collection is enabled, review verbosegc in
native_stderr.log(IBM Java),native_stdout.log(HotSpot Java), or anyverbosegc.logfiles (if using-Xverbosegclogor-Xloggc) in the IBM Garbage Collection and Memory Visualizer Tool and ensure that the proportion of time in garbage collection for a relevant period before and during the problem is less than 10% - Review any
javacore*.txtfiles in the IBM Thread and Monitor Dump Analyzer tool. Review the causes of the thread dump (e.g. user-generated, OutOfMemoryError, etc.) and review threads with large stacks and any monitor contention. - Review any
heapdump*.phdandcore*.dmpfiles in the Eclipse Memory Analyzer Tool
Troubleshooting WAS traditional on z/OS
- Increase the value of
server_region_stalled_thread_threshold_percentso that a servant is only abended when a large percentage of threads are taking a long time. Philosophies on this differ, but consider a value of 10. - Set
control_region_timeout_delayto give some time for work to finish before the servant is abended; for example, 5. - Set
control_region_timeout_dump_actionto gather useful diagnostics when a servant is abended; for example, IEATDUMP - Reduce the
control_region_$PROTOCOL_queue_timeout_percentvalues so that requests time out earlier if they queue for a long time; for example, 10. - If necessary, apply granular timeouts to particular requests
- Run
listTimeoutsV85.pyto review and tune timeouts.
Additional Recipes
- WAS traditional Dynamic Diagnostic Trace Recipe
- WAS traditional Diagnostic Trace from Startup Recipe
- WAS traditional Hung Thread Detection Recipe
- WAS traditional HTTP Access Log Recipe
- WAS traditional Dynamic verbosegc Recipe
- WAS traditional verbosegc from Startup Recipe
- WAS traditional Common Diagnostic Files Recipe
- WAS traditional collector Recipe
- WAS traditional runtime diagnostic trace script
WAS traditional Dynamic Diagnostic Trace Recipe
- WAS Administrative Console } Troubleshooting } Logs and Trace }
$SERVER} Diagnostic Trace - Click the
Runtimetab - Set
Maximum File SizeandMaximum Number of Historical Filesas large as the disk allows (multiply the two for maximum usage). At leat 500MB is desirable.- If these values were changed, click
Apply
- If these values were changed, click
- Click
Change log detail levels - Replace
*=infowith the desired diagnostic trace (or set it to*=infoto disable trace) - Click
OK - Reproduce the problem
- Upload the following files:
- WAS/profiles/PROFILE/logs/trace*.log
- WAS/profiles/PROFILE/logs/System*.log
- WAS/profiles/PROFILE/logs/native*.log
- WAS/profiles/PROFILE/ffdc/*
WAS traditional Diagnostic Trace from Startup Recipe
- WAS Administrative Console } Troubleshooting } Logs and Trace }
$SERVER} Diagnostic Trace - Set
Maximum File SizeandMaximum Number of Historical Filesas large as the disk allows (multiply the two for maximum usage). At leat 500MB is desirable.- If these values were changed, click
Apply
- If these values were changed, click
- Click
Change log detail levels - Replace
*=infowith the desired diagnostic trace (or set it to*=infoto disable trace) - Click
OK - Save configuration changes
- Synchronize nodes
- Restart the JVM
- Reproduce the problem
- Upload the following files:
- WAS/profiles/PROFILE/logs/trace*.log
- WAS/profiles/PROFILE/logs/System*.log
- WAS/profiles/PROFILE/logs/native*.log
- WAS/profiles/PROFILE/ffdc/*
WAS traditional Hung Thread Detection Recipe
- Decide on your hung thread detection interval and threshold. In general, the interval is performant even at 1 second. In general, the threshold should be set to your maximum expected response time plus 20%.
- WAS Administrative Console } Servers } Server Types } Websphere
application servers }
$SERVER} Server Infrastructure } Administration } Custom Properties - Click
New...- Name =
com.ibm.websphere.threadmonitor.interval - Value =
$SECONDS_INTERVAL - Click
OK
- Name =
- Click
New...- Name =
com.ibm.websphere.threadmonitor.threshold - Value =
$SECONDS_THRESHOLD - Click
OK
- Name =
- Save configuration
- Synchronize nodes
- Restart
- Monitor
SystemOut*logforWSVR0605Wmessages and review the stack to understand what the threads were doing at the time the threshold was exceeded. Ensure you review garbage collection and operating system statistics as well.
Notes:
- If many requests exceed the threshold at the same time, this can
introduce its own overhead in acquiring and printing the stack traces.
By default,
com.ibm.websphere.threadmonitor.false.alarm.thresholdis the threshold for an exponential backoff that occurs every 100 breaches, but if there is a concern about such a potential overhead, then reducecom.ibm.websphere.threadmonitor.false.alarm.threshold.
WAS traditional HTTP Access Log Recipe
In general, the WAS traditional HTTP access log has a low overhead of less than 1-2%.
There was a regression in 8.5.5.24, 9.0.5.16, and 9.0.5.17 that
caused timestamp display issues when using accessLogFormat
and it was fixed in APAR PH56229 and subsequent fixpacks.
- WAS Administrative Console } Servers } Server Types } Websphere
application servers }
$SERVER} Web Container Settings } Web container transport chains - Click on each entry that is handling the traffic of interest (most
commonly,
WCInboundand/orWCInboundSecure) and perform the following steps.- HTTP inbound channel
- Check "Enable logging"
- Expand "NCSA Access logging"
- Check "Use chain-specific logging"
- Access log file path =
${SERVER_LOG_ROOT}/http_access.log - Access log maximum size = 500
- Maximum Number of historical files = 2
- NCSA access log format = Common
- Expand "Error logging"
- Check "Use chain-specific logging"
- Error log file path =
${SERVER_LOG_ROOT}/http_error.log - Error log maximum size = 500
- Maximum Number of historical files = 2
- Click Apply
- Click "Custom properties"
- Click New...
- Name = accessLogFormat
- Value =
- WAS 9 or WAS >= 8.5.5.6:
%h %u %t "%r" %s %b %D %{R}W - WAS < 8.5.5.6:
%h %u %t "%r" %s %b %D
- WAS 9 or WAS >= 8.5.5.6:
- Click OK
- Save configuration changes
- Synchronize nodes
- Restart the JVM
- Reproduce the problem
- Upload the following files:
$WAS/profiles/$PROFILE/logs/http*.log$WAS/profiles/$PROFILE/logs/System*.log$WAS/profiles/$PROFILE/logs/native*.log$WAS/profiles/$PROFILE/ffdc/*
For background, see WAS traditional HTTP Access Log.
WAS traditional Dynamic verbosegc Recipe
- WAS Administrative Console } Servers } Server Types } Websphere
application servers }
$SERVER} Server Infrastructure } Java and Process Management } Process definition } Java Virtual Machine - Click the
Runtimetab - Check
Verbose garbage collection - Click
OK - Reproduce the problem
- Upload the following files:
$WAS/profiles/$PROFILE/logs/System*.log$WAS/profiles/$PROFILE/logs/native*.log$WAS/profiles/$PROFILE/ffdc/*
WAS traditional verbosegc from Startup Recipe
- WAS Administrative Console } Servers } Server Types } Websphere
application servers }
$SERVER} Server Infrastructure } Java and Process Management } Process definition } Java Virtual Machine - Add a space to the end of
Generic JVM argumentsand append the following:-Xverbosegclog:${SERVER_LOG_ROOT}/verbosegc.%seq.log,20,50000 - Click
OK - Save configuration changes
- Synchronize nodes
- Restart the JVM
- Reproduce the problem
- Upload the following files:
$WAS/profiles/$PROFILE/logs/$SERVER/verbosegc*.log$WAS/profiles/$PROFILE/logs/$SERVER/System*.log$WAS/profiles/$PROFILE/logs/$SERVER/native*.log$WAS/profiles/$PROFILE/logs/ffdc/*
WAS traditional Common Diagnostic Files Recipe
- Upload the following files:
$WAS/profiles/$PROFILE/logs/$SERVER/System*.log$WAS/profiles/$PROFILE/logs/$SERVER/native*.log$WAS/profiles/$PROFILE/logs/$SERVER/verbosegc*.log$WAS/profiles/$PROFILE/logs/$SERVER/trace*.log$WAS/profiles/$PROFILE/logs/$SERVER/http*.log$WAS/profiles/$PROFILE/logs/ffdc/*$WAS/profiles/$PROFILE/logs/tpv/*$WAS/profiles/$PROFILE/javacore*txt$WAS/profiles/$PROFILE/heapdump*phd$WAS/profiles/$PROFILE/core*dmp
WAS traditional collector Recipe
- On the deployment manager node, remote in and ensure you're the user that runs WAS or root.
- Change directory to somewhere outside the WAS directory that has a
few hundred MB free. For example:
cd /tmp/ - Use an environment variable to increase the heap size of the
collector. For example:
export IBM_JAVA_OPTIONS="-Xmx1g" - Execute
collector.shby specifying the full path to it. For example, replace the path to WebSphere and$PROFILEwith the deployment manager profile name:/opt/IBM/WebSphere/AppServer/profiles/$PROFILE/bin/collector.sh > diag_collector.txt 2>&1 - Once it completes, quickly review the end of the
diag_collector.txtfile for any obvious errors running the collector. A healthy collection ends withReturn code: 0. - Upload
*WASenv.jaranddiag_collector.txt
For details, see the collector.sh documentation.
WAS traditional runtime diagnostic trace script
- Download diagnostictrace.py to your deployment manager
- Review the runtime
Maximum File SizeandMaximum Number of Historical Filessettings for the target JVMs to ensure sufficient trace will be captured. - Execute
diagnostictrace.pyto set runtime diagnostic trace using one of the following options. Replace*=infowith the desired trace string:- Option 1: Set diagnostic trace on all alive and reachable JVMs
excluding dmgr and nodeagents:
bin/wsadmin.sh -lang jython -f diagnostictrace.py --action set --trace "*=info" --serverType APPLICATION_SERVER | tee -a diag_wastrace.txt - Option 2: Set diagnostic trace on all alive and reachable JVMs
including dmgr and nodeagents:
bin/wsadmin.sh -lang jython -f diagnostictrace.py --action set --trace "*=info" | tee -a diag_wastrace.txt
- Option 1: Set diagnostic trace on all alive and reachable JVMs
excluding dmgr and nodeagents:
- Reproduce the problem.
- Disable runtime tracing by using the same step above to reset the
runtime trace to
*=info. - Upload the following:
diag_wastrace.txt- For each JVM:
$WAS/profiles/$PROFILE/logs/$SERVER/System*.log$WAS/profiles/$PROFILE/logs/$SERVER/native*.log$WAS/profiles/$PROFILE/logs/$SERVER/verbosegc*.log$WAS/profiles/$PROFILE/logs/$SERVER/trace*.log$WAS/profiles/$PROFILE/logs/$SERVER/http*.log$WAS/profiles/$PROFILE/logs/ffdc/*$WAS/profiles/$PROFILE/logs/tpv/*$WAS/profiles/$PROFILE/javacore*txt$WAS/profiles/$PROFILE/heapdump*phd$WAS/profiles/$PROFILE/core*dmp
Troubleshooting WebSphere Liberty Recipes
- Review all warnings and errors in
messages.log(or usingbinaryLogif binary logging is enabled) before and during the problem. A regular expression search is" [W|E] ". One common type of warning is an FFDC warning which points to a matching file in the FFDC logs directory.- If you're on Linux or use cygwin, use the following command:
find . -name "*messages*" -exec grep " [W|E] " {} \; | grep -v -e known_error
- If you're on Linux or use cygwin, use the following command:
- Review all
JVMmessages inconsole.logbefore and during the problem. This may include things such as OutOfMemoryErrors. The filename of such artifacts includes a timestamp of the formYYYYMMDD. Review any other strange messages inconsole.logbefore and during the problem. - If verbose garbage collection is enabled, review verbosegc in
console.log, or anyverbosegc.logfiles (if using-Xverbosegclogor-Xloggc) in the IBM Garbage Collection and Memory Visualizer Tool and ensure that the proportion of time in garbage collection for a relevant period before and during the problem is less than 10%. - Review any
javacore*.txtfiles in the IBM Thread and Monitor Dump Analyzer tool. Review the causes of the thread dump (e.g. user-generated, OutOfMemoryError, etc.) and review threads with large stacks and any monitor contention. - Review any
heapdump*.phdandcore*.dmpfiles in the Eclipse Memory Analyzer Tool.
Additional Recipes
- WebSphere Liberty verbosegc from Startup Recipe
- WebSphere Liberty HTTP Access Log Recipe
- WebSphere Liberty requestTiming Recipe
WebSphere Liberty HTTP Access Log Recipe
In general, the WebSphere Liberty HTTP access log has a low overhead of less than 1-2%.
- Edit the
httpEndpointelement in server.xml (or other included XML configuration file that has this element) to add anaccessLoggingelement. For example:<httpEndpoint id="defaultHttpEndpoint" host="*" httpPort="9080" httpsPort="9443"> <accessLogging filepath="${server.output.dir}/logs/http_access.log" maxFileSize="100" maxFiles="4" logFormat="%h %u %t "%r" %s %b %D %{R}W %{remote}p %p" /> </httpEndpoint>- Note: It may be that your
httpEndpointelement is self-closing (i.e.<httpEndpoint ... />) in which case you have to remove the/and add</httpEndpoint>(see above).
- Note: It may be that your
- A restart is not required and the change will apply as soon as the file is saved.
- Reproduce the problem
- Upload the following files:
logs/http_access*loglogs/messages*loglogs/traces*loglogs/ffdc/*
For background, see WebSphere Liberty HTTP Access Log.
WebSphere Liberty verbosegc from Startup Recipe
Consider enabling Java verbose garbage collection on all JVMs, including production. This will help with performance analysis, OutOfMemoryErrors, and other post-mortem troubleshooting. Benchmarks on OpenJ9 show an overhead of less than 1% and usually less than 0.5%.
Add the following to jvm.options (or equivalent) and
restart the JVM:
- OpenJ9 JVM (IBM
Java or IBM Semeru Runtimes Java):
-Xverbosegclog:logs/verbosegc.%seq.log,20,50000 - HotSpot JVM (OpenJDK Runtime
Environment, Oracle Java, and similar):
- Java >= 9:
-Xlog:safepoint=info,gc:file=logs/verbosegc.log:time,level,tags:filecount=5,filesize=20M - Java 8:
-Xloggc:logs/verbosegc.log
-XX:+UseGCLogFileRotation
-XX:NumberOfGCLogFiles=5
-XX:GCLogFileSize=20M
-XX:+PrintGCDateStamps
-XX:+PrintGCDetails
- Java >= 9:
Review logs/verbosegc*log and monitor for high pause
times and that the proportion of time in GC pauses is less than ~5-10%
using the GCMV
tool.
WebSphere Liberty requestTiming Recipe
WebSphere Liberty requestTiming
gathers details on HTTP requests exceeding a configured threshold and
generally has an overhead of less
than 4%.
- The
requestTiming-1.0feature must be installed. Verify withproductInfo; for example:$ wlp/bin/productInfo featureInfo | grep requestTiming requestTiming-1.0- If it's not installed, you may install it with
installUtilityand then restart Liberty; for example:wlp/bin/installUtility install requestTiming-1.0
- If it's not installed, you may install it with
- Add the
requestTiming-1.0feature and arequestTimingelement toserver.xml(or aconfigDropinoverride) and change the attributes as needed. For example:<featureManager><feature>requestTiming-1.0</feature></featureManager> <requestTiming slowRequestThreshold="10s" hungRequestThreshold="10m" sampleRate="1" />slowRequestThresholdis the main setting and should generally be set to your maximum expected response time.hungRequestThresholdis not required and defaults to 10 minutes. It additionally gathers thread dumps when exceeded.- Ideally, performance test
requestTimingand increasesampleRateif testing shows an unacceptable overhead though this may cause missing some slow requests.
- If dynamic
configuration updates are enabled (the default), then saving the
configuration will enable
requestTiming; otherwise, restart Liberty. - Reproduce the problem and confirm the presence of
TRAS0112Wmessages. - Upload the following files:
logs/messages*loglogs/console.loglogs/ffdc/*
For background, see WebSphere Liberty Request Timing.
Troubleshooting Web Servers Recipes
- IBM HTTP Server:
- Review the
error_logfor any strange errors before and during the problem, includingmpmstats. - Review the
access_logfor any status codes >= 400 and long response times before and during the problem. - Review the
http_plugin.logfile for any strange errors before and during the problem.
- Review the
Troubleshooting Kubernetes Recipes
Kubernetes Basics Recipe
- List the cluster information. For example:
$ kubectl cluster-info Kubernetes master is running at https://kubernetes.docker.internal:6443 KubeDNS is running at https://kubernetes.docker.internal:6443/api/v1/namespaces/kube-system/services/kube-dns:dns/proxy To further debug and diagnose cluster problems, use 'kubectl cluster-info dump'. - List recent events in all namespaces and look for warnings and
errors such as the following. Note that a
Killingevent is consideredNormal:$ kubectl get events --all-namespaces NAMESPACE LAST SEEN TYPE REASON OBJECT MESSAGE kube-system 6m1s Warning Unhealthy pod/metrics-server-6b5c979cf8-t8496 Readiness probe failed: HTTP probe failed with statuscode: 500 kube-system 6m8s Warning Unhealthy pod/metrics-server-6b5c979cf8-t8496 Liveness probe failed: HTTP probe failed with statuscode: 500 kube-system 6m8s Normal Killing pod/metrics-server-6b5c979cf8-t8496 Container metrics-server failed liveness probe, will be restarted - If metrics-server
is running, list total node resource usage. For example:
$ kubectl top node NAME CPU(cores) CPU% MEMORY(bytes) MEMORY% docker-desktop 207m 3% 1830Mi 18% - List all pods. For example:
$ kubectl get pods -o wide --all-namespaces NAMESPACE NAME READY STATUS RESTARTS AGE IP NODE NOMINATED NODE READINESS GATES kube-system coredns-f9fd979d6-6hb96 1/1 Running 1 30h 10.1.0.7 docker-desktop <none> <none> kube-system coredns-f9fd979d6-x7dhk 1/1 Running 1 30h 10.1.0.6 docker-desktop <none> <none> kube-system etcd-docker-desktop 1/1 Running 1 30h 192.168.65.4 docker-desktop <none> <none> kube-system kube-apiserver-docker-desktop 1/1 Running 1 30h 192.168.65.4 docker-desktop <none> <none> kube-system kube-controller-manager-docker-desktop 1/1 Running 1 30h 192.168.65.4 docker-desktop <none> <none> kube-system kube-proxy-fm942 1/1 Running 1 30h 192.168.65.4 docker-desktop <none> <none> kube-system kube-scheduler-docker-desktop 1/1 Running 1 30h 192.168.65.4 docker-desktop <none> <none> kube-system metrics-server-7f68754c9c-xkb2h 1/1 Running 0 16m 10.1.0.13 docker-desktop <none> <none> kube-system storage-provisioner 1/1 Running 2 30h 10.1.0.8 docker-desktop <none> <none> kube-system vpnkit-controller 1/1 Running 1 30h 10.1.0.9 docker-desktop <none> <none> kubernetes-dashboard dashboard-metrics-scraper-79c5968bdc-4kpl2 1/1 Running 0 38m 10.1.0.11 docker-desktop <none> <none> kubernetes-dashboard kubernetes-dashboard-9f9799597-x694s 1/1 Running 0 38m 10.1.0.10 docker-desktop <none> <none> - Prints logs for a particular pod. For example:
$ kubectl logs metrics-server-7f68754c9c-xkb2h -n kube-system
I0428 21:16:26.210289       1 serving.go:325] Generated self-signed cert (/tmp/apiserver.crt, /tmp/apiserver.key)
[...]
Kubernetes etcd Issues Recipe
- Search etcd logs (
/var/logs/pods/*etcd*/etcd/*):leader failed to send out heartbeat on time; took too long, leader is overloaded likely from slow disk- Compactions greater than 100ms
grep -r "finished scheduled compaction" /var/log/pods/*etcd*/etcd/* | awk -F\" '$(NF-1) ~ /[0-9]s/ || $(NF-1) ~ /[1-9][0-9][0-9]/ {print $(NF-1);}' | sort -nr | head
- Consider if defragmentation is necessary which may reduce memory
usage of
kube-apiserverandetcd:
Kubernetes Modify Container Command
- Edit the pod spec (e.g. in a deployment) and add/modify the
commandandargs. For example:spec: containers: - name: ... command: ["/bin/sh"] args: ["-c", "sleep 300"]
Troubleshooting OpenShift Recipes
- OpenShift Login Recipe
- OpenShift General Troubleshooting Recipe
- OpenShift Use Image Registry Recipe
- OpenShift Remote into Container Recipe
- OpenShift Analyze a Pod Recipe
- OpenShift Analyze a Node Recipe
- OpenShift Investigate ImagePullBackOff Recipe
- OpenShift Review Logs Recipe
- OpenShift Download Container Files Recipe
- OpenShift Investigate Source of Signal
- Liberty in OpenShift Get Javacore Recipe
- Liberty in OpenShift Get Heapdump Recipe
- Liberty in OpenShift Get System Dump Recipe
- Replace Container Directory in OpenShift
- Execute a Script in a Container on Startup in OpenShift
OpenShift Login Recipe
- Access the OpenShift web console at https://console-openshift-console.${CLUSTER_DOMAIN_NAME}/.
- In the top right, click on your name } Copy Login Command } Display
Token } Copy the
oc logincommand

- Download the
ocexecutable from your cluster at https://downloads-openshift-console.${CLUSTER_DOMAIN_NAME}/ or from the internet: - Open a terminal and change directory to where
ocis. - Paste and run the
oc logincommand from step 2 above. - Run
oc whoami --show-consoleto confirm everything works.
OpenShift General Troubleshooting Recipe
From a browser
- Review overall status: Administrator } Home } Overview }
Status

- Review node resource usage: Administrator } Home } Overview }
Cluster Utilization

Click on the utilization number and use the dropdown to get different views, e.g. By Node

- Review critical and warning alerts: Administrator } Observe (or
Monitoring) } Alerting } Click "Filter", and check "Critical" and
"Warning"

- Review recent warning and error events: Administrator } Home }
Events } Change "All types" to "Warning"

- Review deep dive utilization: Administrator } Observe (or
Monitoring) } Dashboards } Node Exporter / USE Method / Cluster

From the command line
- Ensure you're logged in with oc
- Review the overall cluster status:
$ oc get clusterversion NAME VERSION AVAILABLE PROGRESSING SINCE STATUS version 4.10.10 True False 87d Error while reconciling 4.10.10: an unknown error has occurred: MultipleErrors- If status includes "MultipleErrors", display all errors with:
oc get clusterversion -o 'jsonpath={.items[].status.conditions}'
- If status includes "MultipleErrors", display all errors with:
- Review the status of nodes:
$ oc get nodes NAME STATUS ROLES AGE VERSION master0 Ready master 201d v1.20.0+df9c838 master1 Ready master 201d v1.20.0+df9c838 master2 Ready master 201d v1.20.0+df9c838 worker0 Ready worker 201d v1.20.0+df9c838 worker1 NotReady worker 11d v1.20.0+df9c838 worker2 Ready worker 201d v1.20.0+df9c838- Describe any that are
Status=NotReadyand search forConditions:
If no issues are obvious, debug the node in more depth.$ oc describe node worker1 Name: worker1 [...] Conditions: Type Status LastHeartbeatTime LastTransitionTime Reason Message ---- ------ ----------------- ------------------ ------ ------- MemoryPressure Unknown Fri, 03 Dec 2021 18:07:43 -0600 Tue, 11 Jan 2022 16:12:38 -0600 NodeStatusUnknown Kubelet stopped posting node status. DiskPressure Unknown Fri, 03 Dec 2021 18:07:43 -0600 Tue, 11 Jan 2022 16:12:38 -0600 NodeStatusUnknown Kubelet stopped posting node status. PIDPressure Unknown Fri, 03 Dec 2021 18:07:43 -0600 Tue, 11 Jan 2022 16:12:38 -0600 NodeStatusUnknown Kubelet stopped posting node status. Ready Unknown Fri, 03 Dec 2021 18:07:43 -0600 Tue, 11 Jan 2022 16:12:38 -0600 NodeStatusUnknown Kubelet stopped posting node status.
- Describe any that are
- Review node resource usage:
$ oc adm top nodes NAME CPU(cores) CPU% MEMORY(bytes) MEMORY% master0 1990m 26% 13070Mi 89% master1 1614m 21% 10982Mi 75% master2 1016m 13% 10138Mi 69% worker0 4986m 32% 17360Mi 57% worker1 4986m 32% 17360Mi 57% worker2 2634m 16% 16352Mi 54%- Describe any that have high usage of CPU and/or memory:
If no CPU or memory culprits are obvious, debug the node in more depth.$ oc describe node master0 Name: master0 [...] Allocatable: cpu: 7500m ephemeral-storage: 95069439022 memory: 14871872Ki pods: 250 [...] Non-terminated Pods: (32 in total) Namespace Name CPU Requests CPU Limits Memory Requests Memory Limits AGE --------- ---- ------------ ---------- --------------- ------------- --- openshift-kube-apiserver kube-apiserver-master0 290m (3%) 0 (0%) 1224Mi (8%) 0 (0%) 7d16h [...] Allocated resources: (Total limits may be over 100 percent, i.e., overcommitted.) Resource Requests Limits -------- -------- ------ cpu 1595m (21%) 0 (0%) memory 5241Mi (36%) 0 (0%)
- Describe any that have high usage of CPU and/or memory:
- Review critical and warning alerts:
- Critical:
curl -k -H "Authorization: Bearer $(oc -n openshift-monitoring sa get-token prometheus-k8s)” https://$(oc -n openshift-monitoring get route alertmanager-main -o jsonpath='{.spec.host}')/api/v1/alerts?filter=severity=critical - Warning:
curl -k -H "Authorization: Bearer $(oc -n openshift-monitoring sa get-token prometheus-k8s)" https://$(oc -n openshift-monitoring get route alertmanager-main -o jsonpath='{.spec.host}')/api/v1/alerts?filter=severity=warning
- Critical:
- Review recent warning and error events:
oc get events --sort-by='.lastTimestamp' --all-namespaces --field-selector type=Warning | tail -10 - Review top pod resource usage by CPU:
$ oc adm top pod --all-namespaces --sort-by=cpu | head NAMESPACE NAME CPU(cores) MEMORY(bytes) openshift-kube-apiserver kube-apiserver-master0 940m 6526Mi openshift-operators service-binding-operator-c4896b966-js9t9 547m 662Mi openshift-etcd etcd-master1 480m 2185Mi openshift-kube-apiserver kube-apiserver-master1 304m 4751Mi openshift-kube-apiserver kube-apiserver-master2 284m 4787Mi openshift-operator-lifecycle-manager olm-operator-64fbc79dbc-47mvq 261m 1507Mi openshift-monitoring prometheus-k8s-1 243m 2355Mi openshift-etcd etcd-master0 243m 1902Mi openshift-monitoring prometheus-k8s-0 237m 2249Mi - Review top pod resource usage by memory:
$ oc adm top pod --all-namespaces --sort-by=memory | head NAMESPACE NAME CPU(cores) MEMORY(bytes) openshift-kube-apiserver kube-apiserver-master0 1220m 6396Mi openshift-kube-apiserver kube-apiserver-master2 351m 4828Mi openshift-kube-apiserver kube-apiserver-master1 276m 4763Mi rook-ceph csi-rbdplugin-htblh 1m 2464Mi openshift-monitoring prometheus-k8s-1 359m 2355Mi openshift-monitoring prometheus-k8s-0 373m 2265Mi openshift-etcd etcd-master1 331m 2195Mi openshift-etcd etcd-master0 119m 1943Mi openshift-etcd etcd-master2 252m 1759Mi - Get the status of cluster operators:
$ oc get clusteroperators NAME VERSION AVAILABLE PROGRESSING DEGRADED SINCE dns 4.7.13 True False True 2d19h- Describe any that are
Degraded=True:$ oc describe clusteroperators dns Name: dns [...] Status: Conditions: Last Transition Time: 2022-02-09T06:40:54Z Message: DNS default is degraded Reason: DNSDegraded Status: True Type: Degraded
- Describe any that are
- Check for overcommit issues
on worker nodes:
oc get nodesoc debug node/$NODE -tchroot /host journalctl --grep="Killed"- Overcommit ratios may be tuned. Alternatively, disable overcommit by setting all pods' request=limit.
Troubleshooting Tips
- Troubleshoot Networking
- For a pod status of
pending, reviewoc describe pod $POD - The horizontal pod autoscaler initially has a value of
<unknown>and might take ~5 minutes to update. A persistent value of<unknown>might indicate that the deployment does not define resource requests for the metric and the autoscaler will not activate. - Investigate pod errors
due to permissions:
oc get pod/$POD -o yaml | oc adm policy scc-subject-review -f -
OpenShift Use Image Registry Recipe
- Ensure you're logged in with oc
- By default, a registry does not have an external route; if this is
required, the registry must be exposed:
- Follow the instructions to expose the registry for your cluster version.
- Then, allow a user to push to the registry
oc policy add-role-to-user registry-editor $(oc whoami) - Finally, allow a user to pull from the registry:
oc policy add-role-to-user registry-viewer $(oc whoami)
- Get the registry route and save to a variable:
REGISTRY=$(oc get route default-route -n openshift-image-registry --template='{{ .spec.host }}') - Make sure it looks okay:
echo ${REGISTRY} - Log into the registry:
podman login -u $(oc whoami) -p $(oc whoami -t) ${REGISTRY}- For self-signed certificates, add
--tls-verify=falsetopodman login
- For self-signed certificates, add
- After you've built some local container, list that image:
$ podman images REPOSITORY TAG IMAGE ID CREATED SIZE <none> <none> 0263a6f15fdf 2 minutes ago 771MB - Tag the image for pushing to your registry (replace
$IMAGEID,$PROJECT, and$IMAGE)podman tag $IMAGEID $REGISTRY/$PROJECT/$IMAGE - Push the image to your registry:
podman push $REGISTRY/$PROJECT/$IMAGE - List the image stream within the cluster (an image stream is an
indirect pointer to an image that allows updating the pointer without
re-building):
oc get imagestreams $IMAGE -n $PROJECT - The image may now be referenced internally with
image-registry.openshift-image-registry.svc:5000/$PROJECT/$IMAGE
OpenShift Remote into Container Recipe
From a browser
- Web console } Administrator } Workloads } Pods }
$PODNAME} Terminal

From the command line
- Ensure you're logged in with oc
- Find the relevant pod(s):
$ oc get pods --namespace $NAMESPACE NAME READY STATUS RESTARTS AGE mypod-7d57d6599f-tq7vt 1/1 Running 0 12m - Remote into the pod (if it has more than one container, specify the
container with
-c $CONTAINER):$ oc rsh --namespace $NAMESPACE -t $PODNAME sh-4.4$
OpenShift Analyze a Pod Recipe
- Ensure you're logged in with oc
- Find the relevant pod(s):
$ oc get pods -o wide -n $PROJECT NAME READY STATUS RESTARTS AGE IP NODE NOMINATED NODE READINESS GATES $POD 1/1 Running 0 4m46s ... ... <none> <none> - Display CPU
and memory statistics:
$ oc adm top pods $POD -n $PROJECT NAME CPU(cores) MEMORY(bytes) $POD 5m 186Mi - Display events in the pod (as well as the node it's on, labels,
etc.):
$ oc describe pod $POD -n $PROJECT Name: ... Namespace: ... Priority: 0 Node: .../... Start Time: Mon, 15 Feb 2021 12:36:57 -0800 Labels: deployment=... pod-template-hash=7d57d6599f [...] Events: Type Reason Age From Message ---- ------ ---- ---- ------- Normal Scheduled 21m default-scheduler Successfully assigned ... to ... Normal AddedInterface 21m multus Add eth0 [...] Normal Pulling 21m kubelet Pulling image "image-registry.openshift-image-registry.svc:5000/..." Normal Pulled 21m kubelet Successfully pulled image "image-registry.openshift-image-registry.svc:5000/..." Normal Created 21m kubelet Created container ... Normal Started 21m kubelet Started container ... - Display the pod's stdout logs:
$ oc logs $POD -n $PROJECT Launching defaultServer (Open Liberty 21.0.0.1/wlp-1.0.48.cl210120210113-1459) on Eclipse OpenJ9 VM, version 1.8.0_282-b08 (en_US) [...] - If needed, remote into the pod
- If required diagnostic utilities aren't available within a container, you may build and run a debug pod on the node with those utilities.
OpenShift Analyze a Node Recipe
From a browser
- Administrator } Compute } Nodes }
$NODENAME} Terminal
From the command line
- Ensure you're logged in with oc
- Find the relevant node(s):
$ oc get nodes -o wide NAME STATUS ROLES AGE VERSION INTERNAL-IP EXTERNAL-IP OS-IMAGE KERNEL-VERSION CONTAINER-RUNTIME ...1 Ready master,worker 105d v1.18.3+2fbd7c7 ...1 ...4 Red Hat 3.10.0-1160.2.2.el7.x86_64 cri-o://1.18.3-19.rhaos4.5.git9264b4f.el7 ...2 Ready master,worker 105d v1.18.3+2fbd7c7 ...2 ...2 Red Hat 3.10.0-1160.2.2.el7.x86_64 cri-o://1.18.3-19.rhaos4.5.git9264b4f.el7 ...4 Ready master,worker 105d v1.18.3+2fbd7c7 ...4 ...0 Red Hat 3.10.0-1160.2.2.el7.x86_64 cri-o://1.18.3-19.rhaos4.5.git9264b4f.el7 - If needed, review node resource usage:
$ oc adm top nodes NAME CPU(cores) CPU% MEMORY(bytes) MEMORY% ...1 592m 3% 8344Mi 29% ...2 958m 6% 8675Mi 30% ...4 1139m 7% 9523Mi 33% - Remote into a node:
$ oc debug node/$NODENAME -t - The debug container is its own container running on the node but
usually you want to act as if you're remote'd into the actual node by
running chroot:
sh-4.2# chroot /host sh-4.2# whoami root - If you need to run utilities that aren't installed on the node, then
you can package
those utilities into an image and then run that image on the node.
Note that the image stream is in a particular project so
-nmust be specified, and note that in this use case, you probably do not want to runchrootsince the relevant binaries are in the container rather than the node. For example:$ oc debug node/$NODENAME -t --image=image-registry.openshift-image-registry.svc:5000/$PROJECT/$IMAGE -n $PROJECT sh-5.0# gcore usage: gcore [-a] [-o prefix] pid1 [pid2...pidN]
Map container PID to node PID
- Either first
chroot /host(in which case you'll lose access to your debug pod's binaries), or add--root /host/run/runcafterrunc. - Find the PIDs that might be interesting. For example, if we're
searching for a Java PID:
# pgrep -f java 73138 77182 84890 100958 - Use
runc listto find the container IDs for those PIDs that are in containers. For example:# for pid in $(pgrep -f java); do runc list | grep $pid; done | awk '{print $1}' 76d7cbc64b8411fc04390c940fe14c797d4a996a00a56d1014312a7aa7b6d260 1a4a983095d84776603b8d77ff625ace91bb492db12fbee42666145d05324dee ef77108b440d2ca5631a3781f0bb440e904d86f818457381c0fb820d8f6aa3fd - Use
runc stateto get details about a container. For example (some output removed):# runc state 76d7cbc64b8411fc04390c940fe14c797d4a996a00a56d1014312a7aa7b6d260 { "id": "76d7cbc64b8411fc04390c940fe14c797d4a996a00a56d1014312a7aa7b6d260", "pid": 73138, "status": "running", "bundle": "/var/data/crioruntimestorage/overlay-containers/76d7cbc64b8411fc04390c940fe14c797d4a996a00a56d1014312a7aa7b6d260/userdata", "rootfs": "/var/data/criorootstorage/overlay/a83cefbb7952694e724af131870657c6b13043f9fc847b7c4757457224a308da/merged", "created": "2021-02-15T20:36:59.080374202Z", "annotations": { "io.container.manager": "cri-o", "io.kubernetes.container.hash": "6e7830a0", "io.kubernetes.container.name": "...", "io.kubernetes.container.ports": "[{\"containerPort\":9443,\"protocol\":\"TCP\"},{\"containerPort\":9080,\"protocol\":\"TCP\"}]", "io.kubernetes.container.restartCount": "0", "io.kubernetes.cri-o.Image": "...", "io.kubernetes.cri-o.Name": "k8s_...-7d57d6599f-5qq7z_..._722d428b-d0ac-4b1e-b4f5-503b1b76c1e4_0", "io.kubernetes.pod.name": "...-7d57d6599f-5qq7z", "io.kubernetes.pod.namespace": "...", }, } - If needed, go to the rootfs directory for access to the container's
filesystem. For example:
# head /var/data/criorootstorage/overlay/a83cefbb7952694e724af131870657c6b13043f9fc847b7c4757457224a308da/merged/logs/messages.log
********************************************************************************
product = Open Liberty 21.0.0.1 (wlp-1.0.48.cl210120210113-1459)
OpenShift Investigate ImagePullBackOff Recipe
ImagePullBackOff occurs when an image can't be pulled. This may have many causes such as insufficient authorization, pulling from the context of one project but the ImageStream is in another project, network issues or protections, etc.
- Ensure you're logged in with oc
- Run the command that causes the issue and note the date and time (in
UTC). For example:
$ TZ=UTC date Tue Feb 16 18:36:10 UTC 2021 $ oc debug node/$NODE -t --image=image-registry.openshift-image-registry.svc:5000/$PROJECT/$IMAGE Creating debug namespace/openshift-debug-node-9jmxs ... Starting pod/...-debug ... To use host binaries, run `chroot /host` Removing debug pod ... Removing debug namespace/openshift-debug-node-9jmxs ... error: Back-off pulling image "image-registry.openshift-image-registry.svc:5000/$PROJECT/$IMAGE" - Review the logs of the image registry at approximately the date and
time of the issue. For example:
$ oc logs deployments/image-registry -n openshift-image-registry | grep -v -e probe -e metrics [...] time="2021-02-16T18:36:18.148593608Z" level=warning msg="error authorizing context: authorization header required" go.version=go1.13.15 http.request.host="image-registry.openshift-image-registry.svc:5000" http.request.id=17430d0b-49ec-4ba9-8161-32456ca2f29f http.request.method=GET http.request.remoteaddr="...:50939" http.request.uri=/v2/ http.request.useragent="cri-o/1.18.3-19.rhaos4.5.git9264b4f.el7 go/go1.13.15 os/linux arch/amd64" - In the above example, the image pull back-off occurred because of an
authorization issue. In this case, it is because we forgot to specify
-n $PROJECTon theoc debugcommand which was run in the context of another project.
OpenShift Review Logs Recipe
From the command line
- Ensure you're logged in with oc
- Change
REPLACEMEto your project name:PROJECT=REPLACEME; echo "Processing project ${PROJECT}"; for pod in $(oc get pods -n $PROJECT -o jsonpath='{.items[*].metadata.name}'); do echo "Processing pod ${pod}"; for container in $(oc get pod $pod -n $PROJECT -o jsonpath="{.spec.containers[*].name}"); do oc logs $pod -c $container -n $PROJECT &> diag_podlogs_${PROJECT}_${pod}_${container}_$(date +%Y%m%d_%H%M%S).txt; oc logs --previous $pod -c $container -n $PROJECT &> diag_lastpodlogs_${PROJECT}_${pod}_${container}_$(date +%Y%m%d_%H%M%S).txt; done; done - Upload
diag*.txt
From a browser
- Web console } Administrator } Workloads } Pods }
$PODNAME} Logs } Download

OpenShift Download Container Files Recipe
From the command line
- Ensure you're logged in with oc
- Find the relevant pod(s):
$ oc get pods --namespace $NAMESPACE NAME READY STATUS RESTARTS AGE mypod-7d57d6599f-tq7vt 1/1 Running 0 12m - Download files from the pod (requires the container has the
tarbinary installed; if there is more than one container, specify the container with-c $CONTAINER):$ oc cp --namespace $NAMESPACE $PODNAME:/logs/messages.log messages.log tar: Removing leading `/' from member names
OpenShift Investigate Source of Signal
This procedure helps find the source of a kill signal
such as SIGQUIT:
- Ensure you're logged in with
oc with
cluster-adminpermissions - Find the relevant pod receiving the signal:
$ oc get pods --namespace $NAMESPACE NAME READY STATUS RESTARTS AGE mypod-7d57d6599f-tq7vt 1/1 Running 0 12m - Find the worker node of the pod:
oc get pod --namespace $NAMESPACE --output "jsonpath={.spec.nodeName}{'\n'}" $PODNAME - Start a debug pod on the worker node with the containerdiag
image:
oc debug node/$NODE -t --image=quay.io/ibm/containerdiag - Find the worker node PID of the pod container (we'll use this
later); for example:
$ podinfo.sh -p mypod-7d57d6599f-tq7vt 3636617 - Change to the root filesystem:
chroot /host - Run this command to append to the audit
rules file:
cat >> /etc/audit/rules.d/audit.rules - Paste this line and press
ENTER:-a always,exit -F arch=b64 -S kill -k watchkill - Type
Ctrl^Dto finish the append. - Confirm the line is there:
$ tail -1 /etc/audit/rules.d/audit.rules -a always,exit -F arch=b64 -S kill -k watchkill - Regenerate the audit rules:
augenrules --load - Kill
auditd(there is no graceful way of doing this):systemctl kill auditd - Start
auditd:systemctl start auditd - Double check the status and make sure it's running
(
active (running)):$ systemctl status auditd ● auditd.service - Security Auditing Service Loaded: loaded (/usr/lib/systemd/system/auditd.service; enabled; vendor preset: enabled) Active: active (running) since Wed 2022-10-05 13:26:04 UTC; 9min ago [...] - Wait for the signal to occur.
- After the issue is reproduced, search for the signal in the audit
logs (replace
SIGQUITwith the signal name):ausearch -k watchkill -i | grep -A 5 -B 5 --group-separator========= SIGQUIT - Find the relevant audit event; for example:
type=PROCTITLE msg=audit(10/05/22 08:47:31.523:278210) : proctitle=java -Dsdjagent.loadjnilibrary=false -Dsun.jvmstat.perdata.syncWaitMs=5000 -Dsdjagent.managementAgentConnectDelayMs=0 -jar /tmp/ type=OBJ_PID msg=audit(10/05/22 08:47:31.523:278210) : opid=230677 oauid=unset ouid=unknown(1000680000) oses=-1 obj=system_u:system_r:container_t:s0:c15,c26 ocomm=java type=SYSCALL msg=audit(10/05/22 08:47:31.523:278210) : arch=x86_64 syscall=kill success=yes exit=0 a0=0x1 a1=SIGQUIT a2=0x1 a3=0x7 items=0 ppid=149339 pid=218261 auid=unset uid=unknown(1000680000) gid=root euid=unknown(1000680000) suid=unknown(1000680000) fsuid=unknown(1000680000) egid=root sgid=root fsgid=root tty=(none) ses=unset comm=main exe=/opt/java/openjdk/jre/bin/java subj=system_u:system_r:spc_t:s0 key=watchkill - In the
OBJ_PIDline, theopid=is the PID of the program receiving the signal. Confirm this matches the worker node PID of the pod container from step 5 above. - In the
PROCTITLEline, theproctitle=is the command line of the program sending the signal. In theSYSCALLline, thepid=is the PID of the program sending the signal and theppid=is the parent PID of that program. - Search for the
pid=inps; for example:ps -elf | grep 218261 - If nothing is found (i.e. the process sending the signal quickly
went away), search for the
ppid=inps; for example:$ ps -elf | grep 149339 0 S root 149339 146443 0 80 0 - 642951 futex_ Sep21 ? 01:23:32 java -Xmx256m -Djava.library.path=/opt/draios/lib -Dsun.rmi.transport.connectionTimeout=2000 -Dsun.rmi.transport.tcp.handshakeTimeout=2000 -Dsun.rmi.transport.tcp.responseTimeout=2000 -Dsun.rmi.transport.tcp.readTimeout=2000 -jar /opt/draios/share/sdjagent.jar - This process will most likely be driven by some container. The
parent PID is the 5th column, so just keep running
ps -elfup that chain until you findconmon; for example:$ ps -elf | grep 146441 | grep -v grep 4 S root 146441 146404 0 80 0 - 2977 do_wai Sep21 ? 00:00:00 /bin/bash /var/tmp/sclXDwWEb 4 S root 146443 146441 0 80 0 - 15984 hrtime Sep21 ? 00:01:14 /opt/draios/bin/dragent --noipcns $ ps -elf | grep 146404 | grep -v grep 4 S root 146404 146391 0 80 0 - 13837 do_wai Sep21 ? 00:00:00 /usr/bin/scl enable llvm-toolset-7.0 -- /docker-entrypoint.sh 4 S root 146441 146404 0 80 0 - 2977 do_wai Sep21 ? 00:00:00 /bin/bash /var/tmp/sclXDwWEb $ ps -elf | grep 146391 | grep -v grep 1 S root 146391 1 0 80 0 - 30958 poll_s Sep21 ? 00:05:20 /usr/bin/conmon -b /var/data/crioruntimestorage/overlay-containers/681b13596d8c31f8e60e8b0a0973382fe73094f37ec13ff2fa32918996af06e7/userdata [...] 4 S root 146404 146391 0 80 0 - 13837 do_wai Sep21 ? 00:00:00 /usr/bin/scl enable llvm-toolset-7.0 -- /docker-entrypoint.sh - Take the hexadecimal string in the
conmoncommand line to get container information; for example:$ runc state 681b13596d8c31f8e60e8b0a0973382fe73094f37ec13ff2fa32918996af06e7 [...] "io.kubernetes.container.name": "sysdig-agent", "io.kubernetes.pod.name": "sysdig-agent-l49j6", "io.kubernetes.pod.namespace": "ibm-observe", [...] - Therefore, the ultimate cause of this signal was the
sysdig-agentcontainer in thesysdig-agent-l49j6pod in theibm-observenamespace. - If the signal audit rule is no longer needed, remove it from
/etc/audit/rules.d/audit.rules, re-generate the rules, and restartauditd.
Liberty in OpenShift Get Javacore Recipe
- Ensure you're logged in with oc
- Find the relevant pod(s):
$ oc get pods --namespace $NAMESPACE NAME READY STATUS RESTARTS AGE mypod-7d57d6599f-tq7vt 1/1 Running 0 12m - Remote into the pod (if it has more than one container, specify the
container with
-c $CONTAINER):$ oc rsh --namespace $NAMESPACE -t $PODNAME sh-4.4$ - Execute
server javadump. The$WLPpath is usually either/opt/ibm/wlpor/opt/ol/wlpdepending on whether it's WebSphere Liberty or OpenLiberty, respectively:$WLP/bin/server javadump - Exit the remote shell:
exit - Download the output directory that has the javacore (replace
$WLPas in step 4):oc cp --namespace $NAMESPACE $PODNAME:$WLP/output/defaultServer libertyoutput - Zip and upload the
libertyoutputdirectory
Liberty in OpenShift Get Heapdump Recipe
- Ensure you're logged in with oc
- Find the relevant pod(s):
$ oc get pods --namespace $NAMESPACE NAME READY STATUS RESTARTS AGE mypod-7d57d6599f-tq7vt 1/1 Running 0 12m - Remote into the pod (if it has more than one container, specify the
container with
-c $CONTAINER):$ oc rsh --namespace $NAMESPACE -t $PODNAME sh-4.4$ - Execute
server javadumpwith the heapdump option. The$WLPpath is usually either/opt/ibm/wlpor/opt/ol/wlpdepending on whether it's WebSphere Liberty or OpenLiberty, respectively:$WLP/bin/server javadump --include=heap - Exit the remote shell:
exit - Download the output directory that has the heapdump (replace
$WLPas in step 4):oc cp --namespace $NAMESPACE $PODNAME:$WLP/output/defaultServer libertyoutput - Zip and upload the
libertyoutputdirectory
Liberty in OpenShift Get System Dump Recipe
- This procedure requires logging into
ocwith a user withcluster-adminsuperuser privileges- Ensure you're logged in with oc
- Find the relevant pod(s):
$ oc get pods --namespace $NAMESPACE NAME READY STATUS RESTARTS AGE mypod-7d57d6599f-tq7vt 1/1 Running 0 12m - Remote into the pod (if it has more than one container, specify the
container with
-c $CONTAINER):$ oc rsh --namespace $NAMESPACE -t $PODNAME sh-4.4$ - Execute the following command to determine the
core_pattern:cat /proc/sys/kernel/core_pattern - If
core_patternstarts with a|, then it will be sent to the worker node. Otherwise, ensure the specified directory exists in the container. - Execute
server javadumpwith the system dump option. The$WLPpath is usually either/opt/ibm/wlpor/opt/ol/wlpdepending on whether it's WebSphere Liberty or OpenLiberty, respectively:
It is a common and expected error that the core dump is not found since it goes to the worker node; for example:$WLP/bin/server javadump --include=systemThe core file created by child process with pid = $PID was not found
- If
core_patterndid not start with a|, retrieve the core dump from thecore_patterndirectory inside the container. Otherwise, continue to the next steps. - Exit the remote shell:
exit - Find the worker node of the pod:
oc get pod --namespace $NAMESPACE --output "jsonpath={.spec.nodeName}{'\n'}" $PODNAME - Start a debug pod on the worker node:
oc debug node/$NODE -t - If
core_patternends withsystemd-coredump, dumps should be in/var/lib/systemd/coredump/. If it ends withapport, dumps should be in/var/crash/or/var/lib/apport/coredump/. If it ends withrdp, review/opt/dynatrace/oneagent/agent/conf/original_core_pattern. - List the directory from the last step with:
chroot /host/$DUMPSDIRECTORY - Now we'll use this debug pod to download the file. First start a
looping output so that the debug pod doesn't timeout by executing:
while true; do echo 'Sleeping'; sleep 8; done - Next, open a new terminal and find the debug pod and namespace:
$ oc get pods --field-selector=status.phase==Running --all-namespaces | grep debug openshift-debug-node-pwcn42r47f worker3-debug 1/1 Running 0 3m38s - Use the above namespace (first column) and pod name (second column)
to download the core dump from the worker node from the Storage location
above, making sure to prefix the Storage location with
/host/; for example:oc cp --namespace openshift-debug-node-pwcn42r47f worker3-debug:/host/var/lib/systemd/coredump/core.kernel-command-.1000650000.08b9e28f46b348f3aabdffc6896838e0.2923161.1659552745000000.lz4 core.dmp.lz4 - After the download completes, in the previous terminal window, type
Ctrl^Cto exit the loop and then typeexitto end the debug pod - Upload
core.dmp.lz4
Replace Container Directory in OpenShift
A directory inside a container may be replaced without re-building an
image by mounting a volume on the target directory and populating that
volume within an initContainer.
- Determine the directory you want to replace. If needed,
oc execinto the container and find the target directory. - Edit the pod or deployment YAML. For example:
oc edit deployment deployment1 - Add a shared, ephemeral volume to the pod. For example:
spec: volumes: - name: shared-data emptyDir: {} - Add an
initContainerthat mounts the shared volume and sleeps for enough time to upload the directory to it. For example:spec: initContainers: - name: initcontainer image: fedora command: ["/bin/sh", "-c", "sleep 180"] volumeMounts: - mountPath: /tmp/mounted name: shared-data - Add the shared volume to the target container at the target
directory. For example:
spec: containers: - name: ... volumeMounts: - mountPath: /opt/java/openjdk name: shared-data - Save the YAML and the pod/deployment will restart
- Wait for the pod to restart and show in an
Initstate. For example:$ oc get pods NAME READY STATUS RESTARTS AGE liberty1-b86b797cb-d42nd 0/1 Init:0/1 0 3s - Copy the files for the destination directory into the init
container. For example:
oc cp -c initcontainer JDKdebugbuild.tar.gz liberty1-b86b797cb-d42nd:/tmp/ - Remote into the init container and organize the target directory
under
/tmp/mountedas needed. For example:$ oc exec -it liberty1-b86b797cb-d42nd -c initcontainer -- bash $ cd /tmp $ tar xzf JDKdebugbuild.tar.gz $ mv jdk/* /tmp/mounted/ - Wait for the sleep time of the init container to elapse and the target container will start.
- If required, remote into the target container and confirm the target
directory has been updated properly. For example:
$ oc exec -it liberty1-b86b797cb-d42nd -- bash
  $ /opt/java/openjdk/bin/java -version
  OpenJDK Runtime Environment (build 11.0.21-internal+0-adhoc..BuildJDK11x86-64linuxPersonal)
  [...]
Execute a Script in a Container on Startup in OpenShift
- Confirm the process ID (PID) of the target process in a running container. It is common, though not required, that Liberty is PID 1.
- Edit the pod or deployment YAML. For example:
oc edit deployment deployment1 - Add a
lifecycle.postStart.exec.commandelement to the target container that executes a diagnostic script. For example, the following sleeps 5 seconds and then gathers 5 javacores 10 seconds apart (changePIDas required):spec: containers: - name: ... lifecycle: postStart: exec: command: ["/bin/sh", "-c", "echo 'sleep 5; PID=1; i=0; while [ $i -le 5 ]; do kill -3 $PID; sleep 10; i=$(( i + 1 )); done' > /tmp/diag.sh; chmod +x /tmp/diag.sh; /tmp/diag.sh &"] - Save the YAML and the pod/deployment will restart
Notes:
- The script is run in the background because Kubernetes won't set the
container to
RUNNINGuntil the postStart script "completes".
Troubleshooting Java Recipes
Troubleshooting IBM Java Recipes
This chapter has been renamed to Troubleshooting OpenJ9 and IBM J9 Recipes.
General
Theory
Aspects of Performance Tuning
Why does performance matter?
Gallino, Karacaoglu, & Moreno (2018) found that "a 10 percent decrease in website performance leads to a 2.6 percent decrease in retailers' revenue and a decrease of 0.05 percentage points in conversion, after controlling for traffic and a battery of fixed effects. [...] Delays of 100 milliseconds have a significant impact on customer abandonment."
A typical performance exercise can yield a throughput improvement of about 200% relative to default tuning parameters.
Indirect benefits of improved performance include reduced hardware needs and reduced costs, reduced maintenance, reduced power consumption, knowing your breaking points, accurate system sizing, etc.
Increased performance may involve sacrificing a certain level of feature or function in the application or the application server. The tradeoff between performance and feature must be weighed carefully when evaluating performance tuning changes.
Basic Definitions
In general, the goal of performance tuning is to increase throughput, reduce response times, and/or increase the capacity for concurrent requests, all balanced against costs.
- A response time is the time taken to complete a unit of work. For example, the time taken to complete an HTTP response.
- The number of concurrent requests is the count of requests processing at the same time over some fixed time interval (e.g. per second). For example, the number of HTTP requests concurrently being processed per second. A single user may send multiple concurrent requests.
- Throughput is the number of responses over some fixed time interval (e.g. per second). For example, successful HTTP responses per second.
- A hypothesis is a testable idea. It is not believed to be true nor false.
- A theory is the result of testing a hypothesis using evidence and getting a positive result. It is believed to be true.
Common Throughput Curve
A common throughput curve includes a saturation point and may include a buckle zone:

In the heavy load zone or Section B, as the concurrent client load increases, throughput remains relatively constant. However, the response time increases proportionally to the user load. That is, if the user load is doubled in the heavy load zone, the response time doubles. At some point, represented by Section C, the buckle zone, one of the system components becomes exhausted. At this point, throughput starts to degrade. For example, the system might enter the buckle zone when the network connections at the web server exhaust the limits of the network adapter or if the requests exceed operating system limits for file handles.
Response Time vs. Latency
Some define latency as a synonym for the response time (the time between a stimulus and a response), or as a subset or superset of the response time. Others define latency along a more strict and classical definition "concealed or inactive"; i.e., external to queue processing time (most commonly understood as transit or network time). This book prefers the latter definition (as detailed in practical queuing theory); although, in general, we try to avoid the word latency due to this ambiguity.
Architecture/Clustering
It is always important to consider what happens when some part of a cluster crashes. Will the rest of the cluster handle it gracefully? Does the heap size have enough head room? Is there enough CPU to handle extra load, etc.? If there is more traffic than the cluster can handle, will it queue and timeout gracefully?
Methodology
There are various theoretical methodologies such as the USE Method and others which are useful to review.
Begin by understanding that one cannot solve all problems immediately. We recommend prioritizing work into short term (high), 3 months (medium) and long term (low). How the work is prioritized depends on the business requirements and where the most pain is being felt.
Guide yourself primarily with tools and methodologies. Gather data, analyze it, create hypotheses, and test your hypotheses. Rinse and repeat. In general, we advocate a bottom-up approach. For example, with a typical WebSphere Application Server application, start with the operating system, then Java, then WAS, then the application, etc. (ideally, investigate all at the same time).
The following are some example scenarios and approaches. They are specific to particular products and symptoms and they are just a taste of how to do performance tuning. Later chapters will go through the details.
- Poor performance occurs with only a single user: Focus on the component accounting for the most time. Check for resource consumption, including frequency of garbage collections. You might need code profiling tools to isolate the problem to a specific method.
- Poor performance only occurs with multiple users: Check to determine if any systems have high CPU, network or disk utilization and address those. For clustered configurations, check for uneven loading across cluster members.
- None of the systems seems to have a CPU, memory, network, or disk
constraint but performance problems occur with multiple users:
- Check that work is reaching the system under test. Ensure that some external device does not limit the amount of work reaching the system.
- A thread dump might reveal a bottleneck at a synchronized method or a large number of threads waiting for a resource.
- Make sure that enough threads are available to process the work both in IBM HTTP Server, database, and the application servers. Conversely, too many threads can increase resource contention and reduce throughput.
- Monitor garbage collections or the verbosegc option of your Java virtual machine. Excessive garbage collection can limit throughput.
Other useful links:
- If you need tuning assistance, IBM Services provides professional consultants to help.
- On Designing and Deploying Internet-Scale Services
Methodology Best Practices
Methodically capture data and logs for each test and record results in a spreadsheet. In general, it is best to change one varaible at a time. Example test matrix:
Test # Start Time Ramped Up End Time Concurrent Users Average Throughput (Responses per Second) Average Response Time (ms) Average WAS CPU% Average Database CPU% 1 2020-01-01 14:00:00 UTC 2020-01-01 14:30:00 UTC 2020-01-01 16:00:00 UTC 10 50 100 25 25 Use a flow chart that everyone agrees to. Otherwise, alpha personalities or haphazard and random testing are likely to prevail, and these are less likely to succeed. The following is just an example.

Depth first means first "fill in" application server JVMs within a node before scaling across multiple nodes. The following are example hypotheses that are covered in more detail in each product chapter. They are summarized here just for illustration of hypotheses:- CPU is low, so we can increase threads.
- CPU is low, so there is lock contention (gather monitor contention data through a sampling profiler such as IBM Java Health Center).
- CPU is high, so we can decrease threads or investigate possible code issues (gather profiling data through a sampling profiler such as IBM Java Health Center).
- Garbage collection overhead is high, so we can tune it.
- Connection pool wait times are high, so we can increase the size of the connection pool (if the total number of connections do not exceed the limits in the database).
- Database response times are high (also identified in thread dumps with many threads stuck in SQL calls), so we can investigate the database.
Deeply understand the logical, physical, and network layout of the systems. Create a rough diagram of the relevant components and important details. For example, how are the various systems connected and do they share any resources (potential bottlenecks) such as networks, buses, etc? Are the operating systems virtualized? It's also useful to understand the processor layout and in particular, the L2/L3 cache (and NUMA) layouts as you may want to "carve out" processor sets along these boundaries.
Most, if not all, benchmarks have a target maximum concurrent user count. This is usually the best place to start when tuning the various queue sizes, thread pools, etc.
Averages should be used instead of spot observations. For important statistics such as throughput, getting standard deviations would be ideal.
Each test should have a sufficient "ramp up" period before data collection starts. Applications may take time to cache certain content and the Java JIT will take time to optimally compile hot methods.
Monitor all parts of the end-to-end system.
Consider starting with an extremely simplified application to ensure that the desired throughput can be achieved. Incrementally exercise each component: for example, a Hello World servlet, followed by a servlet that does a simple select from a database, etc. This lets you confirm that end-to-end "basics" work, including the load testing apparatus.
Run a saturation test where everything is pushed to the maximum (may be difficult due to lack of test data or test machines). Make sure things don't crash or break.
Is changing one variable at a time always correct?
It's common wisdom that one should always change one variable at a time when investigating problems, performance testing, etc. The idea is that if you change more than one variable at a time, and the problem goes away, then you don't know which one solved it. For example, let's say one changes the garbage collection policy, maximum heap size, and some of the application code, and performance improves, then one doesn't know what helped.
The premise underlying this wisdom is that all variables are independent, which is sometimes (maybe usually, to different degrees) not the case. In the example above, the garbage collection policy and maximum heap size are intimately related. For example, if you change the GC policy to gencon but don't increase the maximum heap size, it may not be a fair comparison to a non-gencon GC policy, because the design of gencon means that some proportion of the heap is no longer available relative to non-gencon policies (due to the survivor space in the nursery, based on the tilt ratio).
What's even more complicated is that it's often difficult to reason about variable independence. For example, most variables have indirect effects on processor usage or other shared resources, and these can have subtle effects on other variables. The best example is removing a bottleneck at one tier overloads another tier and indirectly affects the first tier (or exercises a new, worse bottleneck).
So what should one do? To start, accept that changing one variable at a time is not always correct; however, it's often a good starting point. Unlesss there's a reason to believe that changing multiple, dependent variables makes sense (for example, comparing gencon to non-gencon GC policies), then it's fair to assume initially that, even if variables may not be truly independent, the impact of one variable commonly drowns out other variables.
Just remember that ideally you would test all combinations of the variables. Unfortunately, as the number of variables increases, the number of tests increases exponentially. Specifically, for N variables, there are (2N - 1) combinations. For example, for two variables A and B, you would test A by itself, B by itself, and then A and B together (22 - 1 = 3). However, by just adding two more variables to make the total four variables, it goes up to 15 different tests.
There are three reasons to consider this question:
First, it's an oversimplification to think that one should always change one variable at a time, and it's important to keep in the back of one's head that if changing one variable at a time doesn't work, then changing multiple variables at a time might (of course, they might also just be wrong or inconsequential variables).
Second, particularly for performance testing, even if changing a single variable improves performance, it's possible that changing some combination of variables will improve performance even more. Which is to say that changing a single variable at a time is non-exhaustive.
Finally, it's not unreasonable to try the alternative, scattershot approach first of changing all relevant variables at the same time, and if there are benefits, removing variables until the key ones are isolated. This is more risky because there could be one variable that makes an improvement and another that cancels that improvement out, and one may conclude too much from this test. However, one can also get lucky by observing some interesting behavior from the results and then deducing what the important variable(s) are. This is sometimes helpful when one doesn't have much time and is feeling lucky (or has some gut feelings to support this approach).
So what's the answer to the question, "Is changing one variable at a time always correct?"
No, it's not always correct. Moreover, it's not even optimal, because it's non-exhaustive. But it usually works.
Keep a Playbook
When a naval ship declares "battle stations" there is an operations manual that every sailor on the ship is familiar with, knows where they need to go and what they need to do. Much like any navy when a problem occurs that negatively affects the runtime environment it is helpful for everyone to know where they need to be and who does what.
Each issue that occurs is an educational experience. Effective organizations have someone on the team taking notes. This way when history repeats itself the team can react more efficiently. Even if a problem does not reappear the recorded knowledge will live on. Organizations are not static. People move on to new projects and roles. The newly incoming operations team members can inherit the documentation to see how previous problems were solved.
For each problem, consider recording each of the following points:
- Symptom(s) of the problem - brief title
- More detailed summary of the problem.
- Who reported the problem?
- What exactly is the problem?
- Summary of all the people that were involved in troubleshooting and what was their role? The role is important because it will help the new team understand what roles need to exist.
- Details of
- What data was collected?
- Who looked at the data?
- The result of their analysis
- What recommendations were made
- Did the recommendations work (i.e. fix the problem)?
Statistics
Basic statistics
- Average/Mean (μ): An average is most commonly an arithmetic mean of a set of values, calculated as the sum of a set of values, divided by the count of values: μ = (x1 + x2 + ... + xN)/N. For example, to calculate the average of the set of values (10, 3, 3, 1, 99), sum the values (116), and divide by the count, 5 (μ=23.2).
- Median: A median is the middle value of a sorted set of values. For example, to calculate the median of the set of values (10, 3, 3, 1, 99), sort the values (1, 3, 3, 10, 99), and take the midpoint value (3). If the count of values is even, then the median is the average of the middle two values.
- Mode: A mode is the value that occurs most frequently. For example, to calculate the mode of the set of values (10, 3, 3, 1, 99), find the value that occurs the most times (3). If multiple values share this property, then the set is multi-modal.
- Standard Deviation (σ): A standard deviation is a measure of how far a set of values are spread out relative to the mean, with a standard deviation of zero meaning all values are equal, and more generally, the smaller the standard deviation, the more the values are closer to the mean. If the set of values is the entire population of values, then the population standard deviation is calculated as the square root of the average of the squared differences from the mean: σ = √( ( (x1 - μ)2 + (x2 - μ)2 + ... + (xN - μ)2 ) / N ). If the set of values is a sample from the entire population, then the sample standard deviation uses the division (N - 1) instead of N.
- Confidence Interval: A confidence interval describes the range of values in which the true mean has a high likelihood of falling (usually 95%), assuming that the original random variable is normally distributed, and the samples are independent. If two confidence intervals do not overlap, then it can be concluded that there is a difference at the specified level of confidence in performance between two sets of tests.
- Relative change: The ratio of the difference of a new quantity (B) minus an old quantity (A) to the old quantity: (B-A)/A. Multiply by 100 to get the percent change. If A is a "reference value" (e.g. theoretical, expected, optimal, starting, etc.), then relative/percent change is relative/percent difference.
Small sample sizes (N) and large variability (σ) decrease the likelihood of correct interpretations of test results.
Here is R code that shows each of these calculations (the R project is covered under the Major Tools chapter):
> values=c(10, 3, 3, 1, 99)
> mean(values)
[1] 23.2
> median(values)
[1] 3
> summary(values) # A quick way to do the above
   Min. 1st Qu.  Median    Mean 3rd Qu.    Max.
    1.0     3.0     3.0    23.2    10.0    99.0
> mode = function(x) { ux = unique(x); ux[which.max(tabulate(match(x, ux)))] }
> mode(values)
[1] 3
> sd(values) # Sample Standard Deviation
[1] 42.51118
> error = qt(0.975,df=length(values)-1)*(sd(values)/sqrt(length(values)))
> ci = c(mean(values) - error, mean(values) + error)
> ci # Confidence Interval at 95%
[1] -29.5846  75.9846
Amdahl's Law
Amdahl's Law states that the maximum expected improvement to a system when adding more parallelism (e.g. more CPUs of the same speed) is limited by the time needed for the serialized portions of work. The general formula is not practically calculable for common workloads because they usually include independent units of work; however, the result of Amdahl's Law for common workloads is that there are fundamental limits of parallelization for system improvement as a function of serialized execution times.
In general, because no current computer system avoids serialization completely, Amdahl's Law shows that, all other things equal, the throughput curve of a computer system will approach an asymptote (which is limited by the bottlenecks of the system) as number of concurrent users increases:

Relatedly, response times follow a hockey stick pattern once saturation occurs:

Fig. 3 shows the canonical system response time characteristic R (the dark curve). This shape is often referred to as the response hockey stick. It is the kind of curve that would be generated by taking time-averaged delay measurements in steady state at successive client loads. The dashed lines in Fig. 3 also represent bounds on the response time characteristic. The horizontal dashed line is the floor of the achievable response time Rmin. It represents the shortest possible time for a request to get though the system in the absence of any contention. The sloping dashed line shows the worst case response time once saturation has set in.
Queuing Theory
Queuing theory is a branch of mathematics that may help model, analyze, and predict the behavior of queues when requests (e.g. HTTP requests) flow through a set of servers (e.g. application threads) or a network of queues. The models are approximations with various assumptions that may or may not be applicable in real world situations. There are a few key things to remember:
- A server is the thing that actually processes a request (e.g. an application thread).
- A queue is a buffer in front of the servers that holds requests until a server is ready to process them (e.g. a socket backlog, or a thread waiting for a connection from a pool).
- The arrival rate (λ) is the rate at which requests enter a queue. It is often assumed to have the characteristics of a random/stochastic/Markovian distribution such as the Poisson distribution.
- The service time (µ) is the average response time of servers at a queue. Similar to the arrival rate, it is often assumed to have the characteristics of a Markovian distribution such as the Exponential distribution.
- Queues are described using Kendall's
notation: A/S/c
- A is the distribution of arrivals, which is normally M for Markovian (e.g. Poisson),
- S is the distribution of service times, which is normally M for Markovian (e.g. Expontential),
- c is the number of concurrent servers (e.g. threads).
- Therefore, the most common type of a queue we will deal with is an M/M/c queue.
For example, we will model a typical three tier architecture with a web server (e.g. IHS), application server (e.g. WAS), and a database:

This is a queuing network of three multi-server queues in series. Steady state analysis can be done by analyzing each tier independently as a multi-server M/M/c queue. This is so because it was proved that in a network where multi-server queues are arranged in series, the steady state departure processes of each queue are the same as the arrival process of the next queue. That is, if the arrival process in the first multi-server queue is Poisson with parameter λ then the steady state departure process of the same queue will also be Poisson with rate λ, which means the steady state arrival and departure processes of the 2nd multi-server queue will also be Poisson with rate λ. This in turn means that the steady state arrival and departure processes of the 3rd multi-server queue will also be Poisson with rate λ.
Assumptions:
- The arrival process is Poisson with rate λ. That is, the
inter-arrival time T1 between arrivals of two successive requests
(customers) is exponentially distributed with parameter λ. This
means:

- The service rate of each server is exponentially distributed with
parameter µ, that is the distribution of the service time is:

1. Stability Condition: The arrival rate has to be less than the service rate of m servers together. That is:

2. State Occupancy Probability:
pi = Probability that there are i customers (requests) in the system (at service)
pm+k = Probability that there are m+k customers (requests) in the system (m at service and k waiting in the queue)

3. Probability that a Customer (Request) has to Wait:

4. Expected number of Busy Servers:

5. Expected number of Waiting Requests:

6. Expected Waiting Time in the Queue:

7. Expected Waiting Time in the Queue:

8. Expected Waiting Time in the System:

To obtain performance measures of the Web Server, Application Server and Database Server, we replace m in the above given formulae by NWS, NAS and NDS, respectively and replace µ by 1/TWS, 1/TAS and 1/TDS, respectively. As an example, the performance measures for the Web Server are given below. The performance measures for App Server and the DB Server can be obtained in the same way.
1W. Stability Condition for Web Server Queue:

2W. Web Server State Occupancy Probability:
pi = Probability that there are i customers (requests) in the system (at service)
pNws+k= Probability that there are NWS+k customers (requests) in the system (NWS at service and k waiting in the queue)
3W. Probability that a Customer (Request) has to Wait at the Web Server:

4W. Expected number of Busy Web Servers:

5W. Expected number of Requests Waiting at the Web Server Queue:

6W. Expected Waiting Time in the Web Server Queue:

7W. Expected number of Requests in the Web Server:

8W. Expected Waiting Time in the Web Server:

Little's Law
Little's Law states that the long-term average number of requests in a stable system (L) is equal to the long-term average effective arrival rate, λ, multiplied by the (Palm‑)average time a customer spends in the system, W; or expressed algebraically: L = λW.
Practical Queuing Theory
The key takeaways from above are that queues are largely a function of three variables: arrival rate, number of threads, and service time which may be visualized with the following key performance indicators (KPIs):

There are seven key things that ideally should be monitored at as many layers as possible, both for diagnosing performance problems and planning for scalability:
- Service Time: the average time it takes to complete a request by a server thread. Think of a cashier at a supermarket and the average time it takes a cashier to check out a customer.
- Utilization: the total number of available server threads and the average percentage used. Think of the number of cashiers at a supermarket and the average percentage actively processing a customer.
- Arrival Rate: the rate at which work arrives at the queue. Think of the rate at which customers arrive at a supermarket checkout line.
- Response Time: the average time it takes to wait in the queue plus the service time. Think of the average time it takes a customer to stand in line at a checkout line plus the average time it takes a cashier to check out a customer.
- Queue Depth: the average size of the waiting queue. Think of the average number of customers at a supermarket waiting in a queue of a checkout line.
- Error Rate: the rate of errors processing requests. Think of the rate at which customers at a supermarket fail to complete a check out and leave the store (on the internet, they might immediately come back by refreshing).
- Latency: The time spent in transit to the queue.
The above six statistics will be called Key Queue Statistics (and OS CPU, memory, disk, and network can be included as well). For this infrastructure, an ideal interval at which to capture these statistics seems to be every 10 seconds (this may need to be increased for certain components to reduce the performance impact).
Throughput is simply the number of completed requests for some unit of time. Throughput may drop if service time increases, the total number of available server threads decreases, and/or the arrival rate decreases (when server thread utilization is less than 100%).
For performance analysis, a computer infrastructure may be thought of as a network of queues (there's no supermarket analogy because you don't check out of one line and queue into another check out line). The IHS queue feeds the WAS queue which feeds the DB2 queue and so on. Roughly speaking, the throughput of an upstream queue is usually proportional to the arrival rate of the downstream queue.
Each one of these queues may be broken down into sub-queues all the way down to each CPU or disk being a queue; however, in general, this isn't needed and only the overall products can be considered. From the end-user point of view, there's just a single queue: they make an HTTP request and get a response; however, to find bottlenecks and scale, we need to break down this one big queue into a queuing network.
It is common for throughput tests to drive enough load to bring a node to CPU saturation. Strictly speaking, if the CPU run queue is consistently greater than the number of CPU threads, since CPUs are not like a classical FIFO queue but instead context switch threads in and out, then throughput may drop as service time increases due to these context switches, reduced memory cache hits, etc. In general, the relative drop tends to be small; however, an ideal throughput test would saturate the CPUs without creating CPU run queues longer than the number of CPU threads.
Response Times and Throughput
Response times impact throughput directly but they may also impact throughput indirectly if arrivals are not independent (e.g. per-user requests are temporally dependent) as is often the case for human-based workloads such as websites.
As a demonstration, imagine that two concurrent users arrive at time 00:00:00 (User1 & User2) and two concurrent users arrive at time 00:00:01 (User3 & User4). Suppose that each user will make three total requests denoted (1), (2) and (3). Suppose that (2) is temporally dependent on (1) in the sense that (2) will only be submitted after (1) completes. Suppose that (3) is temporally dependent on (2) in the sense that (3) will only be submitted after (2) completes. For simplicity, suppose that the users have zero think time (so they submit subsequent requests immediately after a response). Then suppose two scenarios: average response time = 1 second (columns 2 and 3) and average response time = 2 seconds (columns 4 and 5):
Request    Arrived (μ=1s)  Completed (μ=1s)    Arrived (μ=2s)  Completed (μ=2s)
User1(1)   00:00:00        00:00:01            00:00:00        00:00:02
User1(2)   00:00:01        00:00:02            00:00:02        00:00:04
User1(3)   00:00:02        00:00:03            00:00:04        00:00:06
User2(1)   00:00:00        00:00:01            00:00:00        00:00:02
User2(2)   00:00:01        00:00:02            00:00:02        00:00:04
User2(3)   00:00:02        00:00:03            00:00:04        00:00:06
User3(1)   00:00:01        00:00:02            00:00:01        00:00:03
User3(2)   00:00:02        00:00:03            00:00:03        00:00:05
User3(3)   00:00:03        00:00:04            00:00:05        00:00:07
User4(1)   00:00:01        00:00:02            00:00:01        00:00:03
User4(2)   00:00:02        00:00:03            00:00:03        00:00:05
User4(3)   00:00:03        00:00:04            00:00:05        00:00:07
The throughput will be as follows:
Time                       Throughput/s (μ=1s)                 Throughput/s (μ=2s)
00:00:01                   2                                   0
00:00:02                   4                                   2
00:00:03                   4                                   2
[...]
Note that in the above example, we are assuming that the thread pool is not saturated. If the thread pool is saturated then there will be queuing and throughput will be bottlenecked further.
Of course, ceteris paribus, total throughput is the same over the entire time period (if we summed over all seconds through 00:00:07); however, peak throughput for any particular second will be higher for the lower response time (4 vs. 2). In addition, ceteris paribus often will not hold true because user behavior tends to change based on increased response times (e.g. fewer requests due to frustration [in which case total throughput may drop]; or, more retry requests due to frustration [in which case error throughput may increase]).
Tuning Timeouts
- For On-Line Transaction Processing (OLTP) systems, human perception may be assumed to take at least 400ms; therefore, an ideal timeout for such systems is about 500ms.
- One common approach to setting timeouts based on historical data is to calculate the 99th percentile response time from historical data from healthy days. An alternative is to use the maximum response time plus 20%. Note that both of these approaches often capture problematic responses which should not be considered healthy; instead, consider plotting the distribution of response times and take into account expectations of the system and business requirements.
- Timeouts should be set with all stakeholders involved as there may be known times (e.g. once per month or per year) that are expected to be high.
- If systems allow it (e.g. IBM HTTP Server with websphere-serveriotimeout), consider setting an aggressive global timeout and then override with longer timeouts for particular components that are known to take longer (e.g. report generation).
- In general, timeouts should follow a "funnel model" with the largest timeouts nearer to the user (e.g. web server) and lower timeouts in the application/database/etc.
Determining Bottlenecks
There are three key variables in evaluating bottlenecks at each layer of a queuing network:
- Arrival rate
- Concurrency
- Response time
These are also indirectly affected by many variables. For example, CPU saturation will impact response times and, with sufficient queuing, concurrency as a thread pool saturates; TCP retransmits or network saturation will impact arrival rate and response times, etc.
Common tools to investigate arrival rates and response times include access logs and averaged monitoring statistics. Common tools to investigate concurrency and excessive response times are averaged monitoring statistics and thread dumps.
Testing
Use Cases to Test Cases
Applications are typically designed with specific end user scenarios documented as use cases (for example, see the book Writing Effective Use Cases by Alistair Cockburn). Use cases drive the test cases that are created for load testing.
100% vs 80/20 rule?
A common perception in IT is performance testing can be accommodated by what is know as the 80/20 rule: We will test what 80% of actions the users do and ignore the 20% they do not as frequently. However, what is not addressed are the 20% that can induce a negative performance event causing serious performance degradation to the other 80%. Performance testing should always test 100% of the documented use cases.
The 80/20 rule also applies to how far you should tune. You can increase performance by disabling things such as performance metrics (PMI) and logging, but this may sacrifice serviceability and maintenance. Unless you're actually benchmarking for top speed, then we do not recommend applying such tuning.
Load Testing
Begin by choosing a benchmark, a standard set of operations to run. This benchmark exercises those application functions experiencing performance problems. Complex systems frequently need a warm-up period to cache objects, optimize code paths, and so on. System performance during the warm-up period is usually much slower than after the warm-up period. The benchmark must be able to generate work that warms up the system prior to recording the measurements that are used for performance analysis. Depending on the system complexity, a warm-up period can range from a few thousand transactions to longer than 30 minutes.
Another key requirement is that the benchmark must be able to produce repeatable results. If the results vary more than a few percent from one run to another, consider the possibility that the initial state of the system might not be the same for each run, or the measurements are made during the warm-up period, or that the system is running additional workloads.
Several tools facilitate benchmark development. The tools range from tools that simply invoke a URL to script-based products that can interact with dynamic data generated by the application. IBM Rational has tools that can generate complex interactions with the system under test and simulate thousands of users. Producing a useful benchmark requires effort and needs to be part of the development process. Do not wait until an application goes into production to determine how to measure performance.
The benchmark records throughput and response time results in a form to allow graphing and other analysis techniques.
Reset as many variables possible on each test. This is most important for tests involving databases which tend to accumulate data and can negatively impact performance. If possible, data should be truncated & reloaded on each test.
Stress Testing Tool
There are various commercial products such as IBM Rational Performance Tester. If such a tool is not available, there are various open source alternatives such as Apache Bench, Apache JMeter, Siege, and OpenSTA. The Apache JMeter tool is covered in more detail in the Major Tools chapter and it is a generally recommended tool.
Apache Bench
Apache Bench is a binary distributed in the "bin" folder of the httpd package (and therefore with IBM HTTP Server as well). It can do very simple benchmarking of a single URL, specifying the total number of requests (-n) and the concurrency at which to send the requests (-c):
 $ ./ab -n 100 -c 5 http://ibm.com/
 This is ApacheBench, Version 2.0.40-dev <$Revision: 30701 $> apache-2.0
 Copyright (c) 1996 Adam Twiss, Zeus Technology Ltd
 Copyright (c) 1998-2002 The Apache Software Foundation

 Benchmarking ibm.com (be patient).....done

 Server Software:
 Server Hostname:        ibm.com
 Server Port:            80

 Document Path:          /
 Document Length:        227 bytes

 Concurrency Level:      5
 Time taken for tests:   2.402058 seconds
 Complete requests:      100
 Failed requests:        0
 Write errors:           0
 Non-2xx responses:      100
 Total transferred:      49900 bytes
 HTML transferred:       22700 bytes
 Requests per second:    41.63 [#/sec] (mean)
 Time per request:       120.103 [ms] (mean)
 Time per request:       24.021 [ms] (mean, across all concurrent requests)
 Transfer rate:          19.98 [Kbytes/sec] received

 Connection Times (ms)
               min  mean[+/-sd] median   max
 Connect:       44   56   8.1     55      85
 Processing:    51   61   6.9     60      79
 Waiting:       51   60   6.8     59      79
 Total:         97  117  12.1    115     149

 Percentage of the requests served within a certain time (ms)
   50%    115
   66%    124
   75%    126
   80%    128
   90%    132
   95%    141
   98%    149
   99%    149
  100%    149 (longest request)
Common Benchmarks
DayTrader
DayTrader is a commonly used benchmark application for Java Enterprise Edition. It simulates an online stock trading system and exercises servlets, JSPs, JDBC, JTA transactions, EJBs, MDBs, and more.
There are open source versions of DayTrader for Java EE 7 and Java EE 8.
DayTrader provides three different implementations of the business services:
- TradeDirect (default): The TradeDirect class performs CRUD (create, read, update, and delete) operations directly agaist the supporting database using custom JDBC code. Database connections, commits, and rollbacks are managed manually in the code. JTA user transactions are used to coordinate 2-phase commmits.
- TradeJDBC: The TradeJDBC stateless session bean serves as a wrapper for TradeDirect. The session bean assumes control of all transaction management while TradeDirect remains responsible for handleing the JDBC operations and connections. This implementation reflects the most commonly used JavaEE application design pattern.
- TradeBean: The TradeBean stateless session bean uses Caontainer Managed Persistence (CMP) entity beans to represent the business objects. The state of these objects is completely managed by the application servers EJB container.
IBMStockTrader
IBMStockTrader is an open source sample application that simulates an online stock trading system. It exercises MicroServices, OpenShift operators and more.
Acme Air
Acme Air is an open source benchmark application for Java MicroServices. It simulates a fictitious airline called Acme Air which handles flight bookings.
Acme Air is available as part of multiple repositories with the mainservice holding installation instructions:
- acmeair-mainservice-java
- acmeair-authservice-java
- acmeair-bookingservice-java
- acmeair-customerservice-java
- acmeair-flightservice-java
There is a monolithic version of the application:
There are SprintBoot versions of the microservices as well:
- acmeair-mainservice-springboot
- acmeair-authservice-springboot
- acmeair-bookingservice-springboot
- acmeair-customerservice-springboot
- acmeair-flightservice-springboot
Notes:
- Additional JMeter scripts
- Use the environment variable
SECURE_SERVICE_CALLS=falseto disable authentication.
Think Times
Think time is defined to be the amount of time a user spends between requests. The amount of time a user spends on the page depends on how complex the page is and how long it takes for the user to find the next action to take. The less complex the page the less time it will take for the user to take the next action. However, no two users are the same so there is some variability between users. Therefore think time is generally defined as a time range, such as 4-15 seconds, and the load test tool will attempt to drive load within the parameters of think time. Testing that incorporates think time is attempting to simulate live production work load in order to attempt to tune the application for optimal performance.
There is also a "stress" test where think time is turned down to zero. Stress testing is typically used to simulate a negative production event where some of the application servers may have gone off line and are putting undue load on those remaining. Stress testing helps to understand how the application will perform during such a negative event in order to help the operations team understand what to expect. Stress testing also typically breaks the application in ways not encountered with normal think time testing. Therefore, stress testing is a great way to both:
- Break the application and have an attempt to fix it before being placed in production, and
- Providing the operations staff with information about what production will look like during a negative event.
Operating Systems
Additionally, see the chapter for your particular operating system:
Central Processing Unit (CPU)
A processor is an integrated circuit (also known as a socket or die) with one or more central processing unit (CPU) cores. A CPU core executes program instructions such as arithmetic, logic, and input/output operations. CPU utilization is the percentage of time that programs or the operating system execute as opposed to idle time. A CPU core may support simultaneous multithreading (also known as hardware threads or hyperthreads) which appears to the operating system as additional logical CPU cores. Be aware that simple CPU utilization numbers may be unintuitive in the context of advanced processor features. Examples:
- Intel:
The current implementation of [CPU utilization] [...] shows the portion of time slots that the CPU scheduler in the OS could assign to execution of running programs or the OS itself; the rest of the time is idle [...] The advances in computer architecture made this algorithm an unreliable metric because of introduction of multi core and multi CPU systems, multi-level caches, non-uniform memory, simultaneous multithreading (SMT), pipelining, out-of-order execution, etc.
A prominent example is the non-linear CPU utilization on processors with Intel® Hyper-Threading Technology (Intel® HT Technology). Intel® HT technology is a great performance feature that can boost performance by up to 30%. However, HT-unaware end users get easily confused by the reported CPU utilization: Consider an application that runs a single thread on each physical core. Then, the reported CPU utilization is 50% even though the application can use up to 70%-100% of the execution units. (https://software.intel.com/en-us/articles/intel-performance-counter-monitor)
- AIX:
Although it might be somewhat counterintuitive, simultaneous multithreading performs best when the performance of the cache is at its worst.
- IBM Senior Technical Staff:
Use care when partitioning [CPU cores] [...] it's important to recognize that [CPU core] partitioning doesn't create more resources, it simply enables you to divide and allocate the [CPU core] capacity [...] At the end of the day, there still needs to be adequate underlying physical CPU capacity to meet response time and throughput requirements when partitioning [CPU cores]. Otherwise, poor performance will result.
It is not necessarily problematic for a machine to have many more program threads than processor cores. This is common with Java and WAS processes that come with many different threads and thread pools by default that may not be used often. Even if the main application thread pool (or the sum of these across processes) exceeds the number of processor cores, this is only concerning if the average unit of work uses the processor heavily. For example, if threads are mostly I/O bound to a database, then it may not be a problem to have many more threads than cores. There are potential costs to threads even if they are usually sleeping, but these may be acceptable. The danger is when the concurrent workload on available threads exceeds processor capacity. There are cases where thread pools are excessively large but there has not been a condition where they have all filled up (whether due to workload or a front-end bottleneck). It is very important that stress tests saturate all commonly used thread pools to observe worst case behavior.
Depending on the environment, number of processes, redundancy, continuous availability and/or high availability requirements, the threshold for %CPU utilization varies. For high availability and continuous availability environments, the threshold can be as low as 50% CPU utilization. For non-critical applications, the threshold could be as high as 95%. Analyze both the non-functional requirements and service level agreements of the application in order to determine appropriate thresholds to indicate a potential health issue.
It is common for some modern processors (including server class) and operating systems to enable processor scaling by default. The purpose of processor scaling is primarily to reduce power consumption. Processor scaling dynamically changes the frequency of the processor(s), and therefore may impact performance. In general, processor scaling should not kick in during periods of high use; however, it does introduce an extra performance variable. Weigh the energy saving benefits versus disabling processor scaling and simply running the processors at maximum speed at all times (usually done in the BIOS).
Test affinitizing processes to processor sets (operating system specific configuration). In general, affinitize within processor boundaries. Also, start each JVM with -XgcthreadsN (IBM Java) or -XX:ParallelGCThreads=N (Oracle/HotSpot Java) where N equals the number of processor core threads in the processor set.
It is sometimes worth understanding the physical architecture of the central processing units (CPUs). Clock speed and number of cores/hyperthreading are the most obviously important metrics, but CPU memory locality, bus speeds, and L2/L3 cache sizes are sometimes worth considering. One strategy for deciding on the number of JVMs is to create one JVM per processor chip (i.e. socket) and bind it to that chip.
It's common for operating systems to dedicate some subset of CPU cores for interrupt processing and this may distort other workloads running on those cores.
Different types of CPU issues (Old Java Diagnostic Guide):
- Inefficient or looping code is running. A specific thread or a group of threads is taking all the CPU time.
- Points of contention or delay exist. CPU usage is spread across most threads, but overall CPU usage is low.
- A deadlock is present. No CPU is being used.
How many CPUs per node?
IBM Senior Technical Staff:
As a starting point, I plan on having at least one CPU [core] per application server JVM; that way I have likely minimized the number of times that a context switch will occur -- at least as far as using up a time slice is concerned (although, as mentioned, there are other factors that can result in a context switch). Unless you run all your servers at 100% CPU, more than likely there are CPU cycles available as application requests arrive at an application server, which in turn are translated into requests for operating system resources. Therefore, we can probably run more application servers than CPUs.
Arriving at the precise number that you can run in your environment, however, brings us back to it depends. This is because that number will in fact depend on the load, application, throughput, and response time requirements, and so on, and the only way to determine a precise number is to run tests in your environment.
How many application processes per node?
IBM Senior Technical Staff:
In general one should tune a single instance of an application server for throughput and performance, then incrementally add [processes] testing performance and throughput as each [process] is added. By proceeding in this manner one can determine what number of [processes] provide the optimal throughput and performance for their environment. In general once CPU utilization reaches 75% little, if any, improvement in throughput will be realized by adding additional [processes].
Registers
CPUs execute instructions (e.g. add, subtract, etc.) from a computer program, also known as an application, executable, binary, shared library, etc. CPUs have a fixed number of registers used to perform these instructions. These registers have variable contents updated by programs as they execute a set of instructions.
Assembly Language
Assembly language (asm) is a low-level programming language with CPU
instructions (and other things like constants and comments). It is
compiled by an assembler into machine code which is executed. In the
following example, the first instruction of the main
function is to push a register onto the stack, the second
instruction is to copy (mov) one register into another, and
so on:
0000000000401126 <main>:
  401126:       55                      push   %rbp
  401127:       48 89 e5                mov    %rsp,%rbp
  40112a:       48 83 ec 10             sub    $0x10,%rsp
  40112e:       89 7d fc                mov    %edi,-0x4(%rbp)
  401131:       48 89 75 f0             mov    %rsi,-0x10(%rbp)
  401135:       bf 10 20 40 00          mov    $0x402010,%edi
  40113a:       e8 f1 fe ff ff          call   401030 <puts@plt>
  40113f:       b8 00 00 00 00          mov    $0x0,%eax
  401144:       c9                      leave
  401145:       c3                      ret
Assembly Syntax
The most common forms of syntax for assembly are AT&T and Intel
syntax. There are confusing differences between the two. For example, in
AT&T syntax, the source of a mov instruction is first
followed by the destination:
mov esp, ebpWhereas, in Intel syntax, the destination of mov
instruction is first followed by the destination:
mov ebp, espInstruction Pointer
CPUs may have a register that points to the address of the current execution context of a program. This register is called the instruction pointer (IP), program counter (PC), extended instruction pointer (EIP), instruction address register (IAR), relative instruction pointer (RIP), or other names. Depending on the phase in the CPU's execution, this register may be pointing at the currently executing instruction, or one of the instructions that will be subsequently executed.
Program Stack
A program is usually made of functions which are logical groups of
instructions with inputs and outputs. In the following example, the
program starts in the main function and calls the
getCubeColume function. The getCubeVolume
function calculates the volume and returns it to the main
function which then prints the calculation along with some text:
#include <stdio.h>

int getCubeVolume(int length) {
  return length * length * length;
}

int main(int argc, char **argv) {
  printf("The volume of a 3x3x3 cube is: %d\n", getCubeVolume(3));
  return 0;
}
When getCubeVolume is ready to return its result, it
needs to know how to go back to the main function at the
point where getCubeVolume was called. A program stack is
used to manage this relationship of function executions. A stack is a
data structure in computer science that has push and
pop operations. Pushing something onto a stack puts an item
on top of all existing items in the stack. Popping something off of a
stack removes the top item in the stack.
A real world example is a stack of dishes. As dishes are ready to be
washed, they could be pushed on top of a stack of dishes, and a
dishwasher could iteratively pops dishes off the top of the stack to
wash them. The order in which the dishes are washed is not necessarily
the order in which they were used. It might take a while for the
dishwasher to get to the bottom plate as long as new dirty plates are
constantly added. In this analogy, the dishwasher is the CPU and this is
why the main function is always in the stack as long as the
program is executing. Only after all program instructions have completed
will main be able to complete.
Similarly, a program stack is made of stack frames. Each stack frame
represents an executing program method. In the above example, if we
paused the program during the getCubeVolume call, the
program stack would be made of two frames: the main
function would be the stack frame at the bottom of the stack, and the
getCubeVolume function would the the stack frame at the top
of the stack.
Programs execute in a logical structure called a process which manages memory access, security, and other aspects of a program. Programs have one or more threads which are logical structures that manage what is executing on CPUs. Each thread has a program stack which is an area of memory used to manage function calls. The program stack may also be used for other purposes such as managing temporary variable memory within a function ("local", "stack frame local", or "automatic" variables).
Confusingly, the program stack commonly grows downward in memory. For
example, let's say a thread has a stack that is allocated in the memory
range 0x100 to 0x200. When the main function starts
executing, let's say after some housekeeping, the stack starts at 0x180.
As main calls getCubeVolume, the stack will
"grow" downward into, for example, 0x150 so that
getCubeVolume uses the memory range 0x150 - 0x180 for
itself. When the getCubeVolume finishes, the stack "pops"
by going back from 0x150 to 0x180.
Stack Pointer
CPUs may have a register that points to the top of the program stack for the currently executing thread. This register is called the stack pointer (SP), extended stack pointer (ESP), register stack pointer (RSP), or other names.
Frame Pointer
CPUs may have a register that points to the bottom of the currently executing stack frame where local variables for that function start. This register is called the frame pointer (FP), base pointer (BP), extended base pointer (EBP), register base pointer (RBP), or other names. Originally, this was used because the only other relative address available is the stack pointer which may be constantly moving as local variables are added and removed. Thus, if a function needed access to a local variable passed into the function, it could just use a constant offset from the frame pointer.
Compilers may perform an optimization called frame pointer omission
(FPO) (e.g. with gcc with -O or
-fomit-frame-pointer, or by
default since GCC 4.6) that uses the frame pointer register as a
general purpose register instead and embeds the necessary offsets into
the program using the stack pointer to avoid the need for frame pointer
offsets.
In the unoptimized case (e.g. without -O or with
-fno-omit-frame-pointer with gcc), a common
calling convention is for each function to first push the previous
function's frame pointer onto its stack, copy the current value of the
stack pointer into the frame pointer, and then allocate some space for
the function's local variables (Intel Syntax):
push ebp
mov ebp, esp
sub esp, $LOCALS
When the function returns, it will remove all the local stack space it used, pop the frame pointer to the parent function's value, and return to the previous function as well as release the amount of stack used for incoming parameters into this function; for example (Intel Syntax):
mov esp, ebp
pop ebp
ret $INCOMING_PARAMETERS_SIZE
When a function calls another function, any parameters are pushed onto the stack, then the instruction pointer plus the size of two instructions is pushed onto the stack, and then a jump instruction starts executing the new function. When the called function returns, it continues executing at two instructions after the call statement; for example (Intel Syntax):
push 1
push 2
push 3
push eip + 2
jmp getCubeVolume
Call Stack Walking
For diagnostic tools to walk a call stack ("unwind" the stack), in the unoptimized case where the frame pointer is used to hold the start of the stack frame, the tool simply has to start from the frame pointer which will allow it to find the pushed frame pointer of the previous function on the stack, and the tool can walk this linked list.
If a program is optimized to use frame pointer omission (FPO), then diagnostic tools generally cannot walk the stack since the frame pointer register is used for general purpose computation:
In some systems, where binaries are built with gcc --fomit-frame-pointer, using the "fp" method will produce bogus call graphs
As an alternative, if programs are compiled with debugging
information in the form of standards such as the DWARF
standard and specification that
describe detailed information of the program in instances of a Debugging
Information Entry (DIE) and particularly the Call Frame Information,
then some tools may be able to unwind the stack using this information
(e.g. using libdw and libunwind):
Every processor has a certain way of calling functions and passing arguments, usually defined in the ABI. In the simplest case, this is the same for each function and the debugger knows exactly how to find the argument values and the return address for the function.
For some processors, there may be different calling sequences depending on how the function is written, for example, if there are more than a certain number of arguments. There may be different calling sequences depending on operating systems. Compilers will try to optimize the calling sequence to make code both smaller and faster. One common optimization is when there is a simple function which doesn't call any others (a leaf function) to use its caller stack frame instead of creating its own. Another optimization may be to eliminate a register which points to the current call frame. Some registers may be preserved across the call while others are not.
While it may be possible for the debugger to puzzle out all the possible permutations in calling sequence or optimizations, it is both tedious and error prone. A small change in the optimizations and the debugger may no longer be able to walk the stack to the calling function.
The DWARF Call Frame Information (CFI) provides the debugger with enough information about how a function is called so that it can locate each of the arguments to the function, locate the current call frame, and locate the call frame for the calling function. This information is used by the debugger to "unwind the stack," locating the previous function, the location where the function was called, and the values passed.
Like the line number table, the CFI is encoded as a sequence of instructions that are interpreted to generate a table. There is one row in this table for each address that contains code. The first column contains the machine address while the subsequent columns contain the values of the machine registers when the instruction at that address is executed. Like the line number table, if this table were actually created it would be huge. Luckily, very little changes between two machine instructions, so the CFI encoding is quite compact.
Example usage includes perf record --call-graph dwarf,65528.
Programs such as dwarfdump may be used to print embedded
DWARF information in binaries. These are embedded in ELF sections such
as .eh_frame, .debug_frame,
eh_frame_hdr, etc.
Non-Volatile Registers
Non-volatile registers are generally required to be saved on the stack before calling a function, and popped off the stack when a function returns thus allowing them to be predictable values within the context of any function call. Such registers may include EBX, EDI, ESI, and EBP.
Approximate Overhead of System Calls (syscalls)
Although there are some historical measurements of system call times
(e.g. DOI:10.1145/269005.266660,
DOI:10.1145/224057.224075),
the overhead of system calls depends on the CPU and kernel and should be
benchmarked, for example, with getpid.
Random Access Memory (RAM), Physical Memory
Random access memory (RAM) is a high speed, ephemeral data storage circuit located near CPU cores. RAM is often referred to as physical memory to contrast it to virtual memory. Physical memory comprises the physical storage units which support memory usage in a computer (apart from CPU core memory registers), whereas virtual memory is a logical feature that an operating system provides for isolating and simplifying access to physical memory. Strictly speaking, physical memory and RAM are not synonymous because physical memory includes paging space, and paging space is not RAM.
Virtual memory
Modern operating systems are based on the concept of multi-user, time-sharing systems. Operating systems use three key features to isolate users and processes from each other: user mode, virtual address spaces, and process/resource limits. Before these innovations, it was much easier for users and processes to affect each other, whether maliciously or not.
User mode forces processes to use system calls provided by the kernel instead of directly interacting with memory, devices, etc. This feature is ultimately enforced by the processor itself. Operating system kernel code runs in a trusted, unrestricted mode, allowing it to do certain things that a user-mode process cannot do. A user-mode process can make a system call into the kernel to request such functions and this allows the kernel to enforce constraints and share limited resources.
Virtual address spaces allow each process to have its own memory space instead of managing and sharing direct memory accesses. The processor and kernel act in concert to allocate physical memory and paging space and translate virtual addresses to physical addresses at runtime. This provides the ability to restrict which memory a process can access and in what way.
File/Page Cache
The file or page cache is an area of RAM that is used as a write-behind or write-through cache for some virtual file system operations. If a file is created, written to, or read from, the operating system may try to perform some or all of these operations through physical memory and then asynchronously flush any changes to disk. This dramatically improves performance of file I/O at the risk of losing file updates if a machine crashes before the data is flushed to disk.
Memory Corruption
RAM bits may be intermittently and unexpectedly flipped by atmospheric radiation such as neutrons. This may lead to strange application behavior and kernel crashes due to unexpected state. Some RAM chips have error-correcting code (ECC) or parity logic to handle one or two invalid bit flips; however, depending on the features of such ECC RAM, and the number of bits flipped (e.g. a lot of radiation), memory corruption is still possible. Most consumer-grade personal computers do not offer ECC RAM and, depending on altitude and other factors, memory corruption rates with non-ECC RAM may reach up to 1 bit error per GB of RAM per 1.8 hours.
You may check if you are using ECC RAM with:
- Linux dmidecode
- Windows MemoryErrorCorrection:
wmic memphysical get memoryerrorcorrection
Paging, Swapping
Paging space is a subset of physical memory, often disk storage or a solid state drive (SSD), which the operating system uses as a "spillover" when demands for physical memory exceed available RAM. Historically, swapping referred to paging in or out an entire process; however, many use paging and swapping interchangeably today, and both address page-sized units of memory (e.g. 4KB).
Overcommitting Memory
Overcommitting memory occurs when less RAM is available than the peak in-use memory demand. This is either done accidentally (undersizing) or consciously with the premise that it is unlikely that all required memory will be accessed at once. Overcommitting is dangerous because the process of paging in and out may be time consuming. RAM operates at over 10s of GB/s, whereas even the fastest SSDs operate at a maximum of a few GB/s (often the bottleneck is the interface to the SSD, e.g. SATA, etc.). Overcommitting memory is particularly dangerous with Java because some types of garbage collections will need to read most of the whole virtual address space for a process in a short period of time. When paging is very heavy, this is called memory thrashing, and usually this will result in a total performance degradation of the system of multiple magnitudes.
Sizing Paging Space
Some people recommend sizing the paging files to some multiple of RAM; however, this recommendation is a rule of thumb that may not be applicable to many workloads. Some people argue that paging is worse than crashing because a system can enter a zombie-like state and the effect can last hours before an administrator is alerted and investigates the issue. Investigation itself may be difficult because connecting to the system may be slow or impossible while it is thrashing. Therefore, some decide to dramatically reduce paging space (e.g. 10 MB) or remove the paging space completely which will force the operating system to crash processes that are using too much memory. This creates clear and immediate symptoms and allows the system to potentially restart the processes and recover. A tiny paging space is probably preferable to no paging space in case the operating system decides to do some benign paging. A tiny paging space can also be monitored as a symptom of problems.
Some workloads may benefit from a decently sized paging space. For example, infrequently used pages may be paged out to make room for filecache, etc.
"Although most do it, basing page file size as a function of RAM makes no sense because the more memory you have, the less likely you are to need to page data out." (Russinovich & Solomon)
Non-uniform Memory Access (NUMA)
Non-uniform Memory Access (NUMA) is a design in which RAM is partitioned so that subsets of RAM (called NUMA nodes) are "local" to certain processors. Consider affinitizing processes to particular NUMA nodes.
32-bit vs 64-bit
Whether 32-bit or 64-bit will be faster depends on the application, workload, physical hardware, and other variables. All else being equal, in general, 32-bit will be faster than 64-bit because 64-bit doubles the pointer size, therefore creating more memory pressure (lower CPU cache hits, TLB, etc.). However, all things are rarely equal. For example, 64-bit often provides more CPU registers than 32-bit (this is not always the case, such as Power), and in some cases, the benefits of more registers outweigh the memory pressure costs. There are other cases such as some mathematical operations where 64-bit will be faster due to instruction availability (and this may apply with some TLS usage, not just obscure mathematical applications). Java significantly reduces the impact of the larger 64-bit pointers within the Java heap by using compressed references. With all of that said, in general, the industry is moving towards 64-bit and the performance difference for most applications is in the 5% range.
Large Page Support
Several platforms support using memory pages that are larger than the default memory page size. Depending on the platform, large memory page sizes can range from 4 MB (Windows) to 16 MB (AIX) and up to 1GB versus the default page size of 4KB. Many applications (including Java-based applications) often benefit from large pages due to a reduction in CPU overhead associated with managing smaller numbers of large pages.
Large pages may cause a small throughput improvement (in one benchmark, about 2%).
Some recent benchmarks on very modern hardware have found little benefit to large pages, although no negative consequences so they're still a best practice in most cases.
Input/Output (I/O)
Disk
Many problems are caused by exhausted disk space. It is critical that disk space is monitored and alerts are created when usage is very high.
Disk speed may be an important factor in some types of workloads. Some operating systems support mounting physical memory as disk partitions (sometimes called RAMdisks), allowing you to target certain disk operations that have recreatable contents to physical memory instead of slower disks.
Network Interface Cards (NICs) and Switches
Ensure that NICs and switches are configured to use their top speeds and full duplex mode. Sometimes this needs to be explicitly done, so you should not assume that this is the case by default. In fact, it has been observed that when the NIC is configured for auto-negotiate, sometimes the NIC and the switch can auto-negotiate very slow speeds and half duplex. This is why setting explicit values is recommended.
If the network components support Jumbo Frames, consider enabling it across the relevant parts of the network
Check network performance between two hosts. For example, make a 1 GB file (various operating system commands like dd or mkfile). Then test the network throughput by copying it using FTP, SCP, etc.
Monitor ping latency between hosts, particularly any periodic large deviations.
It is common to have separate NICs for incoming traffic (e.g. HTTP requests) and for backend traffic (e.g. database). In some cases and particularly on some operating systems, this setup may perform worse than a single NIC (as long as it doesn't saturate) probably due to interrupts and L2/L3 cache utilization side-effects.
TCP/IP
TCP/IP is used for most network communications such as HTTP, so understanding and optimizing the operating system TCP/IP stack can have dramatic upstream effects on your application.
TCP/IP is normally used in a fully duplexed mode meaning that communication can occur asynchronously in both directions. In such a mode, a distinction between "client" and "server" is arbitrary and sometimes can confuse investigations (for example, if a web browser is uploading a large HTTP POST body, it is first the "server" and then becomes the "client" when accepting the response). You should always think of a set of two sender and receiver channels for each TCP connection.
TCP/IP is a connection oriented protocol, unlike UDP, and so it requires handshakes (sets of packets) to start and close connections. The establishing handshake starts with a SYN packet from sender IP address A on an ephemeral local port X to receiver IP address B on a port Y (every TCP connection is uniquely identified by this 4-tuple). If the connection is accepted by B, then B sends back an acknowledgment (ACK) packet as well as its own SYN packet to establish the fully duplexed connection (SYN/ACK). Finally, A sends a final ACK packet to acknowledge the established connection. This handshake is commonly referred to as SYN, SYN/ACK, ACK.
A TCP/IPv4 packet has a 40 byte header (20 for TCP and 20 for IPv4).
Bandwidth Delay Product
The Bandwidth-Delay Product (BDP) is the maximum bandwidth times the round trip time:
A fundamental concept in any window-controlled transport protocol: the Bandwidth-Delay Product (BDP). Specifically, suppose that the bottleneck link of a path has a transmission capacity (‘bandwidth’) of C bps and the path between the sender and the receiver has a Round-Trip Time (RTT) of T sec. The connection will be able to saturate the path, achieving the maximum possible throughput
C, if its effective window isC*T. This product is historically referred to as BDP. For the effective window to beC*T, however, the smaller of the two socket buffers should be equally large. If the size of that socket buffer is less thanC*T, the connection will underutilize the path. If it is more thanC*T, the connection will overload the path, and depending on the amount of network buffering, it will cause congestion, packet losses, window reductions, and possibly throughput drops.
Flow Control & Receive/Send Buffers
TCP congestion control (or flow control) is a part of the TCP specifications that governs how much data is sent before receiving acknowledgments for outstanding packets. Flow control tries to ensure that a sender does not send data faster than a receiver can handle. There are two main components to flow control:
- Advertised receiver window size (rwnd): The receiver advertises a "window size" in each acknowledgment packet which tells the sender how much buffer room the receiver has for future packets. The maximum throughput based on the receiver window is rwnd/RTT. If the window size is 0, the sender should stop sending packets until it receives a TCP Window Update packet or an internal retry timer fires. If the window size is non-zero, but it is too small, then the sender may spend unnecessary time waiting for acknowledgments. The window sizes are directly affected by the rate at which the application can produce and consume packets (for example, if CPU is 100% then a program may be very slow at producing and consuming packets) as well as operating system TCP sending and receiving buffer size limits. The buffers are chunks of memory allocated and managed by the operating system to support TCP/IP flow control. It is generally advisable to increase these buffer size limits as much as operating system configuration, physical memory and the network architecture can support. In general, the maximum socket receive and send buffer sizes should be greater than the average bandwidth delay product.
- Sender congestion window size (cwnd): A throttle that controls the maximum, concurrent, unacknowledged, outstanding sent bytes. The operating system chooses an initial congestion window size and then resizes it dynamically based on rwnd and other conditions. By default, the initial congestion window size is based on the maximum segment size and starts small as part of the slow start component of the specifications and then grows relatively quickly. This is one reason why using persistent connections is valuable (although idle connections may have their congestion windows reset after a period of inactivity which may be tuned on some operating systems). There are many congestion window resize algorithms (reno, cubic, hybla, etc.) that an operating system may use and some operating systems allow changing the algorithm.
Therefore, one dimension of socket throttling is the instananeous minimum value of rwnd and cwnd. An example symptom of congestion control limiting throughput is when a sender has queued X bytes to the network, the current receive window is greater than X, but less than X bytes are sent before waiting for ACKs from the receiver.
CLOSE_WAIT
If a socket is ESTABLISHED, and one side (let's call it side X) calls close, then X sends a FIN packet to the other side (let's call it side Y) and X enters the FIN_WAIT_1 state. At this point, X can no longer write bytes to Y; however, Y may still write bytes to X (each TCP socket has two pipes).
When Y receives the FIN, it sends an ACK back and Y enters the CLOSE_WAIT state. When X receives the ACK, it enters the FIN_WAIT_2 state. Y's CLOSE_WAIT state may be read as "Y is waiting for the application inside Y to call close on its write pipe to X." At this point, the socket could stay in this condition indefinitely with Y writing bytes to X. Although this is a valid TCP use case to have a half-opened socket, it is an uncommon use case (except for use cases such as Server-Sent Events), so sockets in CLOSE_WAIT state are more commonly simply waiting for Y to close its half of the socket. If the number of sockets in CLOSE_WAIT are high or increasing over time, this may be caused by a leak of the socket object in Y, lack of resources, missing or incorrect logic to close the socket, etc. If sockets in CLOSE_WAIT continuously increase, at some point the process may receive file descriptor exhaustion or other socket errors and the only resolutions are either to restart the process or induce a RST packet.
When Y closes its half of the socket by sending a FIN to X, then Y enters LAST_ACK. When X responds with an ACK on the FIN, then the Y socket is completely closed, and X enters the TIME_WAIT state for a certain period of time.
The above is a normal close; however, it is also possible that RST packets are used to close sockets.
TIME_WAIT
TCP sockets pass through various states such as LISTENING, ESTABLISHED, CLOSED, etc. One particularly misunderstood state is the TIME_WAIT state which can sometimes cause scalability issues. A full duplex close occurs when sender A sends a FIN packet to B to initiate an active close (A enters FIN_WAIT_1 state). When B receives the FIN, it enters CLOSE_WAIT state and responds with an ACK. When A receives the ACK, A enters FIN_WAIT_2 state. Strictly speaking, B does not have to immediately close its channel (if it wanted to continue sending packets to A); however, in most cases it will initiate its own close by sending a FIN packet to A (B now goes into LAST_ACK state). When A receives the FIN, it enters TIME_WAIT and sends an ACK to B. The reason for the TIME_WAIT state is that there is no way for A to know that B received the ACK. The TCP specification defines the maximum segment lifetime (MSL) to be 2 minutes (this is the maximum time a packet can wander the net and stay valid). The operating system should ideally wait 2 times MSL to ensure that a retransmitted packet for the FIN/ACK doesn't collide with a newly established socket on the same port (for instance, if the port had been immediately reused without a TIME_WAIT and if other conditions such as total amount transferred on the packet, sequence number wrap, and retransmissions occur).
This behavior may cause scalability issues:
Because of TIME-WAIT state, a client program should choose a new local port number (i.e., a different connection) for each successive transaction. However, the TCP port field of 16 bits (less the "well-known" port space) provides only 64512 available user ports. This limits the total rate of transactions between any pair of hosts to a maximum of 64512/240 = 268 per second.
Most operating systems do not use 4 minutes as the default TIME_WAIT duration because of the low probability of the wandering packet problem and other mitigating factors. Nevertheless, if you observe socket failures accompanied with large numbers of sockets in TIME_WAIT state, then you should reduce the TIME_WAIT duration further. On some operating systems, it is impossible to change the TIME_WAIT duration except by recompiling the kernel. Conversely, if you observe very strange behavior when new sockets are created that can't be otherwise explained, you should use 4 minutes as a test to ensure this is not a problem.
Finally, it's worth noting that some connections will not follow the FIN/ACK, FIN/ACK procedure, but may instead use FIN, FIN/ACK, ACK, or even just a RST packet (abortive close).
Nagle's Algorithm (RFC 896, TCP_NODELAY)
There is a special problem associated with small packets. When TCP is used for the transmission of single-character messages originating at a keyboard, the typical result is that 41 byte packets (one byte of data, 40 bytes of header) are transmitted for each byte of useful data. This 4000% overhead is annoying but tolerable on lightly loaded networks. On heavily loaded networks, however, the congestion resulting from this overhead can result in lost datagrams and retransmissions, as well as excessive propagation time caused by congestion in switching nodes and gateways.
The solution is to inhibit the sending of new TCP segments when new outgoing data arrives from the user if any previously transmitted data on the connection remains unacknowledged.
In practice, enabling Nagle's algorithm (which is usually enabled by default) means that TCP will not send a new packet if another previous sent packet is still unacknowledged, unless it has "enough" coalesced data for a larger packet.
The native setsockopt option to disable Nagle's
algorithm is TCP_NODELAY
This option can usually be set globally at an operating system level.
This option is also exposed in Java's StandardSocketOptions.TCP_NODELAY to allow for setting a particular Java socket option.
In WebSphere Application Server, TCP_NODELAY is
explicitly enabled by default for all WAS TCP channel sockets. In the
event of needing to enable Nagle's algorithm, use the TCP channel custom
property tcpNoDelay=0.
Delayed Acknowledgments (RFC 1122)
TCP delayed acknowledgments was designed in the late 1980s in an environment of baud speed modems. Delaying acknowledgments was a tactic used when communication over wide area networks was really slow and the delaying would allow for piggy-backing acknowledgment packets to responses within a window of a few hundred milliseconds. In modern networks, these added delays may cause significant latencies in network communications.
Delayed acknowledgments is a completely separate function from Nagle's
algorithm (TCP_NODELAY). Both act to delay packets in
certain situations. This can be very subtle; for example, on AIX, the
option for the former is tcp_nodelayack and the option for
the latter is tcp_nodelay.
Delayed ACKs defines the default behavior to delay acknowledgments up to 500 milliseconds (the common default maximum is 40 or 200 milliseconds) from when a packet arrives (but no more than every second segment) to reduce the number of ACK-only packets and ACK chatter because the ACKs may piggy back on a response packet. It may be the case that disabling delayed ACKs, while increasing network chatter and utilization (if an ACK only packet is sent where it used to piggy back a data packet, then there will be an increase in total bytes sent because of the increase in the number of packets and therefore TCP header bytes), may improve throughput and responsiveness. However, there are also cases where delayed ACKs perform better. It is best to test the difference.
A host that is receiving a stream of TCP data segments can increase efficiency in both the Internet and the hosts by sending fewer than one ACK (acknowledgment) segment per data segment received; this is known as a "delayed ACK" [TCP:5].
A TCP SHOULD implement a delayed ACK, but an ACK should not be excessively delayed; in particular, the delay MUST be less than 0.5 seconds, and in a stream of full-sized segments there SHOULD be an ACK for at least every second segment.
A delayed ACK gives the application an opportunity to update the window and perhaps to send an immediate response. In particular, in the case of character-mode remote login, a delayed ACK can reduce the number of segments sent by the server by a factor of 3 (ACK, window update, and echo character all combined in one segment).
In addition, on some large multi-user hosts, a delayed ACK can substantially reduce protocol processing overhead by reducing the total number of packets to be processed [TCP:5]. However, excessive delays on ACK's can disturb the round-trip timing and packet "clocking" algorithms [TCP:7].
Delayed acknowledgments interacts poorly with Nagle's algorithm. For example, if A sent a packet to B, and B is waiting to send an acknowledgment to A until B has some data to send (Delayed Acknowledgments), and if A is waiting for the acknowledgment (Nagle's Algorithm), then a delay is introduced. To find if this may be the case:
In Wireshark, you can look for the "Time delta from previous packet" entry for the ACK packet to determine the amount of time elapsed waiting for the ACK... Although delayed acknowledgment may adversely affect some applications [...], it can improve performance for other network connections.
The pros of delayed acknowledgments are:
- Reduce network chatter
- Reduce potential network congestion
- Reduce network interrupt processing (CPU)
The cons of delayed acknowledgments are:
- Potentially reduce response times and throughput
In general, if two hosts are communicating on a LAN and there is sufficient additional network capacity and there is sufficient additional CPU interrupt processing capacity, then disabling delayed acknowledgments will tend to improve performance and throughput. However, this option is normally set at an operating system level, so if there are any sockets on the box that may go out to a WAN, then their performance and throughput may potentially be affected negatively. Even on a WAN, for 95% of modern internet connections, disabling delayed acknowledgments may prove beneficial. The most important thing to do is to test the change with real world traffic, and also include tests emulating users with very slow internet connections and very far distances to the customer data center (e.g. second long ping times) to understand any impact. The other potential impact of disabling delayed acknowledgments is that there will be more packets which just have the acknowledgment bit set but still have the TCP/IP header (40 or more bytes). This may cause higher network utilization and network CPU interrupts (and thus CPU usage). These two factors should be monitored before and after the change.
John Nagle -- the person who created Nagle's algorithm -- generally recommends disabling delayed ACKs by default.
Selective Acknowledgments (SACK, RFC 2018)
"With the limited information available from cumulative acknowledgments, a TCP sender can only learn about a single lost packet per round trip time... [With a] Selective Acknowledgment (SACK) mechanism... the receiving TCP sends back SACK packets to the sender informing the sender of data that has been received. The sender can then retransmit only the missing data segments."
Listen Back Log
The listen back log is a limited size queue for each socket that holds pending sockets that have completed the SYN packet but that the process has not yet "accepted" (therefore they are not yet established). This back log is used as an overflow for sudden spikes of connections. If the listen back log fills up any new connection attempts (SYN packets) will be rejected by the operating system (i.e. they'll fail). As with all queues, you should size them just big enough to handle a temporary but sudden spike, but not too large so that too much operating system resources are used which means that new connection attempts will fail fast when there is a backend problem. There is no science to this, but 511 is a common value.
Keep-alive
RFC 1122 defines a "keep-alive" mechanism to periodically send packets for idle connections to make sure they're still alive:
A "keep-alive" mechanism periodically probes the other end of a connection when the connection is otherwise idle, even when there is no data to be sent. The TCP specification does not include a keep-alive mechanism because it could:
- cause perfectly good connections to break during transient Internet failures;
- consume unnecessary bandwidth ("if no one is using the connection, who cares if it is still good?"); and
- cost money for an Internet path that charges for packets.
Some TCP implementations, however, have included a keep-alive mechanism. To confirm that an idle connection is still active, these implementations send a probe segment designed to elicit a response from the peer TCP.
By default, keep-alive (SO_KEEPALIVE in POSIX) is disabled:
If keep-alives are included, the application MUST be able to turn them on or off for each TCP connection, and they MUST default to off.
Java defaults Keep-alive to off:
The initial value of this socket option is FALSE.
Major products such as WAS traditional, WebSphere Liberty, the DB2 JDBC driver, etc. enable keep-alive on TCP sockets by default.
Monitor TCP Retransmits
Monitor the number of TCP retransmits in your operating system and be aware of the timeout values. The reason: they may explain random response time fluctuations or maximums of up to a few seconds.
The concept of TCP retransmission is one of the fundamental reasons why TCP is reliable. After a packet is sent, if it's not ACKed within the retransmission timeout, then the sender assumes there was a problem (e.g. packet loss, OS saturation, etc.) and retransmits the packet. From TCP RFC 793:
When the TCP transmits a segment containing data, it puts a copy on a retransmission queue and starts a timer; when the acknowledgment for that data is received, the segment is deleted from the queue. If the acknowledgment is not received before the timer runs out, the segment is retransmitted.
For applications such as Java/WAS, retransmissions occur transparently in the operating system. Retransmission is not considered an error condition and it is not reported up through libc. So a Java application may do a socket write, and every once in a while, a packet is lost, and there is a delay during the retransmission. Unless you've gathered network trace, this is difficult to prove. A retransmission may also cause the socket to switch into "slow start" mode which may affect subsequent packet performance/throughput.
Correlating TCP retransmit increases with the times of response time increases is much easier to do than end-to-end network trace with TCP port correlation (which often doesn't exist in low-overhead tracing).
Domain Name Servers (DNS)
Ensure that Domain Name Servers (DNS) are very responsive.
Consider setting high Time To Live (TTL) values for hosts that are unlikely to change.
If performance is very important or DNS response times have high variability, consider adding all major DNS lookups to each operating system's local DNS lookup file (e.g. /etc/hosts).
Troubleshooting Network Issues
One of the troubleshooting steps for slow response time issues is to sniff the network between all the network elements (e.g. HTTP server, application server, database, etc.). The most popular tool for sniffing and analyzing network data is Wireshark which is covered in the Major Tools chapter. Common errors are frequent retransmission requests (sometimes due to a bug in the switch or bad cabling).
The Importance of Gathering Network Trace on Both Sides
Here is an example where it turned out that a network packet was truly lost in transmission (root cause not determined, but probably in the operating system or some security software). This happened between IHS and WAS and it caused IHS to mark the WAS server down. The symptom in the logs was a connection reset error. There are two points that are interesting to cover: 1) If the customer had only gathered network trace from the IHS side, they might have concluded the wrong thing, and 2) It may be interesting to look at the MAC address of a RST packet:
First, some background: the IHS server is 10.20.30.100 and the WAS server is 10.20.36.100.
Next, if we look at just the IHS packet capture and narrow down to the suspect stream:
663 ... 10.20.30.100 10.20.36.100 TCP 76 38898 > 9086 [SYN] Seq=0 Win=5840...
664 ... 10.20.36.100 10.20.30.100 TCP 62 9086 > 38898 [SYN, ACK] Seq=0 Ack=1 Win=65535...
665 ... 10.20.30.100 10.20.36.100 TCP 56 38898 > 9086 [ACK] Seq=1 Ack=1 Win=5840 Len=0
666 ... 10.20.30.100 10.20.36.100 TCP 534 [TCP Previous segment lost] 38898 > 9086 [PSH, ACK] Seq=1381...
667 ... 10.20.36.100 10.20.30.100 TCP 62 [TCP Dup ACK 664#1] 9086 > 38898 [ACK] Seq=1...
678 ... 10.20.36.100 10.20.30.100 TCP 56 9086 > 38898 [RST] Seq=1 Win=123 Len=0
679 ... 10.20.30.100 10.20.36.100 TCP 56 38898 > 9086 [RST] Seq=1 Win=123 Len=0
So 663-665 are just a normal handshake, but then 666 where we'd expect IHS to send the GET/POST to WAS shows TCP Previous Segment lost. A few packets later, we see what appears to be a RST packet coming from WAS. By doing Follow TCP Stream, this is what it looks like from the WAS application point of view:
# Wireshark: tcp.stream eq 52
[1380 bytes missing in capture file]i-Origin-Hop: 1
Via: 1.1 ...
X-Forwarded-For: ...
True-Client-IP: ...
Host: ...
Pragma: no-cache
Cache-Control: no-cache, max-age=0
$WSCS: AES256-SHA
$WSIS: true
$WSSC: https
$WSPR: HTTP/1.1
$WSRA: ...
$WSRH: ...
$WSSN: ...
$WSSP: 443
$WSSI: ...
Surrogate-Capability: WS-ESI="ESI/1.0+"
_WS_HAPRT_WLMVERSION: -1
So of course the request failed -- the front half is cut off (due to the "previous segment lost")!
From this packet trace alone, one would highly suspect that it's the WAS side or the network path between IHS and WAS because it's the one sending the RST. But, let's look at the trace from the WAS server:
146 ... 10.20.30.100 10.20.36.100 TCP 74 38898 > 9086 [SYN] Seq=0...
147 ... 10.20.36.100 10.20.30.100 TCP 58 9086 > 38898 [SYN, ACK] Seq=0...
148 ... 10.20.30.100 10.20.36.100 TCP 60 38898 > 9086 [ACK] Seq=1...
149 ... 10.20.30.100 10.20.36.100 TCP 532 [TCP Previous segment lost] 38898 > 90086 [PSH, ACK] Seq=1381...
150 ... 10.20.36.100 10.20.30.100 TCP 54 [TCP Dup ACK 147#1] 9086 > 38898 [ACK] Seq=1...
151 ... 10.20.30.100 10.20.36.100 TCP 60 38898 > 9086 [RST] Seq=1...
This is similar -- the first segment with the GET/POST line is lost -- but we only see one RST, coming from IHS. It doesn't seem like the WAS box sent out the RST packet (#678 above). This points back to the IHS side and highlights the fact that getting simultaneous packet captures from both sides is critical. (Note: The RST coming from IHS is just IHS closing its half of the stream in packet 679)
One final point that we found looking back on the IHS side was that if we look at frame 664, for example, in the handshake, we can see a good MAC address of d8:3c:85:41:4e:95. However, in the suspect RST frame #678, the MAC address is blank. This is what helped hone the investigation into the IHS OS and network software.
Antivirus / Security Products
We have seen increasing cases of antivirus leading to significant performance problems. Companies are more likely to run quite intrusive antivirus even on critical, production machines. The antivirus settings are usually corporate-wide and may be inappropriate or insufficiently tuned for particular applications or workloads. In some cases, even when an antivirus administrator states that antivirus has been "disabled," there may still be kernel level modules that are still operational. In some cases, slowdowns are truly difficult to understand; for example, in one case a slowdown occurred because of a network issue communicating with the antivirus hub, but this occurred at a kernel-level driver in fully native code, so it was very difficult even to hypothesize that it was antivirus. You can use operating system level tools and sampling profilers to check for such cases, but they may not always be obvious. Keep a watch out for signs of antivirus and consider running a benchmark comparison with and without antivirus (completely disabled, perhaps even uninstalled).
Another class of products that are somewhat orthogonal are security products which provide integrity, security, and data scrubbing capabilities for sensitive data. For example, they will hook into the kernel so that any time a file is copied onto a USB key, a prompt will ask whether the information is confidential or not (and if so, perform encryption). This highlights the point that it is important to gather data on which kernel modules are active (e.g. using CPU during the time of the problem).
Clocks
To ensure that all clocks are synchronized on all nodes use something like the Network Time Protocol (NTP). This helps with correlating diagnostics and it's required for certain functions in products.
Consider setting one standardized time zone for all nodes, regardless of their physical location. Some consider it easier to standardize on the UTC/GMT/Zulu time zone.
POSIX
The Portable Operating System Interface for Unix (POSIX) is the public standard for Unix-like operating systems, including things like APIs, commands, utilities, threading libraries, etc. It is implemented in part or in full by: Linux, AIX, Solaris, z/OS USS, HP/UX, etc.
Process limits (Ulimits)
On POSIX-based operating
systems such as Linux, AIX, etc., process limits (a.k.a.
ulimits, or user limits) are operating system restrictions
on what a process may do with certain resources. These are designed to
protect the kernel, protect memory, protect users from consuming an
entire box, and reduce the risks of Denial-of-Service (DoS) attacks. For
example, a file descriptor ulimit restricts the maximum number of open
file descriptors in the process at any one time. Since a network socket
is represented by a file descriptor, this also limits the maximum number
of open network sockets at any one time.
Process limits come in two flavors: soft and hard. A process limit starts at the soft limit but it may be increased up to the hard limit at runtime.
Choosing ulimits
The default process limits are somewhat arbitrary and often historical artifacts. Similarly, deciding what ulimits to use is also somewhat arbitrary. If a box is mostly dedicated to running a particular process, some people use the philosophy of setting everything to unlimited for those processes. As always, testing (and in particular, stress testing) the ulimit values is advised.
Setting ulimits
Ulimits are most commonly modified through global,
operating system specific configuration files, using the
ulimit command in the shell that launches a process (or its
parent process), or at runtime by the process itself (e.g. through setrlimit).
In general, we recommend using operating system specific configuration files.
Processes will need to be restarted after ulimit settings are changed.
Maximum number of open file descriptors
The ulimit for the maximum number of open file descriptors (a.k.a.
"maximum number of open files", "max number of open files", "open
files", ulimit -n, nofile, or
RLIMIT_NOFILE) limits both the number of open files and
open network sockets.
For example, WebSphere
Application Server traditional defaults to a maximum of up to 20,000
incoming TCP connections and Liberty
defaults up to 128,000. In addition, Java will have various open
files to JARs, and applications will likely drive other sockets to
backend connections such as databases, web services, and so on;
therefore, if such load may be reasonably reached, a
ulimit -n value such as 1048576 (or more), or
unlimited may be considered.
Maximum number of processes
The ulimit for the maximum number of processes (a.k.a. "max user
processes", "max number of processes", ulimit -u,
nproc, or RLIMIT_NPROC) limits the maximum
number of threads spawned by a particular user. This is slightly
different than other ulimits which apply on a per-process basis. For
example, on
Linux:
RLIMIT_NPROC This is a limit on the number of extant process (or, more precisely on Linux, threads) for the real user ID of the calling process.
On some versions of Linux, this is configured globally using a separate mechanism of
/etc/security/limits.d/90-nproc.conf.
It is common for a Java process to use hunreds or thousands of
threads. In addition, given that this limit is accounted for at the
user-level and multiple processes may run under the same user, if such
load may be reasonably reached, a ulimit -u value such as
131072 (or more), or unlimited may be considered.
Maximum data segment size
The ulimit for the maximum data segment size (a.k.a. "max data size",
"maximum data size", "data seg size", ulimit -d, or
RLIMIT_DATA) limits the total native memory requested by
malloc, and, in some operating systems and versions,
mmap (for example, since
Linux 4.7). In general, this ulimit should be
unlimited.
How do you confirm that ulimits are set correctly?
- Recent versions of Linux:
cat /proc/$PID/limits. - If using IBM Java/Semeru/OpenJ9, the javacore produced with
kill -3 $PIDincludes a process limits section. For example:1CIUSERLIMITS User Limits (in bytes except for NOFILE and NPROC) NULL ------------------------------------------------------------------------ NULL type soft limit hard limit 2CIUSERLIMIT RLIMIT_AS unlimited unlimited 2CIUSERLIMIT RLIMIT_CORE unlimited unlimited 2CIUSERLIMIT RLIMIT_CPU unlimited unlimited 2CIUSERLIMIT RLIMIT_DATA unlimited unlimited 2CIUSERLIMIT RLIMIT_FSIZE unlimited unlimited 2CIUSERLIMIT RLIMIT_LOCKS unlimited unlimited 2CIUSERLIMIT RLIMIT_MEMLOCK unlimited unlimited 2CIUSERLIMIT RLIMIT_NOFILE 1048576 1048576 2CIUSERLIMIT RLIMIT_NPROC unlimited unlimited 2CIUSERLIMIT RLIMIT_RSS unlimited unlimited 2CIUSERLIMIT RLIMIT_STACK unlimited unlimited 2CIUSERLIMIT RLIMIT_MSGQUEUE 819200 819200 2CIUSERLIMIT RLIMIT_NICE 0 0 2CIUSERLIMIT RLIMIT_RTPRIO 0 0 2CIUSERLIMIT RLIMIT_SIGPENDING 47812 47812
Process core dumps
A process core dump is a file that represents metadata about a process and its virtual memory at a particular point in time.
Core dump security implications
In general, a process core dump contains most of the virtual memory areas of a process. If a sensitive operation was occurring at the time when the core dump was produced -- for example, a user completing a bank transaction -- then it is possible for someone with access to the core dump to discover sensitive information about that operation -- for example, the name of the user and the details of the bank transaction. For this reason, in general and particularly for production environments, core dumps should be treated sensitively. This is normally done either using filesystem permissions to restrict who can read the core dump or by disabling core dumps (e.g. a core ulimit of 0).
In general, we do not recommend disabling core dumps because then it may be very difficult or impossible to understand the causes of crashes, OutOfMemoryErrors, and other production problems. Instead, we recommend carefully planning out how core dumps are produced, stored, and shared. For example, a core dump may be encrypted and transferred off of a box to a controlled location, and even if the sensitive information within a core dump restricts the core dump from being shared to IBM Support, as long as the core dump exists, it's possible to investigate it remotely using screen sharing or iterative debug commands.
Core dump disk implications
The size of a core dump is approximately the virtual size of the process. A common default is to create the core dump in the current working directory of the process. Therefore, if a process has requested a lot of memory (e.g. Java with a large maximum heap size), then the core dump will be very large. If a process automatically restarts after a crash, then it's possible it will create continuous core dumps if the crash continues to be exercised, and the core dumps can fill up disk space and cause application issues if an application needs disk space in the same filesystem (e.g. transaction log).
Some operating systems provide a way to limit this impact either by
specifying the directory where core dumps go (which can then be mounted
on a filesystem dedicated for diagnostics whose exhaustion does not
impact applications), truncating core dumps to a maximum size, and/or
limiting the total disk space used by core dumps by deleting older core
dumps (e.g. systemd-coredump
on Linux).
You can determine the virtual address space size in various ways
(where VSZ is normally in KB):
- Linux:
ps -o pid,vsz -p PID - AIX:
ps -o pid,vsz -L PID - Solaris:
ps -o pid,vsz -p PID - HP-UX:
UNIX95="" ps -o pid,vsz -p PID
Descructive core dumps
Process core dumps are most often associated with destructive events such as process crashes and they're used to find the cause of a crash. In such an event, after the core dump is produced, the process is killed by the operating system. The core dump may then be loaded into a debugger by a developer to inspect the cause of the crash.
Non-destructive core dumps
Core dumps may be produced non-destructively as a diagnostic aid to investigate things such as memory usage (e.g. OutOfMemoryError) or something happening on a thread. In this case, a diagnostic tool attaches to the process, pauses the process, writes out the core dump, and then detaches and the process continues running.
IBM Java/Semeru/OpenJ9 commonly use non-destructive core dumps as diagnostics (confusingly, these artifacts are called "System dumps" even though they are process dumps). A non-destructive core dump is requested on the first OutOfMemoryError, and non-destructive core dumps may be requested on various Java events, method entry/exit, manually dumping memory for system sizing, and so on.
Performance implications of non-destructive core dumps
Unlike diagnostics such as thread dumps which are generally very lightweight in the range of 10s or 100s of milliseconds, non-destructive core dumps may have a significant performance impact in the range of dozens of seconds during which the process is completely frozen. In general, this duration is proportional to the virtual size of the process, the speed of CPUs and RAM (to read all of the virtual memory), the speed of the disk where the core dump is written, and the free RAM at the time of the core dump (since some operating systems will write the core dump to RAM and then asynchronously flush that to disk).
These performance implications generally don't matter for destructive core dumps because the process does not live after the core dump is produced, and the core dump is often needed to find the cause of the crash.
Core dumps and ulimits
After reviewing the security
and disk
implications of core dumps, the way to ensure core dumps are produced
and not truncated starts by setting core (a.k.a.
"core file size", ulimit -c, core, or
RLIMIT_CORE) and file size (a.k.a. "maximum filesize",
ulimit -f, fsize, or
RLIMIT_FSIZE) ulimits to unlimited.
However, such configuration may not be sufficient to configure core dumps. Further operating-system specific changes may be needed such as:
- Linux: If using a
core_patternthat pipes the core dump to a program such assystemd-coredump, that program must be configured properly or disabled (e.g.systemd-coredumpdefaults to truncating core dumps at 2GB soProcessSizeMaxandExternalSizeMaxshould be increased). - AIX: Enable full CORE dump that is not a pre-430 style CORE dump
Ulimit Summary
Based on the above sections on ulimits and process core
dumps, a summary of a common starting point for customized ulimits
may be something like the following (and generally best applied through
global, operating system
specific configuration instead of such explicit ulimit
commands):
ulimit -c unlimited
ulimit -f unlimited
ulimit -u 131072
ulimit -n 1048576
ulimit -d unlimited
If using the unlimited philosophy:
ulimit -c unlimited
ulimit -f unlimited
ulimit -u unlimited
ulimit -n unlimited
ulimit -d unlimited
Further configuration may need to be applied such as for process core dumps.
SSH Keys
As environments continue to grow, automation becomes more important. On POSIX operating systems, SSH keys may be used to automate running commands, gathering logs, etc. A 30 minute investment to configure SSH keys will save countless hours and mistakes.
Step #1: Generate an "orchestrator" SSH key
- Choose one of the machines that will be the orchestrator (or a Linux, Mac, or Windows cygwin machine)
- Ensure the SSH key directory exists:
If this directory does not exist:$ cd ~/.ssh/$ mkdir ~/.ssh && chmod 700 ~/.ssh && cd ~/.ssh/ - Generate an SSH key:
$ ssh-keygen -t rsa -b 4096 -f ~/.ssh/orchestrator
Step #2: Distribute "orchestrator" SSH key to all machines
If using Linux:
- Run the following command for each machine:
$ ssh-copy-id -i ~/.ssh/orchestrator user@host
For other POSIX operating systems
Log in to each machine as a user that has access to all logs (e.g. root):
$ ssh user@hostEnsure the SSH key directory exists:
$ cd ~/.ssh/If this directory does not exist:
$ mkdir ~/.ssh && chmod 700 ~/.ssh && cd ~/.ssh/If the file
~/.ssh/authorized_keysdoes not exist:$ touch ~/.ssh/authorized_keys && chmod 700 ~/.ssh/authorized_keysAppend the public key from
~/.ssh/orchestrator.pubabove to theauthorized_keysfile:$ cat >> ~/.ssh/authorized_keys Paste your clipboard and press ENTER Ctrl+D to save
Step #3: Now you are ready to automate things
Go back to the orchestrator machine and test the key:
- Log into orchestrator machine and try to run a simple command on
another machine:
$ ssh -i ~/.ssh/orchestrator root@machine2 "hostname" - If your SSH key has a password, then you'll want to use ssh-agent so
that it's cached for some time:
$ ssh-add ~/.ssh/orchestrator - If this gives an error, try starting ssh-agent:
$ ssh-agent - Now try the command again and it should give you a result without
password:
$ ssh -i ~/.ssh/orchestrator root@machine2 "hostname"
Now we can create scripts on the orchestrator machine to stop servers, clear logs, start servers, start mustgathers, gather logs, etc.
Example Scripts
In all the example scripts below, we basically iterate over a list of hosts and execute commands on all of those hosts. Remember that if the orchestrator machine is also one of these hosts, that it should be included in the list (it will be connecting to "itself"). You will need to modify these scripts to match what you need.
Example Script to Stop Servers
#!/bin/sh
USER=root
for i in ihs1hostname ihs2hostname; do
ssh -i ~/.ssh/orchestrator $USER@$i "/opt/IBM/HTTPServer/bin/apachectl -k stop"
ssh -i ~/.ssh/orchestrator $USER@$i "kill -INT `pgrep tcpdump`"
done
for i in wl1hostname wl2hostname; do
ssh -i ~/.ssh/orchestrator $USER@$i "/opt/liberty/bin/server stop ProdSrv01"
ssh -i ~/.ssh/orchestrator $USER@$i "kill -INT `pgrep tcpdump`"
done
Example Script to Clear Logs
#!/bin/sh
USER=root
for i in ihs1hostname ihs2hostname; do
ssh -i ~/.ssh/orchestrator $USER@$i "rm -rf /opt/IBM/HTTPServer/logs/*"
ssh -i ~/.ssh/orchestrator $USER@$i "rm -rf /opt/IBM/HTTPServer/Plugin/webserver1/logs/*"
ssh -i ~/.ssh/orchestrator $USER@$i "nohup tcpdump -nn -v -i any -C 100 -W 10 -Z root -w /tmp/capture`date +"%Y%m%d_%H%M"`.pcap &"
done
for i in wl1hostname wl2hostname; do
ssh -i ~/.ssh/orchestrator $USER@$i "rm -rf /opt/liberty/usr/servers/*/logs/*"
ssh -i ~/.ssh/orchestrator $USER@$i "nohup tcpdump -nn -v -i any -C 100 -W 10 -Z root -w /tmp/capture`date +"%Y%m%d_%H%M"`.pcap &"
done
Example Script to Execute perfmustgather
#!/bin/sh
USER=root
for i in wl1hostname wl2hostname; do
ssh -i ~/.ssh/orchestrator $USER@$i "nohup /opt/perfMustGather.sh --outputDir /tmp/ --iters 6 `cat /opt/liberty/usr/servers/.pid/*.pid` &"
done
Example Script to Gather Logs
#!/bin/sh
USER=root
LOGS=logs`date +"%Y%m%d_%H%M"`
mkdir $LOGS
for i in ihs1hostname ihs2hostname; do
mkdir $LOGS/ihs/$i/
scp -r -i ~/.ssh/orchestrator $USER@$i:/opt/IBM/HTTPServer/logs/* $LOGS/ihs/$i/
scp -r -i ~/.ssh/orchestrator $USER@$i:/opt/IBM/HTTPServer/conf/httpd.conf $LOGS/ihs/$i/
scp -r -i ~/.ssh/orchestrator $USER@$i:/opt/IBM/HTTPServer/plugings/config/*/plugin-cfg.xml $LOGS/ihs/$i/
scp -r -i ~/.ssh/orchestrator $USER@$i:/opt/IBM/HTTPServer/Plugin/webserver1/logs/* $LOGS/ihs/$i/
scp -r -i ~/.ssh/orchestrator $USER@$i:/tmp/capture*.pcap* $LOGS/ihs/$i/
done
for i in wl1hostname wl2hostname; do
mkdir $LOGS/liberty/$i/
scp -r -i ~/.ssh/orchestrator $USER@$i:/opt/liberty/usr/servers/*/logs/ $LOGS/liberty/$i/
scp -r -i ~/.ssh/orchestrator $USER@$i:/opt/liberty/usr/servers/*/server.xml $LOGS/liberty/$i/
scp -r -i ~/.ssh/orchestrator $USER@$i:/tmp/capture*.pcap* $LOGS/liberty/$i/
scp -r -i ~/.ssh/orchestrator $USER@$i:/tmp/mustgather_RESULTS.tar.gz $LOGS/liberty/$i/
done
tar czvf $LOGS.tar.gz $LOGS
Linux
Linux Recipe
- Generally, all CPU cores should not be
consistently saturated. Check CPU
100 - idle%with tools such asvmstat,top,nmon, etc. - Review snapshots of process activity using tools such as
top,nmon, etc., and for the largest users of resources, review per thread activity using tools such astop -H -p $PID. - Generally, swapping of program memory from RAM to disk should rarely
happen. Check that current swapping is 0 with
vmstatso/sicolumns and use tools such asvmstatortopand check if swap amount is greater than 0 (i.e. swapping occurred in the past). - Consider using TuneD and applying the
latency-performance,network-latency,throughput-performance, ornetwork-throughputprofile. - Unless power consumption is important, change the CPU
speed governors to
performance. - Unless power consumption is important, ensure processor boosting is enabled in the BIOS.
- Monitor TCP
retransmissions with
nstat -saz *Retrans*. Ideally, for LAN traffic, they should be 0. - Monitor network interface packet drops, errors, and buffer overruns. Ideally, for LAN traffic, they should be 0.
- For systems with low expected usage of file I/O, set vm.swappiness=0 to reduce the probability of file cache driving program memory swapping.
- If there is extra network capacity and a node has extra CPU
capacity, test permanently disabling TCP delayed acknowledgments
using
quickack 1. - Review saturation, response time, and errors of input/output interfaces such as network cards and disks.
- If the operating system is running in a virtualized guest, review the configuration and whether or not resource allotments are changing dynamically. Review CPU steal time in tools such as vmstat, top, etc.
- Check if CPU is being throttled:
grep nr_throttled /sys/fs/cgroup/cpu.stat - Consider testing explicitly tuned TCP/IP network buffer sizes.
- Review CPU instructions per cycle and tune appropriately.
- For hosts with incoming LAN network traffic from clients
using persistent TCP connection pools (e.g. a reverse HTTP proxy to an
application server such as IHS/httpd to WAS), set
net.ipv4.tcp_slow_start_after_idle=0to disable reducing the TCP congestion window for idle connections. - General operating system statistics and process (and thread) statistics should be periodically monitored and saved for historical analysis.
- Review
sysctl -afor any uncommon kernel settings. - If there are firewall idle timeouts between two hosts on a LAN utilizing a connection pool (e.g. between WAS and a database), consider tuning TCP keep-alive parameters.
- Linux on IBM Power CPUs:
- Test with the IBM Java parameter -Xnodfpbd
- Test with hardware prefetching disabled
- Test with idle power saver disabled
- Test with adaptive frequency boost enabled
- Test with dynamic power saver mode enabled
- Use 64-bit DMA adapter slots for network adapters
- Linux on IBM System z CPUs:
- Use QUICKDSP for production guests
Also review the general topics in the Operating Systems chapter.
General
Query the help manual for a command:
$ man vmstat # By default, contents are sent to less
$ man -a malloc # There may be multiple manuals matching the name. Use -a to show all of them.
$ man -P cat vmstat # Use -P to send the output to something other than less. Note, if you pipe the output, it will figure that out and send things to stdout.
$ man -K vmstat # Search all manpages for a keyword
$ info libc # Some GNU programs offer more detailed documentation using the info command
Installing Programs
- Modern Fedora/RHEL/CentOS/ubi/ubi-init:
dnf install -y $PROGRAMS - Older Fedora/RHEL/CentOS:
yum install -y $PROGRAMS - Debian/Ubuntu:
apt-get update && sudo DEBIAN_FRONTEND=noninteractive TZ=${TZ:-UTC} apt-get -y install $PROGRAMS - Alpine:
apk update && apk add $PROGRAMS- Some packages are available in non-default
repositories; for example:
apk add podman --repository=https://dl-cdn.alpinelinux.org/alpine/edge/community
- Some packages are available in non-default
repositories; for example:
- SUSE:
zypper install $PROGRAMS
Kernel Log
Check the kernel log for any warnings, errors, or repeated
informational messages. The location or mechanism depends on the
distribution and software. The most common recent Linux log management
is done through journalctl. Other potentials are
/var/log/messages, /var/log/syslog,
/var/log/boot.log, and dmesg.
journalctl
- Tail the journal:
journalctl -f - Messages since last boot:
journalctl -b - List logs per boot:
journalctl --list-boots - Messages for a particular boot period:
journalctl -b -0 - Messages that are warnings and errors:
journalctl -p warning - Messages that are warnings and errors (since last boot):
journalctl -b -p warning - Messages that are warnings and errors (last 100):
journalctl -p warning -n 100 - Messages that are errors:
journalctl -p err - Only kernel messages:
journalctl -k - Messages for a particular systemd unit:
journalctl -u low-memory-monitor - Messages since yesterday:
journalctl -S yesterday - Messages in a date range:
journalctl -S "2021-01-01 10:00" -U "2021-01-01 11:00" - Messages with microsecond timestamps:
journalctl -o short-precise
Modifying Kernel Parameters
The kernel mounts a virtual filesystem in /proc/sys which exposes various kernel settings through pseudo files that can be read and (sometimes) written to get and set each value, respectively. For example, the following command gets the current value of the kernel's system wide limit of concurrently running threads/tasks:
$ sudo cat /proc/sys/kernel/threads-max
248744
Each of these pseudo files is documented in man 5 proc.
If a value can be updated, simply echo the new value into the pseudo file:
$ echo 248745 > /proc/sys/kernel/threads-max
bash: /proc/sys/kernel/threads-max: Permission denied
$ sudo echo 248744 > /proc/sys/kernel/threads-max
bash: /proc/sys/kernel/threads-max: Permission denied
Notice that the user must have sufficient permissions, and simply prepending sudo is also not enough. The reason a simple "sudo echo" doesn't work is that this runs the echo command as root, but the output redirection occurs under the user's context. Therefore, you must use something like the tee command:
$ echo 248745 | sudo tee /proc/sys/kernel/threads-max
248745
This works but the change will be reverted on reboot. To make permanent changes, edit the /etc/sysctl.conf file as root. This lists key value pairs to be set on boot, separated by an equal sign. The key is the name of the pseudo file, with /proc/sys removed, and all slashes replaced with periods. For example, the same threads-max setting above would be added to /etc/sysctl.conf as:
kernel.threads-max=248745Sysctl is also a command that can be run to print variables in a similar way to cat:
$ sudo sysctl kernel.threads-max
kernel.threads-max = 248745
Or to temporarily update variables similar to echo above and similar to the sysctl.conf line:
$ sudo sysctl -w kernel.threads-max=248746
kernel.threads-max = 248746
To list all current values from the system:
$ sudo sysctl -a | head
kernel.sched_child_runs_first = 0
kernel.sched_min_granularity_ns = 4000000
kernel.sched_latency_ns = 20000000
Finally, use the -p command to update kernel settings based on the current contents of /etc/sysctl.conf:
$ sudo sysctl -p
net.ipv4.ip_forward = 0
net.ipv4.conf.all.rp_filter = 1
The recommended way to edit kernel settings is to edit or add the
relevant line in /etc/sysctl.conf and run
sysctl -p. This will not only set the currently running
settings, but it will also ensure that the new settings are picked up on
reboot.
Modifying Kernel Command Line Options
Kernel command line options may be set depending on the type of bootloader used:
- GRUB2 using grubby:
- List kernels and options:
sudo grubby --info=ALL - Add space-separated options example:
sudo grubby --update-kernel=ALL --args="cpufreq.default_governor=performance" - Remove options example:
sudo grubby --update-kernel=ALL --remove-args=cpufreq.default_governor
- List kernels and options:
TuneD
TuneD
applies tuning configuration using tuning templates called profiles
either using a
background service (default) or an
apply-and-exit mode using daemon=0.
TuneD was originally built for Fedora, Red Hat Enterprise Linux, and
similar but it is also available on other distributions with similar
functionality. TuneD is incompatible with the cpupower and
power-profiles-daemon programs so those should be disabled
when using TuneD.
TuneD Profiles
Listing TuneD Profiles
List the currently configured profile:
$ tuned-adm active

Current active profile: throughput-performance$ tuned-adm list
Available profiles:
- accelerator-performance - Throughput performance based tuning with disabled higher latency STOP states
- balanced - General non-specialized TuneD profile
- desktop - Optimize for the desktop use-case
- latency-performance - Optimize for deterministic performance at the cost of increased power consumption
- network-latency - Optimize for deterministic performance at the cost of increased power consumption, focused on low latency network performance
- network-throughput - Optimize for streaming network throughput, generally only necessary on older CPUs or 40G+ networks
- powersave - Optimize for low power consumption
- throughput-performance - Broadly applicable tuning that provides excellent performance across a variety of common server workloads
- virtual-guest - Optimize for running inside a virtual guest
- virtual-host - Optimize for running KVM guests
Current active profile: balancedSelect a TuneD Profile
- Ensure TuneD is running
- Select the profile. Ideally, stress test different profiles. In
general, consider
latency-performance,network-latency,throughput-performance, ornetwork-throughput:sudo tuned-adm profile $PROFILE - Some settings may require a reboot of the node and may require BIOS changes.
Debug Symbols
RedHat Enterprise Linux (RHEL)
- Configure debuginfo repositories
sudo yum install -y kernel-debuginfo kernel-debuginfo-common glibc-debuginfo
Fedora/CentOS
sudo dnf install -y dnf-plugins-coresudo dnf debuginfo-install -y kernel glibc
Ubuntu
- Perform
Getting -dbgsym.ddeb packages sudo apt-get -y install linux-image-$(uname -r)-dbgsym libc6-dbg
SLES
- Enable
debuginforepositories depending on the SLES version (list repositories withzypper lr). For example:zypper mr -e SLE-Module-Basesystem15-SP2-Debuginfo-Pool zypper mr -e SLE-Module-Basesystem15-SP2-Debuginfo-Updates zypper install kernel-default-debuginfo glibc-debuginfo
Processes
Query basic process information:
$ ps -elfyww | grep java
S UID        PID  PPID  C PRI  NI    RSS      SZ WCHAN  STIME TTY       TIME   CMD
S root     11386     1 17  80   0 357204 1244770 futex_ 08:07 pts/2 00:00:30   java ... server1
Normally the process ID (PID) is the number in the fourth column, but the -y option (which adds the RSS column) changes PID to the third column. You can control which columns are printed and in which order using -o.
Note that even with the -w option or with a large
COLUMNS envar, the kernel before ~2015 limited the command
line it stored to 4096 characters; however, this has since been fixed.
cgroups
cgroups (or Control Groups) are a way to group processes in a hierarchy to monitor and/or control resource usage through controllers of, for examples, CPU and memory. There are two versions of cgroups: v1 and v2. While v2 does not implement all controllers as v2, it is possible to run a mix of v1 and v2 controllers.
Central Processing Unit (CPU)
Query CPU information using lscpu:
# lscpu
Architecture:                    x86_64
CPU op-mode(s):                  32-bit, 64-bit
Byte Order:                      Little Endian
Address sizes:                   39 bits physical, 48 bits virtual
CPU(s):                          4
On-line CPU(s) list:             0-3
Thread(s) per core:              1
Core(s) per socket:              1
Socket(s):                       4
Vendor ID:                       GenuineIntel
CPU family:                      6
Model:                           158
Model name:                      Intel(R) Core(TM) i7-7820HQ CPU @ 2.90GHz
Stepping:                        9
CPU MHz:                         2900.000
BogoMIPS:                        5808.00
L1d cache:                       128 KiB
L1i cache:                       128 KiB
L2 cache:                        1 MiB
L3 cache:                        32 MiB
Query physical processor layout:
$ cat /proc/cpuinfo
processor    : 0
model name    : Intel(R) Core(TM) i7-3720QM CPU @ 2.60GHz
cpu cores    : 4...
Query the current frequency of each CPU core (in Hz):
$ cat /sys/devices/system/cpu/cpu*/cpufreq/scaling_cur_freq
1200000
1200000
CPU Speed
The CPU scaling governor may dynamically change the CPU frequency to reduce power consumption.
The cpupower program may be installed for easier querying and configuration of CPU speed.
Display the maximum frequency of each CPU core (in Hz):
sudo cat /sys/devices/system/cpu/cpu*/cpufreq/scaling_max_freq
Display the current governors for each CPU:
sudo cpupower frequency-infosudo cat /sys/devices/system/cpu/cpu*/cpufreq/scaling_governor
Display available governors:
sudo cpupower frequency-info --governorssudo ls /lib/modules/$(uname -r)/kernel/drivers/cpufreq/
For maximum performance, set the scaling_governor
to performance:
sudo cpupower frequency-set -g performance- Teeing into the
scaling_governor:for i in /sys/devices/system/cpu/cpu*/cpufreq/scaling_governor; do echo "performance" | sudo tee $i; done
Permanently Changing CPU Scaling Governor
- Since Linux 5.9, set the kernel boot
option
cpufreq.default_governor=performance - Or, if using systemd:
- Install cpupower:
- Fedora/RHEL/CentOS:
sudo dnf install kernel-tools - Debian/Ubuntu:
sudo apt-get install -y linux-tools-$(uname -r)
- Fedora/RHEL/CentOS:
- Find
EnvironmentFilein cpupower.service:sudo grep EnvironmentFile /usr/lib/systemd/system/cpupower.service - Edit the
EnvironmentFile(e.g./etc/sysconfig/cpupower,/etc/default/cpupower, etc.) - Change the governor in
CPUPOWER_START_OPTStoperformance - Start the cpupower service:
sudo systemctl start cpupower - Check that the service started without errors:
sudo systemctl status cpupower - Enable the cpupower service on restart:
sudo systemctl enable cpupower
- Install cpupower:
- Otherwise, use a configuration in modprobe.d
CPU Boosting
Ensure processor boosting is enabled in the BIOS and kernel. Intel calls this Turbo Boost and AMD calls this Turbo Core.
Check /sys/devices/system/cpu/cpufreq/boost or
/sys/devices/system/cpu/intel_pstate/no_turbo depending on
your processor. Alternatively, check the status of turbo boost using
cpupower if available:
cpupower frequency-infoKernel Threads
Kernel
threads may be isolated to particular CPU threads with isolcpus
or tuna:
tuna --cpus=1-2 --isolateVerify:
tuna -PHyperthreading
There are cases in which hyperthreading (or Simultaneous Multithreading [SMT]) is less efficient than a single CPU thread per CPU core. Hyperthreading may be disabled in various ways:
Through BIOS
Using kernel parameter nosmt
Disable SMT control:
$ echo off > /sys/devices/system/cpu/smt/control
$ cat /sys/devices/system/cpu/smt/active
0
Disable sibling CPU threads per core (see lscpu and /proc/cpuinfo for topology); for example:
echo 0 | sudo tee /sys/devices/system/cpu/cpu1/onlineConfirm this with
lscpu --extended; for example:$ lscpu --extended [...] On-line CPU(s) list: 0 Off-line CPU(s) list: 1-3
CPU in cgroups
- cgroups v1:
cat /sys/fs/cgroup/cpu/$SLICE/$SCOPE/cpu.stat - cgroups v2:
cat /sys/fs/cgroup/$SLICE/$SCOPE/cpu.stat
CPU Pressure
Recent versions of Linux include Pressure
Stall Information (PSI) statistics to better understand CPU pressure
and constraints. For example, in /proc/pressure/cpu (or in
cpu.pressure in cgroups):
cat /proc/pressure/cpu
some avg10=0.00 avg60=2.12 avg300=5.65 total=33092333
The "some" line indicates the share of time in which at least some tasks are stalled on a given resource.
The ratios (in %) are tracked as recent trends over ten, sixty, and three hundred second windows, which gives insight into short term events as well as medium and long term trends. The total absolute stall time (in us) is tracked and exported as well, to allow detection of latency spikes which wouldn't necessarily make a dent in the time averages, or to average trends over custom time frames.
nice
Consider testing increased CPU and I/O priority of important programs to see if there is an improvement:
Examples:
$ sudo renice -n -20 -p 17 # Set the fastest scheduling priority for PID 17
17 (process ID) old priority 0, new priority -20
$ ionice -p 17 # print the I/O priority of PID 17
realtime: prio 0
$ sudo ionice -c 1 -n 0 -p 17 # Set the I/O priority of PID 17 to realtime and the highest priority (in this example it's redundant)
vmstat
vmstat is a command to query general operating system statistics. For example:
$ vmstat -tn -SM 5 2
procs -----------memory---------- ---swap-- -----io---- --system-- -----cpu------ ---timestamp---
r  b   swpd   free   buff  cache   si   so    bi    bo   in   cs us sy id wa st
0  0      0  10600    143   2271    0    0   114    24  150  623  3  1 93  3  0    2014-02-10 08:18:37 PST
0  0      0  10600    143   2271    0    0     2    24  679 1763  1  0 98  0  0    2014-02-10 08:18:42 PST
To run vmstat in the background with a 5 second interval:
sh -c "date >> nohup.out && (nohup vmstat -tn 5 > diag_vmstat_$(hostname)_$(date +%Y%m%d_%H%M%S).txt &) && sleep 1 && cat nohup.out"Some versions of Linux do not support the -t flag so the
above command will give an error. If so, change to -n and
use the date in the filename to calculate wall clock times.
To stop collection, kill the vmstat process. For example:
pkill -f vmstatvmstat notes:
- The first line is an average since reboot, so in most cases you should disregard it.
- The "r" column has had a confusing manual page in older releases. The newer description is more clear: "The "procs_running" line gives the total number of threads that are running or ready to run (i.e., the total number of runnable threads)."
- b: Average number of uninterruptible, blocked threads - usually I/O
- free, buff, cache: Equivalent to free command. "Total" free = free + buff + cache
- si/so: Swap in/out. bi/bo: Device blocks in/out
- id: Idle - Best place to look for CPU usage - substract 100 minus this column.
- Us=user CPU%, sy=system CPU%, wa=% waiting on I/O, st=% stolen by hypervisor
Ensure there are no errant processes using non-trivial amounts of CPU.
Per Processor Utilization
Query per processor utilization:
$ mpstat -A 5 2
Linux 2.6.32-358.11.1.el6.x86_64 (oc2613817758.ibm.com)     02/07/2014     _x86_64_    (8 CPU)

01:49:47 PM  CPU    %usr   %nice     %sys %iowait    %irq   %soft    %steal  %guest   %idle
01:49:47 PM  all    1.08    0.00    0.60    0.23    0.00    0.00    0.00    0.00   98.09
01:49:47 PM    0    2.43    0.00    1.83    0.00    0.00    0.00    0.00    0.00   95.74
01:49:47 PM    1    1.62    0.00    1.21    0.00    0.00    0.00    0.00    0.00   97.17...
Some processors may have higher interrupt rates due to network card bindings.
top
top provides processor usage for the overall system and individual processes. Without arguments, it will periodically update the screen with updated information:
        top - 15:46:52 up 178 days,  4:53,  2 users,  load average: 0.31, 0.08, 0.02
        Tasks:  77 total,   2 running,  74 sleeping,   1 stopped,   0 zombie
        Cpu(s): 24.6% us,  0.5% sy,  0.0% ni, 74.9% id,  0.0% wa,  0.0% hi,  0.0% si
        Mem:   5591016k total,  5416896k used,   174120k free,  1196656k buffers
        Swap:  2104472k total,    17196k used,  2087276k free,  2594884k cached
The CPU(s) row in this header section shows the CPU usage in terms of the following:
- us: Percentage of CPU time spent in user space.
- sy: Percentage of CPU time spent in kernel space.
- ni: Percentage of CPU time spent on low priority processes.
- id: Percentage of CPU time spent idle.
- wa: Percentage of CPU time spent in wait (on disk).
- hi: Percentage of CPU time spent handling hardware interrupts.
- si: Percentage of CPU time spent handling software interrupts.
          PID USER      PR  NI  VIRT  RES  SHR S %CPU %MEM    TIME+  COMMAND
         8502 user1     25   0  599m 466m 5212 R 99.9  8.5   0:23.92 java...
The table represents the Process ID (PID). CPU usage percentage (%CPU), and process name (COMMAND) of processes using the most CPU. If the available CPU is 100% utilized, the availability to the Java process is being limited. In the case above, the Java process is using all the available CPU but is not contending with any other process. Therefore, the limiting performance factor is the CPU available to the machine.
If the total CPU usage is 100% and other processes are using large amounts of CPU, CPU contention is occurring between the processes, which is limiting the performance of the Java process.
Old Java Diagnostic Guide
Use the -b flag to run top in a batch mode instead of redrawing the screen every iteration. Use -d to control the delay between iterations and -n to control the number of iterations.
The following command may be used to gather all processes sorted by CPU usage every 30 seconds:
nohup sh -c "top -b -d 30 >> diag_top_$(hostname)_$(date +%Y%m%d_%H%M%S).txt" &The following command may be used to gather the top processes by CPU usage every 30 seconds:
nohup sh -c "top -b -d 30 | grep -A 10 'top - ' >> diag_top_$(hostname)_$(date +%Y%m%d_%H%M%S).txt" &The following command may be used to gather the top processes by memory usage every 30 seconds:
nohup sh -c "top -b -d 30 -o %MEM | grep -A 10 'top - ' >> diag_top_$(hostname)_$(date +%Y%m%d_%H%M%S).txt" &Per-thread CPU Usage
The output of top -H on Linux shows the breakdown of the CPU usage on the machine by individual threads. The top output has the following sections of interest:
top - 16:15:45 up 21 days,  2:27,  3 users,  load   average: 17.94, 12.30, 5.52
      Tasks: 150 total,  26 running, 124 sleeping,   0   stopped,   0 zombie
      Cpu(s): 87.3% us,  1.2% sy,  0.0% ni, 27.6% id,  0.0%   wa,  0.0% hi,  0.0% si
      Mem:   4039848k total,  3999776k used,   40072k free,    92824k buffers
      Swap:  2097144k total,      224k used, 2096920k free,  1131652k cached

        PID USER    PR  NI  VIRT  RES  SHR S %CPU   %MEM    TIME+  COMMAND
      31253 user1   16   0 2112m 2.1g 1764 R 37.0   53.2   0:39.89 java
      31249 user1   16   0 2112m 2.1g 1764 R 15.5   53.2   0:38.29 java
      31244 user1   16   0 2112m 2.1g 1764 R 13.6   53.2   0:40.05 java...
      ..
PID: The thread ID. This can be converted into hexadecimal and used to correlate to the "native ID" in a javacore.txt file...
S: The state of the thread. This can be one of the following:
- R: Running
- S: Sleeping
- D: Uninterruptible sleep
- T: Traced
- Z: Zombie
%CPU: The percentage of a single CPU usage by the thread...
TIME+: The amount of CPU time used by the thread.
Note that the "Cpu(s)" line in the header of the output shows the percentage usage across all of the available CPUs, whereas the %CPU column represents the percentage usage of a single CPU. For example, on a four-CPU machine the Cpu(s) row will total 100% and the %CPU column will total 400%.
In the per-thread breakdown of the CPU usage shown above, the Java process is taking approximately 75% of the CPU usage. This value is found by totaling the %CPU column for all the Java threads (not all threads are shown above) and dividing by the number of CPUs. The Java process is not limited by other processes. There is still approximately 25% of the CPU idle. You can also see that the CPU usage of the Java process is spread reasonably evenly over all of the threads in the Java process. This spread implies that no one thread has a particular problem. Although the application is allowed to use most of the available CPU, the fact that 25% is idle means that some points of contention or delay in the Java process can be identified. A report indicating that active processes are using a small percentage of CPU, even though the machine appears idle, means that the performance of the application is probably limited by points of contention or process delay, preventing the application from scaling to use all of the available CPU. If a deadlock is present, the reported CPU usage for the Java process is low or zero. If threads are looping, the Java CPU usage approaches 100%, but a small number of the threads account for all of that CPU time. Where you have threads of interest, note the PID values because you can convert them to a hexadecimal value and look up the threads in the javacore.txt file to discover if the thread is part of a thread pool. In this way you gain an understanding of the kind of work that the thread does from the thread stack trace in the javacore.txt file. For example, the PID 31253 becomes 7A15 in hexadecimal. This value maps to the "native ID" value in the javacore.txt file.
Old Java Diagnostic Guide
You can convert the thread ID into hexadecimal and search for it in a matching javacore.txt file on the IBM JVM. For example, if the TID is 19511, convert 19511 to hexadecimal = 0x4C37. Search in javacore for native ID:
"WebContainer : 1" (TID:0x0933CB00, sys_thread_t:0x09EC4774, state:CW, native ID:0x00004C37) prio=5
java/text/FieldPosition$Delegate.formatted(FieldPosition.java:291(Compiled Code))
Another technique to monitor per-thread CPU usage is to monitor the accumulated CPU time per thread (TIME+) to understand which threads are using the CPUs.
The following command may be used to gather the top threads by CPU usage every 30 seconds:
nohup sh -c "top -b -d 30 -H | grep -A 50 'top - ' >> diag_top_$(hostname)_$(date +%Y%m%d_%H%M%S).txt" &Note that this example of top -H may consume a
significant amount of CPU because it must iterate over all threads in
the system.
To investigate a set of PIDs more directly, a command like the following may be useful, replace the $PIDXs with your process IDs, and when looking at the top output, look at the second stanza:
$ while true; do for i in $PID1 $PID2 $PID3; do echo "Gathering data for PID $i at $(date)"; top -H -p $i -b -d 10 -n 2 > diag_top_$(hostname)_$(date +%Y%m%d_%H%M%S)_$i.txt; kill -3 $i; done; echo "Sleeping at $(date)"; sleep 60; donepidstat
pidstat provides detailed, per-process information. For example:
pidstat
Linux 4.19.76-linuxkit (fca32e320852)   09/09/20    _x86_64_    (4 CPU)

20:09:39      UID       PID    %usr %system  %guest   %wait    %CPU   CPU  Command
20:09:39        0         1    0.00    0.00    0.00    0.00    0.00     1  entrypoint.sh
20:09:39        0         7    0.00    0.00    0.00    0.00    0.00     0  supervisord
20:09:39        0        10    0.00    0.00    0.00    0.00    0.00     1  rsyslogd
Load Average
Load average is defined as:
The first three fields in [/proc/loadavg] are load average figures giving the number of jobs in the run queue (state R) or waiting for disk I/O (state D) averaged over 1, 5, and 15 minutes.
A load average is reported as three numbers representing 1-minute, 5-minute, and 15-minute exponentially damped/weighted moving averages of the number of runnable and uninterruptible threads recalculated every 5 seconds. If these numbers are greater than the number of CPU cores, then there may be cause for concern.
If capturing top -H during a time of a high load average
does not show high CPU usage, then it is more likely caused by
uninterruptible threads, which are usually waiting on I/O. If CPU
utilization does not correlate with load averages, review the number of
threads in the "D" (uninterruptible) state.
atop
atop is
an ASCII based live and historical system monitor.
Run without any options to do live monitoring:
$ atopIncludes crontab files to run atop in the background. Read a historical file:
# atop -r /var/log/atop/atop_20140908.1
Write atop data with a 10 second interval (Ctrl+C to stop):
atop -w atop.raw 10Graph CPU usage of some process (replace the program name or PID in the first grep):
atop -PPRC -r atop.raw | grep java.*y$ | awk '{if(NR>1) {printf "%s %s,%d\n", $4,$5,(($11+$12+$13)10)/$10} else print "Time,CPU%"}' | \
gnuplot -p -e "set timefmt '%Y/%m/%d %H:%M:%S'; set xtics out;set ytics out; set xdata time; set datafile sep ','; set grid; set style data lines; \
set format y '%.0f'; set format x '%H:%M:%S'; set key autotitle columnhead; plot '/dev/stdin' using 1:2; pause -1"
sar
sar
is part of the sysstat package. It may be run periodically
from a crontab in /etc/cron.d/sysstat and writes files to /var/log/sa/.
You can report sar data textually on the system using the "sar"
command:
$ sar -A | head
Linux 2.6.32-431.30.1.el6.x86_64 (host)     09/09/2014     _x86_64_    (8 CPU)
12:00:01 AM     CPU      %usr     %nice      %sys   %iowait    %steal      %irq     %soft    %guest     %idle
12:10:01 AM     all      0.86      0.00      0.59     0.15      0.00      0.00     0.00      0.00     98.41...
Some useful things to look at in sar:
- runq-sz
- plist-sz
- kbmemused - kbbuffers - kbcached
You can also visualize sar log files using ksar:

nmon
nmon
was originally developed for AIX but has since been ported to Linux.
One reason to use nmon on Linux is that the Java NMONVisualizer
tool is a very powerful and flexible graphing application that
accepts nmon data. For details, see the nmon
section in the AIX chapter.
Start nmon for essentially unlimited collection with a 60 second interval:
sudo nohup nmon -fT -s 60 -c 1000000 -t && sleep 2 && sudo cat nohup.out # Confirm no errors in the outputExecuting this command will start the nmon collector in the
background, so explicitly putting it into the background (&) is not
necessary. This will create a file with the name
$HOST_$STARTDAY_$STARTTIME.nmon
Note that any errors starting nmon (such as file pemissions writing
to the specified directory) will go to nohup.out, so it is important to
check nohup.out to make sure it started correctly. You can also run
ps -elfx | grep nmon to make sure it started.
When you want to stop nmon, run:
sudo pkill -USR2 nmoncollectl
collectl is
a comprehensive, open source, Linux monitoring tool created by RedHat.
It is often used
on RHEL systems:
Collectl is a comprehensive performance data collection utility similar to sar. It is fine grained with low overhead and holistically collects all of the important kernel statistics as well as process data. Additionally, it is a very simple tool to collect very useful performance data.
While collectl is neither shipped nor supported by Red Hat at this time, it is a useful and popular utility frequently used by users and third party vendors.
uprobes
uprobes are a Linux kernel mechanism to trace user program function calls.
uprobe example
In the following example, there is a function entry uprobe
(p) called probe_a/play for the
/home/user1/a.out binary for the play function
at offset 0x1156:
# cat /sys/kernel/debug/tracing/uprobe_events
p:probe_a/play /home/user1/a.out:0x0000000000001156
Although you may define
uprobes manually, perf probe is often easier to
use.
Each uprobe has a corresponding directory entry through which it can be controlled:
# cat /sys/kernel/debug/tracing/events/probe_a/enable
0
Once an event is enabled:
# echo 1 > /sys/kernel/debug/tracing/events/probe_a/enableA trace will be printed every time the function is executed:
# cat /sys/kernel/debug/tracing/trace
# tracer: nop
#
# entries-in-buffer/entries-written: 10/10   #P:6
#
#                                _-----=> irqs-off
#                               / _----=> need-resched
#                              | / _---=> hardirq/softirq
#                              || / _--=> preempt-depth
#                              ||| / _-=> migrate-disable
#                              |||| /     delay
#           TASK-PID     CPU#  |||||  TIMESTAMP  FUNCTION
#              | |         |   |||||     |         |
           a.out-3019    [005] .....  2378.367334: play: (0x401156)
perf Profiler Tool
perf is a user program and kernel sampling CPU profiler tool available since Linux 2.6.
perf record
perf record
is used to gather sampled CPU activity into a perf.data
file.
In general, perf should be run as root
given that the kernel.perf_event_paranoid
setting defaults to 2. To allow non-root usage, this may be
overridden with, for example,
sysctl -w kernel.perf_event_paranoid=-1 or adding
kernel.perf_event_paranoid=-1 to
/etc/sysctl.conf and running sysctl -p.
Here is the most common example that gathers system-wide
(-a) user and kernel call stack samples (-g)
at a ~10.1ms frequency (-F 99 = 99 Hertz;
milliseconds=1000/F) for 60 seconds (sleep 60)
and assumes frame pointer omission
(--call-graph dwarf,65528; discussed below):
perf record --call-graph dwarf,65528 -F 99 -a -g -- sleep 60The next most common example gathers process-specific
(-p) call stack samples:
perf record --call-graph dwarf,65528 -F 99 -g -p $PID -- sleep 60perf call stacks
By default, perf walks callstacks using the frame pointer register
(--call-graph fp); however, this may cause truncated stacks
if a sampled binary is built with frame
pointer ommission (FPO):
In some systems, where binaries are built with gcc --fomit-frame-pointer, using the "fp" method will produce bogus call graphs, using "dwarf", if available (perf tools linked to the libunwind or libdw library) should be used instead. Using the "lbr" method doesn't require any compiler options. It will produce call graphs from the hardware LBR registers. The main limitation is that it is only available on new Intel platforms, such as Haswell. It can only get user call chain. It doesn't work with branch stack sampling at the same time.
When "dwarf" recording is used, perf also records (user) stack dump when sampled. Default size of the stack dump is 8192 (bytes). User can change the size by passing the size after comma like "--call-graph dwarf,4096".
If frame pointer omission is used (such as it is on IBM
Java/Semeru/OpenJ9), you should use
--call-graph dwarf,65528 with perf record
(values larger than 65528 don't work). For example:
perf record --call-graph dwarf,65528 -F 99 -a -g -- sleep 60Note that DWARF based call stack walking may be up to 20% or much more slower than frame pointer based call stack walking.
As an alternative, when running on Intel Haswell and newer CPUs, test
using --call-graph lbr which uses a hardware Last Branch
Record (LBR) capability, doesn't require a frame pointer, and is
generally less overhead than DWARF (although it has a limited maximum
depth):
perf record --call-graph lbr -F 99 -a -g -- sleep 60perf and J9
IBM Java and Semeru have options that resolve JIT-compiled top stack frames:
- For IBM Java >= 8.0.7.20 or Semeru >= v8.0.352 / 11.0.17.0 /
17.0.5.0, restart the Java process with
-XX:+PerfTool - For older versions of IBM Java and Semeru, restart the Java process
with
-Xjit:perfToolwhile making sure to combine with commas with any pre-existing-Xjitoptions. Only the last-Xjitoption is processed, so if there is additional JIT tuning, combine theperfTooloption with that tuning; for example,-Xjit:perfTool,exclude={com/example/generated/*}.
These options create a /tmp/perf-$PID.map file that the
perf tool knows to read to try to resolve unknown symbols.
This option must be used on JVM startup and cannot be enabled
dynamically. If not all symbols are resolved, try adding
-Xlp:codecache:pagesize=4k. Currently, the option
-XX:+PreserveFramePointer to allow walking JIT-compiled
method stacks is not
supported on J9 (and, in any case, that would require
--call-graph fp so you would lose native JVM callstack
walking).
An example
perf post-processing script is provided in the OpenJ9
repository:
chmod a+x perf-hottest- Restart the JVM with
-Xjit:perfTool - When the issue occurs:
perf record --call-graph dwarf,65528 -F 99 -g -p $PID -- sleep 60 perf script -G -F comm,tid,ip,sym,dso | ./perf-hottest sym > diag_perf_$(hostname)_$(date +%Y%m%d_%H%M%S_%N).txt
perf and J9 with assembly annotated profiling of JITted code
perf provides a JVMTI
agent called libperf-jvmti.so that provides assembly
annotated profiling of JITted code.
Unfortunately, this requires compiling perf itself (although this can
be done on any similar architecture machine and the
libperf-jvmti.so binary copied to the target machine):
- Compile
perf:- Debian/Ubuntu:
apt-get update
DEBIAN_FRONTEND=noninteractive TZ=${TZ:-UTC} apt-get -y install python python3 build-essential make gcc g++ default-jdk libbabeltrace-dev libbabeltrace-ctf-dev flex bison libelf-dev libdw-dev libslang2-dev libssl-dev libiberty-dev libunwind-dev libbfd-dev libcap-dev libnuma-dev libperl-dev python-dev libzstd-dev git
git clone --depth 1 https://git.kernel.org/pub/scm/linux/kernel/git/torvalds/linux.git
cd linux/tools/perf
make
- Debian/Ubuntu:
- Start Java with the path to the compiled
libperf-jvmti.so(replace$DIRwith the path to the rootperffolder). Note that-Xjit:perfToolis no longer needed.-agentpath:$DIR/linux/tools/perf/libperf-jvmti.so - Run
perf record:perf record -k 1 --call-graph dwarf,65528 -F 99 -a -g -- sleep 60 - Create a new
perfdata file with injected JIT data:perf inject -i perf.data --jit -o perf.data.jitted - Process the
perfdata as in the other examples in this chapter except use-i perf.data.jittedto read the newperfdata file. For examples:- Using
perf report:perf report -i perf.data.jitted- Type
aon a function to annotate the hot assembly instructions
- Dump the stacks:
perf script -i perf.data.jitted
- Using
Here's an example performing the above using a container (if using
podman machine, first run
podman system connection default podman-machine-default-root):
podman run --privileged -it --rm ibm-semeru-runtimes:open-17-jdk sh -c 'sysctl -w kernel.perf_event_paranoid=-1 && apt-get update && DEBIAN_FRONTEND=noninteractive TZ=${TZ:-UTC} apt-get -y install python python3 build-essential make gcc g++ default-jdk libbabeltrace-dev libbabeltrace-ctf-dev flex bison libelf-dev libdw-dev libslang2-dev libssl-dev libiberty-dev libunwind-dev libbfd-dev libcap-dev libnuma-dev libperl-dev python-dev libzstd-dev git && git clone --depth 1 https://git.kernel.org/pub/scm/linux/kernel/git/torvalds/linux.git && cd linux/tools/perf && make && echo "public class main { public static void main(String... args) { for (int i = 0; i < 50000; i++) { byte[] b = new byte[(int)(Math.random()*10)*1048576]; } } }" > main.java && javac main.java && ./perf record -k 1 --call-graph dwarf,65528 -F 99 -a -g -- java -agentpath:/linux/tools/perf/libperf-jvmti.so main && ./perf inject -i perf.data --jit -o perf.data.jitted && ./perf script -i perf.data.jitted'perf report
perf report
may be used to post-process a perf.data file to summarize
the results.
In the default mode, an ncurses-based display allows for graphical exploration:
perf report -n --show-cpu-utilizationThe second column, Self, reports the percentage of
samples just in that method. The first
column, Children, reports Self plus the
Self of all functions that this method calls,
[...] so that it can show the total overhead of the higher level functions even if they don't directly execute much". [...] It might be confusing that the sum of all the 'children' overhead values exceeds 100% since each of them is already an accumulation of 'self' overhead of its child functions. But with this enabled, users can find which function has the most overhead even if samples are spread over the children.
To only report Self percentages, use
--no-children:
perf report -n --show-cpu-utilization --no-childrenTo automatically multiply the percentages down the graph, use
-g graph. Stacks may be coalesced with
-g folded.
Common shortcuts:
+to expand/collapse a call stackato annotate the hot assembly instructionsHto jump to the hottest instruction
To print in text form, add the --stdio option. For
example:
perf report -n --show-cpu-utilization --stdioWith detailed symbol information, order by the overhead of source file name and line number:
perf report -s srclineperf script
perf script
may be used to post-process a perf.data file to dump
results in raw form for post-processing scripts.
Useful commands
Query available CPU statistics:
# perf list

List of pre-defined events (to be used in -e):
  cpu-cycles OR cycles                               [Hardware event]
  instructions                                       [Hardware event]
  cache-references                                   [Hardware event]
  cache-misses                                       [Hardware event]...
Query CPU statistics for a process (use sleep X for some duration or without sleep X and Ctrl+C to stop):
# perf stat -B -e cycles,cache-misses -p 11386 sleep 5
 Performance counter stats for process id '11386':

        20,810,324 cycles
           215,879 cache-misses
       5.000869037 seconds time elapsed
Sample CPU events for a process and then create a report:
perf record --call-graph dwarf -p 11386 sleep 5
perf report
Query CPU statistics periodically:
$ perf top
Samples: 5K of event 'cycles', Event count (approx.): 1581538113
 21.98%  perf                                        [.] 0x000000000004bd30
  4.28%  libc-2.12.so                                [.] __strcmp_sse42
Application deep-dive:
perf stat -e task-clock,cycles,instructions,cache-references,cache-misses,branches,branch-misses,faults,minor-faults,cs,migrations -r 5 nice taskset 0x01 java myappperf Flame Graphs
Flame
graphs are a great way to visualize perf activity:
git clone https://github.com/brendangregg/FlameGraph
cd FlameGraph
perf record --call-graph dwarf,65528 -F 99 -a -g -- sleep 60
perf script | ./stackcollapse-perf.pl > out.perf-folded
./flamegraph.pl --width 600 out.perf-folded > perf-kernel.svg
Intel Processor Trace
magic-trace
uses perf to analyze CPU activity if Intel Processor Trace
is available, rather than stack sampling.
PerfSpect
Intel PerfSpect calculates high level metrics from hardware events.
Machine clears are when the entire pipeline must be cleared. One cause of this is "false sharing" when 2 CPUs read/write to unrelated variables that happen to share the same L1 cache line.
perf On-CPU Stack Sampling
The $(perf record) command may be used to capture native stack traces on all CPUs at some frequency for some period of time. The following example captures all On-CPU stacks every 50ms for 60 seconds and writes the data to a file called perf.data:
nohup sudo sh -c "date +'%Y-%m-%d %H:%M:%S.%N %Z' >> perfdata_starttimes.txt; cat /proc/uptime >> perfdata_starttimes.txt; perf record --call-graph dwarf,65528 -T -F 99 -a -g -- sleep 60" &The frequency F may be converted to milliseconds (M) with the
equation M=1000/F, so if you want to capture at a different millisecond
frequency, use the equation F=1000/M. For example, to capture at 10ms
frequency, F=1000/10, so the argument would be -F 100. It's
generally a good idea to substract 1 from F (e.g. -F 99) to
avoid any coincidental sampling of application activity of the same
frequency.
There is no way to change the output file name to something other
than perf.data. If the file perf.data already exists, it is moved to
perf.data.old before overwriting the existing file.
The reason for writing the date with millisecond precision into a separate file right before starting $(perf record) is that uptime may have drifted from wallclock time; therefore, it is not a reliable reflection of wallclock time (this is probably why the $(uptime) command only prints a relative amount) and stack tick offsets cannot be compared to the wallclock of uptime (e.g. $(date -d"1970-01-01 + $(date +%s) sec - $(cut -d' ' -f1 </proc/uptime) sec" +"%F %T.%N UTC" > uptime.txt; date >> uptime.txt)). When the $(perf) command reports the "captured on" wallclock time, it is simply looking at the creation time of the perf.data file (which usually occurs at the completion of the recording, so it's usually at the end of the sleep) which is a time_t, which is second precision, so the exact start time with millisecond precision is unavailable. This means that the only way to get millisecond precision wallclock time of a perf stack is to create a separate file that notes the wallclock time with millisecond accuracy right before starting perf.
Before recording, ensure that you have installed at least the kernel and glibc symbols (these are only used by the diagnostic tools to map symbols, so they do not change the function of the OS but they do use about 1GB of disk space). If you cannot install debug symbols for any reason, then gather the kernel symbol table for manual cross-reference.
If you are using IBM Java >= 7.1, then restart the JVM with the
argument -Xjit:perfTool. The JIT will then write a file to
/tmp/perf-${PID}.map which maps JIT-compiled method addresses to
human-readable Java method names for the $(perf script) tool to use. For
IBM Java < 7.1, use perf-map-agent
After the $(perf record) script has completed, process the data to human readable form:
sudo chmod a+rw /tmp/perf-${PID}.map
sudo chown root:root /tmp/perf-${PID}.map
sudo perf script --header -I -f -F comm,cpu,pid,tid,time,event,ip,sym,dso,symoff > diag_perfdata_$(hostname)_$(date +%Y%m%d_%H%M%S_%N).txt
The perf script command might give various errors and warnings and they're usually about missing symbols and mapping files, which is generally expected (since it's sampling all processes on the box).
The time field is the number of seconds since boot (with microsecond precision after the decimal point), in the same format as the first column of /proc/uptime. The top of the perfdata file will include a timestamp when the $(perf record) command started writing the perf.data file (which usually occurs at the completion of the recording, so it's usually at the end of the sleep). For example:
# captured on: Tue Nov 13 11:48:03 2018Therefore, one can approximate the wallclock time of each stack by taking the difference between the first stack's time field and the target stack's time field and adding that number of seconds to the captured time minus the sleep time. Unfortunately, this only gives second level resolution because the captured time only provides second level resolution. Instead, one can use the date printed into perfdata_starttimes.txt and add the difference in seconds to that date.
Example stack:
main 10840/10841 [006] 17020.130034: cycles:ppp:
            7f418d20727d Loop.main([Ljava/lang/String;)V_hot+0x189 (/tmp/perf-10840.map)
            7f41a8010360 [unknown] ([unknown])
                       0 [unknown] ([unknown])
The columns are:
- Thread name
- PID/TID
- CPUID
- Timestamp
- perf event
- Within each stack frame:
- Instruction pointer
- Method name+Offset
- Executable or shared object (or mapping file)
Calculating CPU statistics
Example calculating various CPU statistics for a program execution:
$ sudo perf stat -- echo "Hello World"
Hello World

  Performance counter stats for 'echo Hello World':

               0.36 msec task-clock                #    0.607 CPUs utilized
                  0      context-switches          #    0.000 K/sec
                  0      cpu-migrations            #    0.000 K/sec
                 64      page-faults               #    0.177 M/sec
          1,253,194      cycles                    #    3.474 GHz
            902,044      instructions              #    0.72  insn per cycle
            189,611      branches                  #  525.656 M/sec
              7,573      branch-misses             #    3.99% of all branches

        0.000594366 seconds time elapsed
        0.000652000 seconds user
        0.000000000 seconds sys
The statistics may be pruned with the -e flag:
$ sudo perf stat -e task-clock,cycles -- echo "Hello World"
Hello World

  Performance counter stats for 'echo Hello World':

               0.60 msec task-clock                #    0.014 CPUs utilized
          1,557,975      cycles                    #    2.582 GHz

        0.043947354 seconds time elapsed
        0.000000000 seconds user
        0.001175000 seconds sys
The -r flag runs the program a certain number of times and calculates average statistics for all of the runs:
$ sudo perf stat -r 10 -- echo "Hello World"
Hello World
Hello World
Hello World
Hello World
Hello World
Hello World
Hello World
Hello World
Hello World
Hello World

  Performance counter stats for 'echo Hello World' (10 runs):

               0.33 msec task-clock                #    0.661 CPUs utilized            ( +-  2.14% )
                  0      context-switches          #    0.302 K/sec                    ( +-100.00% )
                  0      cpu-migrations            #    0.000 K/sec
                 63      page-faults               #    0.190 M/sec                    ( +-  0.75% )
          1,148,795      cycles                    #    3.471 GHz                      ( +-  2.09% )
            880,890      instructions              #    0.77  insn per cycle           ( +-  0.56% )
            185,916      branches                  #  561.772 M/sec                    ( +-  0.52% )
              7,365      branch-misses             #    3.96% of all branches          ( +-  1.45% )

          0.0005010 +- 0.0000212 seconds time elapsed  ( +-  4.24% )
The program may be bound to particular CPUs to check the impact of context switches and other kernel tuning:
$ sudo perf stat -e context-switches,cpu-migrations -- taskset -c 0 echo "Hello World"
Hello World

  Performance counter stats for 'taskset -c 0 echo Hello World':

                  1 context-switches
                  1 cpu-migrations

        0.001013727 seconds time elapsed

        0.000000000 seconds user
        0.001057000 seconds sys
Calculating CPU cycles
Example calculating the total number of CPU cycles used by a program:
# perf stat -e task-clock,cycles -- echo "Hello World"
Hello World

 Performance counter stats for 'echo Hello World':

              0.97 msec task-clock                #    0.222 CPUs utilized
   <not supported>      cycles

       0.004376900 seconds time elapsed

       0.000000000 seconds user
       0.000000000 seconds sys
Instructions per cycle
Instructions per cycle (IPC) shows approximately how many instructions were completed per CPU clock cycle. The maximum IPC is based on the CPU architecture and how "wide" it is; i.e., the maximum possible instructions a CPU can complete per clock cycle. Some recent processors are commonly 4- or 5-wide meaning a maximum IPC of 4 or 5, respectively. A useful heuristic is that an IPC less than 1 suggests the CPU is memory-stalled whereas an IPC greater than 1 suggests the CPU is instruction-stalled.
Kernel timer interrupt frequency
perf stat -e 'irq_vectors:local_timer_entry' -a -A --timeout 30000perf probe
perf probe
is used to configure tracepoints such as uprobes.
List uprobes for a binary
# perf probe -F -x /home/user1/a.out
completed.0
data_start
deregister_tm_clones
frame_dummy
main
play
register_tm_clones
Example searching for malloc:
# perf probe -F -x /lib64/libc.so.6 | grep malloc
cache_malloced
malloc
malloc
malloc_consolidate
malloc_info
malloc_info
malloc_printerr
malloc_stats
malloc_stats
malloc_trim
malloc_trim
malloc_usable_size
malloc_usable_size
ptmalloc_init.part.0
sysmalloc
Enable uprobe
# perf probe -x /home/user1/a.out play
Added new event:
  probe_a:play         (on play in /home/user1/a.out)

You can now use it in all perf tools, such as:

        perf record -e probe_a:play -aR sleep 1
Example tracing callgraphs of malloc calls for a particular process for 30 seconds:
# perf record -e probe_libc:malloc --call-graph dwarf -p 3019 -- sleep 30
[ perf record: Woken up 1 times to write data ]
[ perf record: Captured and wrote 0.063 MB perf.data (6 samples) ]
# perf report | head -20
# To display the perf.data header info, please use --header/--header-only options.
#
#
# Total Lost Samples: 0
#
# Samples: 6  of event 'probe_libc:malloc'
# Event count (approx.): 6
#
# Children      Self  Trace output
# ........  ........  ..............
#
   100.00%   100.00%  (7fdd73052610)
            |
            ---_start
               __libc_start_main_alias_2 (inlined)
               __libc_start_call_main
               main
               play
Or for all processes:
# perf record -e probe_libc:malloc --call-graph dwarf -a -- sleep 30
[ perf record: Woken up 697 times to write data ]
Warning:
Processed 82896 events and lost 8 chunks!

Check IO/CPU overload!

Warning:
2 out of order events recorded.
[ perf record: Captured and wrote 216.473 MB perf.data (25915 samples) ]
# perf report | head -20
Warning:
Processed 82896 events and lost 8 chunks!

Check IO/CPU overload!

Warning:
2 out of order events recorded.
# To display the perf.data header info, please use --header/--header-only options.
#
#
# Total Lost Samples: 0
#
# Samples: 25K of event 'probe_libc:malloc'
# Event count (approx.): 25915
#
# Children      Self  Command          Shared Object                     Symbol
# ........  ........  ...............  ................................  ..............................................................................................
#
    43.30%    43.30%  konsole          libc.so.6                         [.] malloc
            |
            |--29.76%--0x55ea4b5f6af4
            |          __libc_start_main_alias_2 (inlined)
            |          __libc_start_call_main
            |          0x55ea4b5f6564
            |          QCoreApplication::exec
            |          QEventLoop::exec
            |          QEventDispatcherGlib::processEvents
List enabled uprobes
# perf probe -l
  probe_a:play         (on play@/home/user1/test.c in /home/user1/a.out)
Disable uprobe
# perf probe -d probe_a:play
Removed event: probe_a:play
eBPF
Extended BPF (eBPF) is a Linux kernel tracing utility. It's based on the Berkeley Packet Filter (BPF) which was originally designed for efficient filtering of network packets, but eBPF has been extended into a broader range of purposes such as call stack sampling for performance profiling. Depending on usage, there are different tools that are front-ends to eBPF such as BPF Compiler Collection (BCC) and bpftrace.
eBPF profiling
On Linux >= 4.8, eBPF is generally more efficient than perf in gathering call
stack samples because some things can be done more efficiently inside
the kernel. This capability is available in the profile
tool in bcc. As with perf, eBPF generally is run as
root.
However, eBPF does not
support DWARF-based or LBR-based call stack walking like
perf record does with --call-graph dwarf.
Previous attempts at integrating DWARF stack walking in the kernel were
buggy.
Alternative proposals of user-land DWARF stack walking integration into
eBPF have been proposed but not yet
implemented.
Therefore, for programs that use frame pointer omission (such as IBM Java/Semeru/OpenJ9), call stack walking with eBPF is very limited.
eBPF profiling example
$ git clone https://github.com/brendangregg/FlameGraph  # or download it from github
$ apt-get install bpfcc-tools  # might be called bcc-tools
$ cd FlameGraph
$ profile-bpfcc -F 99 -adf 60 > out.profile-folded  # might be called /usr/share/bcc/tools/profile
$ ./flamegraph.pl out.profile-folded > profile.svg
bpftrace
bpftrace is a command line interface to tracepoints such as uprobes.
List probes
bpftrace -lProbe sleeping processes
# bpftrace -e 'kprobe:do_nanosleep { printf("PID %d sleeping...\n", pid); }'
Attaching 1 probe...
PID 1668 sleeping...
Count syscalls by process
# bpftrace -e 'tracepoint:raw_syscalls:sys_enter { @[comm] = count(); }'
Attaching 1 probe...
^C
@[a.out]: 4
[...]
Trace uprobe
# bpftrace -e 'uprobe:/home/user1/a.out:play { printf("%llx\n", reg("ip")); }'
Attaching 1 probe...
401156
# objdump -d /home/user1/a.out | grep play
0000000000401156 <play>:
Histogram of read call times
# bpftrace -e 'tracepoint:syscalls:sys_enter_read { @start[tid] = nsecs; } tracepoint:syscalls:sys_exit_read / @start[tid] / { @times = hist(nsecs - @start[tid]); delete(@start[tid]); }'
Attaching 2 probes...
^C

@start[25436]: 4171433620436
@start[1933]: 4171434103928
@times:
[256, 512)             6 |@@@                                                 |
[512, 1K)             85 |@@@@@@@@@@@@@@@@@@@@@@@@@@@@@@@@@@@@@@@@@@@@@@@@@@@@|
[1K, 2K)              69 |@@@@@@@@@@@@@@@@@@@@@@@@@@@@@@@@@@@@@@@@@@          |
[2K, 4K)              45 |@@@@@@@@@@@@@@@@@@@@@@@@@@@                         |
[4K, 8K)              76 |@@@@@@@@@@@@@@@@@@@@@@@@@@@@@@@@@@@@@@@@@@@@@@      |
[8K, 16K)             37 |@@@@@@@@@@@@@@@@@@@@@@                              |
[16K, 32K)            36 |@@@@@@@@@@@@@@@@@@@@@@                              |
[32K, 64K)            12 |@@@@@@@                                             |
[64K, 128K)            3 |@                                                   |
[128K, 256K)           3 |@                                                   |
[256K, 512K)           3 |@                                                   |
[512K, 1M)             0 |                                                    |
[1M, 2M)               1 |                                                    |
[2M, 4M)               1 |                                                    |
htop
htop is similar to the top program. For example:
  1  [||                                        1.0%]   Tasks: 84, 537 thr; 1 running
  2  [||                                        1.0%]   Load average: 0.26 0.60 0.35
  3  [||                                        1.4%]   Uptime: 04:13:07
  4  [||                                        1.7%]
  Mem[||||||||||||||||||||||||||||||     2.09G/7.78G]
  Swp[                                      0K/1024M]

  PID USER      PRI  NI  VIRT   RES   SHR S CPU% MEM%   TIME+  Command
   17 was        20   0 3167M  264M 78172 S  2.7  3.3  0:25.76 java -javaagent:/opt/ibm/wlp/bin/tools/ws-javaagen
  172 was        20   0 4700M  206M 58896 S  1.3  2.6  0:19.88 java -javaagent:/opt/ibm/wlp/bin/tools/ws-javaagen
 1517 was        20   0 4702M  428M  100M S  1.0  5.4  0:41.35 /opt/IBM/WebSphere/AppServer/java/8.0/bin/java -Do [...]
dstat
dstat provides information on CPU, disk, memory, and network. For example:
You did not select any stats, using -cdngy by default.
----total-usage---- -dsk/total- -net/total- ---paging-- ---system--
usr sys idl wai stl| read  writ| recv  send|  in   out | int   csw
  0   0  98   0   0|   0     0 |   0     0 |   0     0 | 874  1142
  0   0  99   0   0|   0     0 |   0     0 |   0     0 | 851  1076
  0   0  98   0   0|   0   192k|   0     0 |   0     0 | 756   920
  1   1  97   0   0|   0     0 |   0     0 |   0     0 | 831  1000
  2   1  97   0   0|   0  4097B|   0     0 |   0     0 | 861  1025
glances
glances provides various information in one glance:
fca32e320852 (Fedora 32 64bit / Linux 4.19.76-linuxkit)                                           Uptime: 4:19:43

CPU  [  2.2%]   CPU       2.2%  nice:     0.0%  ctx_sw:   960   MEM     30.6%   SWAP      0.0%   LOAD    4-core
MEM  [ 30.6%]   user:     0.8%  irq:      0.0%  inter:    772   total:  7.78G   total:   1024M   1 min:    0.21
SWAP [  0.0%]   system:   0.7%  iowait:   0.0%  sw_int:   699   used:   2.38G   used:        0   5 min:    0.27
                idle:    98.6%  steal:    0.0%                  free:   5.40G   free:    1024M   15 min:   0.28

NETWORK       Rx/s   Tx/s   TASKS  82 (627 thr), 1 run, 81 slp, 0 oth sorted automatically by CPU consumption
eth0            0b   192b
lo              0b     0b   CPU%   MEM%  VIRT  RES     PID USER          TIME+ THR  NI S  R/s W/s  Command
                            2.6    0.4   177M  34.1M  3145 root           0:00 1     0 R    0 0    /usr/bin/pytho
TCP CONNECTIONS             2.3    3.3   3.09G 263M     17 was            0:38 87    0 S    0 0    java -javaagen
Listen                 34   0.7    2.5   4.59G 199M    172 was            0:22 49    0 S    0 0    java -javaagen
Initiated               0   0.3    5.4   4.60G 430M   1517 was            0:45 151   0 S    0 0    /opt/IBM/WebSp
Established             2   0.0    9.0   1.99G 714M     59 root           0:00 4     0 S    0 0    /usr/sbin/slap
Terminated              0   0.0    1.0   1.46G 78.2M   286 mysql          0:01 30    0 S    0 0    /usr/libexec/m
Tracked          0/262144   0.0    0.9   680M  68.9M   600 was            0:01 9     0 S    0 0    /usr/bin/Xvnc
                            0.0    0.9   679M  68.6M   106 root           0:01 9     0 S    0 0    /usr/bin/Xvnc
DISK I/O      R/s    W/s    0.0    0.7   875M  57.5M   795 was            0:00 11    0 S    0 0    xfce4-session
sr0              0      0   0.0    0.3   167M  21.7M   676 root           0:00 3     0 S    0 0    /usr/lib64/xfc
sr1              0      0   0.0    0.2   62.7M 19.7M   126 root           0:00 1     0 S    0 0    /opt/IBM/HTTPS
                            0.0    0.2   231M  16.7M   755 root           0:00 3     0 S    0 0    /usr/lib64/xfc
FILE SYS      Used  Total   0.0    0.2   165M  13.9M   718 root           0:00 3     0 S    0 0    xfce4-power-ma
_c/hostname  43.7G  87.8G   0.0    0.1   2.05G 9.12M   324 nobody         0:00 102   0 S    0 0    /opt/IBM/HTTPS
System Tap (stap)
Systemtap simplifies creating and running kernel modules based on kprobes. See installing stap.
A simple "Hello World" script:
#!/usr/bin/stap
probe begin { println("Hello World") exit () }
Execute the script:
# stap helloworld.stpFor most interesting SystemTap scripts, the kernel development package and kernel symbols must be installed. See example scripts at the main repository and others such as a histogram of system call times.
Flame graphs are a great way to visualize CPU activity:
# stap -s 32 -D MAXBACKTRACE=100 -D MAXSTRINGLEN=4096 -D MAXMAPENTRIES=10240 \
    -D MAXACTION=10000 -D STP_OVERLOAD_THRESHOLD=5000000000 --all-modules \
    -ve 'global s; probe timer.profile { s[backtrace()] <<< 1; }
    probe end { foreach (i in s+) { print_stack(i);
    printf("\t%d\n", @count(s[i])); } } probe timer.s(60) { exit(); }' \
    > out.stap-stacks
# ./stackcollapse-stap.pl out.stap-stacks > out.stap-folded
# cat out.stap-folded | ./flamegraph.pl > stap-kernel.svg
WAS Performance, Hang, or High CPU MustGather
The WAS
Performance, Hang, or High CPU MustGather (linperf.sh)
is normally requested by IBM support.
The script is run with the set of process IDs for the JVMs as
parameters and requests thread dumps through kill -3.
Intel VTune Profiler
Intel VTune Profiler is a deep profiler for Intel CPUs.
Instructions with a CPI rate of > ~100 may be concerning and signs of stalls (e.g. cache false sharing, etc.).
Intel Performance Counter Monitor (PCM)
The Intel Performance Counter Monitor (PCM) provides access to performance counters on Intel processors:
$ make
$ sudo ./pcm.x
 EXEC  : instructions per nominal CPU cycle
 IPC   : instructions per CPU cycle
 FREQ  : relation to nominal CPU frequency='unhalted clock ticks'/'invariant timer ticks' (includes Intel Turbo Boost)
 AFREQ : relation to nominal CPU frequency while in active state (not in power-saving C state)='unhalted clock ticks'/'invariant timer ticks while in C0-state'  (includes Intel Turbo Boost)
 L3MISS: L3 cache misses
 L2MISS: L2 cache misses (including other core's L2 cache *hits*)
 L3HIT : L3 cache hit ratio (0.00-1.00)
 L2HIT : L2 cache hit ratio (0.00-1.00)
 L3CLK : ratio of CPU cycles lost due to L3 cache misses (0.00-1.00), in some cases could be >1.0 due to a higher memory latency
 L2CLK : ratio of CPU cycles lost due to missing L2 cache but still hitting L3 cache (0.00-1.00)
 READ  : bytes read from memory controller (in GBytes)
 WRITE : bytes written to memory controller (in GBytes)
 IO    : bytes read/written due to IO requests to memory controller (in GBytes); this may be an over estimate due to same-cache-line partial requests
 TEMP  : Temperature reading in 1 degree Celsius relative to the TjMax temperature (thermal headroom): 0 corresponds to the max temperature

 Core (SKT) | EXEC | IPC  | FREQ  | AFREQ | L3MISS | L2MISS | L3HIT | L2HIT | L3CLK | L2CLK  | READ  | WRITE |  IO   | TEMP

   0    0     0.01   0.32   0.04    0.54     456 K    649 K    0.30    0.25    0.84    0.07     N/A     N/A     N/A     65
   1    0     0.01   0.54   0.02    0.46     286 K    412 K    0.31    0.31    0.91    0.08     N/A     N/A     N/A     65
   2    0     0.00   0.45   0.01    0.47     106 K    119 K    0.11    0.06    1.29    0.03     N/A     N/A     N/A     60
   3    0     0.02   0.81   0.03    0.54     524 K    598 K    0.12    0.19    1.21    0.03     N/A     N/A     N/A     60
   4    0     0.01   0.67   0.02    0.46     229 K    264 K    0.13    0.20    0.98    0.03     N/A     N/A     N/A     60
   5    0     0.00   0.25   0.01    0.47     216 K    224 K    0.04    0.03    1.86    0.02     N/A     N/A     N/A     60
   6    0     0.00   0.15   0.00    0.46      18 K     19 K    0.02    0.03    1.42    0.01     N/A     N/A     N/A     60
   7    0     0.00   0.34   0.00    0.47      45 K     46 K    0.02    0.03    1.69    0.01     N/A     N/A     N/A     60
-----------------------------------------------------------------------------------------------------------------------------
 SKT    0     0.01   0.53   0.02    0.50    1884 K   2334 K    0.19    0.21    1.07    0.05    0.18    0.02    0.04     60
-----------------------------------------------------------------------------------------------------------------------------
 TOTAL  *     0.01   0.53   0.02    0.50    1884 K   2334 K    0.19    0.21    1.07    0.05    0.18    0.02    0.04     N/A

 Instructions retired:  167 M ; Active cycles:  317 M ; Time (TSC): 2597 Mticks ; C0 (active,non-halted) core residency: 3.03 %

 C1 core residency: 4.92 %; C3 core residency: 1.98 %; C6 core residency: 0.09 %; C7 core residency: 89.97 %;
 C2 package residency: 6.29 %; C3 package residency: 4.29 %; C6 package residency: 4.51 %; C7 package residency: 57.55 %;

 PHYSICAL CORE IPC                 : 1.06 => corresponds to 26.41 % utilization for cores in active state
 Instructions per nominal CPU cycle: 0.02 => corresponds to 0.40 % core utilization over time interval
KUTrace
KUtrace is a low-overhead Linux kernel tracing facility for observing and visualizing all the execution time on all cores of a multi-core processor.
Physical Memory (RAM)
Query memory information:
$ cat /proc/meminfo
MemTotal:       15943596 kB
MemFree:         4772348 kB
Buffers:          305280 kB
Cached:          8222008 kB
Slab:             369028 kB
AnonPages:       5397004 kB...
On newer versions of Linux, use the "Available" statistics to determine the approximate amount of RAM that's available for use for programs:
Many load balancing and workload placing programs check /proc/meminfo to estimate how much free memory is available. They generally do this by adding up "free" and "cached", which was fine ten years ago, but is pretty much guaranteed to be wrong today. It is wrong because Cached includes memory that is not freeable as page cache, for example shared memory segments, tmpfs, and ramfs, and it does not include reclaimable slab memory, which can take up a large fraction of system memory on mostly idle systems with lots of files. Currently, the amount of memory that is available for a new workload, without pushing the system into swap, can be estimated from MemFree, Active(file), Inactive(file), and SReclaimable, as well as the "low" watermarks from /proc/zoneinfo. However, this may change in the future, and user space really should not be expected to know kernel internals to come up with an estimate for the amount of free memory. It is more convenient to provide such an estimate in /proc/meminfo. If things change in the future, we only have to change it in one place.
Notes:
- Physical memory used ~= MemTotal - MemFree - Buffers - Cached
- AnonPages ~= The sum total of virtual memory allocations (e.g.
malloc, mmap, etc.) by currently running processes. This is roughly
equivalent to summing the RSS column in $(ps -eww -o pid,rss) (although
RSS pages reported in $(ps) may be shared across processes):
$ ps -eww -o pid,rss | tail -n+2 | awk '{print $2}' | paste -sd+ | bc
lsmem provides detailed information on memory. For
example:
lsmem
RANGE                                  SIZE  STATE REMOVABLE BLOCK
0x0000000000000000-0x0000000007ffffff  128M online        no     0
0x0000000008000000-0x000000006fffffff  1.6G online       yes  1-13
0x0000000070000000-0x0000000097ffffff  640M online        no 14-18
0x0000000098000000-0x00000000a7ffffff  256M online       yes 19-20
0x00000000a8000000-0x00000000bfffffff  384M online        no 21-23
0x0000000100000000-0x00000001bfffffff    3G online        no 32-55
0x00000001c0000000-0x00000001c7ffffff  128M online       yes    56
0x00000001c8000000-0x00000001dfffffff  384M online        no 57-59
0x00000001e0000000-0x00000001efffffff  256M online       yes 60-61
0x00000001f0000000-0x000000023fffffff  1.3G online        no 62-71

Memory block size:       128M
Total online memory:       8G
Total offline memory:      0B
Per-process Memory Usage
Use the ps command to show the resident and virtual sizes of a process:
$ ps -eww -o pid,rss,vsz,command
  PID   RSS    VSZ COMMAND
32665 232404 4777744 java ... server1
Resident memory pages may be shared across processes. The file /proc/$PID/smaps includes a "Pss" line for each virtual memory area which is the proportional set size, which is a subset of RSS, and tries to take into account shared resident pages.
tmpfs
Filesystems mounted with tmpfs
consume RAM and/or swap. Use df to view size and usage. For
example:
$ df -ht tmpfs
Filesystem      Size  Used Avail Use% Mounted on
tmpfs           2.0G     0  2.0G   0% /dev/shm
tmpfs           785M  1.3M  784M   1% /run
tmpfs           2.0G   16K  2.0G   1% /tmp
tmpfs           393M  144K  393M   1% /run/user/1000
Also view Shmem in /proc/meminfo.
Some distributions mount /tmp on tmpfs and programs
using a lot of space in /tmp may drive RAM usage. In
general, such applications should use
/var/tmp instead. A common way to disable this
/tmp tmpfs mount is to run
sudo systemctl mask tmp.mount and reboot.
Memory in cgroups
- cgroups v1:
cat /sys/fs/cgroup/cpu/$SLICE/$SCOPE/memory.stat - cgroups v2:
cat /sys/fs/cgroup/$SLICE/$SCOPE/memory.stat
Memory Pressure
Recent versions of Linux include Pressure
Stall Information (PSI) statistics to better understand memory
pressure and constraints. For example, in
/proc/pressure/memory (or memory.pressure in
cgroups):
cat /proc/pressure/memory
some avg10=0.00 avg60=0.00 avg300=0.00 total=0
full avg10=0.00 avg60=0.00 avg300=0.00 total=0
The "some" line indicates the share of time in which at least some tasks are stalled on a given resource.
The "full" line indicates the share of time in which all non-idle tasks are stalled on a given resource simultaneously. In this state actual CPU cycles are going to waste, and a workload that spends extended time in this state is considered to be thrashing. This has severe impact on performance, and it's useful to distinguish this situation from a state where some tasks are stalled but the CPU is still doing productive work. As such, time spent in this subset of the stall state is tracked separately and exported in the "full" averages.
The ratios (in %) are tracked as recent trends over ten, sixty, and three hundred second windows, which gives insight into short term events as well as medium and long term trends. The total absolute stall time (in us) is tracked and exported as well, to allow detection of latency spikes which wouldn't necessarily make a dent in the time averages, or to average trends over custom time frames.
free
Query physical memory usage:
$ free -m
             total       used       free     shared    buffers     cached
Mem:         15569      10888       4681          0        298       8029
-/+ buffers/cache:       2561      13008
Swap:            0          0          0
In general, you want to look at the "-/+ buffers/cache" line because buffers and cache are not program memory.
/proc/meminfo
/proc/meminfo
provides information about memory.
Example (only showing first few lines):
$ cat /proc/meminfo
MemTotal:       10185492 kB
MemFree:         6849096 kB
MemAvailable:    9621568 kB
Buffers:            1980 kB
Cached:          2960552 kB
[...]
Review the MemAvailable line To find how much memory is
available if needed:
Paging
When the physical memory is full, paging (also known as swapping) occurs to provide additional memory. Paging consists of writing the contents of physical memory to disk, making the physical memory available for use by applications. The least recently used information is moved first. Paging is expensive in terms of performance because, when required information is stored on disk it must be loaded back into physical memory, which is a slow process.
Where paging occurs, Java applications are impacted because of garbage collection. Garbage collection requires every part of the Java heap to be read. If any of the Java heap has been paged out, it must be paged back when garbage collection runs, slowing down the garbage collection process.
The vmstat output shows whether paging was taking place when the problem occurred. vmstat output has the following format:
procs -----------memory----------  ---swap--  -----io---- --system-- ----cpu----
  r  b   swpd   free    buff   cache   si   so    bi    bo   in    cs us sy  id wa
  0  0  17196 679860 1196656 2594884    0    0     1     4    0     0  0  0 100  0
  0  0  17196 679868 1196656 2594884    0    0     0    40 1012    43  0  0 100  0
  0  0  17196 679992 1196656 2594884    0    0     0     3 1004    43  0  0 100  0
The columns of interest are... si and so (swap in and swap out) columns for Linux. Nonzero values indicate that paging is taking place.
What is swapped out?
Search for largest values:
$ free -h &>> diag_swap_$(hostname)_$(date +%Y%m%d).txt
$ for pidfile in /proc/[0-9]*/status; do echo $pidfile &>> diag_swap_$(hostname)_$(date +%Y%m%d).txt; awk '/VmSwap|Name/' $pidfile &>> diag_swap_$(hostname)_$(date +%Y%m%d).txt; done
Shared Memory
It may be necessary to tune the kernel's shared memory configuration for products such as databases.
- /proc/sys/kernel/shmall: The maximum amount of shared memory for the kernel to allocate.
- /proc/sys/kernel/shmmax: The maximum size of any one shared memory segment.
- /proc/sys/kernel/shmmni: The maximum number of shared memory segments.
For example, set kernel.shmmax=1073741824 in
/etc/sysctl.conf and apply with sysctl -p.
Address Space Layout Randomization
Address space layout randomization (ASLR) is a feature of some kernels to randomize virtual address space locations of various program allocations. This is an anti-hacking security feature although it may cause unintuitive and random performance perturbations. For testing/benchmarking, you may see if this is the case by disabling it temporarily:
echo 0 | sudo tee /proc/sys/kernel/randomize_va_spaceAlternatively, ASLR may be disabled on a per-process basis with setarch -R.
NUMA
NUMA stands for Non-Uniform Memory Access which means that RAM is split into multiple nodes, each of which is local to particular sets of CPUs with slower, "remote" access for other CPUs.
The numactl
command provides various utilities such as displaying NUMA layout:
$ numactl --hardware
available: 1 nodes (0)
node 0 cpus: 0 1 2 3 4 5 6 7
node 0 size: 16000 MB
node 0 free: 4306 MB
node distances:
node   0
  0:  10
A process may be started on a particular NUMA node with
numactl -m $NODE ... or processes may be pinned to the CPUs
connected to that node with taskset.
Display the current NUMA
mappings per process with cat /proc/$PID/numa_maps. To
print memory usage by NUMA node:
awk '/N[0-9]+=[0-9]+/ { for (i=1; i<=NF; i++) { if ($i ~ /N[0-9]+=[0-9]+/) { split($i, pieces, /=/); pages[pieces[1]] += pieces[2]; } }} END { for (node in pages) { printf("Node %s = %d bytes\n", node, pages[node]*1024);} }' numa_mapsThe numastat
command (in the package numactl)
shows if memory was allocated to foreign nodes despite a process
preferring its local node. This isn't exactly remote accesses but it
could be interesting. You can just run this once for the whole node
(numastat), and then once for one or more processes
(numstat -p $PID).
If testing can be done, a relatively lower IPC when processes are unpinned to nodes suggests slower, remote memory access.
It may be worth testing disabling automatic NUMA
balancing and page
migration between NUMA nodes
(echo 0 > /proc/sys/kernel/numa_balancing) and disable
numad if running.
On Intel CPUs, Intel provides NumaTOP to investigate NUMA accesses.
On Intel CPUs, Intel provides the PCM tool suite with a tool
called pcm-numa which shows remote RAM access per chip
(Remote DRAM Accesses). For example:
Update every 1.0 seconds
Time elapsed: 1004 ms
Core | IPC  | Instructions | Cycles  |  Local DRAM accesses | Remote DRAM Accesses
   0   0.60         45 M       75 M       188 K                   129 K
   1   0.66       7256 K       10 M      4724                      25 K
   2   0.26       1185 K     4647 K       288                    7177
[...]
Intel also provides the Memory Latency Checker to review NUMA-related latencies.
The pmrep
tool from RedHat shows remote% per second which is
"where the processor that triggered the hinting page fault and the
memory it referred to are on different NUMA nodes". Hinting page faults
aren't directly remote memory accesses; instead, they're related to the
kernel's monitoring of whether or not to migrate memory chunks, so it's
a subset of memory accesses, but if remote% spikes during issues, that
could be a good hint. This might only work if NUMA rebalancing is
enabled.
GLIBC malloc
In recent kernels, the text is at the bottom, stack at the top, and mmap/heap sections grow towards each other in a shared space (although they cannot overlap). By default, the malloc implementation in glibc (which was based on ptmalloc, which in turn was based on dlmalloc) will allocate into either the native heap (sbrk) or mmap space, based on various heuristics and thresholds: If there's enough free space in the native heap, allocate there. Otherwise, if the allocation size is greater than some threshold (slides between 128KB and 32/64MB based on various factors), allocate a private, anonymous mmap instead of native heap (mmap isn't limited by ulimit -d).
In the raw call of sbrk versus mmap,
mmap is slower because it must zero
the range of bytes.
MALLOC_ARENA_MAX
Starting with glibc 2.11 (for example, customers upgrading from RHEL
5 to RHEL 6), by default, when glibc malloc detects mutex contention
(i.e. concurrent mallocs), then the native malloc heap is broken up into
sub-pools called arenas. This is achieved by assigning threads their own
memory pools and by avoiding locking in some situations. The amount of
additional memory used for the memory pools (if any) can be controlled
using the environment variables MALLOC_ARENA_TEST and
MALLOC_ARENA_MAX. MALLOC_ARENA_TEST specifies
that a test for the number of cores is performed once the number of
memory pools reaches this value. MALLOC_ARENA_MAX sets the
maximum number of memory pools used, regardless of the number of
cores.
The default maximum arena size is 1MB on 32-bit and 64MB on 64-bit. The default maximum number of arenas is the number of cores multiplied by 2 for 32-bit and 8 for 64-bit.
This can increase fragmentation because the free trees are separate.
In principle, the net performance impact should be positive of per thread arenas, but testing different arena numbers and sizes may result in performance improvements depending on your workload.
You can revert the arena behavior with the environment variable
MALLOC_ARENA_MAX=1.
OOM Killer
If /proc/sys/vm/overcommit_memory
is set to 0 (the default), then the Linux kernel will allow memory
overcommit. If RAM and swap space become exhausted, the Linux
oom-killer will send a SIGKILL (9) signal to processes until sufficient
space is freed:
By default, Linux follows an optimistic memory allocation strategy. This means that when malloc() returns non-NULL there is no guarantee that the memory really is available. In case it turns out that the system is out of memory, one or more processes will be killed by the OOM killer.
The SIGKILL signal cannot be caught, blocked, or ignored by processes, and no process core dump is produced.
If /proc/sys/vm/panic_on_oom is set to 1, then a kernel
panic will be produced when the OOM killer is triggered and the system
is rebooted. Creating a dump on a panic requires configuring kdump.
The kernel decides which process to kill based on various heuristics
and per-process configuration (section 3.1). A process may be
excluded from the oom-killer by setting its oom_score_adj
to -1000:
$ echo -1000 > /proc/${PID}/oom_score_adjThe OOM killer may be disabled. For example, set
vm.overcommit_memory=2 and
vm.overcommit_ratio=100 in /etc/sysctl.conf
and apply with sysctl -p. In this case, malloc will return
NULL when there is no memory and available. Many workloads can't support
such configurations because of high virtual memory allocations.
OOM Killer Message
When the OOM killer is invoked, a message is written to the kernel log. For example:
kernel: Out of memory: Kill process 20502 (java) score 296 or sacrifice child
kernel: Killed process 20502 (java), UID 1006, total-vm:14053620kB, anon-rss:10256240kB, file-rss:0kB, shmem-rss:0kB
The total and free swap usage at the time is also included. For example:
kernel: Free swap  = 0kB
kernel: Total swap = 2001916kB
By default (vm.oom_dump_tasks = 1), a list of all tasks and their memory usage is included. In general, resolve the OOM issue by searching for the processes with the largest RSS values. For example:
kernel: [ pid ]   uid  tgid total_vm      rss nr_ptes swapents oom_score_adj name
kernel: [16359]  1006 16359  3479474  2493182    5775    13455             0 java
kernel: [20502]  1006 20502  3513405  2564060    6001     8788             0 java
kernel: [25415]  1006 25415  3420281  2517763    5890    15640             0 java
kernel: [ 1984]     0  1984  3512173   115259     908    81569             0 jsvc
[...]
In the process list, the information is retreived
through each PID's task_struct
and its mm field (mm_struct).
The important statistic in the task dump is rss (resident
set size) which is calculated by get_mm_rss
that calls get_mm_counter
through the rss_stat (mm_rss_stat)
field of mm for MM_FILEPAGES,
MM_ANONPAGES, and MM_SHMEMPAGES which are
page counts.
Therefore, multiply by the page size (getconf PAGESIZE)
to convert rss to bytes. The page size is CPU architecture
specific. A common
PAGE_SIZE is 4KB.
EarlyOOM
EarlyOOM is a user-space memory watcher tool that proactively kills memory-hungry processes when the system is dangerously low on free computational memory (unlike the kernel's OOM killer which only kills memory-hungry processes when the system is absolutely exhausted).
EarlyOOM is enabled by default starting with Fedora 33.
It may be disabled with
sudo systemctl stop earlyoom.service && sudo systemctl disable earlyoom.service
File cache
/proc/sys/vm/swappiness
The default value of /proc/sys/vm/swappiness
is 60:
This control is used to define how aggressive the kernel will swap memory pages. Higher values will increase aggressiveness, lower values decrease the amount of swap. The default value is 60.
swappiness, is a parameter which sets the kernel's balance between reclaiming pages from the page cache and swapping out process memory. The reclaim code works (in a very simplified way) by calculating a few numbers:
- The "distress" value is a measure of how much trouble the kernel is having freeing memory. The first time the kernel decides it needs to start reclaiming pages, distress will be zero; if more attempts are required, that value goes up, approaching a high value of 100.
- mapped_ratio is an approximate percentage of how much of the system's total memory is mapped (i.e. is part of a process's address space) within a given memory zone.
- vm_swappiness is the swappiness parameter, which is set to 60 by default.
With those numbers in hand, the kernel calculates its "swap tendency":
swap_tendency = mapped_ratio/2 + distress + vm_swappiness;
If swap_tendency is below 100, the kernel will only reclaim page cache pages. Once it goes above that value, however, pages which are part of some process's address space will also be considered for reclaim. So, if life is easy, swappiness is set to 60, and distress is zero, the system will not swap process memory until it reaches 80% of the total. Users who would like to never see application memory swapped out can set swappiness to zero; that setting will cause the kernel to ignore process memory until the distress value gets quite high.
A value of 0 tells the kernel to avoid paging program pages to disk as much as possible. A value of 100 encourages the kernel to page program pages to disk even if filecache pages could be removed to make space.
Note that this value is not a percentage of physical memory, but as the above example notes, it is a variable in a function. If distress is low and the default swappiness of 60 is set, then program pages may start to be paged out when physical memory exceeds 80% usage (where usage is defined as usage by program pages). Which is to say, by default, if your programs use more than 80% of physical memory, the least used pages in excess of that will be paged out.
This may be adversely affecting you if you see page outs but filecache is non-zero. For example, in vmstat, if the "so" column is non-zero (you are paging out) and the "cache" column is a large proportion of physical memory, then the kernel is avoiding pushing those filecache pages out as much as it can and instead paging program pages. In this case, either reduce the swappiness or increase the physical memory. This assumes the physical memory demands are expected and there is no leak.
In general, for Java-based workloads which have light disk file I/O, set vm.swappiness=0 in /etc/sysctl.conf and apply with sysctl -p.
Note that recent versions of the Linux kernel (generally >= 3.5) have made vm.swappiness=0 more aggressive in avoiding swapping out anonymous pages. Some prefer to use vm.swappiness=1 to retain the old behavior of a slight preference for some swapping of anonymous pages under memory pressure. For the purposes of the above recommendations for Java-based workloads which have light disk file I/O, it's preferable to set vm.swappiness=0.
Kernel memory and slab
In addition to filecache discussed above, the kernel may have other
caches such as slab (which can be driven by application behavior). The
/proc/slabinfo and slabtop program may be used
to investigate slab usage as well as per-cgroup statistics such as
slab_reclaimable/slab_unreclaimable in
memory.stat.
In general, it is not necessary to tune reclaimable filecache and slab buffers on Linux as they can be reclaimed automatically:
free slab objects and pagecache [...] are automatically reclaimed by the kernel when memory is needed elsewhere on the system
It is by design that Linux aggressively uses free RAM for caches but if programs demand memory, then the caches can be quickly dropped.
In addition to vm.swappiness for filecache discussed in
the previous section, additional tuning that may be applied includes
vm.vfs_cache_pressure, vm.min_slab_ratio, and
vm.min_free_kbytes.
Free caches may be manually dropped (for example, at the start of a performance test), although this is generally not recommended:
- Flush free filecache:
sysctl -w vm.drop_caches=1 - Flush free reclaimable slab (e.g. inodes, dentries):
sysctl -w vm.drop_caches=2 - Flush both free filecache and free reclaimable slab:
sysctl -w vm.drop_caches=3
To investigate
the drivers of slab, use eBPF trace on
t:kmem:kmem_cache_alloc. For example:
$ /usr/share/bcc/tools/trace -K 't:kmem:kmem_cache_alloc'
PID     TID     COMM            FUNC
9120    9120    kworker/0:2     kmem_cache_alloc
        b'kmem_cache_alloc+0x1a8 [kernel]'
        b'kmem_cache_alloc+0x1a8 [kernel]'
        b'__d_alloc+0x22 [kernel]' [...]
pdflush
The pdflush process writes dirty file page cache entries to disk asynchronously.
/proc/sys/vm/dirty_writeback_centisecs controls the frequency pdflush awakes and /proc/sys/vm/dirty_expire_centiseconds controls the threshold at which a dirty page is judged that it needs to be written by a run of pdflush (or if memory is low, judged with /proc/sys/vm/dirty_background_ratio). If the total size of dirty pages as a proportion of physical memory exceeds /proc/sys/vm/dirty_ratio, processes write to disk synchronously.
If system I/O activity is heavy but bursty and this causes problems, consider reducing the above variables, first starting with dirty_background_ratio (e.g. 3), followed by dirty_ratio (e.g. 15), followed by dirty_expire_centiseconds (e.g. 500), followed by dirty_writeback_centisecs (e.g. 100).
For example, set vm.dirty_background_ratio=3 in /etc/sysctl.conf and apply with sysctl -p
Zero Swap Space
While there is considerable philosophical debate about swap, consider disabling swap, setting vm.panic_on_oom=1, and configuring kernel vmcore dumps with process-level virtual address space information to avoid swap thrashing situations and reduce downtime, whilst analyzing post-mortem vmcores for excessive memory usage, leaks, or undersizing.
To disable swap, use $(swapoff -a) to immediately disable swap partitions, and then remove any swap partitions from /etc/fstab for future reboots.
Example of configuring kdump on RHEL:
- Configure, start, and enable the crash
kernel/kdump
- Size the amount of RAM for the crash kernel
- Change /etc/kdump.conf to ensure makedumpfile uses
-d 23,31so that process virtual address space information is dumped for each user process (command line arguments, virtual memory, etc.).
- Set vm.panic_on_oom=1 in /etc/sysctl.conf
- Install the kernel and glibc symbols
- Install the
crashutility- Test it out (perhaps with
kernel.sysrq=1and/proc/sysrq-trigger) and learn how to use it:crash /usr/lib/debug/lib/modules/*/vmlinux /var/crash/*/vmcore
- Test it out (perhaps with
Kernel Samepage Merging
Test disabling kernel samepage merging:
echo 0 > /sys/kernel/mm/ksm/runInput/Output (I/O)
Unless tracking file and directory access times is required, use the
noatime and nodiratime flags (or consider
relatime) when mounting
filesystems to remove unnecessary disk activity.
Query disk usage:
$ df -h
Filesystem                       Size  Used Avail Use% Mounted on
/dev/mapper/vg_lifeboat-lv_root  385G  352G   14G  97% /
tmpfs                            7.7G  628K  7.7G   1% /dev/shm
/dev/sda1                        485M   97M  363M  22% /boot
Query filesystem information:
$ stat -f /
  File: "/"
    ID: 2975a4f407cfa7e5 Namelen: 255     Type: ext2/ext3
Block size: 4096       Fundamental block size: 4096
Blocks: Total: 100793308  Free: 8616265    Available: 3496265
Inodes: Total: 25600000   Free: 20948943
Query disk utilization:
$ iostat -xm 5 2
Linux 2.6.32-358.11.1.el6.x86_64 (oc2613817758.ibm.com)     02/07/2014     _x86_64_    (8 CPU)

avg-cpu:  %user   %nice %system %iowait  %steal   %idle
           1.17    0.00    0.55    0.25    0.00   98.03

Device:         rrqm/s   wrqm/s     r/s     w/s    rMB/s    wMB/s avgrq-sz avgqu-sz   await  svctm  %util
sda               0.17    17.13    1.49    3.63     0.05     0.08    50.69     0.13   26.23   3.98   2.03
dm-0              0.00     0.00    1.48   20.74     0.05     0.08    11.59     7.46  335.73   0.92   2.05
dm-1              0.00     0.00    1.48   20.57     0.05     0.08    11.68     7.46  338.35   0.93   2.05...
Running iostat in the background:
nohup iostat -xmt 60 > diag)iostat_$(hostname)_$(date +%Y%m%d_%H%M%S).txt &fatrace
If you have high I/O wait times, fatrace
can show which files are being read and written. This could also be done
with something like eBPF but fatrace is much simpler. It was created by
the Ubuntu team but is also available in other Linux distributions (e.g.
Red
Hat).
Start:
nohup sudo fatrace -t -f CROW -o diag_fatrace_$(hostname)_$(date +%Y%m%d_%H%M%S).txt &Stop:
sudo pkill -INT fatraceExample output:
14:47:03.106836 java(1535): O /etc/hosts
14:47:03.106963 java(1535): R /etc/hosts
fuser
fuser
shows processes reading/writing a particular path. For example:
# /usr/sbin/fuser -a -v -u /opt/IBM/WebSphere/AppServer/profiles/AppSrv01/logs/server1/SystemOut.log
                     USER        PID ACCESS COMMAND
/opt/IBM/WebSphere/AppServer/profiles/AppSrv01/logs/server1/SystemOut.log:
                     was        1517 F.... (was)java
                     was        1674 f.... (was)tail
iotop
iotop is a top-like tool to understand file I/O by PID.
The command may be run in interactive mode or in batch mode as in the example below. Note that output is not sorted by I/O rates.
$ sudo iotop -bot -d 10
    TIME    TID  PRIO  USER      DISK READ  DISK WRITE  SWAPIN      IO    COMMAND
06:50:41 Total DISK READ:        28.75 M/s | Total DISK WRITE:         8.19 M/s
06:50:41 Current DISK READ:      28.75 M/s | Current DISK WRITE:      10.97 M/s
    TIME    TID  PRIO  USER        DISK READ  DISK WRITE  SWAPIN      IO    COMMAND
b'06:50:41     130 be/4 root     1633.01 B/s   15.95 K/s  ?unavailable?  [kworker/u12:1-btrfs-endio]'
b'06:50:41     147 be/4 root        0.00 B/s    9.57 K/s  ?unavailable?  [kworker/u12:3-btrfs-endio-write]'
b'06:50:41     157 be/4 root        0.00 B/s    3.19 K/s  ?unavailable?  [kworker/u12:6-btrfs-worker]'
b'06:50:41     477 be/4 root        0.00 B/s  400.28 K/s  ?unavailable?  [btrfs-transacti]'
b'06:50:41    2562 be/4 root        4.78 K/s    7.75 M/s  ?unavailable?  packagekitd [PK-Backend]'
b'06:50:41    2333 be/4 root        3.19 K/s   13.56 K/s  ?unavailable?  [kworker/u12:9-blkcg_punt_bio]'
b'06:50:41    2334 be/4 root        0.00 B/s 1633.01 B/s  ?unavailable?  [kworker/u12:10-btrfs-endio-meta]'
b'06:50:41    2335 be/4 root        0.00 B/s    7.97 K/s  ?unavailable?  [kworker/u12:11-btrfs-endio-write]'
b'06:50:41    2555 be/4 user1      28.74 M/s    0.00 B/s  ?unavailable?  tar czvf /tmp/test.tar.gz /'
06:50:51 Total DISK READ:        27.94 M/s | Total DISK WRITE:         6.66 M/s
06:50:51 Current DISK READ:      27.94 M/s | Current DISK WRITE:       5.42 M/s
    TIME    TID  PRIO  USER        DISK READ  DISK WRITE  SWAPIN      IO    COMMAND
b'06:50:51     130 be/4 root        0.00 B/s  242.81 K/s  ?unavailable?  [kworker/u12:1-btrfs-endio-write]'
b'06:50:51     147 be/4 root        0.00 B/s   14.35 K/s  ?unavailable?  [kworker/u12:3-btrfs-endio]'
b'06:50:51     157 be/4 root        0.00 B/s  140.35 K/s  ?unavailable?  [kworker/u12:6-btrfs-endio-write]'
b'06:50:51     585 be/4 root        0.00 B/s   15.55 K/s  ?unavailable?  systemd-journald'
b'06:50:51    2562 be/4 root     1224.83 B/s    6.09 M/s  ?unavailable?  packagekitd [PK-Backend]'
b'06:50:51    2333 be/4 root        0.00 B/s   46.65 K/s  ?unavailable?  [kworker/u12:9-btrfs-endio]'
b'06:50:51    2334 be/4 root        0.00 B/s  114.83 K/s  ?unavailable?  [kworker/u12:10-btrfs-endio-write]'
b'06:50:51    2335 be/4 root        0.00 B/s    7.97 K/s  ?unavailable?  [kworker/u12:11-btrfs-endio-write]'
b'06:50:51    2555 be/4 user1      27.94 M/s    0.00 B/s  ?unavailable?  tar czvf /tmp/test.tar.gz /'
dstat
dstat (covered above) may be used to monitor I/O. For example:
$ dstat -pcmrd

---procs--- ----total-usage---- ------memory-usage----- --io/total- -dsk/total-
run blk new|usr sys idl wai stl| used  free  buf   cach| read  writ| read  writ
 32   0   0| 27  73   0   0   0|2232M  249G   61M  568M|11.1M    0 |  42G    0
 33   0   0| 27  73   0   0   0|2232M  249G   61M  568M|11.1M    0 |  42G    0
ioping
ioping
shows diagnostics for a particular device.
Flushing and Writing Statistics
The amount of bytes pending to be written to all devices may be queried with Dirty and Writeback in /proc/meminfo; for example:
$ grep -e Dirty -e Writeback /proc/meminfo
Dirty:                 8 kB
Writeback:             0 kB
WritebackTmp:          0 kB
A tool such as $(watch) may be used to show a refreshing screen.
Details on a per-device
basis may be queried in /sys/block/*/stat
For example:
$ for i in /sys/block/*/stat; do echo $i; awk '{print $9}' $i; done
/sys/block/sda/stat
0
/sys/block/sdb/stat
0
dd
dd
may be used for various disk tasks.
Create a ramdisk with a testfile for subsequent tests:
mkdir /tmp/ramdisk
mount -t tmpfs -o size=1024m tmpfs /tmp/ramdisk
time dd if=/dev/urandom of=/tmp/ramdisk/play bs=1M count=1024 status=progress
Test write speed of the disk at /opt/disk1:
sudo sync
time dd if=/tmp/ramdisk/play of=/opt/disk1/play bs=1M count=1024 oflag=dsync status=progress
Test read speed of the disk at /opt/disk1:
echo 3 | sudo tee /proc/sys/vm/drop_caches
dd if=/opt/disk1/play of=/dev/null bs=1M count=1024 status=progress
ncdu
ncdu
provides a recursive tree view of disk usage. For example:
ncdu 1.15.1 ~ Use the arrow keys to navigate, press ? for help
--- /opt/IBM/WebSphere/AppServer -----------------------------
  532.3 MiB [##########] /profiles
  334.0 MiB [######    ] /runtimes
  265.6 MiB [####      ] /plugins
  238.9 MiB [####      ] /deploytool
  233.5 MiB [####      ] /java
hdparm
hdparm
may be used to benchmark the performance of a disk. For example:
hdparm -Tt /dev/sda- Review settings such as readahead:
sudo hdparm /dev/nvme0n1 - Change settings such as disabling readahead:
sudo hdparm -a 0 /dev/nvme0n1
bonnie++
bonnie++
may be used to benchmark the performance of a disk.
parted
parted
lists drive partitions. For example:
parted /dev print allblkid
blkid
lists partition details.
blkid
lsblk
lists partition details. For example:
lsblk -f -mfdisk
fdisk
lists disk devices. For example:
fdisk -lfio
fio may be used to test disk I/O performance. For example:
$ fio --readonly --name=onessd \
--filename=/dev/nvme0n1 \
--filesize=100g --rw=randread --bs=4k --direct=1 --overwrite=0 \
--numjobs=3 --iodepth=32 --time_based=1 --runtime=3600 \
--ioengine=io_uring \
--registerfiles --fixedbufs \
--gtod_reduce=1 --group_reportingI/O schedulers
- Show current scheduler:
grep . /sys/class/block/nvme*n1/queue/scheduler - Change current scheduler (e.g. Multi-Queue deadline):
echo mq-deadline | sudo tee -a /sys/class/block/nvme0n1/queue/scheduler
Solid State Drives
Solid State Drives (SSDs) include NVMe (Non-Volatile Memory Express) drives over PCI Express.
NVMe
- List drives:
sudo nvme list - Ensure PCIi link speed is set to the maximum in BIOS
- Show maximum link speed:
sudo lspci -vand search for "Physical Layer"
Networking
ip
ip is a tool to query and modify network interfaces.
Common sub-commands:
Common options:
ip addr: Display network interfacesip route: Routing tableip route get 10.20.30.100: Get the next hop to 10.20.30.100ip -s -h link show eth0: General interface informationip -s link: Transfer statistics
Permanent network interface changes
NetworkManager dispatcher scripts
If using NetworkManager, dispatcher scripts may be used to apply changes when the interface comes up. For example:
- As root, create
/etc/NetworkManager/dispatcher.d/30-linkup:#!/bin/sh if [ "$1" == "eth0" ] && [ "$2" == "up" ]; then ip route change [...] quickack 1 elif [ "$1" == "eth1" ] && [ "$2" == "up" ]; then ip route change [...] quickack 1 fi chmod +x /etc/NetworkManager/dispatcher.d/30-linkup- Reboot and check
ip route show
mtr
mtr
combines the functionality of ping and
traceroute to provide statistics on network latency and
potential packet loss. For example:
$ mtr --report-wide --show-ips --aslookup --report-cycles 30 example.com
Start: 2024-02-13T09:22:51-0600
HOST: kgibm Loss% Snt Last Avg Best Wrst StDev
1. AS??? dsldevice.attlocal.net (192.168.1.254) 0.0% 30 1.1 1.3 0.8 5.5 0.8
2. AS1234 a.example.com (203.0.113.1) 0.0% 30 2.3 2.1 1.4 3.4 0.4
3. AS??? 203.0.113.2 0.0% 30 2.2 2.2 1.9 3.1 0.2
4. AS??? ??? 100.0 30 0.0 0.0 0.0 0.0 0.0
5. AS??? 203.0.113.3 0.0% 30 7.5 7.6 6.9 8.4 0.3
6. AS1234 203.0.113.4 0.0% 30 10.4 10.2 9.4 11.9 0.5
7. AS12345 b.example.com (203.0.113.5) 0.0% 30 10.6 10.1 9.3 11.4 0.5
8. AS??? ??? 100.0 30 0.0 0.0 0.0 0.0 0.0
9. AS12345 c.example.com (203.0.113.6) 10.0% 30 10.5 10.4 9.9 12.2 0.5
10. AS123456 203.0.113.7 0.0% 30 10.0 10.0 9.2 11.9 0.5The Avg, Wrst, and StDev are
useful gauges of network latencies.
Be careful interpreting
the Loss% column:
To determine if the loss you’re seeing is real or due to rate limiting, take a look at the subsequent hop. If that hop shows a loss of 0.0%, then you are likely seeing ICMP rate limiting and not actual loss. [...] When different amounts of loss are reported, always trust the reports from later hops.
In the above example, since the final hop has a Loss% of
0.0%, then there is no packet loss detected.
In addition, it's important to gather mtr in both
directions at the same time, if possible:
Some loss can also be explained by problems in the return route. Packets will reach their destination without error but have a hard time making the return trip. For this reason, it is often best to collect MTR reports in both directions when you’re experiencing an issue.
In other words, if you are running mtr targeting
example.com from some workstation, then, if possible, you
should remote into that sever (in this example,
example.com) and perform the same mtr command
at the same time, targeting your workstation in the reverse direction.
If the Loss% of the last hop of both mtr
outputs is approximately the same, then the packet loss could simply be
on the path to your workstation rather than the target.
ping
ping sends ICMP packets to a destination to test basic speed. For example:
$ ping -c 4 -n 10.20.30.1
PING 10.20.30.1 (10.20.30.1) 56(84) bytes of data.
64 bytes from 10.20.30.1: icmp_seq=1 ttl=250 time=112 ms
64 bytes from 10.20.30.1: icmp_seq=2 ttl=250 time=136 ms
64 bytes from 10.20.30.1: icmp_seq=3 ttl=250 time=93.8 ms
64 bytes from 10.20.30.1: icmp_seq=4 ttl=250 time=91.6 msIn general, and particularly for LANs, ping times should be less than a few hundred milliseconds with little standard deviation.
dig
dig tests DNS resolution time. Examples:
dig -4 example.com: Use the configured resolversdig -4 @1.1.1.1 example.com: Use a specific DNS resolverdig -4 +dnssec +multi example.com: Check DNSSEC
ss
ss is a tool to investigate sockets.
ss summary
The summary option prints statistics about sockets:
$ ss --summary
Total: 559
TCP: 57 (estab 2, closed 21, orphaned 0, timewait 0)
Transport Total IP IPv6
RAW 0 0 0
UDP 0 0 0
TCP 36 31 5
INET 36 31 5
FRAG 0 0 0ss basic usage
ss with -amponet prints details about each socket (simlar to the obsolete netstat command plus more details):
$ ss -amponet
State Recv-Q Send-Q Local Address:Port Peer Address:Port
LISTEN 0 128 0.0.0.0:9080 0.0.0.0:* users:(("java",pid=17,fd=159)) uid:1001 ino:6396895 sk:15a <-> skmem:(r0,rb87380,t0,tb16384,f0,w0,o0,bl0,d0)
ESTAB 0 0 127.0.0.1:389 127.0.0.1:41116 timer:(keepalive,66min,0) ino:6400030 sk:1 <-> skmem:(r0,rb1062000,t0,tb2626560,f0,w0,o0,bl0,d0)
ESTAB 0 0 127.0.0.1:41116 127.0.0.1:389 users:(("java",pid=17,fd=187)) uid:1001 ino:6395839 sk:2 <-> skmem:(r0,rb1061808,t0,tb2626560,f0,w0,o0,bl0,d0)Add the -i flag to print detailed kernel statistics:
$ ss -amponeti
State Recv-Q Send-Q Local Address:Port Peer Address:Port
LISTEN 0 128 0.0.0.0:9080 0.0.0.0:* users:(("java",pid=17,fd=159)) uid:1001 ino:6396895 sk:15a <-> skmem:(r0,rb87380,t0,tb16384,f0,w0,o0,bl0,d0) cubic rto:1000 mss:536 cwnd:10 lastsnd:1009912410 lastrcv:1009912410 lastack:1009912410
ESTAB 0 0 127.0.0.1:389 127.0.0.1:41116 timer:(keepalive,64min,0) ino:6400030 sk:1 <-> skmem:(r0,rb1062000,t0,tb2626560,f0,w0,o0,bl0,d0) ts sack cubic wscale:7,7 rto:210 rtt:0.393/0.687 ato:40 mss:21888 pmtu:65535 rcvmss:536 advmss:65483 cwnd:10 bytes_acked:14 bytes_received:51 segs_out:2 segs_in:4 data_segs_out:1 data_segs_in:1 send 4455572519bps lastsnd:3321860 lastrcv:3321860 lastack:3321860 pacing_rate 8902650136bps delivery_rate 64376464bps app_limited rcv_space:43690 rcv_ssthresh:43690 minrtt:0.061
ESTAB 0 0 127.0.0.1:41116 127.0.0.1:389 users:(("java",pid=17,fd=187)) uid:1001 ino:6395839 sk:2 <-> skmem:(r0,rb1061808,t0,tb2626560,f0,w0,o0,bl0,d0) ts sack cubic wscale:7,7 rto:210 rtt:0.007/0.004 ato:40 mss:21888 pmtu:65535 rcvmss:536 advmss:65483 cwnd:10 bytes_acked:52 bytes_received:14 segs_out:4 segs_in:3 data_segs_out:1 data_segs_in:1 send 250148571429bps lastsnd:3321860 lastrcv:3321860 lastack:3321860 delivery_rate 58368000000bps app_limited rcv_space:43690 rcv_ssthresh:43690 minrtt:0.003Newer versions of the command support the -O flag to
print kernel statistics on the same line as each socket:
$ ss -amponetOiss filtering
ss supports filtering on things such as TCP state, port,
etc.:
- Only established sockets:
ss -amponet state established - Only time-wait sockets:
ss -amponet state established - Destination port filtering:
ss -amponet dst :80 - Source port filtering:
ss -amponet src :12345
ss notes
timer:(persist)means the socket has received a zero-window update and is waiting for the peer to advertise a non-zero window.
nstat
nstat is a tool for monitoring network statistics and it's a proposed successor to netstat.
By default, nstat will show statistics with non-zero values since the last time nstat was run, which means that every time it is run, statistics are reset (not in the kernel itself, but in a user-based history file). Example output:
$ nstat
#kernel
IpInReceives 508 0.0
IpInDelivers 508 0.0
IpOutRequests 268 0.0
TcpPassiveOpens 1 0.0
TcpInSegs 508 0.0If nstat has not been run recently, it may reset its history and the following message is displayed:
nstat: history is stale, ignoring it.The final column is a rate column which is only calculated if the nstat daemon is started (see the "nstat daemon" section below).
Common options:
-a: Dump absolute statistics instead of statistics since the last time nstat was run.-s: Do not include this nstat run in the statistics history (i.e. don't reset the statistics history).-z: Dump all zero values as well (useful for grepping/plotting).
nstat common usage
If you want to handle differencing the absolute values yourself:
nstat -sazTo search for a particular statistic, you can specify it at the end. For example:
nstat -saz TcpRetransSegsIf you want nstat to handle differencing the values for you:
nstat -zIf you want nstat to show you what has increased since last running nstat:
nstatCommon nstat statistics
- TCP retransmissions: TcpRetransSegs, TcpExtTCPSlowStartRetrans, TcpExtTCPSynRetrans
- TCP delayed acknowledgments: TcpExtDelayedACKs
Running nstat in the background
The following will run nstat every 60 seconds and write the output to
diag_nstat_*.txt. If there are errors running the commands
(e.g. permissions), the script will exit immediately and you should
review console output and nohup.out:
nohup sh -c "while true; do date >> diag_nstat_$(hostname).txt || exit 1; nstat -saz >> diag_nstat_$(hostname).txt || exit 1; sleep 60; done" &Stop the collection:
pkill -f "nstat -saz"
nstat daemon
Execute nstat with the following options to start a daemon, where the first number is the period of collection in seconds and the second number is the time interval in seconds to use for the rate calculations:
nstat -d 60 -t 60Then execute nstat again. Example output:
$ nstat
#45776.1804289383 sampling_interval=60 time_const=60
IpInReceives 1166 45.4
IpInDelivers 1166 45.4
IpOutRequests 1025 31.7
TcpActiveOpens 5 0.4
TcpInSegs 1152 44.9
TcpOutSegs 1042 40.1
TcpOutRsts 0 0.1
UdpInDatagrams 14 0.5
UdpOutDatagrams 14 0.5
TcpExtTW 13 0.2
TcpExtDelayedACKs 39 0.8
TcpExtTCPHPHits 550 29.3
TcpExtTCPPureAcks 367 6.2
TcpExtTCPHPAcks 121 5.7
TcpExtTCPRcvCoalesce 211 18.0
TcpExtTCPWantZeroWindowAdv 0 0.1
TcpExtTCPOrigDataSent 227 17.3
TcpExtTCPKeepAlive 320 5.1
IpExtInOctets 408933 31441.2
IpExtOutOctets 144543 19947.3
IpExtInNoECTPkts 1166 45.4Stopping the nstat daemon:
pkill nstatTCP Keep-Alive
TCP Keep-Alive
periodically sends packets on idle connections to make sure they're
still alive. This feature is disabled by default and must be explicitly
enabled on a per-socket basis (e.g. using setsockopt
with SO_KEEPALIVE
or a higher-level API like Socket.setKeepAlive).
TCP keepalive is different from HTTP KeepAlive.
Major products such as WAS traditional, WebSphere Liberty, the DB2 JDBC
driver, etc. enable keep-alive on most TCP sockets by default.
In general, the purpose of enabling and tuning TCP keepalive is to set it below any firewall or server idle timeouts between two servers on a LAN using connection pools between them (web service client, DB, LDAP, etc.) to reduce the performance overhead of connection re-establishment.
If TCP Keep-Alive is enabled, there are three kernel parameters to tune for TCP keep-alive:
tcp_keepalive_time: The number of seconds after which a socket is considered idle after which the kernel will start to send TCP keepalive probes while it's idle. This defaults to 7200 seconds (2 hours) and is the major TCP keep-alive tuning knob. In general, this should be set to a value below the firewall timeout. This may also be set withsetsockoptwithTCP_KEEPIDLE.tcp_keepalive_intvl: The number of seconds to wait between sending each TCP keep-alive probe. This defaults to 75 seconds. This may also be set withsetsockoptwithTCP_KEEPINTVL.tcp_keepalive_probes: The maximum number of probes to send without responses before giving up and killing the connection. This defaults to 9. This may also be set withsetsockoptwithTCP_KEEPCNT.
These parameters are normally set in /etc/sysctl.conf
and applied with sysctl -p. For example, with a firewall
idle timeout of 60 seconds:
net.ipv4.tcp_keepalive_time=45
net.ipv4.tcp_keepalive_intvl=5
net.ipv4.tcp_keepalive_probes=2After changing these values, the processes must be restarted to pick them up.
TCP Delayed Acknowledgments
TCP delayed acknowledgments (delayed ACKs) are generally recommended to be disabled if there is sufficient network and CPU capacity for the potential added ACK-only packet load.
To see if a node is delaying ACKs, review the second column of nstat for TcpExtDelayedACKs; for
example:
$ nstat -saz TcpExtDelayedACKs
#kernel
TcpExtDelayedACKs 14 0.0Or using netstat: netstat -s | grep "delayed acks"
To dynamically disable delayed ACKs, use ip route
to set quickack to 1. For example, to
dynamically disable on all routes:
$ ip route show | awk '{ system("ip route change " $0 " quickack 1"); }'To permanently disable delayed ACKs, add a script to make permanent network
interface changes and apply the same ip route change
commands (explicitly; not using the awk script above).
netstat
netstat is an obsolete tool for monitoring network statistics (for alternatives, see the ss, ip, and nstat commands above).
Use netstat to collect a snapshot of network activity:
netstat -antop. Example:
$ netstat -antop
Active Internet connections (servers and established)
Proto Recv-Q Send-Q Local Address Foreign Address State PID/Program name Timer
tcp 0 0 0.0.0.0:6000 0.0.0.0:* LISTEN 3646/Xorg off (0.00/0/0)
tcp 0 0 10.20.117.232:46238 10.20.54.72:80 ESTABLISHED 4140/firefox off (0.00/0/0)
tcp 0 0 10.20.133.78:35370 10.20.253.174:443 TIME_WAIT - timewait (6.63/0/0)
tcp 0 0 10.20.133.78:52458 10.20.33.79:1352 ESTABLISHED 5441/notes keepalive (3542.42/0/0)
tcp 0 1 ::ffff:10.20.133.78:49558 ::ffff:10.20.52.206:52311 SYN_SENT 3502/BESClient on (7.65/4/0)The -o parameter adds the Timer column which will show various timers. For example, the first number before the slash for timewait indicates how many seconds until the socket will be cleared.
Query network interface statistics:
$ netstat -s
Ip:
5033261 total packets received
89926 forwarded
0 incoming packets discarded
4223478 incoming packets delivered
4202714 requests sent out
38 outgoing packets dropped
2 dropped because of missing route
26 reassemblies required
13 packets reassembled ok
Tcp:
15008 active connections openings
248 passive connection openings
611 failed connection attempts
160 connection resets received
4 connections established
4211392 segments received
4093580 segments send out
8286 segments retransmited
0 bad segments received.
3855 resets sent...Since kernel 2.6.18, the current and maximum sizes of the socket backlog on a connection are reported in the Recv-Q and Send-Q columns, respectively, for listening sockets:
Recv-Q Established: The count of bytes not copied by the user program connected to this socket.
Listening: Since Kernel 2.6.18 this column contains the current syn backlog.
Send-Q Established: The count of bytes not acknowledged by the remote host.
Listening: Since Kernel 2.6.18 this column contains the maximum size of the syn backlog.
See implementation details of netstat -s.
Some are described in RFCs 2011 and 2012.
Interface packet drops, errors, and buffer overruns
Check if the RX-DRP, RX-ERR,
RX-OVER, TX-DRP, TX-ERR, and
TX-OVER are non-zero:
$ netstat -i
Kernel Interface table
Iface MTU Met RX-OK RX-ERR RX-DRP RX-OVR TX-OK TX-ERR TX-DRP TX-OVR Flg
eth0 1500 0 0 0 0 0 0 0 0 0 BMU
lo 16436 0 3162172 0 0 0 3162172 0 0 0 LRU
tun0 1362 0 149171 0 0 0 150329 0 0 0 MOPRU
virbr0 1500 0 43033 0 0 0 63937 0 0 0 BMRU
virbr1 1500 0 0 0 0 0 124 0 0 0 BMRU
wlan0 1500 0 1552613 0 0 0 704346 0 0 0 BMRU
- ERR - damaged (reason unspecified, but on receive usually means a frame checksum error)
- DRP - dropped (reason unspecified)
- OVR - lost because of DMA overrun (when the NIC does DMA direct between memory and the wire, and the memory could not keep up with the wire speed)
lnstat
lnstat
is a tool for monitoring various kernel network statistics.
By default, lnstat will run with a 3 second interval until Ctrl^C is pressed. Example output:
nf_connt|nf_connt|nf_connt|nf_connt|nf_connt|nf_connt|nf_connt| [...]
entries|searched| found| new| invalid| ignore| delete| [...]
5| 0| 0| 0| 0| 32| 0| [...]
5| 0| 0| 0| 0| 0| 0| [...]
5| 0| 0| 0| 0| 0| 0| [...]The interval may be specified in seconds with -i.
Running lnstat in the background
The following will run lnstat every 60 seconds and write the output to diag_lnstat_*.txt. If there are errors running the commands (e.g. permissions), the script will exit immediately and you should review console output and nohup.out:
nohup lnstat -i 60 >> diag_lnstat_$(hostname)_$(date +%Y%m%d_%H%M%S).txt &Stop the collection:
pkill lnstat
lsof
Running lsof:
lsofRunning lsof if only interested in network (some of the flags imply not showing regular files):
lsof -PnlLast command but grouping by TCP socket connection states:
lsof -Pnl | grep "TCP " | awk '{print $(NF)}' | sort | uniq -cNetworked Filesystems (NFS)
NFS may be monitored with tools such as nfsiostat.
For example:
nohup stdbuf --output=L nfsiostat 300 > diag_nfsiostat_$(hostname)_$(date +%Y%m%d_%H%M%S).txt &Note: Without using stdbuf, older versions of nfsiostat
do not flush output when stdout is redirected, so output to the file may
be delayed.
For example:
nfs.example.com:/path mounted on /path:
op/s rpc bklog
189.86 0.00
read: ops/s kB/s kB/op retrans avg RTT (ms) avg exe (ms)
3.755 60.772 16.186 4 (0.0%) 15.335 125.260
write: ops/s kB/s kB/op retrans avg RTT (ms) avg exe (ms)
148.911 446.987 3.002 22 (0.0%) 3.249 5.660ethtool
ethtool
may be used to query network driver and hardware settings.
Ring buffer
# ethtool -g eth0
Ring parameters for eth0:
Pre-set maximums:
RX: 2040
RX Mini: 0
RX Jumbo: 8160
TX: 255
Current hardware settings:
RX: 255
RX Mini: 0
RX Jumbo: 0
TX: 255All statistics (unstructured)
ethtool -S eth0Speed information
ethtool eth0Feature flags
ethtool -k eth0Transfer statistics
ethtool -S eth0Driver information
ethtool -i eth0Socket Buffers
Review the background on TCP congestion control.
The default receive buffer size for all network protocols is net.core.rmem_default.
The default receive buffer size for TCP sockets (for both IPv4 and IPv6)
is the second value of net.ipv4.tcp_rmem.
These values may be overridden by an explicit call to setsockopt(SO_RCVBUF)
which will set the receive buffer size to two times the requested value.
The default or requested receive buffer size is limited by
net.core.rmem_max and, in the case of TCP, the third value
(max) in net.ipv4.tcp_rmem.
Starting with Linux 2.4.17 and 2.6.7, the kernel auto-tunes the TCP
receive buffer by default. This is controlled with the property tcp_moderate_rcvbuf.
If auto-tuning is enabled, the kernel will start the buffer at the
default and modulate the size between the first (min) and third (max)
values of net.ipv4.tcp_rmem, depending on memory
availability. In general, the min should be set quite low to handle the
case of physical memory pressure and a large number of sockets.
The default send buffer size for all network protocols is net.core.wmem_default.
The default send buffer size for TCP sockets (for both IPv4 and IPv6) is
the second value of net.ipv4.tcp_wmem.
These values may be overridden by an explicit call to setsockopt(SO_SNDBUF)
which will set the send buffer size to two times the requested value.
The default or requested send buffer size is limited by
net.core.wmem_max and, in the case of TCP, the third value
(max) in net.ipv4.tcp_wmem.
Both receive and send TCP buffers (for both IPv4 and IPv6) are
regulated by net.ipv4.tcp_mem.
tcp_mem is a set of three numbers - low, pressure, and high
- measured in units of the system page size
(getconf PAGESIZE). When the number of pages allocated by
receive and send buffers is below low, TCP does not try to
reduce its buffers' memory usage. When the number of pages exceeds
pressure, TCP tries to reduce its buffers' memory usage.
The total buffers' memory usage page may not exceed the number of pages
specified by high. In general, these values are set as some
proportions of physical memory, taking into account
program/computational demands. By default, Linux sets these to
proportions of RAM on boot. Query the value with sysctl and
multiply the middle number by the page size
(getconf PAGESIZE) and this is the number of bytes at which
point the OS may start to trim TCP buffers.
For example, consider setting values similar to the following in
/etc/sysctl.conf and running sysctl -p:
net.core.rmem_default=1048576
net.core.wmem_default=1048576
net.core.rmem_max=16777216
net.core.wmem_max=16777216
net.ipv4.tcp_rmem=4096 1048576 16777216
net.ipv4.tcp_wmem=4096 1048576 16777216Congestion Control Algorithm
The default congestion algorithm is cubic. A space-delimited list of available congestion algorithms may be printed with:
$ sysctl net.ipv4.tcp_available_congestion_control
net.ipv4.tcp_available_congestion_control = cubic reno htcpAdditional congestion control algorithms, often shipped but not enabled, may be enabled with modprobe. For example, to enable TCP Hybla for high RTT links:
# modprobe tcp_hyblaThe current congestion control algorithm may be dynamically updated with:
# sysctl -w net.ipv4.tcp_congestion_control=hyblaAnother commonly used algorithm is htcp.
The congestion window is not advertised on the network but instead
lives within memory on the sender. To query the congestion window, use
the ss command and search for the cwnd value.
For example:
$ ss -i
State Recv-Q Send-Q Local Address:Port Peer Address:Port
ESTAB 0 0 10.20.30.254:47768 10.20.30.40:http
cubic wscale:0,9 rto:266 rtt:66.25/25.25 ato:40 cwnd:10 send 1.7Mbps rcv_space:14600The default congestion window size (initcwnd) may be
changed by querying the default route and using the change command with
initcwnd added. For example:
# ip route show | grep default
default via 10.20.30.1 dev wlan0 proto static
# ip route change default via 10.20.30.1 dev wlan0 proto static initcwnd 10The default receive window size (initrwnd) may be
changed in a similar way.
Queuing Discipline
The queuing
discipline controls how packets are queued and it's configured with
net.core.default_qdisc:
# sysctl net.core.default_qdisc
net.core.default_qdisc = pfifo_fastAnother commonly used algorithm is fq (fair
queuing).
Maximum Flow Rate
The maximum flow rate may be throttled to reduce the chances of overflowing host receive buffers or intermediate switch buffers in response to packet bursts. For example, for a 10G card, test a maximum flow rate like 8G:
/sbin/tc qdisc add dev eth0 root fq maxrate 8gbitSlow Start after Idle
Starting with kernel version 2.6.18, by default, a socket's
congestion window will be reduced when idle. For internal network
communication using persistent TCP connection pools over controlled, LAN
networks (e.g. a reverse proxy to an application server such as IHS }
WAS connections), set net.ipv4.tcp_slow_start_after_idle=0
in /etc/sysctl.conf and run sysctl -p to
disable reducing the TCP congestion window for idle connections:
net.ipv4.tcp_slow_start_after_idle=0Emulating Network Behaviors
tc
netem is a network emulation component of the traffic control (tc) suite. For example, to emulate a 100ms delay on all packets on an interface:
sudo tc qdisc add dev ${INTERFACE} root netem delay 100msClear induced delay:
sudo tc qdisc del dev ${INTERFACE} rootMonitor TCP Retransmits
For an overview of why it's important to monitor TCP retransmits, see the Operating Systems chapter section on Monitor TCP Retransmits.
On Linux, monitor nstat for TcpRetransSegs, TcpExtTCPSlowStartRetrans, TcpExtTCPSynRetrans. See the nstat section for details. For example:
$ nstat -asz | grep -e TcpRetransSegs -e TcpExtTCPSlowStartRetrans -e TcpExtTCPSynRetrans
TcpRetransSegs 0 0.0
TcpExtTCPSlowStartRetrans 0 0.0
TcpExtTCPSynRetrans 0 0.0An alternative is netstat although this is now obsolete in favor of nstat:
$ netstat -s | grep -i retrans
283 segments retransmitedIf a TCP implementation enables RFC 6298 support, then the RTO is recommended to be at least 1 second:
Whenever RTO is computed, if it is less than 1 second, then the RTO SHOULD be rounded up to 1 second. Traditionally, TCP implementations use coarse grain clocks to measure the RTT and trigger the RTO, which imposes a large minimum value on the RTO. Research suggests that a large minimum RTO is needed to keep TCP conservative and avoid spurious retransmissions [AP99]. Therefore, this specification requires a large minimum RTO as a conservative approach, while at the same time acknowledging that at some future point, research may show that a smaller minimum RTO is acceptable or superior.
However, this is not a "MUST" and Linux, for example, uses a default minimum value of 200ms, although it may be dynamically adjusted upwards.
The current timeout (called retransmission timeout or "rto") can be
queried on Linux using ss:
$ ss -i
...
cubic rto:502 rtt:299/11.25 ato:59 cwnd:10 send 328.6Kbps rcv_rtt:2883 rcv_space:57958The minimum RTO can be configured using the ip
command on a particular route and setting rto_min (relatedly, see tcp_frto).
Monitor TCP State Statistics
One simple and very useful indicator of process health and load is its TCP activity. The following script takes a set of ports and summarizes how many TCP sockets are established, opening, and closing for each port. It has been tested on Linux and AIX. Example output:
$ portstats.sh 80 443
PORT ESTABLISHED OPENING CLOSING
80 3 0 0
443 10 0 2
====================================
Total 13 0 2 portstats.sh:
#!/bin/sh
usage() {
echo "usage: portstats.sh PORT_1 PORT_2 ... PORT_N"
echo " Summarize network connection statistics coming into a set of ports."
echo ""
echo " OPENING represents SYN_SENT and SYN_RECV states."
echo " CLOSING represents FIN_WAIT1, FIN_WAIT2, TIME_WAIT, CLOSED, CLOSE_WAIT,"
echo " LAST_ACK, CLOSING, and UNKNOWN states."
echo ""
exit;
}
NUM_PORTS=0
OS=`uname`
for c in $*
do
case $c in
-help)
usage;
;;
--help)
usage;
;;
-usage)
usage;
;;
--usage)
usage;
;;
-h)
usage;
;;
-?)
usage;
;;
*)
PORTS[$NUM_PORTS]=$c
NUM_PORTS=$((NUM_PORTS + 1));
;;
esac
done
if [ "$NUM_PORTS" -gt "0" ]; then
date
NETSTAT=`netstat -an | grep tcp`
i=0
for PORT in ${PORTS[@]}
do
if [ "$OS" = "AIX" ]; then
PORT="\.$PORT\$"
else
PORT=":$PORT\$"
fi
ESTABLISHED[$i]=`echo "$NETSTAT" | grep ESTABLISHED | awk '{print $4}' | grep "$PORT" | wc -l`
OPENING[$i]=`echo "$NETSTAT" | grep SYN_ | awk '{print $4}' | grep "$PORT" | wc -l`
WAITFORCLOSE[$i]=`echo "$NETSTAT" | grep WAIT | awk '{print $4}' | grep "$PORT" | wc -l`
WAITFORCLOSE[$i]=$((${WAITFORCLOSE[$i]} + `echo "$NETSTAT" | grep CLOSED | awk '{print $4}' | grep "$PORT" | wc -l`));
WAITFORCLOSE[$i]=$((${WAITFORCLOSE[$i]} + `echo "$NETSTAT" | grep CLOSING | awk '{print $4}' | grep "$PORT" | wc -l`));
WAITFORCLOSE[$i]=$((${WAITFORCLOSE[$i]} + `echo "$NETSTAT" | grep LAST_ACK | awk '{print $4}' | grep "$PORT" | wc -l`));
WAITFORCLOSE[$i]=$((${WAITFORCLOSE[$i]} + `echo "$NETSTAT" | grep UNKNOWN | awk '{print $4}' | grep "$PORT" | wc -l`));
TOTESTABLISHED=0
TOTOPENING=0
TOTCLOSING=0
i=$((i + 1));
done
printf '%-6s %-12s %-8s %-8s\n' PORT ESTABLISHED OPENING CLOSING
i=0
for PORT in ${PORTS[@]}
do
printf '%-6s %-12s %-8s %-8s\n' $PORT ${ESTABLISHED[$i]} ${OPENING[$i]} ${WAITFORCLOSE[$i]}
TOTESTABLISHED=$(($TOTESTABLISHED + ${ESTABLISHED[$i]}));
TOTOPENING=$(($TOTOPENING + ${OPENING[$i]}));
TOTCLOSING=$(($TOTCLOSING + ${WAITFORCLOSE[$i]}));
i=$((i + 1));
done
printf '%36s\n' | tr " " "="
printf '%-6s %-12s %-8s %-8s\n' Total $TOTESTABLISHED $TOTOPENING $TOTCLOSING
else
usage;
fiTIME_WAIT
See the Operating Systems chapter for the theory of TIME_WAIT.
Linux has a compile-time
constant of 60 seconds for a TIME_WAIT timeout.
net.ipv4.tcp_fin_timeout is not for
TIME_WAIT but instead for the FIN_WAIT_2
state.
Changing the MTU
If all components in a network path support larger MTU (sometimes called "jumbo frames") and if this setting is enabled on these devices, then an MTU line may be added to /etc/sysconfig/network-scripts/ifcfg-${INTERfACE} and the network service restarted to utilize the larger MTU. For example:
MTU=9000TCP Reordering
In some benchmarks, changing the values of net.ipv4.tcp_reordering
and net.ipv4.tcp_reordering improved network
performance.
Other Network Configuration
To update the socket
listen backlog, set net.core.somaxconn in
/etc/sysctl.conf and apply with sysctl -p.
To update the maximum
incoming packet backlog, set
net.core.netdev_max_backlog in
/etc/sysctl.conf and apply with sysctl -p.
See examples for high bandwidth networks.
Each network adapter has an outbound transmission queue which limits
the outbound TCP sending rate. Consider increasing this by running ip link set $DEVICE txqueuelen $PACKETS
on each relevant device. Test values such as 4096.
tcpdump
tcpdump details
Review the Wireshark chapter for details on how to analyze the data.
If the traffic in question occurs on a single interface, it's better
to use the interface name rather than -i any as this has
less of a chance to confuse Wireshark than the any
pseudo-interface.
If -W 1 is specified, there will be just one file and it
will overwrite at the beginning when rotating, so it's usually better to
use -W 2 with half the desired -C to ensure
having some history (e.g. if the problem is reproduced right after a
rotation). If -W is not specified, the behavior is unclear with some
testing showing strange behavior, so it's best to specify -W.
Review nohup.out to check if
packets dropped by kernel is greater than 0. If so,
consider increasing
the bufffers with -B N (where N is in KB):
Packets that arrive for a capture are stored in a buffer, so that they do not have to be read by the application as soon as they arrive. On some platforms, the buffer's size can be set; a size that's too small could mean that, if too many packets are being captured and the snapshot length doesn't limit the amount of data that's buffered, packets could be dropped if the buffer fills up before the application can read packets from it, while a size that's too large could use more non-pageable operating system memory than is necessary to prevent packets from being dropped.
snarflen
The -s $X snarflen argument specifies up to how many
bytes to capture per packet. Use -s 0 to capture all packet
contents although this may cause a significant overhead if there is a
lot of network activity which isn't filtered. The default snarflen
depends on the version of tcpdump, so it's best to explicitly specify
it.
Dumping pcap files from the command line
In addition to using Wireshark, you may also dump the tcpdump on any Linux machine using the same tcpdump command. For example:
sudo tcpdump -A -n -nn -l -tttt -r capture.pcapCapture network traffic with tcpdump
Review capturing network trace with tcpdump on all ports.
Capture network traffic with tcpdump on one port
Review capturing network trace with tcpdump on a specific port.
Read tcpdump
Wireshark and its associated tshark are generally the best and most
powerful tools to analyze tcpdumps; however, for simplicity or
convenience, it may be useful to read tcpdumps directly using tcpdump -r.
For example:
TZ=UTC tcpdump -nn -r *.pcapRead tcpdump for particular host and port
TZ=UTC tcpdump -nn -r *.pcap host 10.1.2.3 and port 80arping
Find the MAC address associated with an IP address:
arping 10.20.30.100tcping
Send a TCP packet to a destnation host and port to test if it's available. For example:
$ tcping ibm.com 443
ibm.com port 443 open.
$ tcping fakeibm.com 443
fakeibm.com port 443 closed.arp
Show the arp table:
arp -a -varpwatch
arpwatch shows new ARP announcements:
arpwatch -i eth0iptraf-ng
iptraf-ng
monitors network usage. There are different run modes. Some work on all
interfaces with -i all and some only work for a named
interface.
IP traffic monitor:
$ sudo iptraf-ng -i all
iptraf-ng 1.1.4
┌ TCP Connections (Source Host:Port) ─ Packets ─ Bytes ── Flag ── Iface ─ ┐
│┌172.17.0.2:9080 > 1 52 --A- eth0 │
│└172.17.0.1:54608 = 0 0 ---- eth0 │
│┌172.17.0.1:57244 = 3 261 -PA- eth0 │
│└172.17.0.2:9080 = 3 516 -PA- eth0 │
└ TCP: 2 entries ─ Active ┘
Packets captured: 28984 │ TCP flow rate: 0.00 kbpsLAN station monitor:
$ sudo iptraf-ng -l all
iptraf-ng 1.1.4
┌─444444 PktsIn ─ IP In ────── BytesIn ─ InRate ───── PktsOut ─ IP Out ───── BytesOut ──── OutRate ─ ┐
│ Ethernet HW addr: 02:42:ac:11:00:02 on eth0 │
│ └ 17967 17967 1105652 1082.2 17961 17961 2212603 2165.1 │
│ Ethernet HW addr: 02:42:91:4a:2b:ba on eth0 │
│ └ 17961 17961 2212603 2165.1 17967 17967 1105652 1082.2 │General interface statistics:
$ sudo iptraf-ng -g
iptraf-ng 1.1.4
┌ Iface ─ Total ─ IPv4 ─ IPv6 ─ NonIP ────── BadIP ─ Activity ─ ┐
│ lo 0 0 0 0 0 0.00 kbps │
│ eth0 51173 51173 0 0 0 3244.22 kbps │Detailed statistics on an interface:
$ sudo iptraf-ng -d eth0
iptraf-ng 1.1.4
┌ Statistics for eth0 ─ ┐
│ │
│ Total Total Incoming Incoming Outgoing Outgoing │
│ Packets Bytes Packets Bytes Packets Bytes │
│ Total: 25546 2359352 12775 786205 12771 1573147 │
│ IPv4: 25546 2359352 12775 786205 12771 1573147 │
│ IPv6: 0 0 0 0 0 0 │
│ TCP: 25546 2359352 12775 786205 12771 1573147 │
│ UDP: 0 0 0 0 0 0 │
│ ICMP: 0 0 0 0 0 0 │
│ Other IP: 0 0 0 0 0 0 │
│ Non-IP: 0 0 0 0 0 0 │
│ │
│ │
│ Total rates: 3164.82 kbps Broadcast packets: 0 │
│ 4283 pps Broadcast bytes: 0 │
│ │
│ Incoming rates: 1054.61 kbps │
│ 2142 pps │
│ IP checksum errors: 0 │
│ Outgoing rates: 2110.20 kbps │
│ 2141 pps │Packet size counts on an interface:
$ sudo iptraf-ng -z eth0
iptraf-ng 1.1.4
┌ Packet Distribution by Size ─ ┐
│ │
│ Packet size brackets for interface eth0 │
│ │
│ │
│ Packet Size (bytes) Count Packet Size (bytes) Count │
│ 1 to 75: 14973 751 to 825: 0 │
│ 76 to 150: 4991 826 to 900: 0 │
│ 151 to 225: 998 901 to 975: 0 │
│ 226 to 300: 0 976 to 1050: 0 │
│ 301 to 375: 0 1051 to 1125: 0 │
│ 376 to 450: 998 1126 to 1200: 0 │
│ 451 to 525: 0 1201 to 1275: 0 │
│ 526 to 600: 0 1276 to 1350: 0 │
│ 601 to 675: 0 1351 to 1425: 0 │
│ 676 to 750: 0 1426 to 1500+: 0 │
│ │
│ │
│ Interface MTU is 1500 bytes, not counting the data-link header │
│ Maximum packet size is the MTU plus the data-link header length │
│ Packet size computations include data-link headers, if any │nethogs
nethogs
monitors network usage by process.
Example:
$ sudo nethogs -a -v 2 -d 5
NetHogs version 0.8.5
PID USER PROGRAM DEV SENT RECEIVED
? root 172.17.0.2:9080-172.17.0.1:48446 7682253.000 4230555.000 B
? root unknown TCP 0.000 0.000 B
TOTAL 7682253.000 4230555.000 B The various view modes (-v) are:
-v : view mode (0 = KB/s, 1 = total KB, 2 = total B, 3 = total MB). default is 0.iftop
iftop
monitors network usage.
Example:
$ sudo iftop -nN -i eth0
191Mb 381Mb 572Mb 763Mb 954Mb
└────────────────────────┴─────────────────────────┴────────────────────────┴─────────────────────────┴─────────────────────────
172.17.0.2 => 172.17.0.1 1.91Mb 1.49Mb 1.49Mb
<= 979Kb 765Kb 765Kb
────────────────────────────────────────────────────────────────────────────────────────────────────────────────────────────────
TX: cum: 1.87MB peak: 2.23Mb rates: 1.91Mb 1.49Mb 1.49Mb
RX: 956KB 1.11Mb 979Kb 765Kb 765Kb
TOTAL: 2.80MB 3.35Mb 2.87Mb 2.24Mb 2.24MbAdd -P for statistics by port instead of aggregating by
host.
jnettop
jnettop
monitors network usage.
Example:
$ sudo jnettop -n
run 0:00:07 device eth0 pkt[f]ilter: none .
[c]ntfilter: on [b]ps=bytes/s [l]ocal aggr.: none [r]emote aggr.: none
[q]uit [h]elp [s]orting [p]ackets [.] pause [0]-[9] switch device
LOCAL <-> REMOTE TXBPS RXBPS TOTALBPS
(IP) PORT PROTO (IP) PORT TX RX TOTAL
172.17.0.2 <-> 172.17.0.1 754b/s 415b/s 1.14k/s
172.17.0.2 9080 TCP 172.17.0.1 45128 1.47k 831b 2.29k
172.17.0.2 <-> 172.17.0.1 754b/s 415b/s 1.14k/s
172.17.0.2 9080 TCP 172.17.0.1 45130 1.47k 831b 2.29k
─LLLLLLLLLLLLLLLLLLLLLLLLLLLLLLLLLLLLLLLLLLLLLLLLLLLLLLLLLLLLLLLLLLLLLLLLLLLLLLLLLLLLLLLLLLLLLLLLLLLLLLLLLLLLLLLLLLLLLLLLLLLLLLLLLLLLL─
TOTAL 438k/s 241k/s 679k/s
1.95m 1.08m 3.03mtrafshow
trafshow
monitors network usage.
Example:
$ sudo trafshow -n -i eth0
Source/24 Destination/24 Protocol Size CPS
─SSSSSSSSSSSSSSSSSSSSSSSSSSSSSSSSSSSSSSSSSSSSSSSSSSSSSSSSSSSSSSSSSSSSSSSSSSSSSSSSSSSSSSSSSSSSSSSSSSSSSSSSSSSSSSSSSSSSSSSSSSSS─
172.17.0.0,9080 172.17.0.0 6 37804K 281K
172.17.0.0 172.17.0.0,9080 6 17927K 134K
172.17.0.0 172.17.0.0 6 3503K 26K
172.17.0.0,48050 172.17.0.0 6 617
172.17.0.0,49000 172.17.0.0 6 617
─SSSSSSSSSSSSSSSSSSSSSSSSSSSSSSSSSSSSSSSSSSSSSSSSSSSSSSSSSSSSSSSSSSSSSSSSSSSSSSSSSSSSSSSSSSSSSSSSSSSSSSSSSSSSSSSSSSSSSSSSSSSS─
eth0 10 Flows Total: 57M 441Kiperf3
iperf3
may be used to test network speed. Start a server endpoint with
iperf3 -s and then use -c $server on the
client. Compare both directions.
nuttcp
nuttcp
may be used to test network speed. See examples.
speedtest-cli
speedtest-cli
may be used to test internet bandwidth speeds with a public speedtest
provider.
Example:
$ speedtest-cli --bytes --simple
Ping: 22.146 ms
Download: 34.88 Mbyte/s
Upload: 3.77 Mbyte/straceroute
Example:
traceroute example.com
traceroute to example.com (93.184.216.34), 30 hops max, 60 byte packets
1 _gateway (172.17.0.1) 1.511 ms 1.276 ms 1.189 ms
[...]
11 93.184.216.34 (93.184.216.34) 8.908 ms 7.252 ms 6.674 msmtr
Live traceroute. Example:
My traceroute [v0.92]
fca32e320852 (172.17.0.2) 2020-09-09T21:04:08+0000
Keys: Help Display mode Restart statistics Order of fields quit
Packets Pings
Host Loss% Snt Last Avg Best Wrst StDev
1. _gateway 0.0% 14 0.1 0.1 0.1 0.2 0.0
[...]
10. 93.184.216.34 0.0% 13 6.4 7.4 6.4 12.5 2.2nmap
nmap -p 1-65535 -T4 -A -v $host: Probe all TCP ports for a host.
Disable IPv6 DHCP Auto-negotiation
Add the following to /etc/sysctl.conf and apply with
sysctl -p:
net.ipv6.conf.all.autoconf=0
net.ipv6.conf.all.accept_ra=0NetworkManager
Update DNS Servers
- Show active connections:
nmcli connection show --active - Show current DNS servers:
nmcli connection show $uuid | grep -i dns - Set an explicit set of DNS servers for IPv4 and IPv6 examples:
- CloudFlare:
nmcli connection modify $uuid ipv4.ignore-auto-dns yes ipv6.ignore-auto-dns yes ipv4.dns "1.1.1.1 1.0.0.1" ipv6.dns "2606:4700:4700::1111 2606:4700:4700::1001" - Google:
nmcli connection modify $uuid ipv4.ignore-auto-dns yes ipv6.ignore-auto-dns yes ipv4.dns "8.8.8.8 8.8.4.4" ipv6.dns "2001:4860:4860::8888 2001:4860:4860::8844" - Reset to DHCP:
nmcli connection modify $uuid ipv4.ignore-auto-dns no ipv6.ignore-auto-dns no ipv4.dns "" ipv6.dns "" ipv4.dns-search ""
- CloudFlare:
- Reload the connection or restart networking
nmcli connection up $uuidsystemctl restart NetworkManager(this latter option may be more useful in the case WiFi is being used and keys are stored in a wallet rather than using--askabove)
- Confirm settings:
cat /etc/resolv.confnmcli connection show $uuid | grep -i dns
- Test DNS lookup time:
dig example.com | grep -A 1 -e "ANSWER SECTION" -e "Query time" - Other useful commands:
- Show devices:
nmcli device - Show devices with details:
nmcli device show - Modify host-name lookup search list:
ipv4.dns-searchandipv6.dns-search - Add a DNS server instead of replacing:
nmcli connection modify $uuid +ipv4.dns $ip - Disconnect device:
nmcli device disconnect $device - Connect device:
nmcli device connect $device
- Show devices:
- See additional background
resolvectl
resolvectl is a utility to display DNS resolver configuration. For example:
$ resolvectl status
Link 3 (wlp3s0)
Current Scopes: DNS LLMNR/IPv4 LLMNR/IPv6
DefaultRoute setting: yes
LLMNR setting: yes
MulticastDNS setting: no
DNSOverTLS setting: no
DNSSEC setting: no
DNSSEC supported: no
Current DNS Server: 1.1.1.1
DNS Servers: 1.1.1.1
1.0.0.1
DNS Domain: ~.Kernel
Thread Stacks
Output /proc/pid/stack and /proc/pid/task/*/stack to review all kernel stacks.
Process Tracing
strace may be used to trace system calls that a process makes, and ltrace may be used to trace library calls that a process makes. This can be helpful in certain situations when there are low level delays such as writing to disk (strace), or investigating library calls such as libc malloc calls (ltrace). strace and ltrace cannot be run at the same time for the same process.
strace
strace
traces system calls (syscalls) although it usually has an extremely
large overhead even if filtering is used.
strace usually doesn't come pre-installed and it must be installed from the normal repositories.
For example, to dynamically attach to a process and trace all syscalls of a process and all its threads to an output file:
$ strace -f -tt -s 256 -o outputfile.txt -p $PID
^C
$ cat outputfile.txt
31113 11:43:15.724911 open("/home/user/somefile", O_WRONLY|O_CREAT|O_TRUNC|O_LARGEFILE, 0666) = 139
31113 11:43:15.725109 fstat64(139, {st_mode=S_IFREG|0664, st_size=0, ...}) = 0
31113 11:43:15.728881 write(139, "<!DOCTYPE html PUBLIC \"-//W3C//D"..., 8192 <unfinished ...>
31113 11:43:15.729004 <... write resumed> ) = 8192
31113 11:43:15.729385 close(139 <unfinished ...>
31113 11:43:15.731440 <... close resumed> ) = 0The -e option is a comma-delimited list of which
syscalls are traced (and others are not traced). For example:
strace -f -tt -e exit_group,write -s 256 -o outputfile.txt -p $PIDThe -k option on newer versions of strace
prints the stack leading to the syscall. For example:
$ strace -f -tt -k -e mmap,write -s 256 -o outputfile.txt -p $PID
^C
$ cat outputfile.txt
218 20:15:24.726282 mmap(NULL, 16777216, PROT_READ|PROT_WRITE, MAP_PRIVATE|MAP_ANONYMOUS, -1, 0) = 0x150a02000000
> /usr/lib64/libc-2.30.so(__mmap+0x26) [0xfc356]
> /opt/ibm/java/jre/lib/amd64/compressedrefs/libj9prt29.so(default_pageSize_reserve_memory+0xef) [0x305bf]
> /opt/ibm/java/jre/lib/amd64/compressedrefs/libj9prt29.so(getMemoryInRangeForDefaultPages+0x44c) [0x30d6c]
> /opt/ibm/java/jre/lib/amd64/compressedrefs/libj9prt29.so(omrvmem_reserve_memory_ex+0x333) [0x31593]
> /opt/ibm/java/jre/lib/amd64/compressedrefs/libj9vm29.so(allocateFixedMemorySegmentInList+0x258) [0xcb408]
> /opt/ibm/java/jre/lib/amd64/compressedrefs/libj9jit29.so(J9::SegmentAllocator::allocate(unsigned long, std::nothrow_t const&)+0x38) [0x155698]
> /opt/ibm/java/jre/lib/amd64/compressedrefs/libj9jit29.so(J9::SegmentAllocator::allocate(unsigned long)+0xf) [0x15573f]
> /opt/ibm/java/jre/lib/amd64/compressedrefs/libj9jit29.so(J9::J9SegmentCache::J9SegmentCache(unsigned long, J9::J9SegmentProvider&)+0x11f) [0x155aaf]
> /opt/ibm/java/jre/lib/amd64/compressedrefs/libj9jit29.so(TR::CompilationInfoPerThread::initializeSegmentCache(J9::J9SegmentProvider&)+0x23) [0x1337d3]
> /opt/ibm/java/jre/lib/amd64/compressedrefs/libj9jit29.so(TR::CompilationInfoPerThread::processEntries()+0x84) [0x133994]
> /opt/ibm/java/jre/lib/amd64/compressedrefs/libj9jit29.so(TR::CompilationInfoPerThread::run()+0x29) [0x134069]
> /opt/ibm/java/jre/lib/amd64/compressedrefs/libj9jit29.so(protectedCompilationThreadProc(J9PortLibrary*, TR::CompilationInfoPerThread*)+0x79) [0x134129]
> /opt/ibm/java/jre/lib/amd64/compressedrefs/libj9prt29.so(omrsig_protect+0x1e2) [0x223d2]
> /opt/ibm/java/jre/lib/amd64/compressedrefs/libj9jit29.so(compilationThreadProc(void*)+0x203) [0x134583]
> /opt/ibm/java/jre/lib/amd64/compressedrefs/libj9thr29.so(thread_wrapper+0x185) [0xe335]
> /usr/lib64/libpthread-2.30.so(start_thread+0xe1) [0x94e1]
> /usr/lib64/libc-2.30.so(__clone+0x42) [0x101692]More advanced example to track signals:
sh -c "PID=$(pgrep -o java); truncate -s 0 nohup.out && truncate -s 0 diag_strace_$(hostname).txt && date &>> nohup.out && echo PID=${PID} &>> diag_strace_$(hostname).txt && ps -L -p $PID &>> diag_strace_$(hostname).txt && (nohup strace -f -tt -e trace=rt_sigqueueinfo,rt_tgsigqueueinfo,rt_sigpending -o diag_strace_$(hostname)_$(date +%Y%m%d_%H%M%S).txt -p $PID &) && sleep 1 && cat nohup.out"
mmap
Trace mmap-related memory syscalls (particularly with the -k stack option, this may have a significant performance overhead):
Start (replace $PID with the process ID):
nohup strace -f -k -tt -e trace=mmap,munmap,mremap,shmat,shmdt,brk -qq -o diag_strace_$(hostname)_$(date +%Y%m%d_%H%M%S).txt -p $PID &Stop:
pkill -INT straceExample output:
216 17:03:26.915735 mmap(NULL, 16777216, PROT_READ|PROT_WRITE, MAP_PRIVATE|MAP_ANONYMOUS, -1, 0) = 0x150a02000000
58466 17:03:27.099645 --- SIGRT_30 {si_signo=SIGRT_30, si_code=SI_TKILL, si_pid=22, si_uid=1001} ---
58467 17:03:27.167435 --- SIGRT_30 {si_signo=SIGRT_30, si_code=SI_TKILL, si_pid=22, si_uid=1001} ---
58470 17:03:27.172575 --- SIGRT_30 {si_signo=SIGRT_30, si_code=SI_TKILL, si_pid=22, si_uid=1001} ---
58468 17:03:27.176465 --- SIGRT_30 {si_signo=SIGRT_30, si_code=SI_TKILL, si_pid=22, si_uid=1001} ---
215 17:03:27.215293 mmap(NULL, 16777216, PROT_READ|PROT_WRITE, MAP_PRIVATE|MAP_ANONYMOUS, -1, 0) = 0x150a01000000
218 17:03:27.258028 mmap(NULL, 16777216, PROT_READ|PROT_WRITE, MAP_PRIVATE|MAP_ANONYMOUS, -1, 0) = 0x150a00000000
216 17:03:27.344185 mmap(NULL, 16777216, PROT_READ|PROT_WRITE, MAP_PRIVATE|MAP_ANONYMOUS, -1, 0) = 0x1509ab000000
58472 17:03:27.384671 --- SIGRT_30 {si_signo=SIGRT_30, si_code=SI_TKILL, si_pid=22, si_uid=1001} ---
216 17:03:27.497329 munmap(0x1509ab000000, 16777216) = 0
216 17:03:27.798111 mmap(NULL, 16777216, PROT_READ|PROT_WRITE, MAP_PRIVATE|MAP_ANONYMOUS, -1, 0) = 0x1509ab000000
216 17:03:27.953452 munmap(0x1509ab000000, 16777216) = 0
215 17:03:27.963090 munmap(0x150a01000000, 16777216) = 0ltrace
ltrace
traces library calls (e.g. libc) although it may have a significant
overhead even if filtering is used.
The -w N option on newer versions of ltrace
prints the stack leading to the call. For example:
218 20:19:53.651933 libj9prt29.so->malloc(128, 128, 0, 96 <unfinished ...>
218 20:19:53.675794 <... malloc resumed> ) = 0x150a2411d110
> libj9prt29.so(omrmem_allocate_memory+0x71) [150a489ec3f1]
> libj9jit29.so(_ZN2J921SystemSegmentProvider21createSegmentFromAreaEmPv+0xfc) [150a430542bc]
> libj9jit29.so(_ZN2J921SystemSegmentProvider18allocateNewSegmentEmN2TR17reference_wrapperI15J9MemorySegmentEE+0x33) [150a430543b3]
> libj9jit29.so(_ZN2J921SystemSegmentProvider7requestEm+0x393) [150a430549e3]
> libj9jit29.so(_ZN2TR6Region8allocateEmPv+0x2d) [150a433253cd]
> libj9jit29.so(_ZN9TR_Memory18allocateHeapMemoryEmN13TR_MemoryBase10ObjectTypeE+0xe) [150a4332557e]
> libj9jit29.so(_ZN3CS214heap_allocatorILm65536ELj12E17TRMemoryAllocatorIL17TR_AllocationKind1ELj12ELj28EEE8allocateEmPKc.constprop.216+0x265) [150a435043c5]
> libj9jit29.so(_ZN3OMR9OptimizerC2EPN2TR11CompilationEPNS1_20ResolvedMethodSymbolEbPK20OptimizationStrategyt+0x15d) [150a435045cd]
> libj9jit29.so(_ZN2J99OptimizerC1EPN2TR11CompilationEPNS1_20ResolvedMethodSymbolEbPK20OptimizationStrategyt+0x23) [150a43228183]
> libj9jit29.so(_ZN3OMR9Optimizer15createOptimizerEPN2TR11CompilationEPNS1_20ResolvedMethodSymbolEb+0x13a) [150a435022da]
> libj9jit29.so(_ZN3OMR20ResolvedMethodSymbol5genILEP11TR_FrontEndPN2TR11CompilationEPNS3_20SymbolReferenceTableERNS3_12IlGenRequestE+0x3ec) [150a43354b4c]malloc
Trace malloc-related memory library calls (particularly with the -w stack option, this may have a significant performance overhead):
Start (replace $PID with the process ID):
nohup ltrace -f -tt -w 10 -e malloc+free+calloc+realloc+alloca+malloc_trim+mallopt -o diag_ltrace_$(hostname)_$(date +%Y%m%d_%H%M%S).txt -p $PID &Stop:
pkill -INT ltraceExample output:
62080 17:25:58.500832 libdbgwrapper80.so->malloc(4377, 0x150a40e5ab96, 21, 0) = 0x1509d4009b90
62080 17:25:58.504123 libdbgwrapper80.so->free(0x1509d4009b90, 0x150a40e5abb4, 1, 0x150a4a0943fb) = 0
62080 17:25:58.509705 libdbgwrapper80.so->malloc(4377, 0x150a40e5ab96, 21, 0) = 0x1509d4009b90
62080 17:25:58.514305 libdbgwrapper80.so->free(0x1509d4009b90, 0x150a40e5abb4, 1, 0x150a4a0943fb <unfinished ...>
337 17:25:58.519176 <... free resumed> ) = <void>
62080 17:25:58.519361 <... free resumed> ) = 0
62080 17:25:58.519845 libdbgwrapper80.so->malloc(4377, 0x150a40e5ab96, 21, 0 <unfinished ...>
337 17:25:58.525282 libj9prt29.so->malloc(88, 88, 0, 56 <unfinished ...>
62080 17:25:58.528285 <... malloc resumed> ) = 0x1509d4009b90
337 17:25:58.529248 <... malloc resumed> ) = 0x1509d40077d0Miscellaneous
Hardware
List hardware details: lshw
List kernel modules: lsmod
List USB information: lsusb and
usb-devices
Use the sensors and ipmitool commands.
CPU
Show frequencies:
cpupower frequency-infoShow idle states
cpupower idle-infoShow per-core information:
cpupower monitorFor dynamically updating information, see powertop.
Additional CPU information:
dmidecode -t 4dmidecode --type system -qdmidecode -q --type processordmidecode -q --type memory
Processor Sets/Pinning
[A] workload can get better performance if each WebSphere Application Server (WAS) instance, a process in itself, is set to run on a separate subset of CPU threads. Keeping a process on a set of CPU threads, and keeping other processes off that set of CPU threads, can improve performance because it preserves CPU cache warmth and NUMA memory locality. In this setup, with 8 WAS instances and 16 cores, each with 4 Simultaneous Multi-Threading (SMT) threads, each WAS instance was pinned to 2 cores, or 8 CPU threads.
The taskset command may be used to assign the CPUs for a program when the program is started. For example:
taskset -c 0-7 /opt/WAS8.5/profiles/specjprofile1/bin/startServer.sh server1 taskset -c 16-23 /opt/WAS8.5/profiles/specjprofile2/bin/startServer.sh server1 taskset -c 32-39 /opt/WAS8.5/profiles/specjprofile3/bin/startServer.sh server1 taskset -c 48-55 /opt/WAS8.5/profiles/specjprofile4/bin/startServer.sh server1 taskset -c 8-15 /opt/WAS8.5/profiles/specjprofile5/bin/startServer.sh server1 taskset -c 24-31 /opt/WAS8.5/profiles/specjprofile6/bin/startServer.sh server1 taskset -c 40-47 /opt/WAS8.5/profiles/specjprofile7/bin/startServer.sh server1 taskset -c 56-63 /opt/WAS8.5/profiles/specjprofile8/bin/startServer.sh server1
Interrupt Processing
Usually, the Linux kernel handles network devices by using the so called New API (NAPI), which uses interrupt mitigation techniques, in order to reduce the overhead of context switches: On low traffic network devices everything works as expected, the CPU is interrupted whenever a new packet arrives at the network interface. This gives a low latency in the processing of arriving packets, but also introduces some overhead, because the CPU has to switch its context to process the interrupt handler. Therefore, if a certain amount of packets per second arrives at a specific network device, the NAPI switches to polling mode for that high traffic device. In polling mode the interrupts are disabled and the network stack polls the device in regular intervals. It can be expected that new packets arrive between two polls on a high traffic network interface. Thus, polling for new data is more efficient than having the CPU interrupted and switching its context on every arriving packet. Polling a network device does not provide the lowest packet processing latency, though, but is throughput optimized and runs with a foreseeable and uniform work load.
IRQ Pinning
When processes are pinned to specific sets of CPUs, it can help to pin any interrupts that are used exclusively (or mostly) by those processes to the same set of CPUs. In this setup, each WAS instance was configured with its own IP address. The IP address was configured on a specific Ethernet device. The Ethernet device was handled by one or more interrupts or IRQs. Pinning the IRQs for an Ethernet device to the same set or subset of CPUs of the WebSphere Application Server (WAS) instance that has its IP address on that Ethernet device can help performance.
When you pin IRQs to CPUs, you must keep the irqbalance
service from setting the CPUs for those IRQs. The
irqbalance daemon periodically assigns the IRQs to
different CPUs depending on the current system usage. It is useful for
many system workloads, but if you leave irqbalance running
it can undo your IRQ CPU pinnings. The heavy-handed approach is to
simply turn off the irqbalance service and keep it from
starting on boot up.
# service irqbalance stop
# chkconfig irqbalance offIf you need the irqbalance service to continue to
balance the IRQs that you don't pin, then you can configure
irqbalance not to change the CPU pinnings for IRQs you
pinned. In the /etc/sysconfig/irqbalance file, set the
IRQBALANCE_ARGS parameter to ban irqbalance
from changing the CPU pinnings for your IRQs.
IRQBALANCE_ARGS="--banirq=34 --banirq=35 --banirq=36 --banirq=37 --banirq=38 --banirq=39 --banirq=40 --banirq=41"You must restart the irqbalance service for the changes
to take effect.
To pin the IRQs for an Ethernet device to a CPU or set of CPUs, first
you need to find the IRQ numbers the Ethernet device is using. They can
be found in the /proc/interrupts file.
- The first column in the file lists the IRQs currently being used by the system, each IRQ has its own row
- The following columns, one for each CPU in the system, list how many times the IRQ was handled on a specific CPU. In the example below, the columns for CPUs beyond CPU1 have been deleted. The file gets very wide when the system has a lot of CPUs.
- The last column lists the name of the IRQ.
In the example that follows, you can see that Ethernet device eth0 has IRQs 34, 35, 36, and 37, and eth1 has IRQs 38, 39, 40, and 41. It is best to read the rows from right to left. Find the device name in the last column, then look at the beginning of the row to determine the assigned IRQ.
CPU0 CPU1 <additional CPU columns deleted>
16: 3546 16486 ... IPI
29: 17452 0 ... qla2xxx (default)
30: 4303 0 ... qla2xxx (rsp_q)
31: 133 0 ... qla2xxx (default)
32: 0 0 ... qla2xxx (rsp_q)
33: 417366 0 ... ipr
34: 8568860 0 ... eth0-q0
35: 16 0 ... eth0-q1
36: 4 0 ... eth0-q2
37: 5 0 ... eth0-q3
38: 109 0 ... eth1-q0
39: 0 0 ... eth1-q1
40: 3 0 ... eth1-q2
41: 0 0 ... eth1-q3The CPUs an IRQ is allowed to run on are in the
/proc/irq/<irq-number>/smp_affinity file. The file
contains a hexadecimal bit-mask of the CPUs on which the IRQ is allowed
to run. The low order bit is CPU 0. Some Linux distributions also have a
/proc/irq/<irq-number>/smp_affinity_list file that
has the CPU list in human readable form. These files are writable; you
can set the CPUs an IRQ is allowed to run on by writing a new value to
the file.
Now, let's say that the first WAS instance is pinned to CPUs 0-3 and that its IP address is on eth0, and that the second WAS instance is pinned to CPUs 4-7 and that its IP address is on eth1. You could pin each of the four IRQs for eth0 to each of the four CPUs to which the first WAS instance is bound, and pin each of the four IRQs for eth1 to each of the four CPUs to which the second WAS instance is bound.
To specify the CPU numbers with a hexadecimal bit-mask, you would
write to the smp_affinity file.
# echo 00000001 > /proc/irq/34/smp_affinity
# echo 00000002 > /proc/irq/35/smp_affinity
# echo 00000004 > /proc/irq/36/smp_affinity
# echo 00000008 > /proc/irq/37/smp_affinity
# echo 00000010 > /proc/irq/38/smp_affinity
# echo 00000020 > /proc/irq/39/smp_affinity
# echo 00000040 > /proc/irq/40/smp_affinity
# echo 00000080 > /proc/irq/41/smp_affinityAlternatively, to specify the CPU numbers in a human readable form,
you would write to the smp_affinity_list file.
# echo 0 > /proc/irq/34/smp_affinity_list
# echo 1 > /proc/irq/35/smp_affinity_list
# echo 2 > /proc/irq/36/smp_affinity_list
# echo 3 > /proc/irq/37/smp_affinity_list
# echo 4 > /proc/irq/38/smp_affinity_list
# echo 5 > /proc/irq/39/smp_affinity_list
# echo 6 > /proc/irq/40/smp_affinity_list
# echo 7 > /proc/irq/41/smp_affinity_listHowever, research has shown that the performance of the IRQ handling is better on the first SMT thread of a core. It is better to combine IRQs on the first SMT thread than to spread them out over all the SMT threads. The PowerLinux systems were configured with SMT4 enabled. The first SMT thread on a core is therefore any CPU number that is evenly divisible by four. So in this example, what you would instead want to do is pin all the IRQs for eth0 to CPU 0 and pin all the IRQs for eth1 to CPU 4.
# echo 00000001 > /proc/irq/34/smp_affinity
# echo 00000001 > /proc/irq/35/smp_affinity
# echo 00000001 > /proc/irq/36/smp_affinity
# echo 00000001 > /proc/irq/37/smp_affinity
# echo 00000010 > /proc/irq/38/smp_affinity
# echo 00000010 > /proc/irq/39/smp_affinity
# echo 00000010 > /proc/irq/40/smp_affinity
# echo 00000010 > /proc/irq/41/smp_affinityOr, if using the smp_affinity_list file:
# echo 0 > /proc/irq/34/smp_affinity_list
# echo 0 > /proc/irq/35/smp_affinity_list
# echo 0 > /proc/irq/36/smp_affinity_list
# echo 0 > /proc/irq/37/smp_affinity_list
# echo 4 > /proc/irq/38/smp_affinity_list
# echo 4 > /proc/irq/39/smp_affinity_list
# echo 4 > /proc/irq/40/smp_affinity_list
# echo 4 > /proc/irq/41/smp_affinity_listInterrupt Coalescing
Most modern network adapters have settings for coalescing interrupts. In interrupt coalescing, the adapter collects multiple network packets and then delivers the packets to the operating system on a single interrupt. The advantage of interrupt coalescing is that it decreases CPU utilization since the CPU does not have to run the entire interrupt code path for every network packet. The disadvantage of interrupt coalescing is that it can delay the delivery of network packets, which can hurt workloads that depend on low network latency. The SPECjEnterprise workload is not sensitive to network latency. For SPECjEnterprise, it is better to conserve CPU utilization, freeing it up for the applications such as WebSphere and DB2.
On some network adapters the coalescing settings are command line
parameters specified when the kernel module for the network adapter is
loaded. On the Chelseo and Intel adapters used in this setup, the
coalescing settings are changed with the ethtool utility.
To see the coalescing settings for an Ethernet device run
ethtool with the -c option.
# ethtool -c eth2
Coalesce parameters for eth2:
Adaptive RX: off TX: off
stats-block-usecs: 0
sample-interval: 0
pkt-rate-low: 0
pkt-rate-high: 0
rx-usecs: 3
rx-frames: 0
rx-usecs-irq: 0
rx-frames-irq: 0
tx-usecs: 0
tx-frames: 0
tx-usecs-irq: 0
tx-frames-irq: 0
rx-usecs-low: 0
rx-frame-low: 0
tx-usecs-low: 0
tx-frame-low: 0
rx-usecs-high: 0
rx-frame-high: 0
tx-usecs-high: 0
tx-frame-high: 0Many modern network adapters have adaptive coalescing that analyzes the network frame rate and frame sizes and dynamically sets the coalescing parameters based on the current load. Sometimes the adaptive coalescing doesn't do what is optimal for the current workload and it becomes necessary to manually set the coalescing parameters. Coalescing parameters are set in one of two basic ways. One way is to specify a timeout. The adapter holds network frames until a specified timeout and then delivers all the frames it collected. The second way is to specify a number of frames. The adapter holds network frames until it collects the specified number of frames and then delivers all the frames it collected. A combination of the two is usually used.
To set the coalescing settings for an Ethernet device, use the
-C option for ethtool and specify the settings
you want to change and their new values. This workload benefited from
setting the receive timeout on the WebSphere server to 200 microseconds,
the maximum allowed by the Chelseo driver, and disabling the frame count
threshold.
ethtool -C eth4 rx-usecs 200 rx-frames 0
ethtool -C eth5 rx-usecs 200 rx-frames 0
ethtool -C eth6 rx-usecs 200 rx-frames 0
ethtool -C eth7 rx-usecs 200 rx-frames 0On the database server, increasing the receive timeout to 100 microseconds was sufficient to gain some efficiency. The database server had plenty of idle CPU time, so it was not necessary to conserve CPU utilization.
ethtool -C eth2 rx-usecs 100
ethtool -C eth3 rx-usecs 100
ethtool -C eth4 rx-usecs 100
ethtool -C eth5 rx-usecs 100Consider Disabling IPv6
If IPv6 is not used, consider disabling it completely for a potential boost. IPv6 support can be disabled in the Linux kernel by adding the following options to the kernel command line in the boot loader configuration.
ipv6.disable_ipv6=1 ipv6.disable=1Disabling IPv6 support in the Linux kernel guarantees that no IPv6
code will ever be run as long as the system is booted. That may be too
heavy-handed. A lighter touch is to let the kernel boot with IPv6
support and then disable it. This may be done by adding
net.ipv6.conf.all.disable_ipv6=1 to
/etc/sysctl.conf and running sysctl -p and
rebooting. Alternatively, diable IPv6 on particular interfaces with
net.ipv6.conf.eth0.disable_ipv6=1.
Huge Pages
The default page size is 4KB. Large pages on Linux are called huge
pages, and they are commonly 2MB or 1GB (depending on the processor). In
general, large pages perform better for most non-memory constrained
workloads because of fewer and faster CPU translation lookaside buffer
(TLB) misses. There are two types of huge pages: the newer transparent
huge pages (AnonHugePages in /proc/meminfo)
and the older hugetlb (HugePages_Total in
/proc/meminfo). In general, transparent huge pages are
preferred.
Note that there are some potential negatives to huge pages:
huge page use can increase memory pressure, add latency for minor pages faults, and add overhead when splitting huge pages or coalescing normal sized pages into huge pages
Transparent Huge Pages
In recent kernel versions, transparent huge pages (THP) support is enabled by default and automatically tries to use huge pages. The status of THP can be checked with:
$ cat /sys/kernel/mm/transparent_hugepage/enabled
[always] neverThe number of anonymous huge pages allocated can be found in /proc/meminfo
$ grep AnonHuge /proc/meminfo
AnonHugePages: 1417216 kBTransparent huge pages use the khugepaged daemon to periodically defragment memory to make it available for future THP allocations. If this causes problems with high CPU usage, defrag may be disabled, at the cost of potentially lower usage of huge pages:
It's also possible to limit defragmentation
efforts in the VM to generate hugepages in case they're not
immediately free to madvise regions or to never try to defrag memory and
simply fallback to regular pages unless hugepages are immediately
available. Clearly if we spend CPU time to defrag memory, we would
expect to gain even more by the fact we use hugepages later instead of
regular pages. This isn't always guaranteed, but it may be more likely
in case the allocation is for a MADV_HUGEPAGE region.
echo always > /sys/kernel/mm/transparent_hugepage/defrag
echo madvise > /sys/kernel/mm/transparent_hugepage/defrag
echo never > /sys/kernel/mm/transparent_hugepage/defragAnonHugePages is a subset of AnonPages.
You can check for transparent huge page usage by process in /proc/PID/smaps and look for AnonHugePages.
Important notes about THP:
[THP] requires no modifications for applications to take advantage of it.
An application may mmap a large region but only touch 1 byte of it, in that case a 2M page might be allocated instead of a 4k page for no good. This is why it's possible to disable hugepages system-wide and to only have them inside MADV_HUGEPAGE madvise regions.
The amount of memory dedicated to page tables can be found with grep PageTables /proc/meminfo
If your architecture is NUMA and kernel is >= 2.6.14, the huge
pages are per
NUMA node and so you can see the total huge pages allocated to a
process by adding the "huge" elements across nodes in
/proc/PID/numa_maps.
Show huge page layout per NUMA node:
cat /sys/devices/system/node/node*/meminfohugetlb
The older method to use huge pages involves libhugetlbfs
and complex administration. Note:
Pages that are used as huge pages are reserved inside the kernel and cannot be used for other purposes. Huge pages cannot be swapped out under memory pressure.
/proc/meminfo contains information on libhugetlbfs usage:
HugePages_Total is the size of the pool of huge pages.
HugePages_Free is the number of huge pages in the pool that are not yet
allocated.
HugePages_Rsvd is short for "reserved," and is the number of huge pages for
which a commitment to allocate from the pool has been made,
but no allocation has yet been made. Reserved huge pages
guarantee that an application will be able to allocate a
huge page from the pool of huge pages at fault time.
HugePages_Surp is short for "surplus," and is the number of huge pages in
the pool above the value in /proc/sys/vm/nr_hugepages. The
maximum number of surplus huge pages is controlled by
/proc/sys/vm/nr_overcommit_hugepages.
Hugepagesize is the size of each huge page.The number of hugetlb pages in use is:
HugePages_Total - HugePages_Free + HugePages_ReservedFor example:
HugePages_Total: 8192
HugePages_Free: 1024
HugePages_Rsvd: 1024
HugePages_Surp: 0
Hugepagesize: 2048 kBIn this example, there are no hugetlb pages in use, although 1GB is reserved by some processes.
Note that when using hugetlb, RSS for the
process is not accounted for properly (this is not true of THP; THP
accounts into RSS properly) and instead is accounted
for in /proc/meminfo:
"Shared_Hugetlb" and "Private_Hugetlb" show the ammounts of memory backed by hugetlbfs page which is *not* counted in "RSS" or "PSS" field for historical reasons. And these are not included in {Shared,Private}_{Clean,Dirty} field.
Process Limits
Review the operating system section on process limits which is generally summarized as:
ulimit -c unlimited
ulimit -f unlimited
ulimit -u unlimited
ulimit -n unlimited
ulimit -d unlimitedKernel Limits
The maximum number of processes and threads is controlled by /proc/sys/kernel/threads-max:
"This file specifies the system-wide limit on the number of threads
(tasks) that can be created on the system." Each thread also has a
maximum stack size, so virtual and physical memory must support your
requirements.
The maximum number of PIDs is controlled by /proc/sys/kernel/pid_max:
"This file specifies the value at which PIDs wrap around (i.e., the
value in this file is one greater than the maximum PID). The default
value for this file, 32768, results in the same range of PIDs as on
earlier kernels. On 32-bit platforms, 32768 is the maximum value for
pid_max. On 64-bit systems, pid_max can be set
to any value up to 2^22 (PID_MAX_LIMIT, approximately 4
million)."
Crontab
Review all users' crontabs and the processing that they do. Some built-in crontab processing such as monitoring and file search may have significant performance impacts.
Processor Scheduling
The Linux Completely Fair Scheduler (CFS) may affect IBM Java performance:
The Linux Completely Fair Scheduler (CFS) first appeared in the 2.6.23 release of the Linux kernel in October 2007. The algorithms used in the CFS provide efficient scheduling for a wide variety of system and workloads. However, for this particular workload there is one behavior of the CFS that cost a few percent of CPU utilization.
In the CFS, a thread that submits I/O, blocks and then is notified of the I/O completion preempts the currently running thread and is run instead. This behavior is great for applications such as video streaming that need to have low latency for handling the I/O, but it can actually hurt SPECjEnterprise performance. In SPECjEnterprise, when a thread submits I/O, such as sending a response out on the network, the I/O thread is in no hurry to handle the I/O completion. Upon I/O completion, the thread is simply finished with its work. Moreover, when an I/O completion thread preempts the current running thread, it prevents the current thread from making progress. And when it preempts the current thread it can ruin some of the cache warmth that the thread has created. Since there is no immediate need to handle the I/O completion, the current thread should be allowed to run. The I/O completion thread should be scheduled to run just like any other process.
The CFS has a list of scheduling features that can be enabled or disabled. The setting of these features is available through the debugfs file system. One of the features is WAKEUP_PREEMPT. It tells the scheduler that an I/O thread that was woken up should preempt the currently running thread, which is the default behavior as described above. To disable this feature, you set NO_WAKEUP_PREEMPT (not to be confused with NO_WAKEUP_PREEMPTION) in the scheduler's features.
mount -t debugfs debugfs /sys/kernel/debug echo NO_WAKEUP_PREEMPT > /sys/kernel/debug/sched_features umount /sys/kernel/debugUnfortunately, the NO_WAKEUP_PREEMPT scheduler feature was removed in Linux kernel version 3.2. It is and will be available in the RedHat Enterprise Linux 6 releases. It is not available in the latest SUSE Linux Enterprise Server 11 Service Pack 2. There are some other scheduler settings that can achieve close to the same behavior as NO_WAKEUP_PREEMPT.
You can use the
sched_min_granularity_nsparameter to disable preemption.sched_min_granularity_nsis the number of nanoseconds a process is guaranteed to run before it can be preempted. Setting the parameter to one half of the value of thesched_latency_nsparameter effectively disables preemption.sched_latency_nsis the period over which CFS tries to fairly schedule all the tasks on the runqueue. All of the tasks on the runqueue are guaranteed to be scheduled once within this period. So, the greatest amount of time a task can be given to run is inversely correlated with the number of tasks; fewer tasks means they each get to run longer. Since the smallest number of tasks needed for one to preempt another is two, settingsched_min_granularity_nsto half ofsched_latency_nsmeans the second task will not be allowed to preempt the first task.The scheduling parameters are located in the
/proc/sys/kernel/directory. Here is some sample bash code for disabling preemption.# LATENCY=$(cat /proc/sys/kernel/sched_latency_ns) # echo $((LATENCY/2)) > /proc/sys/kernel/sched_min_granularity_nsThe parameter
sched_wakeup_granularity_nsis similar to thesched_min_granularity_nsparameter. The documentation is a little fuzzy on how this parameter actually works. It controls the ability of tasks being woken to preempt the current task. The smaller the value, the easier it is for the task to force the preemption. Settingsched_wakeup_granularity_nsto one half ofsched_latency_nscan also help alleviate the scheduling preemption problem.
IBM Java on Linux
In some cases, -Xthr:noCfsYield
and -Xthr:minimizeUserCPU may improve performance.
systemd
systemd Tips
systemd-analyze blameto review potential causes of slow boot times
Example service
- Create
/etc/systemd/system/wlp.servicewith the contents:[Unit] Description=wlp Wants=network-online.target After=network-online.target [Service] ExecStart=/opt/ibm/wlp/bin/server start ExecStop=/opt/ibm/wlp/bin/server stop User=someuser Environment=JAVA_HOME=/opt/ibm/java Type=forking Restart=always PIDFile=/opt/ibm/wlp/usr/servers/.pid/defaultServer.pid [Install] WantedBy=multi-user.target - Reload systemd configuration:
systemctl daemon-reload - Start the service:
systemctl start wlp - If you want to start the service after reboot:
systemctl enable wlp
Showing service status
Example:
systemctl --no-pager status wlpOther Tips
- Print kernel boot parameters:
cat /proc/cmdline - Print current
kernel log levels:
cat /proc/sys/kernel/printk - Change kernel log level:
echo 5 > /proc/sys/kernel/printk
Linux on Power
The default page size on Linux on Power is 64KB
Some workloads benefit from lower SMT hardware thread values.
Running profile
on Linux on Power.
-Xnodfpbd
Consider testing with -Xnodfpbd because "The hardware
instructions can be slow."
Hardware Prefetching
Consider disabling hardware prefetching because Java does it in software. "[Use] the ppc64_cpu utility (available in the powerpc-utils package) to set the pre-fetch depth to 1 (none) in the DSCR."
# ppc64_cpu --dscr=1Idle Power Saver
Idle Power Saver, [which is enabled by default], will put the processor into a power saving mode when it detects that utilization has gone below a certain threshold for a specified amount of time. Switching the processor into and out of power saving mode takes time. For sustained peak performance it is best not to let the system drop into power saving mode. Idle Power Saver can be disabled by using the web interface to the Advanced System Management Interface (ASMI) console. Navigate to System Configuration -> Power Management -> Idle Power Saver. Set the Idle Power Saver value to Disabled, then click on the "Save settings" button on the bottom of the page.
Adaptive Frequency Boost
The Adaptive Frequency Boost feature allows the system to increase the clock speed for the processors beyond their nominal speed as long as environmental conditions allow it, for example, the processor temperature is not too high. Adaptive Frequency Boost is enabled by default. The setting can be verified (or enabled if it is disabled) by using the web interface to the Advanced System Management Interface (ASMI) console. Navigate to Performance Setup -> Adaptive Frequency Boost. Change the setting to Enabled, then click on the "Save settings" button.
Dynamic Power Saver (Favor Performance) Mode
The PowerLinux systems have a feature called Dynamic Power Saver that will dynamically adjust the processor frequencies to save energy based on the current processor utilization. The Dynamic Power Saver mode can be set to favor performance by using the web interface to the ASMI console. Navigate to System Configuration -> Power Management -> Power Mode Setup. Select Enable Dynamic Power Saver (favor performance) mode, then click on the "Continue" button.
64-bit DMA Adapter Slots for Network Adapters
The 64-bit direct memory access (DMA) adapter slots are a feature on the newer IBM POWER7+ systems. 64-bit DMA enables a faster data transfer between I/O cards and the system by using a larger DMA window, possibly covering all memory. On the PowerLinux 7R2 system, two of the adapter slots, slots 2 and 5, are enabled with 64-bit DMA support. On each system the two network cards were installed in the two 64-bit DMA slots. Using the 64-bit DMA slots resulted in a noticeable improvement in network performance and CPU utilization.
Scaling Up or Out
One question for tuning a multi-threaded workload for increased capacity is whether to scale up by adding more processor cores to an instance of an application or to scale out by increasing the number of application instances, keeping the number of processor cores per application instance the same.
The performance analysis for this workload on the Power architecture has shown that the WebSphere Application Server (WAS) performs best with two processor cores and their attending SMT threads. Therefore, when increasing the capacity of a POWER system running WAS it is best to increase the number of WAS instances, giving each instance two processor cores. The WAS setup for SPECjEnterprise2010 ran eight WAS instances.
...
[If] the WAS instances have to listen on the same port... By default, a WAS instance is configured with multi-home enabled, which means it listens for requests on its port on all of the IP addresses on the system. If multiple WAS instances are running, they cannot all be allowed to listen for requests on all the IP addresses. They would end up stepping on each other and would not function correctly. If multiple WAS instances are running, multi-home must be disabled and each WAS instance must be configured to listen on a different IP address. For instructions on how to configure an application server to use a single network interface, see Configuring an application server to use a single network interface [4] in the WebSphere Application Server Version 8.5 Information Center.
...
Since a system cannot have multiple IP addresses on the same subnet, the IP address of each WAS instance must be on its own Ethernet device. This can easily be done if the number of Ethernet devices on the system is greater than or equal to the number of WAS instances, the IP addresses for the WAS instances can each be put on their own Ethernet device.
If the system has fewer Ethernet devices than the number of WAS instances, then aliases can be used to create multiple virtual devices on a single physical Ethernet device. See section 9.2.8. Alias and Clone Files [5] of the Red Hat Enterprise Linux 6 Deployment Guide for details on how to configure an alias interface.
Linux on System z (zLinux, s390)
Test setting QUICKDSP:
In general, we recommend setting QUICKDSP on for production guests and server virtual machines that perform critical system functions.
You can get a sense of the system your Linux virtual server is running on by issuing cat /proc/sysinfo
The zLinux "architecture" is sometimes referred to as s390.
z/VM has three storage areas: central store (cstore), expanded store (xstore), and page volumes. The first two are RAM and the last is disk.
Discontiguous Saved Segments (DCSS)
Discontiguous Saved Segments (DCSS) may be mounted in zLinux to share data across guests, thus potentially reducing physical memory usage. DCSS can also be used as an in-memory filesystem.
AIX
AIX Recipe
- CPU core(s) should not be consistently saturated.
- Unless energy saving features are required, ensure Power Management is set to Maximum Performance mode.
- Generally, physical memory should never be saturated with computational memory and the operating system should not page computational memory out to disk.
- If you're not tight on RAM, tune Virtual Ethernet Adapter minimum and maximum buffers on all AIX LPARs (including VIO) to maximum possible values to avoid TCP retransmits.
- Test disabling TCP delayed ACKs
- Monitor for TCP retransmissions and test tuning TCP/IP network buffer sizes.
- Use
netstat -vto ensure that network switches are not sending PAUSE frames. - In some situations, enabling network dog threads on multi-processor nodes may avoid a network processing bottleneck with the default single-CPU interrupt processing model.
- Operating system level statistics and optionally process level statistics should be periodically monitored and saved for historical analysis.
- Review operating system logs for any errors, warnings, or high volumes of messages.
- Review snapshots of process activity, and for the largest users of resources, review per thread activity.
- If the operating system is running in a virtualized guest, review the configuration and whether or not resource allotments are changing dynamically.
- If there are firewall idle timeouts between two hosts on a LAN utilizing a connection pool (e.g. between WAS and a database), consider tuning TCP keep-alive parameters.
- Bind your processes properly based on system topology.
- Use MCM memory affinity where appropriate.
- Find the optimal SMT configuration for the machine.
- Find the optimal hardware prefetching setting for your workload.
- Consider AIX-specific tuning for Java applications.
- For large multi-threaded apps, use profiling to make sure that work is allocated equally amongst threads.
- For apps that use a lot of network I/O, tune networking parameters.
- For apps that make heavy use of native memory, experiment with and use the optimal malloc algorithm.
- Use profiling to evaluate the effects of tuning other parameters.
Also review the general topics in the Operating Systems chapter.
Documentation
https://www.ibm.com/docs/en/aix
General
Query AIX level:
$ oslevel
7.2.0.0Kernel Parameters
The no
command is used to query or set kernel parameters. To display all
current values:
/usr/sbin/no -aTo update a value until the next reboot, use -o, for
example:
/usr/sbin/no -o tcp_nodelayack=1To persist the change across reboots, add the -r
flag:
/usr/sbin/no -r -o tcp_nodelayack=1Therefore, generally, both commands are run for each tunable to apply to the running system and for subsequent reboots.
Query the default value of a parameter using no -L:
$ no -L tcp_nodelayack
--------------------------------------------------------------------------------
NAME CUR DEF BOOT MIN MAX UNIT
--------------------------------------------------------------------------------
tcp_nodelayack 0 0 0 0 1 boolean
--------------------------------------------------------------------------------Central Processing Unit (CPU)
Query physical processor information:
$ prtconf
System Model: IBM,9119-FHB
Processor Type: PowerPC_POWER7
Number Of Processors: 2
Processor Clock Speed: 4004 MHz [...]Use the lssrad
command to display processor and memory layout. For example:
$ lssrad -av
REF1 SRAD MEM CPU
0
0 94957.94 0-47Simultaneous Multithreading (SMT)
The smtctl
command may be used to query and change CPUs' SMT mode:
$ smtctl
This system supports up to 4 SMT threads per processor.
SMT is currently enabled...
proc0 has 4 SMT threads...It is important to experiment and use the most optimal SMT setting based on the workload; higher value do not always improve performance:
Workloads that see the greatest simultaneous multithreading benefit are those that have a high Cycles Per Instruction (CPI) count. These workloads tend to use processor and memory resources poorly. Large CPIs are usually caused by high cache-miss rates from a large working set.
Workloads that do not benefit much from simultaneous multithreading are those in which the majority of individual software threads use a large amount of any resource in the processor or memory. For example, workloads that are floating-point intensive are likely to gain little from simultaneous multithreading and are the ones most likely to lose performance.
In addition, consider how
idling with SMT works and whether scaled throughput mode
(vpm_throughput_mode) might be better:
When a single logical CPU (SMT thread) of a virtual processor is used by a logical partition, the rest of the logical CPUs (SMT threads) of this virtual processor remain free and ready for extra workload for this logical partition. Those free logical CPUs are reflected as %idle CPU time until they get busy, and they won't be available at that time for other logical partitions.
CPU Terminology
See the discussion of CPU core(s) as background.
- Physical Processor: An IBM Power CPU core.
- Virtual Processor: The logical equivalent of a Physical Processor, although the underlying Physical Processor may change over time for a given Virtual Processor.
- Logical Processor: If SMT is disabled, a Virtual Processor. If SMT is enabled, an SMT thread in the Virtual Processor.
Micro-Partioning
The LPAR always sees the number of CPUs as reported by "Online
Virtual CPUs" in lparstat -i:
$ lparstat -i
Type : Shared-SMT-4
Mode : Uncapped
Entitled Capacity : 0.20
Online Virtual CPUs : 2
[...]We generally recommend setting (Virtual CPUs) / (Physical CPUs) <= 3 for Power7, for example, ideally 1-2. Also note that a virtual processor may be a CPU core thread rather than a CPU core. Review the Operating Systems chapter for background on CPU allocation.
If the LPAR is capped, it can only use up to its entitlement, spread across the online virtual CPUs. In general, if using capped LPARs, it's recommended to set entitlement equal to online virtual CPUs. If the LPAR is uncapped, it can use up to all of the online virtual CPUs, if available.
Consider the overhead of micro-partitioning:
The benefit of Micro-Partitioning is that it allows for increased overall utilization of system resources by applying only the required amount of processor resource needed by each partition. But due to the overhead associated with maintaining online virtual processors, consider the capacity requirements when choosing values for the attributes.
For optimal performance, ensure that you create the minimal amount of partitions, which decreases the overhead of scheduling virtual processors.
CPU-intensive applications, like high performance computing applications, might not be suitable for a Micro-Partitioning environment. If an application uses most of its entitled processing capacity during execution, you should use a dedicated processor partition to handle the demands of the application.
Even if using uncapped, entitled capacity should generally not exceed
100% because the lack of processor affinity may
cause performance problems. Use mpstat
to review processor affinity.
For PowerVM, a dedicated partition is preferred over a shared partition or a workload partition for the system under test.
Processor folding
By default, CPU folding occurs in both capped and uncapped modes,
with the purpose
being to increase CPU cache hits. In general, CPU folding should not
be disabled, but low values of CPU folding may indicate low entitlement.
Consider testing with folding disabled using schedo:
schedo -o vpm_xvcpus=-1vmstat
vmstat
may be used to query processor usage; for example:
$ vmstat -tw 30 2
System configuration: lcpu=8 mem=8192MB ent=0.20
kthr memory page faults cpu time
------- --------------------- ------------------------------------ ------------------ ----------------------- --------
r b avm fre re pi po fr sr cy in sy cs us sy id wa pc ec hr mi se
9 0 934618 485931 0 0 0 0 0 0 18 2497 1299 4 12 84 0 0.06 27.5 11:49:44
6 0 934629 485919 0 0 0 0 0 0 21 13938 3162 56 11 32 0 0.29 142.9 11:50:14Key things to look at:
- The "System configuration" line will report the number of logical CPUs (in this example, 8), which may be more than the number of physical CPUs (due to SMT).
r: This is the run queue which is the sum of the number of threads currently running on the CPUs plus the number of threads waiting to run on the CPUs. This number should rarely go above the number of logical CPUs.b: This is the number of threads which are blocked, usually waiting for I/O, and should usually be zero.pi/po: Pages in and pages out, respectively, should usually be zero (pi in particular).us/sy/id/wa: These report the processor usage in different dimensions.pc: This reports the processor usage as a fraction of the number of physical CPUs.ec: This reports the processor usage as a fraction of the number of entitled CPUs.
topas
topas
may be used to query system resource usage.
nmon
nmon
may be used to query system resource usage.
To run nmon during an issue, review the AIX nmon Recipe.
When using the -f option, nmon will run in
the background so explicitly putting it into the background (using
&) is not necessary. This will create a file with the
name $HOST_$STARTDAY_$STARTTIME.nmon
Consider loading nmon files into the NMONVisualizer
tool:


There is also a Microsoft Excel spreadsheet visualizer tool named Nmon-Analyser.
PoolIdle 0
If nmon shows an LPAR PoolIdle value of 0, then the POWER HMC "Allow performance information collection" option is disabled. Most customers have this enabled in production. Enable this by selecting "Allow performance information collection".
tprof
tprof
may be used as a lightweight, native CPU sampling profiler; for
example:
LDR_CNTRL=MAXDATA=0x80000000 tprof -Rskeuj -x sleep 60Output will go to sleep.prof; for example:
Process FREQ Total Kernel User Shared Other
======= ==== ===== ====== ==== ====== =====
wait 8 30387 30387 0 0 0
java 34 17533 9794 0 7277 462
/usr/sbin/syncd 2 91 91 0 0 0
/usr/bin/tprof 3 4 4 0 0 0
PID-1 1 2 2 0 0 0
/usr/bin/trcstop 1 1 0 0 1 0
======= ==== ===== ====== ==== ====== =====
Total 54 48023 40283 0 7278 462The Kernel column is subset of the total samples that
were in system calls, User in user programs,
Shared in shared libraries. For Java, Shared
represents the JVM itself (e.g. GC) or running JNI code, and
Other represents Java methods. Total sampled CPU usage of
all Java processes is the Total column of the
java processes divided by the Total column of
the Total row (for example,
(17533/48023)*100 = 36.5%).
By default, tprof does not provide method names for Java
user code samples (seen as hexadecimal addresses in
SEGMENT-N sections). AIX ships with a JVMTI agent
(libjpa) that allows tprof to see method
names; however, if you've isolated the processor usage in
tprof to user Java code, then it is generally better to use
a profiler such as Health
Center instead. Nevertheless, to use the AIX Java agent, use the
-agentlib:jpa64 argument.
Per-thread CPU usage
tprof output also has a per-thread CPU section; for
example:
Process PID TID Total Kernel User Shared Other
======= === === ===== ====== ==== ====== =====
wait 53274 61471 4262 4262 0 0 0
wait 61470 69667 3215 3215 0 0 0
java 413760 872459 1208 545 0 647 16
java 413760 925875 964 9 0 955 0
java 413760 790723 759 12 0 747 0 [...]This is the same braekdown as for the previous section but on a
thread-based (TID). Review whether particular threads are
consuming most of the CPU or if CPU usage is spread across threads. If a
thread dump was taken, convert the TID to hexadecimal and
search for it in the javacore.
CPU Utilization Reporting Tool (curt)
The curt
tool converts kernel trace data into exact CPU utilization for a period
of time. First, generate
curt data and then review
it.
perfpmr.sh
perfpmr
is a utility used by AIX support for AIX performance issues; for
example:
perfpmr.sh 600The number of seconds passed (in the above example, 600)
is not the duration for the entire script, but the maximum for parts of
it (e.g. tcpdump, filemon, etc.). For the
generally recommended option value of 600, the total duration will be
about 30 minutes; for the minimum option value of 60, the total duration
of the script will be about 10 minutes.
Review processor affinity
To search for processor affinity statistics, run:
curt -i trace.tr -n trace.syms -est -r PURR -o curt.outThen review curt.out. The report is split up into
system, per-CPU, and per-thread analysis. For each thread (section
starts with "Report for Thread Id"), find the "processor affinity:"
line.
grep "processor affinity:" curt.outThe ideal affinity is 1.0 (meaning that the virtual processor is always going back to the same physical processor, thus maximizing cache hits, etc.) and the worst affinity is 0. Affinity may be low if a partition is above its entitlement and the shared processor pool does not have extra capacity or is in flux, because the partition will constantly have to take cycles from other processors.
Perform this before the performance problem occurs (under full load) and during the problem and compare the affinities. If affinity decreased during the problem, then the lack of entitlement may be making things worse. Be careful with cause and effect here: it's unlikely (though possible) that the decreased affinity in and of itself caused the problem, but instead was a secondary symptom that made things worse.
Processor affinity may be worse depending on the "spread" over the physical processors with a large number of configured virtual processors. Recent versions of AIX introduced processor folding which tries to optimize the use of the least number of virtual processors both to increase affinity and to decrease processor management overhead. Nevertheless, it may help to have the number of virtual processors not much higher than the entitled capacity or the effectively used capacity (see the processor folding section on how to calculate virtual processors).
Process system trace
One interesting thing to do is process the system trace:
perfpmr.sh -x trace.sh -rThis creates a file name trace.int; then, for example,
find all file system system calls:
grep java trace.int | grep lookuppnIf you see a lot of activity to the /dev/null device;
for example:
107 -6947396- 64 14288867 2.183578 lookuppn exit: '/dev/null' = vnode F1000A03000D1130Though this is to the bit bucket, it will cause the inode for the
/dev/null device to be update its access times and
modification times. To make this more efficient, run the following
dynamic command:
raso -p -o devnull_lazytime=1truss
truss
traces system calls; however, it may have a large performance
overhead:
truss -d -i -s\!all -o truss.out -p $PIDExample to trace a failing telnet:
truss -d -a -f -l -X -o truss_$(hostname)_$(date +"%Y%m%d_%H%M%S").txt telnet $DESTINATIONPhysical Memory (RAM)
lsps
may be used to query page spaces:
$ lsps -a
Page Space Physical Volume Volume Group Size %Used Active Auto Type Chksum
hd6 hdisk0 rootvg 1024MB 2 yes yes lv 0Consider testing with explicit large pages.
vmstat
When the physical memory is full, paging (also known as swapping) occurs to provide additional memory. Paging consists of writing the contents of physical memory to disk, making the physical memory available for use by applications. The least recently used information is moved first. Paging is expensive in terms of performance because, when the required information is stored on disk it must be loaded back into physical memory, which is a slow process.
Where paging occurs, Java applications are impacted because of garbage collection. Garbage collection requires every part of the Java heap to be read. If any of the Java heap has been paged out, it must be paged back when garbage collection runs, slowing down the garbage collection process.
The vmstat output shows whether paging was taking place when the problem occurred. vmstat output has the following format:
kthr memory page faults cpu time
----- ----------- ------------------------ ------------ ----------- --------
r b avm fre re pi po fr sr cy in sy cs us sy id wa hr mi se
0 0 45483 221 0 0 0 0 1 0 224 326 362 24 7 69 0 15:10:22
0 0 45483 220 0 0 0 0 0 0 159 83 53 1 1 98 0 15:10:23
2 0 45483 220 0 0 0 0 0 0 145 115 46 0 9 90 1 15:10:24The columns of interest are pi and po (page
in and page out) for AIX. Non-zero values indicate that paging is taking
place.
svmon
svmon
may be used to review memory usage in detail. Unless otherwise noted,
numbers such as inuse and virtual are in numbers of frames, which are
always 4KB each, even if there are differently sized pages involved.
Example output for global statistics:
$ svmon -G
size inuse free pin virtual
memory 524288 297790 226498 63497 107144
pg space 131072 257
work pers clnt
pin 63497 0 0
in use 107144 164988 25658The values in the svmon -G output have the following meanings:
memory: pages of physical memory (RAM) in the systempg space: pages of paging space (swap space) in the systempin: pages which can only be stored in physical memory and may not be paged to diskin use: pages which are currently backed by physical memory
Columns
size: the total size of the resourceinuse: the number of pages which are currently being usedfree: the number of pages which are currently not being usedpin: the number of pages which are currently in use that can only be stored in physical memory and may not be stolen bylrudvirtual: the number of pages that have been allocated in the process virtual spacework: the number of pages being used for application datapers: the number of pages being used to cache local files (e.g. JFS)clnt: the number of pages being used to cache NFS/JFS2/Veritas/etc. files
Memory inuse on the first row is the physical memory
being used. This is split on the second section between
work for processes, pers for file cache (e.g.
JFS) and clnt for NFS/JFS2/Veritas/etc. file cache. Total
file cache size can be determined by adding pers and
clnt inuse values.
If the memory inuse value is equal to the memory
size value, then all the physical memory is being used.
Some of this memory will most likely be used to cache file system data
as the AIX kernel allows file caching to use up to 80% of the physical
memory by default. Whilst file caching should be released before paging
out application data, depending on system demand the application memory
pages may be swapped out. This maximum usage of the physical memory by
file caching can be configured using the AIX vmtune command
along with the the minperm and maxperm values.
In addition, it is recommended that you set strict_maxperm
to 1 in order to prevent AIX from overriding the maxperm
setting.
If all the physical memory is being used, and all or the majority of the in use memory shown in the second section is for work pages, then the amount of physical memory should be increased. It is suggested that the rate of increase be similar to the amount of paging space used (see pg space inuse value).
Notes:
- 32-bit processes have up to 16 segments of 256MB each.
- 64-bit processes have up to 2^36 segments of 256MB each.
- Physical memory pages are called memory frames.
- The VSID is a system-wide segment ID. If two processes are referencing the same VSID, then they are sharing the same memory.
- The ESID (effective segment ID) is a process level segment ID. A
typical virtual address, e.g.
0xF1000600035A6C00, starts with the segment and the last 7 hex digits are the page/offset. - Larger page sizes may reduce page faults and are more efficient for addressing, but may increase overall process size due to memory holes.
- Dynamic page promotion occurs when a set of contiguous pages (e.g.
4K) add up to a page of the next higher size (e.g. 16 4K pages = one 64K
page). This is done by
psmd(Page Size Management Daemon). mbufmemory is network-related memory usage.
32-bit Memory Model
The 32-bit AIX virtual memory space is split into 16, 256MB segments
(0x0 - 0x15). Segment 0x0 is always reserved for the kernel. Segment 0x1
is always reserved for the executable code (e.g. java). The
rest of the segments may be laid out in different ways depending on the
LDR_CNTRL=MAXDATA environment variable or the
maxdata parameter compiled in the executable.
By default, IBM Java and Semeru Java will choose a generally appropriate MAXDATA value depending on -Xmx. Potential options:
-Xmx> 3GB:MAXDATA=0@DSA= 3.5GB user space, 256MB malloc, 3.25GB mmap- 2.25GB <
-Xmx<= 3GB:MAXDATA=0XB0000000@DSA= 3.25GB user space, malloc grows up, mmap grows down -Xmx<= 2.25GB:MAXDATA=0XA0000000@DSA= 2.75GB user space, malloc grows up, mmap grows down, shared libraries in 0xD and 0xFMAXDATA=0@DSAis not very practical because it only leaves a single segment for native heap (malloc) which is usually insufficient
If you need more native memory (i.e. native OOM but not a leak), and
your -Xmx is less than 2.25GB, explicitly setting
0xB@DSA may be useful by increasing available native memory
by approximately 400MB to 600MB. This causes the shared/mapped storage
to start at 0xF and grow down. The cost is that shared libraries are
loaded privately which increases system-wide virtual memory load (and
thus potentially physical memory requirements). If you change X JVMs on
one machine to the 0xB@DSA memory model, then the total
virtual and real memory usage of that machine may increase by up to
(N*(X-1)) MB, where N is the size of the
shared libraries' code and data. Typically, for stock WebSphere
Application Server, N is about 50MB to 100MB. The change should not
significantly affect performance, assuming you have enough additional
physical memory.
Another effect of changing to the 0xB@DSA memory model
is that segment 0xE is no longer available for
mmap/shmat, but instead those allocations grow
down in the same way as the Java heap. If your -Xmx is a
multiple of 256MB (1 segment), and your process uses
mmap/shmat (e.g. client files), then you will
have one less segment for native memory. This is because native memory
allocations (malloc) cannot share segments with
mmap/shmat (Java heap, client files, etc.). To
fully maximize this last segment for native memory, you can calculate
the maximum amount of memory that is
mmap'ped/shmat'ed at any one time using
svmon (find mmap'ped sources other than the
Java heap and clnt files), and then subtract this amount
from -Xmx. -Xmx is not required to be a
multiple of 256MB, and making room available in the final segment may
allow the mmap'ped/shmat'ted allocations to be
shared with the final segment of the Java heap, leaving the next segment
for native memory. This only works if said
mmaps/shmats are not made to particular
addresses.
When setting MAXDATA for Java, set both
LDR_CNTRL and IBM_JVM_LDR_CNTRL_NEW_VALUE
envars.
Java
Consider AIX environment variable tuning for Java applications:
AIXTHREAD_SCOPE=S
The default value for this variable is S, which signifies system-wide contention scope (1:1).AIXTHREAD_MUTEX_DEBUG=OFF
Maintains a list of active mutexes for use by the debugger.AIXTHREAD_COND_DEBUG=OFF
Maintains a list of condition variables for use by the debugger.AIXTHREAD_RWLOCK_DEBUG=OFF
Maintains a list of active mutual exclusion locks, condition variables, and read-write locks for use by the debugger. When a lock is initialized, it is added to the list if it is not there already. This list is implemented as a linked list, so searching it to determine if a lock is present or not has a performance implication when the list gets large. The problem is compounded by the fact that the list is protected by a lock, which is held for the duration of the search operation. Other calls to the pthread_mutex_init() subroutine must wait while the search is completed. For optimal performance, you should set the value of this thread-debug option to OFF. Their default is ON.SPINLOOPTIME=500
Number of times that a process can spin on a busy lock before blocking. This value is set to 40 by default. If the tprof command output indicates high CPU usage for the check_lock routine, and if locks are usually available within a short amount of time, you should increase the spin time by setting the value to 500 or higher.
Input/Output (I/O)
Disk
Consider mounting with
noatime:
For filesystems with a high rate of file access, performance can be improved by disabling the update of the access time stamp. This option can be added to a filesystem by using the "-o noatime" mount option, or permanently set using "chfs -a options=noatime."
iostat
Investigate disk performance using iostat.
Start iostat:
nohup iostat -DRlT 10 >iostat.txt 2>&1 &Stop iostat:
kill $(ps -ef | grep iostat | grep -v grep | awk '{print $2}')Example iostat output:
System configuration: lcpu=56 drives=2 paths=8 vdisks=0
Disks: xfers read write queue time
-------- -------------------------------- ------------------------------------ ------------------------------------ -------------------------------------- ---------
%tm bps tps bread bwrtn rps avg min max time fail wps avg min max time fail avg min max avg avg serv
act serv serv serv outs serv serv serv outs time time time wqsz sqsz qfull
hdisk0 0.1 86.4K 2.3 0.0 86.4K 0.0 0.0 0.0 0.0 0 0 2.3 0.5 0.3 1.2 0 0 0.0 0.0 0.0 0.0 0.0 0.0 03:54:59
hdisk1 0.0 86.4K 2.3 0.0 86.4K 0.0 0.0 0.0 0.0 0 0 2.3 0.4 0.3 0.8 0 0 0.0 0.0 0.0 0.0 0.0 0.0 03:54:59
Disks: xfers read write queue time
-------- -------------------------------- ------------------------------------ ------------------------------------ -------------------------------------- ---------
%tm bps tps bread bwrtn rps avg min max time fail wps avg min max time fail avg min max avg avg serv
act serv serv serv outs serv serv serv outs time time time wqsz sqsz qfull
hdisk0 0.9 133.2K 21.3 0.0 133.2K 0.0 0.0 0.0 0.0 0 0 21.3 0.3 0.3 0.9 0 0 0.0 0.0 0.0 0.0 0.0 0.0 03:55:09
hdisk1 0.9 133.2K 21.3 0.0 133.2K 0.0 0.0 0.0 0.0 0 0 21.3 0.3 0.2 0.8 0 0 0.0 0.0 0.0 0.0 0.0 0.0 03:55:09Review how
to interpret iostat. The key metric is
%tm_act which reports the percent of time spent waiting
on that disk for that period.
inode cache
Here are considerations about the inode cache from an AIX expert:
The ioo settings for j2 inode cache and meta data cache sizes need to be evaluated on a case by case basis. Determine if the values are too high by comparing the number of client segments in the
svmon -Soutput with the number of unused segments. Also consider the absolute number of client segments. As files are opened, we expect these numbers to go up. Do not adjust anything unless the number of client segments exceeds about 250,000 and the number of unused segments is greater than about 95%. In most cases, reduce them to 100 each.
Such a change may be done with:
ioo -p -o j2_inodeCacheSize=100 -o j2_metadataCacheSize=100Networking
Network interfaces
Query network interfaces:
$ ifconfig -a
en0: flags=1e080863,480<UP,BROADCAST,NOTRAILERS,RUNNING,SIMPLEX,MULTICAST,GROUPRT,64BIT,CHECKSUM_OFFLOAD(ACTIVE),CHAIN>
inet 10.20.30.10 netmask 0xffffff00 broadcast 10.20.30.1
tcp_sendspace 262144 tcp_recvspace 262144 rfc1323 1Query the Maximum Transmission Unit (MTU) of a network adapter:
$ lsattr -El en0 | grep "^mtu"
mtu 1500 Maximum IP Packet Size for This Device TrueReview common kernel tuning based on the interface type and MTU size of the adapter.
If dedicated network adapters are set up for inter-LPAR network traffic, recent versions of AIX support super jumbo frames up to 65280 bytes:
chdev -l en1 -a mtu=65280Interface speed
Query the maximum speed of each interface with entstat;
for example:
$ entstat -d en0
Media Speed Selected: Autonegotiate
Media Speed Running: 10000 Mbps / 10 Gbps, Full DuplexAlso, in general, review that auto negotiation of duplex mode is configured.
Also consider jumbo frames on gigabit ethernet interfaces.
Interface statistics
Use netstat -I
to show per-interface statistics; for example:
$ netstat -I en0
Name Mtu Network Address Ipkts Ierrs Opkts Oerrs Coll
en40 1500 link#2 10.20.30.1 4840798 0 9107485 0 0An additional parameter may be passed as the number of seconds to update the statistics:
$ netstat -I en0 5
input (en0) output input (Total) output
packets errs packets errs colls packets errs packets errs colls
158479802 0 21545659 0 0 178974399 0 42040363 0 0
25 0 1 0 0 29 0 5 0 0
20 0 4 0 0 22 0 6 0 0Ethernet statistics
Use the netstat -v
command to check for Packets Dropped: 0,
Hypervisor Send Failures,
Hypervisor Receive Failures, and
Receive Buffer; for example:
$ netstat -v
[...]
Hypervisor Send Failures: 0
Hypervisor Receive Failures: 0
Packets Dropped: 0
[...]
Receive Information
Receive Buffers
Buffer Type Tiny Small Medium Large Huge
Min Buffers 512 512 128 24 24
Max Buffers 2048 2048 256 64 64
Allocated 512 512 128 24 24
Registered 512 512 128 24 24
History
Max Allocated 512 1138 128 24 24
Lowest Registered 506 502 128 24 24If Max Allocated for a column is greater than
Min Buffers for that column, this may cause reduced
performance. Increase the buffer minimum using, for example:
chdev -P -l ${INTERFACE} -a min_buf_small=2048If Max Allocated for a column is equal to
Max Buffers for that column, this may cause dropped
packets. Increase the buffer maximum using, for example:
chdev -P -l ${INTERFACE} -a max_buf_small=2048It is necessary to bring down the network interface(s) and network device(s) changed by the above commands and then restart those devices and interfaces. Some customers prefer to simply reboot the LPAR after running the command(s).
Kernel network buffers
The netstat -m
command can be used to query mbuf kernel network buffers;
for example:
$ netstat -m
Kernel malloc statistics:
******* CPU 0 *******
By size inuse calls failed delayed free hiwat freed
64 778 16552907 0 13 182 10484 0
128 521 1507449 0 16 183 5242 0 [...]The failed and delayed columns should be
zero.
Hostname resolution
For hostname resolution, by default, DNS is tried before
/etc/hosts, unless DNS is not set up (no
/etc/resolv.conf file). If you would like to optimize DNS
lookup by placing entries into /etc/hosts, then consider changing
the order of hostname lookup, either through
/etc/irs.conf or the environment variable
NSORDER.
Test network throughput
Network throughput may be tested with FTP:
ftp> put "|dd if=/dev/zero bs=64k count=100000" /dev/null
200 PORT command successful.
150 Opening data connection for /dev/null.
100000+0 records in.
100000+0 records out.
226 Transfer complete.
6553600000 bytes sent in 170.2 seconds (3.761e+04 Kbytes/s)
local: |dd if=/dev/zero bs=64k count=100000 remote: /dev/nullTCP Delayed Acknowledgments
TCP delayed acknowledgments (delayed ACKs) are generally recommended to be disabled if there is sufficient network and CPU capacity for the potential added ACK-only packet load.
To see if a node is delaying ACKs, review netstat -s for
the "N delayed" value; for example:
$ netstat -s | grep "delayed)"
13973067635 ack-only packets (340783 delayed)To dynamically disable delayed ACKs without persisting it through reboots:
/usr/sbin/no -o tcp_nodelayack=1To permanently disable delayed ACKs (and also apply it dynamically immediately):
/usr/sbin/no -p -o tcp_nodelayack=1TCP Congestion Control
Monitor for TCP retransmissions. In most modern, internal (LAN)
networks, a healthy network should not have any TCP retransmissions. If
it does, you've likely got a problem. Use a tool like netstat
to watch for retransmissions. For example, periodically run the
following command and monitor for increases in the values:
$ netstat -s -p tcp | grep retrans
1583979 data packets (9088131222 bytes) retransmitted
15007 path MTU discovery terminations due to retransmits
185201 retransmit timeouts
34466 fast retransmits
344489 newreno retransmits
7 times avoided false fast retransmits
0 TCP checksum offload disabled during retransmitIf you observe retransmissions, engage your network team and AIX
support (if needed) to review whether the retransmission are true
retransmissions or not and to investigate the cause(s). One common cause
is a saturation of AIX
OS TCP buffers and you may consider testing tuning such as the
following using the no
command; for example:
no -o tcp_sendspace=524176
no -r -o tcp_sendspace=524176
no -o tcp_recvspace=524176
no -r -o tcp_recvspace=524176
no -o sb_max=1048352
no -r -o sb_max=1048352Review advanced network tuning.
Virtual Ethernet Adapter (VEA)
View VEA Buffer Sizes
Display VEA adapter buffers (min_buf* and
max_buf*). Example:
$ lsattr -E -l ent0
--------------------
alt_addr 0x000000000000 Alternate Ethernet Address True
buf_mode min Receive Buffer Mode True
chksum_offload yes Enable Checksum Offload for IPv4 packets True
copy_buffs 32 Transmit Copy Buffers True
copy_bytes 65536 Transmit Copy Buffer Size True
desired_mapmem 0 I/O memory entitlement reserved for device False
ipv6_offload no Enable Checksum Offload for IPv6 packets True
max_buf_control 64 Maximum Control Buffers True
max_buf_huge 128 Maximum Huge Buffers True
max_buf_large 256 Maximum Large Buffers True
max_buf_medium 2048 Maximum Medium Buffers True
max_buf_small 4096 Maximum Small Buffers True
max_buf_tiny 4096 Maximum Tiny Buffers True
min_buf_control 24 Minimum Control Buffers True
min_buf_huge 128 Minimum Huge Buffers True
min_buf_large 256 Minimum Large Buffers True
min_buf_medium 2048 Minimum Medium Buffers True
min_buf_small 4096 Minimum Small Buffers True
min_buf_tiny 4096 Minimum Tiny Buffers TrueMonitor for potential VEA buffer size issues
Hypervisor
send and receive failures record various types of errors sending and
receiving TCP packets which may include TCP retransmissions and other
issues. As with TCP retransmissions, they should generally be 0 and are
relatively easy to monitor using netstat (or
entstat):
$ netstat -v | grep "Hypervisor.*Failure"
Hypervisor Send Failures: 0
Hypervisor Receive Failures: 14616351The last line above is for receiving buffers and if that counter increases often, then it may be due to insufficient VEA buffers. These buffers are given to the hypervisor by the VEA driver so that the VIOS or other LPARs in the same frame can send packets to this LPAR.
The Send Failures is when sending packets out of ths
LPAR to the remote LPAR (either the VIOS or another LPAR in the same
frame). If you get Receive Failures under the
Send Failures section, then it's the other LPAR which is
running out. If you get Send errors, then it's something
going on with this local LPAR.
These are often caused by insufficient Virtual Ethernet Adapter (VEA) buffers so you may consider tuning them to their maximum values as there is little downside other than increased memory usage.
Insufficient virtual ethernet adapter buffers may cause TCP
retransmits. A symptom of this might be when a non-blocking
write appears to block with low CPU, whereas it would
normally block in poll.
Change Virtual Ethernet Adapter Buffers
The min values specify how many buffers are preallocated. Max is the upper limit on buffers that can be allocated dyamically as needed. Once not needed any more, they are freed. However in bursty situations, AIX may not be able to dynamically allocate buffers fast enough so that could risk dropping packets, so many tune both min and max values to the max that they can be.
There is little downside to using maximum values other than memory usage. Here are the sizes of the buffers used depending on the packet size:
- Tiny: 512 bytes
- Small: 2048 bytes
- Medium: 16384 bytes
- Large: 32768 bytes
- Huge: 65536 bytes
If the smaller buffers run out, then the larger buffers can be borrowed by the VEA driver temporarily.
Review the maximum value for each parameter. For example:
$ lsattr -R -l ent0 -a max_buf_small
512...4096 (+1)Use the chdev
command to change the buffer sizes. For example:
chdev -P -l ent0 -a max_buf_small=4096Perform this for the following:
min_buf_tinymax_buf_tinymin_buf_smallmax_buf_smallmin_buf_mediummax_buf_mediummin_buf_largemax_buf_largemin_buf_hugemax_buf_huge
Changing the virtual ethernet adapter buffers requires rebooting the node.
PAUSE Frames
If ethernet flow control is enabled, in general, a healthy network
should show no increase in PAUSE frames
(e.g. from network switches). Monitor the number of XOFF
counters (PAUSE ON frame). For example:
$ netstat -v | grep -i xoff
Number of XOFF packets transmitted: 0
Number of XOFF packets received: 0
Number of XOFF packets transmitted: 0
Number of XOFF packets received: 0
Number of XOFF packets transmitted: 0
Number of XOFF packets received: 0
Number of XOFF packets transmitted: 0
Number of XOFF packets received: 0This is also available in netstat.int in a perfpmr collection and search for
Number of Pause ON Frames. For example:
$ awk '/Time .* run/ { print; } /ETHERNET STATISTICS/ { interface=$3; gsub(/\(|\)/, "", interface); } /Number of Pause ON Frames Received/ { print interface " " $0; }' netstat.int
Time before run: Sat Nov 14 02:33:49 EST 2020
ent0 Number of Pause ON Frames Received: 68491
ent4 Number of Pause ON Frames Received: 48551
ent2 Number of Pause ON Frames Received: 0
ent6 Number of Pause ON Frames Received: 0
ent3 Number of Pause ON Frames Received: 2945314679
ent5 Number of Pause ON Frames Received: 278601624
Time after run : Sat Nov 14 02:38:49 EST 2020
ent0 Number of Pause ON Frames Received: 68491
ent4 Number of Pause ON Frames Received: 48551
ent2 Number of Pause ON Frames Received: 0
ent6 Number of Pause ON Frames Received: 0
ent3 Number of Pause ON Frames Received: 2945317182
ent5 Number of Pause ON Frames Received: 278606502Dog threads
Enabling dog threads on a multi-CPU system may increase network processing throughput by distributing packet processing across multiple CPUs, although it may also increase latency.
Symptoms that dog threads are worth considering include CPU saturation of the default single processor handling the interrupts and/or a large number of Hypervisor Receive Failures. The latter may also be caused by insufficient Virtual Ethernet Adapter buffers, so ensure those are increased before investigating dog threads.
This feature should be tested and evaluated carefully as it has some potential costs as discussed in the documentation.
Example enabling dog threads:
ifconfig en0 threadExample specifying the number of CPUs to use:
no -o ndogthreads=1In general, test a low number and increase it as needed. Using 0 will use all available CPUs up to a maximum of 256.
Review the processing that the threads are doing using
netstat -s. For example:
$ netstat -s| grep hread
352 packets processed by threads
0 packets dropped by threadsARP Table
The Address Resolution Protocol (ARP) table is a fixed size table for ARP entries. If it shows evidence of being purged, then it may be increased.
Use netstat -p arp to check if ARP entries are being
purged:
$ netstat -p arp
arp:
1633 packets sent
0 packets purgedThe buckets may be displayed with arp -a.
There is a number of table buckets (arptab_nb; default 149)
and a per-bucket size (arptab_bsiz; default 7). If ARP
entries are being purged, test increasing
the size of the bucket with no.
$ no -o arptab_bsiz=10
$ no -r -o arptab_bsiz=10TCP Traffic Regulation
Recent versions of AIX include a TCP Traffic Regulation (TR) feature
which is designed to protect against network attacks. By default it is
off, but security hardening commands such as aixpert may
enable it indirectly. If you are experiencing mysterious connection
resets at high load, this may be working as designed and you can tune or
disable this function using the tcptr
command.
Interrupt coalescing
By default, multiple arriving packets are coalesced into a fewer
number of interrupts using interrupt
coalescing/moderation to reduce interrupt overhead. Under light
loads, this may introduce latency. Consider testing different values of
rx_int_delay to find the best option.
TIME_WAIT
TIME_WAIT is
a normal TCP socket state after a socket is closed. In case this
duration becomes a bottleneck, consider reducing the wait amount (in
15-second intervals; i.e. 1 = 15 seconds):
$ no -o tcp_timewait=1
$ no -r -o tcp_timewait=1iptrace
Capture network packets using iptrace.
Note: iptrace may have a significant
performance overhead (up to ~50%) unless -S is used to
limit the maximum captured bytes per packet. In general, test
iptrace overhead under load before long-term use. It's also
important that the file name is always the last argument after any
flags.
Start capturing all traffic with no limits:
startsrc -s iptrace "-a -b -B /tmp/aixiptrace.bin"To creating rolling output files, use the -L $bytes
option which will roll to a single historical file. For example, the
following limits to 2GB per file, so with one historical file, that's up
to 4GB total. There is no way to create more than one historical
file.
startsrc -s iptrace "-a -b -B -L 2147483648 /tmp/aixiptrace.bin"To limit the bytes captured per packet (and thus reduce the overhead
and disk usage of iptrace), use the -S $bytes option
(-B and -i are needed to use -S).
For example, the following limits each packet to 80 bytes:
startsrc -s iptrace "-a -b -B -S 80 /tmp/aixiptrace.bin"Therefore, for a low-overhead, rotating iptrace up to 4GB of total disk space, use:
startsrc -s iptrace "-a -b -B -L 2147483648 -S 80 /tmp/aixiptrace.bin"Filter to only capture traffic coming into or going out of port 80:
startsrc -s iptrace "-a -b -B -p 80 /tmp/aixiptrace.bin"Stop capturing traffic:
stopsrc -s iptraceUse Wireshark to analyze.
tcpdump
In general, iptrace is used
instead of tcpdump; nevertheless, tcpdump
is available.
For example, capture all traffic in files of size 100MB and up to 10
historical files (-C usually requires -Z):
(nohup tcpdump -n -i $INTERFACE -s 0 -C 100 -Z root -w capture$(hostname)_$(date +"%Y%m%d_%H%M").dmp &); sleep 1; cat nohput.outTo stop the capture:
ps -elf | grep tcpdump | grep -v grep | awk '{print $4}' | xargs kill -INTUse Wireshark to analyze.
TCP Keep-Alive
TCP Keep-Alive
periodically sends packets on idle connections to make sure they're
still alive. This feature is disabled by default and must be explicitly
enabled on a per-socket basis (e.g. using setsockopt
with SO_KEEPALIVE or a higher-level API like Socket.setKeepAlive).
TCP keepalive is different from HTTP
KeepAlive.
In general, the purpose of enabling and tuning TCP keepalive is to set it below any firewall idle timeouts between two servers on a LAN using connection pools between them (web service client, DB, LDAP, etc.) to reduce the performance overhead of connection re-establishment.
If TCP Keep-Alive is enabled, there are three kernel parameters to tune for TCP keep-alive:
tcp_keepidle: The number of half-seconds after which a socket is considered idle after which the kernel will start to send TCP keepalive probes while it's idle. This defaults to 14400 half-seconds (2 hours) and is the major TCP keep-alive tuning knob. In general, this should be set to a value below the firewall timeout. This may also be set withsetsockoptwithTCP_KEEPIDLE.tcp_keepintvl: The number of seconds to wait between sending each TCP keep-alive probe. This defaults to 150 half-seconds. This may also be set withsetsockoptwithTCP_KEEPINTVL.tcp_keepcnt: The maximum number of probes to send without responses before giving up and killing the connection. This defaults to 8. This may also be set withsetsockoptwithTCP_KEEPCNT.
For example, with a firewall idle timeout of 60 seconds:
no -o tcp_keepidle=90
no -o tcp_keepintvl=10
no -o tcp_keepcnt=2Nagle's Algorithm (RFC 896, TCP_NODELAY)
In general, Nagle's
algorithm does not need to be disabled at an AIX level as products
such as WebSphere disable it on a per-socket basis; however, it may be
disabled globally using no:
$ no -o tcp_nagle_limit=0
$ no -r -o tcp_nagle_limit=0Other Kernel and Process Settings
Update the maximum open files ulimit by adding the following lines to
/etc/security/limits;
for example:
nofiles = 50000
nofiles_hard = 50000Processor sets/pinning
The AIX scheduler generally does a good job coordinating CPU usage
amongst threads and processes; however, manually assigning processes to
CPUs can provide more stable, predictable behavior. Binding processes to
particular CPUs is especially important on systems with multiple
processing modules and non-uniform memory access, and also depending on
how various levels of cache are shared between processors. It is best to
understand the system topology and partition resources accordingly,
especially when multiple CPU intensive processes must run on the
machine. The easiest way to do this is using the execrset
command to specify a list of CPUs to bind a command (and its children)
to (running this command as non-root requires the
CAP_NUMA_ATTACH property):
execrset -c $CPUs -e $COMMANDFor example:
execrset -c 0-3 -e java -Xmx1G MemoryAccessNote that on SMT-enabled machines the list of CPUs will represent logical CPUs. For example, if the machine was booted in SMT4 mode, CPUs 0-3 represent the 4 hardware threads that the physical CPU 0 can support.
It is important to note that currently the J9 JVM configures itself
based on the number of online processors in the system, not the number
of processors it is bound to (which can technically change on the fly).
Therefore, if you bind the JVM to a subset of CPUs you should adjust
certain thread-related options, such as -Xgcthreads, which
by default is set to the number of online processors.
attachrset
attachrset
is an alternative to execrset above and dynamically
attaches a process and its threads to a CPU set. For example:
attachrset -F -c 0-3 $PIDUse the lsrset
command to list the current rset of a process:
lsrset -p $PIDMemory Affinity
Memory affinity can be an important consideration when dealing with
large systems composed of multiple processors and memory modules.
POWER-based SMP systems typically contain multiple processor modules,
each module housing one or more processors. Each processing module can
have a system memory chip module (MCM) attached to it, and while any
processors can access all memory modules on the system, each processor
has faster access to its local memory module. AIX memory affinity
support allows the OS to allocate memory along module boundaries and is
enabled by default. To enable/disable it explicitly, use
vmo -o memory_affinity=1/0.
If memory affinity is enabled, the default memory allocation policy
is a round-robin scheme that rotates allocation amongst MCMs. Using the
environment variable MEMORY_AFFINITY=MCM will change the
policy to allocate memory from the local MCM whenever possible. This is
especially important if a process has been bound to a subset of
processors, using execrset for example; setting
MEMORY_AFFINITY=MCM may reduce the amount of memory
allocated on non-local MCMs and improve performance.
Disabling Hardware Prefetching
The dscrctl
command sets the hardware prefetching policy for the system. Hardware
prefetching is enabled by default and is most effective when memory
access patterns are easily predictable. The hardware prefetcher can be
configured with various schemes; however, most transaction oriented Java
workloads may not benefit from hardware prefetching so you may see
improved performance by disabling it using dscrctl -n -s 1.
J9 Java provides the -XXsetHWPrefetch command-line switch
to set the hardware prefetch policy for its process only. Use
-XXsetHWPrefetch:none to disable prefetching and
-XXsetHWPrefetch=N to enable a specific prefetch policy,
where N is a value recognized by dscrctl.
Recent versions of J9 Java disable hardware prefetching by default, so
consider testing -XXsetHWPrefetch:os-default to revert to
the previous behavior and allow the JVM process to use the policy
currently set with dscrctl. Also test the option
-XnotlhPrefetch.
Native Memory Allocation (malloc) Algorithms
In one benchmark, throughput improved by 50% simply by restarting
with the AIX environment variable MALLOCOPTIONS=multiheap.
This is particularly
valuable where there is heavy, concurrent malloc usage;
however, in many cases of WAS/Java, this is not the case. Also consider
MALLOCOPTIONS=pool,buckets.
mallocis often a bottleneck for application performance, especially under AIX [...] By default, the [AIX]mallocsubsystem uses a single heap, which causes lock contention for internal locks that are used bymallocin case of multi-threaded applications. By enabling [the multiheap] option, you can configure the number of parallel heaps to be used by allocators. You can set the multiheap by exportingMALLOCOPTIONS=multipheap[:n], wherencan vary between1-32and32is the default ifnis not specified. Use this option for multi-threaded applications, as it can improve performance.
The multiheap option does have costs, particularly increased virtual and physical memory usage. The primary reason is that each heap's free tree is independent, so fragmentation is more likely. There is also some additional metadata overhead.
Increasing the number of malloc heaps does not significantly increase the virtual memory usage directly (there are some slight increases because each heap has some bookkeeping that it has to do). However, while each heap's free tree is independent of others, the heap areas all share the same data segment, so native memory fragmentation becomes more likely, and thus indirectly virtual and physical memory usage may increase. It is impossible to predict by how much because it depends on the rate of allocations and frees, sizes of allocations, number of threads, etc. It is best to take the known physical and virtual memory usage of a process before the change (rss, vsz) at peak workload, so let's call this X GB (for example, 9 GB). Then apply the change and run the process to peak workload and monitor. The additional usage will normally be no more than 5% of X (in the above example, ~500MB). As long as there is that much additional physical memory available, then things should be okay. It is advised to continue to monitor rss/vsz after the change, especially over time (fragmentation has a tendency to build up).
How do you know if this is affecting you? Consider:
A concentration of execution time in the
pthreadslibrary [...] or in kernel locking [...] routines [...] is associated with a locking issue. This locking might ultimately arise at the system level (as seen with malloc locking issues on AIX), or at the application level in Java code (associated with synchronized blocks or methods in Java code). The source of locking issues is not always immediately apparent from a profile. For example, with AIX malloc locking issues, the time that is spent in the malloc and free routines might be quite low, with almost all of the impact appearing in kernel locking routines.
Here is an example tprof that shows this problem using
tprof -ujeskzl -A -I -X -E -r report -x sleep 60:
Process FREQ Total Kernel User Shared Other Java
======= ==== ===== ====== ==== ====== ===== ====
/usr/java5/jre/bin/java 174 22557 11850 0 7473 86 3148
Shared Object Ticks % Address Bytes
============= ===== ====== ======= =====
/usr/lib/libc.a[shr_64.o] 3037 9.93 900000000000d00 331774
/usr/lib/libpthread.a[shr_xpg5_64.o] 1894 6.19 9000000007fe200 319a8
Total Ticks For All Processes (KERNEL) = 15045
Subroutine Ticks % Source Address Bytes
========== ===== ====== ====== ======= =====
._check_lock 2103 6.88 low.s 3420 40
Total Ticks For All Processes (/usr/lib/libc.a[shr_64.o]) = 3037
Subroutine Ticks % Source Address Bytes
========== ===== ====== ====== ======= =====
.malloc_y 856 2.80 ../../../../../../../src/bos/usr/ccs/lib/libc/malloc_y.c 41420 840
.free_y 669 2.19 ../../../../../../../src/bos/usr/ccs/lib/libc/malloc_y.c 3f980 9a0
Total Ticks For All Processes (/usr/lib/libpthread.a[shr_xpg5_64.o]) = 1894
Subroutine Ticks % Source Address Bytes
========== ===== ====== ====== ======= =====
.global_unlock_ppc_mp 634 2.07 pth_locks_ppc_mp.s 2d714 6c
._global_lock_common 552 1.81 ../../../../../../../../src/bos/usr/ccs/lib/libpthreads/pth_spinlock.c 2180 5e0
.global_lock_ppc_mp_eh 321 1.05 pth_locks_ppc_mp_eh.s 2d694 6cThe key things to notice are:
- In the first
Processsection, theKerneltime is high (about half ofTotal). This will also show up intopas/vmstat/psas high system CPU time. - In the
Shared Objectlist,libcandlibpthreadare high. - In the
KERNELsection,._check_lockis high. - In the
libc.asection,.malloc_yand.free_yare high. - In the
libpthread.asection,.global_unlock_ppc_mpand other similarly named functions are high.
If you see a high percentage in the KERNEL section in
unlock_enable_mem, this is usually caused by calls to sync 1/sync L/lwsync.
It has been observed in some cases that this is related to the default,
single threaded malloc heap.
AIX also offers other allocators and allocator options that may be useful:
- Buckets
This suboption is similar to the built-in bucket allocator of the Watson allocator. However, with this option, you can have fine-grained control over the number of buckets, number of blocks per bucket, and the size of each bucket. This option also provides a way to view the usage statistics of each bucket, which be used to refine the bucket settings. In case the application has many requests of the same size, then the bucket allocator can be configured to preallocate the required size by correctly specifying the bucket options. The block size can go beyond 512 bytes, compared to the Watson allocator or malloc pool options.
You can enable the buckets allocator by exporting MALLOCOPTIONS=buckets. Complete details about the buckets options for fine-grained control are available 1 . Enabling the buckets allocator turns off the built-in bucket component if the Watson allocator is used- malloc pools
This option enables a high performance front end to malloc subsystem for managing storage objects smaller than 513 bytes. This suboption is similar to the built-in bucket allocator of the Watson allocator. However, this suboptions maintains the bucket for each thread, providing lock-free allocation and deallocation for blocks smaller than 513 bytes. This suboption improves the performance for multi-threaded applications, as the time spent on locking is avoided for blocks smaller than 513 bytes.
The pool option makes small memory block allocations fast (no locking) and memory efficient (no header on each allocation object). The pool malloc both speeds up single threaded applications and improves the scalability of multi-threaded applications.
Example Automation Script
Customize paths and commands as needed. Example usage:
/opt/diag.sh javacore sleep10 javacore sleep10 javacore sleep10 collect cleantmp
#!/bin/sh
# usage: diag.sh cmd...
# Version history:
# * 0.0.1: First version
myversion="0.0.1"
outputfile="diag_$(hostname)_$(date +"%Y%m%d_%H%M%S").log"
msg() {
echo "diag: $(date +"%Y%m%d %H%M%S %N %Z") : ${@}" | tee -a "${outputfile}"
}
severeError() {
echo ""
echo "***** ERROR *****"
msg "${@}"
echo "***** ERROR *****"
echo ""
exit 1
}
msg "Starting diag version ${myversion} for $(hostname) to ${outputfile}"
defaultcommands="uptime vmstat lparstat iostat svmon netstatan netstatv lparstati"
msg "Running commands: ${defaultcommands} ${@}"
for cmd in ${defaultcommands} "${@}"; do
msg "Processing command ${cmd}"
if [ "${cmd}" = "uptime" ]; then
msg "Getting uptime"
uptime 2>&1 | tee -a "${outputfile}"
elif [ "${cmd}" = "vmstat" ]; then
msg "Getting a quick vmstat"
vmstat 1 2 2>&1 | tee -a "${outputfile}"
elif [ "${cmd}" = "lparstat" ]; then
msg "Getting a quick lparstat"
lparstat 1 2 2>&1 | tee -a "${outputfile}"
elif [ "${cmd}" = "iostat" ]; then
msg "Getting a quick iostat"
iostat 1 2 2>&1 | tee -a "${outputfile}"
elif [ "${cmd}" = "svmon" ]; then
msg "Getting svmon -G"
svmon -G 2>&1 | tee -a "${outputfile}"
elif [ "${cmd}" = "netstatan" ]; then
msg "Getting netstat -an"
netstat -an >> "${outputfile}" 2>&1
elif [ "${cmd}" = "netstatv" ]; then
msg "Getting netstat -v"
netstat -v >> "${outputfile}" 2>&1
elif [ "${cmd}" = "lparstati" ]; then
msg "Getting lparstat -i"
lparstat -i >> "${outputfile}" 2>&1
elif [ "${cmd}" = "sleep10" ]; then
msg "Sleeping for 10 seconds"
sleep 10
elif [ "${cmd}" = "javacore" ]; then
pid="$(cat /cmd/IBM/WebSphere/AppServer/profiles/AppSrv01/logs/server1/server1.pid)"
msg "Requesting javacore for PID ${pid}"
kill -3 ${pid} 2>&1 | tee -a "${outputfile}"
elif [ "${cmd}" = "collect" ]; then
collectoutputfile="diag_$(hostname)_$(date +"%Y%m%d_%H%M%S").tar"
msg "Collecting all logs to ${collectoutputfile}"
tar cvf "${collectoutputfile}" "${outputfile}" \
"/opt/IBM/WebSphere/AppServer/profiles/AppSrv01/logs/server1/" \
"/opt/IBM/WebSphere/AppServer/profiles/AppSrv01/logs/ffdc/" \
"/opt/IBM/WebSphere/AppServer/profiles/AppSrv01/javacore"* \
"/opt/IBM/WebSphere/AppServer/profiles/AppSrv01/heapdump"* \
"/opt/IBM/WebSphere/AppServer/profiles/AppSrv01/core."* \
2>&1 | tee -a "${outputfile}"
compress "${collectoutputfile}" 2>&1 | tee -a "${outputfile}"
msg "Wrote ${collectoutputfile}.Z"
elif [ "${cmd}" = "cleantmp" ]; then
msg "Cleaning any temporary files"
rm -e "/opt/IBM/WebSphere/AppServer/profiles/AppSrv01/javacore"* "/opt/IBM/WebSphere/AppServer/profiles/AppSrv01/heapdump"* "/opt/IBM/WebSphere/AppServer/profiles/AppSrv01/core."* 2>&1 | tee -a "${outputfile}"
else
severeError "Unknown command ${cmd}"
fi
done
msg "Finished diag. Wrote to ${outputfile}"z/OS
z/OS Recipe
- CPU core(s) should not be consistently saturated.
- Generally, physical memory should never be saturated and the operating system should not page memory out to disk.
- Input/Output interfaces such as network cards and disks should not be saturated, and should not have poor response times.
- TCP/IP and network tuning, whilst sometimes complicated to investigate, may have dramatic effects on performance.
- Consider tuning TCP/IP network buffer sizes.
- Collect and archive various RMF/SMF records on 10 or 15 minute
intervals:
- SMF 30 records
- SMF 70-78 records
- SMF 113 subtype 1 (counters) records
- With recent versions of z/OS, Correlator SMF 98.1 records
- SMF 99 subtype 6 records
- If not active, activate HIS and collect hardware counters:
- Review
ps -p $PID -mandD OMVS,PID=$PIDoutput over time for processes of interest. - Operating system level statistics and optionally process level statistics should be periodically monitored and saved for historical analysis.
- Review system logs for any errors, warnings, or high volumes of messages.
- Review snapshots of process activity, and for the largest users of resources, review per thread activity.
- If the operating system is running in a virtualized guest, review the configuration and whether or not resource allotments are changing dynamically.
- Use the Workload Activity Report to review performance.
- If there is sufficient network capacity for the additional packets, consider reducing the default TCP keepalive timer (TCPCONFIG INTERVAL) from 2 hours to a value less than intermediate device idle timeouts (e.g. firewalls).
- Review
SYS1.PARMLIB(andSYS1.IPLPARMif used) - Test disabling delayed ACKs
Also review the general topics in the Operating Systems chapter.
Documentation
General
z/OS is normally accessed through 3270 clients, telnet, SSH, or FTP.
z/OS uses the EBCDIC character set by default instead of ASCII/UTF;
however, some files produced by Java are written in ASCII or UTF. These
can be converted using the iconv USS command or downloaded
through FTP in BINARY mode to an ASCII/UTF based computer.
Unix System Services (USS) and OMVS
ps
ps may be used to display address space information and
CPU utilization; for example, to list all processes and accumulated CPU
time:
By Process
ps -A -o xasid,jobname,pid,ppid,thdcnt,vsz,vsz64,vszlmt64,time,argsExample output:
ASID JOBNAME PID PPID THCNT VSZ VSZ64 VSZLMT64 TIME COMMAND
160 SSHD7 16916941 67248492 1 16192 13631488 16383P 00:00:00 /usr/sbin/sshd -R
175 KGRIGOR3 84025829 33693995 29 217448 1527775232 20480M 00:00:31 java -Xmx1g ...
fb KGRIGOR8 50471447 139700 1 456 13631488 20480M 00:00:00 ps -A -o xasid,jobname,pid,ppid,thdcnt,vsz,vsz64,vszlmt64,time,argsBy Thread
To display details about each thread of a process, use
-p $PID and -m; for example:
ps -p $PID -m -o xasid,jobname,pid,ppid,xtid,xtcbaddr,vsz,vsz64,vszlmt64,time,semnum,lpid,lsyscall,syscall,state,argsExample output with TIME showing accumulated CPU by
thread:
ASID JOBNAME PID PPID TID TCBADDR VSZ VSZ64 VSZLMT64 TIME SNUM LPID LASTSYSC SYSC S COMMAND
175 KGRIGOR3 84025829 33693995 - - 217448 1513095168 20480M 00:01:38 - - - - HR java -Xmx1g ...
- - - - 1cc3300000000001 8ce048 217448 - - 00:00:00 - 0 1NOP1NOP1NOP1NOP1NOP 1IPT KU -
- - - - 1cc4b00000000002 8fb2f8 217448 - - 00:01:16 - 0 1NOP1NOP1NOP1NOP1NOP - RJ -
- - - - 1cc4d80000000003 8bce78 217448 - - 00:00:00 - 0 1NOP1NOP1NOP1NOP1NOP - RNJV -USS Settings
Display global USS settings: /D OMVS,O
BPXO043I 10.14.11 DISPLAY OMVS 616 OMVS 000F ACTIVE OMVS=(S4) CURRENT UNIX CONFIGURATION SETTINGS: MAXPROCSYS = 1900 MAXPROCUSER = 500 MAXFILEPROC = 65535 MAXFILESIZE = NOLIMIT MAXCPUTIME = 2147483647 MAXUIDS = 500 MAXPTYS = 750 MAXMMAPAREA = 128K MAXASSIZE = 2147483647 MAXTHREADS = 50000 MAXTHREADTASKS = 5000 MAXCORESIZE = 7921K MAXSHAREPAGES = 4M... MAXQUEUEDSIGS = 10000 SHRLIBRGNSIZE = 67108864...
opercmd
opercmd may be an available command to execute operator
commands normally run through a 3270 session, though it requires special
permission. For example:
opercmd "D OMVS,O"Tips
- A dataset may be copied to a file with:
cp "//'cbc.sccnsam(ccnubrc)'" ccnubrc.C - To get to OMVS: ISPF }
6 COMMAND}omvs - OMVS disable autoscroll: NOAUTO } F2
- OMVS enable autoscroll: AUTO } F2
- Convert file from ASCII to EBCDIC:
iconv -fiso8859-1 -tibm-1047 server.xml > server.ebcdic
Language Environment (LE)
z/OS provides a built-in mechanism to recommend fine tuned values for the LE heap. Run with LE RPTSTG(ON) and consult the resulting output: http://www.ibm.com/support/knowledgecenter/SSAW57_8.5.5/com.ibm.websphere.nd.multiplatform.doc/ae/tprf_tunezleheap.html
Ensure that you are NOT using the following options during production: RPTSTG(ON), RPTOPTS(ON), HEAPCHK(ON)
For best performance, use the LPALSTxx parmlib member to ensure that LE and C++ runtimes are loaded into LPA.
Ensure that the Language Environment data sets, SCEERUN and SCEERUN2, are authorized to enable xplink... For best performance, compile applications that use JNI services with xplink enabled.
pax
The pax
command may be used to create or unpack compressed or uncompressed
archive files (similar to POSIX tar and
gzip/gunzip).
- Create with compression:
pax -wzvf $FILE.pax.Z $FILES_OR_DIRS - Create without compression:
pax -wvf $FILE.pax $FILES_OR_DIRS - Unpack (compression autodetected):
pax -ppx -rf $FILE.pax.Z
uncompress
The uncompress
command may be used to decompress .Z files:
uncommpress $FILE.Z3270 Clients
The z/OS graphical user interface is normally accessed through a 3270
session. Commonly used client program are Personal Communications, Host
On-Demand, x3270 (Linux), and c3270 (macOS).
Some notes:
- On some 3270 client keyboard layouts, the right "Ctrl" key is used as the "Enter" key.
- Function keys are used heavily. In general, F3 goes back to the previous screen.
- Some clients such as Host On-Demand allow showing a virtual keyboard (View } Keypad) which may help when needing obscure keys.
- If you receive a red X in the bottom left, then you probably tried to press a key when your cursor was not in an input area. Press the SysReq key and press Enter to reset the screen.
- On some screens, you may move your cursor to any point (normally the top line) and press F2 to split the screen. Use F9 to switch between screens.
- Usually, page up with F7 and page down with F8. If you type
min the input field and press F7 or F8, then you will scroll to the top or bottom, respectively. - Usually, page right with F11 and page left with F10.
- Usually, type
f "SEARCH"to find something and then press F5 to find the next occurrence. Use prev to search backwards:f "SEARCH" prev
z/OS Version
Display z/OS version with /D IPLINFO
Search for the "RELEASE" line:
IEE254I 13.06.07 IPLINFO DISPLAY 033
SYSTEM IPLED AT 09.38.57 ON 05/15/2018
RELEASE z/OS 02.02.00 LICENSE = z/OS
USED LOADRE IN SYS1.IPLPARM ON 00340
ARCHLVL = 2 MTLSHARE = N
IEASYM LIST = (05,RE,L)
IEASYS LIST = (LF,KB) (OP)
IODF DEVICE: ORIGINAL(00340) CURRENT(00340)
IPL DEVICE: ORIGINAL(00980) CURRENT(00980) VOLUME(PDR22 )Interactive System Productivity Facility (ISPF)
After logging in through a 3270 session, it is common to access most programs by typing ISPF.
Typically, if available, F7 is page up, F8 is page down, F10 is page left, and F11 is page right. Typing "m" followed by F7 or F8 pages down to the top or bottom, respectively.
If available, type "F STRING" to find the first occurrence of STRING, and F5 for the next occurrences.
Normally, F3 returns to the parent screen (i.e. exits the current screen).
Command (normally type 6 in ISPF) allows things such as TSO commands or going into Unix System Services (USS).
Utilities - Data Set List (normally type 3.4 in ISPF) allows browsing data sets.
Central Processing Unit (CPU)
z/OS offers multiple different types of processors that may have different costs. The most general processor type is called the general purpose processor or central processor (CP or GCP). There are also z Integrated Information Processor (zIIPs/IFAs) for Java, etc. workloads, z Application Assist Processors (zAAPs), Integrated Facility for Linux processors (IFLs) for Linux on z/VM, and others.
SMF 98.1
With z/OS 2.2 and above, always collect and archive SMF 98.1 records if IBM z/OS Workload Interaction Correlator is entitled. These records provide "valuable data for diagnosing transient performance problems; summary activities with a worst offender and its activity every 5 seconds" with minimal overhead: "IBM benchmarks were run with all available Correlator SMF records being captured and logged and could not detect any additional CPU cost from the increased data collection".
Post-process the output data set using SMF_CORE. To get statistics on the average CP, zIIP, and zAAP utilization and top consumers of each:
java -Xmx1g "-Dcom.ibm.ws390.smf.dateTimeFormat=yyyy-MM-dd'T'HH:mm:ss.SSSZ" -DPRINT_WRAPPER=false -jar smftools.jar "INFILE(DATASET)" "PLUGIN(com.ibm.smf.plugins.Type98CPU,STDOUT)"Example output:
DateTime,LPAR,AvgCpuBusyCP,AvgCpuBusyzAAP,Avg_CpuBusy_zIIP,AddressSpaceMostCPU_CP,AddressSpaceMostCPU_zAAP,AddressSpaceMostCPU_zIIP
2023-12-11T12:30:00.000+0000,DBOC,43,0,41,D2PDDIST,,D2PDDIST
2023-12-11T12:30:05.000+0000,DBOC,50,0,44,D2PDDIST,,D2PDDIST
[...]Display processors
Display processors with /D M=CPU; for example, this
shows four general purpose processors and four zAAP processors:
D M=CPU
IEE174I 15.45.46 DISPLAY M 700
PROCESSOR STATUS
ID CPU SERIAL
00 + 0C7B352817
01 + 0C7B352817
02 + 0C7B352817
03 + 0C7B352817
04 +A 0C7B352817
05 +A 0C7B352817
06 +A 0C7B352817
07 +A 0C7B352817
+ ONLINE - OFFLINE . DOES NOT EXIST W WLM-MANAGED N NOT AVAILABLE A APPLICATION ASSIST PROCESSOR (zAAP)Display threads in an address space
Display threads in an address space and the accumulated
CPU by thread: /D OMVS,PID=XXX (search for PID in the
joblogs of the address space). This output includes a
CT_SECS field which shows the total CPU seconds consumed by
the address space. Note that the sum of all the ACC_TIME in
the report will not equal CT_SECS or the address CPU as
reported by RMF or SDSF because some threads may have terminated. The
ACC_TIME and CT_SECS fields wrap after 11.5
days and will contain *****; therefore, the
/D OMVS,PID= display is less useful when the address space
has been running for longer than that.
-RO MVSA,D OMVS,PID=67502479
BPXO040I 11.09.56 DISPLAY OMVS 545
OMVS 000F ACTIVE OMVS=(00,FS,0A)
USER JOBNAME ASID PID PPID STATE START CT_SECS
WSASRU WSODRA S 0190 67502479 1 HR---- 23.01.38 13897.128 1
LATCHWAITPID= 0 CMD=BBOSR
THREAD_ID TCB@ PRI_JOB USERNAME ACC_TIME SC STATE
2621F4D000000008 009C7938 12.040 PTX JY VAll the threads/TCBs are listed and uniquely identified by their
thread ID under the THREAD_ID column. The accumulated CPU
time for each thread is under the ACC_TIME column. The
thread ID is the first 8 hexadecimal characters in the
THREAD_ID and can be found in a matching
javacore.txt file. In the example above, the Java thread ID
is 2621F4D0.
The threads with eye-catcher WLM are those from the ORB
thread pool which are the threads that run the application enclave
workload. Be careful when attempting to reconcile these CPU times with
CPU accounting from RMF and SMF. This display shows all the threads in
the address space, but remember that threads that are WLM managed (e.g.
the Async Worker threads and the ORB threads) have their CPU time
recorded in RMF/SMF under the enclave which is reported in the RMF
report class that is associated with the related WLM classification rule
for the CB workload type. The other threads will have their
CPU time charged to the address space itself as it is classified in WLM
under the STC workload type.
WebSphere trace entries also contain the TCB address of the thread generating those entries. For example:
THREAD_ID TCB§ PRI_JOB USERNAME ACC_TIME SC STATE
2707058000000078 009BDB58 178.389 STE JY V
Trace: 2009/03/19 08:28:35.069 01 t=9BDB58 c=UNK key=P8 (0000000A)The SDSF.PS display provides an easy way to issue this command for
one or more address spaces. Type d next to an address space
to get this same output. Type ULOG to see the full output
or view in SDSF.LOG.
Similar information can be found from USS:
$ ps -p $PID -m -o xtid,xtcbaddr,tagdata,state=STATE -o atime=CPUTIME -o syscall
TID TCBADDR STATE CPUTIME SYSC
- - HR 14:12 -
1e4e300000000000 8d0e00 YU 0:20
1e4e400000000001 8d07a8 YJV 0:00
1e4e500000000002 8d0588 YNJV 0:00
1e4e600000000003 8d0368 YJV 1:35
1e4e700000000004 8d0148 YJV 0:2531-bit vs 64-bit
z/OS does not have a 32-bit architecture, but instead only has a 31-bit architecture:

zIIP/zAAP Processors
Review zIIP processors:
- Type
/D IPLINFOand search forLOADY2. - Go to the data set list and type the name from
LOADY2in Dsname level and press enter (e.g.SYS4.IPLPARM). - Type
bto browse the data set members and search forPARMLIB. - Go to the data set list and type the name (e.g.
USER.PARMLIB) and find theIEAOPTmember.
Inside SYS1.PARMLIB(IEAOPTxx), the following options
will affect how the zIIP engines process work.
- IFACrossOver = YES / NO
- YES - work can run on both zIIP and general purpose CPs
- NO - work will run only on zIIPs unless there are no zIIPs
- IFAHonorPriority = YES / NO
- YES - WLM manages the priority of zIIP eligible work for CPs
- NO - zIIP eligible work can run on CPs but at a priority lower than any non-zIIP work
Java zIIP/zAAP usage
Restart with -Xtrace:iprint=j9util.48 and review
stderr for libraries using zIIP/zAAP with the following
message:
validateLibrary shared library [...]/lib/default/zip flagged as zAAP enabledSystem Display and Search Facility (SDSF)
SDSF (normally type S in ISPF) provides a system
overview.
SDSF.LOG
LOG shows the system log and it is the most common place to execute
system commands. Enter a system command by pressing /,
press enter, and then type the command and press enter. Then use F8 or
press enter to refresh the screen to see the command's output.
Display system activity summary: /D A
IEE114I 16.18.32 2011.250 ACTIVITY 733
JOBS M/S TS USERS SYSAS INITS ACTIVE/MAX VTAM OAS
00008 00034 00001 00035 00034 00001/00300 00019Display users on the system: /D TS,L
IEE114I 16.51.50 2011.251 ACTIVITY 298
JOBS M/S TS USERS SYSAS INITS ACTIVE/MAX VTAM OAS
00008 00039 00002 00039 00034 00002/00300 00029
DOUGMAC OWT WITADM1 INCheck global resource contention with /D GRS,C
SDSF.DA
SDSF.DA shows active
address spaces. CPU/L/Z A/B/C shows current CPU use,
where A=total, B=LPAR usage, and C=zAAP/zIIP usage.
Type PRE * to show all address spaces.
Type SORT X to sort, e.g. SORT CPU%.
Page right to see useful information such as MEMLIMIT,
RPTCLASS, WORKLOAD, and
SRVCLASS.
In the NP column, type S next to an address
space to get all of its output, or type ? to get a member
list and then type S for a particular member (e.g.
SYSOUT, SYSPRINT).
When viewing joblog members of an address space (? in
SDSF.DA), type XDC next to a member to transfer it to a
data set.
SDSF.ST is similar to DA and includes
completed jobs.
Physical Memory (RAM)
Use /D M=STOR to display available memory. The
ONLINE sections show available memory. For example, this
shows 64GB:
D M=STOR
IEE174I 16.00.48 DISPLAY M 238
REAL STORAGE STATUS
ONLINE-NOT RECONFIGURABLE
0M-64000M
ONLINE-RECONFIGURABLE
NONE
PENDING OFFLINE
NONE
0M IN OFFLINE STORAGE ELEMENT(S)
0M UNASSIGNED STORAGE
STORAGE INCREMENT SIZE IS 256MUse /D ASM to display paging spaces. The
FULL columns for LOCAL entries should never be
greater than 0%. For example:
D ASM
IEE200I 15.30.16 DISPLAY ASM 205
TYPE FULL STAT DEV DATASET NAME
PLPA 79% OK 0414 SYS1.S12.PLPA
COMMON 0% OK 0414 SYS1.S12.COMMON
LOCAL 0% OK 0414 SYS1.S12.LOCAL1
LOCAL 0% OK 0445 SYS1.S12.PAGE01Display total virtual storage: /D VIRTSTOR,HVSHARE
IAR019I 17.08.47 DISPLAY VIRTSTOR 313
SOURCE = DEFAULT
TOTAL SHARED = 522240G
SHARED RANGE = 2048G-524288G
SHARED ALLOCATED = 262244MSome systems display free memory with /F AXR,IAXDMEM:
IAR049I DISPLAY MEMORY V1.0 233
PAGEABLE 1M STATISTICS
66.7GB : TOTAL SIZE
50.8GB : AVAILABLE FOR PAGEABLE 1M PAGE
2404.0MB : IN-USE FOR PAGEABLE 1M PAGES
5238.0MB : MAX IN-USE FOR PAGEABLE 1M PAG
0.0MB : FIXED PAGEABLE 1M FRAMES
LFAREA 1M STATISTICS - SOURCE = DEFAULT
0.0MB : TOTAL SIZE
0.0MB : AVAILABLE FOR FIXED 1M PAGES
0.0MB : IN-USE FOR FIXED 1M PAGES
0.0MB : MAX IN-USE FOR FIXED 1M PAGES
LFAREA 2G STATISTICS - SOURCE = DEFAULT
0.0MB : TOTAL SIZE = 0
0.0MB : AVAILABLE FOR 2G PAGES = 0
0.0MB : IN-USE FOR 2G PAGES = 0
0.0MB : MAX IN-USE FOR 2G PAGES = 0 Job Entry Subsystem (JES)
Use /$DSPOOL to list spool utilization. For example:
$HASP646 41.0450 PERCENT SPOOL UTILIZATIONWorkload Management (WLM)
WLM only makes noticeable decisions about resources when resources are low.
WLM performs better with less service classes.
- Service Classes - goals for a particular type of work - you can have as many of these as you want but from a performance perspective the fewer service classes the better
- Classification Rules - classification rules tie an address space or group of address spaces to a goal or service class
- Report Classes - report classes have nothing to do with classification of work but they do allow you to show reports from a particular perspective for problem and performance diagnosis
Display WLM configuration: /D WLM
IWM025I 14.31.46 WLM DISPLAY 214
ACTIVE WORKLOAD MANAGEMENT SERVICE POLICY NAME: CBPTILE
ACTIVATED: 2011/06/13 AT: 16:15:27 BY: WITADM1 FROM: S12
DESCRIPTION: CB trans w/short percentile goal
RELATED SERVICE DEFINITION NAME: CBPTILE
INSTALLED: 2011/06/13 AT: 16:15:08 BY: WITADM1 FROM: S12The related service definition name is the currently configured WLM definition.
Classify location service daemons and controllers as SYSSTC or high velocity.
Set achievable percentage response time goals: For example, a goal that 80% of the work will complete in .25 seconds is a typical goal. Velocity goals for application work are not meaningful and should be avoided.
Make your goals multi-period: This strategy might be useful if you have distinctly short and long running transactions in the same service class. On the other hand, it is usually better to filter this work into a different service class if you can. Being in a different service class will place the work in a different servant which allows WLM much more latitude in managing the goals.
Define unique WLM report classes for servant regions and for applications running in your application environment. Defining unique WLM report classes enables the resource measurement facility (RMF) to report performance information with more granularity.
Periodically review the results reported in the RMF Postprocessor workload activity report: Transactions per second (not always the same as client tran rate), Average response times (and distribution of response times), CPU time used, Percent response time associated with various delays
Watch out for work that defaults to SYSOTHER.
Delay monitoring: http://www.ibm.com/support/knowledgecenter/SSAW57_8.5.5/com.ibm.websphere.nd.multiplatform.doc/ae/rprf_wlmdm.html
You can print the entire WLM definition from the main screen:

Within the Subsystem types section you will find the classification rules that tie the address spaces to the service classes and report classes. You can also find this by paging right in SDSF.DA.
So what is the Response Time Ratio and what does it tell us? WLM calculates the Response Time Ratio by dividing the actual response time (enclave create to enclave delete) by the GOAL for this service class and multiplying by 100. It is, basically, a percentage of the goal. Note that WLM caps the value at 1000 so if the goal is badly missed you might see some big numbers but they will never exceed 1000. (http://www-03.ibm.com/support/techdocs/atsmastr.nsf/5cb5ed706d254a8186256c71006d2e0a/0c808594b1db5c6286257bb1006118ab/$FILE/ATTHSSAD.pdf/WP102311_SMF_Analysis.pdf)
A CPU goal uses CPU Service Units which normalize across different CPU models: https://www.ibm.com/support/knowledgecenter/en/SSLTBW_2.4.0/com.ibm.zos.v2r4.iear100/calc.htm
HTTP Request Distribution
When multiple servants are bound to the same service class, WLM attempts to dispatch the new requests to a hot servant. A hot servant has a recent request dispatched to it and has threads available. If the hot servant has a backlog of work, WLM dispatches the work to another servant.
Normally running this hot servant strategy is good because the hot servant likely has all its necessary pages in storage, has the just-in-time (JIT) compiled application methods saved close by, and has a cache full of data for fast data retrieval. However, this strategy presents a problem in the following situations: [...]
The default workload distribution strategy uses a hot servant for running requests that create HTTP session objects. Consider configuring the product and the z/OS Workload Manager to distribute your HTTP session objects in a round-robin manner in the following conditions:
- HTTP session objects in memory are used, causing dispatching affinities.
- The HTTP sessions in memory last for many hours or days.
- A large number of clients with HTTP session objects must be kept in memory.
- The loss of a session object is disruptive to the client or server.
- There is a large amount of time between requests that create HTTP sessions.
Execution Velocity
"The execution velocity is a measure of how fast work is running compared to ideal conditions without delays." (https://www.ibm.com/support/knowledgecenter/SSLTBW_2.4.0/com.ibm.zos.v2r4.erbb500/exvel.htm)
System Management Facilities (SMF)
SMF captures operating system statistics to data sets.
Display what SMF is currently recording: /D SMF,O
IEE967I 08.21.08 SMF PARAMETERS 439
MEMBER = SMFPRMT8...
SYS(DETAIL) -- PARMLIB
SYS(TYPE(0,2:10,14,15,20,22:24,26,30,32:34,40,42,47:48,58,64,
70:83,84,88,89,90,100:103,110,120,127:134,148:151,161,199,225,
244,245,253)) -- PARMLIB...
INTVAL(30) -- PARMLIB...
DSNAME(SYS1.S34.MAN2) -- PARMLIB
DSNAME(SYS1.S34.MAN1) -- PARMLIB
ACTIVE -- PARMLIBThe MEMBER is the PARMLIB member holding the configuration. The SYS line shows which SMF types are being monitored. INTVAL is the recording interval (in minutes). The DSNAME members are the working data sets for the SMF data.
Modify the recording interval dynamically: /F RMF,MODIFY ZZ,SYNC(RMF,0),INTERVAL(15M)
Display SMF data set usage: /D SMF
RESPONSE=S12
NAME VOLSER SIZE(BLKS) %FULL STATUS
P-SYS1.S12.MANC SMF001 180000 79 ACTIVE
S-SYS1.S12.MAND SMF001 180000 0 ALTERNATEWhen the active volume fills up, SMF switches to the alternative. This can be done manually with /I SMF
Example JCL to Dump SMF
//SMFD3 JOB MSGCLASS=H,MSGLEVEL=(1,1),REGION=128M,TIME=5,
// NOTIFY=&SYSUID
// SET SMFIN=S25J.ZTESTB.S12.SMF.G0213V00
//* OUTPUT DATASET NAME
// SET DUMPOUT=ZPER.WM0.SMFS12.D213
//*
//S0 EXEC PGM=IFASMFDP,REGION=128M
//SYSPRINT DD SYSOUT=*
//DUMPIN1 DD DISP=SHR,DSN=&SMFIN
//DUMPOUT DD DISP=(,CATLG,DELETE),UNIT=SYSDA,
// SPACE=(CYL,(400,100),RLSE),
// DSN=&DUMPOUT,
// LRECL=32760,BLKSIZE=23467,RECFM=VBS
//SYSIN DD *
INDD(DUMPIN1,OPTIONS(DUMP))
OUTDD(DUMPOUT,TYPE(0:255))
/*Example JCL to Dump Live SMF Data Sets into a Permanent One
//SMFD3 JOB MSGCLASS=H,MSGLEVEL=(1,1),REGION=128M,TIME=5,
// NOTIFY=&SYSUID
// SET SMFIN=S25J.ZTESTG.S34.SMF.G1017V00
//* OUTPUT DATASET NAME
// SET DUMPOUT=ZPER.S34.MEVERET.D092211.A
//*
//S0 EXEC PGM=IFASMFDP,REGION=128M
//SYSPRINT DD SYSOUT=*
//DUMPIN1 DD DISP=SHR,DSN=&SMFIN
//DUMPOUT DD DISP=(,CATLG,DELETE),UNIT=SYSDA,
// SPACE=(CYL,(400,100),RLSE),
// DSN=&DUMPOUT,
// LRECL=32760,BLKSIZE=23467,RECFM=VBS
//SYSIN DD *
INDD(DUMPIN1,OPTIONS(DUMP))
OUTDD(DUMPOUT,TYPE(0:255))
/*The output from the JCL contains the types of records and number of records in the raw data:
IFA020I DUMPOUT -- ZPER.S34.MEVERET.D092211.A
IFA020I DUMPIN1 -- S25J.ZTESTG.S34.SMF.G1017V00
SUMMARY ACTIVITY REPORT
START DATE-TIME 09/22/2011-09:33:34 END DATE-TIME
RECORD RECORDS PERCENT AVG. RECORD MIN. RECORD MAX.
TYPE READ OF TOTAL LENGTH LENGTH
2 1 .00 % 18.00 18
3 1 .00 % 18.00 18
...
TOTAL 42,572 100 % 1,233.27 18
NUMBER OF RECORDS IN ERROR 0Example JCL to Dump SMF
//SMFR1 JOB MSGLEVEL=(1,1),MSGCLASS=H
//WKLD@PGP EXEC PGM=ERBRMFPP,REGION=0K
//MFPINPUT DD DSN=ZPER.WM0.SMFS12.D203,DISP=SHR
//PPXSRPTS DD SYSOUT=*,DCB=(RECFM=FBA,LRECL=133)
//MFPMSGDS DD SYSOUT=*
//SYSOUT DD SYSOUT=*
//SYSIN DD *
ETOD(0000,2400)
PTOD(0000,2400)
RTOD(0000,2400)
STOD(0000,2400)
SYSRPTS(WLMGL(RCLASS(W*)))
SYSOUT(H)
/*
SYSRPTS(WLMGL(SCPER,RCLASS(WT7*)))
/*Example JCL to Clear SMF
//SMFCLEAR JOB MSGLEVEL=(1,1)
//STEP1 EXEC PGM=IFASMFDP
//DUMPIN DD DSN=SYS1.S12.MANC,DISP=SHR
//*
//* SYS1.S34.MAN1
//* SYS1.S34.MAN2
//*
//*DUMPIN DD DSN=SYS1.S12.MANC,DISP=SHR
//DUMPOUT DD DUMMY
//SYSPRINT DD SYSOUT=*
//SYSIN DD *
INDD(DUMPIN,OPTIONS(CLEAR))
OUTDD(DUMPOUT,TYPE(000:255))Resource Measurement Facility (RMF)
- Display if RMF ZZ monitor is running: /F RMF,D ZZ
- Start RMF ZZ monitor: /F RMF,S ZZ
- Start RMFGAT: /F RMF,S III
Monitoring RMF in live mode can be very useful (navigate through ISPF). F10 and F11 page backwards and forwards through time.
Use RMF Monitor 3 } CPC for overall CPU. Execute procu
for detailed CPU. Execute sysinfo for general information.
Execute syssum for a sysplex summary.


Workload Activity Report
The JCL to produce this was covered above.
Example snippet output:

Important values:
- CPU - this is the total amount of processor time (excluding SRB time), used during this interval. It includes time spent on general purpose CPs, zAAPs and zIIPs.
- SRB - this is the amount of processor time consumed by SRBs during the interval. An SRB is a special unit of work used primarily by the operating system to schedule functions that need to run quickly and with high priority.
- AAP - this is the amount of time work was running on zAAP processors during the interval. The IIP field is exactly the same as AAP except it reports time spent on zIIP processors. On our system there were no zIIP processors defined so it will be ignored.
- Ended - this is the total number of WebSphere requests that completed during the interval.
- CP - this value represents the amount of time spent on general
purpose processor. It includes the CP time and the zAAP time that is
reported under the "SERVICE TIME" heading, fields CPU and SRB.
The length of this interval is 5 minutes or 300 seconds so using the CP field value under the "APPL %" heading the amount of CP time is:
(CP * interval length) / 100 or (0.20 * 300) / 100 = 0.600 (rounding error) - AAPCP - this value is the amount of zAAP time that ran on a CP which
could have run on a zAAP had a zAAP processor been available. It is a
subset of the CP value. The system must be configured to capture this
value. It is controlled by the parmlib option xxxxxxxxxxxx. Our system
did not have this option set. To convert this percentage to time is
simple:
(AAPCP * interval length) / 100 - IIPCP - same as AAPCP except for zIIP processors
- AAP - this is the amount of zAAP time consumed during the interval. It reports the same value as the AAP field under the "SERVICE TIME" heading.
- IIP - same as AAP except for zIIP processors.
The APPL% values are processor times reported as a percentage. They are reported as the percentage of a single processor so it is common to see values greater than 100% on multi-processor systems.
Given this information, calculating the amount of processor time used during the interval is very straightforward. The amount of zAAP processor time is simply the value reported in the AAP field, 2.015 seconds. Remember the CPU field contains the time spent on zAAPs so if we want to calculate the total amount of general purpose CP time we must subtract the AAP value from the total of the CPU and SRB values.
In the example above, which is a report class that defines enclave work, the SRB field will always be zero so to calculate the CP time we simply need to subtract the AAP value from the CPU value or 2.171 - 2.015 = 0.156. So in this example, an enclave service class, the total amount of CP and zAAP processor time spent by work executing under this report class is simply the CPU value.
Since we are using a WebSphere example we should also include the amount of processor time consumed by the deployment manager address spaces (control and servant), the node agent address space, and the application server address spaces (control and servant) (the SRB field is non-zero so remember to add that value to the CPU value to get the total amount of CP and zAAP time consumed during the interval. Then just subtract the AAP value from this total to get the amount of CP processor time.)
Example Analysis of Multi-Period Discretionary Delays
z/OS V2R3 SYSPLEX AAAAAA DATE 04/16/2020 INTERVAL 15.00.032 MODE = GOAL
RPT VERSION V2R3 RMF TIME 16.00.00
POLICY=BBBBBBBB WORKLOAD=CCCCCC SERVICE CLASS=DDDDDDDD RESOURCE GROUP=*NONE PERIOD=2 IMPORTANCE=DISC
CRITICAL =NONE
-TRANSACTIONS-- TRANS-TIME HHH.MM.SS.FFFFFF TRANS-APPL%-----CP-IIPCP/AAPCP-IIP/AAP ---ENCLAVES---
AVG 1.48 ACTUAL 3.703426 TOTAL 0.11 0.05 225.28 AVG ENC 1.48
MPL 1.48 EXECUTION 3.702356 MOBILE 0.00 0.00 0.00 REM ENC 0.00
ENDED 494 QUEUED 1069 CATEGORYA 0.00 0.00 0.00 MS ENC 0.00
END/S 0.55 R/S AFFIN 0 CATEGORYB 0.00 0.00 0.00
#SWAPS 0 INELIGIBLE 0
EXCTD 0 CONVERSION 0
STD DEV 10.163165
----SERVICE---- SERVICE TIME ---APPL %--- --PROMOTED-- --DASD I/O--- ----STORAGE---- -PAGE-IN RATES-
IOC 0 CPU 2028.572 CP 0.11 BLK 0.000 SSCHRT 4.1 AVG 0.00 SINGLE 0.0
CPU 67902K SRB 0.000 IIPCP 0.05 ENQ 0.006 RESP 0.6 TOTAL 0.00 BLOCK 0.0
MSO 0 RCT 0.000 IIP 100.47 CRM 0.000 CONN 0.1 SHARED 0.00 SHARED 0.0
SRB 0 IIT 0.000 AAPCP 0.00 LCK 0.134 DISC 0.4 HSP 0.0
TOT 67902K HST 0.000 AAP N/A SUP 0.000 Q+PEND 0.1
/SEC 75446 IIP 904.286 IOSQ 0.0
ABSRPTN 51K AAP N/A
TRX SERV 51K
GOAL: DISCRETIONARY
RESPONSE TIME EX PERF AVG --EXEC USING%-- -------------- EXEC DELAYS % ----------- -USING%- --- DELAY % --- %
SYSTEM VEL% INDX ADRSP CPU AAP IIP I/O TOT IIP CPU CRY CNT UNK IDL CRY CNT QUI
*ALL --N/A-- 91.5 1.5 0.1 N/A 70 0.1 6.5 6.4 0.1 0.1 0.0 23 0.0 0.0 0.0 0.0
EE01 92.0 0.6 0.0 N/A 72 0.0 6.3 6.3 0.0 0.1 0.0 21 0.0 0.0 0.0 0.0
EE02 91.1 0.8 0.1 N/A 69 0.1 6.7 6.6 0.2 0.1 0.0 24 0.0 0.0 0.0 0.0This is saying that 494 WAS transaction completed in this 15 minute interval ending at 16:00:00 under the discretionary period 2 goal, their average execution time was 3.7 seconds, the execution time standard deviation was 10.1 seconds, and the total sampled execution delays averaged 6.5% (mostly delayed on zIIPs). For detailed descriptions of the fields, see https://www.ibm.com/support/knowledgecenter/en/SSLTBW_2.3.0/com.ibm.zos.v2r3.erbb500/wfields.htm
And, "Set achievable percentage response time goals. Velocity goals for application work are not meaningful and should be avoided. [...] Watch out for work that [...] has a discretionary goal."
FTP
FTP can be used to download both USS files as well as data sets. To download a data set, surround the data set name with apostrophes:
ftp> ascii
200 Representation type is Ascii NonPrint
ftp> get 'WITADM1.SPF1.LIST'
...To convert character sets from EBCDIC to ASCII, use FTP ASCII mode. If the file was written on the z/OS system with an ASCII character set, then download the file using FTP BINARY mode.
Input/Output (I/O)
Ensure that DASD are of the fastest speed, striping, etc.
Networking
To discover the host name, run the system command /D SYMBOLS and find the TCPIP address space name. In the TCPIP address space joblogs output, find the TCPIP profile configuration data set:
PROFILE DD DISP=SHR,DSN=TCPIP.PROFILE(&SYSN.)...
In 3.4, browse this dataset and this will show the host name and IP address mapping.
Increase MAXSOCKETS and MAXFILEPROC to 64000 (http://www.ibm.com/support/knowledgecenter/SSAW57_8.5.5/com.ibm.websphere.nd.doc/ae/tprf_tunetcpip.html, http://www.ibm.com/support/knowledgecenter/SSLTBW_2.2.0/com.ibm.zos.v2r2.bpxb200/mxflprc.htm)
Consider disabling delayed acknowledgments (NODELAYACKS). Warning: This option may or may not be better depending on the workload (see the discussion of delayed acknowledgments). (http://www.ibm.com/support/knowledgecenter/SSAW57_8.5.5/com.ibm.websphere.nd.doc/ae/tprf_tunetcpip.html)
Set SOMAXCONN=511 (http://www.ibm.com/support/knowledgecenter/SSAW57_8.5.5/com.ibm.websphere.nd.doc/ae/tprf_tunetcpip.html)
Monitoring dispatch requests: http://www.ibm.com/support/knowledgecenter/SSAW57_8.5.5/com.ibm.websphere.nd.multiplatform.doc/ae/tprf_monitor_dispatch_requests.html
Type HOMETEST in ISPF COMMAND to get the IP hostname and address.
DNS
By default, the DNS lookup timeout (which Java uses) defaults to 5 seconds.
TCP Congestion Control
Review the background on TCP congestion control.
Consider tuning TCP/IP buffer sizes using TCPCONFIG; for example:
- TCPSENDBFRSIZE=131070
- TCPRCVBUFRSIZE=131070
netstat
netstat
may be used to list sockets from USS. The -A flag provides
details such as send and receive queues. For example:
$ netstat -A | head -50
MVS TCP/IP NETSTAT CS V2R4 TCPIP Name: TCPIP 17:14:53
Client Name: BBODMGR Client Id: 0000043D
Local Socket: ::ffff:9.57.7.207..6001
Foreign Socket: ::ffff:9.57.7.207..1550
BytesIn: 00000000000037507439
BytesOut: 00000000000000240750
SegmentsIn: 00000000000000001232
SegmentsOut: 00000000000000001230
StartDate: 01/20/2021 StartTime: 20:30:14
Last Touched: 21:10:34 State: Establsh
RcvNxt: 1627254963 SndNxt: 0500396862
ClientRcvNxt: 1627254963 ClientSndNxt: 0500396862
InitRcvSeqNum: 1589747523 InitSndSeqNum: 0500156111
CongestionWindow: 0000130966 SlowStartThreshold: 0000065535
IncomingWindowNum: 1627517107 OutgoingWindowNum: 0500659006
SndWl1: 1627248788 SndWl2: 0500396862
SndWnd: 0000262144 MaxSndWnd: 0000262144
SndUna: 0500396862 rtt_seq: 0500156111
MaximumSegmentSize: 0000065483 DSField: 00
Round-trip information:
Smooth trip time: 0.000 SmoothTripVariance: 0.000
ReXmt: 0000000000 ReXmtCount: 0000000000
DupACKs: 0000000000 RcvWnd: 0000262144
SockOpt: 8C00 TcpTimer: 00
TcpSig: 05 TcpSel: 40
TcpDet: F8 TcpPol: 00
TcpPrf: 81 TcpPrf2: 22
TcpPrf3: 00
DelayAck: Yes
QOSPolicy: No
RoutingPolicy: No
ReceiveBufferSize: 0000262144 SendBufferSize: 0000262144
ReceiveDataQueued: 0000000000
SendDataQueued: 0000000000
SendStalled: No
Ancillary Input Queue: N/A
----
Client Name: BBODMGR Client Id: 0000021D
Local Socket: ::..9809
Foreign Socket: ::..0
[...]Resource Recovery Service (RRS)
RRS is used to guarantee transactional support.
For best throughput, use coupling facility (CF) logger for the RRS log.
Ensure that your CF logger configuration is optimal by using SMF 88 records.
Set adequate default values for the LOGR policy.
If you don't need the archive log, you should eliminate it since it can introduce extra DASD I/Os. The archive log contains the results of completed transactions. Normally, the archive log is not needed.
SVCDUMPs, SYSTDUMPs
Issue the following command to start dump processing:
/DUMP COMM='Dump Description'
83 IEE094D SPECIFY OPERAND(S) FOR DUMP COMMANDYou will use the number 83 (WTOR) in this case to reply to the system with dump parameters.
In order to reply to the system with the appropriate dump parameters, you need to know the address space ID of the address space you want to dump. There are other options for dumping address spaces; however, we are going to stick to 1 address space at a time using the method in this section. To find the ASIDX go to SDSF.DA (page right with F11).
The template for replying to a dump for a WebSphere address space: [xx],ASID=([yy]),SDATA=(RGN,TRT,CSA,NUC,PSA,GRSQ,LPA,SQA,SUM)
The reply to dump the servant ASIDX 16D is as follows (in SDSF.LOG):
/R 83,ASID=([16D]),SDATA=(RGN,TRT,CSA,NUC,PSA,GRSQ,LPA,SQA,SUM)After 2 minutes or so the following appears:
IEF196I IEF285I SYS1.DUMP.D111011.T193242.S34.S00005 CATALOGED
IEF196I IEF285I VOL SER NOS= XDUMP8.
IEA611I COMPLETE DUMP ON SYS1.DUMP.D111011.T193242.S34.S00005 646The "complete dump on" dataset can be downloaded in binary.
svcdump.jar
svcdump.jar is an "AS IS" utility that can process SVCDUMPs and print various information: https://www14.software.ibm.com/webapp/iwm/web/preLogin.do?source=diagjava
Examples:
- Print threads: java -cp svcdump.jar com.ibm.zebedee.dtfj.PrintThreads <dumpname>
- Extract PHD heapdump: java -cp svcdump.jar com.ibm.zebedee.commands.Convert -a <asid>
Security
When a SAF (RACF or equivalent) class is active, the number of profiles in a class will affect the overall performance of the check. Placing these profiles in a (RACLISTed) memory table will improve the performance of the access checks. Audit controls on access checks also affect performance. Usually, you audit failures and not successes.
Use a minimum number of EJBROLEs on methods.
If using Secure Sockets Layer (SSL), select the lowest level of encryption consistent with your security requirements. WebSphere Application Server enables you to select which cipher suites you use. The cipher suites dictate the encryption strength of the connection. The higher the encryption strength, the greater the impact on performance.
Use the RACLIST to place into memory those items that can improve performance. Specifically, ensure that you RACLIST (if used): CBIND, EJBROLE, SERVER, STARTED, FACILITY, SURROGAT
If you are a heavy SSL user, ensure that you have appropriate hardware, such as PCI crypto cards, to speed up the handshake process.
Here's how you define the BPX.SAFFASTPATH facility class profile. This profile allows you to bypass SAF calls which can be used to audit successful shared file system accesses.
Define the facility class profile to RACF.
RDEFINE FACILITY BPX.SAFFASTPATH UACC(NONE)
Activate this change by doing one of the following:
re-IPL
invoke the SETOMVS or SET OMVS operator commands.Use VLF caching of the UIDs and GIDs
Do not enable global audit ALWAYS on the RACF (SAF) classes that control access to objects in the UNIX file system. If audit ALWAYS is specified in the SETR LOGOPTIONS for RACF classes DIRACC, DIRSRCH, FSOBJ or FSSEC, severe performance degradation occurs. If auditing is required, audit only failures using SETR LOGOPTIONS, and audit successes for only selected objects that require it. After changing the audit level on these classes, always verify that the change has not caused an unacceptable impact on response times and/or CPU usage.
Global Resource Serialization (GRS)
Check global resource contention: /D GRS,C
ISG343I 16.57.02 GRS STATUS 300 NO ENQ RESOURCE CONTENTION EXISTS NO REQUESTS PENDING FOR ISGLOCK STRUCTURE NO LATCH CONTENTION EXISTS
WebSphere Application Server for z/OS uses global resource serialization (GRS) to communicate information between servers in a sysplex... WebSphere Application Server for z/OS uses GRS to determine where the transaction is running.
WebSphere Application Server for z/OS uses GRS enqueues in the following situations: Two-phase commit transactions involving more than one server, HTTP sessions in memory, Stateful EJBs, "Sticky" transactions to keep track of pseudo-conversational states.
If you are not in a sysplex, you should configure GRS=NONE, or if you are in a sysplex, you should configure GRS=STAR. This requires configuring GRS to use the coupling facility.
z/VM
- Enable CP Monitor and save data with MONWRITE.
- Performance Toolkit: http://www.vm.ibm.com/related/perfkit/
Memory Overcommit
In this document, we will define [overcommit] as the total of the virtual memory of the started (logged on) virtual machines to the total real memory available to the z/VM system.
When planning whether memory can be overcommitted in a z/VM LPAR, the most important thing is to understand the usage pattern and characteristics of the applications, and to plan for the peak period of the day. This will allow you to plan the most effective strategy for utilizing your z/VM system's ability to overcommit memory while meeting application-based business requirements.
For z/VM LPARs where all started guests are heavily-used production WAS servers that are constantly active, no overcommitment of memory should be attempted.
In other cases where started guests experience some idle time, overcommitment of memory is possible.
zLinux
Although a bit old, review https://public.dhe.ibm.com/software/dw/linux390/perf/gm13-0635-00.pdf
Hardware Counters
It is generally recommended to activate HIS and collect hardware counters:
S HIS
MODIFY HIS,BEGIN,CTR=HDWR,CNTFILE=NO,CTRONLY
F HIS,B,TT=‘Text',CTRONLY,CTR=ALL,SI=SYNC,CNTFILE=NO
D HISIBM i
IBM i product documentation: http://www-01.ibm.com/support/knowledgecenter/ssw_ibm_i/welcome
IBM Java on IBM i runs in PASE mode, so most of its behavior is the same as on AIX: http://www-01.ibm.com/support/knowledgecenter/ssw_ibm_i_72/rzalf/rzalfwhatispase.htm?lang=en
IBM i Recipe
- CPU core(s) should not be consistently saturated.
- Generally, physical memory should never be saturated and the operating system should not page memory out to disk.
- Input/Output interfaces such as network cards and disks should not be saturated, and should not have poor response times.
- TCP/IP and network tuning, whilst sometimes complicated to investigate, may have dramatic effects on performance.
- Operating system level statistics and optionally process level statistics should be periodically monitored and saved for historical analysis.
- Review operating system logs for any errors, warnings, or high volumes of messages.
- Review snapshots of process activity, and for the largest users of resources, review per thread activity.
- If the operating system is running in a virtualized guest, review the configuration and whether or not resource allotments are changing dynamically.
- Enable Collection Services for performance data.
- If there is sufficient network capacity for the additional packets, consider reducing the default TCP keepalive timer (CHGTCPA TCPKEEPALV) from 2 hours to a value less than intermediate device idle timeouts (e.g. firewalls).
- Test disabling delayed ACKs
Also review the general topics in the Operating Systems chapter.
Central Processing Unit (CPU)
IBM Systems Workload Estimator and processStats: https://www-912.ibm.com/estimator
Use Collection Services performance data to gather detailed performance information: http://www.ibm.com/support/knowledgecenter/SSAW57_8.5.5/com.ibm.websphere.nd.multiplatform.doc/ae/tprf_collectionservices.html
IBM iDoctor for IBM i PEX Analyzer
- Simplifies the collection and enhances the analysis of all types of PEX data, which includes, PROFILE, STATS and TRACE data.
- Provides the details necessary for the low-level analysis of processor utilization, DASD operations, file space usage, waits, file opens and much more.
IBM iDoctor for IBM i Job Watcher
- Provides real-time, non-intrusive, detailed and summarized views of job/thread/task performance data.
- It's the step to take to avoid a system wide trace or to ensure that a trace will yield useful data.
- It's a super WRKSYSACT that displays both "running" and "waiting" components for a job.
More information on CPU and call stacks can be found using the iDoctor tools including Performance Explorer and Job Watcher: https://www-912.ibm.com/i_dir/idoctor.nsf and http://www-01.ibm.com/support/docview.wss?uid=nas8N1012932
OS CPU Profiling
Profiling the CPU on the IBM i can be done on a global or individual job (JVM) basis. This is used with the Performance Explorer (PEX) tool. The process to gather the data is as follows:
1. Add the PEX definition with the *PMCO events (http://www-01.ibm.com/support/knowledgecenter/ssw_ibm_i_72/rzaha/profperf.htm?lang=en):
ADDPEXDFN DFN(JVMCPU) TYPE(*TRACE) JOB((*ALL/*ALL/JVMNAME *ALL)) MAXSTG(1000000) INTERVAL(1) TRCTYPE(*SLTEVT) SLTEVT(*YES) BASEVT((*PMCO *NONE *FORMAT2))2. Gather the data using the above PEX definition:
STRPEX SSNID(TRACE1) DFN(JVMCPU)3. Wait 5-10 minutes while the JVM is using high CPU, and then end the collection:
ENDPEX SSNID(TRACE1) DTALIB(QPEXDATA)4. Print the PEX report, first by program, and next by statement:
PRTPEXRPT MBR(TRACE1) LIB(QPEXDATA) TYPE(*PROFILE) PROFILEOPT(*SAMPLECOUNT *PROGRAM)
PRTPEXRPT MBR(TRACE1) LIB(QPEXDATA) TYPE(*PROFILE) PROFILEOPT(*SAMPLECOUN T *STATEMENT)5. This produces two spool files to show the breakout of CPU. Here is a histogram showing the breakdown:
All Jobs/Tasks CPU. . . : 41212922
Jobs in Collection CPU : 41212922
Job CPU . . . . . . . . : 38813410 94.2 %
Task CPU. . . . . . . . : 2399512 5.8 %
Task ID Job/Task Name Pool Priority Existence Elapsed Time (us) CPU (us) CPU %
00000000000008E1 WQLWI7 QWEBQRYADM 976015 2 171 Y Y 211403580 37479915 90.94
Cnt % %
-
16116 23.1 23.1 libj9jit23.so MethodMetaData.c/getNextMap
4539 6.5 29.5 JITC/java/util/StringTokenizer.scanToken(I)I
4081 5.8 35.4 libj9vm23.so strsup.s/copyCharsToUnicode
3226 4.6 40.0 libj9jit23.so MethodMetaData.c/findMapsAtPC
2788 4.0 44.0 libj9jit23.so MethodMetaData.c/matchingRange
1975 2.8 46.8 JITC/java/io/PrintWriter.println(Ljava/lang/String;)V
1740 2.5 49.3 JITC/java/lang/Throwable.printStackTrace(Ljava/io/PrintWriter;)V
1605 2.3 51.6 libj9jit23.so ArrayCopy.s/__arrayCopy
1058 1.5 53.1 libj9gc23.so ScavengerWriteBarrier.cpp/J9WriteBarrierStore
1049 1.5 54.6 libpthreads.a(shr_xpg5.o) pth_mutex.c/_mutex_lock
1041 1.5 56.1 libj9vm23.so strsup.s/convertCharsToString
1002 1.4 57.5 libj9gc23.so j9memclr.c/J9ZeroMemory
996 1.4 59.0 JITC/ibi/webfoc/wfutil/WFTracestackLocation.vectorizeStringBuffer(LjZ)Ljava/util/Vector;
904 1.3 60.2 libpthreads.a(shr_xpg5.o) pth_locks_ppc_mp.s/global_unlock_ppc_mp
869 1.2 61.5 libj9vm23.so optinfo.c/getLineNumberForROMClassFromROMMethod
859 1.2 62.7 libj9gc23.so MarkingScheme.cpp/scanObject__16MM_MarkingSchemeFP14MM_EnvironmentP8J9Object
623 0.9 63.6 libj9vm23.so segment.c/segmentSearchComparator
559 0.8 64.4 libpthreads.a(shr_xpg5.o) pth_locks_ppc_mp.s/global_lock_ppc_mp
553 0.8 65.2 libj9vm23.so strsup.s/convertCharsToString
543 0.8 66.0 libj9vm23.so findmethod.c/findROMClassInSegment
522 0.7 66.7 libj9vm23.so mthutil.s/nextROMMethod
515 0.7 67.5 libj9vm23.so strsup.s/convertCharsToString Per thread CPU usage
Gathering per thread CPU usage can be done in a variety of ways. The best is to use the WRKJVMJOB command. Example:
1. WRKJVMJOB
2. Take option 11 to display threads. This shows the total CPU (seconds) for each thread.
Job . . . . . . : TJH80EXP PID . . . . . . : 82839
User . . . . . . : QEJBSVR JDK . . . . . . : 1.6.0
Number . . . . . : 946396 Bits . . . . . . : 32
Type options, press Enter.
10=Display call stack
Total Aux
Thread Name Status CPU I/O
00000087 P=704863:O=0:CT THDW 10.336 8277
0000008A JIT Compilatio > THDW 76.830 809
0000008B JIT Compilatio > THDW 67.357 6
0000008C JIT Compilatio > THDW 42.743 3
0000008E IProfiler THDW 4.275 0
0000008F Signal Dispatc > THDW 64.984 0
00000091 Concurrent Mar > THDW 7.643 2790
00000092 GC Slave THDW 3.263 44
00000093 GC Slave THDW 3.172 38
00000094 GC Slave THDW 3.665 46
More...Another option would be to take option 13 instead of 11. This produces a spool file that can be displayed and sent to support.
Physical Memory (RAM)
Memory Pool Tuning and Faulting Guidelines: http://www-01.ibm.com/support/docview.wss?uid=nas8N1014941
Input/Output (I/O)
WRKDSKSTS shows the status of the disk drives. Look for "hot" drives indicating high %Busy. Units consistently above 30% busy will have slow IO response times.
Work with Disk Status RCHM199B
09/09/13 12:27:05
Elapsed time: 00:00:22
Size % I/O Request Read Write Read Write %
Unit Type (M) Used Rqs Size (K) Rqs Rqs (K) (K) Busy
1 4327 61744 87.7 .0 4.0 .0 .0 4.0 .0 0
2 4327 61744 87.7 .3 4.5 .2 .0 4.0 6.0 0
3 4327 61744 87.7 .0 4.0 .0 .0 .0 4.0 0
4 4327 61744 87.7 .0 4.0 .0 .0 .0 4.0 0
5 4327 61744 87.7 .0 4.0 .0 .0 .0 4.0 0
6 4327 61744 87.7 .1 8.0 .0 .1 .0 8.0 0
7 4327 61744 87.7 .1 4.0 .0 .0 4.0 4.0 0
8 4327 61744 87.7 .1 4.0 .0 .1 4.0 4.0 0 F11 shows another view and the current status. Look for DEGRADED or FAILED units. This example shows they are all ACTIVE. No issues.
--Protection--
Unit ASP Type Status Compression
1 1 DPY ACTIVE
2 1 DPY ACTIVE
3 1 DPY ACTIVE
4 1 DPY ACTIVE
5 1 DPY ACTIVE
6 1 DPY ACTIVE
7 1 DPY ACTIVE
8 1 DPY ACTIVE Networking
Tune TCP/IP buffer sizes. Use CHGTCPA to tune them up to 8096 KB: http://www.ibm.com/support/knowledgecenter/SSAW57_8.5.5/com.ibm.websphere.nd.multiplatform.doc/ae/tprf_tunetcpip.html
Using Collection Services Performance Data
WAS provides scripts to enable collection services for performance data: http://www-01.ibm.com/support/knowledgecenter/SSAW57_8.5.5/com.ibm.websphere.nd.multiplatform.doc/ae/tprf_collectionservices.html
Gathering Javacores using WRKJVMJOB
Gathering javacores, core dumps, heap dumps, and JVM summary data is very simple on the IBM i. The WRKJVMJOB utility allows you to do all of this.
1. Execute WRKJVMJOB
2. This produces a list of all the JVMs active on the system
Work with JVM Jobs RCHM199B
09/09/13 12:11:42
Active JVMs on system: 22
Type options, press Enter.
5=Work with 7=Display job log 8=Work with spooled files
9=Display GC information 11=Display threads 12=Dump 13=Print
Opt Job Name User Number Function Status
QSRVMON QSYS 842707 JVM-ServiceMon THDW
QP0ZSPWT HENDERAN 862730 JVM-WSPreLaunc TIMW
BENNIEDMGR QEJBSVR 911766 PGM-jvmStartPa THDW
NODEAGENT QEJBSVR 911778 PGM-jvmStartPa THDW
BENNIENODE QEJBSVR 911779 PGM-jvmStartPa THDW
SHU85EONE QEJBSVR 916849 PGM-jvmStartPa THDW
STIMSERVER QEJBSVR 934284 PGM-jvmStartPa THDW
BENNIE QEJBSVR 937798 PGM-jvmStartPa THDW
DMGR QEJBSVR 941298 PGM-jvmStartPa THDW
12 TJH80EXP QEJBSVR 946396 PGM-jvmStartPa THDW 3. From this list, you can select option 12 to dump. By default, option 12 performs a javacore dump. To produce a different type of dump, you can select 12 next to the JVM, then hit F4 to prompt the command. This will allow you to change. Note the type of dump. (*JAVA = javacore, *SYSTEM = Core dump, *HEAP = heapdump.phd file is produced)
Generate JVM Dump (GENJVMDMP)
Type choices, press Enter.
Job name . . . . . . . . . . . . > TJH80EXP Name
User . . . . . . . . . . . . . > QEJBSVR Name
Number . . . . . . . . . . . . > 946396 000000-999999
Type . . . . . . . . . . . . . . *JAVA *JAVA, *SYSTEM, *HEAP
+ for more values 4. The dumps produced (javacore, heapdump, core dump) will be placed in the JVMs user home directory. The joblog for the JVM will show the location of the file. For example:
DSPJOBLOG JOB(946396/QEJBSVR/TJH80EXP)
JVMDUMP010I Java dump written to /QIBM/UserData/WebSphere/AppServer/V8/Express/profiles/tjh80exp/javacore.20130909.121650.82839.0001.txtJVM Monitoring
Viewing the Application Server JVM can be done through WRKACTJOB. This command shows the total CPU seconds, CPU %, and IO for the job based on the elapsed time:
Work with Active Jobs RCHM199B
09/09/13 11:40:35
CPU %: 2.2 Elapsed time: 00:00:10 Active jobs: 339
Type options, press Enter.
2=Change 3=Hold 4=End 5=Work with 6=Release 7=Display message
8=Work with spooled files 13=Disconnect ...
--------Elapsed---------
Opt Subsystem/Job Type Pool Pty CPU Int Rsp AuxIO CPU %
QWAS8 SBS 2 0 .0 0 .0
TJH80EXP BCH 2 20 3454.9 0 .0 F11 shows further views, including number of threads, status, and function.
Opt Subsystem/Job User Number Type CPU % Threads
QWAS8 QSYS 894103 SBS .0 2
TJH80EXP QEJBSVR 946396 BCH .0 74
Current
Opt Subsystem/Job User Type CPU % Function Status
QWAS8 QSYS SBS .0 DEQW
TJH80EXP QEJBSVR BCH .0 PGM-jvmStartPa THDW WRKSYSSTS shows the memory pool activity for the JVM. The WRKACTJOB above shows the WebSphere server "TJH80EXP" is running in system pool 2. The example output of WRKSYSSTS below shows system pool 2 as having 28,626MB allocated. The page faults are in faults/second, and split between DB and Non-DB faults. This is based on elapsed time.
WRKSYSSTS ASTLVL(*ADVANCED)
Work with System Status RCHM199B
09/09/13 11:51:52
% CPU used . . . . . . . : 2.0 System ASP . . . . . . . : 493.9 G
% DB capability . . . . : .0 % system ASP used . . . : 87.7574
Elapsed time . . . . . . : 00:07:58 Total aux stg . . . . . : 493.9 G
Jobs in system . . . . . : 3211 Current unprotect used . : 15970 M
% perm addresses . . . . : .032 Maximum unprotect . . . : 22252 M
% temp addresses . . . . : .569
Sys Pool Reserved Max ----DB----- --Non-DB--- Act- Wait- Act-
Pool Size M Size M Act Fault Pages Fault Pages Wait Inel Inel
1 1187.55 606.00 +++++ .0 .0 .0 .0 10.5 .0 .0
2 28626.03 11.30 820 .0 .4 .0 .2 39221 .0 .0
3 13319.48 .56 1140 .0 .0 .0 .0 558.7 .0 .0
4 .25 .00 5 .0 .0 .0 .0 .0 .0 .0The above shows very low page fault rate based on almost 8 minutes elapsed time. Also note the Wait-Inel and Act-Inel counts as being 0. A higher value indicates the max act value is too low for the amount of threads active in the pool. This would cause performance problems.
F11 again shows the pool names. System pool 2 is the *BASE pool. This is the default pool for IBM i batch processes, including WebSphere
Sys Pool Reserved Max Paging
Pool Size M Size M Act Pool Subsystem Library Option
1 1187.55 606.00 +++++ *MACHINE *FIXED
2 28626.03 11.30 820 *BASE *CALC
3 13319.48 .56 1140 *INTERACT *CALC
4 .25 .00 5 *SPOOL *FIXEDWindows
Windows Recipe
- CPU core(s) should not be consistently saturated.
- Generally, physical memory should never be saturated and the operating system should not page memory out to disk.
- Input/Output interfaces such as network cards and disks should not be saturated, and should not have poor response times.
- TCP/IP and network tuning, whilst sometimes complicated to investigate, may have dramatic effects on performance.
- Consider changing Processor Performance Management (PPM) to the "High Performance" setting or disabling it.
- Operating system level statistics and optionally process level statistics should be periodically monitored and saved for historical analysis.
- Review operating system logs for any errors, warnings, or high volumes of messages.
- Review snapshots of process activity, and for the largest users of resources, review per thread activity.
- If the operating system is running in a virtualized guest, review the configuration and whether or not resource allotments are changing dynamically.
- Use Perfmon to review performance activity.
- Use the Windows Performance Toolkit to review sampled native processor usage.
- If there is sufficient network capacity for the additional packets, consider reducing the default TCP keepalive timer (HKLM\System\CurrentControlSet\Services\Tcpip\Parameters\KeepAliveTime) from 2 hours to a value less than intermediate device idle timeouts (e.g. firewalls).
- Test disabling delayed ACKs
Also review the general topics in the Operating Systems chapter.
General
Check the Windows Event log (eventvwr.exe) for any warnings, error messages, or repeated informational messages.
Microsoft performance tuning guidelines by server version: https://msdn.microsoft.com/en-us/library/windows/hardware/dn529134
Command Prompt
Recursive search for a file pattern:
> @echo off
> for /F "usebackq" %i in (`dir /s /b *.pdb`) do echo %i
> @echo onWindows Registry
Many operating system settings are changed in the Windows registry. To open the registry, execute regedit.exe.
We recommend periodically backing up the registry, particularly before any significant changes:
- File > Export
- Export Range=All
- Save as some file.reg
Performance Monitor (Perfmon)
Perfmon is the generally recommended tool for Windows performance analysis.
"Windows Performance Monitor is a Microsoft Management Console (MMC) snap-in that provides tools for analyzing system performance. From a single console, you can monitor application and hardware performance in real time, customize what data you want to collect in logs, define thresholds for alerts and automatic actions, generate reports, and view past performance data in a variety of ways." (https://technet.microsoft.com/en-us/library/cc749154.aspx)
By default, counters do not show the process ID, so with multiple java processes, they are java_N, and if one process ends, all counters N+1 actually change. It is recommended to change to the PID format (https://support.microsoft.com/kb/281884):
HKEY_LOCAL_MACHINE\SYSTEM\CurrentControlSet\Services\PerfProc\Performance
DWORD ProcessNameFormat=2
No restarts of the machine or Java are required - just restart Perfmon if it was open.
View Live Data
In the left pane, select Performance > Monitoring Tools > Performance Monitor.
This will show a live graph of % Processor Time:

Some useful tips:
- To delete a counter, select the row in the bottom table and click Delete.
- Click the pencil toggle button to highlight the currently selected counter.
- By default, all counter values are scaled between 0 and 100. You can see if values are scaled by looking at the Scale column.
- "Last" is the last sampled value ("Minimum" and "Maximum" are also useful).
- "Average" is the average of all sampled values.
- "Duration" is the amount of time (rolling) that Perfmon will capture and display data. To extend this, right click on the graph > Properties > General > Duration = X seconds
- There are more options in the properties dialog that are worth exploring.
To add a counter, click the green plus icon:

Select a counter and the instances and click Add >>. In general, select <All instances> to ensure you get all the data. For example, if you select Process > % Processor time and you select <All instances>, if a process is spawned after data collection starts, it will be captured.
The instances are a way to look at counters in a more granular way. For example, the 0 and 1 instances above correspond to the two processors on this machine. If we select _Total, we will get the average of both processors. If we select <All instances>, this is a convenience and it is equivalent to multi-selecting _Total, 0, and 1.
Check "Show description" to better understand each counter.
Logging Perfmon Data to Files
For historical analysis of system metrics, configure Microsoft Perfmon to log statistics to files:
- Start perfmon.exe
- Performance } Monitoring Tools } Right Click on Performance Monitor } New } Data Collector Set or Performance } Data Collector Sets } Right Click on User Defined } New } Data Collector Set
- Specify any name, select "Create manually (Advanced)" and click Next
- Under the "Create data logs" section, select the Performance counter box, and click Next.
- In the "Performance counters:" section, click the "Add" button.
Select each of the following counters:
- Expand Processor } % Interrupt Time, % Privileged Time, % Processor Time, % User Time } All instances } Add
- Expand Network Interface } Bytes Received/sec, Bytes Sent/sec, Output Queue Length, Packets Outbound Discarded, Packets Outbound Errors, Packets Received Discarded, Packets Received Errors } All instances
- Expand Process } % Privileged Time, % Processor Time, % User Time, IO Data Bytes/sec, IO Data Operations/sec, IO Other Bytes/sec, IO Other Operations/sec } All instances
- Expand Thread } % Processor Time, ID Process, ID Thread } All instances
- Expand LogicalDisk } % Disk Read Time, % Disk Write Time, % Free Space, % Idle Time, Avg. Disk Bytes/Read, Avg. Disk Bytes/Write, Avg. Disk sec/Read, Avg. Disk Read Queue Length, Avg. Disk sec/Write, Avg. Disk Write Queue Length, Disk Read Bytes/sec, Disk Reads/sec, Disk Write Bytes/sec, Disk Writes/sec } All instances
- Expand Memory } Available MBytes, Cache Bytes, Cache Faults/sec, Committed Bytes, Free System Page Table Entries, Page Faults/sec, Pages Input/sec, Pages Output/sec, Pool Nonpaged Bytes, Pool Pages Bytes, System Cache Resident Bytes
- Expand Paging File } % Usage
- Expand System } File Control Bytes/sec, File Control Operations/sec, File Data Operations/sec, File Read Bytes/sec, File Read Operations/sec, File Write Bytes/sec, File Write Operations/sec, Processor Queue Length, System Calls/sec
- Change the "Sample Interval" to 30 seconds and click Next.
- In the "Where would you like the data to be saved?" section, change the path for the Perfmon files if you would like, click Next.
- In the "Create the data collector set?" section, click on the Finish button.
- Ensure that the directory where the Perfmon files will be written has sufficient space.
- Start the collection by right clicking and clicking Start.
- After the test is complete, click Stop.
- Gather *.blg from the output directory
For similar instructions and screenshots, see https://www.ibm.com/support/pages/node/411769
Load Existing Logs into Perfmon
- In the left pane, select Performance } Monitoring Tools } Performance Monitor.
- Select the icon for View Log Data.
- Select Log files: and click Add... and browse to the location of the Perfmon blg log files.
- Click Add to select from the available counters in the data.
typeperf
The Windows typeperf command allows for simple access to performance counters from the command line: https://docs.microsoft.com/en-us/windows-server/administration/windows-commands/typeperf
Central Processing Unit (CPU)
The key Perfmon counters are Process > % Interrupt Time, % Privileged Time, % Processor Time, % User Time > <All instances>. Note that the processor statistics for a particular process are in terms of a percentage of total CPU time, so if a process is using 2 CPUs at 100%, the sampled value will be 200.
"Where the "_Total" line reaches 100%, the Java process probably became constrained on CPU. If all the CPU is being used by the Java process, the performance is being limited by the machine. If another process is taking large amounts of CPU at those points in time, CPU contention is limiting the performance of the Java process." (Old Java Diagnostic Guide)
Per-Thread CPU Usage
With the Perfmon Thread counters, identify the threads that are using high CPU and convert the "ID Thread" value to hexadecimal. On IBM Java, if a thread dump was taken during these high CPU times, search the javacore file for the hexadecimal identifier to find the Java stack:
The reason for generating per-thread CPU usage information about the Java process is to understand what is happening to the process. The Java process might be deadlocked if all the threads are taking little or no CPU time. Points of contention or delay might be in the Java process if it does not take all the available CPU, even though the CPU usage is spread evenly over a number of threads in the process. This CPU usage pattern might also indicate a scalability issue. Finally, you might have a looping problem if the Java CPU usage is approaching 100% and a small number of the threads account for all of that CPU usage. The threads using the most process time might be looping. When you find some threads of interest, note the ID Thread values. Convert the values to hexadecimal, and look for the threads in the thread stack trace of the javacore.txt file. This trace helps you to determine if the thread is part of a thread pool and to understand what kind of work the thread performs. For example, an ID thread of 9244 becomes 241C in hexadecimal and is found in the "native ID" value in the javacore.txt file.
Perfmon counters: "% Processor Time", "ID Thread", and any other counters in which you are interested for all the Java thread instances
Old Java Diagnostic Guide
PsList
An alternative tool is pslist which is part of pstools: https://technet.microsoft.com/en-us/sysinternals/bb896682.aspx. See also http://www-01.ibm.com/support/docview.wss?uid=swg21304776
In most modes, you can filter the results by passing a process name prefix (such as java) or a PID at the end of the command.
No arguments prints the accumulated CPU time of each process and the elapsed time each process has been running:
> pslist.exe
Process information for ADMINIB-I6CU78U:
Name Pid Pri Thd Hnd Priv CPU Time Elapsed Time
Idle 0 0 2 0 0 11:08:07.609 0:00:00.000
System 4 8 82 4062 108 0:01:36.500 5:41:15.690
smss 240 11 2 30 440 0:00:01.484 5:41:13.940
csrss 316 13 9 871 2324 0:00:02.312 5:40:51.518...The pslist argument -s shows an auto-updating view similar to task manager (similar to the top command on Unix platforms):
> pslist -s
2:24:04 PM 2/5/2014 Process information for ADMINIB-I6CU78U:
Name Pid CPU Thd Hnd Priv CPU Time Elapsed Time
Idle 0 97 2 0 0 11:15:27.906 5:45:06.985
pslist 4348 3 2 155 2840 0:00:02.015 0:00:30.546
smss 240 0 2 30 440 0:00:01.484 5:45:05.23537.32
csrss 316 0 9 847 2324 0:00:02.312 5:44:42.813
csrss 364 0 8 403 2504 0:00:01.234 5:44:41.250
wininit 372 0 3 77 1472 0:00:00.234 5:44:41.250
winlogon 404 0 3 113 2728 0:00:00.265 5:44:41.188...The pslist argument -t shows a tree view of process ownership:
> pslist -t
Process information for ADMINIB-I6CU78U:
Name Pid Pri Thd Hnd VM WS Priv
Idle 0 0 2 0 0 24 0
System 4 8 82 4030 3380 300 108
smss 240 11 2 30 4024 1100 440
java 2684 8 87 989 816720 315196 294696
csrss 316 13 9 853 50260 4780 2324
csrss 364 13 8 406 210896 12332 2504
conhost 3484 8 2 79 77380 9916 4400
wininit 372 13 3 77 49392 4452 1472
services 460 9 9 248 45168 9796 6204
svchost 580 8 10 362 46512 9492 3832
WmiPrvSE 2152 8 7 339 80312 16304 8368
ProtectionUtilSurrogate 4036 8 10 289 98168 13184 4304...The pslist argument -d prints the accumulated CPU times of each thread as well as the elapsed times the threads have existed:
> pslist -d java
Thread detail for ADMINIB-I6CU78U:
java 2684:
Tid Pri Cswtch State User Time Kernel Time Elapsed Time
2688 9 6 Wait:UserReq 0:00:00.000 0:00:00.000 5:47:24.155
2696 9 8465 Wait:UserReq 0:00:07.515 0:00:06.906 5:47:24.155
2700 8 22 Wait:UserReq 0:00:00.000 0:00:00.000 5:47:24.155
2704 15 8401 Wait:UserReq 0:00:08.921 0:00:02.203 5:47:24.092
2716 15 1146663 Wait:UserReq 0:00:00.000 0:00:00.000 5:47:23.733
2720 9 33519 Wait:UserReq 0:00:00.578 0:00:00.468 5:47:23.733...The pslist argument -x is the same as -d but also prints memory information about the process (to get processes' memory without threads, use -m):
> pslist -x java
Process and thread information for ADMINIB-I6CU78U:
Name Pid VM WS Priv Priv Pk Faults NonP Page
java 2684 816720 315328 304244 313384 159552 633 257
Tid Pri Cswtch State User Time Kernel Time Elapsed Time
2688 9 6 Wait:UserReq 0:00:00.000 0:00:00.000 5:47:41.686
2696 9 8465 Wait:UserReq 0:00:07.515 0:00:06.906 5:47:41.686
2700 8 22 Wait:UserReq 0:00:00.000 0:00:00.000 5:47:41.686
2704 15 8402 Wait:UserReq 0:00:08.937 0:00:02.203 5:47:41.624
2716 15 1146681 Wait:UserReq 0:00:00.000 0:00:00.000 5:47:41.264...Windows Performance Toolkit (WPT)
The Windows Performance Toolkit is a free tool from Microsoft that provides various dimensions of performance analysis: https://docs.microsoft.com/en-us/windows-hardware/test/wpt/
Installation
- Download Windows Assessment and Deployment Kit (Windows ADK)
- On the "Select the features you want to install" screen, only "Windows Performance Toolkit" is required.
- On 64-bit Windows 7 and Windows Server 2008 (but not newer versions
such as Windows 8 and Windows Server 2012), add the following registry
entry and reboot:
REG ADD "HKLM\System\CurrentControlSet\Control\Session Manager\Memory Management" -v DisablePagingExecutive -d 0x1 -t REG_DWORD -f
Collect Data
There are two main ways to collect data (ETL file):
- GUI:
- Start
C:\Program Files*\Windows Kits\*\Windows Performance Toolkit\WPRUI.exeas Administrator (replace with the correct path toWPRUI.exe) - Leave the defaults of Performance Scenario=General, Detail level=Verbose, Logging mode=Memory. These buffer data to memory, so available RAM is needed. There are also options to flush to files.
- Check Resource Analysis } CPU usage
- Click Start
- Reproduce the problem for at least a few minutes
- Click Save to stop
- Start
- Command line:
- Start command prompt as Administrator
- Start collection (replace with the correct path):
"C:\Program Files*\Windows Kits\*\Windows Performance Toolkit\xperf.exe" -on SysProf -stackwalk Profile -BufferSize 1024 -MaxBuffers 320 - These options buffer data to memory, so available RAM is needed. There are also options to flush to files.
- Reproduce the problem for at least a few minutes
- Stop collection (replace with the correct path to
xperf.exe):"C:\Program Files*\Windows Kits\*\Windows Performance Toolkit\xperf.exe" -d callstacks.etl
By default, WPT data is written to
%HOMEPATH%\Documents\WPR Files\*.etl. When clicking the
"Start" button, the old collection files are not overwritten.
Also consider UIforETW.
Analyze Data
There are three main ways to view an ETL file:
Windows Performance Analyzer (WPA.exe %ETL%)
Trace > Configure Symbol Paths
If .NET code was running at the time of the capture, an NGENPDB folder will be automatically created under %HOMEPATH%\Documents\WPR Files\ with the name of the .etl file. If it may be necessary to investigate .NET code, copy this path, which is automatically included in the default symbol path in WPA, and add to the end of the final symbol path.Example: C:\work\WAS8554_20140924\java\jre\bin\;C:\work\WAS8554_20140924\java\jre\bin\compressedrefs\;C:\work\WAS8554_20140924\lib\native\win\x86_64\;srv*C:\Symbols*http://msdl.microsoft.com/download/symbols;
Trace > Load Symbols
Absolute Times
WPA shows all data in relative terms (seconds). Unfortunately, there doesn't appear to be an option to use absolute timestamps. To determine when the tracing started:
- Click Trace > System Configuration
- Click Traces
- Review Start Time (UTC)
The default ETL file name will include the date and time in local format, but this appears to be roughly the time the trace is requested to be stopped.
It is common for a ~200 second delay between the start of the capture and availability of some data (presumably while the kernel is initializing tracing).
CPU Analysis
- Expand Computation > CPU Usage (Sampled) > Utilization by
Process, Stack

Flamegraphs can also be generated: https://randomascii.wordpress.com/2013/03/26/summarizing-xperf-cpu-usage-with-flame-graphs/
CPU Usage by Thread
- Expand Computation > CPU Usage (Attributed) > Utilization by
Process, Thread, Activity *

Disk Analysis
- Expand Storage > Disk Usage > Service Time by Process, Path
Name, Stack

- The disk times are in microseconds (https://blogs.technet.microsoft.com/b/robertsmith/archive/2012/02/07/analyzing-storage-performance-using-the-windows-performance-toolkit.aspx).
Analyzing on Another Machine
- Gather the etl file from %HOMEPATH%\Documents\WPR Files\
- Gather all *.pdb files from the WebSphere folder.
- If .NET code was running at the time of the capture, an NGENPDB folder will be automatically created under %HOMEPATH%\Documents\WPR Files\ with the name of the .etl file. If it may be necessary to investigate .NET code, also gather this folder.
TPROF
The open source performance inspector suite (originally created by IBM) includes a native Windows sampling profiler called TPROF: http://perfinsp.sourceforge.net/tprof.html
This is a great way to understand which native modules are using the CPU and it is requested as part of the IBM Performance MustGather on Windows: http://www-01.ibm.com/support/docview.wss?uid=swg21111364
The reason this tool is so useful is that it is a sampling profiler (see the Java Profilers chapter for background on this topic). It will sample the native stacks of the processes approximately every 7 milliseconds. This tends to be a very low overhead (less than a few percent) way to get insight into CPU usage without dramatically impacting the system. In general, TPROF can be used in production environments, although you should fully test this in a test environment first.
The instructions to install and use TPROF are quite straightforward: http://www-01.ibm.com/support/docview.wss?uid=swg21403450
Currently, TPROF does not work on Windows Server >= 2012.
Install with tinstall.cmd
Run with:
> setrunenv.cmd
> run.tprof.cmd
Press ENTER to start capturing data
Reproduce the problem
Press ENTER again to stop capturing data
Open tprof.out to analyze the results (see the TechNote above for a description of the various sections)For example, in one case we were led to investigate some third party drivers by seeing a significant amount of CPU usage in the kernel (and other modules that are not shown here for confidentiality):
PID 695 51.00 java.exe_0c8c
MOD 320 20.46 C:\Windows\system32\ntoskrnl.exeProcessor Performance Management (PPM)
Processor Performance Management (PPM) is a power saving feature. It may be changed to the "High Performance" setting: https://technet.microsoft.com/en-us/library/dd744398%28v=ws.10%29.aspx
A common symptom in profilers such as TPROF is a high CPU usage in, for example, the intelppm.sys driver:
LAB TKS %%% NAMES
MOD 20448 7.13 C:\Windows\system32\DRIVERS\intelppm.sysFor example, the intelppm driver may be disabled with the following command followed by a restart:
> sc config intelppm start= disabledMemory
Terms:
- Memory may be reserved for future use although this puts no demands on RAM or paging spaces.
- Reserved memory may be concurrently or subsequently committed which ensures there is virtual space in RAM or paging spaces although committed memory only becomes resident in RAM once it's touched (read/written). Programs such as Task Manager have an option to add a column called the "Commit Size" which is the total committed. Reserved and committed memory are roughly two different ways of looking at the "virtual size" of the process from the terms of other operating systems.
- The working set of a process is the amount of memory resident in RAM. This is roughly the "resident set size" of the process from the terms of other operating systems.
- The commit
limit of a Windows node is the size of RAM plus all paging spaces.
If the commit
charge hits the commit limit, after the maximum number of paging
space auto-increases (when "Automatically
manage paging file size for all drives" is checked), a request to
commit memory will
fail even if there is available physical RAM. Unlike Linux, for
example, Windows does not allow overcommit of virtual memory (other then
reservations without commits):
The system commit charge is the total committed or "promised" memory of all committed virtual memory in the system. If the system commit charge reaches the system commit limit, the system and processes might not get committed memory. This condition can cause freezing, crashing, and other malfunctions. Therefore, make sure that you set the system commit limit high enough to support the system commit charge during peak usage.
Physical Memory (RAM)
Perfmon counters (https://technet.microsoft.com/en-us/library/2008.08.pulse.aspx):
- Memory\Available bytes = The amount of free physical memory available for running processes.
- Memory\Cache bytes = The amount of physical memory used by the file system cache.
- Memory\Free System Page Table Entries = The number of free PTEs. Should be non-zero.
- Memory\Pool Non-Paged Bytes = Memory used by the kernel which cannot be paged out.
- Memory\Pool Paged Bytes = Memory used by the kernel which can be paged out.
Process Memory Usage
To monitor process memory usage in Perfmon, check Process\Virtual Bytes and Process\Private Bytes.
VMMap is a useful tool to get a detailed breakdown of process memory usage: https://technet.microsoft.com/en-us/sysinternals/dd535533.aspx
Windows 32-bit uses a default virtual user address space of 2GB (http://download.boulder.ibm.com/ibmdl/pub/software/dw/jdk/diagnosis/dw3gbswitch3.pdf):

This can be changed to a 3GB virtual user address space:

The OS space (Windows kernel) is used for things such as the paged and non-paged pools (e.g. network buffers, see https://blogs.technet.microsoft.com/b/markrussinovich/archive/2009/03/26/3211216.aspx), page table entries (https://technet.microsoft.com/en-us/library/cc784475(v=WS.10).aspx and https://technet.microsoft.com/en-us/library/cc786709(WS.10).aspx), and drivers.
On older versions of Windows, you enable 3GB mode with a /3GB flag in boot.ini and reboot the box: https://technet.microsoft.com/en-us/library/bb124810.aspx and https://msdn.microsoft.com/en-us/library/bb613473(v=vs.85).aspx
On newer versions of Windows, use BCDEdit /set increaseuserva 3072 and reboot the box: https://msdn.microsoft.com/en-us/library/ff542202.aspx
In 3GB mode, some libraries are still based at the 2GB boundary, so -Xmx is practically limited to between -Xmx1408m and -Xmx1856m because it is a single, contiguous allocation. Library rebasing is possible but then shared libraries are loaded privately.
Starting in IBM Java 6, the split heap option may be used which forces gencon and allows you to straddle nursery and tenured regions around the 2GB area. For example: -Xgc:splitheap -Xmx2800m -Xmox1800m (http://www.ibm.com/support/knowledgecenter/SSYKE2_8.0.0/com.ibm.java.win.80.doc/diag/appendixes/cmdline/xgcsplitheap.html)
A program must be linked with /LARGEADDRESSAWARE to utilize a system configured in a way other than the default 2GB mode. IBM Java is linked with this option.
"If an application was linked with /LARGEADDRESSAWARE, DUMPBIN
/HEADERS will display information to that effect."
https://msdn.microsoft.com/en-us/library/wz223b1z.aspx
This option is not risk free: Third party JNI libraries with pointer arithmetic may have unexpected issues or crashes. The kernel itself may also run into issues, particularly with exhausted page translation table entries or an exhausted non-paged pool when there is a lot of network activity.
Input/Output (I/O)
Useful Perfmon counters for disks are (https://technet.microsoft.com/en-us/library/cc722466.aspx):
- LogicalDisk\Avg. Disk sec/Read: Average time, in seconds, of a read of data from the disk
- LogicalDisk\Avg. Disk sec/Write: Average time, in seconds, of a write of data to the disk
- LogicalDisk\Current Disk Queue Length: Indicates the number of disk requests that are currently waiting as well as requests currently being serviced.
- LogicalDisk\%Idle Time: Reports the percentage of time that the disk system was not processing requests and no work was queued.
- LogicalDisk\Disk Reads/sec
- LogicalDisk\Disk Writes/sec
- LogicalDisk\Disk Read Bytes/sec
- LogicalDisk\Disk Write Bytes/sec
- Process\IO Read Bytes/sec
- Process\IO Write Bytes/sec
Defragmentation
As you delete files, you create gaps in the arrangement of the contiguously stored files. As you save new files (and this is especially true for large files), the file system uses up all of these bits of free space - resulting in the new files being scattered all over the disk in noncontiguous pieces. And thus we end up with fragmented disks and system performance issues because the disk heads have to spend time moving from cluster to cluster before they can read or write the data.
[The Disk Defragmenter] utility physically rearranges the files so that they are stored (as much as possible) in physically contiguous clusters. In addition to the consolidation of files and folders, the Defragmenter utility also consolidates free space - meaning that it is less likely for new files to be fragmented when you save them. For operating systems prior to Windows Vista, you had to manually run the utility or schedule automatic defragmentation via a scheduled task. On Windows Vista, Disk Defragmenter runs as a low-priority background task that is automatically run on a weekly basis without requiring user intervention. On Windows Server 2008, which uses the same Disk Defragmenter, the automatic defragmentation is not enabled by default... The basic operation of the utility involves passing it a driver letter, for example: defrag.exe c: would perform a defragmentation of the C: drive.
> defrag c: -a
CIFS/SMB
The most common protocols for a networked file systems on Windows are Common Internet File System (CIFS) and Server Message Block (SMB). The SMB version 2 protocol is new and no longer synonymous with CIFS (https://msdn.microsoft.com/en-us/library/ee441790.aspx).
The versions of SMB2 are 2.002, 2.1, 3.0, and 3.02 (https://msdn.microsoft.com/en-us/library/cc246492.aspx).
If acceptable from a security point of view, consider disabling SMB packet signing: "By default, client-side SMB signing is enabled on workstations, servers, and domain controllers... Using SMB packet signing can degrade performance up to 15 percent on file service transactions" (https://technet.microsoft.com/en-us/library/cc731957.aspx) and "... the overhead could get extremely high-up to 40 percent in some situations" (https://technet.microsoft.com/en-us/library/cc512612.aspx). Disable 'Microsoft network client: Digitally sign communications (if server agrees)' and 'Microsoft network client: Digitally sign communications (always)'.
SMB2.1 introduces large Maximum Transmission Unit (MTU) support up to 1MB (https://technet.microsoft.com/en-us/library/ff625695(v=ws.10).aspx). It is enabled with HKEY_LOCAL_MACHINE\System\CurrentControlSet\Services\LanmanWorkstation\Parameters\DisableLargeMtu = 0 followed by a reboot (http://download.microsoft.com/download/9/B/2/9B205446-37EE-4BB1-9A50-E872565692F1/PerfTuningGuideServer2012R2.pdf).
The Perfmon counter Network Interface\Bytes Total/sec may be used to test the throughput behavior of SMB: https://blogs.technet.microsoft.com/b/josebda/archive/2008/11/11/file-server-performance-improvements-with-the-smb2-protocol-in-windows-server-2008.aspx
Test the response time of an SMB copy using a large file by creating a batch file such as largefilecopy.bat:
@echo off
echo %TIME%
xcopy /J /Y %PATHTOLARGELOCALFILE% \\%SMBPATH%
echo %TIME%One technique of determining what proportion of time a process spends waiting for SMB responses is to gather network trace, filter to the times spanning a particular process request, add a Wireshark column for smb2.time, export to CSV, sum the service response times, and compare to the elapsed time of the process request.
Some people suggest disabling "Domain member: Digitally encrypt secure channel data;" however, this option does not appear to be related to SMB traffic (https://technet.microsoft.com/en-us/library/jj852270(v=ws.10).aspx).
Networking
Update TIME_WAIT timeout: HKEY_LOCAL_MACHINE\SYSTEM\CurrentControlSet\Services\Tcpip\Parameters\TcpTimedWaitDelay = REG_DWORD value 30 (https://www.ibm.com/support/knowledgecenter/SSAW57_8.5.5/com.ibm.websphere.nd.doc/ae/tprf_tunewindows.html)
Update maximum ephemeral local port: HKEY_LOCAL_MACHINE\SYSTEM\CurrentControlSet\Services\Tcpip\Parameters\MaxUserPort = REG_DWORD value 65534 (https://www.ibm.com/support/knowledgecenter/SSAW57_8.5.5/com.ibm.websphere.nd.doc/ae/tprf_tunewindows.html)
Consider disabling delayed TCP acknowledgments: HKEY_LOCAL_MACHINE\SYSTEM\CurrentControlSet\Services\Tcpip\Parameters\Interfaces\TcpAckFrequency = REG_DWORD value 1. Warning: This option may or may not be better depending on the workload (see the discussion of delayed acknowledgments). (https://www.ibm.com/support/knowledgecenter/SSAW57_8.5.5/com.ibm.websphere.nd.doc/ae/tprf_tunewindows.html, https://support.microsoft.com/kb/328890)
Consider increasing the TCP maximum window size. For example, to set the value to 65535, HKEY_LOCAL_MACHINE\SYSTEM\CurrentControlSet\Services\Tcpip\Parameters\GlobalMaxTcpWindowSize = REG_DWORD value 0xFFFF: https://www.ibm.com/support/knowledgecenter/SSAW57_8.5.5/com.ibm.websphere.nd.doc/ae/tprf_tunetcpip.html
Consider increasing the maximum number of TCP/IP control blocks (MaxFreeTcbs) when using large numbers of connections: https://technet.microsoft.com/en-us/library/cc938178.aspx. When modifying MaxFreeTcbs, MaxHashTableSize must also be modified proportionally: https://technet.microsoft.com/en-us/library/cc938176.aspx
Starting with Windows Server 2008, it is no longer applicable to modify EnableDynamicBacklog/MinimumDynamicBacklog/MaximumDynamicBacklog/DynamicBacklogGrowthDelta (https://www.ibm.com/support/knowledgecenter/SSAW57_8.5.5/com.ibm.websphere.nd.doc/ae/tprf_tunewindows.html, https://support.microsoft.com/kb/142641, https://msdn.microsoft.com/en-us/library/ff648853.aspx, https://blogs.technet.microsoft.com/b/nettracer/archive/2010/08/11/where-have-those-afd-driver-related-registry-dynamicbackloggrowthdelta-enabledynamicbacklog-maximumdynamicbacklog-minimumdynamicbacklog-keys-gone.aspx)
Increase network adapter receive buffers: https://support.microsoft.com/kb/981482
It appears that TCP/IP in Windows 2012 is the same as 2008, so all of the same tuning applies: "In Windows Server 2012, TCP/IP - including both Internet Protocol version 4 (IPv4) and IPv6 - is unchanged from TCP/IP in Windows Server 2008 R2. For more information, see TCP/IP in the Windows Server 2008 and Windows Server 2008 R2 Technical Library." (https://technet.microsoft.com/en-us/library/jj573587.aspx).
Ping a remote host. In general, and particularly for LANs, ping times should be less than a few hundred milliseconds with little standard deviation.
> ping -t 10.20.30.1
Pinging 10.20.30.1 [10.20.30.1] with 32 bytes of data:
Reply from 10.20.30.1: bytes=32 time=92ms TTL=249
Reply from 10.20.30.1: bytes=32 time=89ms TTL=249
Reply from 10.20.30.1: bytes=32 time=155ms TTL=249
Reply from 10.20.30.1: bytes=32 time=89ms TTL=249
Ping statistics for
10.20.30.1 Packets: Sent = 4, Received = 4, Lost = 0 (0% loss),
Approximate round trip times in milli-seconds:
Minimum = 89ms, Maximum = 155ms, Average = 106msTCP Congestion Control
Review the background on TCP congestion control.
Initial Congestion Window Size
The initial congestion window size may be changed with (https://support.microsoft.com/kb/2472264):
> netsh interface tcp set supplemental template=custom icw=10netstat
Create a snapshot of socket information:
> netstat -a -b -n -o
Active Connections
Proto Local Address Foreign Address State PID
TCP 0.0.0.0:7278 0.0.0.0:0 LISTENING 2684
[java.exe]
TCP 0.0.0.0:8881 0.0.0.0:0 LISTENING 2684
[java.exe]
TCP 0.0.0.0:9045 0.0.0.0:0 LISTENING 2684
[java.exe]...Show adapter statistics:
C:\tprof\bin>netstat -s
IPv4 Statistics
Received Header Errors = 0
Received Address Errors = 0
Unknown Protocols Received = 0
Received Packets Discarded = 9
Routing Discards = 0
Discarded Output Packets = 17
Output Packet No Route = 0
Reassembly Required = 0
Reassembly Failures = 0
Datagrams Failing Fragmentation = 0...
TCP Statistics for IPv4
Failed Connection Attempts = 445
Reset Connections = 149
Segments Retransmitted = 921...Show ethernet statistics:
> netstat -e
Interface Statistics
Received Sent
Bytes 275244337 12757159...
Discards 0 0
Errors 0 0
Unknown protocols 0Wireshark
Capture network packets using Wireshark (covered in the Major Tools chapter).
Start the capture:
- Install Wireshark: https://www.wireshark.org/#download
- Start Wireshark as Administrator
- Click "Capture" > "Options"
- Select the network interface in the "Input" box
- Click the "Output" tab and enter a "File" such as C:\wireshark.pcap
- Click the "Options" tab and uncheck "Update list of packets in realtime" and click "Start"
Stop the capture:
- Click "Capture" > "Stop"
netsh
netsh is a command line tool to help configure networking.
Disable IPv6 DHCP Auto-negotiation
netsh interface ipv6 set interface %INTERFACE% routerdiscovery=disabledMessage Analyzer
The official way to capture network packets on newer versions of Microsoft Windows is Microsoft Message Analyzer: http://www.microsoft.com/en-us/download/details.aspx?id=44226
Network Monitor
The official way to capture network packets on older versions of Microsoft Windows is Microsoft Network Monitor: https://support.microsoft.com/kb/148942
Process Monitor (ProcMon.exe)
Microsoft Process Monitor provides detailed information on file system activity, registry activity, network activity and process/thread activity: https://technet.microsoft.com/en-us/sysinternals/bb896645. ProcMon replaces previous tools such as FileMon.
- Delete any existing PML files from previous runs.
- Command Prompt> ProcMon.exe /NoConnect (the /NoConnect option avoids immediately starting collection so that you can configure whatever's needed)
- File > Backing Files > Select "Use file named" and enter a path such as C:\ProcMon.pml and click OK.
- Filter > Uncheck "Drop Filtered Events"
- Options > Configure Symbols... > Ensure DbgHelp.dll points to an existing path (install Debugging Tools if not), and set symbol paths to include a local symbol cache directory, such as srv*c:\symbols*http://msdl.microsoft.com/download/symbols
- Options > Profiling Events > Check "Generate thread profiling events" and select "Every 100 milliseconds"
- In the menu bar on the right, uncheck the 5 boxes named "Show Registry Activity, "Show File System Activity," etc. so that only the backing file is capturing the events and not the GUI as well.
- File > Click Capture Events.
- Reproduce problem
- File > Uncheck "Capture Events" (or run ProcMon.exe /terminate from another command prompt). This step is required; otherwise, you may receive the following error when trying to open the PML files: "The file %FILE% was not closed cleanly during capture and is corrupt."
- Load the PML File
Thread Profiling Analysis
Click Tools > Stack Summary..., sort by Time %, and expand the largest stack paths:

Large Pages
The -Xlp option requests the JVM to allocate the Java heap with large pages. This command is available only on Windows Server 2003, Windows Vista, Windows Server 2008, and above. To use large pages, the user that runs Java must have the authority to "lock pages in memory".
To enable this authority, as administrator go to Control Panel > Administrative Tools > Local Security Policy and then find Local Policies > User Rights Assignment > Lock pages in memory. Add the user who runs the Java process, and reboot your machine. For more information, see these websites:
- https://msdn.microsoft.com/en-us/library/aa366720(VS.85).aspx
- https://msdn.microsoft.com/en-us/library/aa366568(VS.85).aspx
Note: On Microsoft Windows Vista and Windows 2008, use of large pages is affected by the User Account Control (UAC) feature. When UAC is enabled, a regular user (a member of the Users group) can use the -Xlp option as normal. However, an administrative user (a member of the administrators group) must run the application as an administrator to gain the privileges required to lock pages in memory. To run as administrator, right-click the application and select Run as administrator. If the user does not have the necessary privileges, an error message is produced, advising that the System configuration does not support option '-Xlp'.
Solaris
Solaris Recipe
- CPU core(s) should not be consistently saturated.
- Program memory should not page out of RAM.
- Input/Output interfaces such as network cards and disks should not be saturated, and should not have poor response times.
- TCP/IP and network tuning, whilst sometimes complicated to investigate, may have dramatic effects on performance.
- Operating system level statistics and optionally process level statistics should be periodically monitored and saved for historical analysis.
- Review operating system logs for any errors, warnings, or high volumes of messages.
- Review snapshots of process activity, and for the largest users of resources, review per thread activity.
- If the operating system is running in a virtualized guest, review the configuration and whether or not resource allotments are changing dynamically.
- If there is sufficient network capacity for the additional packets, consider reducing the default TCP keepalive timer (tcp_keepalive_interval) from 2 hours to a value less than intermediate device idle timeouts (e.g. firewalls).
- Test disabling delayed ACKs
Also review the general topics in the Operating Systems chapter.
General
Check the system log for any warnings, errors, or repeated informational messages.
# less /var/adm/messagesQuery the help manual for a command:
$ man vmstat # By default, contents are sent to more
$ man -a malloc # There may be multiple manuals matching the name. Use -a to show all of them.An Analysis of Performance, Scaling, and Best Practices for IBM WebSphere Application Server on Oracle's SPARC T -Series Servers: http://www.oracle.com/technetwork/server-storage/sun-sparc-enterprise/documentation/ibm-websphere-sparc-t5-2332327.pdf
Review the Solaris tuning in the latest SPECjEnterprise results submitted by Oracle:
The Solaris Management Console (smc) is no longer supported in recent releases: http://docs.oracle.com/cd/E26502_01/html/E29010/gltfb.html
Processes
Query basic process information:
$ ps -elf | grep java
F S UID PID PPID C PRI NI ADDR SZ WCHAN STIME TIME CMD
0 S noaccess 1089 1 0 40 20 ? 15250 ? Jan 28 ? 339:02 /usr/java/bin/java -server -Xmx128m...By default, the process ID (PID) is the number in the fourth column. You can control which columns are printed and in which order using -o.
The built-in ps command may not show the entire command
line. An alternative ps is often available:
$ /usr/ucb/ps auxwwwCentral Processing Unit (CPU)
Query physical processor layout:
# psrinfo -pv The physical processor has 16 cores and 128 virtual processors (0-127) The core has 8 virtual processors (0-7)... # prtdiag -v Memory size: 2GB CPU Freq Size Implementation Mask Status Location 0 1503 MHz 1MB SUNW,UltraSPARC-IIIi 3.4 on-line MB/P0 1 1503 MHz 1MB SUNW,UltraSPARC-IIIi 3.4 on-line MB/P1...
Ensure there are no errant processes using non-trivial amounts of CPU.
vmstat
Query processor usage:
$ vmstat 5 2
kthr memory page disk faults cpu
r b w swap free re mf pi po fr de sr s3 s5 s7 -- in sy cs us sy id
0 0 0 4415400 739680 77 859 5 3 4 0 8 -0 3 -1 0 325 1634 476 2 2 96
0 0 0 4645936 1232224 3 5 0 0 0 0 0 0 0 0 0 285 349 274 0 1 99The documentation on the first line of vmstat is unclear:
Without options, vmstat displays a one-line summary of the virtual memory activity since the system was booted. (http://docs.oracle.com/cd/E19683-01/816-0211/6m6nc67ac/index.html)
Experimentation shows that, with options (such as interval or count), the first line also displays statistics since the system was booted:
# vmstat
kthr memory page disk faults cpu
r b w swap free re mf pi po fr de sr s3 s5 s7 -- in sy cs us sy id
0 0 0 3932200 329624 79 857 1 1 1 0 2 -0 3 -0 0 351 1970 764 2 3 95
# vmstat 5
kthr memory page disk faults cpu
r b w swap free re mf pi po fr de sr s3 s5 s7 -- in sy cs us sy id
0 0 0 3932184 329616 79 857 1 1 1 0 2 -0 3 -0 0 351 1970 764 2 3 95
0 0 0 3527808 70608 2780 25799 3 2 2 0 0 0 2 0 0 445 14699 2383 15 44 41
0 0 0 3527784 70728 2803 26009 0 0 0 0 0 0 0 0 0 430 14772 2387 15 44 42Example to capture vmstat in the background:
INTERVAL=1; FILE=vmstat_`hostname`_`date +"%Y%m%d_%H%M"`.txt; date > ${FILE} && echo "VMSTAT_INTERVAL = ${INTERVAL}" >> $FILE && nohup vmstat ${INTERVAL} >> $FILE &Per processor utilization
Query per-processor utilization:
$ mpstat 5 2
CPU minf mjf xcal intr ithr csw icsw migr smtx srw syscl usr sys wt idl
0 425 0 115 34 26 202 7 51 14 0 838 2 2 0 96
1 434 0 98 290 185 274 5 52 16 0 797 2 2 0 96
CPU minf mjf xcal intr ithr csw icsw migr smtx srw syscl usr sys wt idl
0 0 0 1 15 9 93 3 21 0 0 159 0 0 0 100
1 2 0 3 280 175 181 2 22 0 0 172 0 0 0 99...pgstat
pgstat: http://docs.oracle.com/cd/E23824_01/html/821-1462/pgstat-1m.html
prstat
By default, prstat prints the damped average % CPU statistics for processor usage by individual processes or threads. Without arguments, prstat will periodically update the screen with relatively accurate 'average' information (this may be at variance with data returned from vmstat due to the difference in how it's calculated):
$ prstatAlthough the prstat documentation does not explicitly mention this, by default, the reported CPU usage is decayed over time. This can be confirmed with the Java program at https://raw.githubusercontent.com/kgibm/problemdetermination/master/scripts/java/ConsumeCPU.java. For example, if a Java program uses 50% CPU from time T1 to time T2 (after which its CPU usage goes to approximately 0), and you start to take prstat at time T2, the first iteration will report about 50%, and the second iteration may report a decayed value, and so on in the following iterations. Therefore, prstat may not show the "current" processor usage of processes but may include some historical processor usage.
Use the -mv options to gather accurate interval-based statistics:
$ prstat -mvFor example, use prstat in micro-stat mode with the following options -mv for detailed, interval-accurate statistics, -n to limit the number of processes to report, and an interval and iteration count to print in batch mode:
$ prstat -mvcn ${MAXPROCESSES} ${INTERVAL} ${ITERATIONS}
$ prstat -mvcn 5 10 3
PID USERNAME USR SYS TRP TFL DFL LCK SLP LAT VCX ICX SCL SIG PROCESS/NLWP
26649 root 5.9 17 1.0 12 45 0.0 19 0.1 2K 84 47K 0 prstat/1
26237 root 0.3 0.1 0.0 0.7 1.3 0.0 98 0.0 72 5 493 0 sshd/1...The first iteration of prstat includes CPU data from before the start of prstat. In general, for "current" processor usage, review the second and subsequent iterations.
Be careful of relying upon any interpretation of prstat without it operating in -m 'micro-stat' mode, since there is no accurate timebase to the intervals against which percentage calculations can ever be accurately maintained.
Per-thread CPU usage
Use the -L flag along with -p $PID to display accumulated CPU time and CPU usage by thread (light-weight process [LWP]):
$ prstat -mvcLn ${MAXTHREADS} -p ${PID} ${INTERVAL} ${ITERATIONS}
$ prstat -mvcLn 50 -p 1089 10 12
PID USERNAME SIZE RSS STATE PRI NICE TIME CPU PROCESS/LWPID
1089 noaccess 119M 100M sleep 59 0 3:12:24 0.0% java/14
1089 noaccess 119M 100M sleep 59 0 1:55:58 0.0% java/35
1089 noaccess 119M 100M sleep 59 0 0:00:00 0.0% java/38
1089 noaccess 119M 100M sleep 59 0 0:00:00 0.0% java/36...prstat -L for threads has similar behavior to prstat for processes. Without -mv, it reports damped average % CPU. With -mv, the first iteration includes CPU data from before the start of prstat.
CPU Statistics
Query available CPU statistics:
# cpustat -h
...
event specification syntax:
[picn=]<eventn>[,attr[n][=<val>]][,[picn=]<eventn>[,attr[n][=<val>]],...]
event0: Cycle_cnt Instr_cnt Dispatch0_IC_miss IC_ref DC_rd DC_wr...
event1: Cycle_cnt Instr_cnt Dispatch0_mispred EC_wb EC_snp_cb...Query CPU statistics:
# cpustat -c EC_ref,EC_misses 5 2
time cpu event pic0 pic1
5.011 0 tick 2037798 90010
5.011 1 tick 1754067 85031
10.011 1 tick 2367524 101481
10.011 0 tick 4272952 195616
10.011 2 total 10432341 472138The cputrack command is basically the same as cpustat but works on a per-process level.
Interrupts
Interrupt statistics can be queried with intrstat:
$ intrstat 5 2
device | cpu0 %tim cpu1 %tim
-------------+------------------------------
bge#0 | 0 0.0 4 0.0
glm#0 | 3 0.0 0 0.0
uata#0 | 0 0.0 0 0.0
device | cpu0 %tim cpu1 %tim
-------------+------------------------------
bge#0 | 0 0.0 8 0.0
glm#0 | 23 0.0 0 0.0
uata#0 | 0 0.0 0 0.0...Query interrupts per device:
$ vmstat -i
interrupt total rate
--------------------------------
clock 3244127300 100
--------------------------------
Total 3244127300 100Hardware Encryption
Recent versions of the IBM SDK that run on Solaris support the hardware encryption capabilities of the Ultra-SPARC T2 CMT processor through the IBMPKCS11Impl security provider which is the first in the java.security provider list:
- http://www.ibm.com/support/knowledgecenter/en/SSYKE2_8.0.0/com.ibm.java.security.component.80.doc/security-component/pkcs11implDocs/supportedcards.html
- http://www.ibm.com/support/knowledgecenter/SSYKE2_8.0.0/com.ibm.java.security.component.80.doc/security-component/pkcs11implDocs/cardobservations.html
Physical Memory (RAM)
Program memory should not page out of RAM. This can be monitored with
the api, apo, and apf columns in vmstat -p. For
example:
# vmstat -p 5 3
memory page executable anonymous filesystem
swap free re mf fr de sr epi epo epf api apo apf fpi fpo fpf
4902128 1116760 76 851 1 0 0 0 0 0 0 0 0 0 1 1
4304784 931536 25 31 0 0 0 0 0 0 0 0 0 0 0 0
4304560 931320 447 5117 0 0 0 0 0 0 0 0 0 0 2 0The first line of output is a set of statistics from boot and can usually be discarded.
Monitoring Swap Resources: http://docs.oracle.com/cd/E23824_01/html/821-1459/fsswap-52195.html
Input/Output (I/O)
Query disk usage:
$ df -h
Filesystem size used avail capacity Mounted on
/dev/dsk/c1t0d0s0 63G 60G 3.3G 95% /
/devices 0K 0K 0K 0% /devices
ctfs 0K 0K 0K 0% /system/contract
proc 0K 0K 0K 0% /proc
mnttab 0K 0K 0K 0% /etc/mnttab
swap 4.4G 1.6M 4.4G 1% /etc/svc/volatile
fd 0K 0K 0K 0% /dev/fd
swap 4.5G 49M 4.4G 2% /tmp
swap 4.4G 56K 4.4G 1% /var/run...When encountering "too many open files" ulimit issues use:
lsof -p <pid>Use iostat for basic disk monitoring. For example:
$ iostat -xtcn 5 2
tty cpu
tin tout us sy wt id
0 1 2 2 0 96
extended device statistics
r/s w/s kr/s kw/s wait actv wsvc_t asvc_t %w %b device
0.0 0.0 0.0 0.0 0.0 0.0 0.0 1.1 0 0 c0t0d0
0.5 2.8 4.8 8.6 0.0 0.1 0.0 18.6 0 1 c1t0d0
0.0 0.0 0.0 0.0 0.0 0.0 0.0 0.0 0 0 c1t1d0
0.0 0.0 0.0 0.0 0.0 0.0 0.0 4.6 0 0 wassun1:vold(pid463)
tty cpu
tin tout us sy wt id
0 98 0 0 0 99
extended device statistics
r/s w/s kr/s kw/s wait actv wsvc_t asvc_t %w %b device
0.0 0.0 0.0 0.0 0.0 0.0 0.0 0.0 0 0 c0t0d0
0.0 2.4 0.0 7.0 0.0 0.0 0.0 19.3 0 1 c1t0d0
0.0 0.0 0.0 0.0 0.0 0.0 0.0 0.0 0 0 c1t1d0
0.0 0.0 0.0 0.0 0.0 0.0 0.0 0.0 0 0 wassun1:vold(pid463)...An alternative is fsstat:
$ fsstat -F
new name name attr attr lookup rddir read read write write
file remov chng get set ops ops ops bytes ops bytes
7.11M 3.03M 632K 45.6G 1.97M 35.9G 90.5M 3.97G 1.35T 906M 241G ufs
0 0 0 1.48G 0 1.43G 13.0M 723M 254G 46.9K 8.20M proc
0 0 0 255 0 25 22 0 0 0 0 nfs
0 0 0 0 0 0 0 0 0 0 0 zfs
0 0 0 785M 0 0 0 0 0 0 0 lofs
239M 13.5M 225M 272M 105K 549M 23.9K 209K 362M 226M 91.6G tmpfs
0 0 0 10.3M 0 0 0 30 4.27K 0 0 mntfs
0 0 0 0 0 0 0 0 0 0 0 nfs3
0 0 0 0 0 0 0 0 0 0 0 nfs4
0 0 0 488 0 28 19 0 0 0 0 autofsQuery swap usage:
$ swap -s
total: 876400k bytes allocated + 45488k reserved = 921888k used, 4645872k availableZettabyte File System (ZFS)
Consider isolating the ZFS intent log to a separate disk.
Networking
Query socket information:
$ netstat -an
TCP: IPv4
Local Address Remote Address Swind Send-Q Rwind Recv-Q State
-------------------- -------------------- ----- ------ ----- ------ -----------
*.32772 *.* 0 0 49152 0 LISTEN
127.0.0.1.32833 127.0.0.1.32794 32768 0 32768 0 ESTABLISHED...When running into "too many open files" use
netstat -an | grep ESTA | wc -lQuery socket statistics periodically:
$ netstat -i 5 2
input bge0 output input (Total) output
packets errs packets errs colls packets errs packets errs colls
122009930 0 7978053 0 0 152528566 0 38496689 0 0
33 0 6 0 0 33 0 6 0 0 ...Starting with Solaris 11, use dlstat for network utilization (http://docs.oracle.com/cd/E23824\_01/html/821-1458/ggjew.html):
# dlstat -r -i 1
LINK IPKTS RBYTES INTRS POLLS CH<10 CH10-50 CH>50
e1000g0 101.91K 32.86M 87.56K 14.35K 3.70K 205 5
nxge1 9.61M 14.47G 5.79M 3.82M 379.98K 85.66K 1.64K
vnic1 8 336 0 0 0 0 0
e1000g0 0 0 0 0 0 0 0
nxge1 82.13K 123.69M 50.00K 32.13K 3.17K 724 24
vnic1 0 0 0 0 0 0 0
# dlstat -t -i 5
LINK OPKTS OBYTES BLKCNT UBLKCNT
e1000g0 40.24K 4.37M 0 0
nxge1 9.76M 644.14M 0 0
vnic1 0 0 0 0
e1000g0 0 0 0 0
nxge1 26.82K 1.77M 0 0
vnic1 0 0 0 0Query detailed socket statistics:
# netstat -s
TCP tcpRtoAlgorithm = 4 tcpRtoMin = 400
tcpRtoMax = 60000 tcpMaxConn = -1
tcpActiveOpens = 2162575 tcpPassiveOpens = 349052
tcpAttemptFails = 1853162 tcpEstabResets = 19061...Ping a remote host. In general, and particularly for LANs, ping times should be less than a few hundred milliseconds with little standard deviation.
$ ping -ns 10.20.30.1
PING 10.20.30.1 : 56 data bytes
64 bytes from 10.20.30.1: icmp_seq=0. time=77.9 ms
64 bytes from 10.20.30.1: icmp_seq=1. time=77.2 ms
64 bytes from 10.20.30.1: icmp_seq=2. time=78.3 ms
64 bytes from 10.20.30.1: icmp_seq=3. time=76.9 mssnoop
Capture network packets using snoop (http://www-01.ibm.com/support/docview.wss?uid=swg21175744, http://docs.oracle.com/cd/E23823_01/html/816-5166/snoop-1m.html).
Capture all traffic:
$ su
# nohup snoop -r -o capture`hostname`_`date +"%Y%m%d_%H%M"`.snoop -q -d ${INTERFACE} &
# sleep 1 && cat nohup.out # verify no errors in nohup.outUse Wireshark to analyze the network packets gathered (covered in the Major Tools chapter).
Use -s to only capture part of the packet.
snoop does not have built-in support for log rollover.
Kernel
List available kernel statistics:
# kstat -l
bge:0:bge0:brdcstrcv
bge:0:bge0:brdcstxmt...Query kernel statistics:
# kstat -p -m cpu_stat -s 'intr*'
cpu_stat:0:cpu_stat0:intr 1118178526
cpu_stat:0:cpu_stat0:intrblk 122410
cpu_stat:0:cpu_stat0:intrthread 828519759
cpu_stat:1:cpu_stat1:intr 823341771
cpu_stat:1:cpu_stat1:intrblk 1671216
cpu_stat:1:cpu_stat1:intrthread 1696737858KSSL
On older versions of Solaris and older programs linked with older libraries, you may need to enable the KSSL kernel module, if available, to fully utilize hardware encryption (e.g. TLS performance): http://docs.oracle.com/cd/E19253-01/816-5166/6mbb1kq5t/index.html
truss
Truss can be used to attach to a process and print which kernel/system calls are being made:
# truss -p ${PID}Warning: truss can have a large performance effect when used without filters.
Modifying Kernel Parameters
Some kernel parameters can be set by modifying the /etc/system file and rebooting (http://docs.oracle.com/cd/E23824_01/html/821-1450/chapter1-9.html). For example:
set lim_fd_max = 10000Some networking parameters can be set using the ipadm set-prop command. These updates are persisted on reboot (unless the -t option is specified). For example:
# ipadm set-prop -p _time_wait_interval=15000 tcpipadm command: http://docs.oracle.com/cd/E26502_01/html/E29031/ipadm-1m.html
The ipadm command replaces the "ndd" command in recent versions of Solaris: http://docs.oracle.com/cd/E26502_01/html/E28987/gmafe.html
Note that Solaris 11 changed the names of some of the network tunable parameters: http://docs.oracle.com/cd/E26502_01/html/E29022/appendixa-28.html
Networking
Update the TIME_WAIT timeout to 15 seconds by running # ipadm set-prop -p _time_wait_interval=15000 tcp (https://www.ibm.com/support/knowledgecenter/SSAW57_8.5.5/com.ibm.websphere.nd.doc/ae/tprf_tunesolaris.html)
Update the FIN_WAIT_2 timeout to 67.5 seconds by running # ipadm set-prop -p tcp_fin_wait_2_flush_interval=67500 tcp (https://www.ibm.com/support/knowledgecenter/SSAW57_8.5.5/com.ibm.websphere.nd.doc/ae/tprf_tunesolaris.html)
Update the TCP keepalive interval to 15 seconds by running # ipadm set-prop -p _keepalive_interval=15000 tcp (https://www.ibm.com/support/knowledgecenter/SSAW57_8.5.5/com.ibm.websphere.nd.doc/ae/tprf_tunesolaris.html, http://docs.oracle.com/cd/E23824_01/html/821-1450/chapter4-31.html)
Update the TCP listen backlog to 511 by running # ipadm set-prop -p _conn_req_max_q=511 tcp (https://www.ibm.com/support/knowledgecenter/SSAW57_8.5.5/com.ibm.websphere.nd.doc/ae/tprf_tunesolaris.html)
Update the maximum send and receive buffer sizes to 4MB by running # ipadm set-prop -p max_buf=4194304 tcp (http://docs.oracle.com/cd/E23824_01/html/821-1450/chapter4-31.html)
Update the maximum value of the TCP congestion window to 2MB by running # ipadm set-prop -p _cwnd_max=2097152 tcp (http://docs.oracle.com/cd/E23824_01/html/821-1450/chapter4-31.html)
Update the default send window size to 1MB by running # ipadm set-prop -p send_buf=1048576 tcp (http://docs.oracle.com/cd/E23824_01/html/821-1450/chapter4-31.html)
Update the default receive window size to 1MB by running # ipadm set-prop -p recv_buf=1048576 tcp (http://docs.oracle.com/cd/E23824_01/html/821-1450/chapter4-31.html)
Process Limits
Update the maximum file descriptors to 10,000 by updating these lines in /etc/system and rebooting (https://www.ibm.com/support/knowledgecenter/SSAW57_8.5.5/com.ibm.websphere.nd.doc/ae/tprf_tunesolaris.html):
set lim_fd_max = 10000
set rlim_fd_cur = 10000
dtrace
Dtrace is a very powerful, dynamic tracing tool. For more information, see http://www.solarisinternals.com/wiki/index.php/DTrace_Topics_Intro
Sample 5-level user stack traces for Java processes:
# dtrace -n 'profile-1001 /execname == "java"/ { @[ustack(5)] = count(); }'Print a stack trace any time a function is called:
# dtrace -n 'syscall::read:entry /execname == "bash"/ { ustack(); }'List probes:
# dtrace -ln 'proc:::'Useful scripts:
- Sample user and kernel CPU stacks: https://raw.githubusercontent.com/kgibm/problemdetermination/master/scripts/dtrace/stack_samples.d
- Summarize syscalls: https://raw.githubusercontent.com/kgibm/problemdetermination/master/scripts/dtrace/method_times_summary.d
- Track specific syscall times: https://raw.githubusercontent.com/kgibm/problemdetermination/master/scripts/dtrace/method_times_tree.d
DTrace scripts sometimes refer to time in Hertz. To convert: secs = 1/hertz
FlameGraphs
# git clone https://github.com/brendangregg/FlameGraph
# cd FlameGraph
# dtrace -x ustackframes=100 -n 'profile-99 /arg1/ { @[ustack()] = count(); } tick-60s { exit(0); }' -o out.stacks
# ./stackcollapse.pl out.stacks > out.folded
# ./flamegraph.pl out.folded > out.svgLogical Domains, Zones, and Processor Sets/Pinning
Logical domains, or LDOMs, are a way to virtualize the physical hardware to partition it into multiple guest operating system instances. List domains: ldm list-bindings
Non-global zones, or containers, are a way to virtualize an operating system instance further while sharing the base operating system image and runtime (the parent global zone).
Zones can be used to accomplish processor sets/pinning using resource pools. In some benchmarks, one JVM per zone can be beneficial.
- First, stop the non-global zone
- List zones: zoneadm list -vi
- Enable resource pools: svcadm enable pools
- Create resource pool: poolcfg -dc 'create pool pool1'
- Create processor set: poolcfg -dc 'create pset pset1'
- Set the maximum CPUs in a processor set: poolcfg -dc 'modify pset pset1 (uint pset.max=32)'
- Add virtual CPU to a processor set: poolcfg -dc "transfer to pset pset1 (cpu $X)"
- Associate a resource pool with a processor set: poolcfg -dc 'associate pool pool1 (pset pset1)'
- Set the resource set for a zone: zonecfg -z zone1 set pool=pool1
- Restart the zone: zoneadm -z zone1 boot
- Save to /etc/pooladm.conf: pooladm -s
- Display processor sets: psrset
- Show the processor set a process is associated with (PSET column): ps -e -o pid,pset,comm
HP-UX
HP-UX Recipe
- CPU core(s) should not be consistently saturated.
- Generally, physical memory should never be saturated and the operating system should not page memory out to disk.
- Input/Output interfaces such as network cards and disks should not be saturated, and should not have poor response times.
- TCP/IP and network tuning, whilst sometimes complicated to investigate, may have dramatic effects on performance.
- Operating system level statistics and optionally process level statistics should be periodically monitored and saved for historical analysis.
- Review operating system logs for any errors, warnings, or high volumes of messages.
- Review snapshots of process activity, and for the largest users of resources, review per thread activity.
- If the operating system is running in a virtualized guest, review the configuration and whether or not resource allotments are changing dynamically.
- If there is sufficient network capacity for the additional packets, consider reducing the default TCP keepalive timer (tcp_keepalive_interval) from 2 hours to a value less than intermediate device idle timeouts (e.g. firewalls).
- Test disabling delayed ACKs
Also review the general topics in the Operating Systems chapter.
General
Review some of the tuning recommendations in the following documentation pages:
- https://www.ibm.com/support/knowledgecenter/SSAW57_8.5.5/com.ibm.websphere.nd.doc/ae/tprf_tunehp.html
- https://www.ibm.com/support/knowledgecenter/SSAW57_8.0.0/com.ibm.websphere.installation.nd.doc/info/ae/ae/tins_hpuxsetup.html
- https://h20392.www2.hpe.com/portal/swdepot/displayProductInfo.do?productNumber=HPJCONFIG
Check the BIOS to ensure highest speed:
- Power Management -> HP Power Profile -> Maximum Performance
- Power Management -> HP Power Regulator -> HP Static High Performance Mode
- Advanced Options -> Advanced Performance Tuning Options -> Memory Speed with 2 DIMMS per channel -> Maximum MHz
Consider installing the following generally useful software:
- gdb/wdb - debugger: http://h20565.www2.hpe.com/hpsc/doc/public/display?sp4ts.oid=5060273&docId=emr_na-c02670493&docLocale=en_US
Query basic system information:
$ uname -a; model; machinfo; sysdef; swlist -lCentral Processing Unit (CPU)
Check if hyperthreading is enabled or disabled using
machinfo and consider enabling/disabling it, if
applicable:
Hyperthreading enabled:
$ machinfo
LCPU attribute is enabled...Hyperthreading disabled:
$ machinfo
LCPU attribute is disabled...Use the general performance MustGather (http://www-01.ibm.com/support/docview.wss?uid=swg21127574&aid=1):
$ hpux_performance.sh $PIDUse the top and vmstat commands for basic
process monitoring.
Consider enabling sar for historical data (http://www.ibm.com/developerworks/aix/library/au-unix-perfmonsar.html).
The ptree command is a useful way to visualize the
process tree.
For custom columns in ps:
UNIX95= ps -ef -o pid,pcpu,pri,psetGlancePlus
GlancePlus (license required) is a very useful tool. To run it for a few minutes, use this hpux_glance.sh script: http://www-01.ibm.com/support/docview.wss?uid=swg21127574&aid=3
caliper
The caliper tool is a native sampling profiler (http://h20566.www2.hpe.com/hpsc/doc/public/display?sp4ts.oid=4268168&docId=emr_na-c04221975&docLocale=en_US). The simplest report is the flat profile:
/opt/caliper/bin/caliper fprof --process=all --attach $PID --duration 60 -o fprof.txtSystem wide:
/opt/caliper/bin/caliper fprof -o fprofsystem.txt --ev all -w -e 30Or
/opt/caliper/bin/caliper fprof --scope=kernel --duration=60 -o kernelfprof.txtHPjmeter
HPjmeter is a powerful Java profiler: https://h20392.www2.hpe.com/portal/swdepot/displayProductInfo.do?productNumber=HPJMETER
$ /opt/hpjmeter/bin/javaGlanceAdviser.ksh $PID"If you also collected GC information using the -Xverbosegc option, you can append the Glance data to the GC log file and then use HPjmeter to read the combined file."
jps
Use the jps tool to map Java server names to process
IDs. Example:
$ /opt/IBM/WebSphere/AppServer/java/bin/jps -m
9326 WSPreLauncher -nosplash -application com.ibm.ws.bootstrap.WSLauncher com.ibm.ws.runtime.WsServer /opt/IBM/WebSphere/AppServer/profiles/node1/config cell1 node1 nodeagent
7113 WSPreLauncher -nosplash -application com.ibm.ws.bootstrap.WSLauncher com.ibm.ws.runtime.WsServer /opt/IBM/WebSphere/AppServer/profiles/dmgr1/config cell1 dmgr1 dmgr
6283 WSPreLauncher -nosplash -application com.ibm.ws.bootstrap.WSLauncher com.ibm.ws.runtime.WsServer /opt/IBM/WebSphere/AppServer/profiles/node1/config cell1 node1 server1Or using caliper (on Itanium systems):
$ for i in `ps -elfx | grep java | grep -v grep | awk '{print $4}'`; \
do echo $i; /opt/caliper/bin/caliper fprof --process=root --attach $i --duration 1 | grep Invocation: ;done;Physical Memory (RAM)
swapinfo: http://h20331.www2.hp.com/Hpsub/downloads/task_guide.pdf
Input/Output (I/O)
Use the bdf command to review disk utilization.
Networking
Update the TCP listen backlog to 511 by adding "ndd -set /dev/tcp tcp_conn_request_max 511" to /etc/rc.config.d/nddconf and running "ndd -c" (https://www.ibm.com/support/knowledgecenter/SSAW57_8.5.5/com.ibm.websphere.nd.doc/ae/tprf_tunehp.html)
Update the TCP keepalive interval by adding "ndd -set /dev/tcp tcp_keepalive_interval 7200000" to /etc/rc.config.d/nddconf and running "ndd -c" (https://www.ibm.com/support/knowledgecenter/SSAW57_8.5.5/com.ibm.websphere.nd.doc/ae/tprf_tunehp.html)
Update the TCP keepalive maximum probes by adding "ndd -set /dev/tcp tcp_keepalives_kill 1" to /etc/rc.config.d/nddconf and running "ndd -c" (https://www.ibm.com/support/knowledgecenter/SSAW57_8.5.5/com.ibm.websphere.nd.doc/ae/tprf_tunehp.html)
Use the following command to print socket details:
netstat -anf inet
Ping a remote host. In general, and particularly for LANs, ping times should be less than a few hundred milliseconds with little standard deviation.
$ ping -ns 10.20.30.1
PING 10.20.30.1 : 56 data bytes
64 bytes from 10.20.30.1: icmp_seq=0. time=77.9 ms
64 bytes from 10.20.30.1: icmp_seq=1. time=77.2 ms
64 bytes from 10.20.30.1: icmp_seq=2. time=78.3 ms
64 bytes from 10.20.30.1: icmp_seq=3. time=76.9 msnettl
Capture network packets using nettl (http://www-01.ibm.com/support/docview.wss?uid=swg21175744).
Start capturing all traffic:
# nettl -tn all -e all -f networktraceStop capturing all traffic:
# nettl -tf -e allProfiling
The JVM on HP supports dynamically enabling and disabling low-overhead sampling profiling using the kill command:
- Enable Profiling:
$ kill -USR2 PID - Disable Profiling:
$ kill -USR2 PID
The profiling will write information on each signal to native_stderr.log. For example:
First signal
eprof: starting profiling Tue Nov 20 14:05:02 2012
eprof: terminating profiling
eprof: cannot measure profiling intrusionSecond signal
eprof: writing profile data to /opt/IBM/WebSphere/AppServer/profiles/node1/java10760_75806.eprof
eprof: done.Modifying Kernel Parameters
Review the following instructions to modify core HP-UX kernel parameters: http://www.ibm.com/support/knowledgecenter/SS7J6S_6.2.0/com.ibm.websphere.wesb620.doc/doc/tins_set_kernel_hpux.html
Running ndd -set will not maintain the parameters after
rebooting. Instead, it is recommended to update the parameters in
/etc/rc.config.d/nddconf and run "ndd -c" to load the values from this
file and the values will also be picked up on reboot.
tusc
tusc is a system call tracer.
$ /usr/local/bin/tusc -f -C -o tusc_counts.txt $PID & sleep 30; kill -INT $!
$ /usr/local/bin/tusc -f -l -D -R -T "" -o tusc.txt $PID & sleep 30; kill -INT $!Processor Sets
"The default processor set (0) always exists and may not be destroyed. All processes and processors at system init time start out in the system default processor set."
Therefore, you may want to "reserve" processor set 0 for background processes and non-application server JVMs, and only distribute the JVMs across the other processor sets. You should take into account the core, hyperthread, and L3 layout to avoid sharing processors from pset 0 with the JVM processor sets.
List CPU IDs and which processor set IDs they're bound to:
$ /usr/sbin/psrset -p
SPU 0 PSET 0
SPU 1 PSET 0
SPU 2 PSET 0
SPU 3 PSET 0Create a processor set for a CPU ID:
$ /usr/sbin/psrset -c 1Bind PID to processor set 1:
$ /usr/sbin/psrset -b 1 `cat /opt/IBM/WebSphere/AppServer/profiles/node1/logs/server1/*.pid`Query processor sets for PIDs:
$ /usr/sbin/psrset -q `cat /opt/IBM/WebSphere/AppServer/profiles/node1/logs/server1/*.pid` `cat /opt/IBM/WebSphere/AppServer/profiles/node1/logs/server2/*.pid`
PID 28493 PSET 0
PID 25756 PSET 0Automation
To assign processor sets automatically, you will need to modify the Java command line. This means that you will not be able to use the administrative console to start servers (you can still use it to stop servers)
- For each application server instance, run startServer.sh $NAME -script to generate its start script.
- Now you should have start_$JVMID.sh script for each JVM.
- Edit each start_...sh script and you should see an exec java line at
the bottom. Update to redirect output:
exec "/opt/IBM/WebSphere/AppServer/java/bin/java" $DEBUG "-XX:...
Changes to:
exec "/opt/IBM/WebSphere/AppServer/java/bin/java" $DEBUG "-XX:... >> /opt/IBM/WebSphere/AppServer/profiles/node1/logs/dynamiccluster1_node1/native_stdout.log 2>> /opt/IBM/WebSphere/AppServer/profiles/node1/logs/dynamiccluster1_node1/native_stderr.log & - Start the JVM in the processor set with (each Nth JVM will have _N
in the shell script name) -- replace 1 with the processor set ID:
/usr/sbin/psrset -e 1 ./start_server1.sh
...
macOS
macOS Recipe
- CPU core(s) should not be consistently saturated.
- Generally, physical memory should never be saturated and the operating system should not page memory out to disk.
- Input/Output interfaces such as network cards and disks should not be saturated, and should not have poor response times.
- Operating system level statistics and optionally process level statistics should be periodically monitored and saved for historical analysis.
- Review operating system logs for any errors, warnings, or high volumes of messages.
- Review snapshots of process activity, and for the largest users of resources, review per thread activity.
- If there is sufficient network capacity for the additional packets, consider reducing the default TCP keepalive timer (tcp_keepalive_time) from 2 hours to a value less than intermediate device idle timeouts (e.g. firewalls).
- Test disabling delayed ACKs
Also review the general topics in the Operating Systems chapter.
General
Overview of performance analysis tools: https://developer.apple.com/library/content/documentation/Performance/Conceptual/PerformanceOverview/PerformanceTools/PerformanceTools.html#//apple_ref/doc/uid/TP40001410-CH205-SW2
System Information
Run sysctl -a for general information and settings.
Software information:
% system_profiler SPSoftwareDataType
Software:
System Software Overview:
System Version: macOS 12.0.1 (21A559)
Kernel Version: Darwin 21.1.0
Boot Volume: MainDisk
Boot Mode: Normal
Computer Name: [...]
User Name: [...]
Secure Virtual Memory: Enabled
System Integrity Protection: Disabled
Time since boot: 40 minutesHardware information:
% system_profiler SPHardwareDataType
Hardware:
Hardware Overview:
Model Name: MacBook Pro
Model Identifier: MacBookPro15,1
Processor Name: 6-Core Intel Core i7
Processor Speed: 2.6 GHz
Number of Processors: 1
Total Number of Cores: 6
L2 Cache (per Core): 256 KB
L3 Cache: 9 MB
Hyper-Threading Technology: Enabled
Memory: 16 GB
System Firmware Version: 1554.140.20.0.0 (iBridge: 18.16.14759.0.1,0)
Serial Number (system): ...
Hardware UUID: ...
Provisioning UDID: ...
Activation Lock Status: EnabledCombing the commands and removing potentially sensitive information:
system_profiler SPSoftwareDataType SPHardwareDataType | grep -v -e UUID -e UDID -e 'User Name' -e 'Computer Name' -e Serial
log
The log command prints log entries to the terminal. The underlying
files are in /var/log and ~/Library/Logs/ and
~/Library/Logs/DiagnosticReports
log showto print the logs.log streamto tail the logs.- Stream a particular process example:
log stream --predicate '(process == "WindowServer")' --debug
- Stream a particular process example:
sudo log collectto create a logarchive file. This file may be opened inConsole(see below).% sudo log collect Password: Archive successfully written to /Users/kevinaccount/system_logs.logarchive
Common things to check
grep crash /var/log/system.log
Console
The Console
app shows system logs and events. Click Spotlight Search, type
Console and double click. The underlying files are in
/var/log and ~/Library/Logs/
- Click thew Now button to pause the live view.
- If XCode Instruments is installed, additional pre-defined instrumentation profiles are available under Console } Services
- Click Action } Include Info/Debug Messages for additional debugging
- Open a logarchive file (see above) with File } Open...
Activity Monitor
Activity Monitor is a graphical tool to look at CPU, Memory, and more: https://support.apple.com/en-us/HT201464

sysdiagnose
sysdiagnose captures various system logs and information:
- Open the Activity Monitor application (e.g. Spotlight Search } Activity Monitor, or Finder } Applications } Activity Monitor)
- Click View } Run System Diagnostics...
- Click OK
- When complete, a Finder window opens pointing to a
sysdiagnose_${...}folder andsysdiagnose_${...}.tar.gzfile.
Alternatively, from the Terminal, run
sudo sysdiagnose.
File highlights:
sysdiagnose.logfor macOS version, e.g.Mac OS X 10.15.6 (Build 19G73)system_logs.logarchivefor a full logarchive (see above)ps.txt,ps_thread.txt, andtop.txtfor process and thread activity statisticsspindump.txtfor process CPU samplingfs_usage.txtfor I/O activity
spindump
Spindump captures CPU stack samples for about 20 seconds:
- Open the Activity Monitor application (e.g. Spotlight Search } Activity Monitor, or Finder } Applications } Activity Monitor)
- Click View } Run Spindump
- When complete, a window opens with the results
- The
CPU Time:shows how much CPU time was consumed by each process during the spindump. Review the subsequent stack samples for high CPU time consumers.
Instruments
Instruments is bundled with XCode and provides functions such as a CPU sampling profiler: https://help.apple.com/instruments/mac/current/#/dev7b09c84f5
Capture System-wide CPU Sampling Profiler Data
- Install XCode
- After installing, click Spotlight Search, type Instruments and double click.
- Select the
Time Profilertemplate and clickChoose. - In the top left, click the record button.
- Reproduce the problem.
- In the top left, click the stop button.
- Click File } Save As to export the profile. A
${name}.tracefile is exported.
Analyze CPU Sampling Profiler Data
- Click View } Utilities } Show Run Info to see the absolute wall clock timestamp of the start of the profile.
- Select and drag to zoom in on a time period of interest.
- Filters at the top allow for quickly switching between thread/process views, per-process stacks, etc.
- In the stack view, when clicking on the right expand arrow, hold down ⌥ as you click to recursively expand the largest path automatically.

Memory
Roughly, "available" memory is Free + Inactive + Speculative (if Free has Speculative subtracted as vm_stat does) + File-backed pages
$ vm_stat | awk '/^Pages free/ {x+=$NF;} /^Pages inactive/ {x+=$NF;} /^Pages speculative/ {x+=$NF;} /^File-backed pages/ {x+=$NF;} END {freebytes=(x*4096); printf("%d approximate bytes free\n%.2f approximate GB free\n", freebytes, (freebytes/1024/1024/1024));}'
13006544896 approximate bytes free
12.11 approximate GB freeIn Activity Monitor, Cached Files is defined as the following, and experiments show this is approximated by "File-backed pages" in vm_stat:
Cached Files: Memory that was recently used by apps and is now available for use by other apps. For example, if you've been using Mail and then quit Mail, the RAM that Mail was using becomes part of the memory used by cached files, which then becomes available to other apps. If you open Mail again before its cached-files memory is used (overwritten) by another app, Mail opens more quickly because that memory is quickly converted back to app memory without having to load its contents from your startup drive.
https://support.apple.com/en-us/HT201464#memory
Detailed memory statistics: https://developer.apple.com/library/content/documentation/Performance/Conceptual/ManagingMemory/Articles/VMPages.html#//apple_ref/doc/uid/20001985-CJBJFIDD
Kernel Memory
$ sudo zprint
elem cur max cur max cur alloc alloc
zone name size size size #elts #elts inuse size count
-------------------------------------------------------------------------------------------------------------
vm.permanent 1 76K 76K 77824 77824 76486 4K 4096
[...]
kmod vm peak cur
wired memory id tag size waste size
-------------------------------------------------------------------------------------------------------------
NDR_record 82 816K
[...]
largest peak cur
maps free free size size
-------------------------------------------------------------------------------------------------------------
VM_KERN_COUNT_MANAGED 16113384K
VM_KERN_COUNT_MAP_KALLOC 481508K 460800K 524288K
VM_KERN_COUNT_MAP_KERNEL 331566456K 264758024K 538968056K
VM_KERN_COUNT_MAP_ZONE 133194176K 53549092K 134217536K
VM_KERN_COUNT_WIRED 2553936K
VM_KERN_COUNT_WIRED_BOOT 888096K
VM_KERN_COUNT_WIRED_MANAGED 2036552K
VM_KERN_COUNT_WIRED_STATIC_KERNELCACHE 18552K
[...]
cur
zone views inuse
-------------------------------------------------------------------------------------------------------------
data.kalloc.16[raw] 700K
[...]Page Size
The size of a page on OS X is 4096 bytes.
Wired memory (also called resident memory) stores kernel code and data structures that must never be paged out to disk. Applications, frameworks, and other user-level software cannot allocate wired memory. However, they can affect how much wired memory exists at any time. For example, an application that creates threads and ports implicitly allocates wired memory for the required kernel resources that are associated with them. [...]
Wired memory pages are not immediately moved back to the free list when they become invalid. Instead they are "garbage collected" when the free-page count falls below the threshold that triggers page out events. [...]
The active list contains pages that are currently mapped into memory and have been recently accessed.
The inactive list contains pages that are currently resident in physical memory but have not been accessed recently. These pages contain valid data but may be removed from memory at any time.
The free list contains pages of physical memory that are not associated with any address space of VM object. These pages are available for immediate use by any process that needs them.
When the number of pages on the free list falls below a threshold (determined by the size of physical memory), the pager attempts to balance the queues. It does this by pulling pages from the inactive list. If a page has been accessed recently, it is reactivated and placed on the end of the active list. In OS X, if an inactive page contains data that has not been written to the backing store recently, its contents must be paged out to disk before it can be placed on the free list.
[O]n Mac OS X 10.5 we introduced a new, fifth category of memory, speculative memory, used to hold pages that have been read from disk speculatively.
https://lists.apple.com/archives/darwin-kernel/2008/Jun/msg00001.html
nmond
nmond is a fork of the AIX/Linux nmon tool: https://github.com/stollcri/nmond
Install:
git clone https://github.com/stollcri/nmond
cd nmond/nmond
make
sudo make installRun:
NMOND=ctmdn nmondnmond does not support the headless logging features of the AIX/Linux nmon, so it is only useful for live monitoring.
Tips
In Finder's Open File dialog, type / (or Shift+Command+G) to open a dialog to paste a direct absolute path of a folder to open.
Network
Disable delayed ACKs: Add net.inet.tcp.delayed_ack=0 to
/etc/sysctl.conf and restart
File I/O
fs_usage
fs_usage traces filesystem syscalls: https://developer.apple.com/library/archive/documentation/Performance/Conceptual/FileSystem/Articles/FileSystemCalls.html#//apple_ref/doc/uid/20001989-97106
Start:
nohup sudo fs_usage -ew -f filesys > fsusage_$(hostname)_$(date +"%Y%m%d_%H%M%S_%N").txtStop:
Ctrl^CExample output:
TIMESTAMP CALL FILE DESCRIPTOR BYTE COUNT PATHNAME TIME INTERVAL(W) PROCESS NAME
07:41:30.599158 open F=12 (_WC_T_______) test.txt 0.000113 java.1454892
07:41:30.599161 fstat64 F=12 0.000002 java.1454892
07:41:30.599330 write F=12 B=0xc 0.000043 java.1454892
07:41:30.599338 write F=13 B=0x171 0.000043 java.1454932
07:41:30.599566 close F=12 0.000082 java.1454892diskutil
List disks example:
$ diskutil list
/dev/disk0 (internal, physical):
#: TYPE NAME SIZE IDENTIFIER
0: GUID_partition_scheme *500.3 GB disk0
1: EFI EFI 314.6 MB disk0s1
2: Apple_APFS Container disk1 500.0 GB disk0s2
/dev/disk1 (synthesized):
#: TYPE NAME SIZE IDENTIFIER
0: APFS Container Scheme - +500.0 GB disk1
Physical Store disk0s2
1: APFS Volume Macintosh HD - Data 465.4 GB disk1s1
2: APFS Volume Preboot 78.7 MB disk1s2
3: APFS Volume Recovery 528.9 MB disk1s3
4: APFS Volume VM 2.1 GB disk1s4
5: APFS Volume Macintosh HD 11.4 GB disk1s5
/dev/disk2 (external, physical):
#: TYPE NAME SIZE IDENTIFIER
0: FDisk_partition_scheme *30.8 GB disk2
1: Windows_FAT_32 NO NAME 30.8 GB disk2s1Unmount a disk example:
diskutil unmountDisk /dev/disk2Eject a disk example:
diskutil eject /dev/disk2mds_stores
The mds_stores process may use high CPU as part of file
indexing. If you do not need file indexing, disable it with:
sudo mdutil -a -i offTo show the indexing status:
% sudo mdutil -a -s
/:
Indexing disabled.
/System/Volumes/Data:
Indexing disabled.To re-enable indexing:
sudo mdutil -a -i onIf you do need file indexing, use fs_usage to find which files are driving the indexing and consider excluding their parent directories: System Preferences } Spotlight } Privacy } Add a folder or disk to exclude
Java
Java Recipe
- Review the Operating System recipe for your OS.
- Tune the maximum Java heap size (
-Xmxor-XX:MaxRAMPercentage):- Enable verbose garbage collection (-verbose:gc) which prints statistics on garbage collection to files and generally has an overhead less than 1%. Use a tool such as the IBM Garbage Collection and Memory Visualizer to analyze the verbosegc output. The proportion of time spent in garbage collection versus application processing time should generally be less than 10% and ideally less than 1%.
- In general, a place to start is to set -Xmx to 43% larger than the maximum occupancy of the application, although the latter is largely a function of workload and thread pool size, so this is just a heuristic.
- If the node only uses IPv4 and does not use IPv6, then add the JVM
parameters
-Djava.net.preferIPv4Stack=true -Djava.net.preferIPv6Addresses=false - Consider the particular type of garbage collector to use (see the comparison tables in the JVM sub-chapters).
- Ensure there is no memory leak with long running tests.
- If using a generational collector (which most modern default
collectors are):
- Ensure tests run through full/tenured collections and ensure those pause times are not too long.
- Ensure that there is a sawtooth pattern in the heap usage after collection. Otherwise, the heap size may be too small or the nursery too big.
- A heuristic is that the sawtooth should drop about 25% of the heap size on full collections.
- Total pause times over a few seconds should be routinely investigated.
- Use a profiler such as IBM Java Health Center or OpenJDK Mission Control with a particular focus on the profiling and lock contention analysis. Otherwise, use periodic thread dumps to review JVM activity with the IBM Thread and Monitor Dump Analyzer tool.
- If heavily using XML, consider explicitly configuring JAXP ServiceLoader properties to avoid unnecessary classloading activity.
- Object allocation failures for objects greater than 5MB should generally be investigated.
- Take a system dump or HPROF heapdump during peak activity and review it with the Eclipse Memory Analyzer Tool to see if there are any areas in the heap for optimization.
- Review the stderr and stdout logs for any errors, warnings, or high volumes of messages (e.g. OutOfMemoryErrors).
- If running multiple JVMs on the same machine, consider pinning JVMs to sets of processor cores and tuning -Xgcthreads/-XcompilationThreads or -XX:ParallelGCThreads.
- In general, if memory usage is very flat and consistent, it may be optimal to fix -Xms = -Xmx. For widely varying heap usage, -Xms < -Xmx is generally recommended. You may get the best of both worlds by setting -Xms to the lowest steady state memory usage, -Xmaxf1.0 to eliminate shrinkage, -Xminf to avoid compaction before expansion, and -Xmine to reduce expansions.
- Request a thread dump and search its output for "deadlock" to ensure that no threads are deadlocked (thus reducing throughput).
General
A Java Virtual Machine (JVM) provides the core components needed to run a Java program such as a Virtual Machine (VM) which performs core functions such as memory management, a Garbage Collector (GC) which periodically cleans up unused memory, and a Just-In-Time Compiler (JIT) which translates heavily used Java code into native code for better performance.
A Java Runtime Environment (JRE) is a JVM plus a Java Standard Edition (SE) Class Library (JCL). A JRE provides the Java executable (e.g. java, javaw) to run a Java program. The JCL provides the implementation of core Java classes from some version of the Java SE specification such as java.lang.String, etc.
A Java Development Kit (JDK) is a JRE plus Java tools. Java tools include a compiler (javac), archive utility (jar), etc.
A Software Development Kit (SDK) is a generic term for a collection of tools and a runtime environment to enable the development and running of code for any language. A JDK is an SDK for Java.
The Java landscape is quite confusing. Performance tuning and diagnostics depend on the version and vendor of the JDK. This chapter covers topics that span all JDKs; however, you will certainly want to review the sub-chapters specific to your JDK. Here are links to those sub-chapters along with a bit of historical background to hopefully explain the complexity:
- The HotSpot JVM (sometimes colloquially called the Sun JVM) is the original JVM built by Sun Microsystems who created Java. The JCL created by Sun and packaged with HotSpot never really had a widely used name. Oracle purchased Sun and continued to package HotSpot and that JCL as part of Oracle Java. HotSpot and that JCL were also open-sourced by Sun as OpenJDK. There was a period of some divergence, but modern versions of Oracle Java and OpenJDK+HotSpot are largely the same. Therefore, if you're running Oracle Java or HotSpot (e.g. as part of Adoptium, IcedTea, Amazon Coretto, GraalVM, etc.), the JVM sub-chapter to use is HotSpot JVM and the JCL sub-chapter to use is OpenJDK JCL and Tools. Oracle Java is shipped at https://www.java.com/, and one popular flavor of OpenJDK+HotSpot is shipped at https://adoptium.net/.
- IBM created its own JVM called J9 (which has nothing to do with Java 9; it came in around Java 1.4.2). J9 is packaged as part of IBM Java. J9 was also open-sourced as Eclipse OpenJ9 and it's available for download as the Semeru Runtime Open or Certified Editions. Therefore, if you're using IBM Java or Semeru (OpenJ9+OpenJDK), the JVM sub-chapter to use is OpenJ9 and IBM J9 JVMs. The JDK story is more complicated; IBM licensed the Sun JDK and made some changes to both the JCL and the Java tools. If you're using IBM Java <= 8, the JCL sub-chapter to use is IBM JCL and Tools, although some of the OpenJDK JCL and Tools chapter may also apply. However, if you're using Semeru, as part of the process of open-sourcing J9, IBM mostly abandoned its JCL and Java tools forks and ships with the JCL and Java tools from OpenJDK; therefore, if you're using Semeru, the JCL sub-chapter is OpenJDK JCL and Tools. This change is particularly important if you're migrating from IBM Java <= 8 to Semeru: the JVM is largely the same, but the JCL may have significant changes (e.g. the performance characteristics of the JAXP XSLT compiler may change positively or negatively depending on the use case). IBM Java is available at https://www.ibm.com/support/pages/java-sdk-downloads (and shipped as part of various stack products) and Semeru is at https://developer.ibm.com/languages/java/semeru-runtimes/downloads. There are additional differences such as the fact that Mission Control doesn't work on J9; if available, use Health Center instead.
General Tuning
If only using IPv4, set the generic JVM argument
-Djava.net.preferIPv4Stack=true
JAXP ServiceLoader
By default, JAXP factories use ServiceLoader if not otherwise configured to avoid it, and ServiceLoader may heavily drive classloading. For example, here is the algorithm for DocumentBuilderFactory:
- Use the javax.xml.parsers.DocumentBuilderFactory system property.
- Use the properties file "lib/jaxp.properties" in the JRE directory. This configuration file is in standard java.util.Properties format and contains the fully qualified name of the implementation class with the key being the system property defined above. The jaxp.properties file is read only once by the JAXP implementation and it's values are then cached for future use. If the file does not exist when the first attempt is made to read from it, no further attempts are made to check for its existence. It is not possible to change the value of any property in jaxp.properties after it has been read for the first time.
- Uses the service-provider loading facilities, defined by the ServiceLoader class, to attempt to locate and load an implementation of the service using the default loading mechanism: the service-provider loading facility will use the current thread's context class loader to attempt to load the service. If the context class loader is null, the system class loader will be used.
- Otherwise, the system-default implementation is returned.
Therefore, if the factory isn't specified with a system property and
if there is no lib/jaxp.properties file with an uncommented
line for that factory, then every call to newInstance
drives classloading.
This applies to the other JAXP factories as well: SAXParserFactory, TransformerFactory, XPathFactory, SchemaFactory, and DatatypeFactory.
You may explicitly specify the factories using system properties depending on your JDK. For example:
OpenJDK:
-Djavax.xml.transform.TransformerFactory=org.apache.xalan.processor.TransformerFactoryImpl
-Djavax.xml.xpath.XPathFactory=org.apache.xpath.jaxp.XPathFactoryImpl
-Djavax.xml.xpath.XPathFactory:http://java.sun.com/jaxp/xpath/dom=org.apache.xpath.jaxp.XPathFactoryImpl
-Djavax.xml.parsers.SAXParserFactory=org.apache.xerces.jaxp.SAXParserFactoryImpl
-Djavax.xml.parsers.DocumentBuilderFactory=org.apache.xerces.jaxp.DocumentBuilderFactoryImpl
-Djavax.xml.validation.SchemaFactory:http://www.w3.org/2001/XMLSchema=org.apache.xerces.jaxp.validation.XMLSchemaFactory
-Djavax.xml.datatype.DatatypeFactory=org.apache.xerces.jaxp.datatype.DatatypeFactoryImplIBM Java:
-Djavax.xml.transform.TransformerFactory=com.ibm.xtq.xslt.jaxp.compiler.TransformerFactoryImpl
-Djavax.xml.xpath.XPathFactory=org.apache.xpath.jaxp.XPathFactoryImpl
-Djavax.xml.xpath.XPathFactory:http://java.sun.com/jaxp/xpath/dom=org.apache.xpath.jaxp.XPathFactoryImpl
-Djavax.xml.parsers.SAXParserFactory=org.apache.xerces.jaxp.SAXParserFactoryImpl
-Djavax.xml.parsers.DocumentBuilderFactory=org.apache.xerces.jaxp.DocumentBuilderFactoryImpl
-Djavax.xml.validation.SchemaFactory:http://www.w3.org/2001/XMLSchema=org.apache.xerces.jaxp.validation.XMLSchemaFactory
-Djavax.xml.datatype.DatatypeFactory=org.apache.xerces.jaxp.datatype.DatatypeFactoryImplOn IBM Java, you may also test a different implementation of
javax.xml.transform.TransformerFactory with
-Djavax.xml.transform.TransformerFactory=org.apache.xalan.processor.TransformerFactoryImpl
Alternatively for IBM Java, it ships a
jre/lib/jaxp.properties.sample file that may be renamed to
jre/lib/jaxp.properties and all of its last 6 lines
uncommented as well as a jre/lib/xerces.properties whose
last line may be uncommented.
Note that starting with Java 8, JAXP is upgraded to version 1.6 and this specifies using ServiceLoader instead of the lesser defined "Services API" in previous versions:
The Java SE 8 release contains Java API for XML Processing (JAXP) 1.6, which requires the use of the service provider loader facility defined by java.util.ServiceLoader to load services from service configuration files.
Garbage Collection
Garbage collection automatically frees unused objects. All major JVMs are designed to work with a maximum Java heap size (specified with -Xmx). When the Java heap is full (or various sub-heaps), an allocation failure occurs and the garbage collector will kick in to try to find space. There are some key aspects to garbage collections:
- Mark: Determine whether objects are live or unused.
- Sweep: Reclaim unused objects by marking their memory as available on a free list.
- Compact: Reduce fragmentation by rearranging the free list into one area of memory.
- Generational collector: Split the heap into two parts: a nursery for short lived objects and a tenured area for long-lived objects.
- Copy collection: Mark, then copy live objects into a survivor space (and/or tenured space for generational collectors). A compaction in the survivor space is implicit.
- Stop-the-world (STW) operation: The "world" is Java and a STW operation stops all Java activity while some operations are performed.
Best practice: The proportion of time spent in garbage collection versus application time should be less than 10% and ideally less than 1%.
One of the most important tuning parameters is the maximum heap size. There are three broad types of memory when considering the maximum heap size:
- Base footprint: This generally includes the base product (such as WAS, Portal, etc.) as well as metadata such as Classes and ClassLoaders used by your application.
- Caches and functional queues: These include in-memory caches such as object caches and pools, and functional queues comprised of queues that hold HTTP session data, for example, if stateful HTTP requests are being used.
- Per thread data: Each piece of work ultimately executes on one or more threads. Each thread will allocate memory while it processes its unit of work. The maximum thread pool size is intimately related to the maximum heap size.
Increasing the maximum heap size increases the time between allocation failures but also increases the duration of each garbage collection. These two aspects must be kept in balance.
Generational collectors (e.g. IBM gencon/balanced and all HotSpot collectors) split the heap into one or more regions for different age groups of objects. This is based on the observation that Java programs tend to have two different types of objects: long-lived and short-lived. The purpose of splitting the heap (and collecting the heaps in different phases) is to reduce the average time spent in garbage collection by avoiding checking objects that are long-lived since they are less likely to be garbage.
Some tools will refer to "used" heap. This is not necessarily the same as "live" heap or "footprint." This is because some garbage collection policies such as generational collectors will actively avoid collecting certain subsets of garbage in some types of collections. This garbage will still be part of "used" heap, but it is not live, by definition.
Heuristic: If live occupancy is too low (<50%), GC cycles take longer than necessary. If live occupancy is too high, then time between GCs will be too low.
"Look for peaks in the "Pause times (including exclusive access)" line to identify long garbage collection cycles. When you have identified a long garbage collection cycle, determine which of the mark, sweep, and compact activities of the garbage collection cycle caused the cycle to be as long as it was... If you find long garbage collection cycles you can examine, the raw verbose:gc entry for that garbage collection cycle by selecting the first tab at the bottom of the main panel. This tab has the same name as the file containing the verbose:gc data. You can then look for the garbage collection cycle. Raw verbose:gc cycle output is useful because it often contains the reason why particular actions were taken in that cycle and you can see how to avoid those actions."
"To ensure that the occupancy does not exceed 70%, set the maximum Java heap size to at least 43% larger than the Maximum occupancy value provided by GCMV. This setting then makes the Maximum value 70% of the Java heap and the average to be above 40% of the Java heap size... In situations where memory occupancy of the Java heap varies significantly, you might not be able to maintain occupancy between 40% and 70% of the Java heap. In these situations, it is more important to keep the occupancy below 70% of the maximum heap size than it is to keep the occupancy above 40%."
Heuristic: It is important to monitor the maximum garbage collection pause time (particularly for tenured collections). Generally, pause times greater than 1 second may be a problem.
Heuristic: It is important to monitor the maximum size of the requested object causing the allocation failure. Generally, objects greater than 10MB may be a problem.
"Two additional metrics to key in on are the garbage collection intervals and the average pause times for each collection. The GC interval is the amount of time in between garbage collection cycles. The pause time is the amount of time that a garbage collection cycle took to complete... As heap size increases, the interval between GCs increase, enabling more work to be performed before the JVM pauses to execute its garbage collection routines. However, increasing the heap also means that the garbage collector must process more objects and, in turn, drives the GC pause times higher... The GC intervals and pause times together make up the amount of time that was spent in garbage collection: % Time in GC = (Average Pause Time) / (GC Interval + Average Pause Time)"
One useful set of tests is to plot maximum heap size along with % Time in GC to find the best maximum heap size.
One of the most important factors for choosing a policy is the worst case pause time.
Optimal Heap Size
"If the occupancy of the Java heap is too high, garbage collection occurs frequently. If the occupancy is low, garbage collection is infrequent but lasts longer... Try to keep the memory occupancy of the Java heap between 40% and 70% of the Java heap size... The highest point of occupancy of the Java heap is preferably not above 70% of the maximum heap size, and the average occupancy is between 40% and 70% occupancy. If the occupancy goes over 70%, resize the Java heap."
"A correctly sized Java heap should always have a memory occupancy of between 40% and 70% of the maximum Java heap size. To ensure that the occupancy does not exceed 70%, set the maximum Java heap size to at least 43% larger than the Maximum occupancy value provided by GCMV. This setting then makes the Maximum value 70% of the Java heap and the average to be above 40% of the Java heap size."

By default the JVM provides a very flexible heap configuration that
allows the heap to grow and shrink dynamically in response to the needs
of the application. This allows the JVM to claim only as much memory as
necessary at any given time, thereby cooperating with other processes
running on the system. The starting and maximum size of the heap can be
specified with the -Xms<size><M|G> and
-Xmx<size><M|G> options respectively. This
flexibility however comes at a cost, as the JVM must request memory from
the operating system whenever the heap needs to be grown and return
memory whenever it shrinks. This behavior can lead to various worse-case
scenarios. If the application's heap requirements oscillate it may cause
excessive heap growth and shrinkage. If the JVM is running on a
dedicated machine or memory is otherwise not a concern, the overhead of
heap resizing can be eliminated by requesting a constant sized heap.
This can be accomplished by setting -Xms equal to -Xmx. Choosing the
right size for the heap is very important, as GC overhead is directly
proportional to the size of the heap! The heap should be large enough to
satisfy the application's maximum memory requirements and also contain
some wiggle room. The GC has to work much harder when the heap is near
full capacity due to fragmentation and other issues, so 20-30% of extra
space above the application's maximum needs can lower overall GC
overhead.
If an application requires more flexibility than can be achieved with
a constant sized heap it may be beneficial to tune the sizing parameters
for a dynamic heap. One of the most expensive GC events is object
allocation failure. This occurs when there is not enough contiguous
space in the current heap to satisfy the allocation and results in a GC
collection and a possible heap expansion. If the current heap size is
less than Xmx the heap will be expanded in response to the allocation
failure if the amount of free space is below a certain threshold.
Therefore, it is important to insure that when an allocation fails the
heap is expanded to not only allow the failed allocation to succeed, but
also many future allocations, otherwise the next failed allocation could
trigger yet another GC collection. This is known as heap thrashing. The
-Xminf, -Xmaxf, -Xmine, and -Xmaxe group of options can be used to
effect when and how the GC resizes the heap. The -Xminf<factor>
option (where factor is a real number between 0 and 1) specifies the
minimum free space in the heap; if the total free space falls below this
factor the heap is expanded. The -Xmaxf<factor> option specifies
the maximum free space; if the total free space rises above this factor
the heap is shrunk. These options can be used to minimize heap thrashing
and excessive resizing. The -Xmine<size><M|G>
and -Xmaxe<size><M|G> options specify the
minimum and maximum sizes to shrink and grow the heap by. These options
can be used to insure that the heap has enough free contiguous space to
allow satisfy a reasonable number of allocations before failure.
In general, if memory usage is very flat and consistent, it may be optimal to fix -Xms=-Xmx. For widely varying heap usage, -Xmx<-Xmx is generally recommended. You may get the best of both worlds by settings -Xms to the lowest steady state memory usage, -Xmaxf1.0 to eliminate shrinkage, -Xminf to avoid compaction before expansion, and -Xmine to reduce expansions.
Regardless of whether or not the heap size is constant, it should never exceed the physical memory available to the process, otherwise the operating system may have to swap data in and out of memory. An application's memory behavior can be determined by using various tools, including verbose GC logs.
"GC will adapt heap size to keep occupancy between 40% and 70%. Heap occupancy over 70% causes frequent GC - reduced performance. Heap occupancy below 40% means infrequent GC cycles, but cycles can be longer than they need to be - longer pause times - Reduced Performance. The maximum heap size should therefore be about 40% larger than the maximum occupancy. Maximum occupancy + 43% means occupancy at 70% of total heap. Example: For 70 MB occupancy, 100 MB Max Heap required, which is 70 MB plus 43% of 70 MB."
Generational Garbage Collectors
The Sawtooth
A generational garbage collector tenures objects from the "young" or "nursery" region of the Java heap into an "old" or "tenured" region of the Java heap. If the rate of garbage creation exceeds the rate at which young/nursery generation scavenges can clear objects before they are tenured, then this garbage builds up in the tenured region. When the tenured region fills up, a full garbage collection is run to clean up this garbage. This pattern may suggest suboptimal tuning; however, it may be unavoidable. This is a very common pattern and produces a "sawtooth" shape of Java heap usage. For example, here is a graph from the Garbage Collection and Memory Visualizer Tool:

In the above graph, there are three different plots:
- Used heap (after collection) - teal color. This is what most people look at first when analyzing Java heap usage. This is a line plot of the heap usage after any garbage collection, whether nursery or tenured. This shows the classic sawtooth pattern.
- Used heap (after global collection) - red color. This is a better way to look at the "real" Java heap usage over time. This is a line plot of the heap usage only after full garbage collections. This does not show the build-up of garbage in the tenured area. If the slope of this line is positive, there may be a leak.
- GC type - green color. The "nursery" line at the top is a solid color and this is expected because nursery scavenges should occur frequently under load. The "global" plot at the bottom shows a few periodic full garbage collections. These will line up with the large drops in heap usage when the build-up of garbage is cleaned up in the tenured area.
The implication of the sawtooth is that it is generally naïve to look
at the used heap after any collection or to otherwise sample Java heap
usage. In the case of a sawtooth usage pattern, such measurements are
likely to include a lot of garbage. This also means that common
techniques like "tailing" the verbose garbage collection log must be
more sophisticated to look at used heap only after global collections
(this may be done with grep -A ... | grep for example).
Verbose garbage collection (-verbose:gc)
Verbose garbage collection (known colloquially as verbosegc) prints details about the operations of the garbage collector to a text file. This output can be processed in a tool such as the IBM Garbage Collection and Memory Visualizer to understand the proportion of time spent in garbage collection, total pause times, etc.
By default, verbosegc is not enabled although IBM generally recommends it is enabled for most production environments. Each garbage collection cycle prints a handful of lines and most of the data will be calculated regardless during the normal operation of the garbage collector; therefore, the overhead of verbosegc is mostly writing these small bursts of data to disk.
For IBM Java and IBM Semeru Runtimes Java, for example, comprehensive tests in 2022 measuring the relative difference of verbosegc in startup, footprint, first request and throughput tests on bare metal, z/OS, and containers using both spinning and NVME disks showed an overhead of verbosegc of less than 1% and mostly less than 0.5%.
See the verbosegc section of each JVM vendor's chapter for more details on how to enable verbosegc:
Enabling Verbosegc
In addition to startup flags discussed in the links above, berbosegc may be enabled at runtime through the Memory MBean Verbose attribute (MBeans } java.lang } Memory } Attributes } Verbose } Value = true; Enter):

GC Threads
The garbage collector used by the JVM takes every opportunity to exploit parallelism on multi-CPU machines. All phases of the GC can be executed in parallel with multiple helper threads dividing up the work in order to complete the task as quickly as possible. Depending on the GC strategy and heap size in use, it may be beneficial to adjust the number of threads that the GC uses. The number of GC threads can be specified with the -Xgcthreads<number> option. The default number of GC threads is equal to the number of logical processors on the machine minus 1 and it is usually not helpful to exceed this value, reducing it however will reduce GC overhead and may be desirable in some situations. The most important consideration is the number of CPUs available to the JVM; if the JVM is pinned to less than the total number of CPUs (for example by using execrset on AIX or taskset on Linux) then the number of GC threads should be adjusted. Tuning the number of GC threads may also be desirable when running multiple JVMs on a single machine, or when the JVM is running in a virtualized environment.
Memory Leaks
Memory leaks in the Java language are a dangerous contributor to garbage collection bottlenecks. Memory leaks are more damaging than memory overuse, because a memory leak ultimately leads to system instability. Over time, garbage collection occurs more frequently until the heap is exhausted and the Java code fails with a fatal out-of-memory exception. Memory leaks occur when an unused object has references that are never freed. Memory leaks most commonly occur in collection classes, such as Hashtable because the table always has a reference to the object, even after real references are deleted.
High workload often causes applications to crash immediately after deployment in the production environment. If an application has memory leaks, a high workload can accelerate the magnification of the leakage and cause memory allocation failures to occur.
The goal of memory leak testing is to magnify numbers. Memory leaks are measured in terms of the amount of bytes or kilobytes that cannot be garbage collected. The delicate task is to differentiate these amounts between expected sizes of useful and unusable memory. This task is achieved more easily if the numbers are magnified, resulting in larger gaps and easier identification of inconsistencies. The following list provides insight on how to interpret the results of your memory leak testing:
Memory leak problems can manifest only after a period of time, therefore, memory leaks are found easily during long-running tests. Short running tests might provide invalid indications of where the memory leaks are occurring. It is sometimes difficult to know when a memory leak is occurring in the Java language, especially when memory usage has seemingly increased either abruptly or monotonically in a given period of time. The reason it is hard to detect a memory leak is that these kinds of increases can be valid or might be the intention of the developer. You can learn how to differentiate the delayed use of objects from completely unused objects by running applications for a longer period of time. Long-running application testing gives you higher confidence for whether the delayed use of objects is actually occurring.
Repetitive test
In many cases, memory leak problems occur by successive repetitions of the same test case. The goal of memory leak testing is to establish a big gap between unusable memory and used memory in terms of their relative sizes. By repeating the same scenario over and over again, the gap is multiplied in a very progressive way. This testing helps if the number of leaks caused by the execution of a test case is so minimal that it is hardly noticeable in one run.
You can use repetitive tests at the system level or module level. The advantage with modular testing is better control. When a module is designed to keep the private module without creating external side effects such as memory usage, testing for memory leaks is easier. First, the memory usage before running the module is recorded. Then, a fixed set of test cases are run repeatedly. At the end of the test run, the current memory usage is recorded and checked for significant changes. Remember, garbage collection must be suggested when recording the actual memory usage by inserting System.gc() in the module where you want garbage collection to occur, or using a profiling tool, to force the event to occur.
Concurrency test
Some memory leak problems can occur only when there are several threads running in the application. Unfortunately, synchronization points are very susceptible to memory leaks because of the added complication in the program logic. Careless programming can lead to kept or not-released references. The incident of memory leaks is often facilitated or accelerated by increased concurrency in the system. The most common way to increase concurrency is to increase the number of clients in the test driver.
Consider the following points when choosing which test cases to use for memory leak testing:
A good test case exercises areas of the application where objects are created. Most of the time, knowledge of the application is required. A description of the scenario can suggest creation of data spaces, such as adding a new record, creating an HTTP session, performing a transaction and searching a record.
Look at areas where collections of objects are used. Typically, memory leaks are composed of objects within the same class. Also, collection classes such as Vector and Hashtable are common places where references to objects are implicitly stored by calling corresponding insertion methods. For example, the get method of a Hashtable object does not remove its reference to the retrieved object.
Heap consumption that indicates a possible leak during periods when the application server is consistently near 100 percent CPU utilization, but disappears when the workload becomes lighter or near-idle, is an indication of heap fragmentation. Heap fragmentation can occur when the JVM can free sufficient objects to satisfy memory allocation requests during garbage collection cycles, but the JVM does not have the time to compact small free memory areas in the heap to larger contiguous spaces.
Another form of heap fragmentation occurs when objects that are less than 512 bytes are freed. The objects are freed, but the storage is not recovered, resulting in memory fragmentation until a heap compaction occurs.
Many customers have daily or weekly restarts, often because of uninvestigated leaks. These customers will often believe that this is a "solution" to their problem, and although that may avoid OutOfMemoryErrors, it may still impact garbage collection times.
You should also monitor native memory leaks using operating system tools.
Determining Leaks with Generational Collectors
By design, generational collectors may put trash into the tenured region until a full collection occurs; therefore, to determine if there is a leak with a generational collector, review the used Java heap after full garbage collections. If the slope is positive, then there may be a leak. However, there are cases where even this pattern may not be a leak. For example, if a SoftReference cache builds up more quickly than the soft reference threshold to clear them, the used heap after global collection may rise but those SoftReferences will be cleared under memory pressure.
InetAddress Cache
Review the cache for DNS name resolutions: http://www-01.ibm.com/support/docview.wss?uid=swg21207534
32-bit versus 64-bit
There is a non-trivial cost for 64-bit over 32-bit due to increased memory requirements (larger pointers/references), reduced processor data and instruction cache line hits (e.g. L2, L3 caches, TLB cache hits), etc. Even with -Xcompressedrefs, the performance hit for 64-bit may be up to 5-10% and the increase in overall memory usage up to 15% (see also).
Some scenarios where 64-bit is better:
- Computationally expensive or scientific applications.
- A large cache avoids out of process calls to get data.
- If the application requires a large Java heap that cannot be fit into 32-bit processes otherwise.
- If the application requires more native memory.
- If the 64-bit process gets more registers than a 32-bit process, it may run more quickly. For example, with the IBM Power CPU, 32-bit and 64-bit processes get the same number of registers.
Synchronization and Lock Contention
"If the method is an instance method, [synchronization] locks the lock associated with the instance for which it was invoked (that is, the object that will be known as this during execution of the body of the method). If the method is static, [synchronization] locks the lock associated with the Class object that represents the class in which the method is defined." (See Java Specification)
"Multithreaded applications apply synchronization (locks) around shared resources to ensure that the state of the resource is consistent and that the state is not changed by one thread while it is read by another thread. When an application is deployed on a larger number of CPUs, and subjected to an increasing load, the demand for shared resources increases. To manage the shared resources, more synchronization locks might be created. These locks can become points of contention, preventing threads from executing at the same time. The result is that the application cannot scale to use all available CPU."
You can reduce the rate of lock contention in two ways:
- Reduce the time that the lock is owned when it is taken; for example, limit the amount of work done under the lock in the synchronized block of code.
- Reduce the scope of the lock; for example, instead of using a single lock for an entire table, use separate locks for each row or column of the table.
A thread must spend as little time as possible holding a lock. The longer a lock is held, the greater the probability that another thread tries to obtain the lock and is forced to wait. Reducing the duration that a lock is held reduces the contention on the lock and allows the application to scale further. If you see a long average hold time for a lock, examine the source code:
- check if code that runs under the lock can be moved outside the lock; for example, the code does not act on the shared resource. In this case, move the code outside the lock to allow it to be run in parallel with other threads.
- check if code that runs under the lock results in a blocking operation; for example, a connection to another process is made. In this case, realease the lock before the blocking operation starts.
The locking architecture in an application must be granular enough that the level of lock contention is low. The greater the amount of shared resource that is protected by a single lock, the greater the probability that multiple threads try to access the resource at the same time. Reducing the scope of the resource protected by a lock, and therefore increasing the lock granularity, reduces the level of lock contention and allows the application to scale further.
ReentrantLock
The states and owners of java.util.concurrent.locks.ReentrantLock instances are not reported in thread dumps. A system dump or HPROF heapdump can be used with the Memory Analyzer Tool (Open Query Browser > Java Basics > Thread Overview and Stacks) to analyze the exclusiveOwnerThread field of the ReentrantLock to review ownership and contention.
Investigate Lock Contention
- Use thread dumps and review the raw text files for lock contention or use a tool such as TMDA.
- If the step above is inconclusive, use a sampling lock profiler such as HealthCenter (for IBM Java and OpenJ9) or MissionControl (for HotSpot).
- If the step above is inconclusive, use a deeper lock profiler such as Performance Inspector.
Deadlocks
A deadlock occurs when two or more threads are contending on resources in such a way that each thread is preventing the others from continuing. If exactly two threads or processes are contending on resources, the deadlock can be called a "deadly embrace".
In a deadlock, Thread 1 owns the lock on Object A and is trying to acquire the lock on Object B. At the same time, Thread 2 owns the lock on Object B and is trying to acquire the lock on Object A. Neither thread will give up the lock it has, so neither thread can continue. In more complicated forms, the deadlock problem can involve multiple threads and multiple locks. In the case of a Java application, the presence of a deadlock typically leads to most or all of the threads in the application becoming unable to carry out further work as they queue up on the locks involved in the deadlock.
See the Deadlock sections below for each JVM vendor for techniques on determining deadlocks.
Classloading
"[Before Java 7], multithreaded custom class loaders could deadlock when they did not have an acyclic delegation model." (http://docs.oracle.com/javase/7/docs/technotes/guides/lang/cl-mt.html)
Therefore,
"Currently many class loading interactions are synchronized on the class loader lock." (http://openjdk.java.net/groups/core-libs/ClassLoaderProposal.html)
However,
"The Java SE 7 release includes the concept of a parallel capable class loader." (http://docs.oracle.com/javase/7/docs/technotes/guides/lang/cl-mt.html)
But,
WAS currently uses the older synchronized classloader design even in Java 7. In cases where there is significant monitor contention in ClassLoader synchronization, the common root cause of the contention is some repeated pattern of class loads (for example, creating JAXP objects), and it's often possible to cache the results of these loads and avoid the problematic class loads.
Explicit Garbage Collection (System.gc, Runtime.gc)
It is generally a malpractice for an application to call System.gc() or Runtime.gc() (hereafter referring to both as System.gc(), since the former simply calls the latter). By default, these calls instruct the JVM to perform a full garbage collection, including tenured spaces and a full compaction. These calls may be unnecessary and may increase the proportion of time spent in garbage collection than otherwise would have occurred if the garbage collector was left alone.
The generic JVM arguments -Xdisableexplicitgc (IBM) and -XX:+DisableExplicitGC (HotSpot) are used to tell the JVM to do nothing when System.gc() and Runtime.gc() are called. These arguments are often recommended when it is found in verbosegc that calls to System.gc are negatively affecting the JVM. However, there are potential unintended consequences: For example, in some JVM implementations, core Java functionality such as DirectByteBuffer cleanup may be affected in some situations, leading to unnecessary OutOfMemoryErrors and crashes since the self-healing calls to System.gc to cleanup iceberg native objects have no effect.
Therefore, it is a malpractice to use -Xdisableexplicitgc or -XX:+DisableExplicitGC permanently. The best practice is to figure out who is calling System.gc and avoid or remove those calls. Here are methods to determine this:
Method #1: IBM Java only: Use -Xtrace trigger
Restart the JVM with the generic JVM argument -Xtrace:trigger=method{java/lang/Runtime.gc,jstacktrace},print=mt (http://www.ibm.com/support/knowledgecenter/SSYKE2_8.0.0/com.ibm.java.aix.80.doc/diag/tools/trace_options_trigger.html)
Any time System.gc is called, a stack trace will be printed to native_stderr.log. For example:
12:02:55.436*0x191de00 mt.2 > java/lang/Runtime.gc()V Native method, This = 1b24188
12:02:55.463 0x191de00 mt.18 - Instance method receiver: java/lang/Runtime@00002B8F6249AA70 arguments: ()
12:02:55.463 0x191de00j9trc_aux.0 - jstacktrace:
12:02:55.464 0x191de00j9trc_aux.1 - [1] java.lang.Runtime.gc (Native Method)
12:02:55.464 0x191de00j9trc_aux.1 - [2] java.lang.System.gc (System.java:278)
12:02:55.464 0x191de00j9trc_aux.1 - [3] Test.main (Test.java:3)Important Note: Until IBM Java 7.1, using -Xtrace:print=mt may have a significant overhead. See the -Xtrace section in the IBM Java chapter.
Method #2: Use a tracing profiler
There are many tracing profilers which can time method calls. Find a profiler with the option of only profiling the Runtime.gc method and with the option of getting a call stack to the profile samples.
Method #3: Attach a debugger
Attach a debugger and set a breakpoint in the Runtime.gc method. Then inspect the call stack.
Common Callers of System.gc
DirectByteBuffer usage may drive calls to System.gc (see the DirectByteBuffers section below).
If using RMI, a background thread calls System.gc every hour by default. This interval may be controlled with JVM parameters (in milliseconds):
Every 100 hours:
-Dsun.rmi.dgc.client.gcInterval=360000000 -Dsun.rmi.dgc.server.gcInterval=360000000Essentially never:
-Dsun.rmi.dgc.server.gcInterval=9223372036854775807 -Dsun.rmi.dgc.client.gcInterval=9223372036854775807There is an undocumented API
sun.misc.GC.requestLatencywhich may be used to schedule a background thread that callsSystem.gcon the specified interval. TheSystem.gcwill be called from the methodsun.misc.GC$Daemon.run.
java.nio.DirectByteBuffers
DirectByteBuffers (DBBs) allocated through java/nio/ByteBuffer.allocateDirect
are one way for Java applications to allocate and modify native memory
outside of the Java heap.
DirectByteBuffers and full garbage collections
Since DirectByteBuffers are managed through PhantomReferences,
their final cleanup occurs through full garbage collections. In a
similar way that the Java heap has a maximum size (configured with
-Xmx or -XX:MaxRAMPercentage) which is then
garbage collected as needed, a maximum size may be configured on the
total native memory allocated through DirectByteBuffers
using -XX:MaxDirectMemorySize
which garbage collects any no-longer-used DirectByteBuffer
allocations. Ensure there is enough physical memory to support the DBB
demands.
If this maximum would be exceeded when trying to allocate a new
DirectByteBuffer, then Java will first run some number of
full garbabe collections; if those cleanups don't free enough
DirectByteBuffer native memory for the new allocation to
fit, then an OutOfMemoryError is thrown. The most common
causes of this are either that -XX:MaxDirectMemorySize is
too small for the given load or that there is a
DirectByteBuffer leak which can be investigated with the
Eclipse Memory Analyzer Tool.
IBM Semeru Runtimes and other OpenJDK based runtimes default -XX:MaxDirectMemorySize
to a proportion of the maximum heap size.
IBM Java (but not IBM Semeru Runtimes) defaults to an
unlimited -XX:MaxDirectMemorySize.
DirectByteBuffer native memory waste
Before Java 7, there was significant native memory waste for each DirectByteBuffer:
"Prior to the JDK 7 release, direct buffers allocated using java.nio.ByteBuffer.allocateDirect(int) were aligned on a page boundary. In JDK 7, the implementation has changed so that direct buffers are no longer page aligned. This should reduce the memory requirements of applications that create lots of small buffers. Applications that previously relied on the undocumented alignment can revert to previous behavior if they are run with the command line option: -XX:+PageAlignDirectMemory."
Reflection Inflation
When using Java reflection, the JVM has two methods of accessing the information on the class being reflected. It can use a JNI accessor, or a Java bytecode accessor. If it uses a Java bytecode accessor, then it needs to have its own Java class and classloader (sun/reflect/GeneratedMethodAccessor<N> class and sun/reflect/DelegatingClassLoader). These classes and classloaders use native memory. The accessor bytecode can also get JIT compiled, which will increase the native memory use even more. If Java reflection is used frequently, this can add up to a significant amount of native memory use. The JVM will use the JNI accessor first, then after some number of accesses on the same class, will change to use the Java bytecode accessor. This is called inflation, when the JVM changes from the JNI accessor to the bytecode accessor. (http://www-01.ibm.com/support/docview.wss?uid=swg21566549)
The option -Dsun.reflect.noInflation=true enables immediate inflation on all method invocations. In general, inflated Java bytecode accessors are faster than native JNI accessors, at the cost of additional native and Java memory usage.
Serviceability
The IBM JVM provides significant serviceability improvements such as:
- Thread dumps in separate files with much more information (but still lightweight)
- Easily showing stack traces of calls that allocate large objects
- Method trace and triggers to help with things such as getting stack traces of who is calling System.gc
Java Modules
Java module command line options:
--add-exports: Directly access otherwise non-exported packages. Example:--add-exports openj9.dtfjview/com.ibm.jvm.dtfjview=ALL-UNNAMED--add-opens: Reflectively access otherwise non-exported packages and call methods such assetAccessible. Example:--add-opens openj9.dtfjview/com.ibm.jvm.dtfjview=ALL-UNNAMED--add-modules: Load otherwise unloaded modules. Example:--add-modules=openj9.dtfjview
Java Agent
A simple agent that runs on startup:
- Example class:
import java.lang.instrument.*; public class Premain { public static void premain(String args, Instrumentation inst) { System.out.println("Premain agent started"); } } - Put a
META-INF/MANIFEST.MFin the jar with the content:Premain-Class: Premain - Package into a JAR and start the target JVM with:
-javagent:premain.jar
Java Virtual Machines (JVMs)
The whole Java landscape is quite confusing and is summarized on the Java page.
Sub-chapters
OpenJ9 and IBM J9 JVMs
OpenJ9 and IBM J9 JVMs Recipe
- Review the JVM-independent recipe in the Java chapter.
- In most cases, the default
-Xgcpolicy:gencongarbage collection policy works best, with the key tuning being the maximum heap size (-Xmxor-XX:MaxRAMPercentage) and maximum nursery size (-Xmn). - Upgrade to the latest version and fixpack as there is a history of making performance improvements and fixing issues or regressions over time.
- Take a javacore and review the Java arguments (UserArgs) and Environment Variables sections and remove any unnecessary debug options.
- Take a javacore and review if the JIT code
cache is full or nearly full; if so, and there's available physical
memory, test increasing it with
-Xcodecachetotal384m -Xcodecache32m - Take a javacore and review if the shared
class cache is full or nearly full; if so, and there's available
physical memory, consider increasing
-Xscmx - If using
-Xgcpolicy:genconand you want to reduce average nursery pause times at some throughput and CPU cost, consider concurrent scavenge. - Consider setting
-XX:+CompactStringswhere available, applicable, and not already the default. - Review the performance tuning topics in the OpenJ9 or IBM Java documentation.
- When running benchmarks or comparing performance to other JVMs, consider testing various benchmark ideas.
- If using IBM Semeru Runtimes:
- If JIT CPU or memory usage are a concern, consider using the remote JITServer on available platforms.
- For AIX and Linux, ensure OpenSSL is on the system path for maximum security performance.
- On z/OS, consider enabling IBM Java Health Center
(
-Xhealthcenter:level=headless) for post-mortem CPU and lock profiling data, although this has an overhead of about 2%. - On z/OS, consider using the "pauseless" garbage collection option
-Xgc:concurrentScavengeif usinggenconand on recent software and hardware.
- If using IBM Java (does not apply to IBM Semeru Runtimes):
- Consider setting
-XX:MaxDirectMemorySizeto avoid some unnecessary full garbage collections. - Consider using the IBMJCEPlus security provider that may offer large performance improvements in encryption. This is now the default except on z/OS since 8.0.7.0.
- If the node is using a static IP address that won't be changed while
the JVM is running, use the JVM
option
-Dcom.ibm.cacheLocalHost=true. - Consider enabling IBM Java Health Center
(
-Xhealthcenter:level=headless) for post-mortem CPU and lock profiling data, although this has an overhead of about 2%.
- Consider setting
J9
J9 is an informal name for the JVM that runs both IBM Java and IBM Semeru Runtimes with some differences in J9 between the two and differences in the SDKs discussed elsewhere. J9 is developed mostly in the Eclipse OpenJ9 project.
To find the version of the J9 JVM in IBM Java, find your IBM Java service and fixpack release in the changes list and find the OpenJ9 version link. There are also nightly downloads available.
General
By default, Java will cache non-localhost lookups; however, localhost lookups are not cached in case localhost changes. In some operating systems or configurations, localhost lookups add significant overhead. If the static IP address of the node on which Java is running is unlikely to change, use -Dcom.ibm.cacheLocalHost=true to reduce localhost lookup time (https://www.ibm.com/support/knowledgecenter/SSAW57_8.5.5/com.ibm.websphere.nd.doc/ae/tprf_tunejvm_v61.html).
Garbage Collection
-Xgcpolicy:gencon is the default garbage collection policy starting in Java 6.26 (WAS 8) - it is a copy collector in the nursery area and a mark-sweep-compact collector in the tenured area. Previously, the default policy is -Xgcpolicy:optthruput.
In garbage collection, generally the term parallel means running on multiple threads, and concurrent means running at the same time as the application (i.e. not stop-the-world). Thread local heaps (TLH) are used by each thread for very small objects to reduce cross thread contention (global heap lock).
Comparing Policies
| -Xgcpolicy:gencon | -Xgcpolicy:optthruput | -Xgcpolicy:optavgpause | -Xgcpolicy:balanced | -Xgcpolicy:metronome | -Xgcpolicy:nogc | |
|---|---|---|---|---|---|---|
| Generational - most GC pauses are short (nursery/scavenge collections) | Yes | No | No | Yes | No | No |
| Compaction | Sometimes | Sometimes | Sometimes | Partial, full in overload conditions | Never | No |
| Large Heaps (>10GB) | Yes, depending on heap utilization | No | No | Yes | Yes | ? |
| Soft Real Time - all GC pauses are very short (unless cpu/heap exhaustion occurs) | No | No | No | No | Yes | No |
| Hard Real Time - requires hard real time OS, all GC pauses are very short (unless CPU/heap exhaustion occurs) | No | No | No | No | Yes | No |
| Benefits | Tries to balance application throughput with low pause times | Tries to optimize application throughput; CPU efficient | Tries to flatten out average pause times | Tries to deal with large heaps by breaking memory into many regions. May help with NUMA | Tries to have consistently low pause times | No garbage collection |
| Potential Consequences | Long global GC pauses with large heaps; Occasional long compactions; Benefits negated by frequent large object allocations if they are long-lived | Longer average pause times | Reduced throughput; Increased CPU; Poorly handles large heap usage variations | Increased CPU; Reduced throughput | Increased CPU | Increased Heap Usage |
| Recommended for | General Use (e.g. Web applications, messaging systems) | Batch applications | Consistent pause time requirement | Large heaps (>10GB) | Very low, consistent GC latency | Benchmarks |
Resources:
-Xgcpolicy:gencon
The idea [of a generational collector] is to divide the heap up into different areas, and collect these areas at different rates. New objects are allocated out of one such area, called the nursery (or newspace). Since most objects in this area will become garbage quickly, collecting it offers the best chance to recover memory. Once an object has survived for a while, it is moved into a different area, called tenure (or oldspace). These objects are less likely to become garbage, so the collector examines them much less frequently...
IBM's gencon policy (-Xgcpolicy:gencon) offers a generational GC ("gen-") on top of [-Xgcpolicy:optavgpause]. The tenure space is collected as described above, while the nursery space uses a copying collector. This algorithm works by further subdividing the nursery area into allocate and survivor spaces... New objects are placed in allocate space until its free space has been exhausted. The application is then halted, and any live objects in allocate are copied into survivor. The two spaces then swap roles; that is, survivor becomes allocate, and the application is resumed. If an object has survived for a number of these copies, it is moved into the tenure area instead.
http://www.ibm.com/developerworks/websphere/techjournal/1106_bailey/1106_bailey.html


The default maximum nursery size (-Xmn) in Java 5 is 64MB. The default in Java 6 is 25% of -Xmx. The larger the nursery, the greater the time between collects, the less objects are likely to survive; however, the longer a copy can potentially take. In general the advice is to have as large a nursery as you can afford to avoid full collects - but the full collects shouldn't be any worse than the optavgpause case. The use of concurrent collection is still in place, and the presence of the nursery should be that there's less likelihood of compacting being required in the tenured space.
For -Xgcpolicy:gencon, consider tuning the nursery size (-Xmn) to a larger proportion of -Xmx (the default is 25%)... For applications with more short-lived objects, a performance improvement can be seen by increasing the nursery size.
In an ideal world, no object is copied more than once - after the first copy it either dies or is tenured because it is long lived.
Tenure age: "Tenure age is a measure of the object age at which it should be promoted to the tenure area. This age is dynamically adjusted by the JVM and reaches a maximum value of 14. An object's age is incremented on each scavenge. A tenure age of x means that an object is promoted to the tenure area after it has survived x flips between survivor and allocate space. The threshold is adaptive and adjusts the tenure age based on the percentage of space used in the new area." (http://www.ibm.com/support/knowledgecenter/SSYKE2_8.0.0/com.ibm.java.lnx.80.doc/diag/understanding/mm_gc_generational_tenure.html)
A high tenure age means the JVM is aggressive about leaving objects in the nursery, trying to let them die there, which is generally healthy, since the JVM observes that it is able to collect most garbage in a scavenge.
As the nursery size increases, the maximum copy count and the adaptive tenure age will trend to 1. Once the application is a self optimizing tenure age of 1 at runtime, it may make sense to set tenureage=1 explicitly to make startup faster. That sets the tenure age where it will end up anyway, and ensures we don't do a lot of copying of "infrastructure" objects allocated at startup. Fix the tenure age, e.g.: -Xgc:scvNoAdaptiveTenure,scvTenureAge=1
A healthy used tenured heap (after collection) will show a sawtooth pattern where garbage collects in tenured continuously until a full collection. If the nursery size is too large (or the overall heap size is too small), then an unhealthy pattern in this plot will lack the sawtooth and you will see a low tenure age. This will caused the JVM to constantly run full collections and may increase the rate of compactions. A rough guide is that the size of the sawtooth drop should be about 25% of -Xmx. The tenured area may grow and shrink by specifying -Xmos and -Xmox.
You want the nursery to be large enough that data is at most copied once. Once that occurs the duration of a nursery collect is largely fixed at the copy time of the data, so after that increasing the nursery size increases the time between nursery collects - and therefore drops the GC overhead, and mostly likely the frequency of global collections as well.
If you've got large amounts of available RAM and process address space, the extreme tuning solution is a very large nursery with a tenure age of 1. This works on the theory that transactional data can only be copied once, and anything surviving two collects should be put into the old generation as its non-transactional (ie, at startup). You can fix the tenure age via a command line option.
There's no easy (low overhead) way of finding out what the average flip count is, but the following will give you a histogram on each scavenge collect: http://www.ibm.com/support/knowledgecenter/SSYKE2_8.0.0/com.ibm.java.lnx.80.doc/diag/tools/gcpd_tracing_scavenger.html
The maximum nursery size should be greater or equal to the maximum, concurrent transaction data for all threads. The average number of times that non-tenured objects are copied should be ~= 1
To force full GCs after each N scavenges, use -Xgc:maxScavengeBeforeGlobal=N
If you would like to tail the verbosegc log, it is generally recommended to look at free memory after global collections only because scavenges do not touch trash in the tenured region. On Linux, for example:
$ tail -f native_stderr.log | grep -A 1 "gc-end.*global" native_stderr.log
<gc-end id="1748" type="global" contextid="1741" durationms="670.959" timestamp="2014-07-02T16:28:22.476">
<mem-info id="1749" free="156456360" total="311361536" percent="50">Consider testing with -XX:+InterleaveMemory to take advantage of certain CPU-memory architectures.
Concurrent Scavenge
Consider using -Xgc:concurrentScavenge
if you want to reduce average nursery garbage collection times (though
not necessarily maximum times) at the cost of reduced throughput and
increased CPU. The average throughput drop may be up to 10-20%. The CPU
increase may be about 20% though some newer hardware such as the Z14 has
hardware assist that can bring this down to about 5-10%. The time of
full GCs is generally not impacted though they may become more frequent.
It is possible that Java heap utilization may also increase, and nursery
tuning (e.g. -Xmn) can become particularly important. If
total CPU usage is near saturation, additional performance impacts may
be observed. When testing, consider testing increased -Xmn
(and potentially also -Xmx, if possible).
Tilt Ratio
The tilt ratio is (size of new or allocate space)/(size of survivor space). The tilt ratio starts at 50% and is dynamically updated in an attempt to maximize the time between scavenges: http://www.ibm.com/support/knowledgecenter/SSYKE2_8.0.0/com.ibm.java.lnx.80.doc/diag/understanding/mm_gc_generational_tilt.html
Concurrent Marking
In general for both the gencon and optavgpause GC policies, concurrent marking can be tuned with the
-XconcurrentlevelNoption which specifies the ratio between the amounts of heap allocated and the amounts of heap marked. The default value is 8. The number of low priority mark threads can be set with the-XconcurrentbackgroundNoption. By default 1 thread is used for concurrent marking. If generational garbage collection is desired but the overhead of concurrent marking, with respect to both the overhead of the marking thread and the extra book-keeping required when allocating and manipulating objects, is not desired then concurrent marking may be disabled with the-Xconcurrentlevel0option although this may increase pause times. This option is appropriate for workloads that benefit from gencon's optimizations for object allocation and lifetimes but also require maximum throughput and minimal GC overhead while application threads are running.
Further documentation:
- https://www.ibm.com/support/knowledgecenter/SSYKE2_8.0.0/com.ibm.java.vm.80.doc/docs/mm_gc_mark_concurrent.html
-XconcurrentlevelX: https://www.ibm.com/support/knowledgecenter/SSYKE2_8.0.0/openj9/xconcurrentlevel/index.html-XconcurrentslackSIZE: https://www.ibm.com/support/knowledgecenter/SSYKE2_8.0.0/openj9/xconcurrentslack/index.html-XconcurrentbackgroundX: https://www.ibm.com/support/knowledgecenter/SSYKE2_8.0.0/openj9/xconcurrentbackground/index.html
-Xgcpolicy:balanced
The balanced GC policy (available starting with Java 7) is suitable for arbitrarily large heaps, and includes various techniques to prevent worst-case pause time from growing linearly with total heap size. Balanced is a generational policy, so as with gencon most collections will be of the nursery space, and thus will be quite brief. An incremental compaction function performs a subset of compaction work during each GC pause, to avoid the very large pause time associated with compacting the entire heap in a single operation. Tenured space collections are performed on sub-areas of the tenured heap, and objects are grouped by lifespan within the heap, to make tenured collections more efficient and brief.
The primary goal of the balanced collector is to amortize the cost of global garbage collection across many GC pauses, reducing the effect of whole heap collection times. At the same time, each pause should attempt to perform a self contained collection, returning free memory back to the application for immediate reuse.
To achieve this, the balanced collector uses a dynamic approach to select heap areas to collect in order to maximize the return-on-investment of time and effort. This is similar to the gencon policy approach, but is more flexible as it considers all parts of the heap for collection during each pause, rather than a statically defined new space.
http://www.ibm.com/developerworks/websphere/techjournal/1108_sciampacone/1108_sciampacone.html

The balanced policy can better utilize NUMA node groupings.
Balanced GC overview: http://www.ibm.com/developerworks/websphere/techjournal/1108_sciampacone/1108_sciampacone.html
-Xgcpolicy:metronome
The metronome GC policy (available in the base VM starting with Java 7) invokes the WebSphere RealTime (WRT) collector. WRT performs GC in small increments using a time-bounded algorithm to ensure that any individual GC pause is very brief. This behavior is suitable for applications needing consistent low latency response times, e.g. financial transaction systems. The trade-off for getting very low GC latency is some increase in CPU and heap consumption. Unlike gencon, optthruput, and optavgpause collectors, GC pause time with WRT does not increase linearly with heap size, so WRT is suitable for use with very large heaps.
http://www.ibm.com/developerworks/library/j-rtj4/
-Xgcpolicy:optthruput
"The simplest possible garbage collection technique is to continue allocating until free memory has been exhausted, then stop the application and process the entire heap. While this results in a very efficient garbage collector, it means that the user program must be able to tolerate the pauses introduced by the collector. Workloads that are only concerned about overall throughput might benefit from this strategy." (http://www.ibm.com/developerworks/websphere/techjournal/1106_bailey/1106_bailey.html)

-Xgcpolicy:optavgpause
"For applications that are willing to trade some overall throughput for shorter pauses... -Xgcpolicy:optavgpause attempts to do as much GC work as possible before stopping the application, leading to shorter pauses... The same mark-sweep-compact collector is used, but much of the mark and sweep phases can be done as the application runs. Based on the program's allocation rate, the system attempts to predict when the next garbage collection will be required. When this threshold approaches, a concurrent GC begins. As application threads allocate objects, they will occasionally be asked to do a small amount of GC work before their allocation is fulfilled. The more allocations a thread does, the more it will be asked to help out. Meanwhile, one or more background GC threads will use idle cycles to get additional work done. Once all the concurrent work is done, or if free memory is exhausted ahead of schedule, the application is halted and the collection is completed. This pause is generally short, unless a compaction is required. Because compaction requires moving and updating live objects, it cannot be done concurrently." (http://www.ibm.com/developerworks/websphere/techjournal/1106_bailey/1106_bailey.html)

Optimized for applications with responsiveness criteria. It reduces and makes more consistent the time spent inside the stop-the-world operations by carying out some of the stop-the-world activity while the application is running. This has an additional overhead. Optavgpause is suited for consistent allocation patterns or when very large objects adversely affect gencon.
Should you set minimum heap equal to the maximum heap?
For generational policies, the guidance is that you should fix the nursery size: -Xmns == -Xmnx, and allow the tenured heap to vary: -Xmos != -Xmox. For non generational you only have a tenured heap, so -Xms != -Xmx applies.
The reason being that the ability to expand the heap adds resilience into the system to avoid OutOfMemoryErrors. If you're then worried about the potential cost of expansion/shrinkage that this introduces by causing compactions, then that can be mitigated by adjusting -Xmaxf and -Xminf to make expand/shrink a rare event.
Long Mark Times
Long mark times can occur for the following reasons:
- Increase in the number of Objects on the Java heap
- Increase in the Java heap size
- CPU contention
- System paging
An increase in the number of objects on the Java heap or an increase in the Java heap size is typical. They are the two major factors contributing to GC duration; more Java objects take longer to mark, and more Java heap space means more time is required to traverse the larger memory space. CPU contention and system paging are caused by system resource contention, which you can determine if the paging and CPU information is available.
Long Sweep Times
Long sweep times can occur for the following reasons:
- Increase in Java heap size
- CPU contention
- System paging
An increase in Java heap size is typical because the major factor contributing to the duration of the sweep phase is the size of the Java heap that must be traversed. If sweep times increase significantly, the most likely cause is system resource contention, which you can determine if the paging and CPU information is available.
Compaction
When compactions occur, they use most of the garbage collection cycle. The Garbage Collector avoids compaction where possible. However, when compactions must occur, the raw verbose:gc output contains a message explaining why the compaction occurred.
The most common cause of avoidable long GC cycles is Java heap expansion and shrinkage. When the Java heap shrinks in size, a compaction is probably required to allow the shrinkage to occur. When the Java heap expands, a compaction might occur before the expansion, particularly when the Java heap occupancy is growing rapidly.
A correctly sized Java heap aims to keep the Java heap occupancy between 40% and 70% of the maximum heap size, which are the trigger occupancy levels for heap expansion and shrinkage. If the range of occupancy is too great to stay within the recommended range, it is more important to keep the occupancy under 70% of the maximum than it is to stay over 40%.
You can remove or reduce the need for shrinkage by increasing the -Xmaxf option from its default value of 0.6, which controls the 40% threshold for shrinkage. By increasing the -Xmaxf value, the lower threshold is reduced below the normal range of occupancy, and shrinkage can be avoided during the normal operation of the application, while still leaving the possibility of shrinkage if the Java heap occupancy drops dramatically.
The -Xmaxf parameter specifies the amount of the Java heap that must be free before shrinkage occurs, so a setting of -Xmaxf0.7 will cause shrinkage when the occupancy is below 30% (70% is free), and -Xmaxf0.9 cause shrinkage when the occupancy is below 10% (90% is free).
Explicit requests for garbage collection to run using calls to the System.gc() or Runtime.gc() methods cause a compaction to occur during the garbage collection cycle if compaction did not occur in the previous garbage collection cycle. Explicit garbage collection calls cause garbage collection to run more frequently than necessary, and are likely to cause a compaction to occur. Remove explicit garbage collection calls where possible.
To disable heap shrinkage: -Xmaxf1.0
Verbose garbage collection (-verbose:gc)
Comprehensive tests in 2022 measuring the relative difference of verbosegc in startup, footprint, first request and throughput tests on bare metal, z/OS, and containers using both spinning and NVME disks showed an overhead of verbosegc of less than 1% and mostly less than 0.5%.
By default, with just -verbose:gc, output will be sent
to stderr (in WAS traditional, native_stderr.log; in
WebSphere Liberty, console.log). Specifying -Xverbosegclog
implicitly enables -verbose:gc and allows you to write
verbosegc to named files instead, along with the option of rotating said
files after certain numbers of GC events (this works on all platforms
including z/OS). If you are concerned about performance, you can use
-Xverbosegclog to write the data to a RAMdisk. If the JVM
is unable to create the file (e.g. permissions, disk space, etc.),
verbosegc will fall back to stderr.
When using -Xverbosegclog, generally you'll want to
specify non-unique dump tokens along with a set of historical files so
that the logs roll over across process instances (in practice, this
means not using %pid or
%Y%m%d.%H%M%S). For example:
-Xverbosegclog:verbosegc.%seq.log,20,50000If you specify X,Y after the log name, output is
redirected to X number of files, each containing
Y GC cycles. You can only roll-over by the number of GC
cycles and not by raw file size; however, garbage collection events are
generally in the same magnitude in size, so you should be able to
approximate. As a rough starting point, one GC cycle outputs about 2KB.
Therefore, if let's say you wanted to rollover at 100MB, you would
do:
A= Desired size in MBB= Average GC cycle size output in bytesY = (A * 1024 * 1024) / B
So, with A=100 and B=2048, Y
would be 51200, and then you would use:
-Xverbosegclog:verbosegc.%seq.log,20,51200That would create up to 20 historical files with roughly 100MB each. If you wanted to better approximate Y, then you need to better understand B. For that, you could do a historical analysis of verbosegc and calculate the mean sizes, in bytes, of each GC event, and fiddle around with B until you get close to A per file.
Showing allocation rates:
awk -F\" '/allocated-bytes/ {nontlh+=$2;tlh+=$4;} END {printf("non-tlh: %4.0f GB, tlh: %4.0f GB \n",nontlh/1024/1024/1024,tlh/1024/1024/1024);}' verbosegc*.logverbosegc examples
The following will create up to 20 historical files of roughly 100MB each in generally recommended directories:
- WebSphere Liberty:
-Xverbosegclog:logs/verbosegc.%seq.log,20,50000 - WAS traditional (enabled by default starting in WAS 9):
-Xverbosegclog:${SERVER_LOG_ROOT}/verbosegc.%seq.log,20,50000
Stop-the-world Events
A "stop-the-world" garbage collection event is defined as the time between exclusive-start and exclusive-end verbosegc elements. This includes scavenges.
Time spent unloading classes
If you find long total GC pause times and the break down includes long times in "time spent unloading classes" in GCMV, then there are a few options:
Investigate which classes and classloaders are being unloaded and review if creating these can be reduced or avoided (for example, see the discussion on reflection inflation):
-verbose:class -Xgc:verboseExtensionsConsider using -Xgc:classUnloadingKickoffThreshold=N
Consider using -Xgc:maxScavengeBeforeGlobal=N
Consider changing to a different -Xgcpolicy. GC policies like optthruput and optavgpause do not have a tenured region, and balanced cleans up classloaders more aggressively (see the table above for details on tradeoffs of each).
Ensure IBM Java APAR IV49664 is applied: http://www-01.ibm.com/support/docview.wss?uid=swg1IV49664
Test increasing the nursery size and/or decreasing -Xmx to cause full GCs to run more often.
If unloading times increase as the number of class(loader)es increases, test with -Xjit:disableCHOpts,disableCHTabl or more aggressively (if there are no Java agents), -Xjit:disableCHOpts,disableCHTable,noRecompile
Check for: APAR IV49664: SLOW CLASS UNLOADING SCAN TIME
Check for: APAR IV47984: LONG GC PAUSE TIMES WHEN USING WIDE CLASS HIERARCHIES
Try a different GC policy, (perhaps balanced).
Example verbosegc tag showing time spent unloading classes:
<classunloading classloaders="325178" classes="905" timevmquiescems="0.000" timetakenms="16990.786" />Exclusive Access Time
Before a garbage collection, the GC requests "exclusive access" to the JVM. Normally, this should take almost no time. This time is not included in the "Total Pause Time" statistic in GCMV (instead there is an Exclusive Access Time statistic). If this is taking a long time, then most likely some other JVM thread is holding exclusive access for that time. You can determine how long these are by looking for:
<exclusive-start id="1628" timestamp="2014-03-31T16:13:51.448" intervalms="16331.866">
<response-info timems="1499.726" idlems="999.647" threads="2" lastid="000000000FC2C600" lastname="Thread-123" />
</exclusive-start>The only real way to investigate these is to take a core dump by using the -Xdump slow event and setting the threshold below the average timems value; for example: -Xdump:system:events=slow,filter=1000ms,range=1..2
Load the dump into IDDE, run "!info lock" and search for this section:
id: 0x2aaab4000ed0 name: VM exclusive access
owner thread id: 27707 name: Thread-105
waiting thread id: 26717 name: defaultJavaTimer-thread-1The current thread should match the owner thread, so then just run "!info thread" and you'll see the stack (top frame should be in a native method).
Excessive Garbage Collection
By default, if the JVM detects "excessive time" spent in garbage collection (default 95%), an OutOfMemoryError is thrown: https://www.ibm.com/support/knowledgecenter/SSYKE2_8.0.0/openj9/xgc/index.html#excessivegcratio
The 95% threshold can be changed with -Xgc:excessiveGCratio=90 where 90 is an example different percentage.
Explicit Garbage Collection (System.gc, Runtime.gc)
In addition to the cases covered in the general Java chapter, the IBM JVM may explicitly call System.gc in certain situations. For example, if the JVM is unable to get native memory for class(loader) metadata, it will call System.gc in case this indirectly cleans up native resources. In fact, in this case, the JVM calls an internal method so a full GC will occur even if -Xdisableexplicitgc is set. If the JVM runs out of native memory but continues to run and continues to try to allocate native class(loader) metadata, this can cause a full GC storm.
Garbage Collection Threads
The maximum number of logical CPU cores is read and fixed at JVM startup by querying the operating system. If the number of logical CPUs decreases at runtime, and -Xgcthreads is not specified, then the JVM may decide to use less CPUs during a garbage collection based on how many are available. If the number of logical CPU cores increases more than the amount at JVM startup, the JVM will not use these additional cores for garbage collection.
Garbage Collection Notes
A scavenge which is converted into a global collection collection is
called a percolate (percolate-collect). This happens when
there isn't enough space in the tenured region to accommodate objects
that need to be tenured from the nursery. If you see a lot of full GCs
due to percolate and even when there is a lot of free space in tenured,
then tenured is probably highly fragmented. Consider discovering
large object allocations and eliminating them. Increasing the
maximum heap size may help but that should be tested. The
balanced GC policy may also help but that is a more
significant change.
An "aggressive" GC is declared if a previous GC was unable to reclaim sufficient resources. It means that the GC will try as much as it can, including compaction, class unloading, softref clearing, etc. An aggressive collect may also be triggered if two explicit GCs happen back-to-back.
Just in Time (JIT) Compiler
The JIT compiler samples Java method execution at runtime and compiles the byte code of more frequently invoked methods into optimized native code. This native code is typically 10-20 times faster.
Some JIT command line options are specified with -Xjit.
Note that this option may only be specified once, so if you want to use
multiple such options, combine them with commas into one option.
JIT Interpeter Profiler
The JIT has an interpreter profiler that helps it decide what methods to JIT compiler (or re-compile). The JIT profiler has a memory limit, and if this limit is hit, parts of the profiler may be disabled. Consider testing with a larger limit; for example:
-Xjit:iprofilerMemoryConsumptionLimit=67108864JIT CPU Usage
The -XsamplingExpirationTime${SECONDS}
option allows you to disable this background process a certain number of
seconds after the JVM starts when you think that the most important
JITting has been completed. A related option helps control sampling
frequency when the JVM is idle:
-Xjit:samplingFrequencyInIdleMode=${ms}
As of this writing, in recent versions of J9 Java, the default number
of JIT compilation threads on non-Linux operating systems is the number
of CPUs minus 1 but no less than 1 and no more than 7. On Linux, 7
threads are created although only the number of CPUs minus 1 are
activated initially; if JIT compilation starvation is detected,
additional threads up to 7 may be activated. These can be quite
intensive, and if there are many Java processes on a machine, if the JIT
compilation threads happen to run at the same time, the processors may
become saturated. In the same way that -Xgcthreads must be
considered when running multiple JVMs on a machine, -XcompilationThreads
can be reduced although this should be tested.
There is an option to increase the size of the JIT profiling buffer
(default 1024): -Xjit:iprofilerBufferSize=${bytes}
The option -Xjit:noServer may be used to reduce the
level of inlining and therefore reduce JIT CPU utilization, although the
program may run more slowly. The option
-Xjit:virtualizationHighDensity may be used to be even more
aggressive in reducing JIT CPU utilization (it is a superset of
-Xjit:noServer), although the program may run even more
slowly.
Another way to reduce the CPU usage of JIT compilation is to increase
the size of the shared class cache (-Xscmx) and
consequently the likelihood that Ahead-of-time (AOT) compiled methods
can be reused. In general, AOT can be as big as disk space and physical
memory support.
By default, the JIT will compile methods after a certain number of
invocations. This can be changed with -Xjit:count
(use 0 to compile immediately, although this is generally not
recommended).
JIT Code and Data Caches
The JIT has two caches: code and data. The code cache holds the
actual compiled native code for any methods that are JITted and the data
cache is metadata for said code (which is relatively much smaller than
the code). If the application uses a lot of classes or classloaders or
runs heavy workload for a long time, the JIT code cache may fill up and
subsequent JITting is reduced or stopped. The JIT code cache is not an
LRU cache and methods may only be removed for a narrow set of reasons
(e.g. class unloading, agent retransformation, etc.). You may also make
more room in the caches by excluding some methods from being JITted with
-Xjit:exclude.
The size of the code and data caches may be reviewed in javacores in
the NATIVEMEMINFO or Total memory in use and
Total memory free statistics (not that the latter may grow
up to Allocation limit):
2MEMUSER +--JIT: 363,553,696 bytes / 18702 allocations
2MEMUSER | |
3MEMUSER | +--JIT Code Cache: 134,217,792 bytes / 1 allocation
2MEMUSER | |
3MEMUSER | +--JIT Data Cache: 71,305,344 bytes / 34 allocations
[...]
1STSEGTYPE JIT Code Cache
[...]
1STSEGTOTAL Total memory: 134217728 (0x0000000008000000)
1STSEGINUSE Total memory in use: 121952439 (0x000000000744D8B7)
1STSEGFREE Total memory free: 12265289 (0x0000000000BB2749)
1STSEGLIMIT Allocation limit: 134217728 (0x0000000008000000)
[...]
1STSEGTYPE JIT Data Cache
[...]
1STSEGTOTAL Total memory: 71303168 (0x0000000004400000)
1STSEGINUSE Total memory in use: 71303168 (0x0000000004400000)
1STSEGFREE Total memory free: 0 (0x0000000000000000)
1STSEGLIMIT Allocation limit: 402653184 (0x0000000018000000)In general, the first compile occurs at the warm level
except during startup which starts at cold to compile
methods more quickly and then those are usually recompiled later. This
may be disabled with -Xjit:dontDowngradeToCold.
Tuning the JIT Code Cache
The maximum size of the code cache is controlled with -Xcodecachetotal:
Long-running, complex, server-type applications can fill the JIT code cache, which can cause performance problems because not all of the important methods can be JIT-compiled. Use the -Xcodecachetotal option to increase or decrease the maximum code cache size to a setting that suits your application.
In recent versions, the default maximum size of the cache is 256MB. For example, to increase to 384MB:
-Xcodecachetotal384mAlternatively, since OpenJ9 0.40.0 (e.g. IBM Java 8.0.8.10), this may be specified as a percentage of visible RAM using codecachetotalMaxRAMPercentage:
-XX:codecachetotalMaxRAMPercentage=25The maximum size may also be controlled with
-Xjit:codetotal=393216 where the value is in KB although
note that this option is not public and must be combined with other
-Xjit options.
The segment size is controlled with -Xcodecache.
A larger segment size may decrease fragmentation; however, it increases
runtime footprint because each JIT compilation thread can work on its
own segment. The maximum size is 32MB and the default is scaled based on
-Xcodecachetotal. For example:
-Xcodecache32mAn excessive code cache size may have negative consequences. The longer the JVM runs, the more likely the JIT is to generate code at higher optimization levels if there's space in the cache. The higher optimization compilations produce much bigger compiled method bodies (typically because of additional inlining). This can impact the instruction cache which may reduce performance. So, ideally, you want the JIT to compile just the “right” set of methods at “appropriate” optimization levels and then stop. There isn’t any way of knowing when that has happened, so if the code cache is set very big it will likely just keep going into negative territory. In addition, it takes a long time to compile at the higher optimization levels, and that time spent on the compiling can be a negative itself.
In other words, it is common for the JIT code cache to fill up in large production workloads, and this may be optimal. There are cases when a larger code cache size is better but ensure you monitor tests of such larger values over a long period of time (e.g. until the larger code cache fills up).
Tuning the JIT Data Cache
The JIT data cache maximum size is tuned with
-Xjit:dataTotal=XKB.
JIT Verbose Logging
Restart with the option:
-Xjit:verbose={compileStart|compileEnd|compilePerformance},vlog=jitlogThis will produce a file named
jitlog.$YYYYMMDD.$HHMMSS.$PID in the current working
directory of the JVM (e.g. $WAS/profiles/$PROFILE/). As
with verbose garbage collection logging, the word "verbose" is a
misnomer as this logging is very lightweight and it has a very low
overhead which means JIT verbose logging is suitable for production. For
every compilation event, which occurs relatively rarely, there will be a
few lines printed. There are no command line options to control maximum
vlog file size or rotation but the file should be relatively small. For
example, this was run in production on a very large customer on each of
their JVMs with little overhead and it produced about 50MB for an entire
day of running (per JVM).
There is no option to roll the verbose JIT log file. One will be produced and continuously written to per process ID until the JVM is stopped.
Example output:
+ (AOT load) sun/io/ByteToCharUTF8.reset()V @ 00002AAAB4D9B5A8-00002AAAB4D9B6C4 compThread 0
#CR 000000000050C100 Compile request rqk=8 j9method=000000000053BF38 java/util/Hashtable.rehash()V
#CR 000000000050C100 Compile request rqk=8 j9method=0000000000520268 java/lang/String.hashCode()I
(warm) Compiling java/util/Hashtable.rehash()V t=10 rqk=8Shared Classes (-Xshareclasses)
Class data sharing is a mechanism to reduce start-up and restart time of a JVM, and to reduce memory footprint if multiple JVMs on the same node are running concurrently which use some classes that are the same. In addition to class metadata, the shared class cache may also include Ahead-Of-Time (AOT) compilations of native class code.
By default in IBM Java, class data sharing is disabled. By default in Semeru Java, class data sharing is enabled only for bootstrap classes. However, by default, class data sharing is fully enabled in WebSphere Application Server traditional, Liberty, and Liberty in containers.
Class data sharing is enabled with the -Xshareclasses
option, most commonly including a logical name for the shared class
cache (although this usually doesn't need to be specified for the above
products that enable it by default, unless you want to change the name
or specify other tuning options):
-Xshareclasses:name=myappConsider creating a unique shared class cache for every category of JVMs on a node; for example, application servers, node agents, deployment manager, etc.
A common issue is that the shared class cache fills up. This may be
checked by requesting a thread dump and reviewing the SHARED CLASSES
section. Check the percent full line:
2SCLTEXTCPF Cache is 100% fullIf the cache is full and there is available physical memory, the
maximum size of the shared class cache may be specified with -Xscmx;
for example:
-Xscmx400MHowever, note that all JVMs must be first stopped, the previous
shared class cache must be destroyed by running Java with the
destroy option:
java -Xshareclasses:name=myapp,destroyAnd then a JVM must be started with the new -Xscmx
size.
All shared class caches may be listed with:
java -Xshareclasses:listAllCachesA common tuning that may be tested is:
-Xscmx400M -Xjit:dontDowngradeToCold,useHigherMethodCounts,forceAOT -Xaot:dontDowngradeToCold,useHigherMethodCounts,forceAOTIf -Xshareclasses:verbose is specified during a test,
when the JVM stops gracefully, it will print how much AOT or JIT data
was unable to use the shared class cache to stderr; for
example:
Unstored AOT bytes due to the setting of -Xscmaxaot is 184230.
Unstored JIT bytes due to the setting of -Xscmaxjitdata is 193842.Then consider increasing -Xscmaxaot
and -Xscminjitdata
based on the above numbers (and potentially increase
-Xscmx) and re-test.
-Xquickstart
"The IBM JIT compiler is tuned for long-running applications typically used on a server. You can use the -Xquickstart command-line option to improve the performance of short-running applications, especially for applications in which processing is not concentrated into a few methods.
-Xquickstart causes the JIT compiler to use a lower optimization level by default and to compile fewer methods. Performing fewer compilations more quickly can improve application startup time. When the AOT compiler is active (both shared classes and AOT compilation enabled), -Xquickstart causes all methods selected for compilation to be AOT compiled, which improves the startup time of subsequent runs. -Xquickstart might degrade performance if it is used with long-running applications that contain methods using a large amount of processing resource. The implementation of -Xquickstart is subject to change in future releases." (http://www.ibm.com/support/knowledgecenter/SSYKE2_8.0.0/com.ibm.java.lnx.80.doc/diag/tools/jitpd_short_run.html)
-Xquickstart is generally only interesting for
short-lived benchmarks.
Container Support
When running in containers, use -XX:+UseContainerSupport and use -XX:MaxRAMPercentage and -XX:InitialRAMPercentage instead of -Xmx and -Xms.
Reduce Memory Footprint
To reduce memory footprint when idling, use -XX:+IdleTuningGcOnIdle and -XX:+IdleTuningCompactOnIdle
-Xaggressive
Consider testing with -Xaggressive: "Enables performance optimizations and new platform exploitation that are expected to be the default in future releases." (http://www.ibm.com/support/knowledgecenter/en/SSYKE2_8.0.0/com.ibm.java.lnx.80.doc/diag/appendixes/cmdline/Xaggressive.html)
Large Object Area
-Xloaminimum may be used to increase the size of the LOA: https://www.ibm.com/support/knowledgecenter/en/SSYKE2_8.0.0/openj9/xloaminimum/index.html
-Xrs
The -Xrs flag is used to disable the default signal handler (for things such as javacores with kill -3, etc.); however, using this option may reduce performance by up to 5% due to the way the JIT works and the way Java uses signals when available for performance boosts.
IBM Semeru Runtimes
OpenSSL
On Linux and AIX, IBM Semeru Runtimes uses more performant native cryptographic libraries, if available. Ensure OpenSSL libraries are installed on the system path. On Windows and macOS, IBM Semer Runtimes bundles OpenSSL.
On Linux, check for libcrypto libraries on the system
path with ldconfig -p | grep libcrypto. Library versions
will be checked
in a certain order.
Use the -Djdk.nativeCryptoTrace trace to confirm with
tracepoints including "using Native crypto library".
JITServer
On Semeru >= 11, the JITServer on available platforms offloads JIT compilation CPU and memory usage to another process.
Benchmark Ideas
When running benchmarks or comparing performance to other JVMs,
consider testing some of the following options (in addition to the overall
tuning recipe). Note that some of these may not be generally
recommended for production use as they may reduce function or
serviceability; if you find an option to be particularly valuable, open
a support case to inquire more about it and the potential risks or costs
of using it. Effects of options may
not be mutually exclusive. -Xjit options should be
combined into a single option.
-Xtune:throughput(available since OpenJ9 0.32.0; IBM Java 7.0.7.15)- For earlier JVMs, try the JVM options
-Xjit:dontDowngradeToCold,disableSelectiveNoServer,useHigherMethodCounts -Xaot:dontDowngradeToCold,disableSelectiveNoServer,useHigherMethodCountsand the environment variableTR_DisableNoIProfilerDuringStartupPhase=1
- For earlier JVMs, try the JVM options
-Xjit:dontDowngradeToCold,useHigherMethodCounts,forceAOT -Xaot:dontDowngradeToCold,useHigherMethodCounts,forceAOT-Xaggressive-XtlhPrefetch-XcompilationThreads1-Xtrace:none-Xverify:none(note: this is only for testing; on recent versions, use-XX:+ClassRelationshipVerifierinstead)-Xshareclasses:none-Xtune:virtualized(if in a virtualized environment)-Xjit:acceptHugeMethods,scratchSpaceLimit=1048576- Environment variable
TR_OptimizeForConstantLengthArrayCopy=1 - Linux:
echo always | sudo tee /sys/kernel/mm/transparent_hugepage/enabled - Run with
-verbose:classand eliminate any recurring classloading after startup - For gencon, test with tuning or disabling concurrent marking or test with different GC policies without gencon's concurrent mark such as balanced and optthruput (although each has implications).
- Test with large pages (-Xlp). This is enabled by default in recent versions, but may require operating system configuration for full enablement.
- Stop the JVMs, restart and destroy the shared class cache
(
-Xshareclasses:destroyAll), and restart again without thedestroyAlloption -XXsetHWPrefetch:os-default- On older versions of Java but newer hardware, use
-Dcom.ibm.crypto.provider.doAESInHardware=true - On AIX and Linux on Power, and OpenJ9 >= 0.20.0
or IBM Java >= 8.0.6.20, consider
-XX:+GlobalLockReservation -Xthroptions-XX:-CompactStrings
External Delays
Performance problems can sometimes be caused by the poor responsiveness of external resources that your application is attempting to access. These external resources include database, File I/O, other applications, and legacy systems. To see if the problem is caused by external delays:
Identify that a number of threads are waiting on external resources and what those resources are, by examining the javacore.txt file that has been collected.
Profile the responsiveness of the resource to see if response times are longer than expected. You can use a method trace to profile when the call to the resource returns, or you can profile the resource being accessed.Java thread information is displayed in the "THREADS subcomponent" section of the Javadump. The stack trace is provided for each thread, which can be used to determine whether there are any threads waiting on external resources. A thread may wait on an external resource either in a wait, read, or receive method. In this example, the threads are in the Object.wait() method because of a call to AS400ThreadedServer.receive(), which is an external resource:
3XMTHREADINFO "WebContainer : 0" (TID:0x0000000001191E00, sys_thread_t:0x00000000010955C0, state:CW, native ID:0x0000000000004454) prio=5
4XESTACKTRACE at java/lang/Object.wait(Native Method)
4XESTACKTRACE at java/lang/Object.wait(Object.java:199(Compiled Code))
4XESTACKTRACE at com/ibm/as400/access/AS400ThreadedServer.receive(AS400ThreadedServer.java:281(Compiled Code))4XESTACKTRACE at com/ibm/as400/access/AS400ThreadedServer.sendAndReceive(AS400ThreadedServer.java:419(Compiled Code))
4XESTACKTRACE at com/ibm/as400/access/BaseDataQueueImplRemote.read(BaseDataQueueImplRemote.java:220(Compiled Code))
4XESTACKTRACE at com/ibm/as400/access/KeyedDataQueue.read(KeyedDataQueue.java:413(Compiled Code))
4XESTACKTRACE at com/ibm/testapp/vjops/infra/cdapj/trans/CDAPDataQRouter.readByteBuffer(Bytecode PC:36(Compiled Code))
4XESTACKTRACE at com/ibm/testapp/vjops/infra/cdapj/trans/CDAPDataQRouter.getMessage(Bytecode PC:28(Compiled Code))
4XESTACKTRACE at com/ibm/testapp/vjops/infra/cdapj/trans/DataQueueMsgTransactor.doCDAPTransaction(Bytecode PC:175(Compiled Code))
...
3XMTHREADINFO "WebContainer : 2" (TID:0x0000000001495100, sys_thread_t:0x000000000135D6B0, state:CW, native ID:0x000000000000445C) prio=5
4XESTACKTRACE at java/lang/Object.wait(Native Method)
4XESTACKTRACE at java/lang/Object.wait(Object.java:199(Compiled Code))
4XESTACKTRACE at com/ibm/as400/access/AS400ThreadedServer.receive(AS400ThreadedServer.java:281(Compiled Code))
4XESTACKTRACE at com/ibm/as400/access/AS400ThreadedServer.sendAndReceive(AS400ThreadedServer.java:419(Compiled Code))
4XESTACKTRACE at com/ibm/as400/access/BaseDataQueueImplRemote.read(BaseDataQueueImplRemote.java:220(Compiled Code))
4XESTACKTRACE at com/ibm/as400/access/KeyedDataQueue.read(KeyedDataQueue.java:413(Compiled Code))
4XESTACKTRACE at com/ibm/testapp/vjops/infra/cdapj/trans/CDAPDataQRouter.readByteBuffer(Bytecode PC:36(Compiled Code))
4XESTACKTRACE at com/ibm/testapp/vjops/infra/cdapj/trans/CDAPDataQRouter.getMessage(Bytecode PC:28(Compiled Code))
4XESTACKTRACE at com/ibm/testapp/vjops/infra/cdapj/trans/DataQueueMsgTransactor.doCDAPTransaction(Bytecode PC:175(Compiled Code))
...
3XMTHREADINFO "WebContainer : 3" (TID:0x000000000167A800, sys_thread_t:0x0000000000E57AE0, state:B, native ID:0x0000000000005072) prio=5
4XESTACKTRACE at java/lang/Object.wait(Native Method)
4XESTACKTRACE at java/lang/Object.wait(Object.java:231(Compiled Code))
4XESTACKTRACE at com/ibm/ws/util/BoundedBuffer.waitGet_(BoundedBuffer.java:188(Compiled Code))
4XESTACKTRACE at com/ibm/ws/util/BoundedBuffer.take(BoundedBuffer.java:522(Compiled Code))
4XESTACKTRACE at com/ibm/ws/util/ThreadPool.getTask(ThreadPool.java:816(Compiled Code))
4XESTACKTRACE at com/ibm/ws/util/ThreadPool$Worker.run(ThreadPool.java:1476(Compiled Code))One of the threads is in BoundedBuffer.waitGet_(), which is an internal resource [and thus not an external delay; in this case the thread is waiting for work]. If the Javadump shows threads that are suspected to be blocking on external resources, the next step is to profile the response time of those resources to see if they are taking a long time.
You can profile the amount of time taken by a method that accesses an external resource by using method trace. Method trace can capture trace data for the JVM, the Java Class Libraries (JCL), and Java application code. You do not need to modify your application to use method trace, which is useful if the source code for the methods of interest is not available. The following resources describe how to activate and control method trace:
... For example, you might profile the "AS400ThreadedServer.receive()" method, using the following command-line options:
-Xtrace:maximal=mt,output=mtrace#.out,10m,10,methods={com/ibm/as400/access/AS400ThreadedServer.receive*}
These options create up to ten files called mtrace#.out, where the # symbol is replaced with a sequence number. Each is up to 10 MB in size. When all ten possible files have been created, the trace engine begins to overwrite the first file in the sequence. You can then format the mtrace#.out files as described in the IBM Diagnostic Guide for Java. These files provide microsecond precision timing information for the entry and exit of each call to the AS400ThreadedServer.receive() method. You can use this information to calculate the average response time and determine if responsiveness is a problem.
Lock Contention
A monitor has a "thin" lock that can be tested efficiently, but which does not support blocking, and -- only when necessary -- an "inflated" lock. The inflated lock is typically implemented using OS resources that can support blocking, but also is less efficient because of the additional path length required when making the calls to the operating system. Because thin locks don't support blocking, spinning is often used such that threads will spin for a short period of time in case the lock becomes available soon after they first try to acquire it.
Analysis of typical locking patterns gives us the insight that spinning helps most cases, but for some specific cases it does not. Before running an application, it is impossible to know for which monitors spinning will not be useful. It is possible, however, to observe monitor usage and identify at run time those monitors for which you do not believe spinning will be helpful. You can then reduce or eliminate spinning for those specific monitors.
The JVM shipped with WebSphere Application Serer V8 includes spinning refinements that capture locking history and use this history to adaptively decide which monitors should use spin and which should not. This can free up additional cycles for other threads with work to do and, when CPU resources are fully utilized, improve overall application performance.
http://www.ibm.com/developerworks/websphere/techjournal/1111_dawson/1111_dawson.html
Starting in Java 6.0.1, various improvements were made that are expected to improve CPU effeciency. If CPU utilization decreases but application peformance decreases, test with -Xthr:secondarySpinForObjectMonitors. If application performance is affected after the application has run for some time or after a period of heavy load, test with -Xthr:noAdaptSpin. If heap usage is reduced but overall application performance decreases, test -Xlockword:mode=all (http://www.ibm.com/support/knowledgecenter/SSYKE2_8.0.0/com.ibm.java.lnx.80.doc/diag/problem_determination/optimizations_pd.html).
In a javacore, you may see most threads in Conditional Wait (CW) states which you would normally expect to show as Runnable instead. This is "by design" starting in IBM JVM 5. If the top of a thread stack is neither in Object.wait, nor Thread.sleep, nor Thread.join, nor a native method, then the JVM will put the thread into CW state in preparation for the javacore and will return it to Runnable after the javacore is finished. This is done by having all of the aforementioned threads wait for exclusive access to the JVM by waiting on the "Thread public flags mutex lock." This is done to get an internally consistent snapshot of Java stack and monitor states. (http://www-01.ibm.com/support/docview.wss?uid=swg21413580)
Consider upgrading to the latest version of Java because there are often performance improvements in lock contention in the JDK (for example, http://www-01.ibm.com/support/docview.wss?uid=swg1IV67003).
Lock Reservation
Synchronization and locking are an important part of any multi-threaded application. Shared resources must be adequately protected by monitors to insure correctness, even if some resources are only infrequently shared. If a resource is primarily accessed by a single thread at any given time that thread will frequently be the only thread to acquire the monitor guarding the resource. In such cases the cost of acquiring the monitor can be reduced with the -XlockReservation option. With this option it is assumed that the last thread to acquire the monitor will likely also be the next thread to acquire it. The lock is therefore said to be reserved for that thread, thereby minimizing its cost to acquire and release the monitor. This option is well-suited to workloads using many threads and many shared resources that are infrequently shared in practice.
Deadlocks
The Javadump file that should have been collected contains a 'LOCKS' subcomponent. During the generation of the javacore.txt file, a deadlock detector is run, and, if a deadlock is discovered, it is detailed in this section, showing the threads and locks involved in the deadlock:
======================= Deadlock detected !!! --------------------- Thread "DeadLockThread 1" (0x41DAB100) is waiting for: sys_mon_t:0x00039B98 infl_mon_t: 0x00039BD8: java/lang/Integer@004B2290/004B229C: which is owned by: Thread "DeadLockThread 0" (0x41DAAD00) which is waiting for: sys_mon_t:0x00039B40 infl_mon_t: 0x00039B80: java/lang/Integer@004B22A0/004B22AC: which is owned by: Thread "DeadLockThread 1" (0x41DAB100)This example was taken from a deadlock test program where two threads DeadLockThread 0 and DeadLockThread 1 unsuccessfully attempted to synchronize (Java keyword) on two java/lang/Integers.
You can see in the example that DeadLockThread 1 has locked the object instance java/lang/Integer@004B2290. The monitor has been created as a result of a Java code fragment looking like synchronize(count0). This monitor has DeadLockThread 1 waiting to get a lock on the same object instance (count0 from the code fragment). Below the highlighted section is another monitor locked by DeadLockThread 0 that has DeadLockThread 1 waiting.
Large Object Allocation Stack Traces
For a 5MB threshold:
-Xdump:stack:events=allocation,filter=#5m
For a size range (5 to 6 MB): -Xdump:stack:events=allocation,filter=#5m..6m
Compressed References
64-bit processes primarily offer a much larger address space, thereby allowing for larger Java heaps, JIT code caches, and reducing the effects of memory fragmentation in the native heap. Certain platforms also offer additional benefits in 64-bit mode, such as more CPU registers. However, 64-bit processes also must deal with increased overhead. The overhead comes from the increased memory usage and decreased cache utilization. This overhead is present with every single object allocation, as each object must now be referred to with a 64-bit address rather than a 32-bit address. To alleviate this, the -Xcompressedrefs option may be used, and it is enabled by default in certain release on certain operating systems. When enabled, the JVM will use smaller references to objects instead of 64-bit references when possible. Object references are compressed and decompressed as necessary at minimal cost.
In order to determine the compression/decompression overhead for a given heap size on a particular platform, review verbosegc:
<attribute name="compressedRefsDisplacement" value="0x0" />
<attribute name="compressedRefsShift" value="0x0" />Values of 0 essentially indicate that no work has to be done in order convert between references. Under these circumstances, 64-bit JVMs running with -Xcompressedrefs can reduce the overhead of 64-bit addressing even more and achieve better performance.
-Xcompressedrefs is enabled by default in Java 6.0.1 SR5 and Java 7 SR4 when the size of the heap allows it. -Xnocompressedrefs can be used to explicitly disable it. On z/OS, before Java 7.1, compressed references was disabled by default, but it could be enabled explicitly.
Some benchmarks show a 10-20% relative throughput decrease when disabling compressed references: "Analysis shows that a 64-bit application without CR yields only 80-85% of 32-bit throughput but with CR yields 90-95%. Depending on application requirements, CR can improve performance up to 20% over standard 64-bit." (ftp://public.dhe.ibm.com/software/webserver/appserv/was/WAS_V7_64-bit_performance.pdf). You may be able to recover some of this drop by increasing L2/L3 processor cache sizes. Disabling compressed references will also dramatically increase Java heap usage by up to 70%. Additional background: http://www-01.ibm.com/support/docview.wss?uid=swg21660890
Starting with Java 8 SR2 FP10, the maximum heap size that supports compressed references was increased from 25GB to 57GB: http://www-01.ibm.com/support/knowledgecenter/SSYKE2_8.0.0/com.ibm.java.lnx.80.doc/diag/preface/changes_80/whatsnew_sr2fp10.html
-Xgc:preferredHeapBase
With compressed references enabled, due to the design of Java, native metadata must all be allocated in the virtual memory range 0-4GB. This includes all native objects backing classes, classloaders, threads, and monitors. If there is insufficient space for additional metadata to be allocated, then a native OutOfMemoryError (NOOM) will be thrown. In general, this can happen for two reasons: 1) there is a class, classloader, thread, or monitor leak, and 2) the Java heap is sharing the 0-4GB space. The first cause can be investigated with the javacore.txt file that's produced with the NOOM by searching for large numbers of these objects.
The second cause is due to the default performance optimizations that Java makes. The location of the Java heap will affect the type of compression operations that must be performed on each Java pointer reference (http://www-01.ibm.com/support/docview.wss?uid=swg21660890). If the Java heap can fit completely underneath 4GB, then no "compression" needs to occur - the top 32 bits are simply truncated. Otherwise, for different locations of the Java heap, different arithmetic operations need to be performed. On all operating systems, there are cases where the Java heap will be preferred underneath 4GB and squeeze the metadata space, thus causing NOOMs. One option is to reduce metadata demands, and the second option is to specify where the Java heap should start. Usually, it is sufficient to start the Java heap at the 4GB mark: -Xgc:preferredHeapBase=0x100000000
-Xgc:classUnloadingKickoffThreshold
If a classloader becomes eligible for garbage collection, it may only be cleaned up during a full garbage collection, and the cleanup process is relatively long because of the complexity of unloading classloaders and classes. If there is a large volume of such classloaders and classes to clean up, full GC pause times may be very long. In addition, classloaders and classes are backed by native memory so this may drive native memory issues such as native OutOfMemoryErrors (the "iceberg" problem). This may be an issue if the frequency of full GCs is low.
The -Xgc:classUnloadingKickoffThreshold=N increases the
frequency of full GCs based on classloading behavior. It instructs the
JVM to start a concurrent global collection after N
classloaders have been created to try to get ahead of this situation and
clean up such classloaders and classes before they build up too much in
the tenured regions.
There was a period of a few years where this option stopped working and this was fixed in APAR IJ31667.
Method Tracing (-Xtrace methods)
Before IBM Java 7.1, using any method trace may have a significant performance overhead, in some cases up to 40%, and up to 70% during JVM startup. This only affects the -Xtrace "method" option (including simple triggers), not tpnid or other options. This overhead has been mostly removed in Java 7.1
Use -Xtrace triggers to gather diagnostics when specified Java methods are executed. For example, to take a javacore on the first 1500 executions:
-Xtrace:trigger=method{ilog/rules/factory/IlrReflect.*Listener,javadump,,,1500}For example, here is a trace that tracks Java socket I/O activity:
-Xtrace:none -Xtrace:maximal=tpnid{IO.0-50},output=javatrace.logExample output:
17:11:02.473807000 0x12b83f00 IO.18 Entry >IO_Connect(descriptor=353, connect_to(AF_INET6: port=7272 flow=0 addr=...
17:11:02.473944000 0x12b83f00 IO.20 Exit <IO_Connect - return =0
17:11:02.474078000 0x12b83f00 IO.32 Entry >IO_Send(descriptor=353, msg=4197800128, len=20, flags=0)
17:11:02.474117000 0x12b83f00 IO.34 Exit <IO_Send - bytes sent=20
17:11:02.474124000 0x12b83f00 IO.32 Entry >IO_Send(descriptor=353, msg=4197800128, len=193, flags=0)
17:11:02.474145000 0x12b83f00 IO.34 Exit <IO_Send - bytes sent=193
17:11:02.474149000 0x12b83f00 IO.32 Entry >IO_Send(descriptor=353, msg=4197800128, len=1498, flags=0)
17:11:02.474171000 0x12b83f00 IO.34 Exit <IO_Send - bytes sent=1498
17:12:20.422571000 0x13090c00 IO.21 Entry >IO_Recv(descriptor=311, buffer=4195936448, len=88, flags=0)
17:12:20.422577000 0x13090c00 IO.23 Exit <IO_Recv - bytes read=88
17:11:02.474183000 0x12b83f00 IO.43 Entry >IO_Dup2(fd1=290, fd2=353)
17:11:02.474206000 0x12b83f00 IO.44 Exit <IO_Dup2 - error=353
17:11:02.474209000 0x12b83f00 IO.47 Entry >IO_Close(descriptor=353)
17:11:02.474210000 0x12b83f00 IO.49 Exit <IO_Close - return code=0To format an xtrace output file:
java com.ibm.jvm.format.TraceFormat xtrace.outTrace history for a specific thread can be retrieved through jdmpview or IDDE: !snapformat -t <J9VMThread address>
Xverify
-Xverify:none
disables the verifier; however, this is not supported, not recommended,
and has been deprecated in Java 13:
-Xverify:none Disables the verifier. Note: This is not a supported configuration and, as noted, was deprecated from Java 13.
-Xverify:none is sometimes used because it may provide a
performance benefit. Instead, in recent versions of J9, try -XX:+ClassRelationshipVerifier
instead.
Javacore Thread Dump
Review the native stack traces as well for hot stacks because that might point to some more fundamental issue in the operating system (e.g. malloc contention), etc.
Per-thread CPU usage in javacore (Java 7 SR6, Java 626 SR7, and Java 7.1): A new line has been added to the header section for each thread, giving CPU usage information for that thread (as available from the OS):
3XMTHREADINFO "main" J9VMThread:0x0000000022C80100, j9thread_t:0x0000000000D4E5C0, java/lang/Thread:0x0000000022B96250, state:R, prio=5
3XMJAVALTHREAD (java/lang/Thread getId:0x1, isDaemon:false)
3XMTHREADINFO1 (native thread ID:0xE90, native priority:0x5, native policy:UNKNOWN)
3XMCPUTIME CPU usage total: 0.249601600 secs, user: 0.218401400 secs, system: 0.031200200 secs
3XMHEAPALLOC Heap bytes allocated since last GC cycle=25368 (0x6318)Starting with Java 8, CPU usage of JVM-attached threads is tracked by thread category (which can be disabled with -XX:-ReduceCPUMonitorOverhead): http://www.ibm.com/support/knowledgecenter/SSYKE2_8.0.0/com.ibm.java.lnx.80.doc/diag/preface/changes_80/whatsnew.html. New lines at the end of the THREADS section in javacore provide the accumulated CPU totals in each category, for example:
1XMTHDSUMMARY Threads CPU Usage Summary
NULL =========================
1XMTHDCATEGORY All JVM attached threads: 134.253955000 secs
1XMTHDCATEGORY |
2XMTHDCATEGORY +--System-JVM: 8.642450000 secs
2XMTHDCATEGORY | |
3XMTHDCATEGORY | +--GC: 1.216805000 secs
2XMTHDCATEGORY | |
3XMTHDCATEGORY | +--JIT: 6.224438000 secs
1XMTHDCATEGORY |
2XMTHDCATEGORY +--Application: 125.611505000 secsIn the header lines for each thread, an additional field at the end of the 3XMCPUTIME line indicates the current CPU usage category of that thread, for example:
3XMTHREADINFO "JIT Compilation Thread-0 Suspended" J9VMThread:0x000000000F01EB00, j9thread_t:0x000000000296A7F8
java/lang/Thread:0x00000000E0029718, state:R, prio=10
3XMJAVALTHREAD (java/lang/Thread getId:0x4, isDaemon:true)
3XMTHREADINFO1 (native thread ID:0xDFC, native priority:0xB, native policy:UNKNOWN, vmstate:CW, vm thread flags:0x01000001)
3XMCPUTIME CPU usage total: 5.912437900 secs, user: 5.865637600 secs, system: 0.046800300 secs, current category="JIT"Stack Size (-Xss)
If using large stack sizes, consider setting -Xssi as well: http://www-01.ibm.com/support/docview.wss?uid=swg21659956
Large Pages (-Xlp)
Details of enabling large pages are on each operating system page. To see whether large pages are enabled on a running JVM, compare pageSize and requestedPageSize in verbosegc:
<attribute name="pageSize" value="0x1000" />
<attribute name="requestedPageSize" value="0x20000" />OpenJ9
Performance: https://www.eclipse.org/openj9/oj9_performance.html
Environment Variables
Use IBM_JAVA_OPTIONS on IBM Java or OPENJ9_JAVA_OPTIONS for OpenJ9 to specify additional JVM arguments for programs launches in that terminal/command prompt. For example:
export IBM_JAVA_OPTIONS="-Xmx1024m"
/opt/IBM/WebSphere/AppServer/bin/collector.shIn more recent versions of IBM Java and Semeru Java, the _JAVA_OPTIONS
envar is also available.
z/OS
zIIP/zAAP Usage
Even if application processing hands-off to non-zIIP-eligible native code (e.g. third party JNI), recent versions of z/OS (with APAR OA26713) have a lazy-switch design in which short bursts of such native code may stay on the zIIP and not switch to GCPs.
To check a snapshot of activity and see whether it's zIIP-eligible,
take a console dump, load it
in jdmpview, run info thread all and check
each thread for IFA Enabled=yes or
IFA Enabled=yes.
Known Issues and Regressions
- IJ44106: ~10%
higher CPU on versions higher than 8.0.7.11 with stacks often in
com/ibm/crypto/provider. Resolved in 8.0.7.20. - IJ35969:
Higher CPU with stacks often in
java/io/ObjectInputStreamorsun/misc/VM.latestUserDefinedLoader. Regression introduced in 8.0.6.31 through IJ32927. IJ35969 provides a workaround available in 8.0.7.5 using-Dcom.ibm.disableLUDCLRefresh=trueif user code is not invoked duringObjectInputStreamprocessing.
HotSpot JVM
HotSpot JVM Recipe
- Review the JVM-independent recipe in the Java chapter.
- In most cases, the default
-XX:+UseG1GCor-XX:+UseParallelOldGCgarbage collection policies (depending on version) work best, with the key tuning being the maximum heap size (-Xmx). - Set
-XX:+HeapDumpOnOutOfMemoryError. - Enable verbose
garbage collection and use a tool such as the Garbage
Collection and Memory Visualizer to confirm the proportion of time
in stop-the-world garbage collection pauses is less than ~10% and
ideally less than 1%.
- Check for long individual pause times (e.g. greater than 400ms or whatever response time expectations are)
- For G1GC, check for humongous allocations.
- Review the latest garbage collection tuning guidance.
General
Use -XX:+PrintFlagsFinal to see all the options the JVM
actually starts with.
Garbage Collection
By default, the collector uses N threads for minor collection where N = # of CPU core threads. Control with -XX:ParallelGCThreads=N
Comparing Policies
| -XX:+UseParallelOldGC | -XX:+UseG1GC | -XX:+UseShenandoahGC | -XX:+UseZGC | -XX:+UseSerialGC | -XX:+UseConcMarkSweepGC | -XX:+UseEpsilonGC | |
|---|---|---|---|---|---|---|---|
| Generational - most GC pauses are short (nursery/scavenge collections) | Yes (Two Generations) | Yes (Two Generations) | Yes (One Generation) | Yes (One Generation) | Yes (Two Generations) | Yes (Two Generations) | No |
| Compaction | Alayws | Partial | Concurrent | ? | No | Never | No |
| Large Heaps (>10GB) | Maybe | Yes | Yes | ? | ? | Maybe | Maybe |
| Soft Real Time - all GC pauses are very short (unless cpu/heap exhaustion occurs) | No | Yes | Yes | ? | No | Yes | Yes |
| Hard Real Time - requires hard real time OS, all GC pauses are very short (unless CPU/heap exhaustion occurs) | No | No | No | ? | No | No | Yes |
| Benefits | Tries to balance application throughput with low pause times | Regionalized heap - good for very large heaps | Designed for very large heaps | ? | No cross-thread contention | Special circumstances | No garbage collection |
| Potential Consequences | Not designed for low latency requirements | ? | ? | ? | Potentially limited throughput of GC | Non-compacting - requires strategy to force compactions; Hard to tune; Larger memory footprint (~30%); Reduced throughput; Longest worst-case pause times (when compaction is unavoidable); Deprecated | Memory exhaustion |
| Recommended for | General Use (e.g. Web applications, messaging systems) | General Use on recent versions of Java | Large heaps (>10GB) | ? | ? | Deprecated | Benchmarks |
Garbage-First Garbage Collector (G1GC)
The Garbage First Garbage Collector (G1GC) is a multi-region, generational garbage collector. Review the G1GC Tuning Guide.
G1GC is the default collector starting with Java 9.
Humongous objects
Any object larger than half the region size
(-XX:G1HeapRegionSize) is considered a humongous
object, it's allocated directly into the old generation, and it
consumes the entire region which drives fragmentation.
Print humongous requests from a verbosegc:
awk 'BEGIN {print "Humongous Allocation";} /humongous/ { for (i=1;i<=NF;i++) { if ($i == "allocation" && $(i+1) == "request:") { print $(i+2); } } }' $FILE > data.csvTo create a histogram using Python+Seaborn:
import seaborn as sns
import matplotlib
import matplotlib.pyplot as plt
import pandas as pd
sns.set_theme()
data = pd.read_csv("data.csv")
axes = sns.histplot(data, x="Humongous Allocation")
axes.ticklabel_format(style='plain')
axes.get_xaxis().set_major_formatter(matplotlib.ticker.StrMethodFormatter('{x:,.0f}'))
axes.get_yaxis().set_major_formatter(matplotlib.ticker.StrMethodFormatter('{x:,.0f}'))
plt.xticks(rotation=45)
plt.tight_layout()
plt.savefig('humongous.png')
plt.show()Throughput/Parallel Scavenge Collector (ParallelGC)
This is the default policy on Java 8 and below.
The throughput collector that performs parallel scavenge copy collection on the young generation. This type of garbage collection is the default type on multi-processor server class machines.
Two types of tuning for this collector:
Option 1: Use the default throughput/parallel scavenge collector with built-in tuning enabled.
Starting with Version 5, the Sun HotSpot JVM provides some detection of the operating system on which the server is running, and the JVM attempts to set up an appropriate generational garbage collection mode, that is either parallel or serial, depending on the presence of multiple processors, and the size of physical memory. It is expected that all of the hardware, on which the product runs in production and preproduction mode, satisfies the requirements to be considered a server class machine. However, some development hardware might not meet this criteria.
The behavior of the throughput garbage collector, whether tuned automatically or not, remains the same and introduces some significant pauses, that are proportional to the size of the used heap, into execution of the Java application system as it tries to maximize the benefit of generational garbage collection. However, these automatic algorithms cannot determine if your workload well-suits its actions, or whether the system requires or is better suited to a different garbage collection strategy.
Consult these tuning parameters:
-XX:+UseParallelGC
-XX:+UseAdaptiveSizePolicy
-XX:+AggressiveHeapOption 2: Use the default throughput/parallel scavenge collector, but tune it manually.
Disadvantages of using the built-in algorithm that is established using the -XX:+UseAdaptiveSizePolicy parameter, include limiting what other parameters, such as the -XX:SurvivorRatio parameter, can be configured to do in combination with the built-in algorithm. When you use the built-in algorithm, you give up some control over determining the resource allocations that are used during execution. If the results of using the built-in algorithm are unsatisfactory, it is easier to manually configure the JVM resources, than to try and tune the actions of the algorithm. Manually configuring the JVM resources involves the use of half as many options as it takes to tune the actions of the algorithm.
Consult these tuning parameters:
-XX:NewRatio=2 This is the default for a server that is configured for VM mode -XX:MaxNewSize= and -XX:NewSize= -XX:SurvivorRatio= -XX:+PrintTenuringDistribution -XX:TargetSurvivorRatio=
See https://www.ibm.com/docs/en/was-nd/9.0.5?topic=tj-tuning-hotspot-java-virtual-machines-solaris-hp-ux and https://www.ibm.com/docs/en/was-nd/9.0.5?topic=thjvmshu-sun-hotspot-jvm-tuning-parameters-solaris-hp-ux
Verbose garbage collection (-verbose:gc)
Verboseg garbage collection is a low-overhead log to understand
garbage collection times and behavior. By default, it is written to
stdout (e.g. native_stdout.log).
Java 8
For Java 8, use the following Java options:
-verbose:gc -XX:+PrintGCDateStamps -XX:+PrintGCDetailsTo add safepoint times:
-verbose:gc -XX:+PrintGCDateStamps -XX:+PrintGCDetails -XX:+PrintGCApplicationConcurrentTime -XX:+PrintGCApplicationStoppedTimeTo send output to a set of rolling files instead of stderr:
-verbose:gc -XX:+PrintGCDateStamps -XX:+PrintGCDetails -XX:+PrintGCApplicationConcurrentTime -XX:+PrintGCApplicationStoppedTime -Xloggc:verbosegc.log -XX:+UseGCLogFileRotation -XX:NumberOfGCLogFiles=10 -XX:GCLogFileSize=100MFor WAS traditional, use SERVER_LOG_ROOT to write to the
same directory as other files:
-verbose:gc -XX:+PrintGCDateStamps -XX:+PrintGCDetails -XX:+PrintGCApplicationConcurrentTime -XX:+PrintGCApplicationStoppedTime -Xloggc:${SERVER_LOG_ROOT}/verbosegc.log -XX:+UseGCLogFileRotation -XX:NumberOfGCLogFiles=10 -XX:GCLogFileSize=100M-XX:+PrintHeapAtGC may be used for additional
information although it has some overhead.
Java >= 9
For Java >9, use the recommended
-Xlog:gc option instead. Note that
-XX:+PrintGCDetails is no longer required (see the mapping
for other options):
-Xlog:gc:stdout:time,level,tagsTo add safepoints:
-Xlog:safepoint=info,gc:stdout:time,level,tagsTo send output to a set of rolling files instead of stderr:
-Xlog:safepoint=info,gc:file=verbosegc.log:time,level,tags:filecount=10,filesize=100MCompressedOops
On 64-bit, if using -Xmx less than or equal to 32GB,
then -XX:+UseCompressedOops is enabled by default:
"Compressed oops is supported and enabled by default in Java SE 6u23 and
later" (http://docs.oracle.com/javase/7/docs/technotes/guides/vm/performance-enhancements-7.html)
Oops stands for ordinary object pointer.
Recent versions of HotSpot supports -Xmx much larger than 32GB with CompressedOops using -XX:ObjectAlignmentInBytes: https://bugs.openjdk.java.net/browse/JDK-8040176
Detailed Garbage Collection Tuning
-XX:+AggressiveOpts:
Turns on point performance optimizations that are expected to be on by default in upcoming releases. The changes grouped by this flag are minor changes to JVM runtime compiled code and not distinct performance features (such as BiasedLocking and ParallelOldGC). This is a good flag to try the JVM engineering team's latest performance tweaks for upcoming releases. Note: this option is experimental! The specific optimizations enabled by this option can change from release to release and even build to build. You should reevaluate the effects of this option with prior to deploying a new release of Java.
http://www.oracle.com/technetwork/java/tuning-139912.html#section4.2.4
Consider -XX:+UseTLAB which "uses thread-local object allocation blocks. This improves concurrency by reducing contention on the shared heap lock." (http://docs.oracle.com/cd/E13209_01/wlcp/wlss30/configwlss/jvmgc.html)
The -XX:+AlwaysPreTouch option may be used to force the entire Java heap into RAM on startup.
Permanent Region (permgen)
HotSpot used to have a dedicated region of the address space called the permanent generation to store things such as class meta-data, interned Strings, and class static variables. This region needed to be manually sized. If the region was exhausted, the JVM would throw an OutOfMemoryError with the message "PermGen space." The PermGen space has been removed in Java 8 (http://openjdk.java.net/projects/jdk8/milestones) and replaced with the Metaspace (unbounded by default but may be capped with -XX:MaxMetaspaceSize).
Hotspot's representation of Java classes (referred to here as class meta-data) is currently stored in a portion of the Java heap referred to as the permanent generation. In addition, interned Strings and class static variables are stored in the permanent generation. The permanent generation is managed by Hotspot and must have enough room for all the class meta-data, interned Strings and class statics used by the Java application. Class metadata and statics are allocated in the permanent generation when a class is loaded and are garbage collected from the permanent generation when the class is unloaded. Interned Strings are also garbage collected when the permanent generation is GC'ed.
The proposed implementation will allocate class meta-data in native memory and move interned Strings and class statics to the Java heap. Hotspot will explicitly allocate and free the native memory for the class meta-data. Allocation of new class meta-data would be limited by the amount of available native memory rather than fixed by the value of -XX:MaxPermSize, whether the default or specified on the command line.
"The -XX:MaxPermSize= and -Xmx (Maximum Java Heap size) parameters respectively configure the maximum size of the permanent region, where the class code and related data are logically presented as part of the old generation region but are kept physically separate, and the maximum size of the main heap where Java objects and their data are stored either in the young or old generation regions. Together the permanent region and the main heap comprise the total Java heap. An allocation failure in either of these regions either represents the inability to accommodate either all the application code or all the application data, both of which are terminal conditions, that can exhaust available storage, and cause an OutOfMemory error." (https://www.ibm.com/support/knowledgecenter/SSAW57_8.5.5/com.ibm.websphere.nd.doc/ae/tprf_hotspot_jvm.html, https://docs.oracle.com/javase/7/docs/webnotes/tsg/TSG-VM/html/memleaks.html)
In addition, note that interned Strings moved to the Java heap starting in Java 7: https://www.oracle.com/technetwork/java/javase/jdk7-relnotes-418459.html#jdk7changes
Reference Processing
PhantomReferences are handled differently than finalizers. Queued PhantomReferences are processed on the back of every GC cycle.
By default, there is a single "Reference Handler" thread which processes the ReferenceQueue. Use -XX:+ParallelRefProcEnabled to enable multiple threads for parallel reference queue processing. This may be useful for things such as high DirectByteBuffer allocation and free rates.
DirectByteBuffers may be monitored with the BufferPoolMXBean: http://docs.oracle.com/javase/7/docs/api/java/lang/management/BufferPoolMXBean.html
Safepoints
Safepoints are the internal mechanism by which the JVM tries to pause application threads for operations such as stop-the-world garbage collections.
Additional information may be printed with:
-XX:+PrintSafepointStatisticsPreserveFramePointer
If using JDK >= 8u60, use -XX:+PreserveFramePointer
to allow tools such as Linux perf to perform higher quality stack
walking. Details:
- https://docs.oracle.com/javase/9/tools/java.htm
- http://www.brendangregg.com/Slides/JavaOne2015_MixedModeFlameGraphs.pdf
DTrace Integration
Newer versions of Java have DTrace integration, but one large limitation is Bug 6617153, which causes DTrace to fail to evaluate Java thread stack names, making jstack nearly useless.
Code Cache
The default JIT compiled code cache size is 32MB-48MB. If there is available RAM, consider increasing this code cache size to improve JIT performance. For example:
-XX:ReservedCodeCacheSize=1536mIncreasing the maximum code cache size may have negative consequences. The longer the JIT keeps compiling, the more likely it is to generate code at higher optimisation levels. It takes a long time to compile at the higher optimization levels, and that time spent on the compiling can be a negative itself. More broadly, the higher optimization compilations produce much bigger compiled method bodies. Too many can start to impact the instruction cache. So, ideally, you want the JIT to just compile the "right" set of methods at "appropriate" optimization levels and then stop. There isn't any way of knowing when that has happened, so if the code cache is set very big it may keep going into negative territory if it runs for long enough. The best way to find the right value is to run experiments with different values and run for long periods of time.
To exclude certain methods from JIT code cache compilation:
-XX:CompileCommand=exclude,com/example/Exapmle.methodTo log code compilations: -XX:+LogCompilation
Code Cache Flushing
We have observed cases where code cache flushing when the code cache
is full causes application thread pauses (e.g. DTrace stack samples in
libjvm.so\1cJCodeCachebAfind_and_remove_saved_code6FpnNmethodOopDesc__pnHnmethod+0x50)`.
You may test if this is the case or not by disable code cache flushing,
although of course this means that code can no longer be JITted after
the code cache limit is reached:
-XX:-UseCodeCacheFlushingFor performance reasons, consider increasing the code cache size as well when doing this (tuned to available RAM):
-XX:-UseCodeCacheFlushing -XX:ReservedCodeCacheSize=1536mIf the code cache still fills up (e.g. lots of reflection, etc.) then you will receive this message in stderr:
CodeCache is full. Compiler has been disabled.Relevant code cache changes:
Environment Variables
Use JAVA_TOOL_OPTIONS to specify additional JVM arguments for programs launches in that terminal/command prompt. For example:
export JAVA_TOOL_OPTIONS="-Xmx1024m"
/opt/IBM/WebSphere/AppServer/bin/collector.shasync-profiler
async-profiler
is a Safepoint-aware native sampling profiler.
Concurrent low-pause mark-sweep collector (CMS)
The CMS collector has been removed since Java 14: https://openjdk.java.net/jeps/363
The stop-the-world phases of the CMS garbage collector include CMS-remark (https://blogs.oracle.com/poonam/entry/understanding_cms_gc_logs), and CMS-initial-mark (https://blogs.oracle.com/jonthecollector/entry/the_unspoken_cms_and_printgcdetails).
CMS has poor contraction capabilities, partly because it can only compact on the back of a failed CMS, full collection. If fragmentation is high, this can cause CMS to fail more often and cause many full GCs.
"CMS (Concurrent Mark Sweep) garbage collection does not do compaction." (http://www.oracle.com/technetwork/java/javase/tech/g1-intro-jsp-135488.html)
Java Class Libraries (JCLs)
The whole Java landscape is quite confusing and is summarized on the Java page.
Sub-chapters
OpenJDK JCL and Tools
java.util.logging (JUL)
Log to System.err
- Create logging.properties and set all the trace levels at the end:
handlers=java.util.logging.ConsoleHandler java.util.logging.ConsoleHandler.level=ALL java.util.logging.SimpleFormatter.format=[%1$tc] %4$s: %5$s %6$s%n # Trace: #.level=INFO .level=ALL #com.example.MyClass.level=ALL - Set
-Djava.util.logging.config.file=/$PATH/logging.properties
Log to a file
- Create logging.properties and set all the trace levels at the end:
handlers=java.util.logging.FileHandler java.util.logging.FileHandler.pattern=/$PATH/jul.log java.util.logging.FileHandler.limit=100000 java.util.logging.FileHandler.count=2 java.util.logging.FileHandler.formatter=java.util.logging.SimpleFormatter java.util.logging.SimpleFormatter.format=[%1$tc] %4$s: %5$s %6$s%n # Trace: .level=INFO com.example.MyClass.level=ALL - Set
-Djava.util.logging.config.file=/$PATH/logging.properties
SimpleFormatter patterns
- date
- source: caller, if available; otherwise, the logger's name.
- logger
- level
- message
- thrown: throwable if any
The format is specified with format string syntax:
[%1$tc] %4$s: %5$s%n[Fri Sep 25 12:13:14 PDT 2020] SEVERE: message%1$tY-%1$tm-%1$td %1$tH:%1$tM:%1$tS.%1$tL %4$-6s %3$s %5$s%6$s%n2020-01-01 01:02:03.456 SEVERE com.example.MyClass message
Java >= 7 supports specifying SimpleFormatter.format with
-Djava.util.logging.SimpleFormatter.format=$FORMAT
Reflection Inflation
For a discussion of reflection and inflation, see the general Java chapter. On the HotSpot JVM, the option -Dsun.reflect.inflationThreshold=0 creates an inflated Java bytecode accessor which is used on the second and every subsequent method invocation.
JSSE Debug
JSSE supports debug output to System.out with -Djavax.net.debug (example output); most commonly, -Djavax.net.debug=all
All the options are described in sun/security/ssl/Debug.java.
The value -Djavax.net.debug= is equivalent to disabling
debug.
HTTP(S) Client (HttpURLConnection)
The OpenJDK JCL includes an HTTP client implemented using the abstract classes java/net/HttpURLConnection and javax/net/ssl/HttpsURLConnection and concrete classes sun/net/www/protocol/http/HttpURLConnection and sun/net/www/protocol/https/HttpsURLConnectionImpl. A client is created using the java/net/URL.openConnection method.
Timeouts
- Set
default connect
timeout:
-Dsun.net.client.defaultConnectTimeout=$MILLISECONDS - Set
default read
timeout:
-Dsun.net.client.defaultReadTimeout=$MILLISECONDS
Keep-Alive
For HTTP/1.1 connections, the specification (RFC 2616)
states that if the server does not respond with a
Connection: close response header, then the connection
should be treated as a keep-alive connection. The maximum duration may
be specified wih the Keep-Alive: timeout=X (seconds)
response header.
However, OpenJDK also
requires that the server responds with a
Connection: keep-alive header. It appears this logic is not
required by the specification but it seems
to be there for legacy reasons and is unlikely to be changed,
particularly with the replacement
HTTP client available since Java 11.
Therefore, if the server responds with
Connection: keep-alive, then the connection is cached
into an in-memory KeepAliveCache.
This may be disabled
with -Dhttp.keepAlive=false although this may impact
performance (the main purpose of keep-alive connections is to avoid the
TCP and TLS handshakes, which are relatively expensive). The maximum
number of cached keep-alive connections per destination
host is controlled
with -Dhttp.maxConnections=X (default 5).
If the server responds with a Keep-Alive: timeout=X
response header, then the KeepAliveCache will purge and
close the connection after approximately X seconds of idleness. If the
server does not respond with such a header, the default is 5 seconds.
The timeout mechanism is implemented on a thread with the name
Keep-Alive-Timer. The thread ends gracefully if there are
no connections in the pool, and the thread is re-created when
needed.
In summary, if the HttpURLConnection client is used, and
the protocol is HTTP/1.1, and the server responds with a
Connection: keep-alive header, and the server does not
respond with a Keep-Alive: timeout=X header, then the
client JDK will time-out the connection from its
KeepAliveCache after 5 seconds of inactivity. In newer versions of
Java (e.g. 8u361, IBM Java 8.0.8.0, etc.), this 5 second default is
tunable
with -Dhttp.keepAlive.time.server.
In general, for LAN connections that are expected to be persistent
between a JCL HTTP(S) client and backend, set
-Dhttp.maxConnections less than or equal to the maximum
number of concurrent connections supported by the backend divided by the
number of clients, ensure the backend is sending the
Connection: keep-alive header, configure the Keep Alive
Timeout relatively high (this may be limited by resource constraints or
intermediate network device timeouts), and, if possible, configure the
backend to send a Keep-Alive: timeout=X value that is
slightly less than the timeout that it uses itself to time out
connections (to avoid a race condition wherein the client re-uses a
pooled connection which has already timed out on the backend).
For examples:
- If WebSphere Liberty is acting as a server:
<httpEndpoint id="defaultHttpEndpoint" httpPort="9081" httpsPort="9444" headersRef="addResponseHeaders" /> <headers id="addResponseHeaders"> <add>Connection: keep-alive</add> <add>Keep-Alive: timeout=30</add> </headers> <httpOptions persistTimeout="575h" /> - If IHS is acting as a server, starting with IHS 9 or 8.5.5.19, when
setting
KeepAliveTimeoutto a millisecond value, for example,KeepAliveTimeout 30999ms, then IHS will use this for its timeout but it will send back a Keep-Alive timeout response header rounded down to 30 seconds (in this example).
Expect: 100-Continue
This client has a limitation that if the request contains the header "Expect: 100-Continue", this will only automatically be processed by the JDK if streaming mode is enabled. Streaming mode is not enabled by default and it may be enabled by calling HttpURLConnection setChunkedStreamingMode or setFixedLengthStreamingMode.
HTTP(S) Client (HTTP Client)
Java 11 introduced the Java HTTP Client. This is a more modern alternative to HttpURLConnection, including support for HTTP/2 and it does not have limitations such as the Expect 100-Continue non-streaming mode limitation.
Starting with Java 20, the
default idle connection timeout was reduced from 1200 to 30 seconds and
jdk.httpclient.keepalive.timeout
was enhanced
to also apply to HTTP/2 connections.
Lightweight Directory Access Protocol (LDAP) Client
- -Dcom.sun.jndi.ldap.connect.timeout=X: connection timeout in milliseconds
- -Dcom.sun.jndi.ldap.read.timeout=X: read timeout in milliseconds for LDAP operations
https://docs.oracle.com/javase/8/docs/technotes/guides/jndi/jndi-ldap.html
ServerCommunicatorAdmin
The following warning message:
The server has decided to close this client connection.
is emitted by a subclass of com/sun/jmx/remote/internal/ServerCommunicatorAdmin.
This is within JMX because of a terminate call (probably from the timeout thread). Example output:
[5/15/20 19:20:49:708 EEST] 0000022b misc W ServerCommunicatorAdmin reqIncoming The server has decided to close this client connection.On J9-based JVMs, you may investigate who is creating and destroying these objects with:
-Xtrace:print=mt,methods={com/sun/jmx/remote/internal/ServerCommunicatorAdmin.<init>*},trigger=method{com/sun/jmx/remote/internal/ServerCommunicatorAdmin.<init>*,jstacktrace}String.substring Performance
HotSpot V7 update 6 introduced a significant change to the implementation of java/lang/String, where calls to substring no longer return a "view" into the String, but instead return a copy (of the substring portion):
- List of Java SE 7 Release Notes: http://www.oracle.com/technetwork/java/javase/7u-relnotes-515228.html
- List of bugs fixed in 7u6: http://www.oracle.com/technetwork/java/javase/2col/7u6-bugfixes-1733378.html
- Change request discussing the changes: http://bugs.sun.com/bugdatabase/view_bug.do?bug_id=6924259
- Developer mailing list discussing the changes: http://mail.openjdk.java.net/pipermail/core-libs-dev/2013-February/014609.html
- Java Lobby article on the subject: https://dzone.com/articles/changes-stringsubstring-java-7
- Java Performance Tuning article on the subject: http://java-performance.info/changes-to-string-java-1-7-0_06/
If profiling shows significant activity in substring or in array copy, then this may be why. In general, the change is believed to be positive because with the old behavior, the original, potentially very large, String cannot be garbage collected unitl all substrings are garbage collected. However, if applications use substring heavily, then they may need to be re-coded.
DNS Cache
The JVM has a DNS cache called the InetAddress
cache. The cache timeout is first read from networkaddress.cache.ttl
in the java.security file. Next, it is read from the system
property -Dsun.net.inetaddr.ttl although this is
deprecated. If neither property is set, and a SecurityManager is enabled
(Java 2 Security on WebSphere), then successful lookups are cached
forever; otherwise, successful lookups are cached for 30 seconds.
Unsuccessful lookups are cached for 10 seconds
(networkaddress.cache.negative.ttl or
-Dsun.net.inetaddr.negative.ttl).
The result of evaluating localhost is not cached by
default.
If the operating system supports both IPv4 and IPv6, then lookups
will first be done over IPv6. If IPv6 is not the primary source, to
instead do IPv4 first and avoid potential IPv6 timeouts, use
-Djava.net.preferIPv4Stack=true.
IBM JCL and Tools
Reflection Inflation
For a discussion of reflection and inflation, see the general Java chapter. On the IBM JVM, the option -Dsun.reflect.inflationThreshold=0 disables inflation completely.
The sun.reflect.inflationThreshold property tells the JVM what number of times to use the JNI accessor. If it is set to 0, then the JNI accessors are always used. Since the bytecode accessors use more native memory than the JNI ones, if we are seeing a lot of Java reflection, we will want to use the JNI accessors. To do this, we just need to set the inflationThreshold property to zero. (http://www-01.ibm.com/support/docview.wss?uid=swg21566549)
On IBM Java, the default -Dsun.reflect.inflationThreshold=15 means that the JVM will use the JNI accessor for the first 15 accesses, then after that it will change to use the Java bytecode accessor. Using bytecode accessor currently costs 3-4x more than an invocation via JNI accessor for the first invocation, but subsequent invocations have been benchmarked to be over 20x faster than JNI accessor.
Advanced Encryption Standard New Instructions (AESNI)
AESNI is a set of CPU instructions to improve the speed of encryption and decryption using AES ciphers. It is available on recent Intel and AMD CPUs (https://en.wikipedia.org/wiki/AES_instruction_set) and POWER >= 8 CPUs (http://www.redbooks.ibm.com/abstracts/sg248171.html). If using IBM Java >= 6 and the IBM JCE security provider, then AESNI, if available, can be exploited with -Dcom.ibm.crypto.provider.doAESInHardware=true (http://www-01.ibm.com/support/knowledgecenter/SSYKE2\_7.0.0/com.ibm.java.security.component.70.doc/security-component/JceDocs/aesni.html?lang=en).
In some benchmarks, SSL/TLS overhead was reduced by up to 35%.
Use -Dcom.ibm.crypto.provider.AESNITrace=true to check if the processor supports the AES-IN instruction set:
Object Request Broker (ORB) and Remote Method Invocation (RMI)
Important links:
- General information on ORB
- TroubleShooting: Object Request Broker (ORB) problems
- MustGather: Object Request Broker (ORB)
- Additional troubleshooting guide
- Object Request Broker tuning guidelines
Review key ORB properties discussed in WAS documentation and Java documentation with the following highlights:
-Dcom.ibm.CORBA.ConnectTimeout=SECONDS: New socket connect timeout.-Dcom.ibm.CORBA.MaxOpenConnections=X: Maximum number of in-use connections that are to be kept in the connection cache table at any one time.-Dcom.ibm.CORBA.RequestTimeout=SECONDS: Total number of seconds to wait before timing out on a Request message.-Dcom.ibm.CORBA.SocketWriteTimeout=SECONDS: More granular timeout for every socket write. The value will depend on whether fragmentation is enabled or not. If it's enabled, then it should generally be set relatively low (e.g. 5 seconds) because each write is very small (see FragmentSize). If it's disabled, then the write will be as big as the largest message, so set the timeout based on that and your expected network performance. When setting this value, set on both client and server.-Dcom.ibm.CORBA.ConnectionMultiplicity=N: See the discussion on ConnectionMultiplicity. Recent versions of Java automatically tune this value at runtime.-Dcom.ibm.websphere.orb.threadPoolTimeout=MILLISECONDS: Avoid potential deadlocks or hangs on reader threads. This is often set to a value of 10000.-Dcom.ibm.CORBA.FragmentSize=N: See the discussion on FragmentSize.
Default ORB configuration is specified in
${java}/jre/lib/orb.properties. For WAS, it's generally
recommended instead to change these options (where available) under
Administrative Console } Websphere application servers } $server }
Container services } ORB
service or using -D generic JVM arguments. There may be
additional settings under Custom Properties within this
panel. WAS on z/OS has additional settings under z/OS
additional settings. For WAS configuration, these available settings
translate to the
<services xmi:type="orb:ObjectRequestBroker" ... element
or <properties ... child elements underneath that in
server.xml (or genericJVMarguments and custom properties under the JVM
section in server.xml).
Note that in WAS, there is an ORB.thread.pool configuration which is normally used; however, if the ThreadPool properties are specified in orb.properties, then they override the WAS configuration. See a detailed discussion of how properties are evaluated at the different levels.
You may see ORB reader threads (RT) and writer threads (WT). For example, here is a reader thread:
3XMTHREADINFO
"RT=265:P=941052:O=0:WSTCPTransportConnection[addr=...,port=2940,local=48884]"
J9VMThread:0x000000000E255600, j9thread_t:0x00002AAAC15D5470,
java/lang/Thread:0x000000004CF4B4F0, state:R, prio=5
3XMTHREADINFO1 (native thread ID:0x7EFD, native priority:0x5, native
policy:UNKNOWN)
3XMTHREADINFO2 (native stack address range from:0x00002AAAD7D6A000,
to:0x00002AAAD7DAB000, size:0x41000)
3XMTHREADINFO3 Java callstack:
4XESTACKTRACE at java/net/SocketInputStream.socketRead0(Native
Method)
4XESTACKTRACE at
java/net/SocketInputStream.read(SocketInputStream.java:140(Compiled
Code))
4XESTACKTRACE at
com/ibm/rmi/iiop/Connection.readMoreData(Connection.java:1642(Compiled
Code))
4XESTACKTRACE at
com/ibm/rmi/iiop/Connection.createInputStream(Connection.java:1455(Compiled
Code))
4XESTACKTRACE at
com/ibm/rmi/iiop/Connection.doReaderWorkOnce(Connection.java:3250(Compiled
Code))
4XESTACKTRACE at
com/ibm/rmi/transport/ReaderThread.run(ReaderPoolImpl.java:142(Compiled
Code))
These will normally be in R (runnable) state, even if they are just waiting for the incoming message.
The number of Reader Threads (RT) are controlled by the number of active socket connections, not by the ORB thread pool size. For every socket.connect/accept call, an RT gets created and an RT gets removed when the socket closes. RT is not bounded by MaxConnectionCacheSize which is a soft limit - the cache can grow beyond the MaxConnectionCacheSize. Once the cache hits the MaxConnectionCacheSize, the ORB will try to remove stale i.e. unused connections.
The ORB thread pool size will be a cap on the maximum number of Writer Threads (WT), as only up to the number of ORB threads can be writing.
Connection Multiplicity
com.ibm.CORBA.ConnectionMultiplicity: The value of the ConnectionMultiplicity defines the number of concurrent TCP connections between a server and client ORB. The default is 1 or automatic depending on the version of Java. Lower values can lead to a performance bottleneck in J2EE deployments where there are a large number of concurrent requests between client & server ORB.
For example,
-Dcom.ibm.CORBA.ConnectionMultiplicity=N
See further discussion at https://www.ibm.com/support/pages/troubleshooting-object-request-broker-orb-problems-1 and https://www.ibm.com/support/pages/node/244347.
Fragment Size
The ORB separates messages into fragments to send over the ORB connection. You can configure this fragment size through the com.ibm.CORBA.FragmentSize parameter.
To determine and change the size of the messages that transfer over the ORB and the number of required fragments, perform the following steps:In the administrative console, enable ORB tracing in the ORB Properties page.
Enable ORBRas diagnostic trace ORBRas=all (http://www-01.ibm.com/support/docview.wss?uid=swg21254706).
Increase the trace file sizes because tracing can generate a lot of data.
Restart the server and run at least one iteration (preferably several) of the case that you are measuring.
Look at the traceable file and do a search for Fragment to follow: Yes.This message indicates that the ORB transmitted a fragment, but it still has at least one remaining fragment to send prior to the entire message arriving. A Fragment to follow: No value indicates that the particular fragment is the last in the entire message. This fragment can also be the first, if the message fits entirely into one fragment.
If you go to the spot where Fragment to follow: Yes is located, you find a block that looks similar to the following example:
Fragment to follow: Yes
Message size: 4988 (0x137C)
--
Request ID: 1411This example indicates that the amount of data in the fragment is 4988 bytes and the Request ID is 1411. If you search for all occurrences of Request ID: 1411, you can see the number of fragments that are used to send that particular message. If you add all the associated message sizes, you have the total size of the message that is being sent through the ORB.
You can configure the fragment size by setting the com.ibm.CORBA.FragmentSize ORB custom property.
Setting -Dcom.ibm.CORBA.FragmentSize=0 disables
fragmentation and may improve performance in some cases; however, note
that multiple requests may be multiplexed on a single connection and
there will be a lock on the connection during the write of the full
message. If a message is large, fragmentation is disabled, and the
concurrent load is greater than ConnectionMultiplicity, this may create
a bottleneck.
One additional value that FragmentSize=0 may provide is to isolate a subset of problematic clients (e.g. bad network) to just the reader threads because a full, non-fragmented read occurs on the reader thread whereas with fragmentation, it will need to consume a worker thread while it waits for the next fragment. Note that when the server sends the response back to the client, the write happens on the ORB thread pool thread; however, with a sufficient ORB thread pool size, this may help isolate such problematic clients.
Interceptors
Interceptors are ORB extensions that can set up the context prior to the ORB runs a request. For example, the context might include transactions or activity sessions to import. If the client creates a transaction, and then flows the transaction context to the server, then the server imports the transaction context onto the server request through the interceptors.
Most clients do not start transactions or activity sessions, so most systems can benefit from removing the interceptors that are not required.
To remove the interceptors, manually edit the server.xml file and remove the interceptor lines that are not needed from the ORB section.
ORB IBM Data Representation (IDR)
ORB 7.1 introduced dramatic performance improvements.
java.nio.DirectByteBuffer
Unlike IBM Semeru Runtimes
and similar OpenJDK runtimes, IBM Java has slightly different
default DirectByteBuffer behavior: The
-XX:MaxDirectMemorySize hard limit defaults to unlimited
and instead there is a "soft" limit default of 64MB. This soft limit
grows if the application needs more DirectByteBuffer space
and no hard limit is configured. The JDK is reluctant to grow the soft
limit and before it will expand the soft limit there will be a series of
System GC events, trying to free up enough space to avoid growing the
limit. System GCs cause long pauses during which application threads
cannot do any work, so we generally try to avoid them if at all possible
for performance reasons. Also, when the soft limit is used, the limit
will be raised only a little bit at a time, and every time the limit is
hit, there is another series of System GCs before growth is allowed. So
if the application demands a lot of DirectByteBuffers, then starting at
64 MB and growing to whatever the necessary size is will take a long
time, during which performance will be significantly impacted. For this
reason, from a performance perspective, it is generally recommended
specify -XX:MaxDirectMemorySize as needed. Ensure there is
enough physical memory to support the DBB demands. For example:
-XX:MaxDirectMemorySize=1GThe option
-Dcom.ibm.nio.DirectByteBuffer.AggressiveMemoryManagement=true
may be used to enable a more aggressive DirectByteBuffer
cleanup algorithm (which may increase the frequency of
System.gc calls).
XML and XSLT
Profile your application using tools such as the IBM Java Health Center or more simply by taking multiple thread dumps. If you observe significant lock contention on an instance of java/lang/Class and/or significant CPU time in com/ibm/xtq/xslt/* classes, then consider testing the older XSLT4J interpreter to see if you have better results:
From Version 6, the XL TXE-J compiler replaces the XSLT4J interpreter as the default XSLT processor.
The XL TXE-J compiler is faster than the XSLT4J interpreter when you are applying the same transformation more than once. If you perform each individual transformation only once, the XL TXE-J compiler is slower than the XSLT4J interpreter because compilation and optimization reduce performance.
For best performance, ensure that you are not recompiling XSLT transformations that can be reused. Use one of the following methods to reuse compiled transformations:
- If your stylesheet does not change at run time, compile the stylesheet as part of your build process and put the compiled classes on your classpath. Use the org.apache.xalan.xsltc.cmdline.Compile command to compile the stylesheet and set the http://www.ibm.com/xmlns/prod/xltxe-j/use-classpath transformer factory attribute to true to load the classes from the classpath.
- If your application will use the same stylesheet during multiple runs, set the http://www.ibm.com/xmlns/prod/xltxe-j/auto-translet transformer factory attribute to true to automatically save the compiled stylesheet to disk for reuse. The compiler will use a compiled stylesheet if it is available, and compile the stylesheet if it is not available or is out-of-date. Use the http://www.ibm.com/xmlns/prod/xltxe-j/destination-directory transformer factory attribute to set the directory used to store compiled stylesheets. By default, compiled stylesheets are stored in the same directory as the stylesheet.
- If your application is a long-running application that reuses the same stylesheet, use the transformer factory to compile the stylesheet and create a Templates object. You can use the Templates object to create Transformer objects without recompiling the stylesheet. The Transformer objects can also be reused but are not thread-safe.
- If your application uses each stylesheet just once or a very small number of times, or you are unable to make any of the other changes listed in this step, you might want to continue to use the XSLT4J interpreter by setting the javax.xml.transform.TransformerFactory service provider to org.apache.xalan.processor.TransformerFactoryImpl.
For additional information, see http://www-01.ibm.com/support/docview.wss?uid=swg21639667
DNS Cache
The DNS Cache works the same as in the OpenJDK JCL;
however, there is an additional property
-Dcom.ibm.cacheLocalHost=true to cache
localhost lookups.
Java Profilers
There are two broad categories of profilers: statistical/sampling profilers which sample call stacks, and tracing profilers which record method entry/exit times. In general, sampling profilers are very low overhead and suitable for production (e.g. IBM Health Center is less than 1%), whereas tracing profilers may be up to 50% or more overhead and generally aren't suitable for production. Imagine that sampling profilers are like taking javacores at a high frequency (with less overhead since the profiler is only sampling call stacks). Tracing profilers are more accurate but produce a lot more data and have to hook deeply into the JVM to get their data, causing the additional overhead.
Whether or not your tests are going well, it is important to plan in at least some basic profiling tests, both for a single user (either sampling or tracing profiler) and for a full stress test (sampling profiler).
Java Profilers Recipe
- In most cases, sampling profilers are used first and tracing profilers are only used for fine grained tuning or deep dive analysis.
- Analyze any methods that use more than 1% of the reported time in themselves.
- Analyze any methods that use more than 10% of the reported time in themselves and their children.
- Analyze any locks that have large contention rates, particularly those with long average hold times.
Statistical/Sampling Profilers
IBM Java Health Center
The IBM Java Health Center tool is covered in depth in the Major Tools chapter.
HotSpot HPROF
HPROF is a sampling JVMTI profiler that ships with Java (and therefore with WebSphere). Restart the JVM with -agentlib:hprof=cpu=samples
When the program stops gracefully, the sample counts will be printed to stdout/stderr.
Example output:
CPU SAMPLES BEGIN (total = 126) Fri Oct 22 12:12:14 2004
rank self accum count trace method
1 53.17% 53.17% 67 300027 java.util.zip.ZipFile.getEntry
2 17.46% 70.63% 22 300135 java.util.zip.ZipFile.getNextEntry
3 5.56% 76.19% 7 300111 java.lang.ClassLoader.defineClass2
4 3.97% 80.16% 5 300140 java.io.UnixFileSystem.list
5 2.38% 82.54% 3 300149 java.lang.Shutdown.halt0
6 1.59% 84.13% 2 300136 java.util.zip.ZipEntry.initFields
7 1.59% 85.71% 2 300138 java.lang.String.substring
8 1.59% 87.30% 2 300026 java.util.zip.ZipFile.open
9 0.79% 88.10% 1 300118 com.sun.tools.javac.code.Type$ErrorType.<init>
10 0.79% 88.89% 1 300134 java.util.zip.ZipFile.ensureOpenhttp://docs.oracle.com/javase/7/docs/technotes/samples/hprof.html
Java Mission Control (Formerly JRockit Mission Control)
This tool has been moved into the Major Tools chapter under OpenJDK Mission Control.
HotSpot VisualVM
VisualVM (http://docs.oracle.com/javase/7/docs/technotes/guides/visualvm/) is shipped with Java (${JAVA}/bin/jvisualvm) and therefore with WebSphere. It provides both a sampling and tracing profiler. VisualVM does not have a headless mode, so you must run the GUI client on the same machine as the target JVM (http://docs.oracle.com/javase/7/docs/technotes/tools/share/jstatd.html). jvisualvm through jstatd does not support remote profiling: "Java VisualVM... cannot profile remote applications." (http://docs.oracle.com/javase/7/docs/technotes/guides/visualvm/applications_remote.html). The only way to use it remotely would be to export DISPLAY to another machine.
Once you've connected to the JVM, click on Sampler and click the CPU button to start sampling. By default, when VisualVM samples a stack, it will skip over stack frames in the packages java.*, javax.*, sun.*, sunw.*, and com.sun.* (https://blogs.oracle.com/nbprofiler/entry/profiling_with_visualvm_part_2). You can setup a profiling preset under Tools > Options and specify a blank string for the "Do not profile packages" textbox to override this.
It does not appear that VisualVM data can be cropped to a particular time period, making it difficult to use for problems during a specific period.
VisualVM supports a plugin that can track DirectByteBuffer usage: https://blogs.oracle.com/nbprofiler/entry/new_memory_buffer_plugin_for
Tracing Profilers
IBM Java -Xtrace
For simple tracing profiler usage on IBM Java, -Xtrace is very easy to use: http://www-01.ibm.com/support/docview.wss?uid=swg21657391
Rational Application Developer (RAD) Profiler
The Rational Application Developer profiling platform provides three different analyses of application behavior:
- Memory-usage analysis
- Method-level execution analysis
- Thread analysis
Suited when you have an eclipse based IDE installed and are using RAD to develop software.
Profiling agents are executed alongside the JVM (and inside the JVM process) when that JVM is run with special JVMTI-specific VM arguments. When the profiling agents run, they collect data from the JVM in the form of execution, heap, or thread events. Within the Rational Application Developer profiling sphere, these agents are referred to as the Execution Analysis, Heap Analysis, and Thread Analysis agents.
The following tutorial walks you through how to go about setting up the profiling agent and collecting data
http://www.ibm.com/developerworks/rational/tutorials/profilingjavaapplicationsusingrad/
You can also profile outside of RAD using the standalone mode.
Rational Agent Controller (RAC)
The Rational Agent Controller (RAC) has a really broad set of supported operating systems: AIX, Linux, Linux s/390 (zLinux), Windows, Solaris, and z/OS: http://www-01.ibm.com/support/docview.wss?uid=swg27013420#v8. Once you've got the agent controller installed and the JVM instrumented, you can either gather data in headless mode which you load into Rational Application Developer, or start/pause monitoring remotely from RAD.
The RAC comes with a JVMTI profiling agent which has to be attached to the JVM. This profiler has a lot of native components which makes this a bit tricky. First, you'll need to add a generic JVM argument, such as:
"-agentpath:/opt/IBM/SDP/AgentController/plugins/org.eclipse.tptp.javaprofiler/libJPIBootLoader.so=JPIAgent:server=controlled,format=binary,file=log.trcbin;CGProf"Note that the argument has to be specified with double quotes to avoid any issues with the semicolon in the Linux launcher. So if you already had some arguments, such as -Xgcpolicy:gencon, then your final generic JVM arguments would be:
-Xgcpolicy:gencon "-agentpath:/opt/IBM/SDP/AgentController/plugins/org.eclipse.tptp.javaprofiler/libJPIBootLoader.so=JPIAgent:server=controlled,format=binary,file=log.trcbin;CGProf"Next, we need to tell Linux how to load native library dependencies for libJPIBootLoader.so. To do this, we need to tell WAS to start with a specific LD_LIBRARY_PATH environment variable. Envars can be set through the Environment Entries option (http://www-01.ibm.com/support/docview.wss?uid=swg21254153):
Name = LD_LIBRARY_PATH
Value = /opt/IBM/SDP/AgentController/plugins/org.eclipse.tptp.javaprofiler/:/opt/IBM/SDP/AgentController/libWAS is smart enough to append the library path you specify to the library path that it needs itself.
Use the server=controlled option in which case the JVM will not start until RAD connects to it (http://www.eclipse.org/tptp/home/downloads/4.5.0/documents/installguide/agentcontroller_45/linux/getting_started.html#Java_15). The reason we did this was so that we can control what gets profiled, since we weren't interested in profiling JVM startup. This option is recommended over server=enabled for high volume profiling (http://www-01.ibm.com/support/docview.wss?uid=swg21414403). Here are the basic steps we followed:
- Start the RAC agent (RAStart.sh) before launching the application server
- Launch the application server (it will immediately enter a wait state)
- Connect to the JVM using RAD: http://www.ibm.com/developerworks/rational/tutorials/profilingjavaapplicationsusingrad/index.html
- In some versions of RAD, this will immediately start profiling, in which case you'll probably want to click Pause - the JVM will continue to start but profiling will not be active
- When you're ready, resume the actual profiling and continue as long as necessary
- You'll probably want to select the option in RAD to save the data to a local file for post-analysis in addition to streaming it into RAD itself
There is also the option of using server=standalone which writes the profiling data to a local file and avoids the RAC itself and needing to connect in remotely from RAD. However, startup may take very long and create a lot of data which would have been cumbersome to analyze.
There are many ways to analyze the captured data: http://www.ibm.com/developerworks/rational/tutorials/profilingjavaapplicationsusingrad/index.html
For example, capture top -b -H -d 1800 -p $PID to gather accumulated CPU time per thread at the start of profiling and at the end and take the difference to find the threads that accumulated CPU and sort by that number. Next, within RAD's Execution Time Analysis, select the Call Tree tab and find these threads. Expand the threads and follow down the largest paths of cumulative time. Note that there may be some rows with very large cumulative times that are probably just the frames of the thread that are "waiting for work," such as a call to getTask or await, and these can be disregarded.

Once you find a high level method of interest (the art of profiling!), right click it and select Show Method Invocation Details. In the third table, "Selected Method Invokes," sort by Cumulative CPU Time, descending (if you don't have this column, you will need to make sure you have this option selected in one of the RAD attach/profiling screens when starting to profile). This will give the accumulated CPU time from a high level. You can then "drill down" further if you'd like to by doing the same procedure with rows from this table.

Note: Cumulative CPU time in the method invocation details is for the whole tracing profile, not from within the context of the call tree thread stack that you get here from.
Performance Inspector
Performance inspector is a suite of profilers including sampling and tracing profilers and other tools for various operating systems. An open source version still exists but it is not actively maintained: http://perfinsp.sourceforge.net/
IBM Java Runtime Environment
This chapter has been split and moved into a JVM chapter (OpenJ9 and IBM J9 JVMs) and JDK chapters: OpenJDK JCL and Tools if you're using OpenJ9, or IBM JCL and Tools if you're using IBM Java. The whole Java landscape is quite confusing and is summarized on the Java page.
Oracle Java Runtime Environment
This chapter has been split and moved into a JVM chapter (HotSpot JVM) and a JDK chapter (OpenJDK JCL and Tools). The whole Java landscape is quite confusing and is summarized on the Java page.
WebSphere Application Server
IBM WebSphere Application Server (WAS) is a Java Enterprise Edition (JEE) application server with functions such as serving websites. WAS traditional (colloquially abbreviated tWAS) is the name of the original product produced since 1998 and still a strategic offering. WebSphere Liberty is a partial rewrite produced since 2012 and geared towards cloud and MicroServices. Both editions of WebSphere are commonly purchased through the WebSphere Hybrid Edition offering.
Sub-Chapters
See the following sub-chapters depending on which product you're using:
WebSphere Application Server traditional
WAS traditional is colloquially abbreviated tWAS. Documentation:
WAS traditional Recipe
- Review the Operating System recipe for your OS. The highlights are to ensure CPU, RAM, network, and disk are not consistently saturated.
- Review the Java recipe for your JVM.
The highlights are to tune the maximum heap size (
-Xmx), the maximum nursery size (-Xmn) and enable verbose garbage collection and review its output with the GCMV tool. - Ensure that the application thread pools are not consistently saturated: HTTP = WebContainer, EJB = ORB.thread.pool, JMS activation specifications over MQ = WMQJCAResourceAdapter, JMS over SIBus = SIBJMSRAThreadPool, z/OS = ORB workload profile setting, etc.
- Consider reducing the default Hung Thread Detection threshold and interval which will print a warning and stack trace when requests exceed a time threshold.
- If receiving HTTP(S) requests:
- For HTTP/1.0 and HTTP/1.1, avoid client keepalive socket churn by
setting
Unlimited persistent requests per connection. - For servers with incoming LAN HTTP traffic from clients
using persistent TCP connection pools with keep alive (e.g. a reverse
proxy like IHS/httpd or web service client), consider increasing the
Persistent timeoutto reduce keepalive socket churn. - For HTTP/1.0 and HTTP/1.1, minimize the number of application responses with HTTP codes 400, 402-417, or 500-505 to reduce keepalive socket churn.
- If using HTTP session database persistence, tune the write frequency.
- For increased resiliency, if using HTTPS, set
-DtimeoutValueInSSLClosingHandshake=1. - If possible, configure and use servlet caching/Dynacache for HTTP response caching.
- Consider enabling the HTTP NCSA access log with response times for post-mortem traffic analysis.
- If the applications don't use resources in
META-INF/resourcesdirectories of embedded JAR files, then setcom.ibm.ws.webcontainer.SkipMetaInfResourcesProcessing = true. - Consider reducing each TCP Transport's
Maximum open connectionsto the hundreds range to avoid excessive request queuing under stress and test with a saturation test.
- For HTTP/1.0 and HTTP/1.1, avoid client keepalive socket churn by
setting
- If using databases (JDBC):
- Connection pools should not be consistently saturated. Tune each pool's Maximum connections.
- Consider tuning each data source's statement cache size and isolation level.
- Consider disabling idle and age connection timeouts by setting reap time to 0 (and tune any firewalls, TCP keep-alive, and/or database connection timeouts, if needed).
- Compare relative results of globalConnectionTypeOverride=unshared.
- If using JMS MDBs without a message ordering requirement, tune activation specifications' maximum concurrency to control the maximum concurrent MDB invocations and maximum batch size to control message batch delivery size.
- If using authentication:
- Consider tuning the authentication cache and LDAP sizes.
- Test the relative performance of disabling horizontal security attribute propagation.
- If using EJBs, consider tuning
the ORB such as
-Dcom.ibm.CORBA.ConnectionMultiplicity,-Dcom.ibm.CORBA.FragmentSize, and-Dcom.ibm.CORBA.MaxOpenConnections. - If none of the Intelligent
Management or Intelligent
Management for Web Server features are used nor planned to be used,
set
LargeTopologyOptimization=falseto reduce unnecessary CPU usage and PMI overhead. - Review logs for any errors,
warnings, or high volumes of messages, and use
-Dcom.ibm.ejs.ras.disablerasnotifications=trueif you're not listening to JMX log notifications. - Monitor, at minimum, response times, number of requests, thread pools, connection pools, and CPU and Java heap usage using TPV/PMI and/or a third party monitoring program.
- Upgrade to the latest version and fixpack of WAS and Java as there is a history of making performance improvements over time.
- Consider running with a sampling profiler such as Health Center for post-mortem troubleshooting.
- If using Dynacache replication:
- If using memory-to-memory HTTP session replication, weigh whether the costs and complexity are better than simple sticky sessions with re-login, or consider using a linearly scalable external cache provider, or the Dynacache client/server replication model.
- Install and use the Cache Monitor sample application to watch cache hit rates and cache exhaustion.
- If using
SHARED_PUSHreplication, consider usingSHARED_PUSH_PULLto reduce replication volume.
- If the application writes a lot to SystemOut.log, consider switching to binary HPEL for improved performance.
- Review the performance tuning topic in the WAS traditional documentation.
WAS Basics
"In general, a large number of applications will realize some improvement from tuning in three core areas: the JVM, thread pools, and connection pools."
Review all messages in SystemOut.log, SystemErr.log (or HPEL logs), native_stdout.log, native_stderr.log, application logs (such as log4j), and First Failure Data Capture (FFDC) logs. Note that with FFDC logs, an exception will often only create an FFDC stack and information file on the first occurrence (this is the design of FFDC), but you can review the _exception.log summary file for the number of times that exception was thrown.
Review the WAS logs and eliminate (or try to reduce) any warnings and exceptions. If customers say, "Oh, those warnings/errors are 'normal'," persist in investigating them anyway and pushing for them to be eliminated. Imagine you are tuning a sports car for optimal performance and there's a warning light in the dashboard. Yes, it is possible that the warning is "normal" and will not impact performance, but unless you have direct evidence that this is so, you should go under the assumption that such warnings and errors are signs of potential performance problems. You should resolve any warnings that the designers of the car thought worthy of highlighting. Such warnings may have indirect or subtle performance impacts that may not be easy to theoretically understand. At minimum, the system is spending resources tracking and reacting to these warning conditions. In the case of exceptions, these include stack traces which may cost a significant amount to create, even if an exception is caught and suppressed.
Continue to monitor for warnings and errors during performance runs, particularly hung thread warnings (WSVR0605W) and CPU starvation warnings (HMGR0152W).
If you don't know the host names and ports of the various nodes and servers but you have access to the configuration, consult the file WAS/profiles/{PROFILE}/config/cells/CELL/nodes/{NODE}/serverindex.xml and search for the relevant virtual hosts such as WC_adminhost_secure and WC_defaulthost. The administrative server is normally at https://DMGRHOST:{DMGRADMINHOST_SECUREPORT}/admin
Review the WAS FDA/config/appserver/server.xml and FDA/config/appserver/node.resources.xml files in the latest SPECj results submitted by IBM (click Full Disclosure Archive): http://www.spec.org/jEnterprise2010/results/res2013q2/jEnterprise2010-20130402-00042.html
Key administrative concepts:
- An installation of WAS Network Deployment has a set of 0 or more profiles which represent nodes. These nodes share the same runtime binaries. An installation is either 32-bit or 64-bit
- A profile/node is a set of 0 or more managed servers (most commonly, application servers). The node has a process called the node agent which manages the configuration of the servers, and may also orchestrate their runtime behavior (starting and stopping them, restarting failed application servers, etc.).
- A special type of profile/node is the deployment manager profile (dmgr). This profile represents a cell, which is a set of 1 or more nodes, including the deployment manager node/server itself. The deployment manager holds the primary configuration data for the whole cell and the deployment manager runs the Administrative Console application which is used to administer the whole cell.
- To participate in a cell, a node must be federated with the deployment manager profile using tooling or the "addNode" command from the newly created profile's bin directory.
- Usually, WAS will be installed on one physical/virtual machine with a single deployment manager profile/node, and then a set of 1 or more other physical/virtual machines will install WAS with a single profile/node (representing that machine) federated into the deployment manager.
- When a configuration change is made in the deployment manager, nodes must be synchronized with the deployment manager to get the updated changes. By default, this happens automatically every 1 minute (see the node agent's file synchronization service settings). Nodes can also be manually synchronized while saving the changes into the DMGR (click Review, and then check the box to synchronize the nodes), or through the Nodes collection under System Administration. For example, if you have 10 machines, with 5 application servers each, you install an application into the deployment manager, then when the nodes are synchronized, the application will be distributed to all the nodes and then it can be started across all of those servers.
Performance Tuning Templates
WAS ships with a set of tuning templates including a production tuning template for a typical production environment. The script is found in ${WAS}/bin/applyPerfTuningTemplate.py and the production template is found in ${WAS}/scriptLibraries/perfTuning/V70/peak.props.
The production tuning template applies the following changes (https://www.ibm.com/support/knowledgecenter/en/SSAW57_9.0.5/com.ibm.websphere.nd.multiplatform.doc/ae/tprf_tuneappserv_script.html); however, we recommend re-enabling PMI after the script completes.
Note: Although the production tuning template is in a folder named V70, it applies to later versions of WAS.
Here is a Unix example of running the production tuning template on one application server. This assumes that the deployment manager and node agent are started.
$ cd ${WAS}/bin/
$ ./wsadmin.sh -lang jython -f applyPerfTuningTemplate.py -nodeName node1 -serverName server1 -templateFile ../scriptLibraries/perfTuning/V70/peak.propsGeneral Tuning
Check "Start components as needed" to potentially improve startup time by not starting components of the application server that are not used (https://www.ibm.com/support/knowledgecenter/SSAW57_8.5.5/com.ibm.websphere.nd.doc/ae/urun_rappsvr.html).
Tune the XML parser definitions by updating the jaxp.properties and xerces.properties files in the ${app_server_root}/jre/lib and adding:
javax.xml.parsers.SAXParserFactory=org.apache.xerces.jaxp.SAXParserFactoryImpl
javax.xml.parsers.DocumentBuildFactory=org.apache.xerces.jaxp.DocumentBuilderFactoryImpl
org.apache.xerces.xni.parser.XMLParserConfiguration=org.apache.xerces.parsers.XIncludeAwareParserConfiguration
Shared Libraries
Use shared libraries where possible to reduce memory usage.
Change Java Software Development Kit (SDK)
In recent versions of WAS, use the managesdk command to change the Java Software Development Kit: http://www-01.ibm.com/support/knowledgecenter/SSAW57_8.5.5/com.ibm.websphere.nd.multiplatform.doc/ae/rxml_managesdk.html?lang=en
Example: List available SDKs:
$ ./managesdk.sh -listAvailable
CWSDK1003I: Available SDKs :
CWSDK1005I: SDK name: 1.7_64
CWSDK1005I: SDK name: 1.6_64Example: Change SDK for all profiles:
$ ./managesdk.sh -enableProfileAll -sdkName 1.7_64
CWSDK1017I: Profile AppSrv01 now enabled to use SDK 1.7_64.Idle CPU
See Idle WebSphere Tuning Considerations
Education
- Self-paced WebSphere Application Server Troubleshooting and Performance Lab
- Top 10 Performance and Troubleshooting tips for WebSphere Application Server traditional and Liberty
Sub-Chapters
- Scaling and Large Topologies
- Performance Monitoring
- Logging and Tracing
- Thread Pools
- Java Database Connectivity (JDBC)
- HTTP
- Startup
- Database Persistence
- Dynamic Cache
- EJBs
- Messaging
- Web Services
- Asynchronous Beans
- Intelligent Management
- Security
- Administration
- Session Initiation Protocol (SIP)
- WAS traditional on zOS
Scaling and Large Topologies
Scaling and Large Topologies Recipe
- Use clusters to scale horizontally and vertically, and to support failover and easier administration. If using WAS >= 8.5, consider using dynamic clusters.
- If using the High Availability Manager (HAM) or any functions that
require it (e.g. EJB WLM, SIB, etc.):
- In general, the number of processes in a single core group should not exceed 100-200. Practically, this number is limited by the CPU usage, heartbeat intervals, and number of available sockets. Review the potential scaling impacts and alternatives.
- Processes communicating using HAM must be in the same core group or part of bridged core groups.
- The members of a core group should be on the same LAN.
- The members of a cell should not communicate with one another across firewalls as that provides no meaningful additional security and complicates administration.
- Create dedicated preferred coordinators for large core groups with a
large default maximum heap size (e.g.
-Xmx2g). - If using core group bridges, create dedicated bridge servers with a
large default maximum heap size (e.g.
-Xmx2g). - Start or stop groups of processes at the same time to reduce the effects of view changes.
- Change the HAM protocols to the latest versions:
IBM_CS_WIRE_FORMAT_VERSIONandIBM_CS_HAM_PROTOCOL_VERSION
- If you have many processes and applications are not using any function that requires the High Availability Manager, it is generally not recommended to disable HAM, but instead to create multiple cells or bridged core groups.
- Very large topologies may employ multiple cells for the same application(s). This allows for deployment of new application versions or configurations to only one of the cells; if the change breaks, it affects only that cell. However, multiple such cells can be problematic if significant database schema changes are made.
Clusters
Clusters are the core component of application high availability:
Clusters are sets of servers that are managed together and participate in workload management. Clusters enable enterprise applications to scale beyond the amount of throughput capable of being achieved with a single application server. Clusters also enable enterprise applications to be highly available because requests are automatically routed to the running servers in the event of a failure. The servers that are members of a cluster can be on different host machines.... A cell can include no clusters, one cluster, or multiple clusters.
Servers that belong to a cluster are members of that cluster set and must all have identical application components deployed on them. Other than the applications configured to run on them, cluster members do not have to share any other configuration data. One cluster member might be running on a huge multi-processor enterprise server system, while another member of that same cluster might be running on a smaller system.
A vertical cluster has cluster members on the same node, or physical machine. A horizontal cluster has cluster members on multiple nodes across many machines in a cell. You can configure either type of cluster, or have a combination of vertical and horizontal clusters.
Dynamic Clusters
WAS 8.5 and above includes Intelligent Management which provides dynamic clusters. Dynamic clusters provide the same functionality of traditional clusters and more.
Large Topologies, High Availability Manager
The latest guidance on core group size is:
- Core groups of up to 100 members should work without issue.
- Core groups containing more than 100 members should work without issue in many topologies. Exceeding a core group of 200 members is not recommended.
If the size of your core group is too large, consider core group bridging.
It's a best practice to use the newer High Availability Manager (HAManager) protocols, particularly with large topologies:
IBM_CS_WIRE_FORMAT_VERSION=6.1.0IBM_CS_HAM_PROTOCOL_VERSION=6.0.2.31
Other considerations:
- Set a preferred
coordinator:
Remember that coordinator election occurs whenever the view changes. Electing a new coordinator uses a lot of resources because this process causes increased network traffic and CPU consumption. Specifying a preferred coordinator server, whenever practical, helps eliminate the need to make frequent coordinator changes... Preferred coordinator servers should be core group processes that are cycled as infrequently as possible. The preferred coordinator servers should also be hosted on machines with excess capacity.
- Don't
use a deployment manager as a core group coordinator:
Even though it is possible to use a deployment manager as a core group coordinator, it is recommended that you use an application server that is not a deployment manager.
- Consider tuning some of the HA intervals.
In general, for small core groups, HA/DCS issues are usually symptoms of other issues like CPU exhaustion, network instability, etc.
Core Group Bridges
Core group bridges allow communication across core groups:
- Core group bridges be configured in their own dedicated server process, and that these processes have their monitoring policy set for automatic restart.
- For each of your core groups, you set the
IBM_CS_WIRE_FORMAT_VERSIONcore group custom property to the highest value that is supported on your environment. - To conserve resources, do not create more than two core group bridge interfaces when you define a core group access point. You can use one interface for workload purposes and another interface for high availability. Ensure that these interfaces are on different nodes for high availability purposes. For more information, see the frequently asked question information on core group bridges.
- You should typically specify ONLY two bridge interfaces per core group. Having at least two bridge interfaces is necessary for high availability. Having more than two bridge interfaces adds unnecessary overhead in memory and CPU.
Large Topology Theory
The Best Practices for Large WebSphere Application Server Topologies whitepaper provides in-depth study of large WAS topologies. Useful excerpts:
The WebSphere Application Server Network Deployment product is tuned for small to modest-sized cells in its default configuration. By understanding how the application server components are designed and behave, it is possible to tune the product so that large topologies, which contain hundreds of application servers, can be created and supported.
The primary thing that limits the size of the cell is the need to support shared information across all or a large set of application server processes. The breadth and currency requirements for shared information, which is something that must be known by all or many application server instances within the cell, present a challenge for any distributed computing system.
An instance of the High Availability Manager (HAManager) runs inside every process in a Network Deployment cell, including the deployment manager, node agents, application servers and proxy servers. The HAManager provides a set of frameworks and facilities that other WebSphere services and components use to make themselves highly available.
The HAManager relies on core groups. A core group is a collection of firmly coupled processes which collaborate to form a distributed group communication service. It is a requirement that all members of a core group must be in the same cell.
As the size of a cell increases, it may be necessary to partition the cell into multiple core groups, because core groups do not scale to the same degree as other cell constructs. When a cell has been partitioned, it is often necessary to share routing information between core groups. For example, a web application located in core group 1 may call an enterprise bean application located in core group 2. There are also cases where it is necessary to share routing information across cells. A Core Group Bridge provides this capability to extend the HAManager bulletin board beyond core group boundaries. Core groups that are connected with a core group bridge can share routing data.
While there are no WebSphere-defined limits on the size of a core group, there are practical limits. The practical limits are primarily driven by available resources and stability. The amount of resource used by the HAManager and core groups depends on a number of factors, including the core group size, core group configuration settings, the amount of routing data required to support the deployed applications, and quality of service settings.
All members of a core group must be located on machines that are connected by a high speed local area network (LAN). Do not locate members of the same core group on machines that are connected by a wide-area network (WAN). Do not place members of a cell across a firewall, as a firewall provides no meaningful security between members of WebSphere processes.
For active heart-beating, the default configuration settings provide a 30 second heartbeat interval and a 180 second heartbeat timeout, meaning that failovers initiated by the active failure detection mechanism take longer than failovers initiated by socket closing events. This default setting represents a compromise between failover time and background CPU usage. If faster failover is required, then the configured heartbeat timeout can be lowered, at the cost of additional background CPU usage.
The amount of background CPU used by the HAManager for heart-beating and failure detection is affected by the heartbeat interval and core group size. Starting with a core group of 100 members as a baseline using the default heartbeat interval of 30 seconds, approximately 20% of the background CPU used by a WebSphere product application server at idle is spent on heartbeat processing.
Observing a high background CPU at idle can be indicative of the core group (or groups) approaching the practical limit for your infrastructure and deployment. If you encounter high idle CPU, you should explore decreasing the number of members in existing core groups by moving processes to a new bridged core group to reduce the background CPU.
It is a best practice to configure one or more preferred coordinator processes for each core group. This limits the movement of the coordinator and number of state rebuilds. Ideally, assign processes that do not host applications and are located on machines with spare capacity as preferred coordinators.
In a topology that contains core group bridges, it is a best practice to create stand-alone application server processes that do not host applications to function as both bridge interfaces and preferred coordinators.
The limits on the size of a core group are practical, not programmatic. The most important considerations in determining core group sizes are resource usage and stability.
The HAManager uses CPU, memory, and network resources. Generally speaking, memory is not a major factor in determining core group size. The amount of long-term heap memory required for routing data is determined by the topology and applications installed, not by the core group size. Splitting a cell into multiple core groups does not reduce the memory required for the routing data. Therefore, the size of the core group is determined almost exclusively based on the CPU required to establish and maintain the group communication service.
The HAManager uses CPU to establish network connections and group communication protocols between running members of the core group. As processes are started, connections are opened to other core group members and the group membership and communication protocols are updated to include the newly started members in the group, or "View". This change is often referred to as a "View Change." As processes are stopped, connections are closed and the group membership and communication protocols are updated to exclude the stopped members.
Therefore, starting or stopping a process causes the HAManager to use CPU to open or close connections and update the group communication service. This means that starting or stopping one process causes some CPU usage by all other running core group members. As the size of the core group grows, the number of connections and size of the group membership will grow, meaning that more CPU will be used for large core groups than for small ones. There is also some short-term usage of heap memory to send the network messages required to update the group communication service.
In general, it is more efficient to start or stop groups of processes at the same time, allowing the HAManager to efficiently consolidate multiple group membership and communication protocol changes within a single view change.
An additional factor to consider is the number of sockets that are consumed to create the connections between core group members. The members of a core group form a fully connected network mesh, meaning every member connects directly to every other member. The total number of sockets used to connect all members of a core group approaches n2, where n is the number of core group members. Suppose for example that you tried to create a core group of 200 members on a single machine. The number of sockets required would be 200 x 199 or 39,800 sockets. The same 200 members split into 4 core groups of 50 members each would require 4 x 50 x 49 or 9800 sockets.
Core groups containing more than 100 members should work without issue in many topologies. Exceeding a core group size of 200 members is not recommended.
Important: Disabling the HAManager might cause some critical functions to fail.
For the reasons outlined previously, rather than disabling HAManager, either create multiple cells or partition the cell into multiple core groups and create bridges. Even if you do not currently use a component that requires HAManger, you may require one at a later time.
IBM_CS_DATASTACK_MEG
In recent versions of WAS, the default values of IBM_CS_DATASTACK_MEG
and the transport
buffer size are usually sufficient. Setting the two memory sizes
does not increase the amount of static heap allocated by the HAManager.
These settings affect flow control (how many messages are allowed to
pass through the HAManager at any one point in time before we stop
sending messages). Larger settings allow more efficient communications.
We have seen situations (on large topologies) where having the memory
sizes set too small will lead to problems. Generally, the messages have
already been allocated by the time they reach the congestion checker so
this doesn't give much relief on heap usage although may help with some
stability issues.
WAS Performance Monitoring
WAS provides two broad capabilities for performance monitoring: the Performance Monitoring Infrastructure (PMI), and Application Response Measurement (ARM). PMI is a statistical sampler inside WAS that periodically gathers averaged or instantaneous data on various components such as HTTP response times, thread pools, database connection pools, messaging, etc. Application Response Measurement, also called Request Metrics, traces and times individual requests as they execute through various components. This difference in approaches was covered previously in the Java Profilers chapter. To recap, statistical samplers (e.g. PMI) are very lightweight and help resolve the majority of issues; however, they will not capture data on particular requests. Whereas, tracing profilers (e.g. ARM) are much heavier weight and more complex to analyze. PMI exposes its data through JMX and ARM exposes its data either through log files or a Java agent API.
Performance Monitoring Infrastructure (PMI)
What is PMI?
The Performance Monitoring Infrastructure (PMI) uses a client-server architecture. The server collects performance data from various WebSphere Application Server components. A client retrieves performance data from one or more servers and processes the data. This data consists of counters such as servlet response time and database connection pool usage.
PMI supports five sets of counters: None, Basic, Extended, All, and Custom. The Basic set is enabled by default and has an overhead of approximately 2%, whether or not it is actively being logged or queried:
"Basic overhead ~= 2%
Extended overhead ~= 3%
Custom ~= 2% - 6%"
In general, it is recommended to run with PMI enabled, even in production. Running without PMI is equivalent to flying a plane without instruments. However, for the purposes of a benchmark, after you've "completed" your tuning, for the final run you may consider reducing or disabling PMI. Disabling PMI completely may cause a small throughput improvement (in one benchmark, about 2%).
Various Dimensions of Monitoring
It is useful to conceptualize different PMI statistics into groups. The first dimension is the "end user view" or a black box view of your application. This gives you a view as to how the application is performing and what are the response times taken to serve the requests. For example, for HTTP requests, the PMI counters are Web Applications/ServiceTime.
The second dimension is the "resources utilization view" of the system involved in the user activity. This will tell you the basic health of your system, including CPU, memory consumption, JVM health, as well as the health of various resources available such as HTTP sessions, connection pools, thread pools, etc. This dimension corresponds to the "what resource is constrained" portion of the problem diagnosis. For example, for HTTP requests, the PMI counters are Thread Pools/ActiveCount and JDBC Connection Pools/FreePoolSize, as well as JVM Runtime/ProcessCPUUsage and JVM Runtime/UsedMemory.
The third dimension is the "application view." Application code typically runs as a servlet or entreprise java bean to access various back-ends such as databases, web services, etc. For example, for HTTP requests, the PMI counters are Enterprise Beans/MethodResponseTime.
The data points are then retrieved using a web client, Java client or JMX client. WebSphere Application Server provides the built-in Tivoli Performance Viewer (TPV), which is embedded into WAS admin console.
HTTP Metrics Endpoint
Since WAS
9.0.5.7 and 8.5.5.20, PMI data may be made available through a
/metrics URL endpoint in Prometheus format by installing
$WAS/installableApps/metrics.ear into an application server
or the deployment manager. A sample Grafana
dashboard may be used to visualize the data. See an article
describing this in detail.
Tivoli Performance Viewer (TPV)
The Tivoli Performance Viewer (TPV) retrieves performance data by periodically polling the PMI service of the application server that is being monitored. TPV is not part of any external Tivoli tool. TPV is part of the WebSphere Application Server administrative console.
To minimize the performance impact, Tivoli Performance Viewer polls the server with the PMI data at an interval set by the user. All data manipulations are done in the Tivoli Performance Viewer. The Tivoli Performance Viewer's GUI provides controls that enable you to choose the particular resources and counters to include in the view and whether to visualize in chart or table form.
In a Network Deployment environment, the node agent maintains each monitored server's per-user buffer. When the TPV monitor is enabled in the administrative console, the deployment manager polls the node agents for data to display. Therefore, it's important to monitor the performance of the deployment manager and node agents themselves when using PMI and/or TPV, particularly verbose garbage collection. There will be some additional overhead when enabling TPV, but mostly in the node agents and particularly in the deployment manager.
In the administrative console, select Monitoring and Tuning > Performance Viewer > Current activity, the check the box next to "server1" and click "Start Monitoring." After that operation comples, click the link on an application server:

Expand "Performance Modules" and, for example, check "JDBC Connection Pools," "Servlet Session Manager," and "Web Applications," expand "Thread Pools," and check "WebContainer," and click "View Modules."


In the table under the graph, check the boxes next to the line plots that should be drawn in the graph. For example, you may want to check the JDBC "UseTime" and "WaitTime" to review database response times and times to acquire a database conection, respectively. By default, the graph updates every 30 seconds.The "Value" and "Scale Value" columns display the last value of the counter (the Scale Value is used for the graph). In the following example, the average JDBC use time of a connection is 18.5 milliseconds, the average reseponse time of all servlets is 1.85 milliseconds, and the average concurrently active threads in all WAS thread pool is 8.


The modules may be further broken down in detail. For example, you may check each servlet under Web Applications, click View Modules, and review the average response time per servlet:

For more details, please visit the following URLs.
- https://www.ibm.com/support/knowledgecenter/SSAW57_8.5.5/com.ibm.websphere.nd.doc/ae/tprf_tpvmonitor.html
- https://www.ibm.com/support/knowledgecenter/SSAW57_8.5.5/com.ibm.websphere.nd.doc/ae/tprf_tpvcurrentactivity.html
What metrics should you gather?
Summary of all metrics: https://www.ibm.com/support/knowledgecenter/SSAW57_9.0.5/com.ibm.websphere.nd.multiplatform.doc/ae/rprf_dataorg.html
PMI Basic includes the following counters. The most commonly useful are highlighted in bold:
- Enterprise Beans.CreateCount
- Enterprise Beans.RemoveCount
- Enterprise Beans.ReadyCount
- Enterprise Beans.MethodCallCount: The number of calls to the business methods of the bean.
- Enterprise Beans.MethodResponseTime: The average response time in milliseconds on the business methods of the bean.
- Enterprise Beans.PooledCount
- Enterprise Beans.MessageCount: MDB: The number of messages delivered to the onMessage method of the bean.
- Enterprise Beans.PassiveCount
- Enterprise Beans.MethodReadyCount
- Enterprise Beans.ReadLockTime
- Enterprise Beans.WriteLockTime
- Enterprise Beans.LockCancelCount
- Enterprise Beans.AsyncWaitTime
- Enterprise Beans.AsyncQSize
- Enterprise Beans.AsyncCancelCount
- Enterprise Beans.AsyncFNFFailCount
- Enterprise Beans.AsyncFutureObjectCount
- Enterprise Beans.Discards
- JDBC Connection Pools.CreateCount
- JDBC Connection Pools.CloseCount
- JDBC Connection Pools.PoolSize
- JDBC Connection Pools.FreePoolSize: The number of free connections in the pool.
- JDBC Connection Pools.WaitingThreadCount
- JDBC Connection Pools.PercentUsed
- JDBC Connection Pools.UseTime: The average time a connection is used... Difference between the time at which the connection is allocated and returned. This value includes the JDBC operation time.
- JDBC Connection Pools.WaitTime: The average waiting time in milliseconds until a connection is granted.
- JVM Runtime.HeapSize
- JVM Runtime.UsedMemory: The used memory in the JVM run time.
- JVM Runtime.UpTime
- JVM Runtime.ProcessCpuUsage: The CPU Usage (in percent) of the Java virtual machine.
- JCA Connection Pools.CreateCount
- JCA Connection Pools.CloseCount
- JCA Connection Pools.PoolSize
- JCA Connection Pools.FreePoolSize: The number of free connections in the pool.
- JCA Connection Pools.WaitingThreadCount
- JCA Connection Pools.UseTime: Average time in milliseconds that connections are in use.
- JCA Connection Pools.WaitTime: The average waiting time in milliseconds until a connection is granted.
- Servlet Session Manager.LiveCount: The number of local sessions that are currently cached in memory from the time at which this metric is enabled.
- System Data.CPUUsageSinceLastMeasurement: The average system CPU utilization taken over the time interval since the last reading... On SMP machines, the value returned is the utilization averaged over all CPUs.
- Thread Pools.ActiveCount: The number of concurrently active threads. Note: The ActiveCount value can include a count for a long-running thread that is used for asynchronous I/O. Under these circumstances, it is possible that even when there is no apparent activity on the thread pool, the ActiveCount value will never reach zero.
- Thread Pools.PoolSize
- Transaction Manager.ActiveCount
- Transaction Manager.CommittedCount
- Transaction Manager.RolledbackCount: The total number of global transactions rolled back.
- Web Applications.RequestCount: The total number of requests that a servlet processed.
- Web Applications.ServiceTime: The response time, in milliseconds, of a servlet request.
Warning: If you are using a generational garbage collection policy such as the IBM gencon or balanced policies (gencon is the new default starting in WAS version 8), or most of the Oracle policies, then be aware that the JVM Runtime.UsedMemory statistic may be deceiving because it is sampling based on time rather than global collections, so samples may report high memory utilization that may consist of a lot of trash that will be cleaned up at the next global collection. Use verbose garbage collection instead.
We do not cover the PMI Extended set because we recommend that if you do plan on doing complex PMI analysis, that you should use the Custom set instead.
In general, we recommend the PMI Custom set with all of the applicable highlighted counters above as well as the following counters (where applicable):
- Dynamic Caching.HitsInMemoryCount: The number of requests for cacheable objects that are served from memory. For servlet instance, locate it under template group. For object instance, locate it under object group.
- Dynamic Caching.MissCount: The number of requests for cacheable objects that were not found in the cache. For servlet instance, locate it under template group. For object instance, locate it under object group.
- JDBC Connection Pools.JDBCTime: The amount of time in milliseconds spent running in the JDBC driver which includes time spent in the JDBC driver, network, and database
- JDBC Connection Pools.PrepStmtCacheDiscardCount: The total number of statements discarded by the least recently used (LRU) algorithm of the statement cache
- Mediation.MediatedMessageCount: The number of messages that have been mediated at a mediated destination.
- Mediation.MediationTime: The amount of time in milliseconds taken to mediate a message at a mediated destination.
- MEStats.BufferedReadBytes: Number of bytes of data that have been received from the network and are held pending further processing. Large values might indicate that the application server is unable to process data fast enough to keep up with the other application server processes hosting messaging engines.
- MEStats.BufferedWriteBytes: Number of bytes of data being held pending transmission. Large values might indicate network congestion or application server processes hosting messaging engines that are unable to process data fast enough to keep up with the application server.
- QueueStats.AvailableMessageCount: The number of messages available for a queue for consumption. If this number is close to the destination high messages value then review the high messages value.
- QueueStats.LocalMessageWaitTime: The time spent by messages on this queue at consumption. If this time is not what was expected then view the message in the administrative console to decide what action needs to be taken.
- Servlet Session Manager.ExternalReadTime: The time (milliseconds) taken in reading the session data from the persistent store. For multirow sessions, the metrics are for the attribute; for single row sessions, the metrics are for the entire session. Applicable only for persistent sessions. When using a JMS persistent store, you can choose to serialize the replicated data. If you choose not to serialize the data, the counter is not available.
- Servlet Session Manager.ExternalWriteTime: The time (milliseconds) taken to write the session data from the persistent store. Applicable only for (serialized) persistent sessions. Similar to external Read Time.
- Servlet Session Manager.LifeTime: The average session life time in milliseconds (time invalidated - time created)
- Servlet Session Manager.NoRoomForNewSessionCount: Applies only to sessions in memory with AllowOverflow=false. The number of times that a request for a new session cannot be handled because it exceeds the maximum session count.
- Servlet Session Manager.SessionObjectSize: High impact - debugging only: The size in bytes of (the serializable attributes of ) in-memory sessions. Only session objects that contain at least one serializable attribute object is counted. A session can contain some attributes that are serializable and some that are not. The size in bytes is at a session level.
- Servlet Session Manager.TimeoutInvalidationCount: The number of sessions that are invalidated by timeout.
- Thread Pools.ConcurrentHungThreadCount: The number of concurrently hung threads
- Web Applications.AsyncContext Response Time: The response time (in milliseconds) for an AsyncContext associated with a servlet to complete.
- Web Applications.ErrorCount: Total number of errors in a servlet or JavaServer Page (JSP).
- Web services.ProcessedRequestCount: The number of requests the service successfully processed.
- Web services.ResponseTime: The average response time (in milliseconds) for a successful request
Java Heap Utilization
In general, instead of monitoring heap utilization (which has various issues such as generational false positive sawtooth sampling), if possible, we recommend monitoring the average proportion of time in garbage collection over a rolling window which can be calculated from the garbage collection pause times. In general, we recommend that the proportion of time in GC is less than 5-10%.
Configuring Custom PMI
In the WAS administrative console, navigate to Servers > Server Types > WebSphere Application Server > server1 > Performance Monitoring Infrastructure and click on "Custom." Click on the "Runtime" tab, and for example, expand "Servlet Session Manager," click on "DayTrader3#web.war," check "SessionObjectSize" and click "Enable."
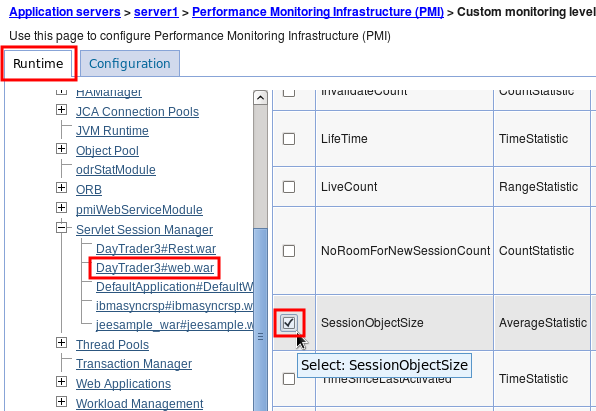
Logging TPV Data
TPV is a live view but for most system monitoring, problem analysis, or performance tuning, you will want to look at the data after the fact. TPV supports sending the data to log files and loading those files into any administrative console for playback. TPV logging is a bit cumbersome because the log must be restarted after every application server restart; however, this can be automated with wsadmin scripts.
Logging TPV data in a production environment may have a significant overhead. Consider using a monitoring product such as ITCAM before trying to use TPV logging in production.
Select Monitoring and Tuning > Performance Viewer > Current activity, click the link on "server1," and click the "Log" link under settings in TPV:

Set "Duration" to 300000000, "Maximum File Size" to 100, "Maximum Number of Historical Files" to 5, "Log Output Format" to "Binary," click "Apply," and then click "View Modules."

Click the "Start Logging" button:
Files will be writen to /opt/IBM/WebSphere/AppServer/profiles/AppSrv01/logs/tpv/, for example.
Later, when you want to view the logs, in the administrative console, select Monitoring and Tuning > Performance Viewer > View Logs, click "Browse," select /opt/IBM/WebSphere/AppServer/profiles/AppSrv01/logs/tpv/*.tpv, and click "View Log."

Check the performance modules as before, click View Modules, and use the backwards, stop, play, and forward buttons to review the collected data. By default, the log will be played back automatically.
Note: If there is a very short duration of data, you may not see all of the buttons above as all of the data can be displayed in one view.
Analyzing TPV XML Data on the Command Line
Example which finds all TPV XML files, extracts out the node and JVM name, and extracts the timestamp and WMQJCAResourceAdapter thread pool ActiveCount value:
find . -name "tpv*xml" | while read tpvfile; do grep -A 5 -e "<Snapshot" -e "<Stats.*WMQJCAResourceAdapter\"" ${tpvfile} | sed 's/.*time="\(..........\)\(...\)".*/\1/g' | grep -e "^[0-9]" -e "BRS id=\"3\"" | while read timestamp; do read threadpool; printf "$(TZ=CAT-2 date -d @${timestamp} +"%Y-%m-%d %H:%M:%S"),$(echo "${tpvfile}" | sed 's/.*\(node.\).*tpv_\(AppServer[^_]\+\)_.*/\1-\2/g'),$(echo "${threadpool}" | sed 's/.*cur="\([^"]\+\)".*/\1/g')\n"; done; done | sort | uniqThe "id" value to search for may be found here: https://www.ibm.com/support/knowledgecenter/en/SSAW57_9.0.5/com.ibm.websphere.javadoc.doc/web/apidocs/constant-values.html
For example, the above was found by searching for com.ibm.websphere.pmi.stat.WSThreadPoolStats and then noting that ActiveCount has the value 3.
PMI Details
In general, use ThreadPool.ActiveCount over ThreadPool.PoolSize, as the former is the average concurrently active threads in a thread pool, whereas the latter is simply the size of the thread pool. ActiveCount is an instantaneous measurement.
Runtime Performance Advisors (RPA)
Runtime Performance Advisors (RPAs) are pieces of code built into WAS that may be enabled to watch for certain performance issues and periodically report tuning recommendations. They are disabled by default:
Tuning WebSphere Application Server involves analyzing performance data and determining the optimal server configuration. This determination requires considerable knowledge about the various components in the application server and their performance characteristics. The performance advisors encapsulate this knowledge, analyze the performance data, and provide configuration recommendations to improve the application server performance. Therefore, the performance advisors provide a starting point to the application server tuning process and help you without requiring that you become an expert. (https://www.ibm.com/support/knowledgecenter/SSAW57_8.5.5/com.ibm.websphere.nd.doc/ae/tprf_tuningentrypoint.html)
Note: The PMI service must be enabled for RPAs. If an RPA is enabled and the needed PMI counters are not already enabled, then the configuration will be updated to enable those counters.
An RPA runs in one of two places (https://www.ibm.com/support/knowledgecenter/SSAW57_8.5.5/com.ibm.websphere.nd.doc/ae/cprf_choosingperfadvisor.html):
- In each application server JVM and provides warning level advice in SystemOut/Runtime Messages/JMX (Performance and Diagnostic Advisor). Advice provided on: WebContainer and ORB thread pools, connection pool size, persisted session sizes and times, prepared statement cache size, session cache size, and memory leak detection.
- In the node agent and provides advice in the administrative console Tivoli Performance Viewer (Tivoli Performance Viewer advisor). Advice provided on: WebContainer and ORB thread pools, connection pool size, persisted session sizes and times, prepared statement cache size, session cache size, dynamic cache size, and JVM heap size.
In general, JVM advisors are used to review advice after the fact, whereas TPV advisors are used when actively monitoring TPV data.
Warning: If you are using a generational garbage collection policy such as the IBM gencon or balanced policies (gencon is the new default starting in WAS version 8), or most of the Oracle policies, then be aware that the memory leak detection advice may report false positives. This is due to the fact that the advisor samples heap usage to minimize performance impact; however, the design of generational policies means that heap usage will show a leaking profile in between full garbage collections as the tenured regions fill up with garbage. Starting in WAS 8.5, instead of using the memory leak detection advice, you should use the excessive memory usage and excessive garbage collection health policies with usexdHeapModule=true. This has been resolved in APAR PI28801: http://www-01.ibm.com/support/docview.wss?uid=swg1PI28801
Application Response Measurement (ARM) / Request Metrics
Request metrics is a tool that enables you to track individual transactions, recording the processing time in each of the major WebSphere Application Server components... As a transaction flows through the system, request metrics includes additional information so that the log records from each component can be correlated, building up a complete picture of that transaction.
Because request metrics tracks individual transactions, using it imposes some performance implications on the system. However, this function can be mitigated by the use of the request filtering capabilities.
For example, tools can inject synthetic transactions. Request metrics can then track the response time within the WebSphere Application Server environment for those transactions. A synthetic transaction is one that is injected into the system by administrators to take a proactive approach to testing the performance of the system.
"Performance Monitoring Infrastructure (PMI) provides information about average system resource usage statistics, with no correlation between the data across different WebSphere Application Server components. For example, PMI provides information about average thread pool usage. Request metrics provides data about each individual transaction, correlating this information across the various WebSphere Application Server components to provide an end-to-end picture of the transaction" (https://www.ibm.com/support/knowledgecenter/SSAW57_8.5.5/com.ibm.websphere.nd.doc/ae/cprf_positioningrm.html).
Enabling Request Metrics: https://www.ibm.com/support/knowledgecenter/SSAW57_8.5.5/com.ibm.websphere.nd.doc/ae/tprf_rqenable.html and https://www.ibm.com/support/knowledgecenter/SSAW57_8.5.5/com.ibm.websphere.nd.doc/ae/uprf_rrequestmetrics.html and https://www.ibm.com/support/knowledgecenter/SSAW57_8.5.5/com.ibm.websphere.nd.doc/ae/uprf_settrace.html
Description of ARM data in SystemOut.log: https://www.ibm.com/support/knowledgecenter/SSAW57_8.5.5/com.ibm.websphere.nd.doc/ae/rprf_tracerecord.html
After ARM is enabled, to get data in the web server plugin, you must regenerate the configuration file: https://www.ibm.com/support/knowledgecenter/SSAW57_8.5.5/com.ibm.websphere.nd.doc/ae/tprf_webserver.html
Enabling Request Metrics
The overhead of "Standard Logs" may be in the tens of percent or more, mostly due to the additional volume of logging. Consider using HPEL if available to reduce this.
- WebSphere Administrative Console > Monitoring and Tuning > Request Metrics
- Ensure "Prepare Servers for Request metrics collection" is checked (by default, it is).
- Under "Components to be instrumented," either select "All" or select "Custom," and multi-select the components; for example, "Servlet," "Servlet Filter", and "WebServices"
- Under "Trace level," select "Performance_Debug," unless you also need to see Servlet Filters, in which case select "Debug"
- Under "Request Metrics Destination," check "Standard Logs"
- Click "OK," save and synchronize. If "Prepare Servers for Request metrics collection" was already checked (the default), then the application server(s) do not need to be restarted.
- The output will go to SystemOut.log and it may be significant.
Ensure that enough SystemOut historical files and sizes are configured:
http://www-01.ibm.com/support/knowledgecenter/SSAW57_8.5.5/com.ibm.websphere.nd.multiplatform.doc/ae/utrb_jvmlogs.html?cp=SSAW57_8.5.5%2F3-18-6-479&lang=en
- For example this will write up to 1GB:
File Size > Maximum Size = 250MB
Maximum Number of Historical Log Files = 4
- For example this will write up to 1GB:
Here is example output (the elapsed portion is in milliseconds):
[11/7/13 15:11:45:178 PST] 0000008a PmiRmArmWrapp I
PMRM0003I: parent:ver=1,ip=127.0.0.1,time=1383865303230,pid=3807,reqid=6,event=1 -
current:ver=1,ip=127.0.0.1,time=1383865303230,pid=3807,reqid=7,event=1
type=URI detail=/AppWithFilter/TestServlet elapsed=5001
[11/7/13 15:11:45:180 PST] 0000008a PmiRmArmWrapp I
PMRM0003I: parent:ver=1,ip=127.0.0.1,time=1383865303230,pid=3807,reqid=6,event=1 -
current:ver=1,ip=127.0.0.1,time=1383865303230,pid=3807,reqid=6,event=1
type=Servlet Filter detail=TestFilter elapsed=15003Note that request metrics is enabled at a cell level. Therefore, once the setting changes are saved and synchronized, all servers will immediately start logging request and this can impact performance on all of them. You can disable this on some servers by appending the diagnostic string com.ibm.ws.pmi.*=none before applying the setting changes.
Request Metrics Analyzer Next
The following GUI tool is a very nice way to explore request metrics logs: https://github.com/skliche/request-metrics-analyzer-next
Request Metrics Filters
Request Metrics has a dramatic performance overhead when tracking every request, but it has various filters that only print data for requests that match the filters. One technique to use this in production is to add a filter for a particular IP address. When a problem occurs, use this client computer to make requests and that way you will see how the various components are responding for just those requests.
- Click on "Filters"
- Click on "SOURCE_IP"
- Check "Enable"
- Click OK
- Click on "Filter Values"
- Click "New"
- Value=$IP_ADDRESS
- Check "Enable filter"
- Click OK
- Click "New"
- Click on "SOURCE_IP"
If you are not seeing something, first confirm all the above are checked (sometimes settings are lost because of not clicking OK on the proper screens). Next, confirm you're using the right IP address. You can turn on NCSA access logging in WAS to see what the IP address is of the incoming user (see below).
Sampling Profiler
Consider enabling a sampling profiler, even in production. This does have a cost but provides very rich troubleshooting data on what Java code used most of the CPU, what monitors were contended, and periodic thread information. Benchmarks for Health Center showed an overhead of <2%. Gauge the overhead in a performance test environment.
- IBM Java:
- Add the following to generic JVM arguments and restart:
-Xhealthcenter:level=headless - After each time the JVM gracefully stops, a
healthcenter*.hcdfile is produced in the current working directory (e.g.$WEBSPHERE/profiles/$PROFILE/).
- Add the following to generic JVM arguments and restart:
Logging and Tracing
The SystemOut.log is the main log file (e.g.
$WAS/profiles/$PROFILE/logs/$SERVER/SystemOut.log) and
contains WAS messages and System.out messages. The
SystemErr.log is also an important log file that contains
System.err messages (for example, from
Throwable.printStackTrace). The
native_stderr.log file is another important file as it
includes all native stderr messages such as JVM warnings and errors (in
general, search for JVM). The
native_stdout.log is a lesser used file and contains native
stdout messages.
Unless you are consuming JMX notifications for log events, disable
them to improve performance of logging and tracing by up to 50% using
the system property
-Dcom.ibm.ejs.ras.disablerasnotifications=true.
Starting in WAS 8, the IBM service log (activity.log) is disabled by default. Before WAS 8, it is recommended to disable the activity.log.
Trace Overhead
The overhead of WAS diagnostic trace is proportional to the breadth of the trace specification and the number of concurrent threads (e.g. requests) driving said tracers. The overhead is inversely proportional to the filesystem speed, available system capacity (e.g. CPU & caches), number of CPU core threads, and available physical memory. It's very difficult to estimate the overhead of a trace specification, even for those that are commonly used, because just one of these variables may have a significant effect. For example, the broad WAS security trace which enables all security tracers may have very different overhead depending on which security features are configured. Therefore, a customer should run a baseline performance test that's representative of production traffic in a test environment, and then run the same test with the desired trace enabled, and calculate the overhead.
In one DayTrader benchmark, the diagnostic trace ejbcontainer=fine,
which is a detailed trace of EJB activity, reduced throughput by 75%.
Starting with WAS 8, the optional High Performance Extensible Logging
(HPEL) diagnostic trace alternative (with TextLog disabled) reduced that
same benchmark overhead by 50%. With both WAS diagnostic trace systems,
if log statement JMX notifications are not needed,
-Dcom.ibm.ejs.ras.disablerasnotifications=true should also
be used.
Here are some ideas to improve the trace experience:
- On WAS >=8, switch to HPEL with the TextLog disabled (for convenience, the TextLog may be enabled for only a slightly penalty as it doesn't contain traces).
- Tune the speed of the filesystem where the trace is written.
- Consider using operating system RAMdisks to dedicate RAM to a virtual filesystem and write the traces to that mount.
- If possible, use the generic JVM argument -Dcom.ibm.ejs.ras.disablerasnotifications=true
- If the problem can be reproduced with a single user, isolate a production server from production traffic, enable all the full required traces, and use some mechanism to only allow one problematic user onto that server (e.g. direct IPs, ODR routing rules, etc.).
- Disable the IBM service log (activity.log). On WAS 8, and later versions, it is disabled by default.
- If trace is being written to a networked filesystem, write to a local filesystem instead (or RAMdisk).
- Ask IBM development for a reduced trace string or diagnostic patch with very specific trace points.
Controlling Trace Levels
The diagnostic trace level defaults to *=info. The level specification is a colon-delimited list of the form name=level and it may be changed dynamically at runtime: http://www-01.ibm.com/support/docview.wss?uid=swg21254706
Depending on the trace specification and application activity, the volume of trace written may be very high. It is often recommended to update the trace log rotation to something like File > Maximum Size = 250MB and Maximum Number of Historical Log Files = 4 (http://www-01.ibm.com/support/knowledgecenter/SSAW57_8.5.5/com.ibm.websphere.nd.multiplatform.doc/ae/utrb_traceservice.html?cp=SSAW57_8.5.5%2F3-18-6-295&lang=en).
Print the current trace level using
wsadmin -lang jython:
AdminControl.getAttribute(AdminControl.completeObjectName("type=TraceService,process=server1,*"), "traceSpecification")Dynamically update trace level using
wsadmin -lang jython:
AdminControl.setAttribute(AdminControl.completeObjectName("type=TraceService,process=server1,*"), "traceSpecification", "*=all")In WAS >= 7.0.0.37, 8.0.0.10, and 8.5.5.5, a new setTraceSpecification method has been added which returns the finally applied string (for verification or typos and optimizations):
AdminControl.invoke(AdminControl.completeObjectName("type=TraceService,process=server1,*"), "setTraceSpecification", "*=all:*=info")The diagnostic trace level may also be used to control java.util.logging.Logger (JUL) thresholds. Here is an example servlet with a JUL: https://raw.githubusercontent.com/kgibm/problemdetermination/master/scripts/java/SimpleWebServlet.java
If the WAS diagnostic trace level is set to *=info: com.ibm.simpleweb.SimpleWebServlet=all, then trace.log will show matching JUL statements:
[10/6/14 12:45:15:158 PDT] 0000009f SimpleWebServ > com.ibm.simpleweb.SimpleWebServlet service ENTRY
[10/6/14 12:45:15:159 PDT] 0000009f SimpleWebServ < com.ibm.simpleweb.SimpleWebServlet service RETURNHowever, you will receive the following warning when using such a specification in the administrative console. This warning may be disregarded.
The configured trace state included the following specifications that do not match any loggers currently registered in the server: ''com.ibm.simpleweb.SimpleWebServlet=all''
High Performance Extensible Logging (HPEL)
Consider using High
Performance Extensible Logging (HPEL). In benchmarks, HPEL reduced
the overhead of logs and trace by about 50%. In general, unless you are
listening to log notifications, also consider setting
-Dcom.ibm.ejs.ras.disablerasnotifications=true. If
possible, disable the HPEL text log to further improve performance. The
text log content is redundant and only for convenience; the same
information is stored in the binary repositories. Note that HPEL does
not use less disk space and in fact will use more disk space; the
performance improvements occur for other reasons.
logViewer
The logViewer tool is used to read binary HPEL logs. There are various options, including a -monitor [seconds] option to dynamically tail logs (http://www-01.ibm.com/support/knowledgecenter/SSAW57_8.5.5/com.ibm.websphere.nd.multiplatform.doc/ae/rtrb_logviewer.html?lang=en):
$ logViewer -monitorCross Component Trace (XCT)
XCT is available starting in WAS 8.5. XCT adds a unique request identifier to log and trace entries. XCT is similar to request metrics in many ways, but it is more deeply ingrained into the flow. XCT requires that High Performance Extensible Logging (HPEL) is enabled instead of classic logging, and you also have to enable XCT itself.
There are four XCT modes: Disabled, Enabled, Enabled+XCT Records, Enabled+XCT Records+Data Snapshots. The simple Enabled mode adds a unique request ID to every applicable log and trace record. You can dump this data using the HPEL logViewer with the "-format advanced" argument. For example, I've got an application that causes a transaction timeout. Traditionally, all you would get is a WTRN0124I message with the last thread stack and a WTRN0041I message noting the timeout. I enabled the minimal tracing of getting WAS response times and then ran logViewer -format advanced:
[7/10/12 9:11:45:121 PDT] 00000099 I UOW= source=com.ibm.websphere.XCT org=null prod=null component=null thread=[WebContainer : 2] requestID=[AABHT9d/5yd-AAAAAAAAAAB] BEGIN AABHT9d/5yd-AAAAAAAAAAB 00000000000-cccccccccc2 HTTPCF(InboundRequest /TransactionTest/Test RemoteAddress(0:0:0:0:0:0:0:1) RequestContext(2072483128))
[7/10/12 9:13:45:125 PDT] 0000007e I UOW= source=com.ibm.ws.tx.jta.TimeoutManager org=IBM prod=WebSphere component=Application Server thread=[Non-deferrable Alarm : 1] WTRN0124I: When the timeout occurred the thread with which the transaction is, or was most recently, associated was Thread[WebContainer : 2,5,main]. The stack trace of this thread when the timeout occurred was: ...
First Failure Data Capture (FFDC)
Since 7.0.0.19, after an FFDC exception is thrown, the algorithm is here: http://www-01.ibm.com/support/docview.wss?uid=swg1PM39875
"...for the FFDC summary file to be updated for a given incident...
1. When there have been more than 10 incidents and at least a minute has passed after the last time the summary table was updated.
2. It has been more than 5 minutes since the last time the summary table was updated."When this happens, the same file name is used - ${server}_exception.log - but the file is simply truncated and rewritten.
The _exception.log file is only rotated on JVM startup: http://www-01.ibm.com/support/docview.wss?uid=swg1PK86345
The FFDC1003I message is only printed the first time each "type" of an FFDC exception is thrown. After that, only the summary _exception.log file is updated. This can be configured differently but it would create a lot more FFDC log files.
Example _exception.log:
Index Count Time of first Occurrence Time of last Occurrence Exception SourceId ProbeId
------+------+---------------------------+---------------------------+---------------------------
0 4 10/20/14 10:54:32:479 PDT 10/20/14 11:05:32:584 PDT java.io.IOException com.ibm.ws.management.discovery.DiscoveryService.sendQuery 189 ...txt
1 4 10/20/14 11:23:16:003 PDT 10/20/14 11:23:27:173 PDT org.omg.CORBA.INV_OBJREF com.ibm.ws.giop.message.GIOPRequestMessage.populate 192 ...txtTransaction Log
The Transaction log directory can be set in the administrative console by navigating to Servers => Application Servers => server_name => Container Services => Transaction Service.
When an application that runs on the application server accesses more than one resource, the application server stores transaction information in the product directory so that it can coordinate and manage the distributed transaction correctly. When there is a higher transaction load, storing persistent information in this way can slow the performance of the application server because it depends on the operating system and the underlying storage systems. To achieve better performance, designate a new directory for the log files on a separate, physically larger, storage system.
The transaction log is most commonly stored either in a shared filesystem or in a database. In general, internal benchmarks show that using a database is approximately 10% slower, but the time spent processing the transaction log is usually a small proportion of the total transaction time, so this difference is often imperceptible.
Database Transaction Log
In terms of multi threading, the log is written to on multiple threads though there is serialization between the threads so that only one writes to the database at a time. The threads involved are simply the threads that the application is executing transactions on (so threads across multiple thread pools). In order for that to scale the basic idea is that one thread is capable of writing data on behalf of several other threads (i.e. it batches SQL statements) and the other threads wait on an intrinsic lock but once acquired they can return without needing to write to the database since their changes have been persisted already.
-Dcom.ibm.ws.recoverylog.custom.jdbc.ThrottleThreshold
is an integer value that defaults to 6 and is related to batching of
updates. It is a measure of how many threads are requesting that their
data is persisted to the logs. When the number is reached, then the log
service prioritises the forcing threads so they can return with a no-op
after the current thread writing their data has dropped the intrinsic
lock (to a rough approximation). In theory, in a very busy system with
very high levels of concurrency, increasing that value could help
throughput (fewer, bigger batches) and conversely if concurrency was
quite low then a smaller value may have some value in batching the SQL
more efficiently.
Networked Filesystem (NFS)
http://www-01.ibm.com/support/docview.wss?uid=swg21456699
CPU Starvation Detected Warning (HMGR0152W)
[9/23/14 14:17:05:923 CDT] 0000008f CoordinatorCo W HMGR0152W: CPU Starvation detected. Current thread scheduling delay is 7 seconds.
The HMGR0152W starvation detection warning works by looping, noting time X, calling java/lang/Thread.sleep(Y=IBM_CS_THREAD_SCHED_DETECT_PERIOD, default 30 seconds), noting time Z upon return, and then reporting Z-Y-X as the scheduling delay if it is over the threshold IBM_CS_THREAD_SCHED_DETECT_ERROR (default 5 seconds).
For example, by default, a report of a 7 second scheduling delay means that a thread called Thread.sleep(30), but returned 37 seconds later, 2 seconds more than the threshold.
If this message appears frequently, or if this message occurs at about the same time as significant performance slowdowns or timeouts, you may want to investigate further. This message will disappear when the thread scheduling delay has been corrected. Perform resource analysis to determine the proper course of action. Common items to review:
- The most common cause of this is a long, stop-the-world garbage collection cycle, because Java threads, including the timer that prints this warning, cannot be dispatched during this cycle. Review verbose:gc or a monitoring tool for garbage collections immediately preceding this warning that take longer than IBM_CS_THREAD_SCHED_DETECT_ERROR.
- Review operating system statistics immediately preceding the warning such as high processor utilization, processor run queues greater than available processors, low memory and paging activity, virtualization steal times, etc. Operating system statistics are often gathered at intervals such as 60 or 300 seconds. If this interval is greater than IBM_CS_THREAD_SCHED_DETECT_ERROR, then the relevant symptoms may be averaged out of the operating system numbers. In this case, reduce the operating system statistics gathering interval to less than or equal to the IBM_CS_THREAD_SCHED_DETECT_ERROR.
http://www-01.ibm.com/support/docview.wss?uid=swg21236327
Thread Pools
Thread pools and their corresponding threads control all execution of the application. The more threads you have, the more requests you can be servicing at once. However, the more threads you have the more they are competing for shared resources such as CPUs and Java heap and the slower the overall response time may become as these shared resources are contended or exhausted. If you are not reaching a target CPU percentage usage, you can increase the pool sizes, but this will probably require more memory and should be sized properly. If there is a bottleneck other than the CPUs, then CPU usage will stop increasing. You can think of thread pools as queuing mechanisms to throttle how many concurrent requests you will have running at any one time in your application.
The most commonly used (and tuned) thread pools within the application server are:
- HTTP: WebContainer
- JMS (SIB): SIBJMSRAThreadPool
- JMS (MQ Activation Specifications): WMQJCAResourceAdapter
- JMS (MQ Listener Ports): MessageListenerThreadPool
- EJB: ORB.thread.pool
- z/OS: WebSphere WLM Dispatch Thread
Sizing Thread Pools
Understand which thread pools your application uses and size all of them appropriately based on utilization you see in tuning exercises through thread dumps or PMI/TPV.
If the application server ends up being stalled 1/2 of the time it is working on an individual request (likely due to waiting for a database query to start returning data), then you want to run with 2X the number of threads than cores being pinned. Similarly if it's 25%, then 4X, etc.
Use TPV or the IBM Thread and Monitor Dump Analyzer to analyze thread pools.
Thread pools need to be sized with the total number of hardware processor cores in mind.
- If sharing a hardware system with other WAS instances, thread pools have to be tuned with that in mind.
- You need to more than likely cut back on the number of threads active in the system to ensure good performance for all applications due to context switching at OS layer for each thread in the system
- Sizing or restricting the max number of threads an application can have, will help prevent rouge applications from impacting others.
The ActiveCount statistic on a thread pool in WebSphere is defined as "the number of concurrently active threads" managed by that thread pool. This metric is particularly useful on the WebContainer thread pool because it gives an indication of the number of HTTP requests processed concurrently.
Note: The concurrent thread pool usage (PMI ActiveCount) may not necessarily be the concurrently "active" users hitting the application server. This is not due just to human think times and keepalive between requests, but also because of asynchronous I/O where active connections may not be actively using a thread until I/O activity completes (non-blocking I/O). Therefore, it is incorrect to extrapolate incoming concurrent activity from snapshots of thread pool usage.
If this metric approaches its maximum (which is determined by the maximum pool size), then you know that either the pool is simply too small or that there is a bottleneck that blocks the processing of some of the requests.
One rule of thumb is to use 5 threads per server CPU core for the default thread pool, and 10 threads per server CPU for the ORB and Web container thread pools. For a machine with up to 4 CPUs, the default settings are usually a good start for most applications. If the machine has multiple application server instances, then these sizes should be reduced accordingly. Conversely, there could be situations where the thread pool size might need to be increased to account for slow I/O or long running back-end connections.

Recent versions of WAS report when a thread pool has reached 80% or 100% of maximum capacity. Whether or not this is sustained or just a blip needs to be determined with diagnostics or PMI.
WSVR0652W: The size of thread pool "WebContainer" has reached 100 percent of its maximum.Hung Thread Detection
WAS hung thread detection may be more accurately called WAS long response time detection (which defaults to watching requests taking more than 10-13 minutes) and the "may be hung" warning may be more accurately read as "has been executing for more than the configured threshold." The thread may or may not be actually hung at the time of the detection.
WSVR0605W is the warning printed when WAS detects that a unit of work is taking longer than the WAS hung thread detection threshold. Hang detection only monitors most WAS managed threads, such as the WebContainer thread pool. Any native threads, or threads spawned by an application are not monitored. The warning includes the stack of the thread at the moment the warning is printed which often points to the delay:
[11/16/09 12:41:03:296 PST] 00000020 ThreadMonitor W WSVR0605W: Thread "WebContainer : 0" (00000021) has been active for 655546 milliseconds and may be hung.
There is/are 1 thread(s) in total in the server that may be hung.
at java.lang.Thread.sleep(Native Method)
at java.lang.Thread.sleep(Thread.java:851)
at com.ibm.Sleep.doSleep(Sleep.java:55)
at com.ibm.Sleep.service(Sleep.java:35)
at javax.servlet.http.HttpServlet.service(HttpServlet.java:831)...WAS will check threads every
com.ibm.websphere.threadmonitor.interval seconds (default
180) and any threads dispatched more than
com.ibm.websphere.threadmonitor.threshold seconds (default
600) will be dumped. Therefore, any thread dispatched between
com.ibm.websphere.threadmonitor.threshold seconds and
com.ibm.websphere.threadmonitor.threshold +
com.ibm.websphere.threadmonitor.interval seconds will be
marked.
Hung thread detection includes the option of exponential backoff so
that logs are not flooded with WSVR0605W warnings. Every
com.ibm.websphere.threadmonitor.false.alarm.threshold
number of warnings (default 100), the threshold is increased by
1.5X.
The amount of time the thread has been active is approximate and is based on each container's ability to accurately reflect a thread's waiting or running state; however, in general, it is the amount of milliseconds that a thread has been dispatched and doing "work" (i.e. started or reset to "non waiting" by a container) within a WAS managed thread pool.
To configure hung thread detection, change the following properties and restart: $SERVER } Server Infrastructure } Administration } Custom Properties:
com.ibm.websphere.threadmonitor.interval: The frequency (in seconds) at which managed threads in the selected application server will be interrogated. Default: 180 seconds (three minutes).com.ibm.websphere.threadmonitor.threshold: The length of time (in seconds) in which a thread can be active before it is considered hung. Any thread that is detected as active for longer than this length of time is reported as hung. Default: The default value is 600 seconds (ten minutes).
Hung Thread Detection Overhead
The hung thread detection algorithm is very simple: it's basically a
loop that iterates over every thread and compares the dispatch time (a
long) to the current time (a long) and checks
if the difference is greater than the threshold. Therefore, in general,
it is possible to set the threshold and interval very low to capture
"long" responses of a very short duration. For example, some customers
run the following in production:
- $SERVER } Server Infrastructure } Administration } Custom Properties
- com.ibm.websphere.threadmonitor.interval = 1
- com.ibm.websphere.threadmonitor.threshold = 5
- Restart
OS Core Dumps on Hung Thread Warnings with J9
For OpenJ9 and IBM Java, you can also produce core dumps on a hung
thread warning using -Xtrace:trigger:
-Xtrace:trigger=method{com/ibm/ws/runtime/component/ThreadMonitorImpl.threadIsHung,sysdump,,,1}In this example, the maximum number of system dumps to produce for this trigger is 1. Enabling certain -Xtrace options on IBM Java <= 7.1 may affect the performance of the entire JVM (see the -Xtrace section).
Thread Pool Statistics
Starting with WAS 7.0.0.31, 8.0.0.8, and 8.5.5.2, thread pool statistics may be written periodically to SystemOut.log or trace.log. This information may be written to SystemOut.log by enabling the diagnostic trace Runtime.ThreadMonitorHeartbeat=detail or to trace.log by enabling the diagnostic trace Runtime.ThreadMonitorHeartbeat=debug. Example output:
[1/12/15 19:38:15:208 GMT] 000000d4 ThreadMonitor A UsageInfo[ThreadPool:hung/active/size/max]={
SIBFAPThreadPool:0/2/4/50,
TCPChannel.DCS:0/3/18/20,
server.startup:0/0/1/3,
WebContainer:0/3/4/12,
SIBJMSRAThreadPool:0/0/10/41,
ProcessDiscovery:0/0/1/2,
Default:0/2/7/20,
ORB.thread.pool:0/0/10/77,
HAManager.thread.pool:0/0/2/2
}When the diagnostic trace is enabled, this output is written every com.ibm.websphere.threadmonitor.interval seconds. Only thread pools that have at least one worker thread (whether active or idle) will be reported.
BoundedBuffer
Consider BoundedBuffer tuning: https://www.ibm.com/support/knowledgecenter/SSAW57_8.5.5/com.ibm.websphere.nd.doc/ae/tprf_tunechain.html
The thread pool request buffer is essentially a backlog in front of the thread pool. If the thread pool is at its maximum size and all of the threads are dispatched, then work will queue in the requestBuffer. The maximum size of the requestBuffer is equal to the thread pool maximum size; however, if the unit of work is executed on the thread pool with a blocking mode of EXPAND_WHEN_QUEUE_IS_FULL_ERROR_AT_LIMIT or EXPAND_WHEN_QUEUE_IS_FULL_WAIT_AT_LIMIT, then the maximum size is ThreadPoolMaxSize * 10. When the requestBuffer fills up, then WSVR0629I is issued (although only the first time this happens per JVM run per thread pool). When the requestBuffer is full, work will either wait or throw a ThreadPoolQueueIsFullException, depending on how the unit of work is executed.
How the JVM MBean dumpThreads method works
WAS exposes a JVM MBean for each process that has methods to create thread dumps, heap dumps, and system dumps. For example, to produce a thread dump on server1, use this wsadmin command (-lang jython):
AdminControl.invoke(AdminControl.completeObjectName("type=JVM,process=server1,*"), "dumpThreads")
The dumpThreads functionality is different depending on the operating system:
- POSIX (AIX, Linux, Solaris, etc.): kill(pid, SIGQUIT)
- Windows: raise(SIGBREAK)
- z/OS: In recent versions, produces a javacore, heapdump, and SYSTDUMP by default
For any customers that have changed the behavior of the JVM (-Xdump) in how it responds to SIGQUIT/SIGBREAK (i.e. kill -3), then dumpThreads will respond accordingly (unless running z/OS, in which case use wsadmin_dumpthreads* properties). For anyone wishing to keep a non-default behavior for SIGQUIT/SIGBREAK but still have a scriptable way to produce only javacores, see the Troubleshooting chapters on alternative ways of requesting thread dumps.
Java Database Connectivity (JDBC)
Investigating Long Executions
On WAS >= 9.0.0.4 and
8.5.5.12, consider enableJDBCTiming
with a millisecond threshold which will print a stack of executions
exceeding that threshold and the query.
Lightweight Query Trace
*=info:com.ibm.ws.rsadapter.jdbc.WSJdbcPreparedStatement=allDatabase Connection Pools
Database connection pools are highly contended in heavily multi-threaded applications. Ensuring available connections in the pool leads to superior performance. Monitor PMI metrics to watch the number of threads waiting on connections from the pool as well as the average wait time.
- If threads are waiting, consider increasing the number of pooled connections in conjunction with your database administrator (DBA), decreasing the number of active threads in the system, or investigating the usage of database connections by the application.
- In some cases, a one-to-one mapping between DB connections and threads may be ideal.
- Always use the latest database driver for the database you are running as performance optimizations between versions are often significant.
The maximum connection pool size is set under Connection pool settings: Resources } JDBC } Data Sources } $DS } Connection pool properties
In order to successfully tune the connection pool, you need to know two pieces of information:
- The requests per second that occur during a peak
- How long the database takes to respond to each type of operation, SELECT, INSERT, UPDATE, and so on.
Maximum connections setting:
- Double the number of the Maximum connections parameter then slowly back it down
- Better performance is generally achieved if this value is set lower than the value for the maximum size of the Web container thread pool
If a ConnectionWaitTimeoutException is found in the WebSphere logs:
- Obtain the average database operations duration for the application
- Start with a value that is 5 seconds longer than this average
- Gradually increase it until problem is resolved or setting is at the highest value that the client/SLAs will tolerate.
- Before you increase the pool size, consult the database administrator. Why? Because the DBA sets the maximum number of connections their database will accept. If the size of the connection pool increases then that will across all cluster members and can result in trying to establish more connections to the database than it will accept. That scenario results in a lot of strange failures that will take some time to troubleshoot to get to the root cause.
- Ensure that the database server is configured to handle the maximum pool size setting.
- In a clustered environment, there is the potential of simultaneously allocating Max connections form all servers simultaneously.
Connection pools are a shared, synchronized resource. They have been highly optimized but when there are a very large number of threads, lock synchronization may become a bottleneck. You may use the IBM Health Center tool or similar tool to measure the lock contention, and if it is high, then you may need to consider scaling out to more JVMs.
Connection pool idle and aged timeouts
For maximum performance, connections in the pool should not timeout due to the idle timeout ("Unused timeout") nor the age timeout ("Aged timeout"). To accomplish this, disable the connection pool maintenance thread by setting the "Reap time" to 0.
The reason to do this is that connection creation and destruction may be expensive (e.g. TLS, authentication, etc.). Besides increased latency, in some cases, this expense may cause a performance tailspin that may make response time spikes worse; for example, something causes an initial database response time spike, incoming load in the clients continues apace, the clients create new connections, and the process of creating new connections causes the database to slow down more than it otherwise would, causing further backups, etc.
The main potential drawback of this approach is that if there is a firewall between the connection pool and the database, and the firewall has an idle or age timeout, then the connection may be destroyed and cause a stale connection exception the next time it's used. This may fail the request and purge the entire connection pool if "Purge policy" = "EntirePool". The main ways to avoid this are either to configure the firewall idle or age timeouts similar to above, or tune the TCP keepalive settings in the client or database operating systems below the timeouts.
Similarly, some databases may have their own idle or age timeouts. The database should be tuned similarly. For example, IBM DB2 does not have such connection timeouts.
Finally, some people use connection pool usage as a proxy of database response time spikes. Instead, monitor database response times.
Connection Pool Usage
The DataSource MBean may be used to query connection pool usage using
wsadmin -lang jython. In the following example, three
connections are in use and two connections are free:
wsadmin>print AdminControl.invoke(AdminControl.queryNames("*:type=DataSource,process=server1,name=TradeDataSource,*"), "showPoolContents")
PoolManager name:jdbc/TradeDataSource
PoolManager object:-522043580
Total number of connections: 5 (max/min 5/5, reap/unused/aged 180/1800/0, connectiontimeout/purge 180/EntirePool)
(testConnection/inteval false/0, stuck timer/time/threshold 0/0/0, surge time/connections 0/-1)
(pool paused false, prePopulate alternate false, resourceFailBackEnabled true, isAlternateResourceEnabled false,
disableDatasourceFailoverAlarm false, startFailBack false)
(isPartialResourceAdapterFailoverSupportEnabled false, isAlteranteResourcePoolManager false, resourceAvailabilityTestRetryInterval
10, currentInusePool null, currentMode 100, alternate jndiName null)
Shared Connection information (shared partitions 200)
com.ibm.ws.tx.jta.TransactionImpl@a47615d6#tid=349227028 MCWrapper id 767a85e9 Managed connection WSRdbManagedConnectionImpl@37f2f2c5
State:STATE_TRAN_WRAPPER_INUSE Connections being held 1 Used with transaction com.ibm.ws.tx.jta.TransactionImpl@a47615d6#tid=349227028
com.ibm.ws.tx.jta.TransactionImpl@9ea5a8b5#tid=349227084 MCWrapper id 3f4eefc9 Managed connection WSRdbManagedConnectionImpl@689ac78c
State:STATE_TRAN_WRAPPER_INUSE Connections being held 1 Used with transaction com.ibm.ws.tx.jta.TransactionImpl@9ea5a8b5#tid=349227084
com.ibm.ws.tx.jta.TransactionImpl@4850aa55#tid=349227060 MCWrapper id 716535f Managed connection WSRdbManagedConnectionImpl@7424ebb6
State:STATE_TRAN_WRAPPER_INUSE Connections being held 1 Used with transaction com.ibm.ws.tx.jta.TransactionImpl@4850aa55#tid=349227060
Total number of connection in shared pool: 3
Free Connection information (free distribution table/partitions 5/1)
(0)(0)MCWrapper id 863b69f0 Managed connection WSRdbManagedConnectionImpl@41038936 State:STATE_ACTIVE_FREE
(0)(0)MCWrapper id 94ff7816 Managed connection WSRdbManagedConnectionImpl@9791d5db State:STATE_ACTIVE_FREE
Total number of connection in free pool: 2
UnShared Connection information
No unshared connections
Connection Leak Logic Information: ...All data source connection pool statistics may be displayed with showAllPoolContents:
wsadmin>print AdminControl.invoke(AdminControl.queryNames("*:type=DataSource,process=server1,name=TradeDataSource,*"), "showAllPoolContents")Free connections in a data source connection pool may be purged manually:
wsadmin>AdminControl.invoke(AdminControl.queryNames("*:type=DataSource,process=server1,name=TradeDataSource,*"), "purgePoolContents", "immediate")
''
wsadmin>AdminControl.invoke(AdminControl.queryNames("*:type=DataSource,process=server1,name=TradeDataSource,*"), "purgePoolContents", "0")
''Statement cache
"The WebSphere Application Server data source optimizes the processing of prepared statements and callable statements by caching those statements that are not being used in an active connection. Both statement types help reduce overhead for transactions with backend data.
A prepared statement is a precompiled SQL statement that is stored in a PreparedStatement object. Application Server uses this object to run the SQL statement multiple times, as required by your application run time, with values that are determined by the run time.
A callable statement is an SQL statement that contains a call to a stored procedure, which is a series of precompiled statements that perform a task and return a result. The statement is stored in the CallableStatement object. Application Server uses this object to run a stored procedure multiple times, as required by your application run time, with values that are determined by the run time.In general, the more statements your application has, the larger the cache should be. Be aware, however, that specifying a larger statement cache size than needed wastes application memory and does not improve performance.
Determine the value for your cache size by adding the number of uniquely prepared statements and callable statements (as determined by the SQL string, concurrency, and the scroll type) for each application that uses this data source on a particular server. This value is the maximum number of possible statements that can be cached on a given connection over the life of the server.
Default: For most databases the default is 10. Zero means there is no cache statement." (https://www.ibm.com/support/knowledgecenter/SSAW57_8.5.5/com.ibm.websphere.nd.doc/ae/rdat_datobjtune.html)
The statement cache size specifies the number of statements that can
be cached per connection. Caching prepared statements improves overall
response times because an application can reuse a
PreparedStatement on a connection if it exists in that
connection's cache, bypassing the need to create a new
PreparedStatement. However, to make effective use of this
cache the application has to be properly written to use parameterized
SQL statements using the ? (question mark) notation instead of
dynamically building strings with the parameters already substituted as
each unique statement will make the cache useless.
Ideally the PreparedStmtCacheDiscardCount should be zero; however, given potential memory constraints, then having a slow incrementing count is not necessarily a bad thing. See: https://www.ibm.com/support/pages/node/6410242
Recommendations are made in several WebSphere Application Server documents on the value for the prepared statement cache. They all recommend estimating the number of unique SQL statements an application prepares and using this number to set the number of prepared statements to be cached for each connection.
These formulas work well when the number of unique prepared statements and maximum connections are relatively small; however, these formulas do not take into account the possible memory consumption of the cached prepared statements, particularly when the total number of statements being cached is large. What is considered a small or large prepared statement cache depends on the database vendor in use.
Each prepared statement object consumes some amount of memory. The actual amount is variable, based on the database vendor in use, as well as the number and size of the parameter data for the statement. When prepared statement caches are configured to large values, it is possible to outgrow the amount of memory available to the cache, resulting in unexpected behavior. Depending on the type of JDBC driver, the memory consumption might be from the Java heap or from the JVM's native heap...
If you choose to decrease the size of your prepared statement cache, some cycling of the statement cache could occur, as the least recently used statements are closed to make room for more recently used statements. It can be worthwhile to analyze the usage pattern of the prepared statements in your application. If some prepared statements are executed infrequently, the penalty in consumed resources might outweigh the advantage of the caching mechanism. These infrequently-used statements might be better suited to the java.sql.Statement interface, rather than the java.sql.PreparedStatement interface. Statement objects are not cached by the Application Server and will not consume memory beyond the scope in which they are used.
Shareable versus Unshareable Connections
Database connections marked shareable are not returned to the connection pool when they are closed. Instead, they are reserved for reuse by subsequent requests for a connection within the same transaction containment context. For example, if a thread within a servlet uses the normal get-use-close pattern on a database connection more than once, the second time, the same connection is immediately returned since it was reserved from the pool.
The Java Enterprise Edition specification defines shareable as the default configuration unless otherwise specified:
Sharing connections typically results in efficient usage of resources and better performance. [...] Containers must assume connections to be shareable if no deployment hint is provided.
With all that said, there are some cases where unshareable connections perform better, so you should consider trying unshareable. Note that this may expose connection leaks or other problems. You can set globalConnectionTypeOverride=unshared to disable shareable connections: https://www.ibm.com/support/knowledgecenter/SSAW57_8.5.5/com.ibm.websphere.nd.doc/ae/tdat_conpoolman.html
Scenarios where unshareable connections may be preferable:
- The time it takes for the application to service an HTTP request takes a long time.
- The application typically does not open/close more than one connection to service an HTTP request.
- The application rarely uses a transaction other than auto-commit with the database.
Scenarios where shareable connections may be preferable:
- The time it takes for the application to service an HTTP request is very quick.
- The application will frequently open/close a connection to the database.
- The application makes heavy use of transactions to the database.
- Some EJB container transactions require shareable connections.
As with any setting within the application server it is imperative to perform load testing and seeing which connection setting works better with the application.
More JDBC Connections than Threads
Applications that open more than one JDBC connection simultaneously in the same thread before closing the previous connections are identified by seeing more connections in the JDBC connection pool than threads in the thread pool. This can potentially result in an application deadlock if there are not enough connections in the connection pool. To correct this the application developers have to fix the code to close a JDBC connection before acquiring another connection.
DB2 JDBC Driver
On HP-UX, preallocate the DB2 trace segment and ensure the database is created with the UTF-8 code set: https://www.ibm.com/support/knowledgecenter/SSAW57_8.5.5/com.ibm.websphere.nd.doc/ae/tprf_tunehp.html
Oracle JDBC Driver
Tracing
Enabling Oracle JDBC driver trace: Oracle ships several JAR files for each version of the JDBC drivers. The optimized JAR files do not contain any logging code and, therefore, do not generate any log output when used. To get log output, you must use the debug JAR files, which are indicated with a "_g" in the file name, like ojdbc5_g.jar or ojdbc6_g.jar.
- Set this diagnostic trace: *=info:WAS.j2c=all:RRA=all:WAS.database=all:Transaction=all:com.ibm.ws.oracle.logwriter=all
- Activate the Debug Library by creating the custom property: -Doracle.jdbc.Trace=true
The JVM must be restarted after the changes have been made to use the debug JAR. The Oracle trace points all come from the 'logwriter' component.
Large memory usage
High memory usage, java.lang.OutOfMemoryErrors, slow performance, and a large volume of garbage collection cycles may occur when the Oracle JDBC driver is used to connect to Oracle databases. This is due to the memory management of the Oracle JDBC driver.
In a heap dump, it can be seen that the Oracle JDBC driver stores a
large amount of data in Connection and PreparedStatement objects. For
example, oracle.jdbc.driver.T4CConnection,
oracle.jdbc.driver.PhysicalConnection$BufferCacheStore,
oracle.jdbc.driver.BufferCache,
oracle.jdbc.driver.T4CPreparedStatement, and others.
The problem is caused by the way that the Oracle JDBC driver manages memory. For full details, refer to the Oracle white paper, Oracle JDBC Memory Management. Here are some relevant quotes:
The Oracle JDBC drivers can use large amounts of memory. This is a conscious design choice, to trade off large memory use for improved performance. For the most part and for most users this has proved to be a good choice. Some users have experienced problems with the amount of memory the JDBC drivers use.
Some users, mostly those with very large scale applications, have seen performance problems due to large heap size, garbage collector thrashing, and even OutOfMemoryExceptions. In subsequent releases the development team has worked to address those issues by improving the way the drivers use memory and by providing users with additional control to address specific problems.
the size of the buffers depends not on the actual size of the row data returned by the query, but on the maximum size possible for the row data. After the SQL is parsed, the type of every column is known and from that information the driver can compute the maximum amount of memory required to store each column. The driver also has the fetchSize, the number of rows to retrieve on each fetch. With the size of each column and the number of rows, the driver can compute the absolute maximum size of the data returned in a single fetch. That is the size of the buffers.
In the worst case, consider a query that returns 255 VARCHAR2(4000) columns. Each column takes 8k bytes per row. Times 255 columns is 2040K bytes or 2MB per row. If the fetchSize is set to 1000 rows, then the driver will try to allocate a 2GB char[]. This would be bad... The primary tool for controlling memory use is the fetchSize.
Although Java memory management is quite good, allocating large buffers is expensive. It is not the actual malloc cost. That is very fast. Instead the problem is the Java language requirement that all such buffers be zero filled. So not only must a large buffer be malloc'ed, it must also be zero filled. Zero filling requires touching every byte of the allocated buffer. Modern processors with their multilevel data caches do ok with small buffers. Zero filling a large buffer overruns the processor data caches and runs at memory speed, substantially less than the maximum speed of the processor. Performance testing has repeatedly shown that allocating buffers is a huge performance drag on the drivers. This has led to a struggle to balance the cost of allocating buffers with the memory footprint required to save buffers for reuse.
The 11.1.0.7.0 drivers introduce a connection property to address the large buffer problem. This property bounds the maximum size of buffer that will be saved in the buffer cache... The connection property is -Doracle.jdbc.maxCachedBufferSize=N ... e.g. 100000. The default is Integer.MAX_VALUE. This is the maximum size for a buffer which will be stored in the internal buffer cache... If you need to set maxCachedBufferSize, start by estimating the buffer sizes for the SQL queries that require the largest buffers. In the process you may find that by tuning the fetch size for these queries you can achieve the desired performance. Considering the frequency of execution and the size of the buffers, pick a size such that most statements can use cached buffers, but still small enough so that the Java runtime can support the number of buffers needed in order to minimize the frequency with which new buffers have to be allocated.
In 11.2 the value of maxCachedBufferSize is interpreted as the log base 2 of the maximum buffer size. For example if maxCachedBufferSize is set to 20 the max size buffer that is cached is 2^20 = 1048576. For backwards compatibility, values larger than 30 are interpreted as the actual size rather than log2 of the size, but using powers of 2 is recommended... It is usually the case that setting maxCachedBufferSize to a reasonable value has no impact. If you need to set maxCachedBufferSize, start with 18. If you have to set the value to less than 16, you probably need more memory."
Servlets
WebContainer Thread Pool
Configure the maximum size of the WebContainer thread
pool under Application Servers } $SERVER } Thread Pools
} WebContainer } Maximum Size
If system resources allow, it is recommended to set the minimum size of the WebContainer equal to the maximum size because some DirectByteBuffers are cached and kept in thread locals and these are lost if the threads recycle.
Keep Alive Connections
Max requests per connection
By default for HTTP/1.0 and HTTP/1.1 (but not HTTP/2.0), WAS closes an incoming HTTP keep alive connection after 100 requests. This may cause a significant throughput impact, particularly with TLS (in one benchmark, ~100%). To disable such closure of sockets, check "Unlimited persistent requests per connection" and restart:
Servers } Application servers } $SERVER } Web container
settings } Web container transport chains } $TRANSPORT }
HTTP Inbound Channel } Check "Unlimited persistent requests per
connection"
Idle timeouts
In general, for servers with incoming LAN network traffic from clients using persistent TCP connection pools (e.g. a reverse proxy like IHS/httpd or web service client), increase the idle timeout (and restart) to avoid connections getting kicked out of the client connection pool. The maximum value is 2147483 seconds or about 24 days.
Servers } Application servers } $SERVER } Web container
settings } Web container transport chains } $TRANSPORT }
HTTP Inbound Channel } Set "Persistent timeout"
Error codes closing keep-alive connections
If an HTTP response returns what's internally considered an "error code" (HTTP 400, 402-417, or 500-505); then, after the response completes, if the socket is a keep-alive socket, it will be closed. This may impact throughput if an application is, for example, creating a lot of HTTP 500 error responses and thus any servers with incoming LAN network traffic from clients using persistent TCP connection pools (e.g. a reverse proxy like IHS/httpd or web service client) will have to churn through more sockets than otherwise (particularly impactful for TLS handshakes). This code is shared with Liberty so you may see more details there.
Class and JSP reload checking
If not needed, disable application class and JSP reload checking:
- Enterprise Applications }
$APP} Class loading and update detection- Check "Override class reloading settings for Web and EJB modules"
- Set "Polling interval for updated files" = 0
- Enterprise Applications }
$APP} JSP and JSF options- Uncheck "JSP enable class reloading"
- Save, Synchronize, and Restart
Invocation Cache
If more than 500 unique URLs are actively being used (each JavaServer Page is a unique URL), you should increase the size of the invocation cache.
NCSA Access Logs
The HTTP transport channel supports the standardized NCSA access log
format to print a line for every HTTP response with various details such
as URL. There was a regression in 8.5.5.24, 9.0.5.16, and 9.0.5.17 that
caused timestamp display issues when using accessLogFormat
and it was fixed in APAR PH56229 and subsequent fixpacks.
Enabling the NCSA Access Log
In the WAS Administrative Console:
- Navigate to
$SERVER} Web Container Settings } Web container transport chains - Click on each
WCInbound*entry that is handling the traffic of interest and perform the following steps. - } HTTP inbound channel
- Check "Enable logging"
- Expand "NCSA Access logging"
- Check "Use chain-specific logging"
- Access log file path =
${SERVER_LOG_ROOT}/http_access.log - Access log maximum size = 500
- Maximum Number of historical files = 2
- NCSA access log format = Common
- Expand "Error logging"
- Check "Use chain-specific logging"
- Error log file path =
${SERVER_LOG_ROOT}/http_error.log - Error log maximum size = 500
- Maximum Number of historical files = 2
- Click Apply
- Click "Custom properties"
- Click New...
- Name = accessLogFormat
- Value =
- WAS 9 or WAS >= 8.5.5.6:
%h %u %t "%r" %s %b %D %{R}W - WAS < 8.5.5.6:
%h %u %t "%r" %s %b %D
- WAS 9 or WAS >= 8.5.5.6:
- Click OK
- Save, synchronize, and restart the JVM.
For example, with an accessLogFormat of
%h %u %t "%r" %s %b %D %{R}W, an
http_access.log file will be written in
$WAS/profiles/$PROFILE/logs/ with output such as the
following. The second-to-last column is the response time of the request
in microseconds (divide by 1000 for milliseconds):
127.0.0.1 - [03/Sep/2014:17:32:33 -0700] "GET / HTTP/1.1" 200 5792 25603 24654The time printed is the time the request arrived, so it is possible that the timestamps will not be in order.
Starting with WAS 8.5.5.6, the WAS access log supports
%{R}W which is the HTTP service time. The difference
between the HTTP response time and the HTTP service time is that the
former includes the time to send back the entire response, whereas the
latter only times up to the first byte sent back. The reason for this
distinction is that one very common issue is a slow or bad network, slow
client, or slow intermediary proxy (e.g. IHS, etc.). With
%D, there is no distinction between the time spent in WAS
and the time spent in the network, end-user, and intermediary proxies.
%{R}W is a subset of %D and helps isolate
where the slowdown may be. This is a heuristic and it doesn't help with
servlets that stream responses (and do complex work in between) or
otherwise call flush. It also doesn't help if WAS (or the operating
system it sits on) has an issue while sending back the rest of the
bytes. With those caveats, %{R}W is a great addition to
help find where HTTP responses may be slow and you should enable both
%D and %{R}W if your version of WAS includes
them.
Investigating Response Times
This section covers different methods of printing the response times of HTTP(S) requests. If all you need are averages, then the built-in Performance Monitoring Infrastructure (PMI) provides average statistics for HTTP(S) response times. However, if you need information on particular requests, then averages may not help. The most robust solution is to use a monitoring product. This will cover the basic capabilities that are built-in to WAS.
Method 0: Web Server logs
This method is not part of WAS, but most use a web server in front of
WAS such as the IBM HTTP Server (IHS) or Apache httpd. Servers such as
IHS/httpd can log each request and its response time. For example, on
IHS/httpd, add %D or %T to your
LogFormat to print the response time. Other up-stream load
balancers or proxies may have similar capabilities. The rest of this
section covers WAS-only methods...
Method 1: Starting in WAS 8.0.0.2, NCSA access log with custom
accessLogFormat (see previous section above).
Method 2: Diagnostic Trace
The following diagnostic trace can be used:
com.ibm.ws.http.channel.inbound.impl.HttpICLReadCallback=all:com.ibm.ws.http.channel.inbound.impl.HttpInboundLink=all
- Change the log details to this for the relevant servers (this can be
done dynamically using the Runtime tab). For each request, the following
entries will appear in trace.log for a new connection
[9/26/11 16:07:30:143 PDT] 00000029 HttpInboundLi 3 Init on link: com.ibm.ws.http.channel.inbound.impl.HttpInboundLink@83d083d com.ibm.ws.channel.framework.impl.InboundVirtualConnectionImpl@6c706c7
[9/26/11 16:07:30:144 PDT] 00000029 HttpInboundLi > ready: com.ibm.ws.http.channel.inbound.impl.HttpInboundLink@83d083d com.ibm.ws.channel.framework.impl.InboundVirtualConnectionImpl@6c706c7 Entry
[9/26/11 16:07:30:144 PDT] 00000029 HttpInboundLi 3 Parsing new information: com.ibm.ws.channel.framework.impl.InboundVirtualConnectionImpl@6c706c7
[9/26/11 16:07:30:146 PDT] 00000029 HttpInboundLi 3 Received request number 1 on link com.ibm.ws.http.channel.inbound.impl.HttpInboundLink@83d083d
[9/26/11 16:07:30:146 PDT] 00000029 HttpInboundLi 3 Discrimination will be called
[9/26/11 16:07:30:149 PDT] 00000029 SystemOut O SWAT EAR: Invoking com.ibm.Sleep by anonymous (127.0.0.1)... []
[9/26/11 16:07:31:151 PDT] 00000029 SystemOut O SWAT EAR: Done com.ibm.Sleep
[9/26/11 16:07:31:152 PDT] 00000029 HttpInboundLi 3 close() called: com.ibm.ws.http.channel.inbound.impl.HttpInboundLink@83d083d com.ibm.ws.channel.framework.impl.InboundVirtualConnectionImpl@6c706c7
[9/26/11 16:07:31:153 PDT] 00000029 HttpInboundLi 3 Reading for another request...
[9/26/11 16:07:31:153 PDT] 00000029 HttpInboundLi < ready ExitFor an existing connection, it will be slightly different:
[9/26/11 16:07:35:139 PDT] 00000028 HttpICLReadCa 3 complete() called: com.ibm.ws.channel.framework.impl.InboundVirtualConnectionImpl@6c706c7
[9/26/11 16:07:35:139 PDT] 00000028 HttpInboundLi 3 Parsing new information: com.ibm.ws.channel.framework.impl.InboundVirtualConnectionImpl@6c706c7
[9/26/11 16:07:35:141 PDT] 00000028 HttpInboundLi 3 Received request number 2 on link com.ibm.ws.http.channel.inbound.impl.HttpInboundLink@83d083d
[9/26/11 16:07:35:141 PDT] 00000028 HttpInboundLi 3 Discrimination will be called
[9/26/11 16:07:35:144 PDT] 00000028 SystemOut O SWAT EAR: Invoking com.ibm.Sleep by anonymous (127.0.0.1)... []
[9/26/11 16:07:36:146 PDT] 00000028 SystemOut O SWAT EAR: Done com.ibm.Sleep
[9/26/11 16:07:36:147 PDT] 00000028 HttpInboundLi 3 close() called: com.ibm.ws.http.channel.inbound.impl.HttpInboundLink@83d083d com.ibm.ws.channel.framework.impl.InboundVirtualConnectionImpl@6c706c7
[9/26/11 16:07:36:148 PDT] 00000028 HttpInboundLi 3 Reading for another request...The time between the Discrimination will be called and
close() lines is when the request/response executed.
Method 3: Request Metrics
Request metrics (also called Application Response Measurement) is a standard mechanism for tracking, exposing, and/or logging end-to-end transaction information. However, request metrics has a very large overhead by default unless you use filters (discussed below) and should only be used in a test environment. Request metrics can be enabled in the administrative console under Monitoring and Tuning } Request Metrics. The server does not need to be restarted for request metrics to start working.
- Ensure "Prepare Servers for Request metrics collection" is checked
- Select "Custom" for "Components to be instrumented" and select "Servlet"
- Set "Trace level" to "Hops"
- Check "Standard Logs"
For each JSP and servlet request, the PMRM0003I log
entry will be written to SystemOut.log:
[9/26/11 15:43:45:448 PDT] 00000027 PmiRmArmWrapp I PMRM0003I: parent:ver=1,ip=10.20.30.8,time=1317075586068,pid=32507,reqid=1,event=1 - current:ver=1,ip=10.20.30.8,time=1317075586068,pid=32507,reqid=1,event=1 type=URI detail=/swat/Sleep elapsed=1004The elapsed value at the end of the log line is how long the request took to process and send back the full response, in milliseconds. The detail field has the URL.
If you also select JDBC, you'll get line such as:
[9/26/11 15:49:11:128 PDT] 0000003c PmiRmArmWrapp I PMRM0003I: parent:ver=1,ip=10.20.30.8,time=1323213487261,pid=13311,reqid=1,event=1 - current:ver=1,ip=10.20.30.8,time=1323213487261,pid=13311,reqid=5,event=1 type=JDBC detail=java.sql.Statement.executeQuery(String) elapsed=1For high volume systems, this can have a huge performance impact, mostly in the overhead of writing to the logs (even with a fast disk, there is also some cross-thread synchronization in logging, etc.). If possible, use the request metrics filters to limit what is logged to particular URLs. Another common technique is to use a source IP filter to a well known user. When an issue occurs, have that user inject their workload and then only those requests will be logged.
Given that request metrics is enabled cell-wide, if you want to
disable the SystemOut logging on some servers, you can change the log
details for those servers by adding (this can be done dynamically using
the Runtime tab):
com.ibm.ws.pmi.reqmetrics.PmiRmArmWrapper=off
It is also possible to write your own ARM agent in Java which could,
for example, watch for requests that take longer than some threshold,
and only print those out to SystemOut.log and/or gather
javacores/thread stacks for that request. You would then uncheck
"Standard Logs" and instead check "Application Response Measurement(ARM)
agent ."
Method 4: IBM -Xtrace
If you want to look at the response times of a particular Java
method, and you're using the IBM JVM, then you could use
-Xtrace method trace. For example, we know that all HTTP(s)
requests for servlets go through
javax/servlet/http/HttpServlet.service, so we could use the
generic JVM argument:
-Xtrace:methods={javax/servlet/http/HttpServlet.service},print=mtEvery time this method is executed, the following entries will be
written to native_stderr.log:
23:21:46.020*0x2b28d0018700 mt.0 > javax/servlet/http/HttpServlet.service(Ljavax/servlet/ServletRequest;Ljavax/servlet/ServletResponse;)V Bytecode method, This = 2b292400fcf8
23:21:47.071 0x2b28d0018700 mt.6 < javax/servlet/http/HttpServlet.service(Ljavax/servlet/ServletRequest;Ljavax/servlet/ServletResponse;)V Bytecode methodRemember that servlets can include other servlets (usually through JSPs), and the method trace entries will be properly indentend, but just make sure you match the right entry and exit to get the correct elapsed time.
Method trace is more useful when you already have some idea of where the slowdown may be. For example, you can specify a list of particular business methods, and then iteratively drill down into those that are slow until you reach the slow method. This of course won't help if the problem is systemic, such as garbage collection, operating system paging, etc., since that will arbitrarily affect any methods. However, it is good at pinpointing backend slowdowns (e.g. put a method trace around database calls).
Method trace changes the way methods are JITted (that's how it's able to instrument any Java method) and it does have a non-trivial performance overhead. This overhead may be slightly minimized by writing the trace to a binary output file instead of as text to stderr.
Other Methods
- If you are using the WebSphere Virtual Enterprise On Demand Router, it has advanced logging capabilities, particularly including filtering to avoid logging overhead.
- If you know when the slowness happens, javadump snapshots are often a good way to determine the slowdown.
- As mentioned in the beginning, although PMI is an average, it does have per-servlet statistics, so that may be able to help pinpoint the slow servlets.
- Adding your own logging entry/exit points around common execution points (for example, if you use a servlet filter or servlet base class) could serve the same function as a custom ARM agent.
WebContainer Channel Write Type
The design of WAS with the default
configuration of channelwritetype=async is that WAS
will buffer up to the size of each HTTP response in native
DirectByteBuffer (DBB) memory as it waits for asynchronous TCP writes to
finish. This means that if WAS is serving a large volume of responses
from Java servlets (including static files through the WAS FileServlet,
servlet/JSP responses, etc.), and if the clients (or the network path
leading to the clients) cannot keep up with the pace of network writes,
then these DirectByteBuffers will consume the amount of pending writes
in native memory. This can cause native OutOfMemoryErrors in 32-bit
processes, or paging on 64-bit processes with insufficient physical
memory. Even if the network and end-user do keep up, this behavior may
simply create a large volume of DBBs that can build up in the tenured
area. You may change
channelwritetype to sync to avoid this
behavior although servlet performance may suffer, particularly for
end-users on WANs.
Note: With channelwritetype=async, you may see
WCChannelLinks waiting to write to the client without any
WebContainer thread processing a request. This is expected and is a
possibility with asynchronous writing. In this case, what likely
happened is that the servlet wrote all of its response to the HTTP
channel and finished its use of the thread, and the HTTP channel will
asynchronously write the buffered response to the client.
If you have a system dump, in the Memory Analyzer Tool, you can find
DirectByteBuffers waiting to be written to the client in the
writeQueue java.util.ArrayList under
com.ibm.ws.webcontainer.channel.WCChannelLink. In a PHD
heapdump, you won't know it is the writeQueue, but that
field is the only ArrayList on that object so you know it
is the writeQueue. Right click on the
ArrayList and click Show Retained Set. Each
com.ibm.ws.buffermgmt.impl.PooledWsByteBufferImpl
references a DirectByteBuffer, so the number of these instances will
correlate with the number of DirectByteBuffers. In a system dump, you
can also check the writing field on the
WCChannelLink to see if that link to the client is still in
the process of writing the response.
If you have a system dump and a recent version of the IBM Extensions
for Memory Analyzer, you can determine the channelwritetype
by clicking Open Query Browser } IBM Extensions } WebSphere Application
Server } Web Container Analysis.
If you have a system dump, you can find the URL being processed (to review if it may be a large file, for example) and other information such as HTTP headers underneath the WCChannelLink request and response fields.
SSLUtils.flushCloseDown
If you find many threads in a thread dump in the following stack:
at java/lang/Thread.sleep(Native Method)
at java/lang/Thread.sleep(Thread.java:950(Compiled Code))
at com/ibm/ws/ssl/channel/impl/SSLUtils.flushCloseDown(SSLUtils.java:237(Compiled Code))
at com/ibm/ws/ssl/channel/impl/SSLUtils.shutDownSSLEngine(SSLUtils.java:126(Compiled Code))
at com/ibm/ws/ssl/channel/impl/SSLConnectionLink.cleanup(SSLConnectionLink.java:228(Compiled Code))
at com/ibm/ws/ssl/channel/impl/SSLConnectionLink.close(SSLConnectionLink.java:172(Compiled Code))
at com/ibm/ws/http/channel/inbound/impl/HttpInboundLink.close(HttpInboundLink.java:899(Compiled Code))
at com/ibm/wsspi/channel/base/InboundApplicationLink.close(InboundApplicationLink.java:58(Compiled Code))
at com/ibm/ws/webcontainer/channel/WCChannelLink.close(WCChannelLink.java:333(Compiled Code))
at com/ibm/ws/webcontainer/channel/WCChannelLink.releaseChannelLink(WCChannelLink.java:503(Compiled Code)) [...]Then you may consider setting the generic JVM
argument -DtimeoutValueInSSLClosingHandshake=1 or the
same as an SSL
channel custom property.
When this property was introduced, the default wait was indefinite; however, a subsequent fixpack in late 2017 changed the default timeout to 30 seconds.
This stack tends to occur when WAS tries to write the closing SSL handshake and the other side is not reading data, the other side is not closing the connnection, and/or the write buffers are full.
com.ibm.ws.webcontainer.async.AsyncContextImpl.startUsingWCThreadPool
If a thread pool is consumed by threads in
com.ibm.ws.webcontainer.async.AsyncContextImpl.startUsingWCThreadPool
or there are many errors of the form "Async operation cannot obtain a
thread for execution due to timeout", then tune the WebContainer
customer property
com.ibm.ws.webcontainer.asyncrunnabletimeout (default 30
seconds). See APAR PH60242. This is only a workaround and otherwise
consider reducing the volume of asynchronous work being posted and/or
gather an OS core dump during the issue. One unresolved hypothesis is
that the threads waiting to be spawned are processing a
WSCompleteRunnable.
DirectByteBuffer Pools
The WAS WebContainer uses DirectByteBuffers (DBBs) to perform HTTP reads and writes. The use of DBBs is required for good performance. DBBs are used in both cases of channelwritetype=async and channelwritetype=sync. The way DBBs are used is that each WebContainer thread has a lazy-loaded, ThreadLocal pool of DBBs and there is a global pool of DBBs for all WebContainer threads. This is a major reason why it's good for performance to set the minimum size of the WebContainer thread pool to the maximum size because that minimizes the creation and destruction of these DBBs.
The size of the DBB used will depend on the size of the HTTP read or write. Each DBB pool is split into buckets with each bucket having DBBs of a certain fixed size. The default sizes of the DBBs are:
32, 1024, 8192, 16384, 24576, 32768, 49152, 65536In other words, there is a bucket of DBBs that are each 32 bytes, and a bucket of DBBs that are each 1024 bytes, and so on.
The default sizes of each bucket for a WebContainer ThreadLocal DBB pool are:
30, 30, 30, 20, 20, 20, 10, 10In other words, there can be up to 30 DBBs of size 32 in the first bucket, up to 30 DBBs of size 1024 in the second bucket, and so on.
The global DBB pool multiplies each of the bucket sizes by 10. In other words, there can be up to 300 DBBs of size 32, and so on.
Therefore, by default, the global pool will use up to ~28MB of DBB native memory, and each WebContainer ThreadLocal DBB pool will use up to ~3MB of DBB native memory.
To determine if the DBB sizes and/or DBB bucket sizes are
insufficient, first, ensure that the WebContainer thread pool minimum =
maximum, then configure DBB trace (this may have significant overhead,
so be careful running in production) with
-Xtrace:print=j9jcl.335-338,trigger=tpnid{j9jcl.335,jstacktrace},trigger=tpnid{j9jcl.338,jstacktrace},
run the JVM until the WebContainer thread pool reaches the maximum size,
and run the workload until it reaches steady state. If after this point,
the DBB trace is still showing allocations from
com.ibm.ws.buffermgmt.impl.WsByteBufferPoolManagerImpl.allocateBufferDirect,
then consider increasing the DBB and/or bucket sizes. Normally, we only
change the bucket sizes (poolDepths) and leave the poolSizes as
default.
Another inconclusive but often indirect symptom of DBB pool exhaustion is high global garbage collection pause times with high numbers of PhantomReferences being cleared. The native memory backing DirectByteBuffers is cleared using PhantomReferences, so once a DBB has no more strong references, it is put on a queue like a finalizer. DBBs tend to get tenured, so they can build up in the tenured region of a generational collector and this will hold on to native memory until the next full GC, or if MaxDirectMemorySize is hit, and a large number of queued DBBs may increase global GC pause times (in some implementations, because PhantomReference processing is single threaded).
To modify either the DBB sizes and/or the bucket sizes, edit
server.xml (in a network deployment environment, edit in
the deployment manager configuration and then synchronize the
node(s)):
In the root process:Server element, add the
attribute
xmlns:wsbytebufferservice="http://www.ibm.com/websphere/appserver/schemas/6.0/wsbytebufferservice.xmi"Find the services element with the xmi:type
loggingservice.http:HTTPAccessLoggingService. After the
matching </services> tag, override the DBB sizes
and/or the bucket sizes. For example:
<services xmi:type="wsbytebufferservice:WSByteBufferService" xmi:id="WSBBS_1" enable="true">
<properties xmi:id="BuffSVC_4" name="poolSizes" value="32,1024,8192,16384,24576,32768,49152,65536"/>
<properties xmi:id="BuffSVC_5" name="poolDepths" value="100,100,100,20,20,20,20,20"/>
</services>Restart the JVM.
JSP Buffers
The JSP
body buffer needs to contain the evaluation of a JSP body tag. The
buffer will grow to the size of the body of an action: "The buffer size
of a BodyContent object is unbounded.". The property BodyContentBuffSize
defines the initial size of each buffer (default 512 bytes) and it's
doubled until all of the content is contained. If
com.ibm.ws.jsp.limitBuffer=false (the default), the buffer
will remain at its latest size for subsequent requests. If
com.ibm.ws.jsp.limitBuffer=true, the buffer is reset to
BodyContentBuffSize. If the total size of instances of
org.apache.jasper.runtime.BodyContentImpl exceeds 5-10% of
the maximum Java heap size, then it's recommended to either reduce the
application's usage of large JSP body content and/or to set
com.ibm.ws.jsp.limitBuffer=true.
It's difficult to theoretically calculate an optimal default value
for BodyContentBuffSize. If the size is too small, then
there is potentially extra time spent growing the buffer. If the size is
too large, then there is potentially extra time spent garbage
collecting. This is a property used for all JSPs, but if there are
multiple JSPs, they will have different characteristics. As with most
performance tuning, the best approach is to test different options and
find the optimal value using a binary search (ideally first in a test
environment): Start with a value X1=512. Continue doubling as long as
results improve. Once results are worse, halve the difference from the
previous value (X2-X1)/2 and repeat the algorithm (double or halve the
difference) until an optimal value is found.
If you have a heapdump, use the Memory Analyzer Tool to calculate the
retained set of the class
org.apache.jasper.runtime.BodyContentImpl.
If you have a system dump or HPROF heapdump, then use the following OQL queries in the Memory Analyzer Tool to check the settings of limitBuffer and BodyContentBuffSize:
SELECT x.limitBuffer FROM INSTANCEOF java.lang.Class x WHERE x.@displayName.contains("class org.apache.jasper.runtime.BodyContentImpl ")
x.limitBuffer
trueSELECT x.bodyContentBufferSize FROM org.apache.jasper.runtime.JspFactoryImpl x
x.bodyContentBufferSize
512HTTP gzip compression
HTTP compression can be done either for a request body, or more commonly, for a response body. HTTP compression can only be done if the client sends a request header called Accept-Encoding with an encoding supported by the server:
GET / HTTP/1.1
Accept-Encoding: gzip,deflateWhen a response is compressed, the response will have an HTTP header saying how the body is compressed:
HTTP/1.1 200 OK
Content-Encoding: gzipWAS traditional does not natively support
Content-Encoding such as gzip compression for
HTTP responses (except in the proxy server or ODR).
It is recommended to do compression at the web server level (e.g. for
IHS, mod_deflate or mod_gzip); however, it may
be done by the application within WAS by setting the proper response
header and compressing the response content using a custom servlet
filter.
Java Server Faces (JSF)
The default setting of
org.apache.myfaces.SERIALIZE_STATE_IN_SESSION=true in the
version of MyFaces 2.0 that WAS <= 8.5.5 uses may have a significant
performance overhead. The default in MyFaces 2.2 has been changed to
false. However, note setting this to false causes the state to be stored
in browser cookies. If the amount of state is very large, this can cause
performance problems for the client-to-server interaction.
The com.sun.faces.util.LRUMap object can hold on to a
lot of memory as this is used to hold the various JSF Views in the
session. There are two types of JSF Views stored in the session. Logical
Views in session and Number of views in session: A logical view is a top
level view that may have one or more actual views inside of it. This
will be the case when you have a frameset, or an application that has
multiple windows operating at the same time. The
LOGICAL_VIEW_MAP map is an LRU Map which contains an entry
for each logical view, up to the limit specified by the
com.sun.faces.numberOfViewsInSession parameter. Each entry
in the LOGICAL_VIEW_MAP is an LRU Map, configured with the
com.sun.faces.numberOfLogicalViews parameter.
By default the number of views stored for each of these maps is 15.
Therefore you can see how it could end up using a lot of memory. The
value of com.sun.faces.numberOfViewsInSession and
com.sun.faces.numberOfLogicalViews does not have to be "4",
it can whatever you feel is adequate for your application.
If either of these parameters are not in the application then it will store up to 15 views in the LRU Maps. Setting these values to something lower will result in lower memory usage by JSF.
The actual number depends on your application. Basically, if we can't find a JSF View in the session to restore we will create a new one. In general, a complex application is one that would allow a user to move back and forth to pages (think something like a wizard), or an application that contains framesets or a lot of pop up windows. For example, if a pop up window is used to fill out some information and then click submit to go back to the original page... that would require storing more views in session.
15 tends to be a high number, especially if the views are large (contains quite a lot of JSF components and their state). One thing to remember is each Logical View can contain the set number of Actual Views. That is where the idea of a frameset comes in -- one logical view for the parent page, and the actual views are the different frames.
More information and how to set the parameters:
- https://www.ibm.com/docs/en/was-nd/9.0.5?topic=parameters-jsf-engine-configuration
- https://www.ibm.com/docs/en/was-nd/9.0.5?topic=22-configuring-jsf-engine-parameters
In particular, com.sun.faces.numberOfViewsInSession and
com.sun.faces.numberOfLogicalViews, potentially as low as 4
(the default for both is 15), and
com.sun.face.serializeServerState=true
<context-param>
<param-name>com.sun.faces.numberOfViewsInSession</param-name>
<param-value>4</param-value>
</context-param>
<context-param>
<param-name>com.sun.faces.numberOfLogicalViews</param-name>
<param-value>4</param-value>
</context-param>For general MyFaces JSF tuning guidance, see https://wiki.apache.org/myfaces/Performance
MyFaces JSF Embedded JAR Search for META-INF/*.faces-config.xml
By default, the IBM Apache MyFaces JSF implementation searches
JSF-enabled applications for META-INF/*.faces-config.xml
files in all JARs on the application classpath. A CPU profiler might
highlight such tops of stacks of this form:
java.util.jar.JarFile$1.nextElement
java.util.jar.JarFile$1.nextElement
org.apache.myfaces.view.facelets.util.Classpath._searchJar
org.apache.myfaces.view.facelets.util.Classpath._searchResource
org.apache.myfaces.view.facelets.util.Classpath.search
com.ibm.ws.jsf.config.resource.WASFacesConfigResourceProvider.getMetaInfConfigurationResources [...]When an embedded faces-config.xml file is found, a message is written to SystemOut.log with a wsjar: prefix, so this would be a simple way to check if such embedded resource searches are needed. For example:
[10/13/18 4:36:18:481 EST] 00000073 DefaultFacesC I Reading config : wsjar:file:[...]/installedApps/[...]/[...].ear/lib/bundled.jar!/META-INF/faces-config.xmlIf your applications only use a faces-config.xml within the application itself and do not depend on embedded faces-config.xml files within JARs on the application classpath, then you can just disable these searches:
- Servers } Server Types } WebSphere application servers } ${SERVER} } Web Container Settings } Web container } Custom Properties } New
- Name =
com.ibm.ws.jsf.disablealternatefacesconfigsearch - Value =
true - Documentation
If some applications do require embedded
faces-config.xml files, then you can disable
the search globally, but then enable the search on a per-application
basis.
HTTP Sessions
The HTTP session timeout is an important factor for how much heap pressure the JVM will face. Work with the business to find the lowest reasonable value (default 30 minutes).
If a customer requires session fail over, in general, use session persistence (database) over memory-to-memory replication. Consider if session failover is required as it increases complexity and decreases performance. The alternative is to affinitize requests and surgically store any critical state into a database.
If using session persistence and a customer can handle timed update semantics, use timed updates. This is typical for very high volume websites or those with very large HTTP session sizes or both. Again, there is risk even with 10 second intervals of some data loss should a negative event occur. Therefore ensure that the business owners for the application are aware of the risk and their acknowledgment of the risk before switching to timed updates. There is also the option of manual synchronization of sessions but this does involve adding and testing additional code.
The WebSphere Contrarian: Back to basics: Session failover
"My preferred alternative is to rely not on session distribution, but instead to rely simply on HTTP server plug-in affinity to "pin" a user to an application server, although this does mean that stopping an application server JVM will result in the loss of the HttpSession object. The benefit of doing so is that there is no need to distribute the session objects to provide for HttpSession object failover when an application server fails or is stopped. The obvious down side is that a user will lose any application state and will need to log back in and recreate it, and this may or may not be acceptable for your application or business requirements. I'll mention that I've worked with a number of customers that in fact agree with this view and make this their standard practice."
Try to keep per-user session data small, ideally less than 4KB each.
Session
overflow (Allow overflow) of
non-distributed/non-persisted sessions is generally a dangerous
practice. This creates an unbounded queue for sessions, and it's rarely
good to ever have unbounded queues, especially with objects that are
often times quite big and long-lived. This can easily cause out of
memory errors with sudden spikes of load, and allows for simple Denial
of Service (DoS) attacks, whether they be malicious or an errant script.
Consider disabling session overflow for non-distributed/non-persistent
sessions (by default it is disabled), and adding logic to the
application to check for overflow and handle that. Then, sufficient
queue tuning, session timeout tuning, and horizontal scaling should be
done to support the required number of sessions. When overflow occurs
for non-distributed sessions, an instance of a non-null session is
returned and it is set to invalid. This can be checked by the
application developer.
Note that Allow overflow does not
apply to distributed sessions, although the maximum in-memory
session count does still act as an in-memory cache:
Allow overflow [...] is valid only in non-distributed sessions mode.
Database Session Persistence
There are various important tuning settings for database session persistence, including, for example, the write frequency.
Session Data Disappears on Fail Over
In order for HTTP Session fail over to work properly an application has to code their Java objects properly by implementing either Serializable or Externalizable. If the developers fail to do this then when some negative event causes users to fail over to another JVM session data will simply disappear.
Annotation Scanning
Consider disabling annotation scanning if not needed:
Enterprise applications that contain many classes and are enabled for annotations processing (are not marked as "metadata-complete") take extra time to deploy. Extra time is necessary to scan application binaries for annotations that were introduced by Java EE 5. If there are no additional options to limit which classes are scanned, when scanning is enabled for a module all classes in the module must be scanned. A scan of all classes is necessary even when only a small subset of classes within a given module has annotations.
ServletContext.getResource performance
The Java Enterprise Edition 6 (JEE6) specification changed
the behavior of ServletContext.getResource to also
search for resources in META-INF/resources directories of
any JAR files in /WEB-INF/lib:
javax/servlet/ServletContext.getResourcewill first search the document root of the web application for the requested resource, before searching any of the JAR files inside/WEB-INF/lib.
WAS starts to implement JEE6 in version 8 with some performance improvements starting with 8.0.0.10 and 8.5.5.5.
If you notice a lot of time spent in ServletContext.getResource (more
specifically,
com/ibm/ws/webcontainer/util/MetaInfResourcesFileUtils), or
significant processing unzipping JARs with that method in the stack, and
if you can confirm with your application developers that there are no
resources in the JAR files in the WARs, then you can set com.ibm.ws.webcontainer.SkipMetaInfResourcesProcessing = true
to revert to JEE5
behavior.
The custom property
com.ibm.ws.webcontainer.metainfresourcescachesize, which
defaults to 20, may be used to reduce META-INF/lib
searching and JAR processing. If tracing is enabled with
com.ibm.ws.webcontainer.util.*=all, a cache hit will
produce the trace entry starting with
got cached META-INF name.
Timeouts
"In general, increasing values for timeouts or pool sizes will delay recognition of a downstream component failure, but in the case of pool sizes a larger value also provides some buffering in the event of a failure. As you can see, tuning to prevent your website from stalling in the event of a failure will require a tradeoff between increasing and decreasing various parameters. Arriving at the optimal values for your environment will require iterative testing with various settings and failure scenarios so that you (or at least your computer systems) will be prepared to fail, which in turn should help insure your success (and continued employment)."
WebContainer Diagnostic Trace
The following diagnostic trace can be used:
com.ibm.ws.http.channel.inbound.impl.HttpICLReadCallback=all:com.ibm.ws.http.channel.inbound.impl.HttpInboundLink=all
For each request, the following entries will appear in trace.log for a new connection
[9/26/11 16:07:30:143 PDT] 00000029 HttpInboundLi 3 Init on link: com.ibm.ws.http.channel.inbound.impl.HttpInboundLink@83d083d
com.ibm.ws.channel.framework.impl.InboundVirtualConnectionImpl@6c706c7
[9/26/11 16:07:30:144 PDT] 00000029 HttpInboundLi > ready: com.ibm.ws.http.channel.inbound.impl.HttpInboundLink@83d083d
com.ibm.ws.channel.framework.impl.InboundVirtualConnectionImpl@6c706c7 Entry
[9/26/11 16:07:30:144 PDT] 00000029 HttpInboundLi 3 Parsing new information: com.ibm.ws.channel.framework.impl.InboundVirtualConnectionImpl@6c706c7
[9/26/11 16:07:30:146 PDT] 00000029 HttpInboundLi 3 Received request number 1 on link com.ibm.ws.http.channel.inbound.impl.HttpInboundLink@83d083d
[9/26/11 16:07:30:146 PDT] 00000029 HttpInboundLi 3 Discrimination will be called
[9/26/11 16:07:30:149 PDT] 00000029 SystemOut O SWAT EAR: Invoking com.ibm.Sleep by anonymous (127.0.0.1)... []
[9/26/11 16:07:31:151 PDT] 00000029 SystemOut O SWAT EAR: Done com.ibm.Sleep
[9/26/11 16:07:31:152 PDT] 00000029 HttpInboundLi 3 close() called: com.ibm.ws.http.channel.inbound.impl.HttpInboundLink@83d083d
com.ibm.ws.channel.framework.impl.InboundVirtualConnectionImpl@6c706c7
[9/26/11 16:07:31:153 PDT] 00000029 HttpInboundLi 3 Reading for another request...
[9/26/11 16:07:31:153 PDT] 00000029 HttpInboundLi < ready ExitFor an existing connection, it will be slightly different:
[9/26/11 16:07:35:139 PDT] 00000028 HttpICLReadCa 3 complete() called: com.ibm.ws.channel.framework.impl.InboundVirtualConnectionImpl@6c706c7
[9/26/11 16:07:35:139 PDT] 00000028 HttpInboundLi 3 Parsing new information: com.ibm.ws.channel.framework.impl.InboundVirtualConnectionImpl@6c706c7
[9/26/11 16:07:35:141 PDT] 00000028 HttpInboundLi 3 Received request number 2 on link com.ibm.ws.http.channel.inbound.impl.HttpInboundLink@83d083d
[9/26/11 16:07:35:141 PDT] 00000028 HttpInboundLi 3 Discrimination will be called
[9/26/11 16:07:35:144 PDT] 00000028 SystemOut O SWAT EAR: Invoking com.ibm.Sleep by anonymous (127.0.0.1)... []
[9/26/11 16:07:36:146 PDT] 00000028 SystemOut O SWAT EAR: Done com.ibm.Sleep
[9/26/11 16:07:36:147 PDT] 00000028 HttpInboundLi 3 close() called: com.ibm.ws.http.channel.inbound.impl.HttpInboundLink@83d083d
com.ibm.ws.channel.framework.impl.InboundVirtualConnectionImpl@6c706c7
[9/26/11 16:07:36:148 PDT] 00000028 HttpInboundLi 3 Reading for another request...The time between the "Discrimination will be called" and "close()" lines is when the request/response is executed.
IBM Java -Xtrace
If you want to look at the response times of a particular Java method, and you're using the IBM JVM, then you could use -Xtrace method trace. For example, we know that all HTTP(s) requests for servlets go through javax/servlet/http/HttpServlet.service, so we could use the generic JVM argument:
-Xtrace:methods={javax/servlet/http/HttpServlet.service},print=mtEvery time this method is executed, the following entries will be
written to native_stderr.log:
23:21:46.020*0x2b28d0018700 mt.0 > javax/servlet/http/HttpServlet.service(Ljavax/servlet/ServletRequest;Ljavax/servlet/ServletResponse;)V Bytecode method, This = 2b292400fcf8
23:21:47.071 0x2b28d0018700 mt.6 < javax/servlet/http/HttpServlet.service(Ljavax/servlet/ServletRequest;Ljavax/servlet/ServletResponse;)V Bytecode methodRemember that servlets can include other servlets (usually through JSPs), and the method trace entries will be properly indented, but just make sure you match the right entry and exit to get the correct elapsed time.
Method trace is more useful when you already have some idea of where the slowdown may be. For example, you can specify a list of particular business methods, and then iteratively drill down into those that are slow until you reach the slow method. This of course won't help if the problem is systemic, such as garbage collection, operating system paging, etc., since that will arbitrarily affect any methods. However, it is good at pinpointing backend slowdowns (e.g. put a method trace around database calls).
Transport Channels
How transport channels work:
The product web container manages all HTTP requests to servlets, JavaServer Pages and web services. Requests flow through a transport chain to the web container. The transport chain defines the important tuning parameters for performance for the web container. There is a transport chain for each TCP port that the product is listening on for HTTP requests. For example, the default HTTP port 9080 is defined in web container inbound channel chain.
The default write buffer size for HTTP requests is 32768 bytes. Responses greater than this value trigger an implicit flush, and if no content length was specified, result in the response being sent with chunked Transfer-Encoding. Setting this value much higher probably does not result in significantly fewer actual write() system calls, as the underlying OS buffers are unlikely to accept such large writes. The most interest in this property is not for performance, but as a safety net for response data being written prior to the headers being complete. Or to avoid chunked responses (one-off clients may be confused by some unexpected chunked responses, download progress cannot be estimated, etc).
Asynchronous I/O (AIO) versus New I/O (NIO)
AIO is the default TCP transport mechanism which is a WAS feature that uses a native library on each operating system to utilize operating system features for asynchronous I/O. An alternative is NIO which is Java's built in asynchronous I/O (also uses native functions in the JVM). Historically, AIO has been disabled primarily to decrease native memory pressures on 32-bit processes running near the edge. There are no clear performance numbers comparing AIO versus NIO. Therefore, consider testing with NIO instead.
In general, AIO should show a marginal performance improvement over NIO because it simplifies some of the selector logic and reduces thread context switching. On newer versions of Windows, AIO may have poorer performance.
AIO may report more concurrently active threads than NIO in the WebContainer thread pool because of a design difference in the way the WebContainer thread pool is used to handle network input/output. In particular, AIO runs ResultHandler Runnables in the WebContainer thread pool which may be idle in the sense that they are waiting for I/O, but are considered active by the WebContainer thread pool because they are actively waiting for AIO results. This behavior is by design and it may only be a concern if the concurrently active thread count is 90% or more of the maximum size of the thread pool. Application performance should primarily be judged by response times and throughput, not by thread pool utilization.
There are two AIO native libraries shipped with WAS: ibmaio and
ibmaiodbg (e.g. .so or .dll). If the JVM is
started with -DAIODebugNative=true then
ibmaiodbg is loaded instead which writes additional debug
tracing to traceaio.txt in the JVM's working directory
(e.g. $WAS/profiles/$PROFILE/). This
traceaio.txt file does not wrap and cannot be enabled or
disabled dynamically. In general, this should be paired with the WAS
diagnostic trace
*=info:com.ibm.ws.webcontainer.*=all:com.ibm.ws.wswebcontainer.*=all:com.ibm.wsspi.webcontainer.*=all:HTTPChannel=all:GenericBNF=all:TCPChannel=all
With NIO, a dedicated thread does the scheduling for the other WC
threads rather than how AIO has each WC thread do scheduling as needed.
This may avoid certain AIO deadlock scenarios with persistent
connections where all threads are in
com/ibm/ws/util/BoundedBuffer.waitPut_ after
com/ibm/ws/http/channel/inbound/impl/HttpInboundLink.close.
TCP Transport Channel
Maximum Open Connections
By default, each TCP transport channel allows up to 20,000 concurrently open incoming connections (Maximum open connections).
Benefits of a large value are:
- AIO/NIO intensive work (e.g. most of the time spent reading or writing HTTP responses) can process more concurrent requests.
- There can be more keepalive connections.
- Certain applications have many connections with little activity on each connection.
- Other functions such as asynchronous servlets and WebSockets may require a large number of connections.
Disadvantages of a large value are:
- If there is a backup in the application, host, or external services, too many requests can queue and increase response times without any timeout notification to end-users, unless there are timeouts in upstream proxies (for example, ServerIOTimeout in IHS).
- The number of connections must be supported by operating system and process resource limits such (for example, on a POSIX system, every socket requires a file descriptor and thus the open file ulimit must be large enough).
Keep alive
Both tWAS and Liberty set TCP KeepAlive on TCP channel sockets by
default (setKeepAlive(true)).
503 Service Unavailable
WAS will send back a 503 in at least these situations:
- If the WAS HTTP transport channel is stopping or stopped.
- If there is an internal failure when setting up a new connection.
- If the web application containing the target servlet is stopping, stopped, restarting, uninstalled, etc.
An application may send back a 503 response itself, as can other products such as the SIP proxy, Java Proxy Server, On Demand Router, etc.
Apache HttpClient
To isolate your deployment from the OSS framework "Apache HTTP Components" provided by WAS, you would define one or more of the system properties.
For example:
-Dcom.ibm.ws.classloader.server.alwaysProtectedPackages=org.apache.http.The input will cause the server to block all loadClass() operations on class names containing the package prefix "org.apache.http.". If you need to block getResource() operations on org/apache/http/, then you would also define property:
-Dcom.ibm.ws.classloader.server.alwaysProtectedResources=org/apache/http/And if you need access to a subpackage of org.apache.http., or a class in org.apache.http., you could define property:
-Dcom.ibm.ws.classloader.server.alwaysAllowedPackages=org.apache.http.subpkg.,org.apache.http.ClassNameStartup
Common Tuning
Context and Dependency Injection (CDI)
- With tWAS >= 9, CDI is enabled by default. With tWAS < 9, CDI
is only enabled if an application has a
beans.xmlfile - If all applications do not use CDI
beans.xml, then set-Dcom.ibm.ws.cdi.enableImplicitBeanArchives=falseor to disable CDI completely,-Dcom.ibm.ws.cdi.enableCDI=false - To disable CDI on a per-application basis, use the amm.filter.properties file.
Application Startup
There is a "server.startup" thread pool (default maximum size of 3) in which applications start. If this thread pool (actually, its queue of work) is full, the following message will be printed in SystemOut.log:
[10/9/18 19:07:24:002 CEST] 00000001 ThreadPool I WSVR0629I: The request buffer for thread pool "server.startup" has reached its capacity.However, simply increasing the server.startup thread pool may not help because large parts of application startup within the WebContainer are single threaded and you may see contention in com.ibm.ws.webcontainer.component.WebContainerImpl. A feature request was opened but deemed too risky and complex: https://www.ibm.com/developerworks/rfe/execute?use_case=viewRfe&CR_ID=21322
As per Amdahl's Law, the best thing to do is to profile and optimize the startup time of the application(s) taking the longest time to start. For J9-based JVMs, use IBM Java Health Center and for HotSpot-based JVMs, use OpenJDK Mission Control. More simply, take a bunch of thread dumps during startup to see where most of the time is spent. If there aren't many opportunities to optimize startup, then consider splitting applications into separate clusters.
Alternatively, there is a feature called "Launch application before server completes startup" which may be disabled, although note: "A setting of true informs the product that the application might start on a background thread and thus server startup might continue without waiting for the application to start. Thus, the application might not be ready for use when the application server starts."
You may see a stack with a synchronization block such as:
3XMTHREADINFO "server.startup : 2" J9VMThread:0xDE4DAD00, j9thread_t:0xDE3E61D4, java/lang/Thread:0xF6424EB8, state:CW, prio=5
3XMTHREADINFO1 (native thread ID:0x12AF, native priority:0x5, native policy:UNKNOWN)
3XMTHREADINFO2 (native stack address range from:0x01981000, to:0x019C2000, size:0x41000)
3XMTHREADINFO3 Java callstack:
4XESTACKTRACE at java/lang/Thread.sleep(Native Method)
4XESTACKTRACE at java/lang/Thread.sleep(Thread.java:893)
4XESTACKTRACE at com/ibm/test/ApplicationStartup.contextInitialized(ApplicationStartup.java:12)
4XESTACKTRACE at com/ibm/ws/webcontainer/webapp/WebApp.notifyServletContextCreated(WebApp.java:1651)
4XESTACKTRACE at com/ibm/ws/webcontainer/webapp/WebAppImpl.initialize(WebAppImpl.java:410)
4XESTACKTRACE at com/ibm/ws/webcontainer/webapp/WebGroupImpl.addWebApplication(WebGroupImpl.java:88)
4XESTACKTRACE at com/ibm/ws/webcontainer/VirtualHostImpl.addWebApplication(VirtualHostImpl.java:169)
4XESTACKTRACE at com/ibm/ws/webcontainer/WSWebContainer.addWebApp(WSWebContainer.java:749)
4XESTACKTRACE at com/ibm/ws/webcontainer/WSWebContainer.addWebApplication(WSWebContainer.java:634)
4XESTACKTRACE at com/ibm/ws/webcontainer/component/WebContainerImpl.install(WebContainerImpl.java:422)
4XESTACKTRACE at com/ibm/ws/webcontainer/component/WebContainerImpl.start(WebContainerImpl.java:714)
4XESTACKTRACE at com/ibm/ws/runtime/component/ApplicationMgrImpl.start(ApplicationMgrImpl.java:1154)
4XESTACKTRACE at com/ibm/ws/runtime/component/DeployedApplicationImpl.fireDeployedObjectStart(DeployedApplicationImpl.java:1369)
4XESTACKTRACE at com/ibm/ws/runtime/component/DeployedModuleImpl.start(DeployedModuleImpl.java:638)
4XESTACKTRACE at com/ibm/ws/runtime/component/DeployedApplicationImpl.start(DeployedApplicationImpl.java:967)
4XESTACKTRACE at com/ibm/ws/runtime/component/ApplicationMgrImpl.startApplication(ApplicationMgrImpl.java:760)
4XESTACKTRACE at com/ibm/ws/runtime/component/ApplicationMgrImpl.start(ApplicationMgrImpl.java:2147)
4XESTACKTRACE at com/ibm/ws/runtime/component/CompositionUnitMgrImpl.start(CompositionUnitMgrImpl.java:445)
4XESTACKTRACE at com/ibm/ws/runtime/component/CompositionUnitImpl.start(CompositionUnitImpl.java:123)
4XESTACKTRACE at com/ibm/ws/runtime/component/CompositionUnitMgrImpl.start(CompositionUnitMgrImpl.java:388)
4XESTACKTRACE at com/ibm/ws/runtime/component/CompositionUnitMgrImpl.access$500(CompositionUnitMgrImpl.java:116)
4XESTACKTRACE at com/ibm/ws/runtime/component/CompositionUnitMgrImpl$CUInitializer.run(CompositionUnitMgrImpl.java:994)
4XESTACKTRACE at com/ibm/wsspi/runtime/component/WsComponentImpl$_AsynchInitializer.run(WsComponentImpl.java:349)
4XESTACKTRACE at com/ibm/ws/util/ThreadPool$Worker.run(ThreadPool.java:1659)
3XMTHREADINFO "server.startup : 1" J9VMThread:0xDE4D7100, j9thread_t:0xDE3E5EB8, java/lang/Thread:0xF6424F40, state:B, prio=5
3XMTHREADINFO1 (native thread ID:0x12AE, native priority:0x5, native policy:UNKNOWN)
3XMTHREADINFO2 (native stack address range from:0x01940000, to:0x01981000, size:0x41000)
3XMTHREADBLOCK Blocked on: com/ibm/ws/webcontainer/component/WebContainerImpl@0xE72A44F8 Owned by: "server.startup : 2" (J9VMThread:0xDE4DAD00, java/lang/Thread:0xF6424EB8)
3XMTHREADINFO3 Java callstack:
4XESTACKTRACE at com/ibm/ws/webcontainer/component/WebContainerImpl.start(WebContainerImpl.java:714)
4XESTACKTRACE at com/ibm/ws/runtime/component/ApplicationMgrImpl.start(ApplicationMgrImpl.java:1154)
4XESTACKTRACE at com/ibm/ws/runtime/component/DeployedApplicationImpl.fireDeployedObjectStart(DeployedApplicationImpl.java:1369)
4XESTACKTRACE at com/ibm/ws/runtime/component/DeployedModuleImpl.start(DeployedModuleImpl.java:638)
4XESTACKTRACE at com/ibm/ws/runtime/component/DeployedApplicationImpl.start(DeployedApplicationImpl.java:967)
4XESTACKTRACE at com/ibm/ws/runtime/component/ApplicationMgrImpl.startApplication(ApplicationMgrImpl.java:760)
4XESTACKTRACE at com/ibm/ws/runtime/component/ApplicationMgrImpl.start(ApplicationMgrImpl.java:2147)
4XESTACKTRACE at com/ibm/ws/runtime/component/CompositionUnitMgrImpl.start(CompositionUnitMgrImpl.java:445)
4XESTACKTRACE at com/ibm/ws/runtime/component/CompositionUnitImpl.start(CompositionUnitImpl.java:123)
4XESTACKTRACE at com/ibm/ws/runtime/component/CompositionUnitMgrImpl.start(CompositionUnitMgrImpl.java:388)
4XESTACKTRACE at com/ibm/ws/runtime/component/CompositionUnitMgrImpl.access$500(CompositionUnitMgrImpl.java:116)
4XESTACKTRACE at com/ibm/ws/runtime/component/CompositionUnitMgrImpl$CUInitializer.run(CompositionUnitMgrImpl.java:994)
4XESTACKTRACE at com/ibm/wsspi/runtime/component/WsComponentImpl$_AsynchInitializer.run(WsComponentImpl.java:349)
4XESTACKTRACE at com/ibm/ws/util/ThreadPool$Worker.run(ThreadPool.java:1659)Enabling Diagnostic Trace during Startup
The normal mechanism to enable diagnostic trace at runtime is through the Runtime tab or an MBean call; however, both are unavailable during startup. Instead, Java Surgery (https://www.ibm.com/support/pages/ibm-runtime-diagnostic-code-injection-java-platform-java-surgery) may be used to call the static method to set trace dynamically and this works even during startup. Example:
java -jar surgery.jar -pid ${PID} -command ExecuteMethod -class com.ibm.ejs.ras.ManagerAdmin -method setTraceState -arg "*=info:WAS.j2c=all:RRA=all:Transaction=all"Startup Order
The startup order of applications may be controlled with the Startup order value.
Java Persistence API (JPA)
JPA 2.0 and before uses OpenJPA. JPA 2.1 and later uses EclipseLink (unlesss otherwise configured).
Increasing the integer value of [com.ibm.websphere.jpa.entitymanager.poolcapacity] might improve performance by reducing the number of EntityManager instances that must be created. However, increasing the value affects the amount of consumed memory (https://www.ibm.com/support/knowledgecenter/SSAW57_8.5.5/com.ibm.websphere.nd.doc/ae/rejb_jpa_system_prop.html).
OpenJPA
If an OpenJPA application is running in a single JVM, then you may use the OpenJPA data cache: https://www.ibm.com/support/knowledgecenter/SSAW57_8.5.5/com.ibm.websphere.nd.doc/ae/tejb_datcacheconfig.html
Otherwise, you may use the OpenJPA second level (L2) cache provider plug-in over Dynacache: https://www.ibm.com/support/knowledgecenter/SSAW57_8.5.5/com.ibm.websphere.nd.doc/ae/rdyn_openjpa.html
L2 caching increases the memory consumption of the application, therefore, it is important to limit the size of the L2 cache. There is also a possibility of stale data for updated objects in a clustered environment. Configure L2 caching for read-mostly, infrequently modified entities. L2 caches are not recommended for frequently and concurrently updated entities.
If the application has a set of data that is used in a static, read-only method, like accessing basic persistent fields and persisting unidirectional relationships to a read-only type, then the WSJPA ObjectCache is a non-distributed cache of read-only entities that operates at the EntityManagerFactory object level: https://www.ibm.com/support/knowledgecenter/SSAW57_8.5.5/com.ibm.websphere.nd.doc/ae/tejb_jpaobjectcache.html
To trace all OpenJPA initiated SQL statements, edit persistence.xml and add a property with name "openjpa.Log" and value "SQL=TRACE". This will go to SystemErr.log:
[1/5/10 5:20:27:063 CST] 00000034 SystemErr R 1293127 GTIMSPersistence TRACE [WebContainer : 5] openjpa.jdbc.SQL - <t 292426094, conn 2131263240>
[1730 ms] spentNow look for the corresponding query, i.e. the statement corresponding to connection "conn 2131263240". The duration of the query in this case was 1730ms above.
[1/5/10 5:20:25:333 CST] 00000034 SystemErr R 1291397 GTIMSPersistence TRACE [WebContainer : 5] openjpa.jdbc.SQL - <t 292426094, conn 2131263240>
executing prepstmnt 393222 select doc_Id from (SELECT d.doc_Id FROM GTIMS.Doc_Component_Instance d where d.doc_Component_Id = ? and d.document_Component_Inst_Data=?
intersect SELECT d.doc_Id FROM GTIMS.Doc_Component_Instance d where d.doc_Component_Id = ? and d.document_Component_Inst_Data=?) where doc_Id!=?
[params=(long) 2, (String) -1761467286, (long) 1, (String) CORPORATION, (long) 82305]Latest JPA performance options available in WAS 8.5:
<property name="openjpa.ConnectionRetainMode" value="always"/>
<property name="wsjpa.FastPath" value="true"/>
<property name="openjpa.RestoreState" value="false"/>
<property name="openjpa.OptimizeIdCopy" value="true"/>
<property name="openjpa.ProxyManager" value="delayCollectionLoading=true"/>Dynamic Cache (Dynacache)
Dynacache Recipe
- If using memory-to-memory HTTP session replication, weigh whether the costs and complexity are better than simple sticky sessions with re-login, or consider using a linearly scalable external cache provider, or the Dynacache client/server replication model.
- Install and use the Cache Monitor sample application to watch cache hit rates and cache exhaustion.
- If using
SHARED_PUSHreplication, consider usingSHARED_PUSH_PULLto reduce replication volume.
General Dynacache Notes
"WebSphere Application Server's Dynacache provides a general in-memory caching service for objects and page fragments generated by the server. The DistributedMap and DistributedObjectCache interfaces can be used within an application to cache and share Java objects by storing references to these objects in the cache for later use. Servlet caching, on the other hand, enables servlet and JSP response fragments to be stored and managed by a customizable set of caching rules."
Caching the output of servlets, commands, and JavaServer Pages (JSP) improves application performance... [Dynacache] intercepts calls through a servlet service method or a command execute method, and either stores the output of the object to the cache or serves the content of the object from the dynamic cache... The dynamic cache service is enabled by default. (https://www.ibm.com/support/knowledgecenter/SSAW57_8.5.5/com.ibm.websphere.nd.doc/ae/tdyn_dynamiccache.html)
For command caching to operate properly, you must enable servlet caching. (https://www.ibm.com/support/knowledgecenter/SSAW57_8.5.5/com.ibm.websphere.nd.doc/ae/tdyn_cachecommands.html)
There is an option called "limit memory cache size" to constrain how much memory Dynacache will use: https://www.ibm.com/support/knowledgecenter/SSAW57_8.5.5/com.ibm.websphere.nd.doc/ae/udyn_rcachesettings.html
Dynamic Cache Replication - Data Replication Service (DRS)
[DRS] replicates data from the dynamic cache service across the consumers in a replication domain.
To create replication domains manually, click Environment > Replication domains in the administrative console.
To create a new replication domain automatically when you create a cluster, click Servers > Clusters > New in the administrative console.
Do not use the default value of a single replica for the Number of replicas for dynamic cache replication domains. Instead, use a full group replica for any replication domains that you configure for dynamic cache.
In the administrative console, click Servers > Server Types > WebSphere application servers > server_name > Container services > Dynamic cache service. To enable replication, select Enable cache replication. Choose a replication domain.
With replication, data is generated one time and copied or replicated to other servers in the cluster, saving time and resources. Cache replication can take on three forms:
PUSH - Send out new entries, both ID and data, and updates to those entries.
PULL - Requests data from other servers in the cluster when that data is not locally present. This mode of replication is not recommended.
PUSH/PULL - Sends out IDs for new entries, then, only requests from other servers in the cluster entries for IDs previously broadcast. The dynamic cache always sends out cache entry invalidations.
Specifically, for PUSH or PUSH/PULL, the dynamic cache broadcasts the update asynchronously, based on a timed interval rather than sending them immediately when they are created. Invalidations are sent immediately.
SHARED_PUSH policy means as an object is added to the cache, it is immediately replicated to other nodes which is expensive in terms of JVM memory usage. Instead, the SHARED_PUSH_PULL policy should be used. This means only the cache key is replicated to the other nodes, and if the object is required it is replicated on the first 'cache miss'. This is much more memory efficient at the expense of a longer response time on the first access to the cached object. As the object would only be required on failover, this would be a rare occurrence anyway. This change in caching policy should be reviewed by the application development team, and tested in a failover scenario.
The other replication mode is NOT_SHARED: "When you use the Not Shared setting, as cache entries are created, neither the cache content nor the cache IDs are propagated to other servants or servers in the replication domain. However, invalidations are propagated to other servants or servers." (https://www.ibm.com/support/knowledgecenter/SSAW57_8.5.5/com.ibm.websphere.nd.doc/ae/udyn_rcachesettings.html)
There are two major types of invalidations: implicit and explicit. Implicit invalidations occur when a cache entry times out (if it has a time out) or it gets pushed out of the cache by the Least Recently Used (LRU) algorithm if the cache is full (based on the maximum cache size). Explicit invalidations occur when someone calls the DistributedMap invalidate* methods (for example, on a user logout) or through the same thing on a dependency. In some cases, implicit invalidations are not necessary to propagate, such as in large WebSphere Portal clusters: http://www-10.lotus.com/ldd/portalwiki.nsf/dx/Tuning_a_cluster_environment_%28Tuning_Guide_6.1.x%29. There are two JVM custom properties that avoid these implicit invalidations: com.ibm.ws.cache.CacheConfig.filterTimeOutInvalidation=true for the timeout case and com.ibm.ws.cache.CacheConfig.filterLRUInvalidation=true for the case when a cache is full and an entry is pushed out.
Replication type: https://www.ibm.com/support/knowledgecenter/SSAW57_8.5.5/com.ibm.websphere.nd.doc/ae/udyn_scacheinstancesettings.html
Architecture
The main architectures are peer-to-peer (default) and client/server.
Potential Tuning
Advanced options may help with DRS and Dynacache performance:
-Dcom.ibm.ws.cache.CacheConfig.useServerClassLoader=true- Deserializes an InvalidationEvent using the system classloader first and then using application classloader which generally improves performance.
-Dcom.ibm.ws.cache.CacheConfig.filterLRUInvalidation=true- In general, if a cache item is evicted because of lack of space, it's generally not needed to invalidate the entry in other JVMs.
-Dcom.ibm.ws.cache.CacheConfig.filterTimeOutInvalidation=true- In general, entries will timeout independently across all the JVMs at approximately the same time, so it's not needed to explicitly send an invalidation event.
-Dcom.ibm.ws.cache.CacheConfig.filterInactivityInvalidation=true- In general, entries will timeout independently across all the JVMs at approximately the same time, so it's not needed to explicitly send an invalidation event.
-Dcom.ibm.ws.cache.CacheConfig.ignoreValueInInvalidationEvent=true
This tuning may be applied globally using the instructions under "configure the custom property globally across all configured cache instances" at http://www-01.ibm.com/support/knowledgecenter/SSAW57_8.5.5/com.ibm.websphere.nd.multiplatform.doc/ae/rdyn_tunediskcache.html
ignoreValueInInvalidationEvent
Specifies whether the cache value of Invalidation event is ignored. If it is true, the cache value of Invalidation event is set to NULL when the code is returned to the caller.
propogateInvalidationsNotSharedValue
Default set to false, which provides the best performance. If it is set to true, Dynacache will send invalidations to peer members in the cluster on cache entry insertions and updates for a NOT_SHARED cache instance. This can cause a significant performance impact.
DRS Thread Pool
Consider tuning the DRS thread pool. Defaults:
- DRS_THREADPOOL_MINSIZE=40
- DRS_THREADPOOL_MAXSIZE-100
- DRS_THREADPOOL_ISGROWABLE=false
ws/WSSecureMap
The ws/WSSecureMap Dynacache is used for horizontal security attribute propagation (web inbound security attribute propagation).
System Dump or HPROF Heapdump Analysis
With the IBM Memory Analyzer Tool and the IBM Extensions for Memory Analyzer, use the Dynacache queries to get details of Dynacache in a system dump. The list of queries are:

For example, review the number of entries, cache size, and hit ratio:


A high number of misses could mean that the cache size is too small, there are many invalidations, there is a get-check-update pattern without warmup/pre-loading, etc.
Clearing Cache
The DynaCache MBean is a scriptable interface to interact with DynaCache caches at runtime.
For example, to clear a DynaCache cache instance on a server at runtime, use the following Jython wsadmin code:
AdminControl.invoke(AdminControl.completeObjectName("type=DynaCache,node=MYNODE,process=MYSERVER,*"), "clearCache", "MYCACHEINSTANCE")
The documentation for clearCache says it will "clear all cache entries for the named cache instance." This will clear both the in-memory cache entries as well as any cache entries offloaded to disk. You can confirm this by executing the "getAllCacheStatistics" command on the cache instance before and after the clearCache call.
Servlet Caching
Servlet caching may cause a significant throughput improvement (in one benchmark, 30-60%).
Use this task to define cacheable objects inside the cachespec.xml, found inside the web module WEB-INF or enterprise bean META-INF directory... [or] you can save a global cachespec.xml in the application server properties directory, but the recommended method is to place the cache configuration file with the deployment module.
In situations where there is a global cachespec.xml file in the application server properties directory, and a cachespec.xml file in an application, the entries in the two cachespec.xml files are merged. If there are conflicting entries in the two files, the entries in the cachespec.xml file that is in the application override the entries in the global cachespec.xml file for that application.
To cache an object, WebSphere Application Server must know how to generate unique IDs for different invocations of that object. The
<cache-id>element performs that task. Each cache entry can have multiple cache-ID rules that run in order until either a rule returns a cache-ID that is not empty or no more rules remain to run. If no cache-ID generation rules produce a valid cache ID, then the object is not cached.Use dependency ID elements to specify additional cache group identifiers that associate multiple cache entries to the same group identifier. The dependency ID is generated by concatenating the dependency ID base string with the values returned by its component elements. If a required component returns a null value, then the entire dependency ID is neither generated nor.
Invalidate other cache entries as a side effect of this object start, if relevant. You can define invalidation rules in exactly the same manner as dependency IDs... The invalidation ID is generated by concatenating the invalidation ID base string with the values returned by its component element. If a required component returns a null value, then the entire invalidation ID is not generated and no invalidation occurs. Multiple invalidation rules can exist per cache-entry. All invalidation rules run separately.
The dynamic cache reloads the updated file automatically. If you are caching static content and you are adding the cache policy to an application for the first time, you must restart the application. You do not need to restart the application server to activate the new cache policy.
When new versions of the cachespec.xml are detected, the old policies are replaced. Objects that cached through the old policy file are not automatically invalidated from the cache; they are either reused with the new policy or eliminated from the cache through its replacement algorithm.
Full cachespec.xml schema: https://www.ibm.com/support/knowledgecenter/SSAW57_8.5.5/com.ibm.websphere.nd.doc/ae/rdyn_cachespec.html
The <timeout> is specified in seconds. If a
timeout is not specified, then the cache entry does not expire. However,
in both cases, a cache entry may be evicted or invalidated either
explicitly, by invalidation rules, or by the Least Recently Used (LRU)
algorithm when the cache is full.
Before WAS 9, if servlet caching is enabled in an application server, all requests pass through Dynacache, even if there is no chance they will be cached. Starting in WAS 9, only requests that have a context root associated with a cachespec.xml flow through Dynacache. This means that using a global cachespec.xml in WAS/profiles/{PROFILE}/properties only works for applications that have a cachespec.xml in the WAR's WEB-INF. To "defer" to a global cachespec.xml, a "dummy" cachespec.xml may be placed in the application such as:
A cached response served from the servlet cache will also set a
CACHED_RESPONSE: true response header.
<?xml version="1.0" ?>
<!DOCTYPE cache SYSTEM "cachespec.dtd">
<cache>
<cache-entry>
<class>servlet</class>
<name>/dummy</name>
</cache-entry>
</cache>Example custom ID generators: https://github.com/kgibm/WASServletCachingIDGenerators
Servlet Caching Example
Suppose that a servlet manages a simple news site. This servlet uses the query parameter "action" to determine if the request views (query parameter "view") news or updates (query parameter "update") news (used by the administrator). Another query parameter "category" selects the news category. Suppose that this site supports an optional customized layout that is stored in the user's session using the attribute name "layout". Here are example URL requests to this servlet:
http://yourhost/yourwebapp/newscontroller?action=view&category=sports (Returns a news page for the sports category )
http://yourhost/yourwebapp/newscontroller?action=view&category=money (Returns a news page for the money category)
http://yourhost/yourwebapp/newscontroller?action=update&category=fashion (Allows the administrator to update news in the fashion category)Define the
<cache-entry>elements that are necessary to identify the servlet. In this case, the URI for the servlet is "newscontroller", so this is the cache-entry<name>element. Because this example caches a servlet or JavaServer Pages (JSP) file, the cache entry class is "servlet".Define cache ID generation rules. This servlet caches only when action=view, so one component of the cache ID is the parameter "action" when the value equals "view". The news category is also an essential part of the cache ID. The optional session attribute for the user's layout is included in the cache ID.
Define dependency ID rules. For this servlet, a dependency ID is added for the category. Later, when the category is invalidated due to an update event, all views of that news category are invalidated.
Define invalidation rules. Because a category dependency ID is already defined, define an invalidation rule to invalidate the category when action=update. To incorporate the conditional logic, add "ignore-value" components into the invalidation rule. These components do not add to the output of the invalidation ID, but only determine whether or not the invalidation ID creates and runs.
<cache-entry> <name>newscontroller</name> <class>servlet</class> <cache-id> <component id="action" type="parameter"> <value>view</value> <required>true</required> </component> <component id="category" type="parameter"> <required>true</required> </component> <component id="layout" type="session"> <required>false</required> </component> </cache-id> <dependency-id> <component id="category" type="parameter"> <required>true</required> </component> </dependency-id> <invalidation> <component id="action" type="parameter" ignore-value="true"> <value>update</value> <required>true</required> </component> <component id="category" type="parameter"> <required>true</required> </component> </invalidation> </cache-entry>
Servlet Caching by User
Be careful in building your cache ID if cached objects may be user-specific. In such a case, you can use some user-identifiable component for the cache ID such as the JSESSIONID:
<cache-entry> <class>servlet</class> <name>/forward.do</name> <cache-id> <property name="EdgeCacheable">true</property> <component id="type" type="parameter"> <required>true</required> <value>esiParentConsume</value> </component> <component id="JSESSIONID" type="cookie" /> <timeout>35</timeout> <priority>1</priority> </cache-id> </cache-entry>
cachespec.xml
Example to Disable Caching for a Servlet or JSP
<cache-entry>
<class>servlet</class>
<name>com.example.servlet.MyServlet.class</name>
<property name="do-not-cache">true</property>
</cache-entry>
<cache-entry>
<class>servlet</class>
<name>com.ibm._jsp._myjsp.class</name>
<property name="do-not-cache">true</property>
</cache-entry>Monitoring
"Use the administrative console to install the cache monitor application from the app_server_root/installableApps directory. The name of the application is CacheMonitor.ear... you can access the cache monitor using http://your_host_name:your_port_number/cachemonitor" (https://www.ibm.com/support/knowledgecenter/SSAW57_8.5.5/com.ibm.websphere.nd.doc/ae/tdyn_servletmonitor.html).
Monitor the cache hit ratio: https://www.ibm.com/support/knowledgecenter/SSAW57_8.5.5/com.ibm.websphere.nd.doc/ae/tdyn_cache_tune.html
If javacores or other indicators show a lot of JMX activity causing performance issues, use com.ibm.ws.management.connector.soap.logClientInfo=true
Example in dmgr SystemOut.log:
[8/20/13 11:31:19:624 SGT] 0000001d SOAPConnector I SOAP client info: Host/port= localhost/54242, authSubject.getPrincipals()=Another method to monitor Dynacache is using this flight recorder: https://github.com/kelapure/dynacache/blob/master/scripts/DynaCacheStatisticsCSV.py.readme.txt and https://github.com/kelapure/dynacache/blob/master/scripts/DynaCacheStatisticsCSV.py
baseCache
The baseCache is a built-in cache instance. Its replication in a
replication domain is disabled by default (enable under
$SERVER } Container Services } Dynamic cache service). Its
JNDI name is services/cache/distributedmap.
Missed replication
Missed replication may be caused by:
- Uninitialized caches which is usually resolved by
-Dcom.ibm.ws.cache.CacheConfig.createCacheAtServerStartup=true
Disk Offload
Disk offload allows paging cache to/from disk to allow a cache larger than the in-memory cache. The disk offload also includes a garbage collector.
Flush to Disk on Stop
Flush to disk graceful JVM stop may be enabled globally with
-Dcom.ibm.ws.cache.flushToDiskOnStop=true
Messages are printed when this is enabled for each cache and another shows how long it takes to write. For example:
[11/20/20 16:26:41:432 EST] 000000ac Cache I DYNA0060I: Flush to disk on stop is enabled for cache name "baseCache".
[11/20/20 16:30:51:639 EST] 000000ac Cache I DYNA0073I: Flush to disk on stop for cache name "baseCache" has completed. The statistics are: numOfEntriesFlushToDisk=1964 numOfBytesFlushToDisk=70984192 timeElapsedEntriesFlushToDisk=1645 numDepIdsInAuxTable=76253 numCacheIdsInDepIdAuxTable=703152 numTemplatesInAuxTable=10 numCacheIdsInTemplateAuxTable=121752 timeElapsedWriteAuxTables=248560Object Request Broker (ORB) and Remote Method Invocation (RMI)
For IBM JVMs, additionally see the ORB section in the IBM Java chapter.
ORB pass by reference (com.ibm.CORBA.iiop.noLocalCopies) may cause a significant throughput improvement (in one benchmark, 50-60%).
The Object Request Broker (ORB) pass by reference option determines if pass by reference or pass by value semantics should be used when handling parameter objects involved in an EJB request. This option can be found in the administrative console by navigating to Servers => Application Servers => server_name => Object Request Broker (ORB). By default, this option is disabled and a copy of each parameter object is made and passed to the invoked EJB method. This is considerably more expensive than passing a simple reference to the existing parameter object.
To summarize, the ORB pass by reference option basically treats the invoked EJB method as a local call (even for EJBs with remote interfaces) and avoids the requisite object copy. If remote interfaces are not absolutely necessary, a slightly simpler alternative which does not require tuning is to use EJBs with local interfaces. However, by using local instead of remote interfaces, you lose the benefits commonly associated with remote interfaces, location transparency in distributed environments, and workload management capabilities.
The ORB pass by reference option will only provide a benefit when the EJB client (that is, servlet) and invoked EJB module are located within the same classloader. This requirement means that both the EJB client and EJB module must be deployed in the same EAR file and running on the same application server instance. If the EJB client and EJB modules are mapped to different application server instances (often referred to as split-tier), then the EJB modules must be invoked remotely using pass by value semantics.
Set com.ibm.CORBA.ServerSocketQueueDepth to 511 (https://www.ibm.com/support/knowledgecenter/SSAW57_8.5.5/com.ibm.websphere.nd.doc/ae/tprf_tuneappserv.html). If this value is reached, subsequent connection attempts will receive connection refused errors after a connection timeout period (and potentially implicit retries).
The thread pool size is dependent on your workload and system. In typical configurations, applications need 10 or fewer threads per processor. (Servers > Server Types > Application servers > server_name > Container services > ORB service > Thread pool)
Each inbound and outbound request through the ORB requires a thread from the ORB thread pool. In heavy load scenarios or scenarios where ORB requests nest deeply, it is possible for a Java virtual machine (JVM) to have all threads from the ORB thread pool attempting to send requests. Meanwhile, the remote JVM ORB that processes these requests has all threads from its ORB thread pool attempting to send requests. As a result, progress is never made, threads are not released back to the ORB thread pool, and the ORB is unable to process requests. As a result, there is a potential deadlock. Using the administrative console, you can adjust this behavior through the ORB com.ibm.websphere.orb.threadPoolTimeout custom property.
Monitor and tune the ORB service thread pool: http://www.ibm.com/support/knowledgecenter/SSAW57_8.0.0/com.ibm.websphere.nd.doc/info/ae/ae/rorb_tims.html
Monitor and tune the connection cache size (com.ibm.CORBA.MaxOpenConnections): http://www.ibm.com/support/knowledgecenter/SSAW57_8.0.0/com.ibm.websphere.nd.doc/info/ae/ae/rorb_tims.html. Ideally, this should be greater than or equal to the maximum number of concurrent connections, but not so large as to cause too many threads (or in such a case, JNI Reader Threads could be used instead).
By default, the option to "prefer local" (meaning to prefer sending requests to EJBs on the same node, if available) is enabled; however, the deployment manager must be running for it to function: http://www-01.ibm.com/support/knowledgecenter/SSAW57_8.5.5/com.ibm.websphere.nd.multiplatform.doc/ae/urun_rwlm_cluster_create1.html?lang=en
Running with Java security enabled will reduce performance. For example: http://www-01.ibm.com/support/docview.wss?uid=swg21661691
EJBs
If the Performance Monitoring Infrastructure (PMI) counters show a high rate of ejbStore methods being called, then the EJB container cache size may need to be increased: https://www.ibm.com/support/knowledgecenter/SSAW57_8.5.5/com.ibm.websphere.nd.doc/ae/rprf_ejbcontainer.html
Run the EJB Cache trace to ensure the cache sizes are tuned optimally: https://www.ibm.com/support/knowledgecenter/SSAW57_8.5.5/com.ibm.websphere.nd.doc/ae/tejb_tunecash.html
If there is significant heap pressure from stateful session beans (check heapdumps), consider specifying a timeout that the application can handle using -Dcom.ibm.websphere.ejbcontainer.defaultStatefulSessionTimeout=$MINUTES (https://www.ibm.com/support/knowledgecenter/SSAW57_8.5.5/com.ibm.websphere.nd.doc/ae/rprf_ejbcontainer.html)
If PMI shows that most bean instances are being used in the pool, consider increasing the pool size for that application: https://www.ibm.com/support/knowledgecenter/SSAW57_8.5.5/com.ibm.websphere.nd.doc/ae/rprf_ejbcontainer.html. For example, com.ibm.websphere.ejbcontainer.poolSize="*=,3000"
JNI Reader Threads
In general, switching to JNI Reader Threads is only recommended when a very large number of concurrent users/connections is required. Instead of the default one thread per connection (and each client will have at least 2-3 connections: one for bootstrap, one for the listener, and potentially one for TLS), JNI reader threads only require a handful of threads (usually 4 is enough, which is the default), each one of which handles up to 1,024 connections simultaneously using asynchronous I/O.
By default, the ORB uses a Java thread for processing each inbound connection request it receives. As the number of concurrent requests increases, the storage consumed by a large number of reader threads increases and can become a bottleneck in resource-constrained environments. Eventually, the number of Java threads created can cause out-of-memory exceptions if the number of concurrent requests exceeds the system's available resources.
To help address this potential problem, you can configure the ORB to use JNI reader threads where a finite number of reader threads, implemented using native OS threads instead of Java threads, are created during ORB initialization. JNI reader threads rely on the native OS TCP/IP asynchronous mechanism that enables a single native OS thread to handle I/O events from multiple sockets at the same time. The ORB manages the use of the JNI reader threads and assigns one of the available threads to handle the connection request, using a round robin algorithm. Ordinarily, JNI reader threads should only be configured when using Java threads is too memory-intensive for your application environment.
Each JNI thread can handle up to 1024 socket connections and interacts directly with the asynchronous I/O native OS mechanism, which might provide enhanced performance of network I/O processing.
If JNI Readers Threads are enabled, the default number (com.ibm.CORBA.numJNIReaders) is 4 which can handle up to 4,096 concurrent connections: http://www-01.ibm.com/support/knowledgecenter/SS7K4U_8.5.5/com.ibm.websphere.nd.multiplatform.doc/ae/rorb_setg.html?cp=SSAW57_8.5.5&lang=en
Workload Management (WLM)
"Multiple application servers can be clustered with the EJB containers, enabling the distribution of enterprise bean requests between EJB containers on different application servers... EJB client requests are routed to available EJB containers in a round robin fashion based on assigned server weights." (http://www-01.ibm.com/support/knowledgecenter/SSAW57_8.5.5/com.ibm.websphere.nd.doc/ae/crun_srvgrp.html?lang=en)
WLM balances requests in the form of method calls/invocations. The "pattern problem" occurs when there is a pattern of method calls that correlates with the number of cluster members. For example, if there are two cluster members and an even number of method calls such as "create" and "invoke," it's possible that all the lightweight create requests execute on one server, and the heavyweight invoke requests execute on the other server. In that case the "load" on the servers (for example, measured in CPU utilization) is not equal among the servers. Workarounds to this problem include 1) changing the number of cluster members (for example, from even to odd), and 2) adjusting the weights of the cluster members to non-equal values (typically recommended for normalization are cluster weights of 19 and 23).
Java Naming and Directory Interface (JNDI)
By default the JNDI naming caches are unbounded and persist for the life of the JVM. There is one cache per provider URL. If applications use a large variety of names or large named objects, then the caches may use significant amounts of memory. Each cache can be made to timeout (on next access) using the -Dcom.ibm.websphere.naming.jndicache.maxcachelife=$minutes property: http://www-01.ibm.com/support/knowledgecenter/SSAW57_8.5.5/com.ibm.websphere.nd.multiplatform.doc/ae/rnam_jndi_settings.html?cp=SSAW57_8.5.5&lang=en. The caches can be completely disabled with -Dcom.ibm.websphere.naming.jndicache.cacheobject=none. These properties can be placed into the properties Hashtable used in creating the InitialContext.
You can find the size of all JNDI caches by gathering a heapdump or coredump. Open the IBM Memory Analyzer Tool, and click Open Query Browser > Show Retained Set. For the class row, type com.ibm.ws.naming.jcache.Cache and click OK. Review the sum of shallow heaps in the bottom right.
InitialContext
A javax.naming.InitialContext is the starting point to perform naming operations. There is significant processing in creating an InitialContext, so it is recommended to cache them. However, an InitialContext is not thread safe:
An InitialContext instance is not synchronized against concurrent access by multiple threads. (http://docs.oracle.com/javase/8/docs/api/javax/naming/InitialContext.html)
It is recommended to use ThreadLocals to create InitialContexts once. For example:
private final ThreadLocal<InitialContext> jndiContext = new ThreadLocal<InitialContext>() {
protected InitialContext initialValue() {
try {
final InitialContext context = new InitialContext();
return context;
} catch (NamingException e) {
throw new RuntimeException(e);
}
};
};InitialContexts are often used to bind once at application startup (in which case a thread local is not needed); however, it is common practice to catch exceptions on object invocations and re-lookup a resource at runtime, in which case ThreadLocals should be used to avoid the cost of creating InitialContexts.
Message Driven Beans (MDBs)
Activation Specifications versus Listener Ports
You can choose Activation Specifications or Listener Ports for handling MDBs. In general, we recommend using Activation Specifications because Listener Ports are stabilized:
- Listener Ports follow the principle of the Application-Service-Facility (ASF) part of the JMS specification and thus they poll for messages from the destinations. Activation Specifications on the other hand work on the principle of callbacks and notifications, so there is no polling involved.
- Listener Ports are not portable, whereas Activation Specifications are portable across JEE environments.
- Activation Specifications are better in performance due to the nature of callbacks: the moment a message is available on the destination the message provider notifies the consumers. For Listener Ports, the thread has to constantly poll for messages. Once a message is found, it has to spawn a new thread, pass the message reference to the other thread so that the other thread can actually do a get.
Sizing Thread Pools for Message Driven Beans
Whether you're using activation specifications or listener ports, tuning the relevant thread pools is a key aspect of MDB performance. Thread pools are configured at a server level, while the number and concurrency of the MDBs is configured independently. Therefore, if your maximum thread pool size is too small, messages may queue unnecessarily. Below are equations for the most common setups which define how to setup the relevant thread pool maximums to avoid queuing. The x=1..n items are all the items of that type processing MDBs for that server (which may be configured at a higher scope). The thread pool maximum size is not the only variable -- the JVM heap, OS resources, etc. also have to be able to support the configured concurrency.
Service Integration Bus (SIB):
WebSphere MQ Messaging Provider:
Listener Ports:
Activation Specifications
MDB concurrency is the primary tuning variable, along with the thread pool on which MDBs execute:
- SIBus MDB concurrency set with: Maximum Concurrent MDB invocations per endpoint. Updates to this value require a restart of the messaging cluster.
- WebSphere MQ Messaging Provider concurrency set with: Advanced Properties } Maximum Server Sessions or maxConcurrency
The batch size is how many messages are queued up in front of each MDB.
Pausing and Resuming Activation Specifications
Pause an Activation Specification using
wsadmin -lang jython:
AdminControl.invoke(AdminControl.queryNames("*:type=J2CMessageEndpoint,ActivationSpec=jms/testactivationspec1,*"), "pause")
J2CA0524I: The Message Endpoint ... is deactivated.Resume an Activation Specification using
wsadmin -lang jython:
AdminControl.invoke(AdminControl.queryNames("*:type=J2CMessageEndpoint,ActivationSpec=jms/testactivationspec1,*"), "resume")
J2CA0523I: The Message Endpoint ... is activated.Get status of an Activation Specification using
wsadmin -lang jython:
GetStatus: AdminControl.invoke(AdminControl.queryNames("*:type=J2CMessageEndpoint,ActivationSpec=jms/testactivationspec1,*"), "getStatus")
1 (Active), 2 (Inactive), 3 (Stopped).Service Integration Bus (SIB)
The Service Integration Bus is a pure Java JMS provider built into WAS:
- Bus: Group of messaging engines
- Bus Member: Hosts messaging engine
- Messaging Engine (ME): Handles destinations (queues, topics), connections, and messages
- ME Cluster Policy:
- High availability: ME(s) will failover to other available cluster members
- Scalability: Each cluster member runs an ME
- Both: Each ME may failover to one other cluster member
SIB Thread Pools
JMS messages for Activation Specifications are processed on the
SIBJMSRAThreadPool thread pool. Therefore, the sum of the
maximum concurrent invocations per endpoint for all Activation
Specifications should be less than or equal to the maximum size of the
SIBJMSRAThreadPool thread pool.
JMS messages for Listener Ports are processed on the
MessageListenerThreadPool thread pool. Therefore, the sum
of the maximum sessions for all listener ports should be less than or
equal to the maximum size of the MessageListenerThreadPool
thread pool.
Network communication is received by the
JS-ReceiveListenerDispatcher thread pool. Its maximum size
is controlled by
com.ibm.ws.sib.jfapchannel.MAX_CONCURRENT_DISPATCHES and
defaults to 32.
Incoming messages are received by the
SIBFAPInboundThreadPool threads. If such messages need to
be persisted to a database in a messaging engine, that is done by the
sib.PersistentDispatcher thread pool whose maximum size is
controlled by sib.msgstore.jdbcWriteThreads.
General SIB Tuning Tips
- Tune the maximum concurrent endpoints and maximum batch sizes.
- Consider tuning the memory buffers
- From Best
Practices for Large WebSphere Application Server Topologies
There are several factors that affect SIBus performance. The more destinations there are hosted on a messaging engine, the longer it takes for the engine to start... If the same number of destinations are apportioned over more than one bus member, the startup time improves considerably. However, the drawback is that there are more network connections between the bus members, more overall resource usage, and that the configuration becomes more complex.
If you have many disjoint destinations in your bus being used by different applications, consider creating different buses.
You must tune the environment so that messages are consumed at a rate slightly higher than the rate that they are produced. If the producer produces messages at a faster rate, the messages will overload the bus.
SIB Configuration
SIB properties set in the administrative console take precedence over
properties set in the sib.properties file.
Consider increasing various data buffer sizes.
If you are using durable subscriptions, explicitly set the activation specification configuration in the Administrative Console within the cluster that hosts the durable subscription home ME to Target type = Messaging engine name, Target Significance = Required, and Target = Durable subscription home messaging engine. Otherwise, remote GETs may occur in some situations (particularly failover) and they are pointless overhead (both CPU and memory) for durable subscriptions.
On z/OS, the control region adjunct (CRA) address space runs SIBus messaging engines and the MDBs run in the servants.
Message Reliability
The SIBus provides five different levels of reliability.
- Best effort non-persistent
- Express non-persistent
- Reliable non-persistent
- Reliable persistent
- Assured persistent
Persistent messages are always stored to some form of persistent data store, while non-persistent messages are generally stored in volatile memory. There is a trade-off between reliability of message delivery and the speed with which messages are delivered. The further the reliability level decreases, the faster messages can be processed.
Non-persistent message reliability may cause a significant throughput improvement (in one benchmark, 29%).
If you are using mediations and not using assured persistent messages, consider skipping the well formed check.
Message Store
Message store type:
- Local Derby database data store: With this option, a local, in-process Derby database is used to store the operational information and messages associated with the messaging engine. Although convenient for development purposes, this configuration uses valuable cycles and memory within the application server to manage the stored messages.
- File-based data store: (default) If the message engine is configured to use a file-based data store, operating information and messages are persisted to the file system instead of a database. This performs faster than the local Derby database and, when a fast disk such as a redundant array of independent disks (RAID) is used, can perform just as fast as a remote database. The test results shown below did not use a RAID device for the file-based data store and do not reflect this additional improvement.
- Remote database data store: In this configuration, a database residing on a remote system is configured to act as the message engine data store. This frees up cycles for the application server JVM process that were previously used to manage the Derby database or file-based stores, enabling a more performant, production level database server (such as IBM DB2 Enterprise Server) to be used. One technical advantage of using a database for the data store is that some J2EE applications can share JDBC connections to benefit from one-phase commit optimization. For more information see information on sharing connections to benefit from one-phase commit optimization. File store does not support this optimization.
Using a remote data store may cause a significant throughput improvement (in one benchmark, 55%).
Database Message Store
IBM DB2 tuning: "To get the best performance from messages in the 3 KB to 20 KB range, you should consider putting the SIBnnn tables into a tablespace with 32 KB pages and adjusting the column width of the VARCHAR column to 32032 bytes."
Data Tables
If statistics suggest a concurrency bottleneck on the
SIBnnn tables for a data store, you might try to solve the
problem by increasing
the number of tables. Example wsadmin code to perform this:
engines = AdminTask.listSIBEngines('[-bus BUS_NAME]')
datastore = AdminConfig.list('SIBDatastore', engines)
AdminConfig.modify(datastore, [['permanentTables', '10'], ['temporaryTables', '10']])
AdminConfig.save()
AdminNodeManagement.syncActiveNodes()Relevant points:
- Every destination (queue/topic) is represented as multiple streams internally based on various conditions. The permanent table will be allocated to different streams of various destinations during the creation of the messaging engine. So, if there are multiple permanent tables configured then there is a mechanism to allocate different tables to multiple streams and the information about the streams and table allocation would be stored in the SIB000 table.
- Once the permanent table ID is set on a particular stream, it would use the same table to put all the data which uses that particular stream. So in a scenario where only a single destination is used by the application to put all the messages and all the messages have same priority and reliability, then only a single stream would be used and hence all the messages would be put to a single table.
- However, if there are messages of different priorities and there are multiple destinations and the messages are being added concurrently, then multiple streams would be selected and the messages would be written to the SIB table depending on the table allocated to that stream.
If all of the messages are put to the same destination and have same
priority and reliability set, then they are written to the same table.
One simple way to check if multiple tables are indeed selected in your
environment is to review the SIB000 table and look for the
permanentId or permanent_id column.
If the messages/notifications produced are put to the same destination/queue in SIB and have the same priority and reliability, then all of these would go to only one of the permanent table. Currently there is no provision to distribute this evenly across all the tables. Since the decision to use a particular SIB table is made during queue creation, you can run some tests by deleting and recreating some of the queues and observe the behaviour.
Database Lock
After SIB has started, it checks
the database to ensure a lock every 20 seconds. If this check fails
due to a fatal database exception and
jdbcFailoverOnDBConnectionLoss = true (default), then this
will lead to the JVM shutting itself down (through an HAManager panic)
to force a SIB failover to another JVM. If
jdbcFailoverOnDBConnectionLoss = false, SIB will continue
trying to get the lock every 20 seconds (during which there is a
potential for data loss). If another highly available cluster member is
running, the high availability manager will automatically start the
messaging engine on another running server. During SIB startup, the
properties jdbcInitialDatasourceWaitTimeout (default 15
minutes) and jdbcStaleConnectionRetryDelay (default 2
seconds) are used to retry errors during startup.
File Message Store
The file store log directory can be specified during the creation of
an SIBus member using the -logDirectory option in the
AdminTask.addSIBusMember command or via the administration
console SIBus Member creation panels. This should be on fast disks.
Monitoring
There are various SIB wsadmin monitoring scripts.
The CWSID0016I message indicates the state of messaging engines. For example:
000000fe SibMessage I [:] CWSID0016I: Messaging engine ${NAME} is in state Starting.
000000fe SibMessage I [:] CWSID0016I: Messaging engine ${NAME} is in state Joining.
000000fe SibMessage I [:] CWSID0016I: Messaging engine ${NAME} is in state Joined.
000000fe SibMessage I [:] CWSID0016I: Messaging engine ${NAME} is in state Started.
000000fe SibMessage I [:] CWSID0016I: Messaging engine ${NAME} is in state Stopping.
000000fe SibMessage I [:] CWSID0016I: Messaging engine ${NAME} is in state Stopped.Useful PMI Statistics
- Thread Pools
- ActiveCount
- Enterprise Beans
- MessageBackoutCount: The number of backed out messages that failed to be delivered to the onMessage method of the bean (applies to: message-driven beans).
- MessageCount: The number of messages delivered to the onMessage method of the bean (applies to: message-driven beans).
- MethodResponseTime: The average response time in milliseconds on the remote methods of the bean.
- ActiveMethodCount: Average concurrently actively called methods.
- MethodCallCount
- SIB Service } SIB Messaging Engines }
*} Destinations } Queues- AvailableMessageCount: Number of messages available for consumption from this queue
- AggregateMessageWaitTime: Total amount of time spent in the bus by messages consumed from this queue
- UnavailableMessageCount: Number of messages on this queue but not available for consumption
- TotalMessagesProducedCount: Total number of messages produced to this queue
- LocalConsumerCount: Number of local consumers currently attached to this queue
- LocalProducerCount: Number of local producers currently attached to this queue
- LocalMessageWaitTime: Total amount of time spent on this queue by messages consumed from this queue
- TotalMessagesConsumedCount: Total number of messages consumed from this queue
- SIB Service } SIB Messaging Engines }
*} Storage Management } Data Store- JDBCTransactionTime: Total execution time of internal batches
- PersistentDispatcherAvoidanceCount: Measures the number of operations on reliable persistent data dispatched for writing to the data store but whose writing was subsequently unnecessary.
- SIB Service } SIB Messaging Engines }
*} Storage Management } File Store- FileStoreLogSpace: Space in bytes left in the file store log
- FileStorePermanentObjectStoreSpace: Space in bytes left in the file store permanent store
- SIB Service } SIB Communications } Messaging Engines } Standard
- MEStats.BufferedReadBytes
- MEStats.BufferedWriteBytes
- MEStats.MessageBytesRead
- MEStats.MessageBytesWritten
- JCA Connection Factory
- PoolSize
- FreePoolSize
- UseTime
- WaitTime
Message Visibility/Message Gathering
Message visibility/message gathering may be used to consume messages from all available queue points of a destination. This may be useful when cluster members have different configurations or processing speeds; however, message visibility itself has a high performance overhead. In general, using a single, highly available, clustered destination will probably perform better in the case of differing node performance.
Read ahead
Read ahead will preemptively mark messages so that they can be flowed down a client connection and made available for a consumer to receive before explicitly requested. The default behaviour is for this to be used for non-durable and unshared durable subscribers (where there can only be a single consumer receiving a subscription message at any one time). The reason for this is that in both these cases, once messages are assigned for a particular subscription, there should only be one consumer at a time that can attempt to receive those messages. So, if messages are marked, but for some reason the consumer doesn't receive them (for example, either because work is rolled back or the consumer is closed before receiving all the messages) then those messages can be unmarked on the destination without affecting any other consumers. While read ahead can provide some performance benefit in simple scenarios, it can be disabled if problems arise in more complicated scenarios.
Administrative Console Monitoring
In recent versions of WAS, the administrative console provides basic monitoring on the Runtime tab of the Messaging Engine.
Publication point queue depth:

Subscription queue depth:
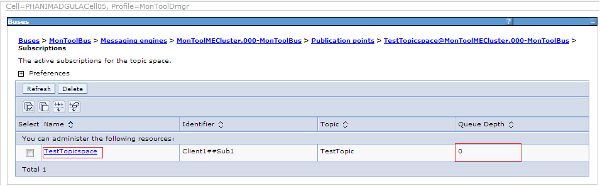
Service Integration Bus Destination Handler
The IBM Service Integration Bus Destination Handler tool is a tool that can view, move, copy, delete and restore messages.
Service Integration Bus Explorer
SIB Explorer is a tool to monitor SIB:


Service Integration Bus Performance
SIB Performance is a tool to monitor SIBus performance.
Advanced ME Tuning
Consider various performance
tuning properties either through custom
properties or the sib.properties
file. Setting properties requires restarting the MEs. Potential
values worth testing:
- sib.msgstore.cachedDataBufferSize=80000000
- Default size is 40000000. With a larger cache, it is more likely a message can be delivered from memory, instead of being read from the persistence store.
- sib.msgstore.jdbcWriteMaxBytesPerBatch=8000000
- sib.msgstore.jdbcWriteMaxTasksPerBatch=128
- sib.msgstore.jdbcWriteThreads=16
- sib.msgstore.transactionSendLimit=200
- sib.msgstore.jdbcWriteRate=160
Lightweight Tracing
To investigate activation specification maxConcurrency (search for
maxWorkCount in the client):
- Client:
*=info:com.ibm.ws.sib.ra.inbound.impl.SibRaSingleProcessListener=all:com.ibm.ws.sib.ra.inbound.impl.SibRaDispatcher=all - ME:
*=info:com.ibm.ws.sib.comms.server.clientsupport.CATAsynchConsumer=all:com.ibm.ws.sib.comms.server.clientsupport.StaticCATConnection=all:com.ibm.ws.sib.processor.impl.ConsumerDispatcher=all
WebSphere MQ Messaging Provider
JMS messages are processed on the WMQJCAResourceAdapter
thread pool. Therefore, the sum of the maximum concurrent invocations
per endpoint for all Activation Specifications should be less than or
equal to the maximum size of the WMQJCAResourceAdapter
thread pool.
MDB Response Times
Request Metrics (covered earlier) can be used to track the response times of individual MDB transactions:
- Ensure "Prepare Servers for Request metrics collection" is checked
- Select "Custom" for "Components to be instrumented" and select "JMS" and any other relevant components
- Set "Trace level" to "Hops"
- Check "Standard Logs"
Simply save and synchronize the changes and request metrics is dynamically enabled.
Here is an example where a servlet calls a stateless session bean which puts a message on a queue. Then an Activation Specification reads from this service integration bus queue to parse the message and sleep one second. Here is the output in SystemOut.log:
[4/17/14 8:56:48:531 PDT] 00000028 SystemOut O TestMDB received message
[4/17/14 8:56:48:529 PDT] 00000021 PmiRmArmWrapp I PMRM0003I: parent:ver=1,ip=127.0.0.1,time=1397749842692,pid=21621,reqid=8,event=1 - current:ver=1,ip=127.0.0.1,time=1397749842692,pid=21621,reqid=8,event=1 type=URI detail=/TestAdvancedWeb/Test elapsed=78
[4/17/14 8:56:49:563 PDT] 00000028 PmiRmArmWrapp I PMRM0003I: parent:ver=1,ip=127.0.0.1,time=1397749842692,pid=21621,reqid=8,event=1 - current:ver=1,ip=127.0.0.1,time=1397749842692,pid=21621,reqid=4097,event=1 type=JMS detail=queue1 elapsed=1034The "type=JMS" line indicates that an MDB has finished processing, the detail field shows the WAS queue name, and the elapsed field shows it took 1034ms. Interestingly, I also had the Servlet component enabled in request metrics, and you can see that the "parent" of the JMS line is the "current" of the servlet line, which means the correlation crosses some boundaries and allows us to know that this message was processed from the same transaction as that particular servlet invocation. This is very useful for tracking asynchronous requests.
JMS Connections Explained
When an application obtains a J2EE Managed connection, which includes JMSConnections obtained from a (JCA managed) connection factory looked up in the J2EE app server's naming context, the J2C connection manager owns/manages the JMS Connection, what the application is given is a wrapper (an instance of the JMSConnectionHandle class which implements the JMS Connection interface). It is this connection handle that is 'closed' by the container/J2C - once it is closed further attempts to use the connection handle (for example to create a session) will fail with javax.jms.IllegalStateException: Connection closed
Once closed the connection handle cannot be re-opened.
When looking in the connection pool what you see are the JMS Connections that the J2C connection manager is managing (technically it actually manages javax.resource.spi.ManagedConnection objects which themselves are wrappers to the actual JMS Connection, and the connection handles). JMS Connections are not closed when the close is called (on the connection handle) but returned to the pool (for unshareable; for shareable, they are available for reuse until returned to the free pool when the transaction context ends).
The handle is closed in compliance with the J2EE connector architecture specification. The close of the handle is not part of the transaction context (JTA or LTC) ending but performed by the container in concert with J2C as part of application component instance lifecyle management as per the JCA specification. While it is absolutely correct that JMS Connections are required by the JMS specification to be thread safe and are non-Transactional, they are still managed connections in a J2EE app server environment.
In other words, managed JMS Connections can be reused under different LTCs; handles to the managed connections are closed, rendering them unusable, as part of the interaction between J2C and the container managing the lifecycle of the application component instance.
It is possible to cache the connection handle inside a stateful session bean; however, passivation would need to be accounted for, as would connection failure handling. This is generally discouraged since J2C is managing connections and it is generally a bad idea for two entities to attempt to manage the same resource - which effectively is what the app would be attempting to do by caching+reusing the connection. It is also worth noting that JMS connections themselves may not map one-to-one with the actual TCP connections and a large number of them may not pose a resource issue; for example, WMQ may multiplex a configurable number of multiple JMS connections and sessions down the same TCP connection though this will be JMS provider specific.
An alternative is to use J2SE JMS. Using this alternative means using a non JCA managed connection factory which will produce non-managed connections and non-managed sessions. Management (caching/reuse/threading/connection failure etc) of the connections/sessions etc is then the sole responsibility of the application. Any work performed against the sessions would not be enlisted with transactions (LTC or JTA) - they would behave just as they would in a J2SE environment.
Listener Ports
MDB concurrency is the primary tuning variable, along with the thread pool on which MDBs execute:
- MDB concurrency set with: Maximum Sessions
Pausing and Resuming Listener Ports
Stop a listener port using wsadmin -lang jython:
AdminControl.invoke(AdminControl.queryNames("*:type=ListenerPort,name=LPNAME,process=server1,*"), "stop")
WMSG0043I: MDB Listener... stopped...Start a listener port using wsadmin -lang jython:
AdminControl.invoke(AdminControl.queryNames("*:type=ListenerPort,name=LPNAME,process=server1,*"), "start")
WMSG0042I: MDB Listener... started successfully...Print if a listener port is started or not via
wsadmin -lang jython:
AdminControl.getAttribute(AdminControl.queryNames("*:type=ListenerPort,name=LPNAME,process=server1,*"), "getStatus")
Returns true or falseWeb Services
This chapter mostly only applies if the application uses the IBM web services engine. If a third party engine (or HTTP client) is used, separate tuning must be reviewed for that framework.
General web service tuning tips
- Review the Web services performance best practices
- Review the custom properties of the HTTP transport chain for web services
- Reduce the time to create the JAXBContext with
-Dcom.ibm.ws.websvcs.getJAXBContext.cacheClassList.persist=trueand other application best practices - If applicable and if using JAX-WS and WAS >= 8.5.5.2, set
-Dcom.ibm.websphere.webservices.jaxwsOptimizeLevelOne=true - If you use transport level security for XML encryption or digital signatures, consider using the unrestricted JCE policy files
- If using JAX-RPC, consider testing the relative benefit of response
compression using
-Dcom.ibm.websphere.webservices.http.responseContentEncoding - If sending web services requests from an MDB, use
-Dcom.ibm.ws.websvcs.transport.jms.cacheReplyQCF=true - If using JAX-WS on WAS >= 8.5.5.2, consider setting
-DcacheTransformerFactory=true - If using a JAX-WS client with WAS security enabled and WS-Reliable
Messaging is not needed, consider setting
-Dcom.ibm.websvcs.client.serializeSecurityContext=false
Outbound Connection Cache
If using the web service client, tune -Dcom.ibm.websphere.webservices.http.maxConnection=X
based on the thread pool size and backend capacity.
For performance reasons, ensure that the com.ibm.websphere.webservices.http.maxConnection custom property is at least half the size of the maximum number of threads in the web container thread pool. The default size for the web container thread pool is 50. As a result, the default size of the com.ibm.websphere.webservices.http.maxConnection property is set to 25 and 50 for JAX-RPC and JAX-WS, respectively. You can adjust the setting for com.ibm.websphere.webservice.http.maxConnection upwards from this initial value, as required, to better utilize the threads.
The outbound connection cache does not have PMI monitoring but does have a lightweight diagnostic trace:
- JAX-WS:
*=info:com.ibm.ws.websvcs.transport.channel.Monitor=all - JAX-RPC:
*=info:com.ibm.ws.webservices.engine.transport.channel.Monitor=all
WSPerf Tool
Investigate JAX-WS or JAX-RPC performance using diagnostic trace.
Inbound Web Services Processing
Monitor PMI statistics on inbound web services processing
Preferring Local Execution
If the web services client is running in the same JVM as the web service target, consider using the optimized local communication path:
To improve performance, there is an optimized communication path between a web services client application and a web container that are located in the same application server process. Requests from the web services client that are normally sent to the web container using a network connection are delivered directly to the web container using an optimized local path. The local path is available because the web services client application and the web container are running in the same process.
The optimized local communication path is disabled by default. You can enable the local communication path with the enableInProcessConnections custom property. Before configuring this custom property, make sure that you are not using wildcards for host names in your web container end points. Set this property to true in the web container to enable the optimized local communication path. When disabled, the web services client and the web container communicate using network transports.
Web Services Response Caching
Service Servlet Caching
Consider using Dynacache to cache web service responses.
JAX-RPC Client Caching
If using JAX-RPC, enabling the web services client cache is an option to improve the performance by using the dynamic cache service to save responses from remote web services for a specified amount of time. You enable the web services caching by enabling the dynamic cache service and servlet caching. After a response is returned from a remote web service, the response is saved in the client cache on the application server. Any identical requests that are made to the same remote web service are then responded to from the cache for a specified period of time. The web services client cache relies primarily on time-based invalidations because the target web service can be outside of your enterprise network and unaware of your client caching. Therefore, you can specify the amount of time in the cache and the rules to build cache entry IDs in the cache in your client application.
Asynchronous Beans
- Legacy WAS work asynchronous beans implement com.ibm.websphere.asynchbeans.Work and are run asynchronously by a WAS WorkManager (which manages a set of threads) through the startWork method call.
- CommonJ work asynchronous beans implement commonj.work.Work and are run asynchronously by a CommonJ WorkManager (which manages a set of threads) through the schedule method call.
- Timer listener asynchronous beans implement commonj.timers.TimerListener and are run asynchronously by a WAS timer manager that implements commonj.timers.TimerManager. These timers are used to schedule future work and are appropriate for managed JEE environments, unlike instances of java.util.Timer.
- Alarm listener asynchronous beans implement com.ibm.websphere.asynchbeans.AlarmListener and are run asynchronously by a WAS alarm manager (which manages a set of threads). These alarms are used to schedule future work.
- http://www-01.ibm.com/support/knowledgecenter/SSAW57_8.5.5/com.ibm.websphere.nd.multiplatform.doc/asyncbns/concepts/casb_asbover.html?cp=SSAW57_8.5.5&lang=en
Work Manager
If a non-zero "work timeout" is specified and if the time the work bean has been queued for execution plus the execution time exceeds the work timeout, then the WorkManager will call release() on the work bean. (http://www-01.ibm.com/support/knowledgecenter/SSAW57_8.5.5/com.ibm.websphere.nd.multiplatform.doc/asyncbns/tasks/tasb_workmanager.html?lang=en)
Intelligent Management
Intelligent Management Recipe
- If using Java On Demand Routers:
- Test the relative performance of an increased maximum size of the
Defaultthread pool. - If ODRs are on shared installations, consider using separate shared class caches.
- If using Windows:
- If using AIO (the default), test the relative performance of
-DAIONewWindowsCancelPath=1 - If using AIO (the default), test the relative performance of disabling AIO and using NIO
- If using AIO (the default), test the relative performance of
- Test the relative performance of an increased maximum size of the
Background
Intelligent Management (IM) was formerly a separate product called WebSphere Virtual Enterprise (WVE) and it became a part of WebSphere Network Deployment starting with version 8.5.
IM introduces the On Demand Router which supports application editioning, health policies, service policies, maintenance mode, automatic discovery, dynamic clusters, traffic shaping, and more. The ODR was first delivered as a Java process that was based on the Proxy Server and it was normally placed in between a web server and the application servers. Starting with WAS 8.5.5, there is an option called Intelligent Management for Web Servers (colloquially, ODRLib) which is a native C component that delivers some of the same functionality but is integrated directly into the IBM HTTP Server (IHS) web server.
Java On Demand Router (ODR)
The Java On Demand Router (ODR) is built on top of the WAS Java Proxy
Server. Both of these write the following log files asynchronously in a
background LoggerOffThread:
local.log: A log of the communications between the client (e.g. browser) and the ODR, i.e. the activities in the "local" ODR process.proxy.log: A log of the communications between the ODR and the backend server (e.g. application server).
The weighted least outstanding request (WLOR) load balancing algorithm is generally superior to the available load balancing algorithms in the WebSphere plugin. WLOR takes into account both the weight of the server and the number of outstanding requests, so it is better at evening out load if one server slows down. WLOR is the default in both ODRLib and the Java ODR.
The "excessive request timeout condition" and "excessive response time condition" are useful health policies that the ODR can monitor to gather diagnostics on anomalous requests.
Conditional Request Trace enables traces only for requests that match a particular condition such as a URI.
The ODR measures "service time" as the time the request was sent to the application server until the time the first response chunk arrives.
Default Thread Pool
The Java ODR/Proxy primarily uses the Default thread
pool for its HTTP proxying function; however, most of its activity is
asynchronous, so a very large volume of traffic would be required to
overwhelm this thread pool. In such case, it may help to increase its
maximum size, although exhaustion of the Default thread
pool may just be a symptom of downstream or upstream issues instead.
Maintenance Mode
Putting servers into maintenance mode is a great way to gather performance diagnostics while reducing the potential impact to customers. One maintenance mode option is to allow users with affinity to continue making requests while sending new requests to other servers.
Putting a server into maintenance mode is a persistent change. In other words, a server will remain in maintenance mode (even if the server is restarted) until the mode is explicitly changed. The maintenance mode of a server is stored persistently as a server custom property. The name of the custom property is "server.maintenancemode" under Application Servers } Administration } Custom Properties. Possible values for that property are:
- false - maintenance mode is disabled
- affinity - only route traffic with affinity to the server
- break - don't route any traffic to the server
Custom Logging
The Java ODR supports custom logging which logs information about HTTP responses, allows for conditions on what is logged and has very flexible fields for logging.
The condition uses HTTP request and response operands. Response operands include response code, target server, response time, and service time.
There are various fields available to print.
Instructions to log all responses:
- Log into the machine that runs the WAS DMGR, open a command prompt,
and change directory to the
$WAS/bin/directory. - Run the following command for each ODR, replacing
$ODRNODEwith the ODR's node and$ODRSERVERwith the name of the ODR:wsadmin -f manageODR.py insertCustomLogRule $ODRNODE:$ODRSERVER 1 "service.time }= 0" "http.log %h %t %r %s %b %Z %v %R %T" - In the WAS DMGR administrative console, for each ODR, go to: Servers
} Server Types } On Demand Routers }
$ODR} On Demand Router Properties } On Demand Router settings } Custom Properties- Click New and set Name=http.log.maxSize and Value=100 and click OK. This value is in MB.
- Click New and set Name=http.log.history and Value=10 and click OK
- Click Review, check the box to synchronize, and click Save
- Restart the ODRs
- Now observe that there should be an http.log file in
$WAS\profiles\$PROFILE\logs\$ODR\
The default value for http.log.maxSize
is 500 MB and the default value for
http.log.history is 1.
Note that the number of historical files is in addition to the
current file, meaning that the defaults will produce up to 1GB in two
files. Also note that changing the values affects not only the ODR
custom logs, but also the proxy.log,
local.log, and cache.log.
Other notes:
Log rules may be listed with:
$ wsadmin -f manageODR.py listCustomLogRules $ODRNODE:$ODRSERVER
WASX7209I: Connected to process "dmgr" on node dmgr1 using SOAP connector; The type of process is: DeploymentManager
WASX7303I: The following options are passed to the scripting environment and are available as arguments that are stored in the argv variable: "[listCustomLogRules, odr1:odrserver1]"
1: condition='service.time >= 0' value='http.log %h %t %r %s %b %Z %v %R %T'Log rules may be removed by referencing the rule number (specified in
insertCustomLogRule or listed on the left side of the
output of listCustomLogRules):
$ wsadmin -f manageODR.py removeCustomLogRule ${ODRNODE}:%{ODRSERVER} 1
WASX7209I: Connected to process "dmgr" on node dmgr1 using SOAP connector; The type of process is: DeploymentManager
WASX7303I: The following options are passed to the scripting environment and are available as arguments that are stored in the argv variable: "[removeCustomLogRule, odr1:odrserver1, 1]"
Removed log rule #1If the overhead of the example log rule above is too high, then it
may be reduced significantly by only logging requests that take a long
time. Change the server.time threshold (in milliseconds) to some large
value. For example (the name of the log is also changed to be more
meaningful such as http_slow.log):
$ ./wsadmin.sh -f manageODR.py insertCustomLogRule ${ODRNODE}:%{ODRSERVER} 1 "service.time >= 5000" "http_slow.log %h %t %r %s %b %Z %v %R %T"
WASX7209I: Connected to process "dmgr" on node dmgr1 using SOAP connector; The type of process is: DeploymentManager
WASX7303I: The following options are passed to the scripting environment and are available as arguments that are stored in the argv variable: "[insertCustomLogRule, odr1:odrserver1, 1, service.time >= 5000, http_slow.log %h %t %r %s %b %Z %v %R %T]"
Inserted 'log rule #1Example output:
localhost6.localdomain6 09/Jan/2018:14:33:55 PST "GET /swat/Sleep HTTP/1.1" 200 326 cell1/node1/dc1_node1 oc3466700346 6006 6004Note that %r will be double-quoted without you needing
to specify the double quotes in insertCustomLogRule. In
fact, insertCustomLogRule does not support double quotes
around any field.
Binary Trace Facility (BTF)
The Java ODR supports a different type of tracing from the traditional diagnostic trace. Btrace enables trace on a per-request basis and infrequently-occurring conditions out-of-the-box (e.g. reason for 503). Btrace is hierarchical with respect to function rather than code and trace records are organized top-down and left-to-right (processing order). The trace specification can be set as a cell custom property starting with trace, e.g. name=trace.http, value=http.request.loadBalance=2
The trace command in the WAS installation directory can
be used to format btrace data:
$WAS/bin/trace read $SERVER_LOGS_DIRECTORY $SPEC_TO_READDynamic clusters
Application Placement Controller (APC)
The Application Placement Controller code runs in one JVM in the cell and coordinates stopping and starting JVMs when dynamic clusters are in automatic mode, or creating runtime tasks for doing so when dynamic clusters are in supervised mode. The frequency of changes is throttled by the minimum time between placements option. Some of the basic theory of the APC is described in Tang et al., 2007.
Investigate autonomic dynamic cluster size violations.
Investigate APC issues:
- Check all node agents are running and healthy and the core group is marked as stable.
- Check if any nodes or servers are in maintenance mode.
- Check the logs for servers to see if they were attempted to be started but failed for some reason (e.g. application initialization).
- Check each node's available physical memory if there is sufficient free space for additional servers.
- Find where the APC is running
(
DCPC0001I/HAMI0023I) and not stopped (DCPC0002I/HAMI0023I), and ensure that it is actually running at the interval of minimum time between placement options (otherwise, it may be hung). - Check if APC detected a violation with the
DCPC0309Imessage. If found, check for any subsequent errors or warnings. - Check the apcReplayer.log, find the
**BEGIN PLACEMENT INPUT DUMP**section, and review if all nodes are registered with lines starting with{CI.
If APC is constantly stopping and starting JVMs seemingly needlessly, test various options such as:
APC.BASE.PlaceConfig.DEMAND_DISTANCE_OVERALL=0.05APC.BASE.PlaceConfig.UTILITY_DISTANCE_PER_APPL=0.05APC.BASE.PlaceConfig.WANT_VIOLATION_SCORE=trueAPC.BASE.PlaceConfig.PRUNE_NO_HELP=false
Service Policies
Service policies define application goals (e.g. average response time less than 1 second) and relative priorities (e.g. application A is High). The Java ODR uses these policies in its request prioritization and routing decisions.
CPU/Memory Overload Protection
These overload protection features cause the Java ODR to queue work to application servers that it sees are over the configured thresholds of CPU and/or memory usage.
Health Policies
When using the "excessive
memory usage" health policy, set usexdHeapModule=true.
Otherwise, the heap usage is sampled and this can create false positives
with generational garbage collection policies such as gencon. The
"memory leak" health policy uses the built-in traditional WAS
performance advisor and this always samples, so it's not recommended
with generational garbage collectors.
Visualization Data Service
This service logs key performance data into CSV log files. The logs
are written to the deployment manager profile directory at
$DMGR_PROFILE/logs/visualization/*.log
- System Administration } Visualization Data Service } Check "Enable
Log"
- Timestamp format =
MM/dd/yyyy HH:mm:ss- If this is not specified, it defaults to the "number of milliseconds since the standard base time known as "the epoch", namely January 1, 1970, 00:00:00 GMT." - i.e. new Date(timestamp)
- Max file size = 20MB
- Max historical files = 5
- The max file size and historical files apply to each viz data log file, individually.
- Timestamp format =
Example output of ServerStatsCache.log:
timeStamp,name,node,cellName,version,weight,cpu,usedMemory,uptime,totalRequests,liveSessions,updateTime,highMemMark,residentMemory,totalMemory,db_averageResponseTime,db_throughput,totalMethodCalls
01/03/2019 09:45:53,server1,localhostNode01,localhostCell01,XD 9.0.0.9,1,0.26649348143619733,80953,846,1337,0,01/03/2019 09:45:44,,334792,5137836,,,Bulletin Board over the Structured Overlay Network (BBSON)
BBSON is an alternative to the High Availability Manager (HAManager) and allows some of the WAS components that traditionally relied on the HAManager to use a different approach. BBSON is built on the P2P component which is peer-to-peer with small sized groups rather than a mesh network like HAManager. This can allow for greater scalability and no need for core group bridges. All IM components can use BBSON. WAS WLM can also use BBSON.
The SON thread pool sizes may be set with cell custom properties
son.tcpInThreadPoolMin,
son.tcpInThreadPoolMax,
son.tcpOutThreadPoolMin, and
son.tcpOutThreadPoolMax.
High Availability Deployment Manager (HADMGR)
The high availability deployment manager allows multiple instances of the deployment manager to share the same configuration (using a networked filesystem) to eliminate a single point of failure if one of them is not available. The HADMGR must be accessed through an On Demand Router (ODR) which routes to one of the active deployment managers. The deployment manager can be very chatty in making many small file I/O accesses, thus performance of the networked filesystem is critical.
PMI
In WAS ND 8.5 and above, to disable PMI completely, if you are not using any Intelligent Management capabilities, then set the cell custom property LargeTopologyOptimization=false, disable PMI, and restart:
Intelligent Management which is part of Websphere Application Server V8.5.0.0 and later, requires the default PMI counters to be enabled. It is not possible to disable PMI or the default PMI counters when using Intelligent Management capabilities. If no IntelligentManagement capabilities will ever be used then the property described in this fix can be used to disable Intelligent Management. In turn it will allow disabling the PMI Monitoring Infrastructure of default PMI counters.
- System Administration } Cell } Additional Properties } Custom
Properties } New
- Name: LargeTopologyOptimization
- Value: false
- OK
- Server } Server Types } WebSphere application servers }
$SERVER} Performance } Performance Monitoring Infrastructure (PMI)- Uncheck "Enable Performance Monitoring Infrastructure"
- OK
- Review
- Check "Synchronize changes with Nodes"
- Save
- Restart
$SERVER
Security
Authentication Cache
The authentication cache should generally be enabled (which it is by default) and its maximum size tuned:
Consider increasing the cache and token timeout if you feel your environment is secure enough. By increasing these values, you have to re-authenticate less often. This action supports subsequent requests to reuse the credentials that already are created. The downside of increasing the token timeout is the exposure of having a token hacked and providing the hacker more time to hack into the system before the token expires. You can use security cache properties to determine the initial size of the primary and secondary hashtable caches, which affect the frequency of rehashing and the distribution of the hash algorithms.
Java Security
Java Security is disabled by default which is generally recommended as it has a significant performance cost. For a discussion of the limitations of the Java Security Manager, see the proposed JEP 411 to deprecate and remove it.
Java security typically reduces throughput by 15-40%. However, Java Security is not a fixed cost; rather, the cost is proportional to the number of security calls. One common manifestation of this is that one application has an overhead with Java Security enabled of X%, and then another application has a much higher overhead; in most cases, this is caused by a difference in the number of calls to security between those applications, rather than a product issue. A sampling profiler such as IBM Java Health Center is usually the best way to gauge the overhead of Java Security. Use the call stack invocation paths to reduce the number of security calls if possible.
Single Sign On (SSO)
Consider configuring Single Sign On (SSO) so that:
a single authentication to one application server is enough to make requests to multiple application servers in the same SSO domain.
Security Attribute Propagation
Security attribute propagation shares authenticated security Subjects and security context information between servers. Consider some potential tuning:
The following two custom properties might help to improve performance when security attribute propagation is enabled:
- com.ibm.CSI.propagateFirstCallerOnly: The default value of this property is true. When this custom property is set to true the first caller in the propagation token that stays on the thread is logged when security attribute propagation is enabled. When this property is set to false, all of the caller switches are logged, which can affect performance.
- com.ibm.CSI.disablePropagationCallerList: When this custom property is set to true the ability to add a caller or host list in the propagation token is completely disabled. This function is beneficial when the caller or host list in the propagation token is not needed in the environment.
Horizontal Security Attribute Propagation
The Single Sign On option will first check the local JVM's
authentication cache. A Subject used often can remain here until the
LtpaToken expiration. Next, if security attribute propagation and
Dynacache are enabled, WAS will check the ws/WSSecureMap
DistributedMap:
When front-end servers are configured and in the same data replication service (DRS) replication domain, the application server automatically propagates the serialized information to all of the servers within the same domain using ws/WSSecureMap.
The size of this map may be tuned:
The WSSecureMap security cache settings can be adjusted through custom properties in the administrative console.
- com.ibm.ws.security.WSSecureMapInitAtStartup=true
- com.ibm.ws.security.WSSecureMapSize (integer of 100 or greater).
Explicit invalidations for ws/WSSecureMap are sent out
on user logout. To disable this, use
com.ibm.websphere.security.web.removeCacheOnFormLogout=false
If the subject is not found in ws/WSSecureMap, WAS will
try to make an MBean call back to the server that originally created the
subject. The originating server's host:port is found in the SSO token.
In some cases, this may
cause worse performance than simply re-authenticating:
You must determine whether enabling this option improves or degrades the performance of your system. While the option prevents some remote user registry calls, the deserialization and decryption of some tokens might impact performance. In some cases propagation is faster, especially if your user registry is the bottleneck of your topology. It is recommended that you measure the performance of your environment both by using and not using this option. When you test the performance, it is recommended that you test in the operating environment of the typical production environment with the typical number of unique users accessing the system simultaneously.
There is also a timeout value that can be set to manage this
condition:
com.ibm.websphere.security.tokenFromMBeanSoapTimeout. You
can also disable the mbean callback with
com.ibm.websphere.security.disableGetTokenFromMBean.
Note: Security attribute propagation may be set at
multiple levels: cell, server, and security domain. For security
domains, the option is set as a custom property with the name
com.ibm.ws.security.webInboundPropagationEnabled and a
value of true or false.
LDAP Authentication
When using LDAP authentication, consider various common tuning:
Consider the following steps to tune Lightweight Directory Access Protocol (LDAP) authentication.
- In the administration console, click Security > Global security.
- Under User account repository, click the Available realm definitions drop-down list, select Standalone LDAP registry and click Configure.
- Select the Ignore case for authorization option in the stand-alone LDAP registry configuration, when case-sensitivity is not important.
- Select the Reuse connection option.
- Use the cache features that your LDAP server supports.
- Choose either the IBM Tivoli Directory Server or SecureWay directory type, if you are using an IBM Tivoli Directory Server. The IBM Tivoli Directory Server yields improved performance because it is programmed to use the new group membership attributes to improve group membership searches. However, authorization must be case insensitive to use IBM Tivoli Directory Server.
- Choose either iPlanet Directory Server (also known as Sun ONE) or Netscape as the directory if you are an iPlanet Directory user. Using the iPlanet Directory Server directory can increase performance in group membership lookup. However, use Role only for group mechanisms.
Also consider tuning the LDAP connection and context pools and the virtual member manager (VMM).
Secure Sockets Layer (SSL), Transport Layer Security (TLS)
When using TLS/SSL, review various common tuning.
J2C Authentication Subjects
When using container-managed authentication data aliases, consider using read-only subjects:
Read-only Subject enables a new cache for J2C Auth Subjects when using container-managed auth data aliases. If the J2C auth subject does not need to be modified after it is created, the following new tuning parameters can be used to improve Java 2 Security performance:
- com.ibm.websphere.security.auth.j2c.cacheReadOnlyAuthDataSubjects=true
- com.ibm.websphere.security.auth.j2c.readOnlyAuthDataSubjectCacheSize=50 (This is the maximum number of subjects in the hashtable of the cache. Once the cache reaches this size, some of the entries are purged. For better performance, this size should be equal to the number of unique subjects (cache based on uniqueness of user principal + auth data alias + managed connection factory instance) when role-based security and Java 2 security are used together).
CSIv2 Cache
If using CSIv2, consider setting stateful sessions:
Ensure that stateful sessions are enabled for CSIv2. This is the default, but requires authentication only on the first request and on any subsequent token expirations.
Administrative Security
Review the performance difference between SOAP and RMI:
Consider changing your administrative connector from Simple Object Access Protocol (SOAP) to Remote Method Invocation (RMI) because RMI uses stateful connections while SOAP is completely stateless. Run a benchmark to determine if the performance is improved in your environment.
Expired Certificates
On the SSL certificate and key management page, click the Keystores and Certificates link in the Related Items list.
Click the Keystore,
Click Personal certificate > Additional Properties.
Renew the certificate and exchange the signer certificates between the DMGR and Nodes:
Go to SSL certificate and key management > Manage endpoint security configurations > Click on inbound on the node (NodeDefaultSSLSettings,null) > click on Key stores and certificates
Select both CellDefaultKeyStore and CellDefaultTrustStore by checking the box and click on exchange signers under CellDefaultKeyStore personal certificates. Choose all certificates and click add click add and it will add all those certificate under CellDefaultTrustStore signers and then click OK
Same thing but select both CellDefaultKeyStore and NodeDefaultTrustStore by checking the box and click on exchange signers under CellDefaultKeyStore personal certificates. Choose all certificates and click add and it will add all those certificate under NodeDefaultTrustStore signers and then click OK
Same thing but select NodeDefaultKeyStore and CellDefaultTrustStore by checking the box and click on exchange signers under NodeDefaultKeyStore personal certificates. Choose all certificates and click add and it will add all those certificate under CellDefaultTrustStore signers and then click OK
Same thing but select NodeDefaultKeyStore and NodeDefaultTrustStore by checking the box and click on exchange signers under NodeDefaultKeyStore personal certificates. Choose all certificates and click add and it will add all those certificate under NodeDefaultTrustStore signers and then click OK
Save the changes with the master configuration and restart the dmgr.
Stop the nodeagent and JVMs and manually sync the node with dmgr using syncNode
- If the syncNode fails (e.g. ADMU0127E), then manually copy the key.p12 file from the node's configuration in the DMGR profile to the node's configuration.
Start the nodeagent and see the status in the admin console and sync the node from the console and see if sync is going smooth by tailing the nodeagent logs.
Clock synchronization
Clock synchronization (e.g. NTP) may be important for security performance:
Use a clock synchronization service to keep system clock values as close as possible. Security processing depends on time stamp validation and having clocks out of synchronization more than five minutes can affect performance due to unnecessary re-authentication and retry processing.
Trace
Tracing login:
*=info:com.ibm.ws.security.*=all:com.ibm.websphere.security.*=all
and search for login
PasswordEncoder
Password encoder:
$WAS/java/bin/java -Djava.ext.dirs=$WAS/plugins:$WAS/lib com.ibm.ws.security.util.PasswordEncoder $PASSWORDPassword Decoder:
$WAS/java/bin/java -Djava.ext.dirs=$WAS/plugins:$WAS/lib com.ibm.ws.security.util.PasswordDecoder $PASSWORDAdministration
Administration Best Practices
Use consistent and repeatable administration processes. Manual
changes may miss changes in some environments or otherwise cause
operational instability. This means to automate all administration. For
example, changes should be done through wsadmin and other
scripts rather than through hard-to-repeat processes such as manual
changes in the Administrative Console. This includes installation,
configuration, application changes, and maintenance in all
environments.
However, the Administrative Console may be used to read and review the current configuration, or to test proposed changes and use the "View administrative scripting command for last action" link after making a change to help generate automation scripts.
Deployment Manager
From Best Practices for Large WebSphere Application Server Topologies:
The memory requirement of the deployment manager increases as the size of the topology increases, and as the number of concurrent sessions increases. Since the deployment manager is just a single process, there is no mechanism to balance the load. Therefore, there is a limit to the number of concurrent users that can be supported on a single deployment manager.
Just as you would tune the application server heap size, you need to tune the deployment manager heap size to accommodate the number of concurrent users who access the deployment manager. Enable verbose garbage collection, and observe how the heap size increases with the increase in topology and in the number of users.
If too many concurrent sessions are overloading the deployment manager, you need to place a limit on concurrent access. For scripting, consider using the V7 job manager as a mechanism for users to submit wsadmin jobs. The jobs are run sequentially, and an email notification is sent to the user upon job completion.
A JMX request from the deployment manager to a single application server flows through the deployment manager to the node agent on the same node where the server resides, and finally to the application server itself. This design is intended for scalability. The deployment manager has to communicate with a node agent only, and each node agent has to communicate with its respective application servers only.
If an invocation is made to all of the servers on a node, the deployment manager uses one invocation to the node agent and the node agent, in turn, broadcasts the invocation to every server on the node. To avoid a scenario where queries get stuck, use narrow queries that target only the servers or nodes from which you really need information. Queries that touch every server can considerably consume cell resources.
Use
-Dcom.ibm.ws.management.connector.soap.keepAlive=true to
avoid the cost of SSL re-handshaking when AdminClient uses
PullRemoteReceiver/PullRemoteSender.
Starting with WAS 8.5.5.7 (PI42208),
you may set -Dcom.ibm.console.overrideSyncPref=true on the
deployment manager so that saving any changes will automatically
synchronize with any running nodes. This avoids common issues with
junior administrators that save a change and restart a server before the
automatic synchronization kicks in.
wsadmin/JMX
From Best Practices for Large WebSphere Application Server Topologies:
Often in a script you need to search for a specific configuration object, such as a specific node, server, or data source. The configuration service extracts what you are searching from the master repository to the workspace for you to make your changes. How you construct your query can greatly affect how many files are extracted. If you do not use a targeted query, you can potentially cause the entire repository to be extracted. For a large topology this is a very expensive operation.
Starting the wsadmin process may take 20 seconds or more, depending on hardware. Avoid breaking up your configuration operations into multiple wsadmin invocations. Do combine them into a single script that can be run within one wsadmin session. Consider structuring your scripts into multiple files, and import them from a front-end script.
The -conntype NONE option is running wsadmin in local mode. We don't support updating the configuration in local mode while the deployment manager is running. After the change is made, to reflect to the changes to the nodes, the user will need to start the dmgr and run the node sync (syncNode) operation in order to sync the changes to the nodes. In local mode, the user will not be able to run anything operational such as AdminControl commands to invoke any WAS MBeans (and some of the AdminTask commands also require that the server is running). Other than that, local mode should act the same.
Getting diagnostics:
- AdminControl.invoke(AdminControl.completeObjectName("type=JVM,process=server1,*"), "dumpThreads")
- AdminControl.invoke(AdminControl.completeObjectName("type=JVM,process=server1,*"), "generateHeapDump")
- AdminControl.invoke(AdminControl.completeObjectName("type=JVM,process=server1,*"), "generateSystemDump")
Additional links:
Examples
Restart server:
print "Restarting " + sys.argv[0] + "/" + sys.argv[1] + "..."
print AdminControl.invoke(AdminControl.queryNames("WebSphere:*,type=Server,node=" + sys.argv[0] + ",process=" + sys.argv[1]), "restart")
print "Restart asynchronously started..."The only potential problem with the above is that it fires off the restart asynchronously, so you don't know if it succeeded or not. Instead, the script can be changed to invoke a stop and then a start, the first of which is synchronous and reports any errors:
print "Stopping " + sys.argv[0] + "/" + sys.argv[1] + "..."
print AdminControl.stopServer(sys.argv[1], sys.argv[0])
print "Starting " + sys.argv[0] + "/" + sys.argv[1] + "..."
print AdminControl.startServer(sys.argv[1], sys.argv[0])
print "Done"Querying PMI
# Provide the name of the WebSphere Application Server
serverName = "server1"
pmiObject = "JVM"
# If serverName is not unique across the cell, add "node=N," before "process":
lookup = "process=" + serverName
objectName = AdminControl.completeObjectName("type=Perf," + lookup + ",*")
if objectName == '' or objectName is None:
print "Server not running or not found"
else:
# Query PMI:
stats = AdminControl.invoke_jmx(AdminControl.makeObjectName(objectName), "getStatsObject", [AdminControl.makeObjectName(AdminControl.completeObjectName("type=" + pmiObject + "," + lookup + ",*")), java.lang.Boolean("false")], ["javax.management.ObjectName","java.lang.Boolean"])
usedmem = stats.getStatistic("UsedMemory").getCount()
totalmem = stats.getStatistic("HeapSize").getCurrent()
percentUsed = int((float(usedmem)/float(totalmem))*100.0)
print("Used Java Heap (MB): %s" %(usedmem/1024))
print("Current Java Heap Size (MB): %s" %(totalmem/1024))
print("Percent Java Heap Used: %s" %(percentUsed))Node Synchronization
By default, automatic node synchronization is set to occur every 1 minute. This can be increased to 60 minutes. In general, do not disable Automatic Synchronization as it can affect security components such as LTPA key distribution.
From Best Practices for Large WebSphere Application Server Topologies:
Node synchronization is the process by which the WebSphere configuration is transferred from the deployment manager to the node agent. The deployment manager and node agents compare MD5 hashes of the configuration files to determine whether the files are identical. In the cases of a node agent or deployment manager restart, the respective server must create all the MD5 hashes in memory for all the configuration documents in the node or cell. As the cell size and number of documents become larger, the start-up time also increases.
WebSphere Application Server has added support for "Hot Restart Sync." With this support, the node agent and deployment managers save the hashes in both memory as well as on the file system. When a restart is performed, the MD5 hashes do not need to be recomputed but rather can be loaded directly from disk. To enable this support, add the following custom property to your deployment manager and node agent:
-DhotRestartSync=true
Notifications
The SOAP connector has the advantage of having a better chance of making it through a firewall (since it is HTTP traffic) than RMI/IIOP; however, you will generally receive notifications faster with RMI than with SOAP. This is because the RMI uses a "push" model while SOAP uses a "pull" model.
When the RMI connector is used, a remote object is created on the client side and on the stub passed to the server side. Whenever a notification is received on the server, it is almost immediately sent (or "pushed") to the client and handed to the registered listeners. With SOAP, at regular intervals, the client requests any notifications from the server for this listener. If there are any, they are returned from (or "pulled" from) the server and then handed to the listeners. This occurs approximately every 20 seconds, but can be more frequent if a large number of notifications are being received.
Since notifications can take up to 20 seconds to be received when using the SOAP connector, it is recommended that the RMI connector be used to receive notifications, when possible.
Copy WAS nodes or cells to other hosts
- WAS 9: The
-allowSameRelease trueoption ofWASPreUpgradeallows moving a V9 node or cell to another set of hosts. Append-allowSameRelease trueon step 5 of migrating cells to new host machines using the command-line tool - WAS 8.5:
- For a single node, see "Move a node to a product installation on a different computer but at the same path" in Recovering or moving nodes with the addNode -asExistingNode command
- For an entire cell, see "Create a cell from a template cell" in Recovering or moving nodes with the addNode -asExistingNode command
- For another option, see "Move a node to a product installation on a different operating system or with a different path" in Recovering or moving nodes with the addNode -asExistingNode command
- In some cases, it may also be useful to backup and restore Installation Manager as well
- Alternatively, depending on how it's done, this is either partially supported or unsupported, but another option is to copy files over and change host names
Re-install Corrupt WAS on the same nodes
To re-install a corrupt WAS installation through Installation Manager, for each node, starting with the DMGR:
- Stop all Java processes (application servers, nodeagent, DMGR, etc.)
- Backup (recursive copy) of
$WASHOME - View
$WASHOME/properties/version/installed.xmland write down the path values of theagent.launch.command,agent.install.location, andcacheLocationproperties. For each one of these paths, back them up (recursive copy). - Backup (copy) InstallationManager.dat from the home directory of the
user that installed Installation Manager, e.g.
~/etc/.ibm/registry/InstallationManager.dat - If Installation Manager itself is suspected to be corrupt, delete
InstallationManager.dat, the paths ofagent.launch.command,agent.install.location, andcacheLocationproperties, and$WASHOME; then, re-install IM, e.g.$IMAGENT/tools/imcl install com.ibm.cic.agent -dataLocation /opt/IBM/IBMIM/data -repositories $IMAGENT/repository.config -installationDirectory /opt/IBM/IBMIM/eclipse -sharedResourcesDirectory /opt/IBM/IBMIMShared -accessRights nonAdmin -acceptLicense -sP -preferences offering.service.repositories.areUsed=false,com.ibm.cic.common.core.preferences.searchForUpdates=false - If Installation Manager is not suspected to be corrupt, then uninstall
WAS:
$IM/eclipse/tools/imcl uninstallAll -installationDirectory $WASHOME; then, recursively delete$WASHOME - Install
WAS, e.g.
$IM/eclipse/tools/imcl install com.ibm.websphere.ND.v90_[...] com.ibm.java.jdk.v8_8.0.[...] -sharedResourcesDirectory /opt/IBM/IBMIMShared -repositories /tmp/WASREPO/repository.config -installationDirectory $WASHOME -sP -acceptLicense. Ensure that the exact version of WAS and any fixpacks and iFixes are installed that match the configurations that have been backed up. - Recursively copy
$WASBACKUP/properties/fsdbto$WASHOME/properties/ - Recursively copy
$WASBACKUP/properties/profileRegistry.xmlto$WASHOME/properties/ - Recursively copy
$WASBACKUP/profilesto$WASHOME/ - Recursively remove
$WASHOME/configuration/org.eclipse.core.runtime $WASBACKUP/configuration/org.eclipse.equinox.app $WASBACKUP/configuration/org.eclipse.osgi $WASBACKUP/configuration/org.eclipse.update - For each profile, recursively remove logs
$WASHOME/profiles/$PROFILE/logs/* - For each profile, recursively remove
$WASHOME/profiles/$PROFILE/configuration/org.eclipse.core.runtime $WASHOME/profiles/$PROFILE/configuration/org.eclipse.equinox.app $WASHOME/profiles/$PROFILE/configuration/org.eclipse.osgi $WASHOME/profiles/$PROFILE/configuration/org.eclipse.update - For each profile, recursively remove
$WASHOME/profiles/$PROFILE/temp/* $WASHOME/profiles/$PROFILE/wstemp/* - For each profile, run
$WASHOME/profiles/$PROFILE/bin/osgiCfgInit.sh - Run
$WASHOME/bin/clearClassCache.sh - If the node is the deployment manager, start the deployment manager
- If the node is not the deployment manager, log out of the deployment
manager administrative console if logged in, then run
$WASHOME/profiles/$PROFILE/bin/syncNode.sh $DMGRHOST $DMGRSOAPPORT, and then run$WASHOME/profiles/$PROFILE/bin/startNode.sh - Start all the application servers and perform tests.
- If everything goes well and further fixpacks or fixpacks are required, then apply those fixes now using normal procedures.
Session Initiation Protocol (SIP)
UDP and Linux tuning: https://www.ibm.com/support/knowledgecenter/SSAW57_8.5.5/com.ibm.websphere.nd.doc/ae/tsip_tunelinux.html
Consider JVM and thread pool tuning: https://www.ibm.com/support/knowledgecenter/SSAW57_8.5.5/com.ibm.websphere.nd.doc/ae/tsip_tune_ha.html
WAS traditional on z/OS
WAS traditional on z/OS Recipe
- Review the z/OS Recipe.
- Enable and review SMF 120 Subtype 9 records.
- Consider classifying workload into individually tuned WLM transaction/service/report classes with a classification file.
- Consider classifying the control region and other address spaces as per general best practices.
- Enable and review SMF 72.3 Workload Activity Reports.
- Review the WLM Delay Monitoring Report.
SMF 120 Records
SMF Type 120 records provide various performance statistics. Subtype 9 records generally supersede and subsume subtype 1-8 records. Subtype 9 records also tend to be more accurate and lower overhead.
- Enable SMF 120 records
- Format the output data set and upload
Post-process the output data set using SMF_WAS_PLUGINS. To get statistics on the LPARs and record types:
java -Xmx1g "-Dcom.ibm.ws390.smf.dateTimeFormat=yyyy-MM-dd'T'HH:mm:ss.SSSZ" -DPRINT_WRAPPER=false -jar smftools.jar "INFILE(DATASET)"Example output:
SMF Data for system ABCD covering Mon Dec 11 12:30:00 GMT 2023 to Mon Dec 11 14:29:59 GMT 2023
Record Type Records %Total Avg Length Min Length Max Length
98 1,440 0.00 28,533.69 27,292 30,204
120 4,801,374 1.00 1,680.77 1,236 6,116
Total 4,802,814 100.00 1,688.82 1,236 30,204
SMF Data for system EFGH covering Mon Dec 11 12:30:00 GMT 2023 to Thu Dec 14 10:28:06 GMT 2023
Record Type Records %Total Avg Length Min Length Max Length
2 1 0.00 14.00 14 14
3 1 0.00 14.00 14 14
98 1,440 0.00 27,914.16 20,124 30,524
120 6,183,802 1.00 1,598.33 1,236 6,116
Total 6,185,244 100.00 1,604.45 14 30,524Response Times
Basic statistics:
java -Xmx1g "-Dcom.ibm.ws390.smf.dateTimeFormat=yyyy-MM-dd'T'HH:mm:ss.SSSZ" -DPRINT_WRAPPER=false -jar smftools.jar "INFILE(DATASET)" "PLUGIN(com.ibm.smf.was.plugins.ResponseTimes,STDOUT)"It is often useful to break out response times over time:
java -Xmx1g "-Dcom.ibm.ws390.smf.dateTimeFormat=yyyy-MM-dd'T'HH:mm:ss.SSSZ" -DPRINT_WRAPPER=false -Dcom.ibm.ws390.smf.smf1209.useTime=RESPONDED -Dcom.ibm.ws390.smf.smf1209.breakdown=BY_SERVER -jar smftools.jar "INFILE(DATASET)" "PLUGIN(com.ibm.smf.was.plugins.ResponseTimes,STDOUT)"General Considerations
See the z/OS operating systems chapter for prerequisite knowledge.
Keep the number of nodes per local partition (LPAR) between one or two nodes with a maximum of four nodes per LPAR. Spread a cell or cluster over at least two LPARs. Using multiple LPARs ensures hardware redundancy as well, while still allowing the cluster to be upgraded on a per node basis.
IBM recommends that you install as much of the WebSphere Application Server for z/OS code in the Link Pack Area (LPA) as is reasonable. Also, ensure that you have eliminated any unnecessary STEPLIBs which can affect performance. If you must use STEPLIBs, verify that any STEPLIB DDs in the controller and servant procs do not point to any unnecessary libraries. (https://www.ibm.com/support/knowledgecenter/SSAW57_8.5.5/com.ibm.websphere.nd.multiplatform.doc/ae/rprf_tunezprogloc.html)
The first place to review is your CTRACE configuration. Ensure that all components are either set to MIN or OFF. To display the CTRACE options for all components on your system, issue the following command from the operator console: D TRACE,COMP=ALL
To change the setting for an individual component to its minimum tracing value, use the following command, where xxx is the component ID: TRACE CT,OFF,COMP=xxx
This configuration change eliminates the unnecessary overhead of collecting trace information that is not needed. Often during debug, CTRACE is turned on for a component and not shut off when the problem is resolved.
Ensure that you are not collecting more SMF data than you need. Review the SMFPRMxx settings to ensure that only the minimum number of records is collected.
The Transaction Service RLS_LOGSTREAM_COMPRESS_INTERVAL custom property can be set to a value larger than the default value if the Transaction Service is the only application component using a logstream. If none of your components are configured to use a logstream, you can set this property to 0 (zero) to disable this function. (https://www.ibm.com/support/knowledgecenter/SSAW57_8.5.5/com.ibm.websphere.nd.doc/ae/tprf_tuneappserv.html)
If you find long garbage collection pause times but the normal components of a pause (mark, sweep, compact, exclusiveaccess) do not add up to the total time, then this is usually caused by the Virtual Lookaside Facility (VLF) caching being disabled or not working efficiently.
"Ensure that ras_trace_defaultTracingLevel=0 or 1, and that ras_trace_basic and ras_trace_detail are not set." (https://www.ibm.com/support/knowledgecenter/SSAW57_8.5.5/com.ibm.websphere.nd.multiplatform.doc/ae/rprf_tuneztrace.html).
Address Spaces
Each application server is split into two or more address spaces: a control region and one or more servant regions. The control region handles incoming traffic and distributes it to the servant regions where the application work is performed. It is a best practice to use ${X} as the control region name and ${X}S for the servant region names. For example, WBESR12 and WBESR12S.

Servants
WebSphere allows you to configure a minimum and maximum number of servants for a server. WLM will dynamically adjust the number of servants within the specified range, up or down based on what's needed to meet the goals for the system. WLM does this for work running in WebSphere and for work elsewhere on the system.
To set the minimum value, consider how many servants you want to start automatically when the server is started and how many you want WLM to keep available. In determining the maximum value, consider how many servants you can support on your system. Also, consider the number of available connectors for applications in WebSphere and elsewhere in the system.
But what if something changes someday and the minimum just is not enough? Or, you reach the configured maximum and need more servants? To change the values, you must update the configuration and recycle the server. But if you are running at peak utilization and decide you need to increase the maximum number of servants; recycling the whole server is probably going to hurt more than just not having enough servants. It would be nice to be able to dynamically change the number of servants without a recycle.
In Version 7, we introduced a new MODIFY command to let you do that. If the server is not configured as single-servant, you can change the current minimum and maximum number of servants. You enter the command as follows:
MODIFY server,WLM_MIN_MAX=(minimum,maximum)
Specify these values as decimal numbers. Obviously, the minimum must be less than the maximum.
Your changes are in effect until the next time you recycle the server, in which case, the values in the configuration are used instead. To make your changes permanent, you need to update the configuration.
In general, WLM responds quickly to your request. If the minimum number of servants is not already running, WLM starts more. Increasing the maximum value, however, might not have any immediate effect. Further, decreases in values might also not cause an immediate change because of WLM's opinion as to how many servants it needs. Some situations, such as session data pinned to the servant, might prevent WLM from reducing the number of currently active servants. Of course, unless you've committed your min and max values to memory, you would probably like to have a quick way to see what you are currently configured for. We added a new command to allow you to do that.
MODIFY server,DISPLAY,WLM
Start servants in parallel: wlm_servant_start_parallel=1 (http://www-03.ibm.com/support/techdocs/atsmastr.nsf/5cb5ed706d254a8186256c71006d2e0a/da939fa8cdf48510862575a1007461d2/$FILE/WP101464%20-%20WebSphere%20zOS%20Hidden%20Gems2.pdf)
All of the various custom properties, environment variables, etc. that are set in the WAS configuration (e.g. through the admin console) ultimately get generated into the was.env file (located under profiles/default/config/cells/cellname/nodes/nodename/servers/servername/was.env) which is read when the address space starts.
Contraction
First, with proper idle tuning and disabling Intelligent Management if not used, CPU usage of unused servants is expected to be very low. For further profiling and tuning, use the IBM Java Health Center profiler. If the concern for unused servants is virtual storage usage, note that it's generally not recommended to overcommit memory. Finally, if work is being distributed unevenly between servants, this should not impact overall processor usage.
Nevertheless, if for whatever reason you would like to contract
servants by setting the minimum number
of servants less than the maximum, the way this works is that every
10 minutes, WLM considers if there are excess servants above the minimum
with no outstanding affined work. This is a conservative judgment
because starting and stopping servants is itself an intensive process.
If WLM decides a servant is no longer needed, it first unbinds it from
the service class (because a different service class may need it). After
further time, if the servant still isn't needed, then it will be fully
destroyed. There is an explicit WLM_MIN_MAX
MODIFY command; however, this is primarily used to adjust the
minimum to request adding servants whereas reducing the minimum is still
very conservative.
For details, see https://www-03.ibm.com/support/techdocs/atsmastr.nsf/002573f7000ac64286256c71006d2e0a/f1ec690b6bee04cd8625778800595c69/$FILE/WP101740%20-%20WAS_and_zOS_WLM_v8.pdf#page=19 and https://dx.doi.org/10.5445/KSP/1000034624
Control Region
The default value of worker threads in a control region is 25. This can be changed to a higher value as required by setting customer property was.controlThreads as follows:
Application servers > server_name > Container Services > ORB Service > Custom Properties > was.controlThreads
To verify how many control region threads you are using, you can check the following message in the control region joblog:
BBOM0001I control_region_thread_pool_size: 25.Starting in WAS 8.0.0.8 and 8.5.5.2 (PM85194), use the property control_region_thread_pool_maximum_size to allow growth of this pool, or set to 0 to allow dynamic calculation of the size (see also PI50098).
Daemon
"Stopping a Daemon server will stop all servers for that cell on that... image. This is because of the way servers for that cell... access key LPA modules. It's done "through" the Daemon server. Stopping the Daemon server means the servers can no longer access those modules, so they too stop." (http://www-01.ibm.com/support/docview.wss?uid=tss1wp100396&aid=3)
Thread Pools
Most work in the servant is handled by the ORB thread pool. The maximum size of this pool is controlled by the ORB workload profile setting: https://www.ibm.com/support/knowledgecenter/SSAW57_8.5.5/com.ibm.websphere.nd.multiplatform.doc/ae/tgrid_zosthreads.html
- IOBOUND: Default - Number of threads is 3 * Number of processors. Specifies more threads in applications that perform I/O-intensive processing on the z/OS operating system. The calculation of the thread number is based on the number of processors. IOBOUND is used by most applications that have a balance of processor intensive and remote operation calls. A batch job is an example that uses the IOBOUND profile.
- CPUBOUND: Number of threads is the number of processors. Specifies that the application performs processor-intensive operations on the z/OS operating system, and therefore, would not benefit from more threads than the number of processors. The calculation of the thread number is based on the number of processors. Use the CPUBOUND profile setting in processor intensive applications, like compute-intensive (CI) jobs, XML parsing, and XML document construction, where the vast majority of the application response time is spent using the processor.
- LONGWAIT: Number of threads is 40. Specifies more threads than IOBOUND for application processing. LONGWAIT spends most of its time waiting for network or remote operations to complete. Use this setting when the application makes frequent calls to another application system, like Customer Information Control System (CICS) screen scraper applications, but does not do much of its own processing.
- In WebSphere Application Server for z/OS V7 you can choose Workload profile CUSTOM and then set property servant_region_custom_thread_count to the number of servant threads you want up to a limit of 100.
BBOO0234I SERVANT PROCESS THREAD COUNT IS X
WAS 7 on z/OS introduced the ability to interrupt hung threads: http://www-03.ibm.com/support/techdocs/atsmastr.nsf/5cb5ed706d254a8186256c71006d2e0a/3c02b79e79ea32fd8625751a005d7f63/$FILE/WP101374%20-%20WebSphere%20zOS%20V7%20Dispatch%20Timeout%20Improvements.pdf. This was improved in WAS 8: http://w3-03.ibm.com/support/techdocs/atsmastr.nsf/3af3af29ce1f19cf86256c7100727a9f/d7bb7aa1f7be24128625791e00830412/$FILE/WP101992%20-%20WebSphere%20zOS%20V8%20Hidden%20Gems.pdf
Joblogs
Type ? next to the WAS servant region in the SDSF.DA or SDFS.ST panels. Roughly speaking, SYSPRINT is equivalent to SystemOut.log and SYSOUT is equivalent to SystemErr.log + native_stderr.log
Common things to look for in WAS joblogs:
- Search for the word HOST by typing F HOST and F5 to repeat search
- Hostname: com.ibm.CORBA.LocalHost = ZTESTB2.PDL.POK.IBM.COM
- Search for the word LEVEL by typing F LEVEL and F5 to repeat search
- WAS Level: BBOM0007I CURRENT CB SERVICE LEVEL IS build level 6.1.0.32 (AM24112) release WAS61.ZNATV date 10/10/10 19:40:16.
- Search for the word cell_name
- Cell name: cell_name: wbecell.
- Search for the word PROCEDURE by typing F PROCEDURE and F5 to repeat
- PROCLIB: PROCEDURE WBESS62 WAS EXPANDED USING SYSTEM LIBRARY USER.S12.PROCLIB
- Search for the word WAS_HOMe by typing F WAS_HOME and F5 to repeat
- WAS_HOME: BBOM0001I adjunct_region_jvm_properties_file: /S12/wbe61/wbes12/AppServer/profiles/default/config/cells/ws/wbenode2/servers/wbesr12/adjunct.jvm.options.
Timeouts
zIIP/zAAP Usage
In general, WAS traditional on z/OS is mostly Java so it mostly offloads to zIIPs (other than small bits such as creating WLM enclaves, SAF, writing SMF records, etc.). Even if application processing hands-off to non-zIIP-eligible native code (e.g. third party JNI), recent versions of z/OS (with APAR OA26713) have a lazy-switch design in which short bursts of such native code may stay on the zIIP and not switch to GCPs. For non-zIIP-eligible native code such as the type 2 DB2 driver, some of that may use zAAPs and total processor usage compared to type 4 depends on various factors and may be lower.
WLM
WebSphere has several different types of work running in its address spaces. It is classified using classification rules under 3 different workloads:
- For STC workloads the WebSphere address spaces control regions and servant regions would be given an aggressive Velocity goal equal to or slightly less than DB2, IMS, or MQ and a goal equal to or slightly higher than CICS.
- For OMVS workloads the WebSphere address spaces control regions and servant regions would be given an aggressive Velocity goal so that at start-up the BPXBATCH facility used to run our applyPTF.sh script does not slow startup of the server.
- For CB workloads the WebSphere Servant Regions are given a Response time with percentile goal close to but not to exceed 90% of the work in .5 seconds. Even though WebSphere servers are long running tasks, typically Velocity goals are used for long running tasks, the actual transactions within WebSphere are very short lived HTTP type transactions. Response times with percentile goals are used for these short lived transactions.
The report classes associated with the classification rule for each workload would be unique.
Workload CB is enclave work or WLM queue managed WebSphere work. Almost all WebSphere work happens here after the initial startup of the address spaces.
STC work also occurs in the WebSphere address spaces:
- The processing necessary to start the address spaces before the first enclave is created is STC workload.
- Any spawned threads from the application will not be enclave, WLM, or CB managed work and will run under STC.
- Address space functions such as JES related activities will be STC workload.
- An argument can be made that says Garbage Collection activities run under STC workload.
Rarely use discretionary classification for WebSphere. If there is only a single service class, then all work occurs in that service class (i.e. overflow work would not go into, for example, a discretionary servie class).
OMVS work also occurs in the WebSphere Address Spaces. During startup a program called BPXBATCH is executed to run a script in the JCL. This script called applyPTF.sh checks to see if any service has been applied. If service has been applied this script executes any post install actions necessary. If startup is very slow, you may want to investigate a classification rule for OMVS. If the combination of applyPTF.sh and lack of classification are the cause of the slow startup, adding a classification rule may fix the slow start problem.
More on WAS with WLM: https://www-03.ibm.com/support/techdocs/atsmastr.nsf/002573f7000ac64286256c71006d2e0a/f1ec690b6bee04cd8625778800595c69/$FILE/WP101740%20-%20WAS_and_zOS_WLM_v8.pdf
WebSphere creates a WLM enclave for all requests that get dispatched in a servant. An enclave has an associated WLM service class and report class. The service class is used by WLM to help make decisions about assigning resources to the servant to ensure the requests meet the goals defined in the service class. The report class is used to separate information about the requests in reports generated by RMF (or other similar products). To determine which service class and report class to assign to the enclave, WLM looks at classification information provided by WebSphere when the enclave is created.
One piece of information provided is called a transaction class. This is just an eight character name assigned to the request. WebSphere supports an XML file pointed to by the variable wlm_classification_file to determine what transaction class to use. The XML file allows you to specify a different transaction class (and thus indirectly a different service class and report class) for different applications or even parts of applications.
The XML file also allows you to specify a transaction class to be used when classifying requests that are internally generated. Sometimes the controller needs to dispatch something in its own servant. For example, this could be the dispatch of a management bean (MBean). To separate internal work from application work, you might want to put these requests in their own report class. To do that you simply specify the 'internal' clause in the XML file and provide a transaction class name that WLM will recognize (based on the rules you provide in the WLM configuration) and assign service and report classes appropriately.
WLMStatefulSession
Note that wlm_stateful_session_placement_on
is not true round robin:
When you enable [wlm_stateful_session_placement_on] [...] When a new HTTP request without affinity arrives on a work queue, the WLM checks to see if there is a servant that has at least one worker thread waiting for work. If there are no available worker threads in any servants, WLM queues the request until a worker thread in any of the servants becomes available. If there are available worker threads, WLM finds the servant with the smallest number of affinities. If there are servant regions with equal number of affinities, then WLM dispatches the work to the servant region with the smaller number of busy server threads. The goal of this algorithm is for WLM to balance the incoming requests without servant affinity among waiting servants while considering changing conditions. The algorithm does not blindly assign requests to servers in a true round-robin manner. [...] This distribution mechanism works for all inbound requests without affinity. After the HTTP session object is created, all the client requests are directed to that servant until the HTTP session object is removed.
Links:
SMF 120
Details on 120-9 records in WP-101342
MODIFY Command
/F ADDRESSSPACE,... COMMANDS... or /MODIFY ADDRESSSPACE,... COMMANDS (https://www.ibm.com/support/knowledgecenter/SSAW57_8.5.5/com.ibm.websphere.nd.multiplatform.doc/ae/rxml_mvsmodify.html)
Display Java heap information: /F ADDRESSSPACE,JVMHEAP
Generate a javacore: /F ADDRESSSPACE,JAVACORE
The joblog will show where it is written: JVMDUMP007I JVM Requesting Java Dump using '/var/WebSphere/home/ZPSRG/javacore.20090309.205027.50397255.txtIn version 8 we added an option to these commands to specify the ASID of the servant region you want dumped. Just add a "ASIDX=" after the command with the appropriate ASID (in hex) of the servant region you want to dump. For example (http://www-03.ibm.com/support/techdocs/atsmastr.nsf/5cb5ed706d254a8186256c71006d2e0a/2e8a87fddebbb3328625791e0083041f/$FILE/WP101992%20-%20WebSphere%20zOS%20V8%20Hidden%20Gems.pdf):
/F server,JAVACORE,ASIDX=F4
PAUSELISTENERS, will cause the target server to close its listener ports and stop taking new requests
DISPLAY,SERVERS modify command has been enhanced to also report the 'state' of the server. There are four possibilities: ACTIVE, ENDING, PAUSED/STOPPING, and RECOVERY. ACTIVE seems pretty obvious. Basically ACTIVE means it isn't any of the other states; it could be up or it could be initializing. ENDING means that the server is on its way down. PAUSED/STOPPING means either you have issued PAUSELISTENERS or STOPped the server. It is kind of the same thing. In both cases the server is not taking new work, but there is a possibility work is still in-flight inside the server. The only difference is if we are stopping, then once the work completes the server will end. Finally, RECOVERY means that the server has been started to recover in-flight transactions and will automatically shut down once that is done. No new work will be taken.
BBOO0182I SERVER ASID SYSTEM LEVEL STATE
BBOO0183I WAS00 /ZWASAXXX 6Fx SY1 8.0.0.0 (ff1106.32) ACTIVE
BBOO0183I BBON001 /BBON001 58x SY1 8.0.0.0 (ff1106.32) ACTIVE
BBOO0183I BBOC001 /BBOS001 5Bx SY1 8.0.0.0 (ff1106.32) PAUSED/STOPPING
BBOO0183I BBODMGR /BBODMGR 57x SY1 8.0.0.0 (ff1106.32) ACTIVEWay back in WebSphere Version 5 we introduced the DISPLAY,WORK command (underneath the MVS 'Modify' command for the WAS controller). This pretty cool command lets you see how much work had been processed by the server since it started and how much work was actually in the server at the time. You could even look server region by server region and see how work was spreading (or not) across them. (http://www-03.ibm.com/support/techdocs/atsmastr.nsf/5cb5ed706d254a8186256c71006d2e0a/ec31a38f42faf8c486257c27005f7a64/$FILE/WP102371%20-%20New%20Functions%20in%20WAS%20zOS%20Maintenance%20Stream.pdf)
MODIFY Commands
z/OS supports modify commands which request diagnostic data from an address space:
Request javacores on servants:
MODIFY $CONTROLLER,JAVACORERequest stacks on servants:
MODIFY $CONTROLLER,STACKTRACEConsole Dump
Take a console dump from the operator console with the title $X of the address space with ID $Y, responding to the operator console identifier $Z returned by the DUMP command (replace X, Y, and Z):
DUMP COMM=($X)
R $Z,ASID=$Y,CONT
R $Z SDATA=(PSA,CSA,LPA,LSQA,RGN,SQA,SUM,SWA,TRT,ALLNUC,GRSQ),ENDDispatch Progress Monitor (DPM)
DPM is complementary to WAS hung thread detection, although it provides many more z/OS-related details: https://www.ibm.com/support/knowledgecenter/en/SSAW57_9.0.5/com.ibm.websphere.nd.multiplatform.doc/ae/tprf_monitor_dispatch_requests.html
Example of dynamically enable DPM to dump stack traces to the joblogs for requests taking more than 30 seconds:
MODIFY $JOB,DPM,HTTP=30
MODIFY $JOB,DPM,HTTPS=30
MODIFY $JOB,DPM,DUMP_ACTION=TRACEBACKTo display active DPMs, look for non-RESET values:
MODIFY $JOB,DISPLAY,DPM
BBOO0361I DISPATCH PROGRESS MONITOR (DPM) SETTINGS:IIOP(RESET):HTTP(030):HTTPS(030):MDB(RESET):SIP(RESET):SIPS(RESET):OLA(RESET):CRA(RESET) DUMP_ACTION(RESET)Dynamically disable DPM:
MODIFY $JOB,DPM,RESET_ALLAcquire console dump with DPM
Set DPM trigger after X elapsed seconds (replace
$addressspaceto match):F $addressspace,dpm,HTTP=X,HTTPS=X,dump_action=TRACEBACKChange the protocol if the work comes in through some method other than HTTP such as MDB. See https://www.ibm.com/support/knowledgecenter/en/SSAW57_9.0.5/com.ibm.websphere.nd.multiplatform.doc/ae/tprf_monitor_dispatch_requests.html
Configure DPM to send to the MVS console in addition to joblog (replace $addressspace to match):
F $addressspace,msgroute,COPYCONSOLE=BBOJ0118ISet slip trap on the DPM message (note that the column in the message ID is required). Replace
$jobnameto match and end with an*to capture controller and servants:SLIP SET,MSGID=BBOJ0118I:,A=SVCD,JOBNAME=$jobname*,MATCHLIM=1, JOBLIST=($jobname), SDATA=(ALLNUC,CSA,GRSQ,LPA,LSQA,PSA,RGN,SQA,SUM,SWA,TRT),ENDAfter a slip is triggered, it will be removed.
After dumps are captured, reset COPYCONSOLE (replace
$addressspaceto match):F $addressspace,msgroute,COPYCONSOLE,resetUpload console dumps, job logs, and verbosegc*log for the servants from HFS/ZFS
TCP Packet Trace
Capture packet trace to/from IP 10.20.30.1:30037
V TCPIP,NCDTCP,PKT,ON,FULL,IP=10.20.30.1,PORTNUM=30037WebSphere Liberty
WebSphere Liberty Recipe
- Review the Operating System recipe for your OS. The highlights are to ensure CPU, RAM, network, and disk are not consistently saturated.
- Review the Java recipe for your JVM.
The highlights are to tune the maximum heap size (
-Xmx), the maximum nursery size (-Xmn) and enable verbose garbage collection and review its output with the GCMV tool. - Liberty has a single
thread pool where most application work occurs and this pool is
auto-tuned based on throughput. In general, it is not recommended to
tune nor specify this element; however, if there is a throughput problem
or there are physical or virtual memory constraints, test with
<executor maxThreads="X" />. If an explicit value is better, consider opening a support case to investigate why the auto-tuning is not optimal. - If receiving HTTP(S) requests:
- If using the
servletfeature less than version 4, then consider explicitly enabling HTTP/2 withprotocolVersion="http/2". - For HTTP/1.0 and HTTP/1.1, avoid client keepalive socket churn by
setting
maxKeepAliveRequests="-1". This is the new default as of Liberty 21.0.0.6. - For servers with incoming LAN HTTP traffic from clients using
persistent TCP connection pools with keep alive (e.g. a reverse proxy
like IHS/httpd or web service client), consider increasing
persistTimeoutto reduce keepalive socket churn. - For HTTP/1.0 and HTTP/1.1, minimize the number of application responses with HTTP codes 400, 402-417, or 500-505 to reduce keepalive socket churn or use HTTP/2.
- If using HTTP session database persistence, tune the
<httpSessionDatabase />element. - If possible, configure and use HTTP response caching.
- If using TLS, set
-DtimeoutValueInSSLClosingHandshake=1. - Consider enabling the HTTP NCSA access log with response times for post-mortem traffic analysis.
- If there is available CPU, test enabling HTTP response compression.
- If the applications don't use resources in
META-INF/resourcesdirectories of embedded JAR files, then set<webContainer skipMetaInfResourcesProcessing="true" />. - Consider reducing each HTTP endpoint's
tcpOptions maxOpenConnectionsto the hundreds range to avoid excessive request queuing under stress and test with a saturation test.
- If using the
- If using databases (JDBC):
- Connection
pools generally should not be consistently saturated. Tune
<connectionManager maxPoolSize="X" />. - Consider tuning each connectionManager's
numConnectionsPerThreadLocalandpurgePolicy, and each dataSource'sstatementCacheSizeandisolationLevel. - Consider disabling idle and aged connection timeouts (and tune any firewalls, TCP keep-alive, and/or database connection timeouts, if needed).
- Connection
pools generally should not be consistently saturated. Tune
- If using JMS
MDBs without a message ordering requirement, tune activation
specifications'
maxConcurrencyto control the maximum concurrent MDB invocations andmaxBatchSizeto control message batch delivery size. - If using EJBs:
- If using non-
@Asynchronousremote EJB interfaces in the application for EJBs available within the same JVM, consider using local interface or no-interface equivalents instead to avoid extra processing and thread usage. - If an EJB is only needed to be accessed locally within the same server, then use local interfaces (pass-by-reference) instead of remote interfaces (pass-by-value) which avoids serialization.
- If using non-
- If using security, consider tuning the authentication cache and LDAP sizes.
- Use the minimal feature set needed to run your application to reduce startup time and footprint.
- Upgrade to the latest version and fixpack as there is a history of making performance improvements and fixing issues or regressions over time.
- Consider enabling request timing which will print a warning and stack trace when requests exceed a time threshold.
- Review logs for any errors, warnings, or high volumes of messages.
- Monitor, at minimum, response times, number of requests, thread pools, connection pools, and CPU and Java heap usage using mpMetrics-2.3, monitor-1.0, JAX-RS Distributed Tracing, and/or a third party monitoring program.
- Consider enabling event logging which will print a message when request components exceed a time threshold.
- Consider running with a sampling profiler such as Health Center or Mission Control for post-mortem troubleshooting.
- Disable automatic configuration and application update checking if such changes are unexpected.
- If the application writes a lot to messages.log, consider switching to binary logging for improved performance.
- Review the performance tuning topics in the OpenLiberty and WebSphere Liberty documentation.
- If running on z/OS:
- Consider enabling SMF 120 records.
- Consider WLM classification: zosWlm-1.0
- Enable hardware cryptography for Java 8, Java 11, or Java 17
Documentation
OpenLiberty is an open source Java application server. WebSphere Liberty is IBM's commercial extension of OpenLiberty. Both may be entitled for support.
For feature differences between editions, find the latest Quarterly
Webinar by searching
for "Liberty quarterly" (without double quotes) under
Search Library Entries, then sort by
Most Recent, click the link, open the PDF, and search for
"Periodic Table of Liberty".
WebSphere Liberty:
OpenLiberty:
Continuous Delivery
If you have longer-term support considerations, consider using Liberty releases ending in .3, .6, .9 or .12.
server.xml
Liberty is configured through a server.xml:
jvm.options
Generic JVM
arguments are set either in
$LIBERTY/usr/servers/$SERVER/jvm.options for a particular
JVM or in $LIBERTY/etc/jvm.options as defaults for all
servers.
Put each option on its own line. The file supports commented lines
that start with #.
Verbose Garbage Collection
Consider enabling Java verbose garbage collection on all JVMs, including production. This will help with performance analysis, OutOfMemoryErrors, and other post-mortem troubleshooting. Benchmarks show an overhead of less than 1% and usually less than 0.5%.
- OpenJ9 or IBM Java
-Xverbosegclog:-Xverbosegclog:logs/verbosegc.%seq.log,20,50000 - HotSpot
-Xloggc:- Java >= 9:
-Xlog:safepoint=info,gc:file=logs/verbosegc.log:time,level,tags:filecount=5,filesize=20M - Java 8:
-Xloggc:logs/verbosegc.log -XX:+UseGCLogFileRotation -XX:NumberOfGCLogFiles=5 -XX:GCLogFileSize=20M -XX:+PrintGCDateStamps -XX:+PrintGCDetails
- Java >= 9:
Monitor for high pause times and that the proportion of time in GC pauses is less than ~5-10% using the GCMV tool.
Logs and Trace
See WebSphere Liberty Logging Documentation and OpenLiberty Logging Documentation.
Always provide or analyze both console.log and
messages.log as they may have different sets of messages.
Ideally, when gathering Liberty server logs, gather the entire logs
folder under $LIBERTY/usr/servers/$SERVER/logs, as well as
the server.xml under $LIBERTY/usr/servers/$SERVER/.
Liberty uses a Java retransformation agent to supports some of its logging capabilities. On IBM Java < 7.1, the mere presence of a retransformation agent will cause the VM to double the amount of class native memory used, whether any individual class is transformed or not. On IBM Java >= 7.1, additional memory is allocated on-demand only for the classes that are retransformed.
WAS traditional Cross-Component Trace (XCT) and Request Metrics are not available in Liberty.
messages.log
messages.log includes WAS messages equal to or above the
INFO threshold (non-configurable),
java.util.logging.Logger messages equal to or above
traceSpecification (default *=info),
System.out, and System.err, with
timestamps.
On server startup, any old messages.log is first rotated
(unless the bootstrap property
com.ibm.ws.logging.newLogsOnStart=false is set).
To specify the maximum file size (in MB) and maximum number of historical files:
<logging maxFiles="X" maxFileSize="Y" />For those experienced with WAS traditional, messages.log
is like the combination of SystemOut.log and
SystemErr.log; however, unless the bootstrap property
com.ibm.ws.logging.newLogsOnStart=false is set, unlike WAS
traditional, Liberty doesn't append to the existing
SystemOut.log on restart by default.
console.log
console.log includes native stdout, native
stderr, WAS messages (except trace) equal to or above the
threshold set by consoleLogLevel (by default,
AUDIT), System.out plus
System.err (if copySystemStreams is true,
which it is by default) and without timestamps (unless
consoleFormat is simple). The
console.log is always truncated on server startup when
using $LIBERTY/bin/server start and does not support
maximum size nor rollover.
For those experienced with WAS traditional, by default,
console.log is like the combination of
native_stdout.log, native_stderr.log, and
SystemOut.log and SystemErr.log messages above
AUDIT without timestamps.
If you would like to use console.log for native
stdout and native stderr only and use
messages.log for everything else (note: a couple of AUDIT
messages will still show up before the logging configuration is
read):
<logging copySystemStreams="false" consoleLogLevel="OFF" />Starting with Liberty 20.0.0.5, consoleFormat supports the simple value that adds timestamps. For example:
$ docker run --rm -e "WLP_LOGGING_CONSOLE_FORMAT=simple" -it open-liberty:latest
Launching defaultServer (Open Liberty 20.0.0.6/wlp-1.0.41.cl200620200528-0414) on Eclipse OpenJ9 VM, version 1.8.0_252-b09 (en_US)
[6/24/20 19:21:53:874 GMT] 00000001 com.ibm.ws.kernel.launch.internal.FrameworkManager A CWWKE0001I: The server defaultServer has been launched.trace.log
Diagnostic trace is enabled with traceSpecification. For example:
<logging traceSpecification="*=info" maxFileSize="250" maxFiles="4" />For a more compact format, add traceFormat="BASIC".
If trace is enabled, trace.log includes WAS messages,
java.util.logging.Logger messages, WAS diagnostic trace,
System.out, and System.err, with
timestamps.
Sending trace to native stdout:
<logging traceSpecification="*=info" traceFileName="stdout" maxFileSize="0" traceFormat="BASIC" />Request Timing
Consider enabling and tuning request timing which will print a warning and stack trace when requests exceed a time threshold. Even in the case that you use a monitoring product to perform slow request detection, the built-in Liberty detection is still valuable for easy searching, alerting, and providing diagnostics to IBM support cases.
The slowRequestThreshold (designated X
below) is the main configuration and it should be set to your maximum
expected application response time in seconds, based on business
requirements and historical analysis. Make sure to include the
s after the value to specify seconds.
The hungRequestThreshold is an optional configuration
that works similar to slowRequestThreshold, but if it is
exceeded, Liberty will produce three thread
dumps, one minute apart, starting after a request exceeds this
duration.
Performance test the overhead and adjust the thresholds and
sampleRate as needed to achieve acceptable overhead.
<featureManager><feature>requestTiming-1.0</feature></featureManager>
<requestTiming slowRequestThreshold="Xs" hungRequestThreshold="600s" sampleRate="1" />Some
benchmarks have shown that requestTiming has an
overhead of about 3-4% when using a sampleRate of 1:
The requestTiming-1.0 feature, when activated, has been shown to have a 4% adverse effect on the maximum possible application throughput when measured with the DayTrader application. While the effect on your application might be more or less than that, you should be aware that some performance degradation might be noticeable.
As of this writing, requestTiming does not track asynchronous servlet request runnables though a feature request is opened.
Example output:
[10/1/20 13:21:42:235 UTC] 000000df com.ibm.ws.request.timing.manager.SlowRequestManager W TRAS0112W: Request AAAAqqZnfKN_AAAAAAAAAAB has
been running on thread 000000c2 for at least 5000.936ms. The following stack trace shows what this thread is currently running.
at java.lang.Thread.sleep(Native Method) [...]
The following table shows the events that have run during this request.
Duration Operation
5003.810ms + websphere.servlet.service | pd | com.ibm.pd.Sleep?durationms=10000Event Logging
Consider enabling and tuning event logging to log excessively long component times of application work. This is slightly different than request timing. Consider the following case: You've set the requestTiming threshold to 10 seconds which will print a tree of events for any request taking more than 10 seconds. However, what if a request occurs which has three database queries of 1 second, 2 seconds, and 6 seconds. In this case, the total response time is 9 seconds, but the one query that took 6 seconds is presumably concerning, so event logging can granularly monitor for such events.
<featureManager>
<feature>eventLogging-1.0</feature>
</featureManager>
<eventLogging includeTypes="websphere.servlet.service" minDuration="500ms" logMode="exit" sampleRate="1" />Example output:
[10/1/15 14:10:57:962 UTC] 00000053 EventLogging I END requestID=AAABqGA0rs2_AAAAAAAAAAA # eventType=websphere.servlet.service # contextInfo=pd
| com.ibm.pd.Sleep?durationms=10000 # duration=10008.947msBinary Logging
Consider using Binary
Logging. In benchmarks, binaryLogging reduced the
overhead of logs and trace by about 50%. Note that binary logging does
not use less disk space and in fact will use more disk space; the
performance improvements occur for other reasons.
Add the following additional
lines to bootstrap.properties for the server (if no
such file exists, create the file in the same directory as
server.xml):
websphere.log.provider=binaryLogging-1.0
com.ibm.hpel.log.purgeMaxSize=100
com.ibm.hpel.log.outOfSpaceAction=PurgeOld
com.ibm.hpel.trace.purgeMaxSize=2048
com.ibm.hpel.trace.outOfSpaceAction=PurgeOldThread Pools
Most application work in Liberty occurs in a single thread pool named
"Default Executor" (by default). The <executor />
element in server.xml may be used to configure this pool; however,
unless there are observed problems with throughput, it is generally not
recommended to tune nor even specify this element. If maxThreads is not
configured, Liberty dynamically
adjusts the thread pool size between coreThreads and maxThreads
based on observed throughput:
In most environments, configurations, and workloads, the Open Liberty thread pool does not require manual configuration or tuning. The thread pool self-tunes to determine how many threads are needed to provide optimal server throughput. [...] However, in some situations, setting the coreThreads or maxThreads attributes might be necessary. The following sections describe these attributes and provide examples of conditions under which they might need to be manually tuned.
- coreThreads: This attribute specifies the minimum number of threads in the pool. [...]
- maxThreads: This attribute specifies the maximum number of threads in the pool. The default value is -1, which is equal to MAX_INT, or effectively unlimited.
If there is a throughput problem, test with a maximum number of
threads equal to $cpus * 2. If this or another explicit
value is better, consider opening a support case to investigate why the
auto-tuning is not optimal. For example:
<executor maxThreads="64" />Diagnostic trace to investigate potential executor
issues:
com.ibm.ws.threading.internal.ThreadPoolController=all
As of this writing, the default
value of coreThreads is $cpus * 2.
Additional details:
HTTP
If the applications don't use resources in
META-INF/resources directories of embedded JAR files, then
set <webContainer skipMetaInfResourcesProcessing="true" />.
Liberty (starting in 18.0.0.2) uses DirectByteBuffers for HTTP reading and writing just like WAS traditional; however, there is only a global pool rather than ThreadLocal pools, and the DBB sizes and bucket sizes may be configured with, for example:
<bytebuffer poolSizes="32,1024,8192,16384,24576,32768,49152,65536" poolDepths="100,100,100,20,20,20,20,20" />Keep Alive Connections
Max requests per connection
By default, for Liberty < 21.0.0.6, for HTTP/1.0 and HTTP/1.1 (but
not HTTP/2.0), Liberty closes an incoming HTTP keep alive connection after
100 requests (see maxKeepAliveRequests). This may cause
a significant throughput impact, particularly with TLS (in one
benchmark, ~100%). To disable such closure of sockets, set maxKeepAliveRequests="-1":
<httpOptions maxKeepAliveRequests="-1" />This is the default as of Liberty 21.0.0.6.
Idle timeouts
In general, for servers with incoming LAN network traffic
from clients using persistent TCP connection pools (e.g. a reverse proxy
like IHS/httpd or web service client), increase the idle
timeout (see persistTimeout) to avoid connections
getting kicked out of the client connection pool. Try values less than
575 hours. For example:
<httpOptions persistTimeout="575h" />Error codes closing keep-alive connections
If an HTTP response returns what's internally considered an "error
code" (HTTP 400, 402-417, or 500-505; any StatusCodes
instance with the third parameter set to true); then,
after the response completes, if the socket is a keep-alive socket, it
will be closed. This may impact throughput if an application is, for
example, creating a lot of HTTP 500 error responses and thus any servers
with incoming LAN network traffic from clients using persistent
TCP connection pools (e.g. a reverse proxy like IHS/httpd or web service
client) will have to churn through more sockets than otherwise
(particularly impactful for TLS handshakes). As an alternative to
minimizing such responses, test using HTTP/2 instead.
HTTP Access Logs
HTTP
access logging with response times may be used to track the number
and response times of HTTP(S) requests in an NCSA format using
%D (in microseconds). The example also uses
%{R}W which is the time until the first set of bytes is
sent in response (in microseconds) which is often a good approximation
for application response time (as compared to %D which is
end-to-end response time including client and network).
For example:
<httpEndpoint httpPort="9080" httpsPort="9443">
<accessLogging filepath="${server.output.dir}/logs/http_access.log" maxFileSize="100" maxFiles="4" logFormat="%h %u %t "%r" %s %b %D %{R}W" />
</httpEndpoint>Starting with Liberty 21.0.0.11, the %{remote}p
option is available to print the ephemeral local port of the client
which may be used to correlate to network trace:
<httpEndpoint httpPort="9080" httpsPort="9443">
<accessLogging filepath="${server.output.dir}/logs/http_access.log" maxFileSize="100" maxFiles="4" logFormat="%h %u %t "%r" %s %b %D %{R}W %{remote}p %p" />
</httpEndpoint>If you are on older versions of Liberty, ensure you have APARs PI20149 and PI34161.
See also:
HTTP Sessions
By default, Liberty sets allowOverflow="true" for HTTP sessions, which means that maxInMemorySessionCount is not considered and HTTP sessions are unbounded which may cause OutOfMemoryErrors in the default configuration without session persistence. If allowOverflow is disabled, maxInMemorySessionCount should be sized taking into account the maximum heap size, the average HTTP session timeout, and the average HTTP session heap usage.
HTTP Session Database Persistence
If using HTTP session database persistence, configure the <httpSessionDatabase />
element along the lines of WAS
traditional tuning guidelines.
If using time-based writes, the writeInterval is the amount of time to wait before writing pending session updates. Note that there is a separate timer which controls the period at which a thread checks for any updates exceeding the writeInterval threshold. If the writeInterval is less than 10 seconds, then the timer is set to the value of the writeInterval; otherwise, the timer is set to a fixed 10 seconds, which means that writes may occur up to 10 seconds after the writeInterval threshold has passed.
HTTP Response Compression
Starting with Liberty 20.0.0.4,
HTTP responses may be automatically compressed (gzip, x-gzip, deflate,
zlib or identity) with the httpEndpoint compression
element. For example, without additional options, the element compresses
text/* and application/javascript response
MIME types:
<httpEndpoint httpPort="9080" httpsPort="9443">
<compression />
</httpEndpoint>This will reduce response body size but it will increase CPU usage.
Web Response Cache
The Web Response Cache configures HTTP response caching using the distributedMap. Example:
<featureManager>
<feature>webCache-1.0</feature>
</featureManager>
<distributedMap id="baseCache" memorySizeInEntries="2000" />The configuration is specified in a cachespec.xml in the application. For details, see ConfigManager and the WAS traditional discussion of cachespec.xml. The response cache uses the baseCache.
HTTP/2
Large request bodies
If an HTTP/2 client is sending large request bodies (e.g. file
uploads), then consider testing additional
tuning in httpOptions under httpEndpoint
available since
23.0.0.4:
limitWindowUpdateFrames: "Specifies whether the server waits until half of the HTTP/2 connection-level and stream-level windows are exhausted before it sends WINDOW_UPDATE frames."settingsInitialWindowSize: "Specifies the initial window size in octets for HTTP/2 stream-level flow control."connectionWindowSize: "Specifies the window size in octets for HTTP/2 connection-level flow control."
Monitoring
Consider enabling, gathering, and analyzing WAS statistics on, at least, thread pools, connection pools, number of requests, average response time, and CPU and Java heap usage. This is useful for performance analysis and troubleshooting. The following options are not mutually exclusive:
- mpMetrics:
Expose statistics through a REST endpoint:
- Enable mpMetrics. For example:
<featureManager> <feature>mpMetrics-4.0</feature> </featureManager> - Gather the data
through the
/metricsREST endpoint through Prometheus or direct requests.
- Enable mpMetrics. For example:
- monitor-1.0:
Expose statistics through Java MXBeans:
- Enable monitor-1.0:
<featureManager> <feature>monitor-1.0</feature> </featureManager> - Enable JMX access through localConnector-1.0 and/or restConnector-2.0
- Gather the data through monitoring products, JConsole, or a Java client (example: libertymon).
- Key
MXBeans are ThreadPoolStats, JvmStats, ServletStats, SessionStats,
and ConnectionPool. If all MXBeans are enabled (as they are by default
if monitor-1.0 is configured), benchmarks show about a 4% overhead. This
may be reduced by limiting the enabled MXBeans; for example:
<monitor filter="ThreadPoolStats,ServletStats,ConnectionPool,..." />
- Enable monitor-1.0:
- JAX-RS
Distributed Tracing for applications with JAX-RS web services:
- Enable mpOpenTracing-1.3:
<featureManager> <feature>mpOpenTracing-1.3</feature> </featureManager> - Connect to Jaeger (easier because no user feature is required) or Zipkin.
- Enable mpOpenTracing-1.3:
mpMetrics
When mpMetrics-x.x (or the convenience
microProfile-x.x feature) is enabled, the
monitor-1.0 feature is implicitly enabled to provide vendor
metrics that include
metrics for thread pools, connection pools, web applications, HTTP
sessions, and JAX-WS. This adds a small performance overhead (especially
the thread pool metrics). If only a subset of these metrics are needed,
reduce the overhead by adding a filter that explicitly configures the
available metrics:
- Only JAX-RS:
<monitor filter="REST" /> - Only some subset of the vendor metrics (pick and choose from the
following list):
<monitor filter="JVM,ThreadPool,WebContainer,Session,ConnectionPool,REST" /> - No JAX-RS nor vendor metrics and instead only
baseandapplicationmetrics:<monitor filter=" "/> <!-- space required -->
Centralized Logging
Consider sending log data to a central service such as Elastic Stack. This is useful for searching many logs at once.
Java Database Connectivity (JDBC)
Review common JDBC tuning, in particular:
- maxPoolSize: The maximum connections to the DB for this pool.
- statementCacheSize: Maximum number of cached prepared statements per connection.
- purgePolicy: Whether to purge all connections when one connection
has a fatal errors. Defaults to
EntirePool. ConsiderFailingConnectionOnly. - numConnectionsPerThreadLocal: Cache DB connections in ThreadLocals on the DefaultExecutor pool. Consider testing with an explicit maxThreads size for the pool.
- isolationLevel: If application semantics allow it, consider reducing the isolationLevel.
Connection pool idle and aged timeouts
For maximum performance, connections in the pool should not time out
due to the idle timeout (maxIdleTime)
nor the aged timeout (agedTimeout).
To accomplish this, modify connectionManager
configuration:
- Set
minPoolSizeto the same value asmaxPoolSizeor setmaxIdleTime="-1", and - Ensure
agedTimeoutis not specified or is set to-1, and - Ensure any intermediate firewalls to the database do not have idle or age timeouts or configure client operating system TCP keep-alive timeouts to below these values, and
- Ensure the database does not have idle or age timeout.
For example:
<connectionManager minPoolSize="50" maxPoolSize="50" reapTime="-1" />The reason to do this is that connection creation and destruction may be expensive (e.g. TLS, authentication, etc.). Besides increased latency, in some cases, this expense may cause a performance tailspin in the database that may make response time spikes worse; for example, something causes an initial database response time spike, incoming load in the clients continues apace, the clients create new connections, and the process of creating new connections causes the database to slow down more than it otherwise would, causing further backups, etc.
The main potential drawback of this approach is that if there is a
firewall between the connection pool and the database, and the firewall
has an idle or age timeout, then the connection may be destroyed and
cause a stale connection exception the next time it's used. This may
fail the request and purge the entire connection pool if
purgePolicy="EntirePool". The main ways to avoid this are
either to configure the firewall idle or age timeouts similar to above,
or tune the TCP keepalive
settings in the client or database operating systems below the
timeouts.
Similarly, some databases may have their own idle or age timeouts. The database should be tuned similarly. For example, IBM DB2 does not have such connection timeouts by default.
Some people use connection pool usage as a proxy of database response time spikes. Instead, monitor database response times in the database or using Liberty's ConnectionPool MXBean and its InUseTime statistic.
Admin Center
The Admin Center is commonly put on port 9443, for example https://localhost:9443/adminCenter/
<featureManager>
<feature>adminCenter-1.0</feature>
</featureManager>
<quickStartSecurity userName="wsadmin" userPassword="wsadmin" />
Sampling Profiler
Consider enabling a sampling profiler, even in production. This does have a cost but provides very rich troubleshooting data on what Java code used most of the CPU, what monitors were contended, and periodic thread information. Benchmarks for Health Center showed an overhead of <2%. Gauge the overhead in a performance test environment.
- OpenJ9 or IBM Java:
- Add the following to
jvm.optionsand restart:-Xhealthcenter:level=headless - After each time the JVM gracefully stops, a
healthcenter*.hcdfile is produced in the current working directory (e.g.$LIBERTY/usr/servers/$SERVER/).
- Add the following to
- HotSpot Mission Control:
- Add the following to
jvm.optionsand restart:-XX:+FlightRecorder -XX:StartFlightRecording=filename=jmcrecording.jfr,settings=profile - After each time the JVM gracefully stops, a
*.jfrfile is produced in the current working directory (e.g.$LIBERTY/usr/servers/$SERVER/).
- Add the following to
Start-up
If a cdi feature is used (check the
CWWKF0012I message) and the applications don't have CDI
annotations in embedded archives, disable such scanning to improve
startup times with <cdi12 enableImplicitBeanArchives="false"/>.
Jandex
Consider creating Jandex index files to pre-compute class and annotation data for application archives.
Startup Timeout Warning
Liberty profile has a fixed timeout of 30 seconds for applications to start. After the 30 second timeout expires two things happen: a message is output to the logs saying the application didn't start quickly enough; during server startup the server will stop waiting for the application to start and claim to be started, even though the application is not yet ready.
To set this value to (for example) one minute add the following to server.xml:
<applicationManager startTimeout="1m"/>
Startup order
Starting with Liberty 20.0.0.6, the application element has an optional startAfter attribute that allows controlling the order of application startup. Example:
<application id="APP1" location="APP1.war"/>
<webApplication id="APP2" location="APP2.war" startAfterRef="APP1"/>
<enterpriseApplication id="APP3" location="APP3.ear"/>
<application id="APP4" location="APP4.ear" startAfterRef="APP2, APP3"/>OSGi Feature Startup Times
Edit
wlp/usr/servers/<serverName>/bootstrap.properties:
osgi.debug=Edit wlp/usr/servers/<serverName>/.options:
org.eclipse.osgi/debug/bundleStartTime=true
org.eclipse.osgi/debug/startlevel=trueExample output:
10 ms for total start time event STARTED - osgi.identity; type="osgi.bundle"; version:Version="1.3.42.202006040801"; osgi.identity="com.ibm.ws.kernel.service" [id=5]
13 ms for total start time event STARTED - osgi.identity; type="osgi.bundle"; version:Version="1.0.42.202006040801"; osgi.identity="com.ibm.ws.org.eclipse.equinox.metatype" [id=6]The bundles have some dependencies so there are a series of start-levels to support the necessary sequencing, but all bundles within a given start-level are started in parallel, not feature-by-feature. You may disable parallel activation to get more accurate times but then you have to figure out all the bundles the feature enables.
Idle CPU
Idle CPU usage may be decreased if dynamic configuration and application updates are not required:
<applicationMonitor dropinsEnabled="false" updateTrigger="disabled"/>
<config updateTrigger="disabled"/>Alternatively, you may still support dynamic updates through MBean triggers that has lower overhead than the default polling:
<applicationMonitor updateTrigger="mbean" pollingRate="999h" />
<config updateTrigger="mbean" monitorInterval="999h" />When the MBean is triggered, the update occurs immediately (i.e. the
pollingRate and monitorInterval values can be
set as high as you like).
Authentication Cache
If using security and the application allows it, consider increasing
the authentication
cache timeout from the default of 10 minutes to a larger value
using, for example, <authCache timeout="30m" />.
If using security and the authentication cache is becoming full,
consider increasing the authentication
cache maxSize from the default of 25000 to a larger value using, for
example, <authCache maxSize="100000" />.
LDAP
If using LDAP, consider increasing various cache
values in <attributesCache />,
<searchResultsCache />, and
<contextPool /> elements. For example:
<ldapRegistry [...]>
<ldapCache>
<attributesCache size="4000" sizeLimit="4000" timeout="2400s" />
<searchResultsCache resultsSizeLimit="4000" size="4000" timeout="2400s" />
</ldapCache>
<contextPool preferredSize="6" />
</ldapRegistry>Web Services
JAX-RS
JAX-RS Client
The JAX-RS 2.0 and 2.1 clients are built on top of Apache CXF. The JAX-RS 3.0 and above clients are built on top of RESTEasy. Upgrading to JAX-RS 3.0 and above may require some application changes.
For applications, it is best to re-use anything that you can. For
example, you should try to re-use Client instances if you
are invoking multiple different endpoints (although other
implementations may not be, the Client implementation in
Liberty is thread safe). If you are invoking the same endpoint, but
possibly with different parameters, then you should re-use the
WebTarget. If you are invoking the same request (same
parameters, cookies, message body, etc.), then you can re-use the
Invocation.Builder. Re-using as much as possible prevents
waste and also improves performance as you are no longer creating new
clients, targets, etc. Make sure to close Response objects
after using them.
Connection and Read Timeouts
Timeouts may be specified via the
com.ibm.ws.jaxrs.client.connection.timeout and
com.ibm.ws.jaxrs.client.receive.timeout properties in
JAX-RS 2.0, via the connectTimeout() and
readTimeout() methods in JAX-RS 2.1, or via
server.xml using the webTarget element and
setting the connectionTimeout and/or
receiveTimeout attributes.
Keep-Alive Connection Pools
The JAX-RS V2 client in synchronous mode uses connection pooling
through the JDK's HttpURLConnection.
In particular, this means that if the server does not respond with a
Keep-Alive response header, then the connection will time-out after 5 seconds
(which is tunable in recent versions of Java).
The JAX-RS V2 client in asynchronous
mode uses connection pooling through Apache HttpClient. This HttpClient may be
tuned with client.setProperty or property
calls such as
org.apache.cxf.transport.http.async.MAX_CONNECTIONS,
org.apache.cxf.transport.http.async.MAX_PER_HOST_CONNECTIONS,
org.apache.cxf.transport.http.async.CONNECTION_TTL, and
org.apache.cxf.transport.http.async.CONNECTION_MAX_IDLE,
although these have high
default values.
It may be possible (although potentially unsupported) to switch from
a JAX-RS V2 synchronous client into an asynchronous client with a
client.setProperty or property call with
use.async.http.conduit=true.
JSP
By default, Liberty compiles JSPs on first access (if a cached compile isn't already available). If you would like to compile all JSPs during server startup instead, use the following (these are re-compiled every startup):
<jspEngine prepareJSPs="0"/>
<webContainer deferServletLoad="false"/>JSF
MyFaces JSF Embedded JAR Search for META-INF/*.faces-config.xml
By default, the Liberty Apache MyFaces JSF implementation searches
JSF-enabled applications for META-INF/*.faces-config.xml
files in all JARs on the application classpath. A CPU profiler might
highlight such tops of stacks of a form such as:
java.util.jar.JarFile$1.nextElement
java.util.jar.JarFile$1.nextElement
org.apache.myfaces.view.facelets.util.Classpath._searchJar
org.apache.myfaces.view.facelets.util.Classpath._searchResource
org.apache.myfaces.view.facelets.util.Classpath.search
[...]FacesConfigResourceProvider.getMetaInfConfigurationResources
[...]When an embedded faces-config.xml file is found, a
message is written to messages.log with a
wsjar: prefix, so this would be a simple way to check if
such embedded resource searches are needed or not. For example:
Reading config : wsjar:file:[...]/installedApps/[...]/[...].ear/lib/bundled.jar!/META-INF/faces-config.xmlIf your applications only use a faces-config.xml within
the application itself and do not depend on embedded
faces-config.xml files within JARs on the application
classpath, then you can disable these searches with org.apache.myfaces.INITIALIZE_SKIP_JAR_FACES_CONFIG_SCAN=true
if on JSF
>= 2.3. This may be set in WEB-INF/web.xml,
META-INF/web-fragment.xml, or globally as a JVM property.
For example, in jvm.options:
-Dorg.apache.myfaces.INITIALIZE_SKIP_JAR_FACES_CONFIG_SCAN=trueIf you want to disable globally using the JVM property but some
applications do require embedded faces-config.xml files,
then use the above property and then enable particular applications in
WEB-INF/web.xml or
META-INF/web-fragment.xml.
EJB
The Liberty EJB implementation is a fork of the Apache Geronimo Yoko ORB.
Yoko Timeouts
-Dyoko.orb.policy.connect_timeout=MILLISECONDS(default -1 which is no timeout)-Dyoko.orb.policy.request_timeout=MILLISECONDS(default -1 which is no timeout)-Dyoko.orb.policy.reply_timeout=MILLISECONDS(default -1 which is no timeout)-Dyoko.orb.policy.timeout=MILLISECONDS: Changeconnect_timeoutandrequest_timeouttogether (default -1 which is no timeout)
Remote Interface Optimization
If an application uses a remote EJB interface and that EJB component
is available within the same JVM, as of this writing, the Yoko ORB that
Liberty uses does not have an optimization to automatically use the
local interface (as is done with WAS traditional using its "local
optimization" [different from prefer local]) and this will drive the
processing of the remote EJB on a separate thread. If an EJB is not
@Asynchronous, consider running such EJBs on the same
thread by using
the local interface or no-interface instead of the remote
interface.
Messaging
Liberty provides various forms of JMS messaging clients and connectors.
Activation Specifications
If using JMS MDBs, tune
activation specifications' maxConcurrency to control
the maximum concurrent MDB invocations and maxBatchSize to
control message batch delivery size.
Embedded Messaging Server
The embedded messaging server (wasJmsServer) is similar to the WAS traditional SIB messaging with the following differences:
- There is no messaging bus in Liberty. A single messaging engine can run in each JVM but there is no cluster concept that will present the messaging engines, queues and topics within them as belonging to a single clustered entity.
- There is no high availability fail-over for the messaging engine. The client JVM is defined to access the queues and topics in messaging engines running in specific JVMs running at a specific hostname rather than anywhere in the same cell as in WAS traditional.
- There are other minor differences where Liberty sticks more closely
to the JMS specification. Examples:
- JMSContext.createContext allows a local un-managed transaction to be started in WAS traditional (although this is often an application design error) but this is not allowed in Liberty.
- WAS traditional SIB APIs (com.ibm.websphere.sib) are not provided in Liberty.
The WebSphere Application Server Migration Toolkit helps discover and resolve differences.
Database Persistence
JPA 2.0 and before uses OpenJPA. JPA 2.1 and later uses EclipseLink.
JakartaEE
Classloading
The directory ${shared.config.dir}/lib/global (commonly,
$WLP/usr/shared/lib/global/) is on the global
classpath, unless the
application specifies a classloader element, in which
case a commonLibraryRef of global can be added
to still reference that directory.
The ContainerClassLoader is the super class of the AppClassLoader. If an application has an EAR with one or more WARs, there will be two AppClassLoaders (one for the WAR module that is a child loader of the EAR's loader). If it's just a standalone WAR, then only one AppClassLoader.
The WAR/EAR AppClassLoader is a child of a GatewayClassLoader that represents the access to Liberty's OSGI bundle classloaders. The GW loader only allows class loads that are in API packages (i.e. javax.servlet.* if the servlet feature is enabled, javax.ejb.* if the ejb feature is enabled, etc.).
Each WAR/EAR AppClassLoader also has a child loader called ThreadContextClassLoader that basically has two parents - the associated AppClassLoader and it's own Gateway ClassLoader that can load additional classes from Liberty bundles that are in packages marked for thread-context that allows Liberty to load classes using the thread's context classloader without allowing an application class to directly depend on it.
AppClassLoader will use the Class-Path entry in a MANIFEST.MF on a JAR, but it is not required. The classpath for a WAR is all classes in the WEB-INF/classes directrory plus all of the jar files in WEB-INF/lib - then if there are any private shared libraries associated with the app, then those class entries are added to the classpath too.
Liberty doesn't allow shared library references from WARs within an EAR. The references are only handled at the application scope (whether that's an EAR or a standalone WAR). Therefore, you can't separately reference a library for each WAR like you could in WAS traditional. The alternative is to put the jars from the shared library into the WARs' WEB-INF/lib directories.
JARs placed in ${LIBERTY}/usr/${SERVER}/lib/global
should be accessible by all applications through
Class.forName.
Passing Configuration
Use a jndiEntry in server.xml; for example:
<variable name="myVariable" value="myValue"/> <jndiEntry jndiName="myEntry" value="${myVariable}"/>Then the application can do
new InitialContext().lookup("myEntry");.Note that this may also be used to pass Liberty configuration such as, for example,
${com.ibm.ws.logging.log.directory}for the log directory.
dnf/yum/apt-get repositories
See https://openliberty.io/blog/2020/04/09/microprofile-3-3-open-liberty-20004.html#yum
Security
Links:
Tracing login:
*=info:com.ibm.ws.security.*=all:com.ibm.ws.webcontainer.security.*=all
and search for performJaasLogin Entry and
performJaasLogin Exit
Failed login delays
APAR PH38929
introduced in 21.0.0.10 performs a delay from 0-5 seconds (a different
random number in this range each time) on a failed login. Consider
enabling and reviewing the HTTP access log to find
such delays by checking for delays with an HTTP 401 or 403 response
code. If your original concern was about response times spikes in your
monitoring, then you may consider leaving this behavior as-is, and
removing such 401 or 403 responses from your response time monitoring.
Otherwise, if your security team reviews the failed logins and the
potential of user enumeration attacks and decides it is okay to reduce
or eliminate the delay, this may be done with failedLoginDelayMin
and failedLoginDelayMax, although you should also
continue to monitor for failed login attempts.
Basic Extensions using Liberty Libraries (BELL)
The bell feature allows packaging a ServletContainerInitializer in a jar file with META-INF/services and run for every app that gets deployed.
<bell libraryRef="scilib" />JConsole
JConsole is a simple monitoring utility shipped with the JVM.
Note that while JConsole does have some basic capabilities of writing statistics to a CSV, this is limited to a handful of JVM statistics from the main JConsole tabs and is not available for the MXBean data. Therefore, for practical purposes, JConsole is only useful for ad-hoc, live monitoring.
To connect remotely with the restConnector, launch the client JConsole as follows:
jconsole -J-Djava.class.path=$JDK/lib/jconsole.jar:$JDK/lib/tools.jar:$LIBERTY/clients/restConnector.jar -J-Djavax.net.ssl.trustStore=$LIBERTY/usr/servers/server1/resources/security/key.jks -J-Djavax.net.ssl.trustStorePassword=$KEYSTOREPASSWORD -J-Djavax.net.ssl.trustStoreType=jksThen use a URL such as
service:jmx:rest://localhost:9443/IBMJMXConnectorREST and
enter the administrator credentials.
- Start JConsole: WLP/java/{JAVA}/bin/jconsole
- Choose the JVM to connect to:

- You may be asked to automatically switch to the secure port:

- Review the overview graphs:

- Click the MBeans tab to review enabled data:

- You may also export some of the data by right clicking and creating
a CSV file:

- You may also execute various MBeans, for example:

Accessing statistics through code:
MBeanServer mbs = ManagementFactory.getPlatformMBeanServer();
ObjectName name = new ObjectName("WebSphere:type=REST_Stats,name=restmetrics/com.example.MyJaxRsService/endpointName");
RestStatsMXBean stats = JMX.newMXBeanProxy(mbs, name, RestStatsMXBean.class);
long requestCount = stats.getRequestCount();
double responseTime = stats.getResponseTime();JConsole with HotSpot
You may need options such as the following for local connections with HotSpot:
-Dcom.sun.management.jmxremote.port=9005
-Dcom.sun.management.jmxremote.authenticate=false
-Dcom.sun.management.jmxremote.ssl=falseFind Release for a Pull Request
- Find the line
[...] merged commit X into OpenLiberty:integration [...]. Take the value ofX. For example, for PR 10332,Xisc7eb966. - Click on the link for that commit and review the tags at the top. For example, commit c7eb966 shows tags starting at 20.0.0.2 which is the first release it's available.
- Alternatively, from the command line, search for tags with that
commit:
git tag --contains X. For example, PR 10332 is available starting in 20.0.0.2:git tag --contains c7eb966 gm-20.0.0.2 gm-20.0.0.3 gm-20.0.0.4 gm-20.0.0.5 gm-20.0.0.6 gm-20.0.0.7 gm-20.0.0.8 gm-20.0.0.9
Java Support
Liberty requires a certain minimum
version of Java. As of this writing, the only feature that requires
a JDK is localConnector-1.0;
all other features only need a JRE.
Quick Testing
If you have Docker installed, you may quickly test some configuration; for example:
$ echo '<server><config updateTrigger="mbean" monitorInterval="60m" /><logging traceSpecification="*=info:com.ibm.ws.config.xml.internal.ConfigFileMonitor=all" traceFormat="BASIC" traceFileName="stdout" maxFileSize="250" /></server>' > configdropin.xml && docker run --rm -v $(pwd)/configdropin.xml:/config/configDropins/overrides/configdropin.xml -it open-liberty:latest | grep -e CWWKF0011I -e "Configuration monitoring is enabled"
[9/14/20 21:16:27:371 GMT] 00000026 ConfigFileMon 3 Configuration monitoring is enabled. Monitoring interval is 3600000
[9/14/20 21:16:31:048 GMT] 0000002a FeatureManage A CWWKF0011I: The defaultServer server is ready to run a smarter planet. The defaultServer server started in 6.851 seconds.
^CFFDC
Liberty will keep up to the last 500 FFDC files. These are generally small files, useful for post-mortem debugging, and don't need to be manually cleaned up.
z/OS
Monitoring on z/OS
WebSphere Liberty provides SMF 120 records for understanding performance aspects of various processes in a Liberty server. Note that there is a small throughput overhead for enabling SMF recording of approximately 3% (your mileage may vary).
- HTTP requests may be monitored with SMF 120 subtype 11 records. These records are enabled by adding the zosRequestLogging-1.0 feature to the server configuration and enabling SMF to capture those records.
- Java batch jobs may be monitored with SMF 120 subtype 12 records. These records are enabled by adding the batchSMFLogging-1.0 feature to the server configuration and enabling SMF to capture those records.
Additional background:
zIIPs/zAAPs
In general, WebSphere Liberty on z/OS is mostly Java so it mostly offloads to zIIPs (other than small bits such as creating WLM enclaves, SAF, writing SMF records, etc.). Even if application processing hands-off to non-zIIP-eligible native code (e.g. third party JNI), recent versions of z/OS (with APAR OA26713) have a lazy-switch design in which short bursts of such native code may stay on the zIIP and not switch to GCPs. For non-zIIP-eligible native code such as the type 2 DB2 driver, some of that may use zAAPs and total processor usage compared to type 4 depends on various factors and may be lower.
JAXB
JAXB may be used to marshal and unmarshal Java classes to and from XML, most commonly with web service clients or endpoints using JAX-WS such as through the xmlWS, xmlBinding, jaxws, or jaxb features.
If you observe that JAXBContext.newInstance is impacting
performance, consider:
- Package a
jaxb.indexfile for every package that does not contain an `ObjectFactory` class. - Consider faster
instantiation performance over faster sustained
unmarshalling/marshalling performance:
- If using Liberty's
xmlWS/xmlBinding:-Dorg.glassfish.jaxb.runtime.v2.runtime.JAXBContextImpl=true - If using Liberty's
jaxws/jaxb:-Dcom.sun.xml.bind.v2.runtime.JAXBContextImpl=true
- If using Liberty's
- If creating a
JAXBContextdirectly, consider using a singleton pattern which is thread safe.
Timed Operations
Timed operations was introduced before requestTiming and is largely superseded by requestTiming, although requestTiming only uses simple thresholds. Unless the more complex response time triggering is interesting, use requestTiming instead.
When enabled, the timed operation feature tracks the duration of JDBC operations running in the application server. In cases where operations take more or less time to execute than expected, the timed operation feature logs a warning. Periodically, the timed operation feature will create a report, in the application server log, detailing which operations took longest to execute. If you run the server dump command, the timed operation feature will generate a report containing information about all operations it has tracked.
To enable timed operations, add the timedOperations-1.0 feature to the server.xml file.
The following example shows a sample logged message:
[3/14/13 14:01:25:960 CDT] 00000025 TimedOperatio W TRAS0080W: Operation websphere.datasource.execute: jdbc/exampleDS:insert into cities values ('myHomeCity', 106769, 'myHomeCountry') took 1.541 ms to complete, which was longer than the expected duration of 0.213 ms based on past observations.
<featureManager>
<feature>timedOperations-1.0</feature>
</featureManager>Education
- Self-paced WebSphere Application Server Troubleshooting and Performance Lab
- Top 10 Performance and Troubleshooting tips for WebSphere Application Server traditional and Liberty
Configuration Analysis
WAS traditional Extracting Properties
A subset of configuration properties may be extracted using an MBean: https://www.ibm.com/support/knowledgecenter/en/SSAW57_9.0.5/com.ibm.websphere.nd.multiplatform.doc/ae/txml_7propsfile.html
Additional background on properties-based configuration, including this note:
You cannot extract whole configuration properties from one cell, and apply to another empty cell to clone your environment.
WebSphere Application Server Configuration Visualizer
The WAS Configuration Visualizer visualizes a WAS traditional config directory in an HTML page: https://www.ibm.com/support/pages/websphere-application-server-configuration-visualizer
WebSphere Application Server Configuration Comparison Tool
The following tool performs configuration comparison for WAS traditional: https://www.ibm.com/support/pages/websphere-application-server-configuration-comparison-tool
General Health Check Points
- Ask for any previous health checks that have been done
- Involve the account team throughout the process
- Ask what are the current problems and pain points
- If there is time, perform a preliminary review of findings and recommendations (e.g. in the middle of the health check) to make sure you're on the right track and covering the key areas
- Mark findings and recommendations with a priority level, effort
level, category (e.g. applications, performance, up-time, product level,
architecture, security, configuration, past issues, problem
determination, logging and monitoring, HA/DR, etc.), environment, status
(needs attention, information only, not optimal, etc.), etc.
- Create a spreadsheet with titles of findings/recommendations with a column for each of the above. This allows various different people to quickly filter to what's important to them.
- Point out things that are going well
- For each recommendation, end with the reason; for example, "Change configuration X to improve resiliency"
- What are the response time targets, and what are the observations?
- What are the CPU and memory utilization targets, and what are the observations?
- How does testing work? How does performance testing compare to production?
- Which highly available services are used (e.g. transaction logs, session replication/persistence)?
- Create an architecture diagram
- Invite relevant management for the final presentation/review
- Review:
- Software versions
- Hardware configuration (e.g. CPU number/speed, RAM amount, etc.)
- Architecture of component interactions
- CPU utilization over time
- Memory utilization over time
- Network utilization over time
- Disk utilization over time
- Software logs (WAS, Java, OS, etc.) for warnings/errors
- Process arguments
- Proportion of time in garbage collection over time
- Longest garbage collection pause times
- Thread pool utilization over time (WAS, IHS, etc.)
- Connection pool (e.g. DB, JMS) utilization over time
- Timeouts
- Security configuration
- Operating system core hard ulimits and how cores are saved/truncated
- Review cache usage (e.g. HTTP sessions)
- Difference in behavior (response times, GC, etc.) between similar cluster members
- Memory leaks
- Review all components (WAS, IHS, etc.)
- Review the recipes from this cookbook
WAS traditional Health Check
Gather WAS traditional Health Check Data
- Run the collector on the deployment manager: https://www.ibm.com/support/knowledgecenter/en/SSAW57_9.0.5/com.ibm.websphere.nd.multiplatform.doc/ae/ttrb_runct.html
- Log in as the same user that's running WAS
mkdir -p /tmp/was/cd /tmp/wasexport IBM_JAVA_OPTIONS="-Xmx2g"${WAS}/profiles/${PROFILE}/bin/collector.sh- Gather the file named
*WASenv.jar
- Run the collector on at least one random application node (for log analysis); ideally, all.
- Gather any historical operating system statistics such as nmon, perfmon, etc.
- Upload all
*WASenv.jarfiles (there should be at least 2) and any OS statistics if available.
Analyze WAS traditional Health Check Data
Analyze (after expanding the *WASenv.jar files):
- WAS versions:
find . -type f -name "*SystemOut*log*" -exec grep -H "^WebSphere" {} \; | awk '{print $(NF-4),$3}' | sort | uniqfind . -type f -name node-metadata.properties -exec grep -H ProductVersion {} \; | grep -v -e wxdop -e xdProduct | sed 's/.*nodes\///g' | sed 's/\/node-metadata.*:/: /g' | sort
- Operating system versions:
find . -type f -name "*SystemOut*log*" -exec grep -H "Host Operating System is" {} \; | sed 's/.* is //g' | sort | uniq
- Java versions:
find . -type f -name "*SystemOut*log*" -exec grep -H "Java version = " {} \; | sed 's/.* is //g' | sort | uniq
- Max file descriptors:
find . -type f -name "*SystemOut*log*" -exec grep -H "Max file descriptor count = " {} \; | sed 's/.*://g' | sort | uniq
- If needed, review installed APARs: AppServer/properties/version/installed.xml
- Check for hung thread warnings:
find . -type f -name "*SystemOut*log*" -exec grep -Hn WSVR0605W {} \;
- Find warnings and errors in SystemOut* logs:
find . -type f -name "*SystemOut*log*" -exec grep -H " [W|E] " {} \; > sysout_warnings_errors.txtawk '{print $7}' sysout_warnings_errors.txt | grep "[WE]:$" | sort | uniq -c | sort -nr | head -10
- Find warnings and errors in SystemErr* logs:
find . -name "*SystemErr*log" -exec grep -H "." {} \; | grep -v -e "SystemErr[[:blank:]]\+R[[:blank:]]\+at" -e "Display Current Environment"
- Find log message rate:
find . -type f \( -name "*SystemOut*log*" -or -name "messages*log*" \) -exec grep "^\[.*" {} \; | awk '{print $1,$2}' | sed 's/:[0-9][0-9][0-9]$//g' | sed 's/\[//g' | sort | uniq -c
- Find startup trace specification:
find . -type f -name server.xml -not -path "*template*" -exec grep -H "startupTraceSpecification" {} \; | sed 's/:.* startupTraceSpecification="/ /g' | sed 's/".*//g'
- Find applications deployed by cluster:
find . -type f -name deployment.xml -exec grep -H deploymentTargets {} \; | grep -v -e ibmasyncrsp -e isclite -e OTiS -e WebSphereWSDM | sed 's/:.*name="/ /g' | sed 's/".*//g' | sed 's/\// /g' | awk '{print $(NF),$(NF-4)}' | sort | uniq | sort -k 2
- Find generic JVM arguments:
find . -type f -name server.xml -not -path "*template*" -exec grep -H genericJvm {} \; | sed 's/:.*genericJvmArguments="\([^"]*\)".*/: \1/g' | grep -v ': $'find . -type f -name server.xml -not -path "*templates*" -exec grep -H systemProperties {} \; | grep -v -e 'value="off"' -e java.awt.headless
- Find where unexpected JVM debugging is enabled:
find . -type f -name server.xml -not -path "*template*" -exec grep -H genericJvm {} \; | grep -e 'verboseModeClass="true"' -e 'verboseModeJNI="true"' -e 'runHProf="true"' -e 'debugMode="true"'
- Find LTPA timeout (minutes);
find . -type f -name security.xml -exec grep -H system.LTPA {} \; | sed 's/:.*timeout/: timeout/g' | sed 's/" .*/"/g'
- Check if "Enable failover of transaction log recovery" is enabled
(disabled may not show in the grep):
find . -type f -name cluster.xml -exec grep -H enableHA {} \; | sed 's/:.*enableHA/: enableHA/g' | sed 's/>//g'
- See if the transaction log directory has been modified (default of a
local directory shows no results):
find . -type f -name serverindex.xml -exec grep recoveryLog {} \;
- Find transaction timeout settings:
find . -type f -name server.xml -not -path "*template*" -exec grep -H "services.*TransactionService" {} \; | sed 's/:.*total/: total/g'- totalTranLifetimeTimeout = Total transaction lifetime timeout
- propogatedOrBMTTranLifetimeTimeout = Maximum transaction timeout
- clientInactivityTimeout = Client inactivity timeout
- asyncResponseTimeout = Async response timeout
- Review defined resources and their scopes:
find . -type f -name resources.xml -not -path "*template*" -exec grep -H "<resources" {} \; | sed 's/xmi.*name/name/g' | sed 's/ description.*//g' | sed 's/" .*/"/g' | sort -k 2 | grep -v -e URLProvider -e MailProvider -e JavaEEDefaultResources
- Check if IBM Service Log (activity.log) enabled:
find . -type f -name server.xml -not -path "*template*" -exec grep -H "serviceLog.*true" {} \;
- Check the type of log rollover (SIZE, TIME, or BOTH):
find . -type f -name server.xml -not -path "*template*" -exec grep -H rolloverType {} \; | sed 's/:.*rolloverType="/: /g' | sed 's/".*//g'
- Check rollover sizes of logs:
find . -type f -name server.xml -not -path "*template*" -exec grep -H "rolloverType=\"[SB]" {} \; | sed 's/:.*fileName="/: /g' | sed 's/".*maxNumberOfBackupFiles="\([^"]\+\)"/ maxNumberOfBackupFiles \1/g' | sed 's/rolloverSize="\([^"]\+\)"/rolloverSize \1;/g' | sed 's/;.*//g'
- Find thread pool sizes:
find . -type f -name server.xml -not -path "*template*" -exec grep -H "<threadPool.*name" {} \; | grep -v "<threadPool .*ORB" | grep -e WebContainer -e Default -e Message.Listener.Pool -e ORB.thread.pool -e SIBJMSRAThreadPool -e WMQJCAResourceAdapter | sed 's/^\(.*\): .*minimumSize="\([^"]\+\)".*maximumSize="\([^"]\+\)".*name="\([^"]\+\)".*/\1 \4 \2 \3/g'
- Find JMS activation specifications:
find . -type f -name resources.xml -not -path "*templates*" -exec grep -H -A 20 j2cActivationSpec.*name= {} \; | grep -e j2cActivationSpec -e maxConcurrency | sed 's/\(.*\): .*jndiName="\([^"]\+\)".*/\1 \2/g' | sed 's/\(.*\)- .*maxConcurrency.*value="\([^"]\+\)".*/\1 maxConcurrency \2/g'
- Find listener ports:
find . -type f -name server.xml -not -path "*templates*" -exec grep -H "<listenerPorts" {} \; | sed 's/^\(.*\): .*name="\([^"]\+\)".*maxSessions="\([^"]\+\)".*maxMessages="\([^"]\+\)".*/\1 \2 maxSessions \3 maxMessages \4/g'
- Find data source maximum connections:
find . -type f -name resources.xml -not -path "*templates*" -exec grep -H -A 50 "<factories.*DataSource" {} \; | grep -e "<factories.*DataSource" -e "<connectionPool" | sed 's/\(.*\): .*jndiName="\([^"]\+\)".*/\1 \2/g' | sed 's/\(.*\)- .*maxConnections="\([^"]\+\)".*/\1 maxConnections \2/g' | grep -B 1 maxConnections | grep -v "\-\-"
- Find list of all custom properties:
find . -type f -name "*xml" -not -path "*templates*" -exec grep "<properties " {} \; | grep com.ibm | sed 's/.*name="\([^"]\+\)".*/\1/g' | sort | uniq
- Review operating system statistics
WebSphere Liberty Health Check
Gather WebSphere Liberty Health Check Data
- If attaching to the running process to dump basic information and a
thread dump is an acceptable risk:
- Liberty server dump: https://www.ibm.com/support/knowledgecenter/en/SSAW57_liberty/com.ibm.websphere.wlp.nd.multiplatform.doc/ae/twlp_setup_dump_server.html
- Log in as the same user that's running WAS
${WAS}/bin/server dump ${NAME} --include=thread- Gather the file as noted in the message:
Server ${NAME} dump complete in ${FILE}
- Liberty server dump: https://www.ibm.com/support/knowledgecenter/en/SSAW57_liberty/com.ibm.websphere.wlp.nd.multiplatform.doc/ae/twlp_setup_dump_server.html
- Otherwise:
- server.xml and any included xml files
- jvm.options (if any)
- bootstrap.properties (if any)
- Container logs and any messages.log and FFDC
- Gather any historical operating system statistics such as nmon, perfmon, etc.
- Upload all Liberty file collections and any OS statistics if available.
Analyze WebSphere Liberty Health Check Data
- Check for transaction manager configuration (e.g.
transactionLogDirectory if storing trans logs on shared disk, nested
dataSource if storing trans logs in DB, etc.):
find . -type f -name "*xml" -exec grep -H "<transaction" {} \;
- Find Liberty versions:
find . -type f -name "*messages*log*" -exec grep -H "product = " {} \; | sed 's/.*:product = //g' | sort | uniq
- Find Java versions:
find . -type f -name "*messages*log*" -exec grep -H "java.runtime = " {} \; | sed 's/.*:java.runtime = //g' | sort | uniq
- Find operating system versions:
find . -type f -name "*messages*log*" -exec grep -H "os = " {} \; | sed 's/.*:os = //g' | sort | uniq
- Review JVM parameters:
find . -type f -name "*jvm.options*" -exec grep -Hn "." {} \;
- Review server.xml configuration for best practices
- Find warnings and errors:
find . -type f -name "*messages*log*" -exec grep -H " [W|E] " {} \; > messages_warnings_errors.txtawk '{print $7}' sysout_warnings_errors.txt | grep "[WE]:$" | sort | uniq -c | sort -nr | head -10
- Find log message rate:
find . -type f \( -name "*SystemOut*log*" -or -name "messages*log*" \) -exec grep "^\[.*" {} \; | awk '{print $1,$2}' | sed 's/:[0-9][0-9][0-9]$//g' | sed 's/\[//g' | sort | uniq -c
- Review operating system statistics
Java Health Check
Gather:
- Gather 10 thread dumps about 30 seconds apart on one JVM during
normal load; for example create a script and pass the PID as an argument
and then upload stdout:
#!/bin/sh for i in $(seq 1 10); do kill -3 $1 sleep 30 done - Gather and upload all JVM and application logs for one JVM
- If you would like to review Java heap utilization, gather a core dump (J9 JVM) or heapdump (HotSpot JVM) (note that this will pause the JVM for dozens of seconds so it should be done at off-peak times and it may have sensitive contents)
- If you would like to gather sampling profiler data data, capture and upload 5 minutes worth of data.
Analyze:
- Find JVM diagnostics:
find . -type f \( -name "*javacore*txt" -or -name "*phd" -or -name "*dmp" -or -name "*trc" -or -name "*hcd" \\)find . -type f \( -name "*stderr*log*" -or -name "*console*log*" \) -exec grep -H JVM {} \;
- Find longest GC pauses:
find . -type f \( -name "*verbosegc*log*" -or -name "*stderr*log*" -or -name "*console*log*" \) -exec grep -H exclusive-end {} \; | sed 's/:</ </g' | awk '{print $(NF-1),$(NF-2),$1}' | sed 's/"//g' | sed 's/timestamp=//g' | sed 's/durationms=//g' | sort -nr | head
- Find verbosegc warnings:
find . -type f \( -name "*verbosegc*log*" -or -name "*stderr*log*" -or -name "*console*log*" \) -exec grep -H "<warning" {} \;
- Find if verbose classloading is enabled:
find . -type f \( -name "*stderr*log*" -or -name "*console*log*" \) -exec grep -H "class load:" {} \;
IBM HTTP Server and WAS Plugin Health Check
Gather on at least one node (ideally, all):
- httpd.conf and any included *conf files
- plugin-cfg.xml
- access.log & error.log
- http_plugin.log
Analyze:
- Find logging configuration:
find . -type f -name "*conf*" -exec grep -H -e LogFormat -e CustomLog {} \; | grep -v -e ":#" -e /templates/
- Find if IHS threads are saturated or nearly saturated:
find . -type f -name "*error_log*" -exec grep -H mpmstats {} \; | grep "rdy . "
- Find HTTP 5XX errors:
find . -type f -name "*access_log*" -exec grep -H "HTTP/1.1\" 5" {} \;
- Find any non-informational entries in WAS plugin log:
find . -type f -name "*http_plugin*log*" -exec grep -H "." {} \;
- Find key WAS Plugin configuration:
find . -type f -name plugin-cfg.xml -not -path "*templates*" -exec grep -Hn -e ServerIOTimeout -e ConnectTimeout {} \;
Linux Configuration Health Check
Gather the following as root and upload
healthcheck_linux*.txt:
date &> healthcheck_linux_$(hostname).txt
echo "=== hostname ===" &>> healthcheck_linux_$(hostname).txt
hostname &>> healthcheck_linux_$(hostname).txt
echo "=== uname ===" &>> healthcheck_linux_$(hostname).txt
uname -a &>> healthcheck_linux_$(hostname).txt
echo "=== cmdline ===" &>> healthcheck_linux_$(hostname).txt
cat /proc/cmdline &>> healthcheck_linux_$(hostname).txt
echo "=== cpuinfo ===" &>> healthcheck_linux_$(hostname).txt
cat /proc/cpuinfo &>> healthcheck_linux_$(hostname).txt
echo "=== lscpu ===" &>> healthcheck_linux_$(hostname).txt
lscpu &>> healthcheck_linux_$(hostname).txt
echo "=== meminfo ===" &>> healthcheck_linux_$(hostname).txt
cat /proc/meminfo &>> healthcheck_linux_$(hostname).txt
echo "=== sysctl ===" &>> healthcheck_linux_$(hostname).txt
sysctl -a &>> healthcheck_linux_$(hostname).txt
echo "=== messages ===" &>> healthcheck_linux_$(hostname).txt
cat /var/log/messages &>> healthcheck_linux_$(hostname).txt
echo "=== syslog ===" &>> healthcheck_linux_$(hostname).txt
cat /var/log/syslog &>> healthcheck_linux_$(hostname).txt
echo "=== journal ===" &>> healthcheck_linux_$(hostname).txt
journalctl --since "7 days ago" &>> healthcheck_linux_$(hostname).txt
echo "=== netstat ===" &>> healthcheck_linux_$(hostname).txt
netstat -s &>> healthcheck_linux_$(hostname).txt
echo "=== nstat ===" &>> healthcheck_linux_$(hostname).txt
nstat -asz &>> healthcheck_linux_$(hostname).txt
echo "=== top ===" &>> healthcheck_linux_$(hostname).txt
top -b -d 1 -n 2 &>> healthcheck_linux_$(hostname).txt
echo "=== top -H ===" &>> healthcheck_linux_$(hostname).txt
top -H -b -d 1 -n 2 &>> healthcheck_linux_$(hostname).txt
echo "=== ps ===" &>> healthcheck_linux_$(hostname).txt
ps -elfyww &>> healthcheck_linux_$(hostname).txt
echo "=== iostat ===" &>> healthcheck_linux_$(hostname).txt
iostat -xm 1 2 &>> healthcheck_linux_$(hostname).txt
echo "=== ip addr ===" &>> healthcheck_linux_$(hostname).txt
ip addr &>> healthcheck_linux_$(hostname).txt
echo "=== ip -s ===" &>> healthcheck_linux_$(hostname).txt
ip -s link &>> healthcheck_linux_$(hostname).txt
echo "=== ss summary ===" &>> healthcheck_linux_$(hostname).txt
ss --summary &>> healthcheck_linux_$(hostname).txt
echo "=== ss ===" &>> healthcheck_linux_$(hostname).txt
ss -amponeti &>> healthcheck_linux_$(hostname).txt
echo "=== nstate ===" &>> healthcheck_linux_$(hostname).txt
nstat -saz &>> healthcheck_linux_$(hostname).txt
echo "=== netstat -i ===" &>> healthcheck_linux_$(hostname).txt
netstat -i &>> healthcheck_linux_$(hostname).txt
echo "=== netstat -s ===" &>> healthcheck_linux_$(hostname).txt
netstat -s &>> healthcheck_linux_$(hostname).txt
echo "=== netstat ===" &>> healthcheck_linux_$(hostname).txt
netstat -anop &>> healthcheck_linux_$(hostname).txt
echo "=== systemd-cgtop ===" &>> healthcheck_linux_$(hostname).txt
systemd-cgtop -b --depth=5 -d 1 -n 2 &>> healthcheck_linux_$(hostname).txt
echo "=== journalctl -b ===" &>> healthcheck_linux_$(hostname).txt
journalctl -b | head -2000 &>> healthcheck_linux_$(hostname).txt
echo "=== journalctl -b -n ===" &>> healthcheck_linux_$(hostname).txt
journalctl -b -n 2000 &>> healthcheck_linux_$(hostname).txt
echo "=== journalctl warning ===" &>> healthcheck_linux_$(hostname).txt
journalctl -p warning -n 500 &>> healthcheck_linux_$(hostname).txt
echo "=== ulimit ===" &>> healthcheck_linux_$(hostname).txt
ulimit -a &>> healthcheck_linux_$(hostname).txt
echo "=== df -h ===" &>> healthcheck_linux_$(hostname).txt
df -h &>> healthcheck_linux_$(hostname).txt
echo "=== systemctl list-units ===" &>> healthcheck_linux_$(hostname).txt
systemctl list-units &>> healthcheck_linux_$(hostname).txt
echo "=== systemd-cgls ===" &>> healthcheck_linux_$(hostname).txt
systemd-cgls &>> healthcheck_linux_$(hostname).txt
echo "=== pstree ===" &>> healthcheck_linux_$(hostname).txt
pstree -pT &>> healthcheck_linux_$(hostname).txtIBM Visual Configuration Explorer (VCE)
The IBM Visual Configuration Explorer (VCE) tool is no longer publicly available.
Log Analysis
IBM Trace and Request Analyzer for WAS (TRA)
https://www.ibm.com/support/pages/ibm-trace-and-request-analyzer-websphere-application-server
IBM Support Assistant 5
Log Analysis
This section has been moved to the IBM Support Assistant chapter.
Resiliency
Strategies to increase resiliency:
- Application development practices:
- MicroServices fault tolerance
- Timeout non-critical functions and gracefully degrade subsets of the HTTP response
- Increase caching to reduce workload including:
- HTTP response caching
- Servlet caching
- Content delivery networks (CDNs)
- Caching products
- Proactive monitoring of problems:
- tWAS: Hung thread detection
- Liberty: requestTiming
- Optimize existing applications with a sampling profiler
- Tune timeouts to the maximum acceptable user response time for all transactions plus 20%:
- React to excessive response times:
- tWAS on z/OS: zWLM service classes
- tWAS on other OSes: IHS with Intelligent Management for Web servers and excessive response time health policies
- Auto-scaling:
Major Tools
This chaper will cover what we consider the most important performance analysis tools for the majority of situations. We cover other tools in other chapters and other tools may be the most important performance tool for a particular situation; however, for these tools we will generally cover them in more depth.
Sub-chapters
- Garbage Collection and Memory Visualizer (GCMV)
- IBM Thread and Monitor Dump Analyzer (TMDA)
- Eclipse Memory Analyzer Tool
- IBM Java Health Center
- OpenJDK Mission Control
- Eclipse
- Apache JMeter
- Wireshark
- IBM Support Assistant
- gnuplot
- Python
- R Project
- Apache Bench
- awk
Garbage Collection and Memory Visualizer (GCMV)
The IBM Garbage Collection and Memory Visualizer (GCMV) tool is used to analyze Java memory usage using the output of verbose garbage collection. It parses both IBM Java, OpenJ9 and HotSpot Java verbose garbage collection log files. For IBM Java and OpenJ9 in particular, it has an advanced engine which provides automated analysis and recommendations from the data.
Installation
See the download instructions.

Basic Usage
Click on File } Load File and and load the verbosegc file

GCMV parses and plots various log types including Verbose GC logs, javacore.txt verbosegc flight
recorder, -Xtgc output, and native memory logs (output from
ps, svmon and Perfmon).
Features and Benefits
GCMV uses a powerful statistical analysis engine which provides guidance on improvements in these areas:
- Memory Leak Detection
- Detect Java heap exhaustion and memory leaks
- Detect "native" (malloc) heap exhaustion and memory leaks
- Optimizing garbage collection performance
- Determine garbage collection overhead
- Detect long or frequent garbage collection cycles and causes
- Recommend settings to avoid long or frequent garbage collection cycles
- Recommend optimum garbage policy
- Fine tuning of Java heap size
- Determine peak and average memory usage
- Recommend Java heap settings
GCMV provides a flexible user interface, making it possible to carry out further analysis of the data and to "drill down" into the causes of trends or data points of interest.
The GCMV graphical interface provides the following capabilities:
- Raw log, tabulated data and graph views
- Ability to zoom and crop graphs
- Ability to select data points in line plots and view in raw data
- Customize the graph by adding/removing data and changing display units
- Compare output from multiple logs
- Save data to jpeg or .csv files for export to spreadsheets
- Templates allow configuration to be saved
- Support for compressed files and rolling logs
Analysis
Primarily, you will review the line plot to observe garbage collection behavior, and click on the Report tab to review the proportion of time spent in garbage collection.
Observe in the following example that towards the end of the graph, the "Used heap (after global collection)" - the brown line - which is the amount of live Java heap after a full garbage collection finishes, has a pattern where it doesn't decrease much and it's near the heap size (blue line). This also correlates with a persistent increase in the "Total pause time" - the dark line. These are the classic signs of heap exhaustion.

Proportion of time in garbage collection:

Cropping Data Analysis
In general, the proportion of time in garbage collection should be less than 10% and ideally less than 1%. It is important to analyze the proportion of time in GC for times of interest; however, zooming does not crop the data analysis. To do so, specify a minimum and maximum value for the X-axis and then click on the Report tab again to update the data analysis and review the proportion of time in GC:
Hover your mouse over the approximate start and end points of the section of concern and note the times of those points (in terms of your selected X Axis type):

Enter each of the values in the minimum and maximum input boxes and press Enter on your keyboard in each one to apply the values. The tool will show vertical lines with triangles showing the area of the graph that you've focused on.

Click on the "Report" tab at the bottom and observe the proportion of time spent in garbage collection for just this period (in this example, 87% which is a problem).

Customizing the Views
Adding and removing line plots
Check or uncheck line plots from the "Data Selector" tab. For example, it is often useful to select VGC Pause } Total pause time, and VGC Heap } Used heap (after global collection).

X-axis
It is often useful to change the X-axis to date/time:

Zooming
You may zoom into any part of the graph, or reset the zoom in the Zoom view. Note that zooming does not affect the report (see the cropping section above for how to do that):

Comparing Different Runs
First, load the baseline verbosegc as normal. Next, right click anywhere in the plot area and click 'Compare File...':

Next, ensure that the X-axis uses a relative format such as hours, instead of date. Otherwise, you'll just end up essentially combining the two verbosegc files with a date gap in between and so you won't be able to visualize any differences.
Finally, zoom in to the part where they overlap (i.e. one might be longer than another, so cut the extra off). Important note: GCMV's zoom feature is only a different visualization of the line plot -- it does not affect GCMV's report tab. That means that if something went wrong outside your zoom which you don't care about, zooming in to avoid that section will not disregard that errant data in the report tab (for things such as proportion of time spent in GC, largest allocation, etc.). To do this, you'll also want to change the Minimum and Maximum X values in the Axes view to approximately match your zoom. It is easiest to first change the X-axis, at which point GCMV will gray out the disregarded data. Then, you can zoom around the non-disregarded data using your cursor.

For each series, there will be a solid line for the baseline verbosegc and a dashed line of the same color for the compared verbosegc. When you click on the report tab, GCMV will create a column for each verbosegc for easier comparison:

In this case, we can see that, for example, the proportion of time spent in GC went from 7.82% to 1.48% (the native_stderr.log was the newer one). Many of the other statistics got better. In this case, we can say that the tuning we did (increasing the nursery size) was very beneficial, all other things being equal.
Now one very important consideration is "all other things being equal." You have to be very careful comparing verbosegc. If, for example, a different amount or rate of work came into these independent runs (for example, a different test was run, or one day was a workday and another a weekend with less work, etc.), then it would be much more difficult to conclude anything. One obvious sign of this is that you're tuning something like the nursery, and the overall Java heap usage is magnitudes different. The point is: carefully control your experiment to hold all other variables constant (and verify using data such as request count, response times, etc.).
Headless Mode
Default report where $FILE is an absolute path to the
verbosegc file and $OUTPUDIR is an absolute path to the
output directory (no sub-directory will be made):
gcmv -consoleLog -nosplash -rc -display 1024x768 -application com.ibm.java.diagnostics.visualizer.headless.application -f "$FILE" -o "$OUTPUTDIR" -p "DEFAULT_TEMPLATES" -generateTableDataYou can create whatever line plot you want by loading the GCMV GUI,
loading a verbosegc, selecting the plots you're interested in, and then
Right Click } Export current settings as template... } Save as an
epf file
Then specify that epf file; for example:
gcmv -consoleLog -nosplash -rc -display 1024x768 -application com.ibm.java.diagnostics.visualizer.headless.application -f $(pwd)/verbosegc.log -o $(pwd)/gcmvreport/ -p gcmv_pauses_and_proportion.epfHere is an example epf file with total pause time and
proportion of time in GC plots. The key element has the key
TupleIDsToDisplayPropertiesImpl.
<?xml version="1.0" encoding="UTF-8" standalone="no"?>
<!DOCTYPE preferences SYSTEM "http://java.sun.com/dtd/preferences.dtd">
<preferences EXTERNAL_XML_VERSION="1.0">
<root type="user">
<map/>
<node name="com">
<map/>
<node name="ibm">
<map/>
<node name="java">
<map/>
<node name="diagnostics">
<map/>
<node name="visualizer">
<map/>
<node name="prefs">
<map/>
<node name="coredisplayers">
<map>
<entry key="com.ibm.java.diagnostics.visualizer.display.DisplayerRegistry.v1" value="[com.ibm.java.diagnostics.visualizer.displayer.tabbed.TabbedDataDisplayer, com.ibm.java.diagnostics.visualizer.displayer.structured.StructuredDataDisplayer, com.ibm.java.diagnostics.visualizer.displayer.html.HTMLReportDisplayer, com.ibm.java.diagnostics.visualizer.displayer.plot.ZoomingPlotDataDisplayer]"/>
<entry key="LinePlotPreferenceHelperForceYAxisStartAtZero" value="true"/>
<entry key="HTMLReportPreferencesHelperSinglePlot" value="false"/>
<entry key="LinePlotPreferenceHelperImageFormat" value="0"/>
<entry key="LinePlotPreferenceHelperDrawDataLegend" value="true"/>
<entry key="LinePlotPreferenceHelperLineThickness" value="1"/>
<entry key="DisplayerPreferenceHelperEnableHovers" value="true"/>
<entry key="TabbedDataPreferenceHelperDisplayDateFirst" value="false"/>
<entry key="LinePlotPreferenceHelperPadPlots" value="true"/>
<entry key="DisplayerPreferenceHelperEnableFileViewer" value="true"/>
<entry key="LinePlotPreferenceHelperCursorFuzziness" value="10"/>
<entry key="LinePlotPreferenceHelperDrawLegend" value="true"/>
<entry key="TabbedDataPreferenceHelperLineThickness" value=","/>
<entry key="HTMLReportPreferencesHelperShowStats" value="true"/>
<entry key="LinePlotPreferenceHelperLegendPosition" value="0"/>
</map>
</node>
<node name="gc">
<map/>
<node name="defaultextensions">
<map>
<entry key="RecommendationPreferenceHelperHeapSizeJitterCountThreshold" value="15"/>
<entry key="RecommendationPreferenceHelperCriticallyHighOccupancyThreshold" value="80"/>
<entry key="RecommendationPreferenceHelperPauseThreshold" value="5000"/>
<entry key="UnitFormatPreferenceHelperDateFormat" value=""/>
<entry key="UnitFormatPreferenceHelperEnableDateFormat" value="UnitFormatPreferenceHelperEnableDateFormat"/>
<entry key="VGCParserPreferenceHelperInteropolateTimes" value="true"/>
<entry key="RecommendationPreferenceHelperHighOccupancyThreshold" value="70"/>
<entry key="RecommendationPreferenceHelperHeapSizeJitterThreshold" value="15"/>
<entry key="UnitFormatPreferencehelper.test" value="5"/>
<entry key="RecommendationPreferenceHelperSystemGCErrorThreshold" value="5"/>
<entry key="RecommendationPreferenceHelperCompactFractionThreshold" value="15"/>
<entry key="RecommendationPreferenceHelperLeakThreshold" value="10"/>
<entry key="RecommendationPreferenceHelperRequestThreshold" value="65536"/>
<entry key="VGCParserPreferenceHelperIgnoreSystemGCs" value="false"/>
<entry key="RecommendationPreferenceHelperExcessiveTenuringThreshold" value="1"/>
<entry key="RecommendationPreferenceHelperFinalizerThreshold" value="750"/>
<entry key="RecommendationPreferenceHelperFragmentationThreshold" value="15"/>
<entry key="RecommendationPreferenceHelperLowOccupancyThreshold" value="40"/>
</map>
</node>
</node>
<node name="impl">
<map>
<entry key="VGCLabels.flat.heap.size" value="25,101,163"/>
<entry key="OutputPropertiesImpl_axis.units_VGCAxes.moved" value="AxisUnits.MB"/>
<entry key="Colours3" value="50,175,50"/>
<entry key="UnstructuredIDsToDisplayPropertiesImpl" value="tuning.recommendation,native.tuning.recommendation"/>
<entry key="VGCLabels.unusable.heap" value="163,100,31"/>
<entry key="Colours8" value="30,144,255"/>
<entry key="OutputPropertiesImpl_axis.units_VGCAxes.time.from.start" value="AxisUnits.date"/>
<entry key="Colours0" value="0,175,175"/>
<entry key="com.ibm.java.diagnostics.visualizer.impl.extensions.PostProcessorRegistry.v1" value="[com.ibm.java.diagnostics.visualizer.postprocessor.vgc.analysis.RollingAveragesPostProcessor, com.ibm.java.diagnostics.visualizer.gc.solarissupport.postprocessor.DerivedOraclePostProcessor, com.ibm.java.diagnostics.visualizer.postprocessor.vgc.analysis.UnitSelectingPostProcessor, com.ibm.java.diagnostics.visualizer.postprocessor.vgc.analysis.DerivedVGCDataPostProcessor]"/>
<entry key="Colours5" value="255,192,203"/>
<entry key="TupleIDsToDisplayPropertiesImpl" value="VGCLabels.jvm.restarts,VGCLabels.proportion.gc,VGCLabels.pause.times.with.exclusive.access,VGCLabels.warning.count"/>
<entry key="OutputPropertiesImpl_axis.units_VGCAxes.percent" value="AxisUnits.percent.sign"/>
<entry key="OutputPropertiesImpl_axis.units_VGCAxes.time" value="AxisUnits.ms"/>
<entry key="com.ibm.java.diagnostics.visualizer.impl.extensions.ParserRegistry.v1" value="[com.ibm.java.diagnostics.visualizer.gc.solarissupport.parser.SunVGCParser, com.ibm.java.diagnostics.visualizer.gc.i5classic.parser.I5ClassicParser, com.ibm.java.diagnostics.visualizer.parser.javadump.JavaDumpParser, com.ibm.java.diagnostics.visualizer.memory.parser.PsNativeParser, com.ibm.java.diagnostics.visualizer.memory.parser.PerfMonParser, com.ibm.java.diagnostics.visualizer.gc.realtime.parser.RealTimeParserV2, com.ibm.java.diagnostics.visualizer.memory.parser.SVMonParser, com.ibm.java.diagnostics.visualizer.gc.i5V6r1.parser.I5V6r1Parser, com.ibm.java.diagnostics.visualizer.gc.realtime.parser.RealTimeParser, com.ibm.java.diagnostics.visualizer.parser.vgc.sovereign.SovereignVGCParser, com.ibm.java.diagnostics.visualizer.gc.v8support.parser.V8Parser, com.ibm.java.diagnostics.visualizer.gc.hp.parser.HPVGCParser, com.ibm.java.diagnostics.visualizer.gc.iseriessupport.parser.ISeriesVGCParser, com.ibm.java.diagnostics.visualizer.parser.vgc.j926.J926VGCParser, com.ibm.java.diagnostics.visualizer.gc.i5V5r4.parser.I5V5r4Parser, com.ibm.java.diagnostics.visualizer.parser.tgc.TGCParserImpl, com.ibm.java.diagnostics.visualizer.gc.solarissupport.parser.OracleG1VGCParser, com.ibm.java.diagnostics.visualizer.parser.vgc.j9.J950VGCParser]"/>
<entry key="VGCLabels.proportion.gc" value="255,38,0"/>
<entry key="OutputPropertiesImpl_axis.units_VGCAxes.copied" value="AxisUnits.MB"/>
<entry key="Colours2" value="255,0,0"/>
<entry key="Colours7" value="165,42,42"/>
<entry key="NumColours" value="10"/>
<entry key="Colours4" value="255,0,255"/>
<entry key="VGCLabels.live.normal.heap.after.gc" value="212,16,104"/>
<entry key="OutputPropertiesImpl_axis.units_VGCAxes.data" value="AxisUnits.MB"/>
<entry key="OutputPropertiesImpl_axis.units_VGCAxes.gc.type" value="AxisUnits.collection.type"/>
<entry key="Colours9" value="255,165,0"/>
<entry key="VGCLabels.gc.rate" value="65,53,157"/>
<entry key="VGCLabels.pause.times.with.exclusive.access" value="121,128,255"/>
<entry key="StructuredIDsToDisplayPropertiesImpl" value="summary,quantum.pause.summary"/>
<entry key="Colours1" value="0,0,255"/>
<entry key="SourcePreferenceHelperBufferSize" value="1024"/>
<entry key="VGCLabels.live.heap.after.global.gc" value="158,177,141"/>
<entry key="VGCLabels.jvm.restarts" value="191,228,69"/>
<entry key="OutputPropertiesImpl_axis.units_VGCAxes.number" value="AxisUnits.100s"/>
<entry key="Colours6" value="173,216,230"/>
<entry key="OutputPropertiesImpl_axis.units_VGCAxes.gc.scope" value="AxisUnits.region"/>
<entry key="VGCLabels.free.flat.heap" value="50,26,47"/>
<entry key="OutputPropertiesImpl_axis.units_VGCAxes.heap" value="AxisUnits.MB"/>
</map>
</node>
</node>
</node>
</node>
</node>
</node>
</node>
</root>
</preferences>Here's an example way to run this over many verbosegc files:
for i in */verbosegc*.log; do pushd $(dirname $i); mkdir $(basename $i .log); ~/work/gcmv/V2.8.7_20231127/IBM\ Garbage\ Collection\ and\ Memory\ Visualizer.app/Contents/MacOS/gcmv -consoleLog -nosplash -rc -display 1024x768 -application com.ibm.java.diagnostics.visualizer.headless.application -f $(readlink -f $(basename $i)) -o $(pwd)/$(basename $i .log)/ -p ~/work/gcmv/gcmv_pauses_and_proportion.epf; popd; doneReferences
IBM Thread and Monitor Dump Analyzer (TMDA)
Overview
The IBM Thread and Monitor Dump Analyzer (TMDA) tool analyzes Java thread dumps, extracting out thread stacks and monitors and displaying them in a GUI: https://www.ibm.com/support/pages/ibm-thread-and-monitor-dump-analyzer-java-tmda
Thread dumps are primarily used in performance analysis as a low frequency, sampling profiler. They are a lightweight and generally non-intrusive way to get a picture of what the JVM is doing. For more details about profilers, see the Java Profilers chapter. The IBM Java and HotSpot Java troubleshooting sections list all of the ways to generate thread dumps.
Use TMDA to help you:
- Get a picture of what the JVM is doing
- See how threads are moving (or not moving) over time using the thread comparison view
- Check for deadlocks or lock contention
For a lab demonstrating TMDA, see https://github.com/IBM/webspherelab/blob/main/WAS_Troubleshooting_Perf_Lab.md#ibm-java-and-openj9-thread-dumps
Features and Benefits
TMDA displays thread dumps in an easy-to-navigate GUI view:
- Color code threads based on run state
- Summarize threads by the top stack frames
- Show a tree view of monitors
- Analyze native memory information in IBM Javacores
Installation
See the download instructions.
Usage
- Click the Open Thread Dumps button to load the thread dump
files:
- Select one or more thread dumps from the list and click on
Analysis.

- You can do the following analysis :
- Native memory analysis
- Thread detail analysis
- Details of the thread monitor
Compare threads from different files
Select one or more thread dumps in the thread dump list and click the Compare Threads button (also works for a single thread dump):

There will be a lot of threads that will be irrelevant in 90% of cases. Focus on the threads where your application work occurs, such as the WebContainer thread pool. In this example, all of the threads are waiting for work (either parked in the WAS BoundedBuffer or in IBM AIO code waiting for the next event). Remember that only the full stack is meaningful. In some cases, a parked thread, or a thread waiting in Object.wait may be a problem, so it's best to look methodically through the stacks.

Key things to look for are:
- Are there any patterns in the stacks? For example, do you see a particular application stack frame always at the top? Or do you see a particular application stack frame somewhere in the middle that suggests that one particular function is slow?
- Are some or most of the threads waiting on a backend service such as a database or web service? If so, can you figure out from the stacks if these are coming from a particular application function?

Monitor analysis is also important to find Java lock bottlenecks. Click the Monitor Detail or Compare Monitors buttons to explore the hierarchy of blocked threads. Remember that some blocked threads are normal, such as threads in a thread pool waiting for the next piece of work.
Thread States
On versions of IBM Java < Java 8, Java 7, Java 6.1, and Java 6 SR16 FP4, the javacore.txt thread dump shows threads which are effectively running (R) as waiting (CW) in TMDA. This is because the JVM uses a cooperative mechanism to try to quiesce running threads for the duration of the Javacore to reduce the chances of problems creating the javacore itself. TMDA naïvely reports the thread dump state without taking this into account. This is no longer an issue on the newer versions of IBM Java since the javacore.txt file reports the "actual" state (right before the javacore started).
Headless
To generate an HTML report in headless mode, pass an
OS-path-separated list of files (Unix=:;
Windows=;) followed by an HTML output file name; for
example:
java -jar jca*jar javacore1.txt:javacore2.txt:javacore3.txt tmdaheadless.htmlEclipse Memory Analyzer Tool
Overview
The Eclipse Memory Analyzer Tool (MAT) is a free and open source Java heapdump analysis tool for issues such as OutOfMemoryErrors and heap sizing. Also review the MAT documentation.
Standalone Installation
If you are reading dumps produced by a HotSpot JVM, then you can simply use the download from eclipse.org.
If you are reading dumps produced by IBM Java or IBM Semeru Runtimes, then you must have the free IBM DTFJ Eclipse Plugin installed. IBM provides a build of MAT with the plugin pre-installed (as well as the additional IBM Extensions for Memory Analyzer):
Usage
- Click
File}Open Heap Dump...and select the dump. By default, only files with known dump file extensions are shown. - Note that the parser type is determined by the file extension, so it
is important to have the right extension: PHD Heapdump
(
.phd), Operating system core dump (.dmp), or HPROF heapdump (.hprof).

First Dialog
After a dump is loaded, a dialog will appear suggesting to run
various reports such as the leak suspects report. In general, the
Leak Suspects report is recommended:

Leak Suspects Report
The leak suspects report runs various heuristics and reports suspected objects retaining a large portion of the Java heap. The first paragraph of each suspect summarizes the suspicion and any subsequent paragraphs and links provide details. Review all of the suspects retaining a large proportion of the Java heap.

Common Tasks
The Overview tab shows:
A) How much heap is used at the time of the dump (MAT performs a full garbage collection when loading the dump, so this does not include any garbage)
B) The largest dominator objects
C) If the IBM Extensions for Memory Analyzer are installed, a link to the WAS Overview report that will provide a WAS-centric view of the dump
D) A histogram shows the heap usage by class
E) The dominator tree shows the heap usage by dominator objects in an expandable tree view
F) Top consumers shows heap usage by package.
G) Open Query Browser provides many advanced ways to look at the data, and also most of the IBM Extensions for Memory Analyzer plugins
H) The leak suspects report will search for likely causes of a leak in the dump.

Heapdump Theory
Retained Heap: It is guaranteed that all objects below an entry are retained or kept alive by the parent. If you assume that object is removed, then the rest have been GCed.
The retained set includes the objects referenced by the fields on the given objects and all objects which are lifetime-dependent on them, i.e. which would be garbage collected if the references at the given fields at the given objects would be nulled.
The dominator tree is a transformation of the graph which creates a spanning tree (all objects in the graph are also in the dominator tree), removes cycles, and models the keep-alive dependencies. Object domination is equivalent to object retention, i.e. the set of objects dominated by some object are the same as the retained set of that object.
A garbage collection root is an object which has a reference to it from outside the heap (for example, stacks and registers of the JVM threads, JNI, and other internal data structures).
Retained Sets
The retained set of an object is the set of objects that are lifetime-dependent on it:
Retained set of X is the set of objects which would be removed by GC when X is garbage collected.

When most people talk about the "size" of a set of objects X, they are really talking about the retained set of the set of objects X, i.e. if nothing referenced X, then those objects could be garbage collected and the number of bytes representing the retained set of X would be freed.
Therefore, if you want to know how much memory a set of objects retain, click Open Query Browser } Java Basics } Show as Histogram, specify the objects, and then click "Calculate retained size" and select either of the two options. For example, one common cause of excessive heap usage is by org.apache.jasper.runtime.BodyContentImpl objects due to the default behavior of com.ibm.ws.jsp.limitBuffer=false. If we want to see how much these buffers are retaining, we can show a histogram for BodyContentImpl and calculate a precise retained size, in this example 291MB:


Class Name | Objects | Shallow Heap | Retained Heap
----------------------------------------------------------------------------------
org.apache.jasper.runtime.BodyContentImpl| 306 | 16.73 KB | 291.90 MB
----------------------------------------------------------------------------------Another way to do this is to simply open the class Histogram and then filter in the Class Name column and calculate the retained size:


One useful technique when first analyzing a heapdump is to open the
class histogram, calculate minimum retained sizes (you probably don't
want to do precise as there may be many classes), and then sort by the
"Retained Heap" column. It's important to note that each retained heap
value is exclusive of the other values, so don't add this column up. For
example, we may see that char[] retain hundreds of MB and
BodyContentImpl objects retain hundreds of MB, but in this example, the
BodyContentImpl objects retain the char[] objects.
It's nice to know how "big" a set of objects is but it's even better
to get a class histogram of what is in that retained set. To do that,
either right click on a set of objects and select "Show Retained Set,"
or use Open Query Browser } Show Retained Set and specify the objects.
One tip is that you can use wildcards, so if you want to know how much
memory is retained by some set of classes (e.g. everything made by one
vendor), simply do com.example.* and review the sum of
shallow heaps (in this example, we can say org.apache classes retain
321MB).


It's important to understand the limitations of retained sets. Complex object graphs often complicate retained sets. For example, WAS classes such as com.ibm.ws.webcontainer.httpsession.MemorySessionContext hold all HTTP sessions, so you may think that you can get the size of all HTTP sessions by simply looking at the retained set of this class. However, let's say WebContainer threads are currently working on some set of HTTP sessions at the time of the heapdump. In that case, those sessions are not part of the retained set of MemorySessionContext because there are references to those objects from outside MemorySessionContext. For specific situations, MAT has a Customized Retained Set query where you can explicitly say which objects to exclude from the set of incoming references (in this example, you would specify MemorySessionContext and specify the set of application objects that reference these sessions as the exclude list). An alternative way to answer the question of how big all the session are is to calculate the retained set of all of the actual session objects instead of the map that contains them.
Class Histogram
Sometimes you'll see a dump where there are no obvious causes of high memory usage in the dominator tree nor the top consumers report. For example, here is a dump retaining 4.2GB of Java heap without any large dominators:


The top consumers report is equally uninteresting:

The leak suspects report is slightly more interesting. The suspect is a set of 730 instances of HashMap retaining 2.26GB; however, each individual HashMap is no more than 57MB:

Where do we go from here? We know it's something in HashMaps but there isn't a particular HashMap to look at. Let's go to the class histogram which shows heap usage grouped by class:

Click the little calculator and select "Calculate Minimum Retained Size (quick approx)" to see approximately how much each class and its instances retain.

Next, right click on HashMap and select "Show Objects by class } incoming references." This will show all of the objects that have references to these HashMaps and group the objects by class:

As we expand the top level element, again we'll want to calculate minimum retained size and look for the class and its instances that retains the most. In this case, it is a set of 4,933 instances of PageContextImpl retaining about 2GB of heap.

This is far enough, but just one last step will be interesting which is to right click on PageContextImpl and choose Show Retained Set:

This shows a histogram by class of the set of objects retained by the selection. We can see that most of the memory held by the PageContextImpl and HashMap objects is character arrays. This lines up with the histogram we saw for the whole heap above, and we could have just as quickly gotten to the root cause by simply starting at the histogram and showing incoming references by class on the top element.

Objects Held by Thread Stack Frames
Load an J9 Java system dump or a recent Java HPROF dump and open Thread Overview and Stacks:

Expand the relevant stack frames and review the stack frame locals:

Comparing Heap Dumps
Acquire two or more heap dumps from the same run of the same JVM process, load both heap dumps in MAT, open the Histogram in the latest heap dump and then use the Compare to another Heap Dump button:

This will show a comparison of the class histograms between the two dumps, sorted by shallow size. In the example below, the latest dump has 20MB more of byte arrays, although there are 19,145 fewer of them (this means that the average size of a byte array has increased). As with class histograms in general, you often want to skip past primitives, Strings, and collections, in this case taking us to 21,998 more instances of RemovedEntry, taking up 703,995 more bytes of shallow heap. At this point, there is no science to discovering the leak (unless it's obvious), but one approach would be to see if the "uncommon" classes are holding the "common" classes; i.e. do the RemovedReaper and TTLHeapEntry objects retain HashMap entries? We can see just by the object counts that it is likely, and therefore, those uncommong objects are a leak suspect.
Note that object addresses and identifiers may change between dumps:
Object IDs which are provided in the heap dump formats supported by MAT are just the addresses at which the objects are located. As objects are often moved and reordered by the JVM during a GC these addressed change. Therefore they cannot be used to compare the objects. This basically means that if one compares two different heap dumps (although from the same process) it is not possible to point to the concrete objects different between the two heap dumps. However, one can still perform comparison on the aggregated results (e.g. the class histogram) and analyze how the amount of object and the memory they take has changed.

MAT also has extended differencing capabilities beyond the class histogram with the compare basket.
Why are some Java objects alive?
For a discussion of the Merge Shortest Paths to GC roots query, see https://www.ibm.com/support/pages/node/1074993
Object Query Language (OQL)
The Object Query Language (OQL) is similar to SQL and provides a powerful way to query the heap dump:
Select java.io.File objects that contain a string in their path:
select * from java.io.File f where toString(f.path).contains("IBM")Select all threads that contain something in their name:
SELECT OBJECTS x FROM INSTANCEOF java.lang.Thread x WHERE x.toString().contains("WebContainer")Select instances of some class which have a retained size > 24 bytes:
select * from instanceof com.ibm.MyClass s where s.@retainedHeapSize > 24Select non-viewed, non-phantomed DirectByteBuffers:
SELECT k, k.capacity FROM java.nio.DirectByteBuffer k WHERE ((viewedBuffer=null)and(inbounds(k).length>1))Select dominators of all instances of some class:
SELECT DISTINCT OBJECTS dominatorof(x) FROM java.lang.String xSelect dominator names of Strings:
SELECT classof(dominatorof(s)).@name, s FROM java.lang.String s WHERE dominatorof(s) != NULLSelect all Strings with dominators of a particular type:
SELECT * FROM java.lang.String s WHERE dominatorof(s) != NULL and classof(dominatorof(s)).@name = "com.ibm.Test"Select all class instances of a particular type:
SELECT OBJECTS c FROM INSTANCEOF java.lang.Class c WHERE c.@displayName.contains("class org.apache.commons.logging.impl.Jdk14Logger ")Select a field from static class instances:
SELECT c.controller FROM INSTANCEOF java.lang.Class c WHERE c.@displayName.contains("class com.ibm.ws.management.util.PlatformHelperImpl ")Selecting information from static class instances:
No better way to select attributes of a static class instance. Using classof() doesn't help because there could be zero instances of a class. The following example checks if the JVM is a z/OS control region. The trailing space character within the double quotes is important for accuracy.
SELECT c.controller FROM INSTANCEOF java.lang.Class c WHERE c.@displayName.contains("class com.ibm.ws.management.util.PlatformHelperImpl ")
SoftReferences
Even if you observe increasing heap utilization after global collection over time:

It is possible that this is caused by SoftReferences being allocated faster than they're being garbage collected. If this is the case, the JVM will clean up garbage SoftReferences if necessary:
All soft references to softly-reachable objects are guaranteed to have been cleared before the virtual machine throws an OutOfMemoryError. Otherwise no constraints are placed upon the time at which a soft reference will be cleared or the order in which a set of such references to different objects will be cleared. Virtual machine implementations are, however, encouraged to bias against clearing recently-created or recently-used soft references.
The rate at which soft references are cleared is controlled with -XsoftrefthresholdX (J9 Java) and -XX:SoftRefLRUPolicyMSPerMB=X (HotSpot Java).
In MAT, you can see how much memory is only softly retained with Java Basics } References } Soft references statistics and review the Total line of the Shallow Heap column in the Only Softly Retained tab:

Headless Mode
- Leak suspects report:
./MemoryAnalyzer -consoleLog -nosplash -application org.eclipse.mat.api.parse $DUMP org.eclipse.mat.api:suspects -vmargs -Xmx4g - Arbitrary
query in text format:
./MemoryAnalyzer -consoleLog -nosplash -application org.eclipse.mat.api.parse $DUMP -command=histogram -format=txt -unzip org.eclipse.mat.api:query -vmargs -Xmx4g- Output:
cat (basename $DUMP .dmp)_Query/pages/Query_Command2.txt
- Output:
Index Files
Most of the index files are divided into compressed pages of bytes held by soft references, so when memory is short they can be discarded and then reloaded, so you would have to ensure the soft references weren't cleared if you skipped writing the files. The index writers create the pages and write them to disk, but then pass the pages and the file across the reader, so provided the pages are present the file might not be needed.
The parser builds some index files, then the garbage cleaner removes unreachable objects and rewrites the indexes with the new identifiers and also builds some new index files including the inbound index. The inbound index does have an intermediate stage which is written to disk - the .log files, which are not held in memory. The rewriting also writes some of the index files in a different format e.g. the outbound index is written in order so that it just extends to the start of the outbound references for the next index.
The dominator tree stage releases all the index files as it needs a lot of space (at least 7 int arrays the size of the number of objects in the dump). You would need to make sure you had enough memory to hold everything.
If MAT is unexpectedly not reading index files, check the timestamps (e.g. if transferred from another system). MAT decides to reload the dump if the last modified time of the index file ($DUMPFILE.index) is less than the last modified time of the dump file. This happened once when receiving files from England and when extracting the zip file, there was no time zone conversion, so the last modified time was hours into the "future." Every time loading the dump, the index file would still not be newer than the dump file. To get around this, manually update the last modified time to something before the last modified time of the index file:
touch -t 201201050000 core.20120106.144823.2163332.0001.dmp
Unreachable Objects
By default, MAT performs a full garbage collection when it first loads a heapdump. On the Overview tab, if there was any garbage, there will be a link to the Unreachable Objects Histogram, which will provide a histogram of the garbage collected.
When using a generational garbage collector (gencon, balanced, ParallelOld, CMS, G1GC, etc.), trash often builds up in the old generation until a full collection runs (specifically, what are essentially short-lived objects survive enough collections to be tenured). Sometimes, it's interesting to look in the trash because this gives a sense of object allocations over time. By analyzing the unreachable objects histogram, you will see the number and shallow sizes of objects in the trash by class. To do a deeper-dive into the trash:
- Load the original heapdump in the Memory Analyzer Tool (MAT)
- Copy the heapdump on your filesystem and append something to the
name (before the extension) like
_unreachable - In MAT, click Window } Preferences } Memory Analyzer } Check "Keep unreachable objects"
- Load the
_unreachableheapdump in MAT - Click the Histogram button
- Click the Compare to another heapdump button and choose the first heapdump as the baseline
This is a way to essentially trick MAT into thinking that it's comparing two different dumps, whereas it's actually comparing a dump with trash and without, giving a clean way to understand a histogram (by class) of what's in the trash. From there, you'll have to get creative to explore further. For example, take the largest class, explore incoming references by class, calculate the minimum retained set, and compare between the two dumps to find which subsets are trash.
Remember to uncheck the "keep unreachable objects" checkbox before you close MAT, because you might forget and get strange analyses the next time you load a dump (this comes from experience).
The value of this approach over simply clicking "Unreachable objects histogram" is that now you can do some cross-dump comparisons of each class (although subsetting is still conceptual/manual).
Source Code
The MAT source code is here: https://git.eclipse.org/c/mat/org.eclipse.mat.git
IBM Extensions for Memory Analyzer (IEMA)
The IBM Extensions for Memory Analyzer (IEMA) are a set of product specific extensions for MAT and are available for free as optional plugins.
Installation
The IEMA plugins may be added to an existing MAT installation:
- Click Help } Install New Software...
- Click the "Add..." button. Enter "IBM Tools IEMA" and Location: https://public.dhe.ibm.com/ibmdl/export/pub/software/websphere/runtimes/tools/iema/
- Check the additional "IBM Monitoring and Diagnostic Tools", install the plugins and restart Eclipse.
Offline installation of MAT, DTFJ, and IEMA
Download MAT from https://www.eclipse.org/mat/downloads.php
Unzip MAT
Open a terminal to the MAT directory and run the following commands (or Windows equivalents):
$ mkdir -p /home/was/Downloads/eclipseupdatesites/dtfj/ $ ./MemoryAnalyzer -application org.eclipse.equinox.p2.metadata.repository.mirrorApplication -source https://public.dhe.ibm.com/ibmdl/export/pub/software/websphere/runtimes/tools/dtfj/ -destination "file:/home/was/Downloads/eclipseupdatesites/dtfj/" -ignoreErrors $ ./MemoryAnalyzer -application org.eclipse.equinox.p2.artifact.repository.mirrorApplication -source https://public.dhe.ibm.com/ibmdl/export/pub/software/websphere/runtimes/tools/dtfj/ -destination "file:/home/was/Downloads/eclipseupdatesites/dtfj/" -ignoreErrors $ mkdir /home/was/Downloads/eclipseupdatesites/iema/ $ ./MemoryAnalyzer -application org.eclipse.equinox.p2.metadata.repository.mirrorApplication -source https://public.dhe.ibm.com/ibmdl/export/pub/software/websphere/runtimes/tools/iema/ -destination "file:/home/was/Downloads/eclipseupdatesites/iema/" -ignoreErrors $ ./MemoryAnalyzer -application org.eclipse.equinox.p2.artifact.repository.mirrorApplication -source https://public.dhe.ibm.com/ibmdl/export/pub/software/websphere/runtimes/tools/iema/ -destination "file:/home/was/Downloads/eclipseupdatesites/iema/" -ignoreErrorsPackage MAT and the update sites and copy to your target machine, then launch MAT and add and install each local update site to add DTFJ and IEMA separately. For details, see Eclipse Offline Update Site Installation.
Debugging MAT
Tracing MAT
See https://wiki.eclipse.org/MemoryAnalyzer/FAQ#Enable_Debug_Output
Dark Matter Warnings
In general, messages of the following form suggest core dump corruption and one should ensure that the core dump was taken with exclusive access and the file isn't truncated; however, there are cases where they may be benign:
!MESSAGE Problem getting superclass for class corruptClassName@0xffffffffffffffff at 0xffffffffffffffff
!STACK 0
com.ibm.j9ddr.view.dtfj.DTFJCorruptDataException: J9DDRCorruptData [as=minidump : 0 Message: Memory Fault reading 0x00000000 : Address: 0x0]
at com.ibm.j9ddr.view.dtfj.J9DDRDTFJUtils.newCorruptDataException(J9DDRDTFJUtils.java:105)
at com.ibm.j9ddr.view.dtfj.J9DDRDTFJUtils.handleAsCorruptDataException(J9DDRDTFJUtils.java:225)
at com.ibm.j9ddr.vm29.view.dtfj.java.DTFJJavaClass.getName(DTFJJavaClass.java:318)
at org.eclipse.mat.dtfj.DTFJIndexBuilder.getSuperclass(DTFJIndexBuilder.java:8258)
at org.eclipse.mat.dtfj.DTFJIndexBuilder.fill(DTFJIndexBuilder.java:1450)
at org.eclipse.mat.parser.internal.SnapshotFactoryImpl.parse(SnapshotFactoryImpl.java:273)
at org.eclipse.mat.parser.internal.SnapshotFactoryImpl.openSnapshot(SnapshotFactoryImpl.java:167)
at org.eclipse.mat.snapshot.SnapshotFactory.openSnapshot(SnapshotFactory.java:147)
at org.eclipse.mat.ui.snapshot.ParseHeapDumpJob.run(ParseHeapDumpJob.java:95)
at org.eclipse.core.internal.jobs.Worker.run(Worker.java:63)
Caused by: com.ibm.j9ddr.NullPointerDereference: Memory Fault reading 0x00000000 :
at com.ibm.j9ddr.vm29.pointer.AbstractPointer.getShortAtOffset(AbstractPointer.java:463)
at com.ibm.j9ddr.vm29.pointer.generated.J9UTF8Pointer.length(J9UTF8Pointer.java:166)
at com.ibm.j9ddr.vm29.pointer.helper.J9UTF8Helper.stringValue(J9UTF8Helper.java:32)
at com.ibm.j9ddr.vm29.pointer.helper.J9ClassHelper.getName(J9ClassHelper.java:88)
at com.ibm.j9ddr.vm29.view.dtfj.java.DTFJJavaClass.getName(DTFJJavaClass.java:315)
... 7 more
!MESSAGE Corrupt data reading declared fields at 0x0 : J9DDRCorruptData [as=minidump : 0 Message: Memory Fault reading 0x00000000 : Address: 0x0] from class com.ibm.j9ddr.view.dtfj.DTFJCorruptDataException: J9DDRCorruptData [as=minidump : 0 Message: Memory Fault reading 0x00000000 : Address: 0x0] at 0xffffffffffffffff
!STACK 0
com.ibm.dtfj.image.CorruptDataException: J9DDRCorruptData [as=minidump : 0 Message: Memory Fault reading 0x00000000 : Address: 0x0]
at org.eclipse.mat.dtfj.DTFJIndexBuilder.isCorruptData(DTFJIndexBuilder.java:4970)
at org.eclipse.mat.dtfj.DTFJIndexBuilder.exploreObject(DTFJIndexBuilder.java:6995)
at org.eclipse.mat.dtfj.DTFJIndexBuilder.processHeapObject(DTFJIndexBuilder.java:3666)
at org.eclipse.mat.dtfj.DTFJIndexBuilder.fill(DTFJIndexBuilder.java:2107) [...]
!MESSAGE Invalid array element reference 0x60457f240 of type ? found at index 0 in array of type [Ljava/util/concurrent/ConcurrentHashMap$Node; length 16 at address 0x60358a448 while finding outbound referencesSuch cases may be when an object is "dark matter": its class has been garbage collected, but the instance still exists in an old region. This may occur because of performance optimizations when there's not enough memory pressure to fully clean everything. This most commonly occurs with generated method accessors created through reflection.
This isn't easy to diagnose because the above exception occurs as part of class and superclass processing of that object so you don't even have the object address. If you enable MAT tracing, find the exceptions above, scroll up and you may see a message such as:
found object 106930 corruptClassName@0xffffffffffffffff at 0x603953fa0 clsId 0In the above example, the object address is
0x603953fa0.
Once you do have the object address, open jdmpview with
the core, run !j9object 0x$address, take the second address
in the error message (clazz = 0x$address2), run
!j9class 0x$address2 and if you see
class J9Object* classObject = !j9object 0xFFFFFFFFFFFFFFFF<FAULT>
with the specific value 0xFFFFFFFFFFFFFFFF, then this
object's class has been garbage collected. Note that this will usually
mean that MAT will discard it as it's not strongly retained. This can be
confirmed in jdmpview with
!isobjectalive 0x$address.
References
- Eclipse MAT Documentation
- Eclipse MAT Downloads
- Lab demonstrating MAT
- Why are some Java objects alive?
- Video: Eclipse Memory Analyzer Tool
- MAT source code
IBM Java Health Center
IBM Monitoring and Diagnostics for Java - Health Center is a profiler for IBM Java. It includes a statistical CPU profiler that samples Java stacks that are using CPU. Recent versions generally have an overhead of less than 1% and are suitable for production use and may be enabled dynamically without restarting the JVM.
Client Installation
See the download instructions.
Agent Installation
The Health Center agent is pre-packaged with IBM Java 8 (on Linux, AIX, Windows, and z/OS) and IBM Semeru Runtimes 11 (on z/OS). See the informal instructions for other versions of IBM Semeru Runtimes.
Agent Usage
There are two ways to enable the Health Center agent: 1) a live socket mode or 2) a headless mode that produces HCD files. In general, we recommend the headless mode at startup (optionally for a limited duration) or dynamically enabled at runtime (optionally for a limited duration).
Health Center Recipe
- Open Garbage Collection View } Right Click } Change units } X axis } Date
- Observe the garbage collection to see roughly when there was significant activity and mouse over the start and end times. Take these times and crop the data in the menu } Data } Crop Data
- Observe the proportion of time spent in garbage collection % in the GC Summary view
- Switch to the CPU view and observe the average and maximum CPU %
- Switch to the Locking view and sort by Slow. If the number of gets or average hold times are high for the top hitters, review the lock Name
- Switch to the Profiling view
- Sort by self % (default sort) and observe the top 10 methods or so. If a single method self % is greater than 5-10%, this is concerning. Click on each one and observe the Invocation paths.
- Sort by tree %. Usually the first one will be something like Thread.run or Worker.run. Select this and change to the Called methods view. Expand the largest tree items until there is a large "drop;" for example, if methods are 100, 99, 100, 100, etc., and then suddenly there is a drop to one method with 60% and one with 40%, this is usually an indication of a major divergence in general application activity. Continue as needed until something interesting comes up (this is an art more than a science).
Overhead
In general, the overhead of Health Center is between 0.4 to 3%, depending on the mode. In the headless mode, the overhead is about 1%; however, if files roll over, this involves zipping files together and that has a momentary impact, which averaged out can increase overhead up to 3%. The socket mode has the lowest overhead of about 0.4%.

Gathering Data
There are two ways to gather HealthCenter data:
- Headless mode: writes data to local .hcd files with the HealthCenter agent enabled in headless mode.
- Socket mode: direct TCP connection from a HealthCenter client to a JVM with the HealthCenter agent enabled and data is streamed to the client (there is an option to export streamed data to an hcd file).
In general, headless mode is preferred for production usage to avoid connectivity/firewall issues and doesn't require direct human involvement.
Review Health Center agent configuration properties.
Warning: Health Center enables J9 -Xtrace
under the covers which uses additional native memory on each thread
based on -Xtrace:buffers.
If you have a lot of threads and native memory constraints (RAM or
virtual), this may cause native OutOfMemoryErrors, so it's always best
to test Health Center with a stress test in a test environment before
using in production. This risk may be exacerbated with Liberty which
defaults to an unlimited
maximum thread pool designed to maximize throughput, so Liberty
users should consider capping this with
<executor maxThreads="N" /> based on available native
memory.
Headless mode
See the four different recipes of enabling headless mode:
- Enable at Startup
- Enable at Startup of Limited Duration
- Enable at Runtime
- Enable at Runtime of Limited Duration
Socket mode
Socket mode may be enabled during restart or dynamically similar to
above although omit level=headless.
When using the socket mode, by default Health Center uses CORBA as
the communication protocol. Another option is to use JRMP with
-Dcom.ibm.java.diagnostics.healthcenter.agent.transport=jrmp.
Both methods are similar in performance although JRMP has a built-in
reaper thread that runs approximately once an hour which calls
System.gc.
Enabling Health Center Dynamically
As partly covered in the above topics, Health Center may be enabled dynamically.
Disabling Health Center
After data collection has started, there are two ways to disable data collection:
When configuring headless mode (either on restart or dynamically), use the configuration properties to stop collection after some point. For example (in minutes):
-Dcom.ibm.java.diagnostics.healthcenter.headless.run.duration=30 -Dcom.ibm.java.diagnostics.healthcenter.headless.run.number.of.runs=1To skip some amount of profiling (e.g. startup), use, for example (in minutes):
-Dcom.ibm.java.diagnostics.healthcenter.headless.delay.start=5In socket mode, in the HealthCenter client, open the "Configure Collection of Data" screen and uncheck all boxes which will send a command to the agent to turn off most collection.
Analyzing Data
- Start Eclipse with Health Center installed
- In Eclipse } Window } Perspective } Open Perspective } Other... } Health Center Status Summary
- Click File } Load Data... to load an HCD file, or File } New
Connection... to connect to a running Health Center agent.

WARNING: The HealthCenter client may quietly drop older data if its Java heap is nearly full, so use a very large heap when analyzing. (This is because it was originally designed for socket mode which streams data in).
Profiling View
Click the Profiling link. By default, the list is sorted by self percentage which will show very hot methods.

The Self (%) column reports the percent of samples where a method was at the top of the stack. The Tree (%) column reports the percent of samples where a method was somewhere else in the stack. In this example, WAS NCSA access logging was sampled more than 2% of the time, and the next largest single sample is java.lang.String.regionMatches. If we click on this row, we can expand the "Invocation Paths" to see which methods call this method. In this example, this 1% of samples was mostly called by JSF HTML rendering from the application.

If you sort by Tree %, skip the framework methods from Java and WAS, and find the first application method. In this example, about 47% of total samples was consumed by com.ibm.websphere.samples.daytrader.web.TradeAppServlet.performTask and all of the methods it called. The "Called Methods" view may be further reviewed to investigate the details of this usage.

Updating to the latest agent
- Stop the application servers and node agents (and DMGR if on that node).
- Install the Health Center Eclipse client and access the local help content to download the latest agent.
- After updating the files, make sure to chown them to the user that runs WAS.
- Re-start the application servers.
Platform-Specific Agent Update Notes
On AIX, if you had previously run Health Center, even if you stop all JVMs, you will probably see this error extracting libhealthcenter.so:
tar: 0511-188 Cannot create ./jre/lib/ppc64/libhealthcenter.so: Cannot open or remove a file containing a running program.By default, AIX will keep shared libraries in memory even after all JVMs referencing that library have stopped. To remove the shared library from memory, you may either reboot the box or more simply, run the slibclean command (see also genkld and genld). This should be safe to run because it only affects shared libraries that have no current load or use counts:
The slibclean command unloads all object files with load and use counts of 0. It can also be used to remove object files that are no longer used from both the shared library region and in the shared library and kernel text regions by removing object files that are no longer required.
Now you should be able to overwrite
libhealthcenter.so.
You may also find that healthcenter.jar has open file
handles (e.g. lsof) in Java processes even if healthcenter
was not enabled. This is because healthcenter.jar is in the
ext JRE directory which is searched as part of some
classpath operations. If you take a system dump, you will find a
java.util.jar.JarFile object with a name field that
includes healthcenter.jar, and this JarFile
object probably has a native file handle open (although you will not
find a java.io.File object with that path). In theory, it
should be safe to overwrite healthcenter.jar even if
running processes have open file handles to it because the JAR file will
not be read by those JVMs that do not have healthcenter enabled.
Point to a different agent installation directory
It is possible to update to the latest agent without modifying the binaries in the WAS folder:
- Extract the agent ZIP into any directory; for example,
/opt/healthcenter/agent/ - Take a javacore of the running target server and find the last value
of
-Djava.ext.dirs(note that there may be multiple instances, so always take the last value). For example:-Djava.ext.dirs=/opt/local/was85/tivoli/tam:/opt/local/was85/java/jre/lib/ext - Prepend the path to the ext folder under the expanded HealthCenter
agent directory to
-Djava.ext.dirs. For example:-Djava.ext.dirs=/opt/healthcenter/agent/jre/lib/ext:/opt/local/was85/tivoli/tam:/opt/local/was85/java/jre/lib/ext - Append this parameter as well as the following parameters (replacing
the path to the HealthCenter agent) to the generic JVM arguments:
-Djava.ext.dirs=/opt/healthcenter/agent/jre/lib/ext:/opt/local/was85/tivoli/tam:/opt/local/was85/java/jre/lib/ext -agentpath:/opt/healthcenter/agent/jre/bin/libhealthcenter.so -Dcom.ibm.java.diagnostics.healthcenter.agent.properties.file=/opt/healthcenter/agent/jre/lib/healthcenter.properties - Append this parameter to the "Claspath" textbox on the same page as
the generic JVM arguments (replacing the path to the HealthCenter
agent):
/opt/healthcenter/agent/jre/lib/ext/healthcenter.jar - Add the necessary HealthCenter arguments described above to enable it.
- Restart the JVM.
Low mode
-Xhealthcenter:level=low disables method profiling since
this has the highest overhead and creates the most data. This would be
useful if you wanted something else from health center (e.g. garbage
collection, native memory, etc.) with less overhead.
You may also disable thread stack capturing to reduce overhead
further:
-Dcom.ibm.diagnostics.healthcenter.data.threads=off
Low mode cannot be combined with headless (e.g.
-Xhealthcenter:level=low,level=headless), so the way to do
it is to use headless mode and then: In jre/lib/ext there
is a file called healthcenter.jar. If you unpack that you
will find a file called TRACESourceConfiguration.properties
and this is what defines which data is switched on by trace. When we run
in low mode, we turn off one of the profiling trace points. You can do
this manually by editing this file and finding the entry
j9jit.16=on and then changing it to
j9jit.16=off. If you repackage the jar up you should find
that the amount of trace generated is a lot less (but you won't get
method profiling).
Hexadecimal Method Names
Sometimes you may see addresses (0x0123ABCD) instead of
method names. This usually occurs for methods loaded very early in the
JVM such as classloading methods.
This issue is generally resolved by starting HealthCenter from JVM startup or by using newer agents, so test upgrading the agent.
Warning: Health Center is sometimes recommended with
-Xtrace:buffers={2m,dynamic} to reduce the probability of
losing method name translations but note that this further increases
native memory demands.
To investigate, use the option
-Dcom.ibm.diagnostics.healthcenter.logging.methodlookup=debug
and upload stdout/stderr.
Health Center Details
In one of the largest customer production situations, health center wrote about 5GB per hour of data to the filesystem.
Docker
To use Health Center through Docker with JRMP and the GUI client,
java.rmi.server.hostname=9.140.104.32 which is the IP address of the
machine doing the docker run and run with:
docker run -p 1972:1972 myDockerContainer
FROM ibmjava:sdk
RUN mkdir /opt/app
COPY HelloWorld.java /opt/app
WORKDIR /opt/app
RUN javac HelloWorld.java
EXPOSE 1972
CMD ["java","-Dcom.sun.management.jmxremote","-Dcom.sun.management.jmxremote.authenticate=false","-Dcom.sun.management.jmxremote.ssl=false","-Dcom.sun.management.jmxremote.rmi.port=1972","-Djava.rmi.server.hostname=9.140.104.32","-Dcom.sun.management.jmxremote.local.only=false","-Xhealthcenter:transport=jrmp","HelloWorld"]Gathering HCD at Runtime
- Go to the current working directory (cwd) of the process. For
example, for tWAS, that's normally
/opt/IBM/WebSphere/AppServer/profiles/${PROFILE}/ - Underneath the cwd, there should be a temporary directory that
HealthCenter created. This is normally named
tmp_${NUMBER1}_${NUMBER2}_. If this directory is not found under the profiles directory, check under/tmp. If it's still not found, uselsofto search for the trace file:lsof -p ${PID} | grep "trace$" - Copy the contents of this directory to a temporary directory. For
example:
mkdir /tmp/hc cp tmp*_/* /tmp/hc/ - Go to the temporary directory. For example:
cd /tmp/hc/ - Zip up the files in this directory (if you don't have the zip
utility, you can use the jar utility in the JDK which also creates a zip
file):
zip hctmp.hcd *
HCD File Name
The HCD file name is of the form
${dir}/${prefix}healthcenter${startday}${startmonth}${startyear}_${starthour}${startminutes}${startsseconds}_${pid}_${filenumber}.hcd.
The temporary directory name is of the form
${dir}/tmp_${startday}${startmonth}${startyear}_${starthour}${startminutes}${startsseconds}_.
By default, ${dir} is the current working directory but
may be overridden with
-Dcom.ibm.java.diagnostics.healthcenter.headless.output.directory=somedir.
By default, ${prefix} is blank but may be set with
-Dcom.ibm.java.diagnostics.healthcenter.headless.filename=someprefix.
If this is set, an _ is automatically appended to the
prefix; therefore, the file will be
${prefix}_healthcenter.... On WAS traditional, if this is
set in the generic JVM arguments, the name of the WAS JVM may be set
with
-Xhealthcenter:level=headless -Dcom.ibm.java.diagnostics.healthcenter.headless.filename=${WAS_SERVER_NAME}.
Agent Version
To find out the agent version from the JDK, extract
hcversion.properties (version.properties on
older JDKs) from healthcenter.jar:
$ jar xf healthcenter.jar hcversion.properties && cat hcversion.properties && rm hcversion.properties
jar.version=3.0.17.20190121Disabling Components
Particular Health Center components
may be disabled with off system properties. For
example:
-Dcom.ibm.diagnostics.healthcenter.data.classes=off
-Dcom.ibm.diagnostics.healthcenter.data.cpu=off
-Dcom.ibm.diagnostics.healthcenter.data.gc=off
-Dcom.ibm.diagnostics.healthcenter.data.io=off
-Dcom.ibm.diagnostics.healthcenter.data.jit=off
-Dcom.ibm.diagnostics.healthcenter.data.memory=off
-Dcom.ibm.diagnostics.healthcenter.data.profiling=off
-Dcom.ibm.diagnostics.healthcenter.data.threads=offDiagnostic Traces
- Log trace engine configuration processing:
-Dcom.ibm.diagnostics.healthcenter.logging.TraceDataProvider=debug - Headless file processing:
-Dcom.ibm.diagnostics.healthcenter.logging.headless=debug - Investigating MBean
authentication/authorization:
Then set diagnostic trace using the product trace mechanism, or-Dcom.ibm.java.diagnostics.healthcenter.agent.debug=true-Djava.util.logging.config.file:com.ibm.java.diagnostics.healthcenter.agent=allcom.ibm.java.diagnostics.healthcenter.agent.mbean.HCLaunchMBean=all
- Others:
-Dcom.ibm.diagnostics.healthcenter.logging.Port=debug -Dcom.ibm.diagnostics.healthcenter.logging.ClassHistogram=debug -Dcom.ibm.diagnostics.healthcenter.logging.cpuplugin=debug
Large Memory Allocations
Health Center may be configured to track large memory allocations based on a number of bytes. For example, to track allocations greater than 10MB:
-Dcom.ibm.java.diagnostics.healthcenter.allocation.threshold.low=10485760Note that, under the covers, this will cause Health Center to configure -Xdump. For example:
-Xdump:silent:events=allocation,filter=#10485760...This will not produce any output files and will only be tracked by Health Center; however, this will silently increment the diagnostic artifact ID every time such an allocation occurs. This may explain very large artifact numbers in other produced files such as javacores, etc.
Health Center Thread Stacks
The profiler in Health Center is only aware of threads that use CPU, so if a thread is waiting on a database, for example, it will not show up in Health Center. However, starting with the Health Center agent version 2.2, it periodically captures every thread stack. The Health Center client has minimal capabilities to display this information; however, you can use the Health Center API to read an HCD file and print these stacks:
import java.io.File; import java.io.PrintWriter; import java.lang.Thread.State; import java.lang.management.LockInfo; import java.lang.management.MonitorInfo; import java.text.SimpleDateFormat; import java.util.ArrayList; import java.util.Comparator; import java.util.Date; import java.util.HashMap; import java.util.List; import java.util.Map; import java.util.Map.Entry; import com.ibm.java.diagnostics.healthcenter.api.HealthCenter; import com.ibm.java.diagnostics.healthcenter.api.factory.HealthCenterFactory; import com.ibm.java.diagnostics.healthcenter.api.threads.ThreadData; import com.ibm.java.diagnostics.healthcenter.api.threads.ThreadsData; public class HealthCenterThreadDumpAnalyzer { private static final SimpleDateFormat threadDumpDate = new SimpleDateFormat("yyyy-MM-dd HH:mm:ss"); public static void main(String[] args) throws Throwable { if (args == null || args.length == 0) { System.err.println("usage: HealthCenterThreadDumpAnalyzer ${HCDFILE}"); return; } File file = new File(args[0]); message("Loading " + file.getAbsolutePath()); HealthCenter hc = HealthCenterFactory.connect(file); message("Getting all thread dumps"); ThreadsData threadsData = hc.getThreadsData(); HashMap<Long, ThreadData[]> threadDumps = threadsData.getAllThreads(); List<Entry<Long, ThreadData[]>> sortedThreadDumps = new ArrayList<>(); for (Entry<Long, ThreadData[]> entry : threadDumps.entrySet()) { sortedThreadDumps.add(entry); } sortedThreadDumps.sort(new Comparator<Entry<Long, ThreadData[]>>() { @Override public int compare(Entry<Long, ThreadData[]> x, Entry<Long, ThreadData[]> y) { return x.getKey().compareTo(y.getKey()); } }); message("Processing all " + sortedThreadDumps.size() + " thread dumps"); try (PrintWriter out = new PrintWriter(new File(file.getParentFile(), file.getName() + "_threads.txt"))) { for (Entry<Long, ThreadData[]> threadDump : sortedThreadDumps) { out.println(threadDumpDate.format(new Date(threadDump.getKey()))); out.println("Full thread dump Java:"); out.println(); ThreadData[] threads = threadDump.getValue(); Map<String, String> contendedMonitorOwners = new HashMap<>(); for (int i = 0; i < threads.length; i++) { ThreadData thread = threads[i]; if (thread.getContendedMonitor() != null && !thread.getContendedMonitor().isEmpty() && thread.getContendedMonitorOwner() != null && !thread.getContendedMonitorOwner().isEmpty()) { contendedMonitorOwners.put(thread.getContendedMonitorOwner(), thread.getContendedMonitor()); } } for (int i = 0; i < threads.length; i++) { ThreadData thread = threads[i]; String threadName = thread.getName(); String nid = String.format("%08x", threadName.hashCode()); nid = "0" + nid.substring(1); out.println("\"" + threadName + "\" #" + i + " daemon prio=9 os_prio=0 tid=0x" + String.format("%016x", threadName.hashCode()) + " nid=0x" + nid + " " + getThreadDumpThreadState(thread.getState()) + " [0x0000000000000000]"); out.println(" java.lang.Thread.State: " + thread.getState()); StackTraceElement[] threadStack = thread.getStackTrace(); if (threadStack != null) { boolean firstFrame = true; for (StackTraceElement frame : threadStack) { out.println(" at " + frame); if (firstFrame) { firstFrame = false; if (thread.getContendedMonitor() != null && !thread.getContendedMonitor().isEmpty()) { String contendedMonitor = thread.getContendedMonitor(); writeContendedMonitor(out, contendedMonitor, true); } } } for (MonitorInfo monitor : thread.getLockedMonitors()) { out.println(" - locked " + monitor); throw new IllegalStateException("Not implemented " + monitor); } for (LockInfo lock : thread.getLockedSynchronizers()) { out.println(" - locked " + lock); throw new IllegalStateException("Not implemented " + lock); } for (String ownedMonitor : thread.getOwnedMonitors()) { int space = ownedMonitor.indexOf(' '); if (space != -1) { ownedMonitor = ownedMonitor.substring(0, space); } out.println(" - locked <0x" + String.format("%016x", ownedMonitor.hashCode()) + "> (a " + ownedMonitor + ")"); } String contendedMonitor = contendedMonitorOwners.get(threadName); if (contendedMonitor != null) { writeContendedMonitor(out, contendedMonitor, false); } } out.println(); } out.println(); } } message("Finished processing"); System.exit(0); } private static void writeContendedMonitor(PrintWriter out, String contendedMonitor, boolean waiting) { String className = contendedMonitor.substring(0, contendedMonitor.indexOf('@')); String identityHashCode = contendedMonitor.substring(contendedMonitor.indexOf('@') + 1); out.println(" - " + (waiting ? "waiting to lock" : "locked") + " <0x" + String.format("%016x", Long.parseLong(identityHashCode, 16)) + "> (a " + className + ")"); } public static String getThreadDumpThreadState(State threadState) { switch (threadState) { case BLOCKED: return "waiting for monitor entry"; case NEW: return "new"; case RUNNABLE: return "runnable"; case TERMINATED: return "terminate"; case TIMED_WAITING: return "waiting on condition"; case WAITING: return "waiting on condition"; default: throw new IllegalStateException("Not implemented for " + threadState); } } public static void message(String message) { System.out.println("[" + new Date() + "] " + message); } }
By default, Health Center captures full stacks. If this appears to be
a performance impact, you can limit this with
-Dcom.ibm.java.diagnostics.healthcenter.thread.stack.depth=${MAXDEPTH}
The default thread stack collection interval is 30 seconds. This can
be changed with
-Dcom.ibm.java.diagnostics.healthcenter.thread.collection.interval=${SECONDS}
To disable collection of thread stacks:
-Dcom.ibm.diagnostics.healthcenter.data.threads=off
References
OpenJDK Mission Control
JDK Flight Recorder (JFR) is an agent in the HotSpot JVM that provides a low-overhead, production-ready sampling profiler and monitoring tool. JFR is very similar to the IBM Java Health Center agent for the J9 JVM.
JDK Mission Control (JMC) is a project by OpenJDK that provides a GUI client to review JFR collections.
Review the JMC User Guide.
Recording data with the agent
There are various HotSpot JVM options to produce JFR recordings. Summaries:
Starting the client
Various downloads of the JMC client are available including from Eclipse Adoptium.
Open JFR File
Click File } Open File... } Select the *.jfr file
Time Zones
The data stored in JFR files are in UTC time. The time zone displayed in JMC are in local time. If the local time where the JFR files were produced does not match the local time of the JMC client machine, then you may set the time zone when launching JMC using the time zone name; for example:
-vmargs
-Duser.timezone=America/New_YorkEclipse
Eclipse is a free open source project that's used to run many of the major tools in this cookbook: https://www.eclipse.org/downloads/
Launching Notes
- To print console logging, edit the
inifile and add the following to lines above any-vmand-vmargslines. For example:-startup plugins/org.eclipse.equinox.launcher_1.5.700.v20200207-2156.jar --launcher.library plugins/org.eclipse.equinox.launcher.win32.win32.x86_64_1.1.1200.v20200508-1552 -debug -consoleLog -vmargs -Xmx8G - To print console logging from a terminal without launching a
separate terminal, launch the program using
eclipsecrather thaneclipseor the prudct's executable. For example:./eclipsec -debug -consoleLog - To specify a particular
inifile rather than the one in the product's directory, use a terminal to launch with the--launcher.iniargument. For example:./eclipsec --launcher.ini /tmp/eclipse.ini - To modify the JVM arguments from the command line instead of the
inifile, use . For example:.\eclipsec.exe -debug -consoleLog -vmargs "-Djava.io.tmpdir=%TEMP%" - To use JVM arguments from both the command line and the
inifile, add--launcher.appendVmargsin theinifile. For example:-startup plugins/org.eclipse.equinox.launcher_1.5.700.v20200207-2156.jar --launcher.library plugins/org.eclipse.equinox.launcher.win32.win32.x86_64_1.1.1200.v20200508-1552 --launcher.appendVmargs -debug -consoleLog -vmargs -Xmx8G - To change the workspace directory, use the
-dataargument. For example:.\eclipsec.exe --launcher.ini C:\eclipse.ini -data "%APPDATA%\Memory Analyzer" -vmargs "-Djava.io.tmpdir=%TEMP%" - To use system properties such as the user home directory:
-data @user.home/myapp-workspace
Example Windows Launch Script
Also add --launcher.appendVmargs to the ini
file after the launcher.library+plugins/ lines.
:: Launcher script
:: Comments start with ::
@echo off
set TITLE=Memory Analyzer Tool Launcher
title %TITLE%
echo %TITLE%
set PATH=C:\IEMA\jre\bin;%PATH%
echo Launching the tool. This may take a few minutes depending on available resources.
C:\IEMA\eclipsec.exe --launcher.ini "C:\IEMA\MemoryAnalyzer.ini" -data "%APPDATA%\MAT" -consoleLog -vmargs "-Djava.io.tmpdir=%TEMP%" "-Xshareclasses:name=mat,cacheDir=%APPDATA%\sharedclasses\mat"
echo(
echo Tool completed. Press any key to end this prompt.
echo(
pauseSetting the Java Virtual Machine that Eclipse Uses
Some tool usages require IBM Java to properly run the analysis (e.g. IBM MAT, IBM Java Health Center, etc.). You may specify the JVM that Eclipse uses in the eclipse.ini file. Above the -vmargs line, add the following two lines, replacing the path to IBM Java that you installed:
-vm
/opt/IBM/Java/ibm-java-x86_64-80/bin/For Windows, IBM Java provides a pre-packaged Eclipse Neon with IBM Java already configured
Open a browser to https://developer.ibm.com/javasdk/downloads/#tab_eclipse
If you are running Windows 32-bit, click on the "Windows on Intel" link:
If you are running Windows 64-bit, click on the "Windows on AMD64/EMT64T" link:
The download will require you to either register for a free IBM ID or use the "Proceed without an IBM id" button and enter your information.
When you get to the download page, the default option is to use the "Download Director" to download the file which is a Java applet that downloads more quickly by using multiple sockets; however, you may choose the simpler option of a direct link by click on the "Download using http" tab.
Extract the .zip file into a directory of your choice.
Go to the "eclipseDevelopmentPackage\eclipse" subdirectory and launch eclipse.exe.
IBM Java on Linux
Open a browser to https://developer.ibm.com/javasdk/downloads/#tab_sdk8
If you are running Linux 32-bit, under the "Linux on Intel" heading, click on the first "Simple unzip with license" link.
If you are running Linux 64-bit, under the "Linux on AMD64/EMT64T" heading, click on the first "Simple unzip with license" link.
Download the package to any directory, most commonly /opt/IBM/Java
From the terminal, add execute permissions and then run
ibm-java-sdk-8.0-3.21-x86_64-archive.bin:chmod +x ./ibm-java-sdk-8.0-3.21-x86_64-archive.bin ./ibm-java-sdk-8.0-3.21-x86_64-archive.bin
Eclipse Maximum Heap Size
The maximum heap size for Eclipse may be set in the "-vmargs" section of the eclipse.ini file.
Offline Update Site Installation
Using any Eclipse installation, run metadata.repository.mirrorApplication and artifact.repository.mirrorApplication for each update site. For example:
Windows:
> mkdir C:\eclipseupdatesites\dtfj\ > .\eclipse.exe -application org.eclipse.equinox.p2.metadata.repository.mirrorApplication -source https://public.dhe.ibm.com/ibmdl/export/pub/software/websphere/runtimes/tools/dtfj/ -destination "file:/C:/eclipseupdatesites/dtfj/" -ignoreErrors > .\eclipse.exe -application org.eclipse.equinox.p2.artifact.repository.mirrorApplication -source https://public.dhe.ibm.com/ibmdl/export/pub/software/websphere/runtimes/tools/dtfj/ -destination "file:/C:/eclipseupdatesites/dtfj/" -ignoreErrorsLinux:
$ mkdir -p /tmp/eclipseupdatesites/dtfj/ $ ./eclipse -application org.eclipse.equinox.p2.metadata.repository.mirrorApplication -source https://public.dhe.ibm.com/ibmdl/export/pub/software/websphere/runtimes/tools/dtfj/ -destination "file:/tmp/eclipseupdatesites/dtfj/" -ignoreErrors $ ./eclipse -application org.eclipse.equinox.p2.artifact.repository.mirrorApplication -source https://public.dhe.ibm.com/ibmdl/export/pub/software/websphere/runtimes/tools/dtfj/ -destination "file:/tmp/eclipseupdatesites/dtfj/" -ignoreErrorsTransfer the downloaded upatesites above to the target machine.
For each updatesite folder:
- In Eclipse, click Help } Install New Software...
- Click the "Add..." button.
- Enter "Local $NAME" (for example, Local DTJF) for the name, click "Local..." and select the update site folder.
- After you click OK, Eclipse will automatically select the new update site and load available plugins from which you can select the plugins.
Apache JMeter
Apache JMeter (http://jmeter.apache.org/) has a bit of a learning curve but generally has all the features needed to do performance testing. Writing and maintaining realistic test suites can be time consuming, particularly because even minor changes to an application can break the test flow and assumptions. Nevertheless, it is critical to have realistic testing. You can have different tiers of tests, from simple smoke tests to incredibly realistic user flows, with the latter being more brittle.
For a lab demonstrating JMeter, see https://hub.docker.com/r/kgibm/fedorawasdebug
Download the JMeter binary (http://jmeter.apache.org/download_jmeter.cgi), unzip, change directory to bin, and run jmeter. You will start with a blank test plan and workbench. In general, you should do most of your work in the test plan and the workbench is only used for some copy/paste operations. Right click on the test plan and use the context menus to build it. Here are some general tips:
- As you change fields and navigate, the changes you make are persistent within the GUI; however, you should save your plan and periodically re-save as you make changes.
- Try to use variables as much as possible so that your test is more flexible.
See a sample JMeter script at https://raw.githubusercontent.com/kgibm/problemdetermination/master/scripts/jmeter/sample_test_plan.jmx, a screenshot of which is below. Here are the highlights:
- A "User Defined Variables" configuration element defines some global variables such as the scheme, host, port, number of threads, etc.
- An "HTTP Request Defaults" configuration element defines the default parameters of the HTTP client. In particular, note that "Retrieve All Embedded Resources" and "Use concurrent pool" are checked to instruct the client to retrieve things such as images, CSS, and JS resources from resulting HTML files to more closely mimic real world behavior.
- An "HTTP Header Manager" configuration element with a header name of "Authorization" and a value of "Basic ..." shows how to add an HTTP header to perform basic authorization on every request. Notice that the element is grayed out, signifying that the element is disabled. To enable it, right click and click Enable or Toggle. This technique is often useful to quickly change tests.
- A "Poisson Random Timer" timer element pauses each thread for a random period of time between requests with most times occurring near the specified value in the configuration.
- A "Thread Group" threads element that will perform the actual HTTP
requests with a certain concurrency and for a certain number of
iterations.
- An "HTTP Cookie manager" configuration element that will stores cookies for each thread.
- An "HTTP Request" sampler element that will do the actual HTTP
request. Since we've set up HTTP Request Defaults above, we only need to
change what's unique to this request, in the first example just the path
/.
- A "Response Assertion" assertion element that will fail the request if it doesn't see the specified value in the response. It is useful to add these to all responses to ensure that there are no functional errors in the application.
- An "XPath Extractor" post processor element which will extract content from the response into variables for use in subsequent requests. We check "Use tidy (tolerant parser)" because most HTML is not well formed XML. We set the reference name to the variable that we want to hold the extraction, and the XPath query to perform the extraction. Other useful post processors are the regular expression extractor.
- An "HTTP Request" sampler element that will do an HTTP request to the contents of the variable that we extracted from the previous response.
- A "Summary Report" listener element that will provide basic statistics on the test results.
- A "Graph Results" listener element that will provide the same statistics as the summary report in graph form over time.
- A "View Results Tree" listener element that will provide the full request and response of every sample. This is useful during test design and should be toggled off otherwise.
- Make a habit to change the "Name" of each element to describe what it's doing. The name will be reflected in the tree on the left.
- To start the test, click the simple green arrow.
- As the test is running, the number of threads executing is in the top right corner. You can also click any of the listener elements to see a live view of the statistics, graph, or results tree.
- To stop the test, click the shutdown red X button (the stop button terminates threads and should be avoided).
- After stopping a test, you may want to clear the previous results before starting a new iteration. Click the clear all brooms icon to reset the listeners.

Wireshark
Wireshark is an open source program to perform analysis on capture packets. Wireshark supports the packet formats of most operating systems.
Wireshark Recipe
- Check capture statistics
- Check for packet loss:
tcp.analysis.retransmission - Statistics } Protocol Hierarchy. Note percentages of packet types.
- Statistics } IO Graphs } Change "Y Axis" for "All Packets" to "Bytes". Note the utilization over time.
- Statistics } DNS } Service Stats } request-response time (msec) } Average / Max Val
- Statistics } Service Response Time } LDAP
Common Terms and Concepts
- A frame is basically a packet.
- A conversation is the set of packets between two endpoints.
- An endpoint is a logical endpoint of a protocol or network layer. For most purposes, focusing on an IP endpoint, i.e. an IP address.
- Following a TCP or HTTP stream means extracting the subset of a conversation, from the point of view of an application. For most purposes, focusing on a TCP stream, i.e. SYN } SYN/ACK } ACK } ... } FIN } FIN/ACK } ACK
- There is no way with a single capture to know how long it took for the packet to be transmitted. This requires a correlated packet capture on the other side where the packet was sent from/to.
- Timestamp of packet is:
- For an incoming packet, the timestamp is when the capture mechanism is handed the packet from its way from the NIC to the client. This would include any transition time over the NIC.
- For an outgoing packet, the timestamp is when the capture mechanism is handed the packet from its way from the client to the NIC, before it hits the NIC.
Time zones
By default, Wireshark shows relative timestamps (seconds since beginning of capture). It's often useful to show absolute timestamps to correlate to other logs. For the most common capture formats such as libpcap, the timestamps in the capture are stored as UTC. To show these UTC timestamps, click View } Time Display Format } UTC Date and Time of Day.
To show absolute timestamps in the local timezone of the system where
the packets were captured, if the local timezone of the system running
Wireshark does not match the capture system, then Wireshark must be
launched from a terminal after setting the appropriate TZ
environment variable value.
When launching Wireshark from POSIX systems such as Linux, this is just a matter of using the Olson time zone ID; for example:
TZ=Asia/Tokyo wiresharkOn Windows, the TZ environment variable does not support
Olson time zone database names and instead you must specify an absolute
time zone offset and this offset is the opposite of the colloquial
offset:
Take care in computing the sign of the time difference. Because the time difference is the offset from local time to UTC (rather than the reverse), its sign may be the opposite of what you might intuitively expect. For time zones ahead of UTC, the time difference is negative; for those behind UTC, the difference is positive.
For example, Tokyo's colloquial UTC offset is UTC+9; however, on
Windows, the TZ environment variable must be specified as
UTC-9:
> set TZ=JST-9
> "C:\Program Files\Wireshark\Wireshark.exe"If the local timezone does not have daylight savings time, or you do not expect that the capture overlaps a daylight savings time transition, you may simply use the offset from UTC instead of looking up the three-letter time zone name; for example, for Tokyo:
> set TZ=UTC-9
> "C:\Program Files\Wireshark\Wireshark.exe"If the local timezone has daylight savings time and the capture
overlaps a daylight savings time transition, then the daylight savings
time three-letter code should be appended. For example, for
America/New_York:
> set TZ=EST5EDT
> "C:\Program Files\Wireshark\Wireshark.exe"After launching Wireshark with the proper TZ envar,
click View } Time Display Format } Date and Time of Day to see the
timestamp in the local timezone of the capture system.
Capture Statistics
Statistics } Capture File Properties:
- Review the times (
First packetandLast packet) and length of the packet capture (Elapsed) to see if it's relevant to the issue and/or representative. - Review the number of packets with
Packets. - Review the average throughput with
Average bytes/s. - Review the
Dropped Packetsvalue, if any.
Example:
First packet: 2020-08-11 19:47:58
Last packet: 2020-08-11 19:51:44
Elapsed: 00:03:45
[...]
Packets: 5693
Time span, s: 225.694
Average pps: 25.2
Average packet size, B: 538
Bytes: 3064080
Average bytes/s: 13 k
Average bits/s: 108 kIn addition, review Statistics } Summary
Packet Loss
In general, TCP retransmissions indicate packet loss; however, Wireshark must infer retransmissions and there may be cases of "benign" retransmissions (e.g. some cooked captures). This is why Wireshark reports TCP retransmissions as "suspected". The only way to know for sure if there is packet loss is to capture network traces on two sides of a conversation and compare TCP sequence numbers on each stream.
With that said, you may guess that there may be packet loss with the following technique:
- Find TCP retransmissions:
- Analyze } Expert Information. If you want to check for a particular
source/destination, apply that display filter first (e.g.
ip.addr == 10.20.30.100) and then checkLimit to Display filterin theExpert Informationdialog. Review the count ofNote: This frame is a (suspected) retransmission(separately, considerACKed Lost Packet,Previous Segment LostandOut of Order). tcp.analysis.retransmissionfilter. If you want to check for a particular source/destination, add those filters; for example,ip.addr == 10.20.30.100 && tcp.analysis.retransmission- Some versions of Wireshark show a
Droppedpacket count in the bottom of the window next to the Packet/Display counts.
- Analyze } Expert Information. If you want to check for a particular
source/destination, apply that display filter first (e.g.
- Take the count of TCP retransmissions and divide by the total packet
count (if using a display filter, divide by the displayed packet count).
The total number of packets and total number of filtered packets is
shown at the bottom of Wireshark:
Packets: X * Displayed: Y (Z%).
TCP Streams
Within each loaded capture, Wireshark generates a unique identifier
for each TCP stream. A TCP stream uniquely identifies a particular
socket through the four-tuple: (Source IP, Source Port, Destination IP,
Destination Port). This is visible in the packet details view under
Transmission Control Protocol } [Stream Index: X].
To filter on a particular stream, use the filter
tcp.stream == X or right click on a packet and select
Follow } TCP Stream.
It may also be useful to add tcp.stream as a custom
column to quickly differentiate different conversations:

Useful Filters
- An IP address is either the source or the destination:
ip.addr == 10.20.30.100 - A port is either the source or the destination:
tcp.port == 443 - TCP handshakes (assuming the default of relative
sequence numbers):
tcp.flags.syn == 1 || (tcp.seq == 1 && tcp.ack == 1 && tcp.len == 0 && tcp.flags.fin != 1) - TCP RST packets may be a sign of a problem or they may be normal.
Some applications use a RST packet for normal socket closure instead of
a full-duplex FIN exchange.
tcp.connection.rst
Find SYNs without SYN/ACKs
To find streams that failed to establish a connection:
- Filter to
tcp.flags.syn == 1 - Click Statistics } Conversations
- Check
Limit to display filter - Select the
TCPtab - Conversations with outgoing SYNs but no incoming SYNs may be suspects (except for those at the end of the capture). Conversations with greater than 1 SYN may also be suspects of retransmissions during connect.
Analyzing Sequence Numbers
For a particular stream, the
relative sequence number (tcp.seq) on a packet represents
how many bytes of TCP data have been sent since the start of the socket.
The relative next sequence number (tcp.nxtseq) is the
expected relative sequence number of the next outbound packet which is
the current sequence number plus the current TCP payload size. This is
useful to know what to expect as the receiver's acknowledgment number
(discussed below).
In the following example, frame 23 is selected which is the first packet of an outbound HTTP request. The current relative sequence number is 1 because the socket was just established. The relative next sequence number is 399 because it will be 1 + 398 (the TCP payload size highlighted in blue).

The relative acknowledgment number (tcp.ack) represents
how many bytes have been successfully received. In the same example
stream, the ACK packet (frame 24) that's acknowledging receiving the
HTTP request has an acknowledgment number of 399 which matches the
relative next sequence number from above:

To visualize this back-and-forth, filter to a stream (e.g.
tcp.stream == 7 as in the example above), click Statistics
} Flow Graph, check "Limit to display filter", and change "Flow type" to
"TCP Flows":

Time Sequence Graph (tcptrace)
A Time Sequence Graph visualizes a TCP stream over time in one
direction. Select a packet } Wireshark Menu } Statistics } TCP Stream
Graphs } Time Sequence (tcptrace). Click Switch Direction
to change directions. The sequence number represents total bytes sent so
this is a useful way to visualize how data is sent over a stream:

The slope of the line is network throughput/bandwidth. The vertical I-beams show bytes per packet. The plot below the I-beams are the ACKs. The top plot shows the client's receive window. If there is a significant difference between plots, there may be an issue in the sending side such as an application send bottleneck or congestion algorithm throttling.
TLS Encrypted Alert
A TLS Encrypted Alert indicates a normal closure or an error:
The "close_notify" alert is used to indicate orderly closure of one direction of the connection. Upon receiving such an alert, the TLS implementation SHOULD indicate end-of-data to the application.
Error alerts indicate abortive closure of the connection (see Section 6.2).
The type and details of the alert are encrypted. If a TLS Encrypted Alert is followed by a FIN, then it is likely a normal close_notify.
Visualize TCP Response Times
There is no concept of a TCP response time. A TCP stream has two
pipes and they act independently. Some layers above TCP, such as HTTP,
do have the concept of requests and responses and thus provide fields
like http.time
which can help understand response times. Other protocols provide
filters under the Service
Response Time dialog.
Nevertheless, if your protocol does have the concept of requests and
responses but does not have a response time field (or you can't see it
because of encryption), you can approximate response times by looking at
tcp.time_delta
which is the "Time since previous frame in this TCP stream". Be careful
though when interpreting this:
- A request may be followed by an ACK-only packet before the response,
so you cannot assume that
tcp.time_deltais roughly equivalent to "time until first byte of the response". The probability of this increases with longer response times. - A request may be chunked into multiple frames in which case the
tcp.time_deltaof the response is only the time since the last frame, not necessarily since the start of the request. - A response may be chunked into multiple frames, so if you are filtering to just a response port to approximate only looking at potential response times, you may also see the time between chunks. (Relatedly, the client may be sending ACK packets between chunks.)
- If a socket is re-used (e.g. HTTP keepalive), then there may be
large
tcp.time_deltavalues which are actually idle time between requests.
With those caveats in mind, you may graph these "potential response times":
- Filter to the conversations of interest. Approximating "potential
response times" may be best done by filtering to the source port of the
server (e.g.
tcp.srcport == 80) and maybe remove handshakes, etc. - Statistics } I/O Graph
- If it's a large capture, wait for the initial load to complete (there's a small Loading progress bar in the bottom right).
- Delete the
All PacketsandTCP Errorsrows by selecting them and clicking the minus button. - In the
Filtered Packetsrow, change theY Axiscolumn toAVG(Y Field)and theY Fieldcolumn totcp.time_delta - If it's a large capture, wait for the load to complete.
- Note that the y-axis units (e.g. us, ms, s, etc.) will change based on the data.

HTTP Streams
HTTP/1.0 and HTTP/1.1 streams provide filters through http.
In particular, http.time provides the HTTP response time.
HTTP/2.0 provides filters through http2
and HTTP/3.0 provides filters through http3
although, as of this writing, neither have a time
field.
For HTTP/1.0 and HTTP/1.1, the frames are only dissected as such if traffic is non-TLS (or TLS traffic is decrypted) and the port is configured in the HTTP protocol:

Visualize HTTP Response Times
- Filter to
http.timeto ensure HTTP dissection is working (see details in the HTTP Streams section). - Statistics } I/O Graph
- If it's a large capture, wait for the initial load to complete (there's a small Loading progress bar in the bottom right).
- Delete the
All PacketsandTCP Errorsrows by selecting them and clicking the minus button. - In the
Filtered Packetsrow, change theY Axiscolumn toAVG(Y Field)and theY Fieldcolumn tohttp.time - If it's a large capture, wait for the load to complete.
- Note that the y-axis units (e.g. us, ms, s, etc.) will change based on the data.

Finding problems or delays in the network
- Use filters like
tcp.time_delta > 1where the number is in seconds although note there may be normal delays for idle, keepalive sockets, for example. - Ensure all suspect servers have synchronized clocks (NTP, etc.).
- Run a few minutes of pings and note the average latency between servers.
- Capture network trace from both servers. The network trace should include both incoming and outgoing packets, to and from the other servers. If they are unidirectional, it turns out merging network traces from two different servers is very dangerous. Basically, a lot of information such as DUP ACKs, etc., is inferred from the sequence of packets, and combining multiple systems' traces can have unintended consequences. In my case, it actually generated TCP retransmits when they did not exist.
- In Wireshark
- Select View } Time/Display Format } Date and Time of Day
- Also, add a column for "Delta time (Displayed)"
- Open the first capture. Basically, we will use the
frame.time_delta_displayedcolumn we added above to find the delays. However, the column is non-sensical with interleaved TCP streams. So what you have to do is basically filter by each stream (using either "Follow TCP stream" on a suspect packet, or finding all unique src/destination port combos, etc.). - Once you have a single TCP stream, then the
frame.time_delta_displayedis the time between packets on that stream. Sort by this column, descending. - If there are any big delays (larger than the max latency), then note a few of those frames. Re-sort by frame number and see what was happening right before that frame.
- Note that a TCP "stream" within a TCP "conversation" is just the unique combination of Source IP, Source Port, Destination IP, and Destination Port. TCP is multiplexing so multiple sockets can be opened between two IPs. What this also means is that if the communication stream is persistent (e.g. connection pooling), then the stream is never torn down (FIN } FIN/ACK } ACK), so there may be large gaps between packets on that stream which may just be the time between two units of work on that stream.
- Note any errors within Wireshark. Research each error carefully as some may be benign (e.g. TCP Checksum Offloading).
- Do the same thing on the other end and compare the time stamps. Remember that the timestamps in a packet capture are the time at which the capturer is handed the packet. For an outgoing packet, this occurs before the packet hits the NIC. For an incoming packet, this occurs after the packet has been processed by the NIC and handed off to the kernel.
- Any time difference between when server A receives the response from server B (from server A's packet capture), and when server B sends the pack to server B (from server B's packet capture) would be the latency. Any other time would mean the time taken to process on server B.
- Also, to find any clock difference, pick any TCP conversation handshake. The SYN/ACK must come after the SYN and before the ACK, so you can shift one packet capture or the other (using editcap -t) to line up with the other. For example, when server B is sending the SYN/ACK and it is behind the SYN, use the following to time shift server B's packet capture: (((ACK - SYN) / 2) + SYN) - (SYNACK)
Finding gaps within an IP conversation in a network capture
- https://www.wireshark.org/docs/dfref/f/frame.html
frame.time_delta} Time delta between the current packet and the previous packet in the capture (regardless of any display filters).frame.time_delta_displayed} Time delta between the current packet and the previous packet in the current display.frame.time_relative} Time delta between the current packet and the first packet in the capture (regardless of any display filters), or if there is a time reference, that reference time.
- To find gaps within an IP conversation:
- First add
frame.time_delta_displayedcolumn: Edit } Preferences } User Interface } Columns } Add } Field Type = Delta Time Displayed. - To find gaps, apply some logical grouping to the packets so that they are all related, e.g. right click on the SYN of the incoming/outgoing packet and click "Follow TCP Stream." Close the window that pops up and now Wireshark is filtered to that particular tcp stream (e.g. "tcp.stream eq 5"). (This could also be done just with the conversation, not just the stream).
- The Delta Time Displayed is the delta time between that packet and the previous packet in that stream -- i.e. the gap between packets in that conversation.
- Another interesting thing to do is to colorize large differences in
frame.time_delta_displayed: View } Coloring Rules } New } Filter:
frame.
time_delta_displayed >= .1
- First add
- The following tshark Lua script searches network packet captures for anomalous TCP delays in handshakes (long response time to a SYN, response not a SYN/ACK, missing response to a SYN, duplicate SYN) and delays between packets after a handshake. The latter is disabled by default because connections are often re-used, so there may be legitimate delays between the end of one part of a conversation and the beginning of another, so that requires more delicate analysis.
TCP Checksum Offloading Errors
TCP Checksum Offloading: Checksum offloading is when the OS network driver does not perform a checksum, but instead fills the checksum with 0 or garbage, and then "offloads" the checksum processing to the physical NIC card which then itself does the checksum and puts it in the packet before sending it off. Thus a capture will get a garbage checksum. Checksum offloading errors within Wireshark are only benign if the packets are outgoing. Two ways to avoid are: 1) turn off the OS checksum offloading (not always possible or simple, and could significantly impact performance), or 2) turn off checksum validation in Wireshark. For 2: Edit } Preferences } Protocols } TCP } Uncheck "Check the validity of the TCP checksum when possible."
- https://www.wireshark.org/docs/wsug_html_chunked/ChAdvChecksums.html
- https://www.wireshark.org/faq.html#q11.1
- https://wiki.wireshark.org/TCP_Checksum_Verification
- https://wiki.wireshark.org/TCP_Reassembly
tshark
Example usage:
TCP packets:
TZ=UTC tshark -t ud -T fields -e frame.number -e _ws.col.Time -e ip.src -e tcp.srcport -e ip.dst -e tcp.dstport -e tcp.stream -e frame.len -e _ws.col.Protocol -e _ws.col.Info -r *pcap*Apply a filter using -Y
TCP Handshakes
TZ=UTC tshark -t ud -T fields -e frame.number -e _ws.col.Time -e ip.src -e tcp.srcport -e ip.dst -e tcp.dstport -e tcp.stream -e frame.len -e _ws.col.Protocol -e _ws.col.Info -r *pcap* -Y "tcp.flags.syn == 1"Retransmitted TCP handshakes:
TZ=UTC tshark -t ud -T fields -e frame.number -e _ws.col.Time -e ip.src -e tcp.srcport -e ip.dst -e tcp.dstport -e tcp.stream -e frame.len -e _ws.col.Protocol -e _ws.col.Info -r *pcap* -Y "tcp.flags.syn == 1 && tcp.analysis.retransmission"Search for raw bytes
For example, let's say the Java Class Libraries are used to send an
encrypted HTTP POST as seen in -Djavax.net.debug=all
output:
[5/8/24 1:04:09:851 UTC] 000000ae id=00000000 SystemOut O javax.net.ssl|FINE|AE|Default Executor-thread-110|2024-05-08 01:04:09.840 UTC|Thread.java:1178|Plaintext before ENCRYPTION (
0000: 50 4f 53 54 20 2f 69 6e 73 74 61 6e 63 65 73 2f POST..instances.
[...]
[5/8/24 1:04:09:886 UTC] 000000ae id=00000000 SystemOut O javax.net.ssl|FINE|AE|Default Executor-thread-110|2024-05-08 01:04:09.875 UTC|Thread.java:1178|Raw write (
0000: 17 03 03 09 31 00 00 00 00 00 00 00 01 9f 70 9e ....1.........p.
[...]Then we can search for the first bytes of the
Raw write:
$ TZ=UTC tshark -t ud -T fields -e frame.number -e _ws.col.Time -e ip.src -e tcp.srcport -e ip.dst -e tcp.dstport -e tcp.stream -e frame.len -e _ws.col.Protocol -e _ws.col.Info -r liberty.pcapng -Y "frame contains 170303093100000000000000019f709e"
9714 2024-05-08 01:04:09.764567 192.168.1.161 59969 173.223.234.52 443 52 1514 TCP [TCP segment of a reassembled PDU]DNS response times greater than 10ms
TZ=UTC tshark -t ud -T fields -e frame.number -e _ws.col.Time -e ip.src -e ip.dst -e frame.len -e dns.time -e _ws.col.Protocol -e _ws.col.Info -r *pcap* -Y "dns.time >= 0.01"capinfos
To get basic statistics for a pcap file:
$ TZ=UTC capinfos *pcap
File name: [...].pcap
File type: Wireshark/tcpdump/... - pcap
File encapsulation: Linux cooked-mode capture
File timestamp precision: microseconds (6)
Packet size limit: file hdr: 262144 bytes
Number of packets: 1,326 k
File size: 763 MB
Data size: 742 MB
Capture duration: 3504.180516 seconds
First packet time: 2024-01-30 11:42:32.725851
Last packet time: 2024-01-30 12:40:56.906367
Data byte rate: 211 kBps
Data bit rate: 1,694 kbps
Average packet size: 559.78 bytes
Average packet rate: 378 packets/s
SHA256: [...]
RIPEMD160: [...]
SHA1: [...]
Strict time order: False
Number of interfaces in file: 1
Interface #0 info:
Encapsulation = Linux cooked-mode capture (25 - linux-sll)
Capture length = 262144
Time precision = microseconds (6)
Time ticks per second = 1000000
Number of stat entries = 0
Number of packets = 1326022editcap
editcap: https://www.wireshark.org/docs/man-pages/editcap.html
Split packet capture by time
Example of 1 minute per file:
editcap -i 60 input.pcap output.pcapLua Scripts
tshark supports Lua scripts to perform automated analysis.
$ cat file.lua
print("hello world!")
$ tshark -X lua_script:file.luaExample scripts:
Decrypt SSL/TLS Traffic
Using a Log File with Per-Session Secrets
Decrypting Java TLS Traffic
For Wireshark to decrypt TLS communications in a network trace for
any modern TLS cipher suite (i.e. ephemeral key exchange/non-RSA), it
needs either the client or server to log per-session secret keys to a
de-facto standard NSS
Key Log file which is then configured in
Wireshark or embedded in the network capture with
editcap --inject-secrets. This NSS Key Log file output is
implemented in various programs and libraries most often by launching
the executable with the environment variable SSLKEYLOGFILE
set to a file path. Programs and libraries offering support include curl,
OpenSSL, libressl, BoringSSL, GnuTLS, wolfSSL, some builds of
Firefox, some builds of Chrome, and others.
In older versions of Java, -Djavax.net.debug=ssl,keygen
trace would print the client nonce and master secret which could be
converted to the NSS Key Log file format. However, newer versions of
Java seem to have eliminated this as part of the transition to TLS1.3
where the entire javax.net.debug logging code was
overhauled.
Amazon submitted a patch to add NSS Key
Log file support for the request for
enhancement with a -Djavax.net.debug.keylog option but
this was denied because a compatibility and
specification request (CSR) was required, there were some
suggestions of architecting the solution to make it more generic
(arguably, over-architecting for a purely diagnostic function), and
there were also some
concerns
about security although these do
not make much sense because -Djavax.net.debug already
supports logging fully decrypted data. Therefore, the pull request
languished and, as it stands in 2024, although
-Djavax.net.debug can write fully decrypted data, there are
no capabilities in Java to print the required secrets for decryption of
network traces for modern TLS cipher suites.
There are some open source Java agents that may be used at startup or
attached dynamically to add such output such as https://github.com/neykov/extract-tls-secrets
(Apache 2.0 license). Alternatively, if the other half of the
communication is non-Java based (e.g. a client web browser), then it
might be possible to enable SSLKEYLOGFILE there or simply
use a browser's network console to capture traffic and then export to a
HAR file.
Another approach is to use -Djavax.net.debug=all and
then find the raw encrypted writes in the resulting log file and search
for the raw bytes in the network capture and correlate by time.
Using SSLKEYLOGFILE
Some builds of programs and libraries such as Firefox, Chrome,
curl and others support the SSLKEYLOGFILE
environment variable which is a path to a log file that is created by
said programs with per-session secret information on each SSL/TLS
transaction that can be used by Wireshark to decrypt traffic.
- When using a browser, ensure that all instances of the browser program are first closed.
- Open a terminal or command prompt and set
SSLKEYLOGFILEto some file. For example, Linux/macOS:
Or Windows:export SSLKEYLOGFILE=/tmp/tlssecrets.logset SSLKEYLOGFILE=C:\tlssecrets.log - Launch the browser from the terminal or command prompt. For example,
Linux:
macOS:firefox
Windows:open -a Firefox"C:\Program Files\Mozilla Firefox\firefox.exe" - Start the network trace
- Navigate to the server to reproduce the problem.
- If sending to support, send both the network trace output and the
SSLKEYLOGFILE file. Optionally, you may embed the SSLKEYLOGFILE file
into the capture with:
editcap --inject-secrets tls,tlssecrets.log original.pcap original_with_secrets.pcapng
To analyze and decrypt the network trace:
- If the SSLKEYLOGFILE has not been embedded, in Wireshark, set the path in Preferences } Protocols } TLS } (Pre)-Master-Secret log filename
Ports and Heuristics
In general, Wireshark uses two mechanisms to decide whether a protocol dissector should dissect packets: ports and heuristics.
Ports are usually specified on a per-protocol basis under Edit } Preferences } Protocols. For example, if HTTP traffic is running on a "non-standard" port, you may add the additional ports to the HTTP protocol.
Heuristics are optionally implemented by protocols to guess that a stream is of the protocol's type. Some protocols do not expose an option to disable their heuristic, in which case the protocol may be disabled under Analyze } Enabled Protocols.
Working with Wireshark Source
Launching Wireshark in GDB:
$ libtool --mode=execute gdb -ex=run -ex=quit ./wireshark
$ libtool --mode=execute gdb -ex=run -ex=quit --args ./wireshark file.pcap
$ libtool --mode=execute gdb -ex=run -ex=quit --args ./wireshark -R 'tcp.stream == 3' file.pcapAbort on a dissector bug:
export WIRESHARK_ABORT_ON_DISSECTOR_BUG=1Custom Dissector
For a template, see doc/packet-PROTOABBREV.c. To compile
into Wireshark, add the file into epan/dissectors, and add
its name to DISSECTOR_SRC in
epan/dissectors/Makefile.common. See
doc/README.developer and
doc/README.dissector.
IBM Interactive Diagnostic Data Explorer
The IBM Interactive Diagnostic Data Explorer (IDDE) tool is no longer actively maintained. Instead, use the command line jdmpview tool from IBM Java or OpenJ9.
IBM Support Assistant (ISA)
IBM Support Assistant (ISA) 5 provides a case management system along with various diagnostic tools. ISA is an "as-is" tool with best effort support through esupport@us.ibm.com. Some of the bundled tools are not as recent as direct downloads of the latest versions from each tool's downlod page.
Installation
Use the Download link
Log Analysis
ISA 5 includes a log analysis engine called Phase 1 Problem Determination (P1PD) that finds common warnings and errors and proposes various solutions through the "Scan Logs" button:
- In the top left, click Cases > Add
- Enter a Summary and click the green checkbox
- Click the "< Cases" button at the top right of the pop-up to hide it
- Your case should now be selected in the cases dropdown box
- In the Files tab, click the Add files button and select any log files such as SystemOut.log, a ZIP file of logs, etc.
- If you uploaded a ZIP file, right click it and select Unpack
- Click the "Scan this Case" button in the top right and click Submit
- Once the scan completes, click the "Overview" and "Symptoms" tabs to review the log analysis.
Starting ISA5
Run the
start_isa.batorstart_isa.shscript in the ISA5 installation directory. The script will start three different WebSphere Liberty Java processes for ISA and some tools. When the script prints,Press ENTER to finish..., you may pressENTERand the start script will finish. PressingENTERwill not stop the servers (there's a separatestop_isa.bat/stop_isa.shscript for that). So, feel free to pressENTER; nothing will happen and you'll get your terminal back or close the window.
Open a browser and go to http://localhost:10911/isa5 (replace
localhostwith the target hostname if running remotely)You may create cases and upload and interact with files, or you may immediately run tools through the Tools tab. For example:

Java Web Start Tools
All of the tools with [Desktop] in the name are GUI
tools launched through Java Web Start. When first launching each tool,
you may receive a warning such as the following which you can click
Continue through:

There may be long delays while launching tools using JWS. On some versions of Linux, there is a known issue, seemingly with SWT-based applications such as HealthCenter, where the program becomes hung and never launches. It appears this is a race condition in SWT and it is usually worked around by enabling the Java Console in the Java ControlPanel application of the Java on the path.
Specifying the Java Maximum Heap Size
Most of the Desktop JWS tools allow you to specify the maximum Java heap size in a small browser popup overlay when launching the tool:

gnuplot
This cookbook references scripts that use the open source gnuplot tool to generate graphs: http://www.gnuplot.info/
graphcsv.gpi
The primary gnuplot script used is at https://raw.githubusercontent.com/kgibm/problemdetermination/master/scripts/gnuplot/graphcsv.gpi
This is combined with the following script to generate the multiplot commands: https://raw.githubusercontent.com/kgibm/problemdetermination/master/scripts/gnuplot/graphcsv.sh
Some common things you may consider changing:
- Uncomment the following line in graphcsv.gpi to produce a text-based
graph to the console:
#set terminal dumb - Uncomment the following lines in graphcsv.gpi to produce a
PNG:
#set terminal png
#set output "output.png" - Remove "pause -1" from graphcsv.sh to disable the requirement to hit Ctrl+C after the graph is produced (this is particularly useful for #1 and #2 above)
Test Graphing
Test graphing with the following set of commands:
$ cat > data.csv
Time (UTC),CPU,Runqueue,Blocked,MemoryFree,PageIns,ContextSwitches,Wait,Steal
2014-10-15 16:12:11,20,0,0,12222172,0,2549,0,0
2014-10-15 16:12:12,27,1,0,12220732,0,3619,0,0
2014-10-15 16:12:13,30,0,0,12220212,0,2316,0,0
Ctrl+D
$ gnuplot -e "\
> set timefmt '%Y-%m-%d %H:%M:%S';
> set xdata time;
> set style data lines;
> set format y '%.0f';
> set datafile sep ',';
> set key autotitle columnhead;
> set multiplot layout 4,2 scale 1.0,0.8;
> plot 'data.csv' using 1:2;
> plot 'data.csv' using 1:3;
> plot 'data.csv' using 1:4;
> plot 'data.csv' using 1:5;
> plot 'data.csv' using 1:6;
> plot 'data.csv' using 1:7;
> plot 'data.csv' using 1:8;
> plot 'data.csv' using 1:9;
> unset multiplot;
> pause -1;"
Warning: empty y range [0:0], adjusting to [-1:1]
Warning: empty y range [0:0], adjusting to [-1:1]
Warning: empty y range [0:0], adjusting to [-1:1]
Warning: empty y range [0:0], adjusting to [-1:1]Example output:

For a simpler, one-plot graph:
$ gnuplot -e "\
> set timefmt '%Y-%m-%d %H:%M:%S';
> set xdata time;
> set style data lines;
> set format y '%.0f';
> set datafile sep ',';
> set key autotitle columnhead;
> plot 'data.csv' using 1:2;
> pause -1;"Output:

Python
Python is a dynamic programming language particularly suited for mathematical applications (similar to the R Project).
Starting an Interactive Python Session
Start an interactive python session with the command
python from a terminal. In some environments, both python
version 2 and version 3 are installed, and the command
python3 should be used to ensure the latest Python is
used.
$ python
Python 3.9.10 (main, Jan 15 2022, 11:48:04)
[Clang 13.0.0 (clang-1300.0.29.3)] on darwin
Type "help", "copyright", "credits" or "license" for more information.
>>> print("Hello World")
Hello World
>>> Use the command quit() to exit.
Seaborn
Seaborn
is one useful graphing library. Install with
pip install seaborn.
Histogram
histplot
creates a histogram.
import seaborn as sns
import matplotlib
import matplotlib.pyplot as plt
import pandas as pd
sns.set_theme()
column = "flipper_length_mm"
data = sns.load_dataset("penguins")
# data = pd.read_csv("data.csv")
# data = pd.DataFrame(data={column: [0,1,2]})
axes = sns.histplot(data, x=column, kde=True)
axes.ticklabel_format(style='plain')
axes.get_xaxis().set_major_formatter(matplotlib.ticker.StrMethodFormatter('{x:,.0f}'))
axes.get_yaxis().set_major_formatter(matplotlib.ticker.StrMethodFormatter('{x:,.0f}'))
plt.xticks(rotation=45)
plt.tight_layout()
plt.savefig('image.png')
plt.show()Empirical Cumulative Distribution Function
ecdfplot
creates an empirical
Cumulative Distribution Function (eCDF) graph.
import seaborn as sns
import matplotlib
import matplotlib.pyplot as plt
import pandas as pd
sns.set_theme()
column = "flipper_length_mm"
data = sns.load_dataset("penguins")
# data = pd.read_csv("data.csv")
# data = pd.DataFrame(data={column: [0,1,2]})
axes = sns.ecdfplot(data, x=column)
axes.ticklabel_format(style='plain')
axes.get_xaxis().set_major_formatter(matplotlib.ticker.StrMethodFormatter('{x:,.0f}'))
axes.get_yaxis().set_major_formatter(matplotlib.ticker.StrMethodFormatter('{x:,.0f}'))
plt.xticks(rotation=45)
plt.tight_layout()
plt.savefig('image.png')
plt.show()R Project
This cookbook may generate graphs and calculate statistics using the free R project: http://www.r-project.org/.
This cookbook originally predominantly used the R project along with the xts and zoo libraries, but there have been some major regressions in the xts library and at the time of this writing, it was in the process of a major overhaul. After some research, the general approach has switched from R to gnuplot. R is still great for its statistical capabilities, and gnuplot has a lot of warts, particularly around margins with multiplot, de-duplicating X-axes, etc., but gnuplot is a solid tool that's been around for a while and the core of it is suited for the cookbook's simple needs. Perl scripts continue to do the heavy lifting of converting raw data into a CSV so it's often just a matter of passing the CSVs to gnuplot instead of R.
R is designed to work on Unix, Windows, and Mac. R is normally distributed with operating system package managers (e.g. "yum install R" with epel.repo enabled=1 in RHEL), or you can download binary or source packages from https://cran.rstudio.com/.
To run R from the command line, simply type R and you'll be in a read-evaluate-print-loop (REPL). Some basic commands you'll need:
- q() to quit (usually type 'n' to discard the workspace)
- ?CMD to get help on CMD
We'll be using some external packages so the first time you use R, you'll need to install them:
> install.packages(c("xts", "xtsExtra", "zoo", "txtplot"), repos=c("http://cran.us.r-project.org","http://R-Forge.R-project.org"))R has its own package management system and this will download the specified third party packages from the web.
Install Package from Source
> install.packages("http://download.r-forge.r-project.org/src/contrib/xtsExtra_0.0-1.tar.gz", repos=NULL, type="source")Another example:
$ svn checkout --revision 850 svn://svn.r-forge.r-project.org/svnroot/xts/
$ R
> install.packages("xts/pkg/xts", repos=NULL, type="source")
> install.packages("xts/pkg/xtsExtra", repos=NULL, type="source")Graphing CSV Data
An example script is provided which graphs arbitrary time series data in a comma separated value (CSV) file using plot.xts. The script expects the first column to be a time column in the following format: YYYY-MM-DD HH:MM:SS
For example, with the following CSV file:
Time, Lines, Bytes
2014-12-04 13:32:00, 1043, 12020944
2014-12-04 13:33:00, 212, 2737326
2014-12-04 13:34:00, 604, 139822275
2014-12-04 13:35:00, 734, 190323333
2014-12-04 13:36:00, 1256, 126198301
2014-12-04 13:37:00, 587, 72622048
2014-12-04 13:38:00, 1777, 237571451Optionally export environment variables to control the output:
$ export INPUT_TITLE="Data"
$ export INPUT_PNGWIDTH=600
$ export INPUT_PNGHEIGHT=300
$ export TZ=UTCRun the example script with the input file:
$ git clone https://github.com/kgibm/problemdetermination
$ R --silent --no-save -f problemdetermination/scripts/r/graphcsv.r < test.csvThe script generates a PNG file in the same directory:

Package Versions
Display loaded package versions:
> library(xts, warn.conflicts=FALSE)
> library(xtsExtra, warn.conflicts=FALSE)
> sessionInfo()
R version 3.1.2 (2014-10-31)
Platform: x86_64-redhat-linux-gnu (64-bit)
...
attached base packages:
[1] stats graphics grDevices utils datasets methods base
other attached packages:
[1] xtsExtra_0.0-1 xts_0.9-7Test Graphing
Test graphing with the following set of commands:
$ R
library(zoo)
library(xts)
library(xtsExtra)
sessionInfo()
timezone = "UTC"
Sys.setenv(TZ=timezone)
sampleData = "Time (UTC),CPU,Runqueue,Blocked,MemoryFree,PageIns,ContextSwitches,Wait,Steal
2014-10-15 16:12:11,20,0,0,12222172,0,2549,0,0
2014-10-15 16:12:12,27,1,0,12220732,0,3619,0,0
2014-10-15 16:12:13,30,0,0,12220212,0,2316,0,0"
data = as.xts(read.zoo(text=sampleData, format="%Y-%m-%d %H:%M:%S", header=TRUE, sep=",", tz=timezone))
plot.xts(data, main="Title", minor.ticks=FALSE, yax.loc="left", auto.grid=TRUE, nc=2)Common Use Case
> options(scipen = 999)
> x = read.csv("tcpdump.pcap.csv")
> x = na.omit(x[,"tcp.analysis.ack_rtt"])
> summary(x)
Min. 1st Qu. Median Mean 3rd Qu. Max.
0.0000020 0.0000050 0.0000070 0.0001185 0.0002290 0.1222000
> sum(x)
[1] 58.69276
> length(x)
[1] 306702
> quantile(x, 0.99)
99%
0.000388
> plot(density(x[x < quantile(x, 0.99)]))Example graphing mpmstats data
As an example, this will show how to graph IBM HTTP Server mpmstats data. This is a very simple but powerful httpd extension that periodically prints a line to error_log with a count of the number of threads that are ready, busy, keepalive, etc. Here's an example:
[Wed Jan 08 16:59:26 2014] [notice] mpmstats: rdy 48 bsy 3 rd 0 wr 3 ka 0 log 0 dns 0 cls 0
The default interval is 10 minutes although I recommend customers set it to 30 seconds or less. Typically, look at bsy as this is an indication of the number of requests waiting for responses from WAS.
First, we'll convert this into CSV format using sed:
OUTPUT=error_log.csv; echo Time,rdy,bsy,rd,wr,ka,log,dns,cls > ${OUTPUT}; grep "mpmstats: rdy " error_log | sed -n "s/\[[^ ]\+ \([^ ]\+\) \([0-9]\+\) \([^ ]\+\) \([0-9]\+\)\] \(.*\)/\1:\2:\4:\3 \5/p" | tr ' ' ',' | cut -d "," -f 1,5,7,9,11,13,15,17,19 >> ${OUTPUT};Example:
Time,rdy,bsy,rd,wr,ka,log,dns,cls
Jan:08:2014:16:59:26,48,3,0,3,0,0,0,0
Now, we're ready to pipe error_log.csv into an R script that generates a PNG graph and an ASCII art graph. Here is the script (save as mpmstats.r):
require(xts, warn.conflicts=FALSE)
require(xtsExtra, warn.conflicts=FALSE)
require(zoo, warn.conflicts=FALSE)
require(txtplot, warn.conflicts=FALSE)pngfile = "output.png"
pngwidth = 600
asciiwidth = 120mpmtime = function(x, format) { as.POSIXct(paste(as.Date(substr(as.character(x),1,11), format="%b:%d:%Y"), substr(as.character(x),13,20), sep=" "), format=format, tz="UTC") }
data = as.xts(read.zoo(file="stdin", format = "%Y-%m-%d %H:%M:%S", header=TRUE, sep=",", FUN = mpmtime))
x = sapply(index(data), function(time) {as.numeric(strftime(time, format = "%H%M"))})
txtplot(x, data[,2], width=asciiwidth, xlab="Time", ylab="mpmstats bsy")
png(pngfile, width=pngwidth)
plot.xts(data, main="mpmstats", minor.ticks=FALSE, yax.loc="left", auto.grid=TRUE, ylim="fixed", nc=2)
And we run like so:
$ cat error_log.csv | R --silent --no-save -f mpmstats.r 2>/dev/nullThis produces the following ASCII art graph. The x-axis requires integers so we convert the time into HHMM (hours and minutes of the day on a 24 hour clock).
If you only wanted bsy in the graph, just take a subset of data in the plot.xts line:
plot.xts(data[,2:2], main...
Apache Bench
httpd and IHS ship with a cool little command line utility called Apache Bench (ab). At its simplest, you pass the number of requests you want to send (-n), at what concurrency (-c) and the URL to benchmark. ab will return various statistics on the responses (mean, median, max, standard deviation, etc.). This is really useful when you want to "spot check" backend server performance or compare two different environments, because you do not need to install complex load testing software, and since IHS usually has direct access to WAS, you do not have to worry about firewalls, etc.
Below is an example execution.
$ cd $IHS/bin/
$ ./ab -n 1000 -c 10 http://ibm.com/
This is ApacheBench, Version 2.0.40-dev <$Revision: 16238 $> apache-2.0
Copyright 1996 Adam Twiss, Zeus Technology Ltd, http://www.zeustech.net/
Copyright 2006 The Apache Software Foundation, http://www.apache.org/
Benchmarking ibm.com (be patient)
Completed 100 requests
Completed 200 requests
Completed 300 requests
Completed 400 requests
Completed 500 requests
Completed 600 requests
Completed 700 requests
Completed 800 requests
Completed 900 requests
Finished 1000 requests
Server Software: IBM_HTTP_Server
Server Hostname: ibm.com
Server Port: 80
Document Path: /
Document Length: 227 bytes
Concurrency Level: 10
Time taken for tests: 22.452996 seconds
Complete requests: 1000
Failed requests: 0
Write errors: 0
Non-2xx responses: 1000
Total transferred: 455661 bytes
HTML transferred: 227000 bytes
Requests per second: 44.54 [#/sec] (mean)
Time per request: 224.530 [ms] (mean)
Time per request: 22.453 [ms] (mean, across all concurrent requests)
Transfer rate: 19.77 [Kbytes/sec] received
Connection Times (ms)
min mean[+/-sd] median max
Connect: 101 107 4.1 106 136
Processing: 107 115 6.0 114 186
Waiting: 106 115 5.9 114 185
Total: 208 223 7.3 221 292
Percentage of the requests served within a certain time (ms)
50% 221
66% 224
75% 226
80% 228
90% 232
95% 237
98% 245
99% 247
100% 292 (longest request)The key things to look at are:
- Time taken for tests: This is how long it took for all requests finish. When comparing two environments, if your mean and median are similar but total time is worse in one case, this may suggest queueing effects.
- Failed requests, write errors, and Non-2xx responses: These may indicate some problem. See below for a caveat on "Failed requests."
- Requests per second: Throughput.
- Total: Look at min, mean, median, max and sd (standard deviation). Usually the mean is the place to start.
- Percentage of the requests served within a certain time: Response times on a percentile basis. Many customers look at 95%, but this is arbitrary and usually based on what percentage of requests are expected to have errors or do weird behavior.
Some important notes:
ab has odd behavior in that it counts requests with varying Content-Length headers as "Failed requests" due to "length;" for example:
Complete requests: 200 Failed requests: 199 (Connect: 0, Length: 199, Exceptions: 0)It is common to have different content lengths, so usually this can be disregarded (only if the "Length" number counts all the "failed" requests). There is a patch for this, but it has never made it into the core code: https://issues.apache.org/bugzilla/show_bug.cgi?id=27888.
Non-2xx responses may or may not be okay. HTTP status codes are usually okay if they are 304 (Not Modified), for example. They are usually not okay if they are 4xx or 5xx. To get details on the response code, use "-v 2" which will print a warning for non-2xx response codes and list what the code was.
ab is not a browser, so when you request a page, ab will not fetch any resources within the page such as images, scripts, iframes, etc.
awk
awk is a POSIX standard tool to do line-by-line manipulation of text. For example, to print the 4th column in all piped-in lines:
$ cat input | awk '{print $4}'Pre-defined Variables
Records:
awksplits the input into records using the record separator (RS). This defaults to a newline (\n) meaning each line is a record.$0represents the entire record.
Fields:
- Each record (
$0) is split into fields using the field separator (FS). - The field separator
FSdefaults to whitespace. It may be changed withawk -F $SEPor withFS="$SEP"during execution (most often in aBEGINblock). POSIXawkonly supports a single-characterFS. $Nrepresents theN-th field for each line starting with$1being the first field and so on.NFrepresents the number of fields. This may be used in expressions. For example, the last field is$(NF), the second-to-last is$(NF-1)and so on.- Any time
$0is modified, the fields are re-calculated. For example,gsub(/"/, "");affects$0since no third parameter is specified, removes double quotes from$0, and re-calculates the fields.
Basic capabilities
- Arithmetic functions
- Strings are concatenated with whitespace instead of an operator. For
example, to append a period:
mystr = mystr "."; - There is no concept of
NULL, so to unset a variable, just set it to a blank string (this will evaluate to false in anif):myvar = "";; - awk assigns by value instead of by reference, so to duplicate a
string, just assign to a new variable; for example,
str2 = str1;. - When doing arithmetic logic (e.g.
{ if ( $1 > 5 ) { print $0; } }), always add0to the coerced string to avoid strange evaluations (e.g.{ if ( $1 + 0 > 5 ) { print $0; } }).
String functions
- String length:
length(mystr) - Split string
mystrinto arraypiecesusing a split regex:n = split(mystr, pieces, / /);withnbeing the number of resulting elements inpieces- The resulting array is 1-indexed, so the first piece is
pieces[1].
- The resulting array is 1-indexed, so the first piece is
- Find all instances of a regex in a string and replace:
gsub(/regex/, "replace", string); - Return a substring of string starting from a 1-based index position:
newstring = substr(string, i);- A third parameter may be specified for the maximum substring length.
- Find 1-based index of the position of the first match of regex in a
string or 0 if not found:
i = match(string, regex); - Trim whitespace:
function trimWhitespace(str) { gsub(/[ \t\n\r]+/, "", str); return str; }
Arrays
- Associative arrays don't need to be initialized:
mymap["key"]="value"; - Array length:
function arrayLength(array) { l = 0; for (i in array) l++; return l; } - Loop through an array:
for (key in array) { item=array[key]; }- If the array was created from
split, looping through may not be in order, so instead do:l=arrayLength(pieces); for (i=1; i<=l; i++) { item=array[i]; }
- If the array was created from
- To clear an array:
delete myarray; - If an array is created from a function such as
split, then "indexing into it" starts at 1:split("1,2,3", pieces, /,/); print pieces[1]; - Awk cannot return an array from a function. Instead, use a global variable (and delete the array at the beginning of the function).
- POSIX awk has limited support for multi-dimensional arrays; however,
you can add some additional loops:
function array2d_tokeys(array) { delete a2d2k; for (key in array) { split(key, pieces, SUBSEP); if (length(a2d2k[pieces[1]]) == 0) { a2d2k[pieces[1]] = pieces[2]; } else { a2d2k[pieces[1]] = a2d2k[pieces[1]] SUBSEP pieces[2]; } } } function array2d_print_bykeys(original_array, a2d2k_array) { for (key in a2d2k_array) { split(a2d2k_array[key], pieces, SUBSEP); for (piecesKey in pieces) { print key "," pieces[piecesKey] " = " original_array[key, pieces[piecesKey]]; } } } function play() { my2darray["key1", "subkey1"] = "val1"; my2darray["key1", "subkey2"] = "val2"; my2darray["key2", "subkey1"] = "val3"; my2darray["key2", "subkey2"] = "val4"; array2d_tokeys(my2darray); array2d_print_bykeys(data, a2d2k); }
Tips
POSIX awk
gsubdoesn't support backreferences other than the entire match. However, you can accomplish this with multiple statements by replacing with something unique which then you search for. For example, in the string "01/01/2020:00:00:00", to replace the first colon with a space:gsub(/\/....:/, "&@@", $0); gsub(/:@@/, " ", $0); print $0;Get current file name (or
-forstdin):FILENAMEGet line number for the current file:
FNRRun something at the beginning of each file:
FNR == 1 { print; }Run something at the end of each file:
FNR == 1 { if (!firstFNR) { firstFNR = 1; } else { endOfFile(0); } fname = FILENAME; } END { endOfFile(1); } function endOfFile(lastFile) { print("Finished " fname); if (lastFile) { print("Finished all files"); } }Get line number for all processed lines so far:
NRPrint something to
stderr:print("WARNING: some warning") > "/dev/stderr";Change the return code:
END { exit 1; }Skip blank lines:
NF > 0Execute a shell command based on each line:
{ system("ip route change " $0 " quickack 1"); }Execute a shell command and read results into a string variable:
cmd = "uname"; cmd | getline os; close(cmd);Don't process remaining patterns for a line ("The next statement shall cause all further processing of the current input record to be abandoned"):
/pattern1/ { # do some processing print; next; # don't run the catch-all pattern } { print; }A common way to send a list of files to
awkis withfind; for example,find . -type f -print0 | xargs -0 ~/myscript.awk. However,xargsis limited in how many arguments it can pass to the program; if the limit is exceeded,xargsexecutes the program multiple times thus theawkscript cannot store global state for all files or execute a singleBEGINorENDblock. An alternative is to cat everything into awk (e.g.find . -type f -print0 | xargs -0 cat | ~/myscript.awk) but thenFILENAMEandFNRare lost. Instead, you can dropxargsand have the awk script modifyARGVdynamically:The arguments in ARGV can be modified or added to; ARGC can be altered. As each input file ends, awk shall treat the next non-null element of ARGV, up to the current value of ARGC-1, inclusive, as the name of the next input file. Thus, setting an element of ARGV to null means that it shall not be treated as an input file. The name '-' indicates the standard input. If an argument matches the format of an assignment operand, this argument shall be treated as an assignment rather than a file argument. \
So execution goes from:
find . -type f -print0 | xargs -0 ~/checkissues.awkTo:
find . -type f | ~/checkissues.awkHere's the awk snippet that does the ARGV modification:
# xargs allows a limited number of arguments, but POSIX awk allows # us to add files to process by adding to ARGV: # https://pubs.opengroup.org/onlinepubs/9699919799/utilities/awk.html#tag_20_06_13_03 FILENAME == "-" { ARGV[ARGC] = $0; ARGC += 1; # No need to process any of the other patterns for this line: next; }
Concatenate all lines into a single, space-delimited output
awk '{ printf("%s ", $0); } END { printf("\n"); }' $FILEParse hex string to decimal
#!/usr/bin/awk -f
# Create hex character } decimal map, e.g. hexhcars["A"] = 10, etc.
BEGIN {
for (i=0; i<16; i++) {
hexchars[sprintf("%x", i)] = i;
hexchars[sprintf("%X", i)] = i;
}
}
function trimWhitespace(str) {
gsub(/[ \t\n\r]+/, "", str);
return str;
}
# Return 1 if str is a number (unknown radix),
# 2 if hex (0x prefix or includes [a-fA-F]),
# and 0 if number not matched by regexes.
# str is trimmed of whitespace.
function isNumber(str) {
str = trimWhitespace(str);
if (length(str) > 0) {
if (str ~ /^[+-]?[0-9]+(\.[0-9]+)?([eE][+-]?[0-9]+)?$/ || str ~ /^(0[xX])?[0-9a-fA-F]+$/) {
if (str ~ /^0[xX]/ || str ~ /[a-fA-F]/) {
return 2;
} else {
return 1;
}
}
}
return 0;
}
# If str is a hexadecimal number (0x prefix optional), then return its decimal value;
# otherwise, return -1.
# str is trimmed of whitespace.
function parseHex(str) {
numResult = isNumber(str);
if (numResult == 1 || numResult == 2) {
str = trimWhitespace(str);
if (str ~ /^0[xX]/) {
str = substr(str, 3);
}
result = 0;
for (i=1; i<=length(str); i++) {
result = (result * 16) + hexchars[substr(str, i, 1)];
}
return result;
}
return -1;
}
# If str is a decimal number, then return its decimal value;
# otherwise, return -1.
# str is trimmed of whitespace.
function parseDecimal(str) {
if (isNumber(str) == 1) {
return trimWhitespace(str) + 0;
}
return -1;
}Calculate a Pearson correlation coefficient between two columns of numbers
#!/usr/bin/awk -f
# usage: pearson.awk file
# Calculate pearson correlation (r) between two columns (defaults to first two columns). This will skip any rows that have non-number values.
# Background:
# https://ocw.mit.edu/resources/res-6-012-introduction-to-probability-spring-2018/part-i-the-fundamentals/the-correlation-coefficient/
# https://ocw.mit.edu/resources/res-6-012-introduction-to-probability-spring-2018/part-i-the-fundamentals/interpreting-the-correlation-coefficient/
#
# Example:
# $ pearson.awk -v x_right=3 -v y_right=4 access_log
#
# Options:
# Column offset of X values starting from the left (1 is the first column, 2 is second, etc.):
# -v x_left=N
# Column offset of X values from the right (0 is the last column, 1 is second-to-last, etc.):
# -v x_right=N
# Column offset of Y values starting from the left (1 is the first column, 2 is second, etc.):
# -v y_left=N
# Column offset of Y values from the right (0 is the last column, 1 is second-to-last, etc.):
# -v y_right=N
# Suppress warnings about lines being skipped:
# -v suppress_skip_warnings=1
# For debugging, print out just values and those that are just numbers:
# -v debug_values=1
BEGIN {
if (ARGC == 1) {
print("ERROR: no file specified") > "/dev/stderr";
exit 1;
} else if (ARGC == 2) {
# Make sure they're not using stdin; we can't double proces that
if (ARGV[ARGC - 1] == "-") {
print("ERROR: standard file must be used instead of stdin") > "/dev/stderr";
exit 1;
}
# Duplicate the file name to process data twice: once to calculate the means and the second time
# to calculate the pearson correlation.
ARGV[ARGC] = ARGV[ARGC - 1];
ARGC++;
} else {
print("ERROR: only one file supported") > "/dev/stderr";
exit 1;
}
if (length(x_left) == 0 && length(x_right) == 0) {
x_left = 1;
} else if (length(x_left) > 0 && length(x_right) > 0) {
print("ERROR: only one of the x_left or x_right values should be specified") > "/dev/stderr";
exit 1;
}
if (length(y_left) == 0 && length(y_right) == 0) {
y_left = 2;
} else if (length(y_left) > 0 && length(y_right) > 0) {
print("ERROR: only one of the y_left or y_right values should be specified") > "/dev/stderr";
exit 1;
}
}
FNR == 1 {
file_number++;
}
function checkNumber(str) {
if (str ~ /^[+-]?[0-9]+(\.[0-9]+)?([eE][+-]?[0-9]+)?$/) {
return str + 0;
} else {
return "NaN";
}
}
function getX() {
if (x_left) {
result = $(x_left);
} else if (x_right) {
result = $(NF - x_right);
} else {
print("ERROR: invalid argument specifying X column") > "/dev/stderr";
return "NaN";
}
return checkNumber(result);
}
function getY() {
if (y_left) {
result = $(y_left);
} else if (y_right) {
result = $(NF - y_right);
} else {
print("ERROR: invalid argument specifying Y column") > "/dev/stderr";
return "NaN";
}
return checkNumber(result);
}
function areNumbers(x, y) {
return x != "NaN" && y != "NaN";
}
function skipWarn() {
if (length($0) > 0 && !suppress_skip_warnings) {
print("WARNING: skipping line " FNR " because both numbers not found: " $0) > "/dev/stderr";
}
}
# Skip blank lines or errant lines without at least two columns
NF < 2 {
if (file_number == 1) {
skipWarn();
}
next;
}
# First pass of the file: calculate sums
file_number == 1 {
x = getX();
y = getY();
if (areNumbers(x, y)) {
count++;
x_sum += x;
y_sum += y;
if (debug_values) {
print x, y;
}
} else {
skipWarn();
}
}
# First pass of the file: calculate the means at the end of the file
file_number == 2 && FNR == 1 {
x_mean = x_sum / count;
y_mean = y_sum / count;
}
# Second pass of the file: add to the variance/covariance sums
file_number == 2 {
x = getX();
y = getY();
if (areNumbers(x, y)) {
x_diff_from_mean = (x - x_mean);
x_variance_sum += x_diff_from_mean * x_diff_from_mean;
y_diff_from_mean = (y - y_mean);
y_variance_sum += y_diff_from_mean * y_diff_from_mean;
covariance_sum += x_diff_from_mean * y_diff_from_mean;
}
}
# Finally, calculate everything and print
END {
if (count > 0 && !debug_values) {
x_variance = (x_variance_sum / count);
x_stddev = sqrt(x_variance);
y_variance = (y_variance_sum / count);
y_stddev = sqrt(y_variance);
covariance = covariance_sum / count;
if (x_stddev == 0) {
print("ERROR: X standard deviation is 0") > "/dev/stderr";
exit 1;
} else if (y_stddev == 0) {
print("ERROR: Y standard deviation is 0") > "/dev/stderr";
exit 1;
}
pearson = covariance / (x_stddev * y_stddev);
printf("x sum = %.2f, count = %d, mean = %.2f, variance = %.2f, stddev = %.2f\n", x_sum, count, x_mean, x_variance, x_stddev);
printf("y sum = %.2f, count = %d, mean = %.2f, variance = %.2f, stddev = %.2f\n", y_sum, count, y_mean, y_variance, y_stddev);
printf("covariance = %.2f\n", covariance);
printf("pearson correlation coefficient (r) = %.2f\n", pearson);
printf("coefficient of determination (r^2) = %.2f\n", (pearson * pearson));
}
}IBM Memory Analyzer Tool (MAT)
This page has been moved to Eclipse Memory Analyzer Tool. The IBM MAT tool used to be a supported repackaging of Eclipse MAT; instead, use the open source Eclipse Memory Analyzer Tool along with the IBM DTFJ Eclipse Plugin to parse J9 heapdumps and core dumps.
Web Servers
Web Servers Recipe
- The maximum concurrency variables (e.g.
MaxClientsfor IHS) are the key tuning variables. Ensure such variables are not saturated through tools such asmpmstatsormod_status, while at the same time ensuring that the backend server resources (e.g. CPU, network) are not saturated (this can be done by scaling up the backend, sizing thread pools to queue, optimizing the backend to be faster, or limiting maximum concurrent incoming connections and the listen backlog). - Clusters of web servers are often used with IP sprayers or caching proxies balancing to the web servers. Ensure that such IP sprayers are doing "sticky SSL" balancing so that SSL Session ID reuse percentage is higher.
- Load should be balanced evenly into the web servers and back out to
the application servers. Compare access log hit rates for the former,
and use WAS plugin
STATStrace to verify the latter. - Review snapshots of thread activity to find any bottlenecks. For
example, in IHS, increase the frequency of
mpmstatsand review the state of the largest number of threads. - Review the keep alive timeout. The ideal value is where server
resources (e.g. CPU, network) are not saturated, maximum concurrency is
not saturated, and the average number of keepalive requests has peaked
(in IHS, review with
mpmstatsormod_status). - Check the access logs for HTTP response codes (e.g.
%sfor IHS) >= 400. - Check the access logs for long response times (e.g.
%Dfor IHS). - For the WebSphere Plugin, consider setting
ServerIOTimeoutRetry="0"to avoid retrying requests that time out due toServerIOTimeout(unlessServerIOTimeoutis very short). - Enable mod_logio and add
%^FBto LogFormat for time until first bytes of the response - Review access and error logs for any errors, warnings, or high volumes of messages.
- Check http_plugin.log for
ERROR: ws_server: serverSetFailoverStatus: Marking .* down - Use WAS plugin
DEBUGorTRACElogging to dive deeper into unusual requests such as slow requests, requests with errors, etc. Use an automated script for this analysis.
Also review the operating systems chapter.
General
"Web servers like IBM HTTP Server are often used in front of WebSphere Application Server deployments to handle static content or to provide workload management (WLM) capabilities. In versions of the WebSphere Application Server prior to V6, Web servers were also needed to effectively handle thousands of incoming client connections, due to the one-to-one mapping between client connections and Web container threads... In WebSphere Application Server V6 and later, this is no longer required with the introduction of NIO and AIO. For environments that use Web servers, the Web server instances should be placed on dedicated systems separate from the WebSphere Application Server instances. If a Web server is collocated on a system with a WebSphere Application Server instance, they will effectively share valuable processor resources, reducing overall throughput for the configuration."
Locating the web server on a different machine from the application servers may cause a significant throughput improvement (in one benchmark, 27%).
IBM HTTP Server
The IBM HTTP Server is based on the open source Apache httpd code with IBM enhancements. General performance tuning guidelines: http://publib.boulder.ibm.com/httpserv/ihsdiag/ihs_performance.html
Multi-Processing Modules (MPM)
Requests are handled by configurable multi-processing modules (MPMs) (http://publib.boulder.ibm.com/httpserv/manual70/mpm.html, http://publib.boulder.ibm.com/httpserv/manual70/mod/). The most common are:
- worker: This is the default, multi-threaded and optionally multi-process MPM. (http://publib.boulder.ibm.com/httpserv/manual70/mod/worker.html)
- event: Built on top of worker and designed to utilize more asynchronous operating system APIs (http://publib.boulder.ibm.com/httpserv/manual70/mod/event.html)
- prefork: A single thread/process for each request. Not recommended. Generally used for unthread safe or legacy code.
This is the default configuration on distributed platforms other than Windows:
# ThreadLimit: maximum setting of ThreadsPerChild
# ServerLimit: maximum setting of StartServers
# StartServers: initial number of server processes to start
# MaxClients: maximum number of simultaneous client connections
# MinSpareThreads: minimum number of worker threads which are kept spare
# MaxSpareThreads: maximum number of worker threads which are kept spare
# ThreadsPerChild: constant number of worker threads in each server process
# MaxRequestsPerChild: maximum number of requests a server process serves
<IfModule worker.c>
ThreadLimit 25
ServerLimit 64
StartServers 1
MaxClients 600
MinSpareThreads 25
MaxSpareThreads 75
ThreadsPerChild 25
MaxRequestsPerChild 0Out of the box, IBM HTTP Server supports a maximum of 600 concurrent connections. Performance will suffer if load dictates more concurrent connections, as incoming requests will be queued up by the host operating system...
First and foremost, you must determine the maximum number of simultaneous connections required for this Web server. Using mod_status or mod_mpmstats (available with ihsdiag) to display the active number of threads throughout the day will provide some starting data.
There are 3 critical aspects to MPM (Multi-processing Module) tuning in IBM HTTP Server.
- Configuring the maximum number of simultaneous connections (MaxClients directive)
- Configuring the maximum number of IBM HTTP Server child processes (ThreadsPerChild directive)
- Less importantly, configuring the ramp-up and ramp-down of IBM HTTP Server child processes (MinSpareThreads, MaxSpareThreads, StartServers)
The first setting (MaxClients) has the largest immediate impact, but the latter 2 settings help tune IBM HTTP Server to accommodate per-process features in Apache modules, such as the WebSphere Application Server Web server plug-in.
This is the default configuration on Windows:
ThreadLimit 600
ThreadsPerChild 600
MaxRequestsPerChild 0In general, recommendations for a high performance, non-resource constrained environment:
- If using TLS, then ThreadsPerChild=100, decide on MaxClients, and then ServerLimit=MaxClients/ThreadsPerChild; otherwise, ThreadsPerChild=MaxClients and ServerLimit=1.
- StartServers=ServerLimit
- MinSpareThreads=MaxSpareThreads=MaxClients
- MaxRequestsPerChild=0
- Test the box at peak concurrent load (MaxClients); for example: ${IHS}/bin/ab -c ${MaxClients} -n ${MaxClients*10} -i https://localhost/
Note that the default configuration does not follow the MaxClients = (ServerLimit * ThreadsPerChild) formula because it gives the flexibility to dynamically increase MaxClients up to the ceiling of ServerLimit * ThreadsPerChild and gracefully restart IHS without destroying existing connections or waiting for them to drain. This is a useful capability but few customers take advantage of it and it's usually best to follow the formula to reduce any confusion.
Note that the message "Server reached MaxClients setting" in the error_log will only be shown once per running worker process.
IBM HTTP Server typically uses multiple multithreaded processes for serving requests. Specify the following values for the properties in the web server configuration file (httpd.conf) to prevent the IBM HTTP Server from using more than one process for serving requests.
ServerLimit 1 ThreadLimit 1024 StartServers 1 MaxClients 1024 MinSpareThreads 1 MaxSpareThreads 1024 ThreadsPerChild 1024 MaxRequestsPerChild 0
Note that when TLS processing is enabled, there is some inter-process contention (buffers, etc.) so more processes and less processes per threads may be faster: http://publib.boulder.ibm.com/httpserv/ihsdiag/ihs_performance.html#Linux_Unix_ThreadsPerChild
MinSpareThreads, MaxSpareThreads
The MinSpareThreads and MaxSpareThreads options are used to reduce memory utilization during low traffic volumes. Unless this is very important, set both of these equal to MaxClients to avoid time spent destroying and creating threads.
MaxRequestsPerChild
The MaxRequestsPerChild option recycles a thread after it has processed the specified number of requests. Historically, this was used to prevent a leaking thread from using too much memory; however, it is generally recommended to set this to 0 and investigate any observed leaks.
Windows
Although IHS is supported on Windows 64-bit, it is only built as a 32-bit executable. So in all cases on Windows, IHS is limited to a 32-bit address space. IHS on Windows also only supports a single child process (https://www.ibm.com/support/knowledgecenter/SSAW57_8.5.5/com.ibm.websphere.nd.doc/ae/rprf_plugin.html). IHS on Windows is not /LARGEADDRESSAWARE, so it cannot utilize the extra space afforded by the /3GB switch. After APAR PI04922 Windows services created with the httpd-la.exe binary are large address aware (which does not depend on /3GB boot time option): http://www-01.ibm.com/support/docview.wss?uid=swg1PI04922
Note also on Windows that there is no MaxClients. It is set implicitly to ThreadsPerChild.
IBM HTTP Server for z/OS
Details: http://www-01.ibm.com/support/docview.wss?uid=tss1wp101170&aid=1
Consider using AsyncSockets=yes in httpd.conf
Access Log, LogFormat
The access log is enabled by default and writes one line for every processed request into logs/access.log. The format of the line is controlled with the LogFormat directive in httpd.conf: http://publib.boulder.ibm.com/httpserv/manual70/mod/mod_log_config.html
The access log is defined with the CustomLog directive, for example:
CustomLog logs/access_log commonThe last part (e.g. "common") is the name of the LogFormat to use. Here is the default "common" LogFormat:
LogFormat "%h %l %u %t \"%r\" %>s %b" commonYou can either modify this line or add a new LogFormat line with a new name and change the CustomLog to point to the new one.
We recommend adding at least %D to give the total response time (in microseconds).
LogFormat "%h %l %u %t \"%r\" %>s %b %D" commonHere are some other commonly useful directives:
- Print the time taken to serve the request, in microseconds: %D
- Print the time taken to serve the request, in seconds: %T
- Print the contents of the cookie JSESSIONID in the request sent to the server (also includes the clone ID that the cookie wants the request to go back to): %{JSESSIONID}C
- Print the contents of the cookie JSESSIONID in the response sent to the client: %{JSESSIONID}o
- View and log the SSL cipher negotiated for each connection: \"SSL=%{HTTPS}e\" \"%{HTTPS_CIPHER}e\" \"%{HTTPS_KEYSIZE}e\" \"%{HTTPS_SECRETKEYSIZE}e\"
- Print the host name the request was for (useful when the site serves multiple hosts using virtual hosts): %{Host}i
Time until first response bytes (%^FB)
mod_logio
allows the %^FB LogFormat option to print the microseconds
between when the request arrived and the first byte of the response
headers are written. For example:
LoadModule logio_module modules/mod_logio.so
LogIOTrackTTFB ON
LogFormat "%h %l %u %t \"%r\" %>s %b %D \"%{WAS}e\" %X %I %O %^FB" commonAccess Log Response Times (%D)
It is recommended to use %D in the LogFormat to track response times (in microseconds). The response time includes application time, queue time, and network time from/to the end-user and to/from the application.
Note that the time (%t) represents the time the request arrived for HTTPD >= 2.0 and the time the response was sent back for HTTPD < 2.0.
Access Log WAS Plugin Server Name (%{WAS}e)
If using the IBM WAS plugin, you can get the name of the application server that handled the request (http://publib.boulder.ibm.com/httpserv/ihsdiag/WebSphere61.html#LOG). The plugin sets an internal, per-request environment variable on the final transport it used to satisfy a request: %{WAS}e. It is fixed length so it has the first N characters of host/IP but always includes the port. The %{WAS}e syntax means log the environment variable (e) named 'WAS'.
Client ephemeral port
The client's ephemeral port is critical to correlate an access log
entry to network trace since a socket is uniquely identified by the
tuple (client IP, client port, httpd IP, httpd port). The client's
ephemeral port may be logged with %{remote}p.
Commonly useful LogFormat
Putting everything together, a commonly useful LogFormat for IBM HTTP Server is:
LoadModule logio_module modules/mod_logio.so
LogIOTrackTTFB ON
LogFormat "%h %l %u %t \"%r\" %>s %b %D \"%{WAS}e\" %X %I %O %^FB %{remote}p %p" commonEdge Side Includes (ESI)
The web server plug-in contains a built-in ESI processor. The ESI processor can cache whole pages, as well as fragments, providing a higher cache hit ratio. The cache implemented by the ESI processor is an in-memory cache, not a disk cache, therefore, the cache entries are not saved when the web server is restarted.
When a request is received by the web server plug-in, it is sent to the ESI processor, unless the ESI processor is disabled. It is enabled by default. If a cache miss occurs, a Surrogate-Capabilities header is added to the request and the request is forwarded to the WebSphere Application Server. If servlet caching is enabled in the application server, and the response is edge cacheable, the application server returns a Surrogate-Control header in response to the WebSphere Application Server plug-in.
The value of the Surrogate-Control response header contains the list of rules that are used by the ESI processor to generate the cache ID. The response is then stored in the ESI cache, using the cache ID as the key. For each ESI "include" tag in the body of the response, a new request is processed so that each nested include results in either a cache hit or another request that forwards to the application server. When all nested includes have been processed, the page is assembled and returned to the client.
The ESI processor is configurable through the WebSphere web server plug-in configuration file plugin-cfg.xml. The following is an example of the beginning of this file, which illustrates the ESI configuration options.
<Property Name="esiEnable" Value="true"/> <Property Name="esiMaxCacheSize" Value="1024"/> <Property Name="esiInvalidationMonitor" Value="false"/>... The second option, esiMaxCacheSize, is the maximum size of the cache in 1K byte units. The default maximum size of the cache is 1 megabyte.
If the first response has a Content-Length response header, the web server plug-in checks for the response size. If the size of the response body is larger than the available ESI caching space, the response passes through without being handled by ESI.
Some parent responses have nested ESI includes. If a parent response is successfully stored in the ESI cache, and any subsequent nested include has a Content-length header that specifies a size larger than the available space in the ESI cache, but smaller than the value specified for esiMaxCacheSize property, the plug-in ESI processor evicts other cache elements until there is enough space for the nested include in the ESI cache.
The third option, esiInvalidationMonitor, specifies if the ESI processor should receive invalidations from the application server... There are three methods by which entries are removed from the ESI cache: first, an entry expiration timeout occurs; second, an entry is purged to make room for newer entries; or third, the application server sends an explicit invalidation for a group of entries. For the third mechanism to be enabled, the esiInvalidationMonitor property must be set to true and the DynaCacheEsi application must be installed on the application server. The DynaCacheEsi application is located in the installableApps directory and is named DynaCacheEsi.ear. If the ESIInvalidationMonitor property is set to true but the DynaCacheEsi application is not installed, then errors occur in the web server plug-in and the request fails.
This ESI processor is monitored through the CacheMonitor application. For the ESI processor cache to be visible in the CacheMonitor, the DynaCacheEsi application must be installed as described above, and the ESIInvalidationMonitor property must be set to true in the plugin-cfg.xml file.
If you're not using the ESI cache, disable it as it has some expensive operations in computing hashes for each request: Administrative Console -> Servers > Web Servers > web_server_name > Plug-in properties > Caching -> Uncheck "Enable ESI," and then re-generate and re-propagate plugin. ESI processing can also cause underisable buffering in the WAS Plug-in.
Elliptic Curve Cryptography (ECC) is available in TLS 1.2 and may be a faster algorithm than RSA for SSL signature and key exchange algorithms. As of 2012, ECC ciphers are not supported by most major web browsers, but they are supported by Java 7, OpenSSL, and GSKit. ECC ciphers start with TLS_EC and are available starting in IHS 8.0.0.6
KeepAlive
KeepAlive allows the client to keep a socket open between requests, thus potentially avoiding TCP connection setup and tear down. For example, let's say a client opens a TCP connection and requests an HTML page. This HTML page contains one image. With KeepAlive, after the HTML response has been parsed and the image found, the client will re-use the previous TCP connection to request the image. (http://publib.boulder.ibm.com/httpserv/manual70/mod/core.html#keepalive)
When using mod_event on Linux for IHS >= 9 or z/OS for IHS >= 8.5.5, KeepAlive sockets do not count towards MaxClients. Elsewhere and with mod_worker, KeepAlive sockets do count towards MaxClients.
In the latter case, KeepAliveTimeout (default 5 seconds) is a balance between latency (a higher KeepAliveTimeout means a higher probability of connection re-use) and the maximum concurrently active requests (because a KeepAlive connection counts towards MaxClients for its lifetime).
Starting with IHS 9 and 8.5.5.18, KeepAliveTimeout may be set to ms; for example, "KeepAliveTimeout 5999ms". When done in this format, IHS will round up and time-out in roughly 6 seconds (in this example); however, it will send back a Keep-Alive timeout response header rounded down to 5 seconds (in this example). This is useful to avoid race conditions for clients who don't first try doing a read on a socket before doing a write in which case IHS might time-out half of the socket right as the client tries to re-use it and thus the response will fail.
Checking incoming connection re-use
The %X LogFormat
option will show + if a connection is kept-alive and
available for re-use.
The %k LogFormat
option will show the number of keepalive requests handled by the
connection used to serve this response. If this number is consistently
0, then the client is not re-using connections or something is not
allowing the client connection to be re-used.
Gzip compression
mod_deflate can be used to use gzip compression on responses: http://publib.boulder.ibm.com/httpserv/manual70/mod/mod_deflate.html
mod_mpmstats
mpmstats is a very lightweight but powerful httpd extension that periodically prints a line to error_log with a count of the number of threads that are ready, busy, keepalive, etc. Here's an example:
[Wed Jan 08 16:59:26 2014] [notice] mpmstats: rdy 48 bsy 3 rd 0 wr 3 ka 0 log 0 dns 0 cls 0
On z/OS, ensure PI24990 is installed.
The default mpmstats interval is 10 minutes although we recommend setting it to 30 seconds or less:
<IfModule mod_mpmstats.c> # Write a record every 10 minutes (if server isn't idle). # Recommendation: Lower this interval to 60 seconds, which will # result in the error log growing faster but with more accurate # information about server load. ReportInterval 600 </IfModule>
As covered in the mod_mpmstats link above, some of the key statistics are:
- rdy (ready): the number of web server threads started and ready to process new client connections
- bsy (busy): the number of web server threads already processing a client connection
- rd (reading): the number of busy web server threads currently reading the request from the client
- wr (writing): the number of busy web server threads that have read the request from the client but are either processing the request (e.g., waiting on a response from WebSphere Application Server) or are writing the response back to the client
- ka (keepalive): the number of busy web server threads that are not processing a request but instead are waiting to see if the client will send another request on the same connection; refer to the KeepAliveTimeout directive to decrease the amount of time that a web server thread remains in this state
If mpmstats is enabled, when the server is approaching MaxClients, a
message is printed by mpmstats (this is in addition to the
server reached MaxClients setting message printed by the
server itself).
[notice] mpmstats: approaching MaxClients (48/50)By default, the mpmstats threshold is 90% and may be increased with MPMStatsBusyThreshold.
The mpmstats message will be repeated if the situation occurs again after clearing, whereas the server message will only appear once per process lifetime.
TrackHooks
In recent versions, TrackHooks may be used to get per module response times, check for long-running modules, and track response times of different parts of the request cycle (http://publib.boulder.ibm.com/httpserv/ihsdiag/mpmstats_module_timing.html#loghooks):
Recommended mpmstats configuration
<IfModule mod_mpmstats.c> # Write a record to stderr every 10 seconds (if server isn't idle). ReportInterval 10 TrackHooks allhooks TrackHooksOptions millis permodule logslow TrackModules On SlowThreshold 10 </IfModule>
Add the following to your LogFormat:
%{TRH}e %{TCA}e %{TCU}e %{TPR}e %{TAC}e %{RH}eThe final LogFormat line will most commonly look like this:
LogFormat "%h %l %u %t \"%r\" %>s %b %{TRH}e %{TCA}e %{TCU}e %{TPR}e %{TAC}e %{RH}e %{WAS}e %D" commonThe above requires that mod_status and ExtendedStatus are enabled which enables additional statistics-gathering infrastructure in Apache:
LoadModule status_module modules/mod_status.so
<IfModule mod_status.c>
ExtendedStatus On
</IfModule>As long as the configuration does not use a "<Location /server-status> [...] SetHandler server-status [...] </Location>" block, then there is no additional security exposure by loading mod_status and enabling ExtendedStatus (unless AllowOverride != ALL and someone creates a .htaccess file that enables it).
mod_smf
On z/OS, mod_smf provides additional SMF statistics: http://publib.boulder.ibm.com/httpserv/manual70/mod/mod_smf.html
Status Module
There is a status
module that can be enabled in IHS. It is not enabled by default (or
it hasn't been in the past). However, it does present some interesting
real time statistics which can help in understanding if requests are
backing up or if the site is humming along nicely. It helps provide a
second data point when trying to troubleshoot production problems. Most
enterprise organizations will want to make sure the URL
http://your.server.name/server-status?refresh=N to access
the statistics are protected by a firewall and only available to the
system administrators.
IHSDiag
Use ihsdiag to take thread dumps to understand what IHS threads are doing in detail: http://publib.boulder.ibm.com/httpserv/ihsdiag/http://publib.boulder.ibm.com/httpserv/ihsdiag/
Fast Response Cache Accelerator
FRCA is deprecated.
FRCA/AFPA was deprecated starting in V7.0 [and] its use is discouraged. Instead, it is recommended to use the IBM HTTP Server default configuration to serve static files... If CPU usage with the default configuration is too high, the mod_mem_cache module can be configured to cache frequently accessed files in memory, or multiple web servers can be used to scale out horizontally. Additional options include the offloading of static files to a Content Delivery Network (CDN) or caching HTTP appliance, or to use the caching proxy component of WebSphere Edge Server in WebSphere Application Server Network Deployment (ND).
Websphere Plugin
ServerIOTimeout
Set a timeout value, in seconds, for sending requests to and reading responses from the application server.
If you set the ServerIOTimeout attribute to a positive value, this attempt to contact the server ends when the timeout occurs. However, the server is not [marked down].
If you set the ServerIOTimeout attribute to a negative value, the server is [marked down] whenever a timeout occurs...
If a value is not set for the ServerIOTimeout attribute, the plug-in, by default, uses blocked I/O to write requests to and read responses from the application server, and does not time out the TCP connection...
Setting the ServerIOTimeout attribute to a reasonable value enables the plug-in to timeout the connection sooner, and transfer requests to another application server when possible...
The default value is 900, which is equivalent to 15 minutes.
The ServerIOTimeout limits the amount of time the plug-in waits for each individual read or write operation to return. ServerIOTimeout does not represent a timeout for the overall request.
It is generally recommended to set a non-zero value for ServerIOTimeout. The value should be greater than the maximum expected response time for all legitimate requests.
In recent versions of WAS, the global ServerIOTimeout can be overidden for specific URLs (http://www-01.ibm.com/support/docview.wss?uid=swg1PM94198):
SetEnvIf Request_URI "\.jsp$" websphere-serveriotimeout=10By default, if a ServerIOTimeout pops, then the plugin will re-send non-affinity (http://www-01.ibm.com/support/docview.wss?uid=swg21450051) requests to the next available server in the cluster. If, for example, the request exercises a bug in the application that causes an OutOfMemoryError, then after each timeout, the request will be sent to all of the other servers in the cluster, and if the behavior is the same, then effectively it will lead to a complete, cascading failure. This behavior can be controlled with ServerIOTimeoutRetry:
ServerIOTimeoutRetry specifies a limit for the number of times the HTTP plugin retries an HTTP request that has timed out, due to ServerIOTimeout. The default value, -1, indicates that no additional limits apply to the number of retries. A 0 value indicates there are no retries. Retries are always limited by the number of available servers in the cluster. Important: This directive does not apply to connection failures or timeouts due to the HTTP plug-in ConnectTimeout. (https://www.ibm.com/support/knowledgecenter/SSAW57_8.5.5/com.ibm.websphere.nd.doc/ae/rwsv_plugincfg.html)
The resolution of ServerIOTimeout may be affected by MaxSpareThreads. If ServerIOTimeout is taking longer than expected to fire, review the recommendations on MaxSpareThreads above and consider configuring it so that threads are not destroyed.
Retries
When will the WAS Plug-in retry a request: http://publib.boulder.ibm.com/httpserv/ihsdiag/plugin_questions.html#retry
Load Distribution
Use LogLevel="Stats" to print load distribution in the plugin log after each request (see page 28): http://www-01.ibm.com/support/docview.wss?uid=swg27020055&aid=1
There is an option called BackupServers which was used with WAS version 5 for DRS HTTP session failover, so this option is generally not used any more.
Common causes of different distribution include differing network performance, retransmission rates, or packet loss, different network paths, and/or different DNS resolution times.
MaxConnections
MaxConnections limits the number of connections the WAS Plug-in will open to a single application server from a single webserver child process. In practice, the per-process limitation severely limits the ability to pick a useful number.
- Crossing MaxConnections does not result in a markdown.
- MaxConnections applies even to affinity requests.
- It is usually better to drastically reduce the TCP listen backlog in the application server and reject workload that way"
https://publib.boulder.ibm.com/httpserv/ihsdiag/plugin_questions.html#maxconns
In addition:
The use of the MaxConnections parameter in the WebSphere plug-in configuration is most effective when IBM HTTP Server 2.0 and above is used and there is a single IHS child process. However, there are some operational tradeoffs to using it effectively in a multi-process webserver like IHS.
It is usually much more effective to actively prevent backend systems from accepting more connections than they can reliably handle, performing throttling at the TCP level. When this is done at the client (HTTP Plugin) side, there is no cross-system or cross-process coordination which makes the limits ineffective.
Using MaxConnections with more then 1 child processes, or across a webserver farm, introduces a number of complications. Each IHS child process must have a high enough MaxConnections value to allow each thread to be able to find a backend server, but in aggregate the child processes should not be able to overrun an individual application server."
https://publib.boulder.ibm.com/httpserv/ihsdiag/ihs_performance.html#MAXCONN
When MaxConnections is reached, an affinity or non-affinity request will print the following to http_plugin.log:
WARNING: ws_server_group: serverGroupCheckServerStatus: Server $server has reached maximum connections and is not selectedTo monitor MaxConnections usage, consider using LogLevel="Stats". If the resulting logging needs to be filtered, consider using piped logging to a script and filter as needed. An alternative monitoring option is to look at network sockets (e.g. Linux ss); however, connections are pooled so this doesn't give insight into actively used connections.
WebSphere Caching Proxy (WCP)
The WebSphere Caching Proxy (WCP) is optimized to store and serve cacheable responses from a backend application. WCP is primarily configured through the ibmproxy.conf file: https://www.ibm.com/support/knowledgecenter/SSAW57_8.5.5/com.ibm.websphere.edge.doc/cp/admingd45.html
The CacheQueries directive may be specified multiple times with different patterns of URLs whose content may be cached. URL patterns may be excluded with the NoCaching directive.
CacheQueries PUBLIC http://*/*
NoCaching http://*/files/form/anonymous/api/library/*/document/*/media/*HTTP responses may be GZIP compressed based on MIME type:
CompressionFilterEnable /opt/ibm/edge/cp/lib/mod_z.so
CompressionFilterAddContentType text/htmlThe CacheMemory directive specifies the maximum amount of native memory each WCP process may use for in-memory caching. This will be limited by the operating system, whether the process is 32-bit or 64-bit, shared libraries, and other constraints.
CacheMemory 1000 MWCP has a thread pool which should match or exceed MaxClients in downstream web server(s) for example.
MaxActiveThreads 700In general, it is recommended to pool the connections to the backend servers (such as web servers) to avoid the cost of constantly establishing and closing those connections.
ServerConnPool onThe time idle connections in this pool are held open is controlled with ServerConnTimeout and ServerConnGCRun.
By default, WCP will not cache responses with expiration times within the CacheTimeMargin. If you have available memory, disable this:
CacheTimeMargin 0Load Balancers
Some load balancers are configured to keep affinity between the client IP address and particular web servers. This may be useful to simplify problem determination because the set of requests from a user will all be in one particular web server. However, IP addresses do not always uniquely identify a particular user (e.g. NAT), so this type of affinity can distort the distribution of requests coming into the web servers and it is not functionally required because the WAS plugin will independently decide how to route the request, including looking at request headers such as the JSESSIONID cookie if affinity is required to a particular application server.
Load balancers often have a probe function which will mark down back-end services if they are not responsive to periodic TCP or HTTP requests. One example of this happening was due to the load balancer performing TLS negotiation, exhausting its CPU, and then not having enough juice to process the response quickly enough.
WebSphere Load Balancer
WebSphere Edge Components Load Balancer balances the load of incoming requests. It is sometimes called eLB for Edge Load Balancer or ULB for Userspace Load Balancer (in contrast to the older "IPv4" version that required kernel modules on every platform).
There is a IBM WebSphere Edge Load Balancer for IPv4 and IPv6 Data Collection Tool to investigate LB issues.
nginx
Containers
Forward Proxy One-liner
docker run --rm --entrypoint /bin/sh --name nginx -p 8080:80 -it nginx -c "printf 'server { listen 80 default_server; listen [::]:80 default_server; server_name _; location / { resolver %s; proxy_pass \$scheme://\$http_host\$request_uri; } }' \$(awk '/nameserver/ {print \$2}' /etc/resolv.conf) > /etc/nginx/conf.d/default.conf; cat /etc/nginx/conf.d/default.conf; /docker-entrypoint.sh nginx -g 'daemon off;';"curl --proxy http://localhost:8080/ http://example.com/
To print debug to stdout, sed the log level to debug and
use the -debug nginx binary:
docker run --rm --entrypoint /bin/sh --name nginx -p 8080:80 -it nginx -c "printf 'server { listen 80 default_server; listen [::]:80 default_server; server_name _; location / { resolver %s; proxy_pass \$scheme://\$http_host\$request_uri; } }' \$(awk '/nameserver/ {print \$2}' /etc/resolv.conf) > /etc/nginx/conf.d/default.conf; cat /etc/nginx/conf.d/default.conf; sed -i 's/notice/debug/g' /etc/nginx/nginx.conf; /docker-entrypoint.sh nginx-debug -g 'daemon off;';"
HAProxy
Keep-Alive
The default http-reuse
strategy is safe. Consider whether aggressive
or always are acceptable (as discussed in the manual
and blog)
as they generally provide better performance.
Applications
Sub-chapters
- HTTP Standard
- HTTP2 Standard
- Java Standard Edition
- Jakarta Enterprise Edition
- Java Enterprise Edition
- Eclipse MicroProfile
- Maven
- Spring
- Hibernate
- Cloud Native
- Go
- Swing
- Apache CXF
- Apache HttpClient
- Rational Application Developer
- HTML
- Transport Layer Security
Java Standard Edition (JSE)
Best Practices
- Avoid the costs of object creation and manipulation by using primitive types for variables
- Cache frequently-used objects to reduce the amount of garbage collection needed, and avoid the need to re-create the objects.
- Group native operations to reduce the number of Java Native Interface (JNI) calls when possible.
- Use synchronized methods only when necessary to limit the multitasking in the JVM and operating system.
- Avoid invoking the garbage collector unless necessary. If you must invoke it, do so only during idle time or some noncritical phase.
- Declare methods as final whenever possible. Final methods are handled better by the JVM.
- Use the static final key word when creating constants in order to reduce the number of times the variables need to be initialized.
- Avoid unnecessary "casts" and "instanceof" references, because casting in Java is done at run time.
- Avoid the use of vectors whenever possible when an array will suffice.
- Add and delete items from the end of the vector.
- Avoid allocating objects within loops.
- Use connection pools and cached-prepared statements for database access.
- Minimize thread creation and destruction cycles.
- Minimize the contention for shared resources.
- Minimize the creation of short-lived objects.
- Avoid remote method calls.
- Use callbacks to avoid blocking remote method calls.
- Avoid creating an object only used for accessing a method.
- Keep synchronized methods out of loops.
- Store string and char data as Unicode in the database.
- Reorder the CLASSPATH so that the most frequently used libraries occur first.
- Reduce synchronization
- Keep application logging to a minimum or add log guards
- Consider using work areas for passing around application state through JNDI: https://www.ibm.com/support/knowledgecenter/SSAW57_8.5.5/com.ibm.websphere.nd.doc/ae/welc6tech_wa_tun.html
Synchronization
"Problem determination... tools often report the class of the object on which contention is occurring. A uniquely named class for the object helps identify where in the application code those objects are being used." (http://www.ibm.com/developerworks/websphere/techjournal/1111_dawson/1111_dawson.html)
Applications that overuse the synchronized keyword or have one placed in a frequently used method can often result in poor application response times and/or application deadlocks. Applications should be written to be thread safe (http://www.ibm.com/developerworks/java/library/j-jtp09263/index.html).
Strings
Unicode
Practically, developers are most interested in Unicode code points
which map unique numbers (commonly represented in Unicode with
hexadecimal numbers such as U+000041 representing the character
A) to logical characters. A font then
maps a logical character to a glyph
which is what is seen on a computer screen.
However, what's confusing in Java is that the char
primitive type is not the same as a logical character.
Before Java 5, they were the same since a char was
internally represented using UTF-16 with 2 bytes for each character and
this matched the original Unicode 1.0 standard which only defined up to
65,536 characters.
Java 5 and above support Unicode 4.0 which allows up to 1,112,064
characters. The first 65,536 characters (U+000000 to
U+00FFFF) are referred to as the Basic Multilingual Plane
(BMP) and are still represented with a single char value.
The remaining characters (U+010000 to
U+10FFFF) are called supplementary
characters and represented with a pair of char values
called a surrogate. A surrogate uses the special Unicode code point
range of U+00D800 to U+00DFFF which was
reserved for use in UTF-16. This range is split into two ranges: a
high-surrogates range (U+00D800 to U+00DBFF)
and a low-surrogates range (U+00DC00 to
U+00DFFF). The first code unit comes from the
high-surrogates range and the second code unit comes from the
low-surrogates range.
Encoding and decoding surrogates is discussed in RFC 2781; however,
the Java Character
class provides all the necessary methods for interrogating and
manipulating surrogates either using a char[] or an
int.
Most modern file and wire encodings use UTF-8 which is a more compact encoding scheme. Java classes such as String, InputStreamReader, OutputStreamWriter, etc. transparently handle encoding and decoding to and from UTF-8.
java.lang.ThreadLocal
ThreadLocals are a powerful way to cache information without incurring cross thread contention and also ensuring thread safety of cached items. When using ThreadLocals in thread pools, consider ensuring that the thread pool minimum size is equal to the thread pool maximum size, so that ThreadLocals are not destroyed. (http://docs.oracle.com/javase/7/docs/api/java/lang/ThreadLocal.html)
Note that ThreadLocals may introduce classloader leaks if the ThreadLocal object (or an object it references) is loaded from an application classloader which is restarted without the JVM being restarted. In this case, the only way to clear ThreadLocals is to allow those threads to be destroyed or the ThreadLocal values to be updated to a class from the new classloader (this can be done with a module listener).
Migrating to Java 11
See the following links:
- https://developer.ibm.com/tutorials/migration-to-java-11-made-easy/
- https://openliberty.io/blog/2019/02/06/java-11.html
Printing timestamps
For debugging, as an alternative to java.util.logging or other logging mechanisms, you may use SimpleDateFormat to print the timestamps with milliseconds and the thread ID. Use ThreadLocal because SimpleDateFormat is not thread safe. For example:
import java.text.SimpleDateFormat;
import java.util.Date;
public final class CustomLogger {
public static final ThreadLocal<SimpleDateFormat> DATE_FORMATTER = new ThreadLocal<SimpleDateFormat>() {
@Override
protected SimpleDateFormat initialValue() {
return new SimpleDateFormat("yyyy-MM-dd HH:mm:ss.SSS Z");
}
};
public static void log(String str) {
System.out.println("[" + DATE_FORMATTER.get().format(new Date()) + " thr 0x"
+ Long.toHexString(Thread.currentThread().getId()) + "]: " + str);
}
public static void main(String... args) throws Throwable {
log("Hello World");
}
}Example output:
[2021-03-08 09:42:02.543 -0800 thr 0x1]: Hello WorldSpeculative Tracing
Intermittent performance problems are one of the most difficult type of performance problems. If the issues can't be reproduced easily, then they may be difficult to capture much data for. Often, running the necessary tracing all the time may be too expensive (even with optimization technologies such as High Performance Extensible Logging or Binary Logging). If you've exhausted all other performance techniques (tracing to RAM, thread sampling, request metrics, PMI, and the like), then you may consider tracing instead.
The first stage in finding intermittent performance problems using tracing is to isolate the location(s) of the problems. This is the most iterative and time-consuming stage. One way to do this is to start with the outermost component that demonstrates the symptom and then slowly isolate down. For example, if all that's known is that HTTP requests are intermittently slow, then you may start with the servlet (or if it's proved to be outside that, the container itself). If lightweight tracing doesn't exist, then it must be added. Below is a Java example which speculatively monitors how long a method takes, and if the duration exceeds some configurable threshold, the speculative traces are dumped, thus allowing one iteration of isolation. This code is most efficient when run within fixed-sized thread pools.
private static final int SPECULATIVE_DURATION_THRESHOLD = Integer.parseInt(System.getProperty("SPECULATIVE_DURATION_THRESHOLD", "-1"));
private static final boolean SPECULATIVE_TRACE_ENABLED = SPECULATIVE_DURATION_THRESHOLD == -1 ? false : true;
private static ThreadLocal<ArrayList<String>> speculativeTraces = new ThreadLocal<ArrayList<String>>() {
@Override
protected ArrayList<String> initialValue() {
return new ArrayList<String>(8);
}
};
public void foo() {
final long methodStartTime = SPECULATIVE_TRACE_ENABLED ? System.currentTimeMillis() : -1;
final ArrayList<String> spec = SPECULATIVE_TRACE_ENABLED ? speculativeTraces.get() : null;
if (SPECULATIVE_TRACE_ENABLED) {
spec.clear();
spec.add(methodStartTime + " started");
}
doWork1();
if (SPECULATIVE_TRACE_ENABLED) {
spec.add(System.currentTimeMillis() + " doWork1 finished");
}
doWork2();
if (SPECULATIVE_TRACE_ENABLED) {
spec.add(System.currentTimeMillis() + " doWork2 finished");
}
doWork3();
if (SPECULATIVE_TRACE_ENABLED) {
final long methodDuration = System.currentTimeMillis() - methodStartTime;
if (methodDuration >= SPECULATIVE_DURATION_THRESHOLD) {
System.out.println("Speculative tracing threshold (" + SPECULATIVE_DURATION_THRESHOLD + " ms) exceeded with a call of " + methodDuration + " ms");
for (String speculativeTrace : spec) {
System.out.println(speculativeTrace);
}
System.out.println("Speculative tracing set end at " + System.currentTimeMillis());
}
}
}Sampled Timing Calls
ThreadLocals may be used to sample long method call execution times and print out sampled durations:
private static final int SAMPLE_COUNTPERTHREAD_FOO = Integer.getInteger("samplecountperthread.foo", 1000);
private static final int THRESHOLD_FOO = Integer.getInteger("threshold.foo", 0);
private static final String SAMPLE_MESSAGE_FOO = "Sampled duration (threshold=" + THRESHOLD_FOO + ", rate="
+ SAMPLE_COUNTPERTHREAD_FOO + " calls per thread) in ms of foo = ";
private static final AtomicInteger calls_foo = new AtomicInteger(0);
public void foo() {
final boolean doSample = (calls_foo.incrementAndGet() % SAMPLE_COUNTPERTHREAD_FOO) == 0;
final long startTime = doSample ? System.currentTimeMillis() : -1;
doLongWork();
if (doSample) {
final long diff = System.currentTimeMillis() - startTime;
if (diff >= THRESHOLD_FOO) {
System.out.println(SAMPLE_MESSAGE_FOO + diff);
}
}
}
private void doLongWork() {
// ...
}Always Timing Calls
As an alternative to sampling, you may add code to time all calls and then print details if they are above some threshold:
private static final int THRESHOLD_FOO = Integer.getInteger("threshold.foo", 0);
private static final String TIMING_MESSAGE_FOO = "Duration (threshold=" + THRESHOLD_FOO + ") in ms of foo = ";
public void foo() {
final long startTime = System.currentTimeMillis();
doLongWork();
final long diff = System.currentTimeMillis() - startTime;
if (diff >= THRESHOLD_FOO) {
System.out.println(TIMING_MESSAGE_FOO + diff);
}
}
private void doLongWork() {
// ...
}Request Heap Dump
public static String requestHeapDump()
throws IllegalAccessException, IllegalArgumentException, java.lang.reflect.InvocationTargetException,
NoSuchMethodException, SecurityException, ClassNotFoundException,
javax.management.InstanceNotFoundException, javax.management.MalformedObjectNameException,
javax.management.ReflectionException, javax.management.MBeanException {
String jvm = System.getProperty("java.vendor");
if ("IBM Corporation".equals(jvm)) {
return requestJ9SystemDump();
} else if ("Eclipse Adoptium".equals(jvm)) {
return requestHPROFDump(true);
} else {
throw new UnsupportedOperationException("Unknown JVM vendor " + jvm);
}
}
public static String requestJ9SystemDump()
throws IllegalAccessException, IllegalArgumentException, java.lang.reflect.InvocationTargetException,
NoSuchMethodException, SecurityException, ClassNotFoundException {
return (String) Class.forName("com.ibm.jvm.Dump").getMethod("triggerDump", new Class<?>[] { String.class })
.invoke(null, new Object[] { "system:request=exclusive+prepwalk" });
}
public static String requestHPROFDump(boolean performFullGC)
throws javax.management.InstanceNotFoundException, javax.management.MalformedObjectNameException,
javax.management.ReflectionException, javax.management.MBeanException {
String filename = "dump" + new java.text.SimpleDateFormat("yyyyMMdd.HHmmss").format(new java.util.Date())
+ ".hprof";
java.lang.management.ManagementFactory.getPlatformMBeanServer().invoke(
new javax.management.ObjectName("com.sun.management:type=HotSpotDiagnostic"), "dumpHeap",
new Object[] { filename, performFullGC },
new String[] { String.class.getName(), boolean.class.getName() });
return new java.io.File(filename).getAbsolutePath();
}Request J9 Thread Dump
public class DiagnosticThreadDump {
private static final boolean QUIET = Boolean.parseBoolean(System.getProperty("Diagnostics.Quiet", "false"));
private static final Class<?> j9Dump;
private static final java.lang.reflect.Method j9triggerDump;
static {
j9Dump = loadJ9Dump();
j9triggerDump = loadJ9TriggerDump(j9Dump);
}
private static Class<?> loadJ9Dump() {
try {
return Class.forName("com.ibm.jvm.Dump");
} catch (Throwable t) {
if (!QUIET) {
t.printStackTrace();
}
return null;
}
}
private static java.lang.reflect.Method loadJ9TriggerDump(Class<?> c) {
if (c != null) {
try {
return c.getMethod("triggerDump", new Class<?>[] { String.class });
} catch (Throwable t) {
if (!QUIET) {
t.printStackTrace();
}
}
}
return null;
}
public static String requestJ9ThreadDump() {
try {
return (String) j9triggerDump.invoke(null, new Object[] { "java:request=exclusive+prepwalk" });
} catch (Throwable t) {
if (QUIET) {
return null;
} else {
throw new RuntimeException(t);
}
}
}
public static void main(String[] args) throws Throwable {
requestJ9ThreadDump();
}
}Request J9 System Dump
public class DiagnosticSystemDump {
private static final boolean QUIET = Boolean.parseBoolean(System.getProperty("Diagnostics.Quiet", "false"));
private static final Class<?> j9Dump;
private static final java.lang.reflect.Method j9triggerDump;
static {
j9Dump = loadJ9Dump();
j9triggerDump = loadJ9TriggerDump(j9Dump);
}
private static Class<?> loadJ9Dump() {
try {
return Class.forName("com.ibm.jvm.Dump");
} catch (Throwable t) {
if (!QUIET) {
t.printStackTrace();
}
return null;
}
}
private static java.lang.reflect.Method loadJ9TriggerDump(Class<?> c) {
if (c != null) {
try {
return c.getMethod("triggerDump", new Class<?>[] { String.class });
} catch (Throwable t) {
if (!QUIET) {
t.printStackTrace();
}
}
}
return null;
}
public static String requestJ9SystemDump() {
try {
return (String) j9triggerDump.invoke(null, new Object[] { "system:request=exclusive+prepwalk" });
} catch (Throwable t) {
if (QUIET) {
return null;
} else {
throw new RuntimeException(t);
}
}
}
public static void main(String[] args) throws Throwable {
requestJ9SystemDump();
}
}Requesting Thread Dumps, Heap Dumps, and System Dumps
The following example code shows how to request a thread dump (IBM Java only), heap dump or system dump:
/**
* These are handled in synchronized methods below.
*/
private static int threadDumpsTaken = 0, heapDumpsTaken = 0, coreDumpsTaken = 0;
private static final int maxThreadDumps = Integer.parseInt(System.getProperty("MAXTHREADDUMPS", "-1"));
private static final int maxHeapDumps = Integer.parseInt(System.getProperty("MAXHEAPDUMPS", "1"));
private static final int maxCoreDumps = Integer.parseInt(System.getProperty("MAXCOREDUMPS", "1"));
private static final boolean isIBMJava;
private static final Class<?> ibmDumpClass;
private static final java.lang.reflect.Method ibmJavacoreMethod;
private static final java.lang.reflect.Method ibmHeapDumpMethod;
private static final java.lang.reflect.Method ibmSystemDumpMethod;
private static final Class<?> hotSpotMXBeanClass;
private static final Object hotspotMXBean;
private static final java.lang.reflect.Method hotspotMXBeanDumpHeap;
private static final java.text.SimpleDateFormat hotspotDateFormat = new java.text.SimpleDateFormat("yyyyMMdd'T'HHmmss");
static {
try {
isIBMJava = isIBMJava();
ibmDumpClass = isIBMJava ? Class.forName("com.ibm.jvm.Dump") : null;
ibmHeapDumpMethod = isIBMJava ? ibmDumpClass.getMethod("HeapDump") : null;
ibmJavacoreMethod = isIBMJava ? ibmDumpClass.getMethod("JavaDump") : null;
ibmSystemDumpMethod = isIBMJava ? ibmDumpClass.getMethod("SystemDump") : null;
hotSpotMXBeanClass = isIBMJava ? null : getHotSpotDiagnosticMXBeanClass();
hotspotMXBean = isIBMJava ? null : getHotSpotDiagnosticMXBean();
hotspotMXBeanDumpHeap = isIBMJava ? null : getHotSpotDiagnosticMXBeanDumpHeap();
} catch (Throwable t) {
throw new RuntimeException("Could not load Java dump classes", t);
}
}
public static boolean isIBMJava() {
try {
// We could use System.getProperty, but that requires elevated permissions in some cases.
Class.forName("com.ibm.jvm.Dump");
return true;
} catch (Throwable t) {
return false;
}
}
private static Class<?> getHotSpotDiagnosticMXBeanClass() throws ClassNotFoundException {
return Class.forName("com.sun.management.HotSpotDiagnosticMXBean");
}
private static Object getHotSpotDiagnosticMXBean() throws ClassNotFoundException, java.io.IOException {
javax.management.MBeanServer server = java.lang.management.ManagementFactory.getPlatformMBeanServer();
return java.lang.management.ManagementFactory.newPlatformMXBeanProxy(server,
"com.sun.management:type=HotSpotDiagnostic", hotSpotMXBeanClass);
}
private static java.lang.reflect.Method getHotSpotDiagnosticMXBeanDumpHeap() throws NoSuchMethodException, SecurityException {
return hotSpotMXBeanClass.getMethod("dumpHeap", String.class, boolean.class);
}
public static synchronized void requestThreadDump() {
if (maxThreadDumps == -1 || (maxThreadDumps > -1 && threadDumpsTaken++ < maxThreadDumps)) {
try {
ibmJavacoreMethod.invoke(ibmDumpClass);
} catch (Throwable t) {
throw new RuntimeException(t);
}
}
}
public static synchronized void requestHeapDump() {
if (maxHeapDumps == -1 || (maxHeapDumps > -1 && heapDumpsTaken++ < maxHeapDumps)) {
try {
if (ibmHeapDumpMethod != null) {
ibmHeapDumpMethod.invoke(ibmDumpClass);
} else {
requestHotSpotHPROF();
}
} catch (Throwable t) {
throw new RuntimeException(t);
}
}
}
public static synchronized void requestCoreDump() {
if (maxCoreDumps == -1 || (maxCoreDumps > -1 && coreDumpsTaken++ < maxCoreDumps)) {
try {
if (ibmSystemDumpMethod != null) {
ibmSystemDumpMethod.invoke(ibmDumpClass);
} else {
requestHotSpotHPROF();
}
} catch (Throwable t) {
throw new RuntimeException(t);
}
}
}
private static void requestHotSpotHPROF() throws IllegalAccessException, java.lang.reflect.InvocationTargetException {
String fileName = "heap" + hotspotDateFormat.format(new java.util.Date()) + ".hprof";
boolean live = true;
hotspotMXBeanDumpHeap.invoke(hotspotMXBean, fileName, live);
}java.util.logging
Example of how to use java.util.logging:
package com.test;
public class Foo {
private static final java.util.logging.Logger LOG = java.util.logging.Logger.getLogger(Foo.class.getName());
public void bar(String param1) {
if (LOG.isLoggable(java.util.logging.Level.FINE)) {
LOG.entering(Foo.class.getName(), "bar", param1);
}
// Do work...
if (LOG.isLoggable(java.util.logging.Level.FINER)) {
LOG.finer("Work step1 complete");
}
// Do work...
if (LOG.isLoggable(java.util.logging.Level.FINE)) {
LOG.entering(Foo.class.getName(), "bar");
}
}
}For example, the logging or trace specification may control the logging of this class with com.test.Foo=all
Finalizers
"The Java service team recommends that applications avoid the use of finalizers if possible." (http://www.ibm.com/support/knowledgecenter/SSYKE2_8.0.0/com.ibm.java.win.80.doc/diag/understanding/mm_gc_finalizers.html)
"It is not possible to predict when a finalizer is run... Because a finalized object might be garbage that is retained, a finalizer might not run at all." (http://www.ibm.com/support/knowledgecenter/SSYKE2_8.0.0/com.ibm.java.win.80.doc/diag/understanding/mm_gc_finalizers_contract.html)
XML Parsers
One of the common misconceptions about writing XML applications is that creating a parser instance does not incur a large performance cost. On the contrary, creation of a parser instance involves creation, initialization, and setup of many objects that the parser needs and reuses for each subsequent XML document parsing. These initialization and setup operations are expensive.
In addition, creating a parser can be even more expensive if you are using the JAXP API. To obtain a parser with this API, you first need to retrieve a corresponding parser factory -- such as a SAXParserFactory -- and use it to create the parser. To retrieve a parser factory, JAXP uses a search mechanism that first looks up a ClassLoader (depending on the environment, this can be an expensive operation), and then attempts to locate a parser factory implementation that can be specified in the JAXP system property, the jaxp.property file, or by using the Jar Service Provider mechanism. The lookup using the Jar Service Provider mechanism can be particularly expensive as it may search through all the JARs on the classpath; this can perform even worse if the ClassLoader consulted does a search on the network.
Consequently, in order to achieve better performance, we strongly recommend that your application creates a parser once and then reuses this parser instance.
http://www.ibm.com/developerworks/library/x-perfap2/index.html#reuse
Apache HttpClient
This section has been moved to Apache HttpClient.
WeakReferences and SoftReferences
A typical use of the SoftReference class is for a memory-sensitive cache. The idea of a SoftReference is that you hold a reference to an object with the guarantee that all of your soft references will be cleared before the JVM reports an out-of-memory condition. The key point is that when the garbage collector runs, it may or may not free an object that is softly reachable. Whether the object is freed depends on the algorithm of the garbage collector as well as the amount of memory available while the collector is running.
The WeakReference classA typical use of the WeakReference class is for canonicalized mappings. In addition, weak references are useful for objects that would otherwise live for a long time and are also inexpensive to re-create. The key point is that when the garbage collector runs, if it encounters a weakly reachable object, it will free the object the WeakReference refers to. Note, however, that it may take multiple runs of the garbage collector before it finds and frees a weakly reachable object.
Logging
Always use a logger that can be dynamically modified at run time without having to restart the JVM.
Differentiate between Error logging (which should go to SystemOut.log) and Audit logging which has different requirements and should not be contaminating the SystemOut.log.
Use a fast disk for Audit logging.
Jakarta Enterprise Edition (JEE)
Jakarta Enterprise Edition (JEE) is a fully open source Java Enterprise Edition based off
version 8 including a change of package names from javax to
jakarta (due to trademark issues during the open-sourcing
process). The umbrella project to manage Jakarta EE is Eclipse Enterprise for
Java (EE4J) and various Jakarta EE
specifications are available.
Many of the patterns available in Java Enterprise Edition remain available in Jakarta EE and are not repeated here.
Jakarta RESTful client
- Create and cache
the WebTarget instead of re-creating it for every call
@Path("/client-test2") public class ClientTestCached { private static WebTarget cachedWebTarget = ClientBuilder.newBuilder().build().target("http://localhost:9081/endpoint"); @GET @Produces(MediaType.TEXT_PLAIN) public String ping() { return cachedWebTarget.request().get(String.class); } }
JSON processing
- Create and cache
a Factory first, and then create the reader, writer, or object
builder from that factory
@Path("/json-test2") public class JsonTest2 { private static final JsonBuilderFactory jsonBuilderFactory = Json.createBuilderFactory(null); @GET @Produces(MediaType.APPLICATION_JSON) public JsonObject ping() { JsonObjectBuilder jsonObjectBuilder = jsonBuilderFactory.createObjectBuilder(); return jsonObjectBuilder.add("example", "example").build(); } }
Java Enterprise Edition (JEE)
Also known as Java Platform, Enterprise Edition (Java EE) and Java 2 Platform, Enterprise Edition (J2EE)
Startup Code
With an Eclipse MicroProfile container, create a class with @Initialized:
import javax.enterprise.context.ApplicationScoped; import javax.enterprise.context.Initialized; import javax.enterprise.event.Observes; @ApplicationScoped public class ApplicationInitializer { public void onStartup(@Observes @Initialized(ApplicationScoped.class) Object o) { System.out.println(toString() + " started"); // code System.out.println(toString() + " finished"); } }With a servlet container, create a class with @WebListener:
import javax.servlet.ServletContextEvent; import javax.servlet.ServletContextListener; import javax.servlet.annotation.WebListener; @WebListener public class ApplicationInitializer implements ServletContextListener { @Override public void contextInitialized(ServletContextEvent sce) { System.out.println(toString() + " started"); // code System.out.println(toString() + " finished"); } @Override public void contextDestroyed(ServletContextEvent sce) { } }With an EJB container, create an EJB with @Startup
import javax.annotation.PostConstruct; import javax.ejb.Singleton; import javax.ejb.Startup; @Singleton @Startup public class ApplicationInitializer { @PostConstruct private void onStartup() { System.out.println(toString() + " started"); // code System.out.println(toString() + " finished"); } }
Security
A client will be authenticated only if a resource is protected. You can use web.xml or annotations to protect a web resource. For JAX-RS see https://www.ibm.com/support/knowledgecenter/SSEQTP_liberty/com.ibm.websphere.wlp.doc/ae/rwlp_jaxrs_secure.html
The application-bnd info is for authorization after the authentication.
Web Applications
It is important to reduce the number of resources (images, CSS, Javascript, etc.) served for each request (caching and compression are also important, dealt elsewhere in the Cookbook). You can use browser or network sniffing tools to determine the largest number and sizes of resources. Here are some examples:
- Consider combining images into a single image - often called a "sprite" - and display those images using CSS sprite offset techniques.
- Consider combining multiple JavaScript files into a single file.
- Consider "minifying" JavaScript and CSS files.
- Consider compressing or resizing images more.
HTTP Sessions
Individual sessions retaining more than 1MB may be concerning. Use a system dump or heap dump and a tool such as the Memory Analyzer Tool with the IBM Extensions for Memory Analyzer to deep dive into session sizes and contents (http://www.ibm.com/developerworks/websphere/techjournal/0405_brown/0405_brown.html).
If there is a logout link, call javax.servlet.http.HttpSession.invalidate() to release the HTTP session as early as possible, reducing memory pressure: https://www.ibm.com/support/knowledgecenter/SSAW57_8.5.5/com.ibm.websphere.nd.doc/ae/cprs_best_practice.html
If using session persistence, consider implementing manual update and sync of session updates: https://www.ibm.com/support/knowledgecenter/SSAW57_8.5.5/com.ibm.websphere.nd.doc/ae/cprs_best_practice.html
Keep the amount of data in the HTTP session as small as possible.
Only touch session attributes that actually change. This allows for administrative changes to only persist updated attributes to the HTTP Session persistent storage.
Database Access
SQL statements should be written to use the parameterized ? (question mark) notation. In order for the prepared statement cache to be used effectively the parameterized statements will be reused from the cache. Consequently, building SQL statements with the parameters substituted in will all look like different statements and the cache will have little performance effect.
If you are using global transactions, use deferred enlistment: https://www.ibm.com/support/knowledgecenter/SSAW57_8.5.5/com.ibm.websphere.nd.doc/ae/tdat_conpoolman.html
Make sure to close Connections, Statements, and ResultSets. In some databases (e.g. https://www.ibm.com/support/knowledgecenter/SSAW57_8.5.5/com.ibm.websphere.nd.multiplatform.doc/ae/rprf_wastundb2.html), not closing all of these may cause additional overhead even if the objects will ultimately be closed by the pools.
JDBC Deadlocks
Applications that open more than one JDBC connection to the same datasource can result in a deadlock if there are not enough connections in the connection pool. See http://www-01.ibm.com/support/docview.wss?uid=swg1JR43775 If javacores show multiple threads waiting for a connection and WebSphere Application Server is reporting hung threads then you will want to increase the number of connections in the connection pool to at least 2n+1 where n = maximum number of threads in the thread pool. Applications that open more than 2 connections to the same datasource will need even larger pools (3n+1, 4n+1, etc).
To correct this problem the application developer has to fix the code to close a JDBC connection before opening another JDBC connection.
Web Services
Provide a jaxb.index file for every package that does not contain an ObjectFactory class. This action enables the system to completely avoid the search for JAXB classes. This approach does require application modification to account for the addition of the jaxb.index files. (https://www.ibm.com/support/knowledgecenter/SSAW57_8.5.5/com.ibm.websphere.nd.doc/ae/cwbs_tuning_jaxbcontext.html)
Service Component Architecture (SCA)
Use @AllowsPassByReference if possible with SCA modules: https://www.ibm.com/support/knowledgecenter/SSAW57_8.5.5/com.ibm.websphere.nd.doc/ae/tsca_passby_ref.html
Object Caching
The DistributedMap and DistributedObjectCache interfaces are simple interfaces for the dynamic cache. Using these interfaces, Java EE applications and system components can cache and share Java objects by storing a reference to the object in the cache. The default dynamic cache instance is created if the dynamic cache service is enabled in the administrative console. This default instance is bound to the global Java Naming and Directory Interface (JNDI) namespace using the name services/cache/distributedmap. (https://www.ibm.com/support/knowledgecenter/SSAW57_8.5.5/com.ibm.websphere.nd.doc/ae/tdyn_distmap.html)
Tread with caution. Overly active distributed maps can become quite chatty amongst the JVMs and, in extreme cases, limit the total number of JVMs in the same distributed map domain because the JVMs spend most of their time chatting about the changes that occurred in the map.
MDB
An MDB exists within an EJB project inside an EAR. For example:
package com.example;
import java.time.Instant;
import javax.ejb.ActivationConfigProperty;
import javax.ejb.MessageDriven;
import javax.jms.Message;
import javax.jms.MessageListener;
@MessageDriven(activationConfig = {
@ActivationConfigProperty(propertyName = "destination", propertyValue = "jms/Queue1"),
@ActivationConfigProperty(propertyName = "destinationType", propertyValue = "javax.jms.Queue") }, mappedName = "jms/Queue1")
public class AppMDB implements MessageListener {
public void onMessage(Message message) {
System.out.println(Instant.now() + ": Received " + message);
}
}This is accompanied with a META-INF/ejb-jar.xml; for
example:
<?xml version="1.0" encoding="UTF-8"?>
<ejb-jar version="3.2" xmlns="http://xmlns.jcp.org/xml/ns/javaee" xmlns:xsi="http://www.w3.org/2001/XMLSchema-instance" xsi:schemaLocation="http://xmlns.jcp.org/xml/ns/javaee http://xmlns.jcp.org/xml/ns/javaee/ejb-jar_3_2.xsd">
<display-name>AppMDBEJB</display-name>
</ejb-jar>Example EAR file META-INF/application.xml:
<?xml version="1.0" encoding="UTF-8"?>
<application id="Application_ID" version="8" xmlns="http://xmlns.jcp.org/xml/ns/javaee" xmlns:xsi="http://www.w3.org/2001/XMLSchema-instance" xsi:schemaLocation="http://xmlns.jcp.org/xml/ns/javaee http://xmlns.jcp.org/xml/ns/javaee/application_8.xsd">
<display-name>AppMDB</display-name>
<module id="Module_1594190856221">
<ejb>AppMDBEJB.jar</ejb>
</module>
</application> JMS Client
Example JMS Client in a servlet:
package com.example;
import java.io.IOException;
import java.io.PrintWriter;
import java.time.Instant;
import javax.jms.Connection;
import javax.jms.ConnectionFactory;
import javax.jms.MessageProducer;
import javax.jms.Queue;
import javax.jms.Session;
import javax.jms.TextMessage;
import javax.naming.InitialContext;
import javax.servlet.ServletException;
import javax.servlet.http.HttpServlet;
import javax.servlet.http.HttpServletRequest;
import javax.servlet.http.HttpServletResponse;
public class AppJMSProducer extends HttpServlet {
private static final long serialVersionUID = 1L;
protected void service(HttpServletRequest request, HttpServletResponse response)
throws ServletException, IOException {
String messageStr = "Hello World @ " + Instant.now();
response.setContentType("text/plain");
PrintWriter out = response.getWriter();
out.println(Instant.now() + ": Started writing");
out.flush();
try {
InitialContext ctx = new InitialContext();
ConnectionFactory qcf = (ConnectionFactory)ctx.lookup("jms/ConnectionFactory1");
Queue queue = (Queue)ctx.lookup("jms/Queue1");
try (Connection connection = qcf.createConnection()) {
try (Session session = connection.createSession(false, Session.AUTO_ACKNOWLEDGE)) {
MessageProducer producer = session.createProducer(queue);
TextMessage message = session.createTextMessage();
message.setText(messageStr);
producer.send(message);
}
}
} catch (Throwable t) {
out.println(Instant.now() + ": Error: " + t);
t.printStackTrace();
}
out.println(Instant.now() + ": Finished writing");
}
}For a Maven project, the required dependencies:
<dependency>
<groupId>javax.servlet</groupId>
<artifactId>javax.servlet-api</artifactId>
<version>3.1.0</version>
<scope>provided</scope>
</dependency>
<dependency>
<groupId>javax.jms</groupId>
<artifactId>javax.jms-api</artifactId>
<version>2.0</version>
<scope>provided</scope>
</dependency>HTTP Standard
Caching
Forcing Revalidation of Cached Responses
Despite having "must" in its name,
Cache-Control: must-revalidate only revalidates
(i.e. sends If-Modified-Since or
If-None-Match) after
the content has expired (emphasis added):
When the must-revalidate directive is present in a response received by a cache, that cache MUST NOT use the entry after it becomes stale to respond to a subsequent request without first revalidating it with the origin server.
To force always revalidating, use the oddly named
Cache-Control: no-cache which does
cache and always revalidates (emphasis added; and
with what seems like a gratuitous double negative in an already
confusing section):
If the no-cache directive does not specify a field-name, then a cache MUST NOT use the response to satisfy a subsequent request without successful revalidation with the origin server.
In more direct terms from MDN (emphasis added):
- must-revalidate: Indicates that once a resource becomes stale, caches must not use their stale copy without successful validation on the origin server.
- no-cache: The response may be stored by any cache, even if the response is normally non-cacheable. However, the stored response MUST always go through validation with the origin server first before using it
If content is not often changing, then such revalidations should
usually return 304 Not Modified to re-use the previously
cached response.
HTTP2 Standard
The HTTP/2 standard is governed by RFC 9113. The key differences over HTTP/1 and HTTP/1.1 are header compression and the ability to use a single TCP connection for multiple, concurrent requests (called streams).
Flow Control
HTTP/2 has flow control in both directions, on both the connection and each stream in a connection. This is independent of TCP flow control. HTTP/2 flow control may cause performance issues:
If an endpoint cannot ensure that its peer always has available flow-control window space that is greater than the peer's bandwidth * delay product on this connection, its receive throughput will be limited by HTTP/2 flow control. This will result in degraded performance.
The default
initial window size for connections and streams is 65,535 bytes. A
receiver may send a SETTINGS_INITIAL_WINDOW_SIZE
frame to increase the window size for current
and future
streams; however, this does
not apply to the connection window. The connection window may only
be increased using a WINDOW_UPDATE
frame on the connection (stream
0).
The window size is decremented
on both a stream and the connection when sending a DATA
frame (just the body
size). After receiving a DATA frame, the receiver sends
a WINDOW_UPDATE
frame on both the stream and connection to increment both window
sizes by the amount received.
Flow control may be disabled
by sending a SETTINGS_INITIAL_WINDOW_SIZE frame with a
value of 2147483647 and a WINDOW_UPDATE on the
connection (stream 0) with a value of 2147483647, and then
maintain the window sizes when receiving DATA frames with
subsequent WINDOW_UPDATE frames, if needed.
Eclipse MicroProfile
Eclipse MicroProfile is an open standard for Java MicroServices applications: https://microprofile.io/.
- Workshop on microServices with Java and Kubernetes on IBM Cloud
- Deploying microservices to OpenShift by using Kubernetes Operators
MicroProfile Configuration
Standardized configuration mechanisms: https://microprofile.io/project/eclipse/microprofile-config
MicroProfile RestClient
Type-safe JAX-RS client: https://microprofile.io/project/eclipse/microprofile-rest-client
- Make RestClients
@ApplicationScoped:By default, MicroProfile Rest Clients have a scope of @Dependent. When you inject them into something like a Jakarta RESTful endpoint, they inherit the scope of the Jakarta RESTful class, which is @RequestScoped by default. This will cause a new MicroProfile Rest Client to be created every time, which leads to extra CPU cost and a decent amount of class loading overhead that will slow things down. By making the MicroProfile Rest Client ApplicationScoped, the client is only created once, saving a lot of time.
@ApplicationScoped @Path("/") @RegisterRestClient(configKey="appScopedRestClient") public interface AppScopedRestClient { @GET @Path("/endpoint") @Produces(MediaType.TEXT_PLAIN) public String ping(); } @Path("/mp-restclient-test2") public class MicroProfileRestClientTest2 { @Inject @RestClient private AppScopedRestClient appScopedClient; @GET @Produces(MediaType.TEXT_PLAIN) public String ping() { return appScopedClient.ping(); } }
MicroProfile OpenTracing
Standardized way to trace JAX-RS requests and responses: https://microprofile.io/project/eclipse/microprofile-opentracing
MicroProfile Metrics
Standardized way to expose telemetry data: https://microprofile.io/project/eclipse/microprofile-metrics
MicroProfile OpenAPI
Standardized way to expose API documentation: https://microprofile.io/project/eclipse/microprofile-open-api
MicroProfile Fault Tolerance
Standardized methods for fault tolerance: https://microprofile.io/project/eclipse/microprofile-fault-tolerance
MicroProfile Health
Standardized application health check endpoint: https://microprofile.io/project/eclipse/microprofile-health
MicroShed Testing
MicroShed Testing helps to test MicroProfile applications.
Garbage Collection Thrashing Health Check Example
import javax.enterprise.context.ApplicationScoped;
import org.eclipse.microprofile.health.Health;
import org.eclipse.microprofile.health.HealthCheck;
import org.eclipse.microprofile.health.HealthCheckResponse;
@Health
@ApplicationScoped
public class HealthChecker implements HealthCheck
{
public static final double HEALTH_CHECK_GC_MIN_FREE = Double
.parseDouble(System.getProperty("HEALTH_CHECK_GC_MIN_FREE", "0.05"));
public static final int HEALTH_CHECK_GC_MIN_INTERVAL_MS = Integer.getInteger("HEALTH_CHECK_GC_MIN_INTERVAL_SECONDS",
60 * 5) * 1000;
private static long healthCheckGcLastCheck = System.currentTimeMillis();
@Override
public HealthCheckResponse call()
{
if (isGarbageCollectionHealthy())
{
return HealthCheckResponse.named("healthCheck").up().build();
}
else
{
return HealthCheckResponse.named("healthCheck").down().build();
}
}
public static synchronized boolean isGarbageCollectionHealthy()
{
try
{
final long now = System.currentTimeMillis();
final boolean doCheck = now >= healthCheckGcLastCheck + HEALTH_CHECK_GC_MIN_INTERVAL_MS;
healthCheckGcLastCheck = now;
if (doCheck)
{
final int checkHeapBytes = Math.toIntExact(
(long) ((double) Runtime.getRuntime().maxMemory() * HEALTH_CHECK_GC_MIN_FREE));
@SuppressWarnings("unused")
final byte[] blob = new byte[checkHeapBytes];
}
return true;
}
catch (OutOfMemoryError oome)
{
return false;
}
}
}Maven
List all archetypes
All public archetypes are available at https://repo1.maven.org/maven2/archetype-catalog.xml. To list all versions of a particular archetypeGroupId, search for it in this XML file. For example:
curl -s https://repo1.maven.org/maven2/archetype-catalog.xml | grep -A 2 io.openliberty | grep -v "\-\-" | while read line1; do read line2; read line3; echo "${line1}${line2}${line3}" | awk '{ gsub(/<\/[^>]+>/, ":"); gsub(/<[^>]+>/, ""); gsub(/:$/, ""); print; }'; doneCreate an application using an archetype
- Example with the simplest
archetype:
- Create the project
mvn archetype:generate -DarchetypeGroupId=org.apache.maven.archetypes -DarchetypeArtifactId=maven-archetype-quickstart -DarchetypeVersion=1.4 -DgroupId=com.example -DartifactId=myapp -Dversion=1.0-SNAPSHOT -B - Change directory to the project:
cd myapp - Build the project:
mvn clean install - Run the project:
java -cp target/myapp-1.0-SNAPSHOT.jar com.example.java.App
- Create the project
- Example using a Liberty
WAR archetype:
mvn archetype:generate -DarchetypeGroupId=io.openliberty.tools -DarchetypeArtifactId=liberty-archetype-webapp -DarchetypeVersion=3.7.1 -DgroupId=com.example -DartifactId=myapp -Dversion=1.0-SNAPSHOT -B - Example using a simple
WAR archetype:
mvn archetype:generate -DarchetypeGroupId=org.apache.maven.archetypes -DarchetypeArtifactId=maven-archetype-webapp -DarchetypeVersion=1.4 -DgroupId=com.example -DartifactId=myapp -Dversion=1.0-SNAPSHOT -B
Run without tests
mvn -DskipTests=true clean installSpecify an explicit POM
mvn -f mypom.xml clean installRun specific modules
mvn -pl module1,module2,moduleN -amd clean installInstall Loose JAR
To install a loose JAR into the local Maven repository:
mvn install:install-file -Dfile=$JARPATH -DgroupId=$GROUP -DartifactId=$ARTIFACT -Dversion=1.0-SNAPSHOT -Dpackaging=jar -DgeneratePom=trueThen this may be depended on:
<dependency>
<groupId>$GROUP</groupId>
<artifactId>$ARTIFACT</artifactId>
<version>1.0-SNAPSHOT</version>
</dependency>Standalone JAR
Simple pom.xml
Build with mvn clean package
<?xml version="1.0" encoding="UTF-8"?>
<project xmlns="http://maven.apache.org/POM/4.0.0"
xmlns:xsi="http://www.w3.org/2001/XMLSchema-instance"
xsi:schemaLocation="http://maven.apache.org/POM/4.0.0 http://maven.apache.org/xsd/maven-4.0.0.xsd">
<modelVersion>4.0.0</modelVersion>
<groupId>com.example</groupId>
<artifactId>MyStandaloneJAR</artifactId>
<version>0.1.20210101</version>
<name>MyStandaloneJAR</name>
<properties>
<project.build.sourceEncoding>UTF-8</project.build.sourceEncoding>
<maven.compiler.source>1.8</maven.compiler.source>
<maven.compiler.target>1.8</maven.compiler.target>
</properties>
<dependencies>
<dependency>
<groupId>junit</groupId>
<artifactId>junit</artifactId>
<version>4.13.1</version>
<scope>test</scope>
</dependency>
</dependencies>
</project>With the following directory structure:
├── README.md
├── pom.xml
├── src
│ ├── main
│ │ ├── java
│ │ │ └── com
│ │ │ └── example
│ │ │ ├── App.java
│ │ └── resources
│ │ ├── screenshot1.png
│ └── test
│ └── java
│ └── com
│ └── ibm
│ └── AppTest.javaPackage dependencies in the JAR
Also called an uber-JAR or fat-JAR.
<build>
<plugins>
<plugin>
<groupId>org.apache.maven.plugins</groupId>
<artifactId>maven-assembly-plugin</artifactId>
<version>3.3.0</version>
<configuration>
<descriptorRefs>
<descriptorRef>jar-with-dependencies</descriptorRef>
</descriptorRefs>
<appendAssemblyId>false</appendAssemblyId>
<archive>
<manifest>
<mainClass>com.example.CommandLineRunner</mainClass>
</manifest>
</archive>
</configuration>
<executions>
<execution>
<id>assemble-all</id>
<phase>package</phase>
<goals>
<goal>single</goal>
</goals>
</execution>
</executions>
</plugin>
</plugins>
</build>Runnable JAR specified with the main class in
mainClass.
Dependency to a packaged JAR
<dependency>
<groupId>com.example</groupId>
<artifactId>j2ee.jar</artifactId>
<version>1.0-SNAPSHOT</version>
<scope>system</scope>
<systemPath>${basedir}/lib/j2ee.jar</systemPath>
</dependency>If packaging dependencies, create assembly.xml:
<?xml version="1.0" encoding="UTF-8"?>
<assembly
xmlns="http://maven.apache.org/plugins/maven-assembly-plugin/assembly/1.1.0"
xmlns:xsi="http://www.w3.org/2001/XMLSchema-instance"
xsi:schemaLocation="http://maven.apache.org/plugins/maven-assembly-plugin/assembly/1.1.0 http://maven.apache.org/xsd/assembly-1.1.0.xsd">
<id>jar-with-all-dependencies</id>
<formats>
<format>jar</format>
</formats>
<includeBaseDirectory>false</includeBaseDirectory>
<dependencySets>
<dependencySet>
<outputDirectory>/</outputDirectory>
<useProjectArtifact>true</useProjectArtifact>
<unpack>true</unpack>
<scope>runtime</scope>
</dependencySet>
<dependencySet>
<outputDirectory>/</outputDirectory>
<unpack>true</unpack>
<scope>system</scope>
</dependencySet>
</dependencySets>
</assembly>Then modify the assembly plugin:
<configuration>
<descriptors>
<descriptor>${basedir}/assembly.xml</descriptor>
</descriptors>
</configuration>Spring
Consider the WebSphere Application Sever and Spring Framework versioning compatibility
JMS
Session Concurrency
Most Spring applications use org.springframework.jms.listener.DefaultMessageListenerContainer to drive MDBs/MDPs; for example:
<bean id="jmsContainer" class="org.springframework.jms.listener.DefaultMessageListenerContainer">
<property name="connectionFactory" ref="connectionFactory"/>
<property name="destination" ref="destination"/>
<property name="messageListener" ref="messageListener"/>
<property name="concurrentConsumers" value="50" />
<property name="maxConcurrentConsumers" value="50" />
</bean>concurrentConsumers is the minimum size of the pool and
maxConcurrentConsumers is the maximum size.
However, this may cause issues because JEE environments do not allow more than one JMS session per connection:
Application components in the web and EJB containers must not attempt to create more than one active (not closed) Session object per connection.
By default, DefaultMessageListenerContainer uses a cache level of CACHE_AUTO which, in the absence of a Spring-detected transaction manager, is set to CACHE_CONSUMER and this may cause Spring to create multiple sessions per connection.
This may be disabled with cacheLevel=0:
<bean id="jmsContainer" class="org.springframework.jms.listener.DefaultMessageListenerContainer">
<property name="connectionFactory" ref="connectionFactory"/>
<property name="destination" ref="destination"/>
<property name="messageListener" ref="messageListener"/>
<property name="concurrentConsumers" value="50" />
<property name="maxConcurrentConsumers" value="50" />
<property name="cacheLevel" value="0" />
</bean>Weaving
Spring supports Aspect-Oriented Programming (AOP) (https://docs.spring.io/spring/docs/current/spring-framework-reference/core.html). Spring with AOP and AspectJ requires either compile-time weaving or runtime-weaving (https://www.eclipse.org/aspectj/doc/released/devguide/printable.html). In general, it is preferable to use compile-time weaving to avoid runtime performance overhead. Such runtime overhead is usually evident during application startup with profiling showing hotspots in methods such as org.aspectj.* and org.springframework.aop.aspectj.*.
Hibernate
Object-Relational Mapping (ORM)
Which database connection pool (e.g. Hibernate-provided, WAS, etc.) is used depends on Hibernate configuration: https://github.com/hibernate/hibernate-orm/blob/master/documentation/src/main/asciidoc/userguide/chapters/jdbc/Database_Access.adoc#connectionprovider
The most common configurations are hibernate.connection.datasource (WAS) and hibernate.c3p0.*.
c3p0
- Prepared statement maximum cache size: hibernate.c3p0.max_statements or c3p0.maxStatements
Cloud Native
The cloud native programming model is the "interface" that Kubernetes and microServies applications implement "to build and run scalable applications in modern, dynamic environments such as public, private, and hybrid clouds. Containers, service meshes, microservices, immutable infrastructure, and declarative APIs exemplify this approach".
In contrast, cloud enabled applications are traditional applications that have been changed to run in a cloud environment.
Twelve-factor methodology
The twelve-factor methodology describes best practices for building software-as-a-service applications such as using declarative formats, maximizing portability, designed for cloud platforms, enabling continuous deployment and scaling.
Build to Manage
Build to manage is the idea of integrating logging, monitoring, and management capabilities into the DevOps pipeline.
Srangler Pattern
The strangler pattern incrementally migrates a monolithic application to microservices using a strangler interface to dispatch subsets of behavior to microservices.
Backend for Frontend
The Backend for Frontend (BFF) pattern uses intermediate microservices applications to connect a frontend to a backend. Complex backend systems are exposed to different frontends using different services without a monolothic API that attempts to serve all clients equally.
Entity and Aggregate
The Entity and Aggregate pattern uses microservices that aggregates lifecycle operations on a set of dependent entities.
Adapter Microservice
The Adapter microservice pattern wraps and translates existing services into an entity-based REST interface.
Go
Basics
- If you receive "cannot find package" errors when importing a
package, either
export GO111MODULE=onor create a module withgo mod init $MODULE
Hello World
helloworld.go:
package main
import "fmt"
func main() {
fmt.Println("Hello, World!")
}Run:
$ go run helloworld.go
Hello, World!Thread Dump
Built-in thread dump
By default, Go handles the
SIGQUIT signal by printing a stack trace to
stdout/stderr although then it kills itself:
A SIGQUIT, SIGILL, SIGTRAP, SIGABRT, SIGSTKFLT, SIGEMT, or SIGSYS signal causes the program to exit with a stack dump.
Manually generated thread dump
A thread dump may be manually generated by first calling pprof.Lookup
on the goroutine
profile and then writing that to a file with Profile.WriteTo.
Heap Dump
Manually generated heap dump
A heap dump may be manually generated by calling debug.WriteHeapDump.
Analyzing a Heap Dump from a Core Dump
If you have a core dump, its heap may be analyzed with viewcore.
However, viewcore requires that the
executable does not have stripped
symbols.
In addition, viewcore is not very actively maintained
and there are known
issues as of this writing, so, in general, it's better to use
debug.WriteHeapDump instead if possible.
Building viewcore
git clone https://github.com/golang/debug
cd debug
CGO_ENABLED=0 go build golang.org/x/debug/cmd/viewcoreRunning viewcore
./viewcore core.dmp --exe targetexeviewcore commands
Available Commands:
breakdown print memory use by class
goroutines list goroutines
help Help about any command
histogram print histogram of heap memory use by Go type
html start an http server for browsing core file data on the port specified with -port
mappings print virtual memory mappings
objects print a list of all live objects
objgraph dump object graph (dot)
overview print a few overall statistics
reachable find path from root to an object
read read a chunk of memoryAdditional debugging
If additional debugging information is required, consider compiling the target program without optimizations and inlining:
make build GOFLAGS="-gcflags=all='-N -l'"Signal processing
Go allows a program to handle various POSIX signals:
The functions in this package allow a program to change the way Go programs handle signals.
It also applies to some signals that otherwise cause no action: SIGUSR1, SIGUSR2
Therefore, it's valuable for any Go program to add a
SIGUSR1 handler to write a thread dump and a
SIGUSR2 handler to write a heapdump. For
example:
usr1 := make(chan os.Signal, 1)
signal.Notify(usr1, unix.SIGUSR1)
usr2 := make(chan os.Signal, 1)
signal.Notify(usr2, unix.SIGUSR2)
go func() {
for {
select {
case <- usr1:
f, err := os.Create("threaddump_" + time.Now().Format(time.RFC3339) + ".txt")
if err != nil {
// TODO handle error
continue
}
err = pprof.Lookup("goroutine").WriteTo(f, 2)
if err != nil {
// TODO handle error
continue
}
case <- usr2:
f, err := os.Create("heapdump_" + time.Now().Format(time.RFC3339) + ".bin")
if err != nil {
// TODO handle error
continue
}
debug.WriteHeapDump(f.Fd())
}
}
}()Link options
Stripping symbols
Though not recommended for maintainability, it is common to use the
-s -w link
options; for example:
go build -ldflags="-s -w"This strips debugging symbols from the final executable:
-s Omit the symbol table and debug information. -w Omit the DWARF symbol table.
Although stripping
symbols is done for non-debug builds of some common executables such
as kubelet, unless the size difference is very large or
there are security concerns about reverse engineering, it is generally a
net positive for maintenance to retain symbols by removing the
-s -w link options. This will allow crash debugging,
viewcore, some native stack walking tools, and it is not
expected to have a performance impact to retain symbols.
Swing
Focus
Review the focus specification and focus tutorial.
When needing to control focus on window/dialog open, if possible,
avoid the use of requestFocus completely and use a custom
FocusTraversalPolicy
with an overridden getDefaultComponent.
Otherwise, use requestFocusInWindow
instead of requestFocus
or grabFocus:
requestFocus(): Note that the use of this method is discouraged because its behavior is platform dependent. Instead we recommend the use of requestFocusInWindow().
grabFocus(): Client code should not use this method; instead, it should use requestFocusInWindow().
In general, avoid performing cross-window focus requests:
There is no foolproof way, across all platforms, to ensure that a window gains the focus. [...] If you want to ensure that a particular component gains the focus the first time a window is activated, you can call the requestFocusInWindow method on the component after the component has been realized, but before the frame is displayed. Alternatively, you can apply a custom FocusTraversalPolicy to the frame and call the getDefaultComponent method to determine which component will gain the focus.
Hello World
import java.awt.Component;
import java.awt.event.ActionEvent;
import java.awt.event.ActionListener;
import javax.swing.BoxLayout;
import javax.swing.JButton;
import javax.swing.JFrame;
import javax.swing.JLabel;
import javax.swing.JPanel;
import javax.swing.SwingUtilities;
import javax.swing.border.EmptyBorder;
public class SwingHelloWorld {
public static void main(String[] args) {
SwingUtilities.invokeLater(new Runnable() {
@Override
public void run() {
new SwingHelloWorld().createAndShowMainFrame();
}
});
}
private int clicked = 0;
private void createAndShowMainFrame() {
JFrame frame = new JFrame("Frame");
frame.setDefaultCloseOperation(JFrame.EXIT_ON_CLOSE);
JPanel panel = new JPanel();
panel.setLayout(new BoxLayout(panel, BoxLayout.Y_AXIS));
JLabel label1 = new JLabel("Hello World");
label1.setBorder(new EmptyBorder(10, 10, 10, 10));
label1.setAlignmentX(Component.CENTER_ALIGNMENT);
JLabel label2 = new JLabel("Clicked: " + clicked);
label2.setBorder(new EmptyBorder(10, 10, 10, 10));
label2.setAlignmentX(Component.CENTER_ALIGNMENT);
JButton button = new JButton("Button");
button.setAlignmentX(Component.CENTER_ALIGNMENT);
button.addActionListener(new ActionListener() {
@Override
public void actionPerformed(ActionEvent e) {
label2.setText("Clicked: " + (++clicked));
}
});
panel.add(label1);
panel.add(button);
panel.add(label2);
frame.getContentPane().add(panel);
frame.pack();
frame.setVisible(true);
}
}Apache CXF
Apache CXF is a Java framework for executing and processing JAX-RS or JAX-WS web services. The source is available at https://github.com/apache/cxf.
JDKBugHacks
CXF (used by WAS) may intitiate periodic full garbage collections
through calls to sun/misc/GC.currentLatencyTarget.
These calls are generally not required as it was a workaround for bugs
in older JDKs and this GC function may be disabled with:
-Dorg.apache.cxf.JDKBugHacks.gcRequestLatency=trueApache HttpClient
Apache HttpClient is an open source Java HTTP client.
Connection Pooling
Use PoolingHttpClientConnectionManager to utilize a pool of connections. A connection pool defaults to 25 total maximum connections and 5 maximum connections per route. Change these values by calling setMaxTotal and setDefaultMaxPerRoute, respectively. Then call HttpClients.custom() followed by setConnectionManager to use the pooled connection manager and finally call build to get the connection.
Keep-Alive
Keep-alive behavior is configured with HttpClientBuilder.setConnectionReuseStrategy
and HttpClientBuilder.setKeepAliveStrategy.
The default implementation of the former is DefaultConnectionReuseStrategy
which uses keep-alive unless
common response headers like Connection: close are
processed.
The default implementation of the latter is DefaultConnectionKeepAliveStrategy
which uses keep-alive for an unlimited time unless
the Keep-Alive response header is specified.
User Token Handler
The default user token handler stores state about a user principal from the execution context or mutual TLS authentication session into a connection, if available. This means that such connections cannot be re-used by different user principals and thus may severely limit connection pool re-use. Alternatively, you may call setUserTokenHandler with NoopUserTokenHandler.INSTANCE to avoid this behavior if the security implications are acceptable.
Example
- Add dependencies to pom.xml: https://search.maven.org/artifact/org.apache.httpcomponents.client5/httpclient5
<dependencies> <dependency> <groupId>org.apache.httpcomponents.client5</groupId> <artifactId>httpclient5</artifactId> <version>5.1.3</version> </dependency> <dependency> <groupId>org.slf4j</groupId> <artifactId>slf4j-api</artifactId> <version>1.7.36</version> </dependency> <dependency> <groupId>org.slf4j</groupId> <artifactId>slf4j-simple</artifactId> <version>1.7.36</version> </dependency> </dependencies> - Add client code:
package com.example.java; import org.apache.hc.client5.http.classic.methods.HttpGet; import org.apache.hc.client5.http.impl.classic.CloseableHttpClient; import org.apache.hc.client5.http.impl.classic.CloseableHttpResponse; import org.apache.hc.client5.http.impl.classic.HttpClients; import org.apache.hc.client5.http.impl.io.PoolingHttpClientConnectionManager; import org.apache.hc.client5.http.impl.io.PoolingHttpClientConnectionManagerBuilder; import org.apache.hc.core5.http.io.entity.EntityUtils; public class App { public static final int MAX_HTTP_CLIENT_OUTBOUND_CONNECTIONS_TOTAL = Integer .getInteger("MAX_HTTP_CLIENT_OUTBOUND_CONNECTIONS_TOTAL", 100); public static final int MAX_HTTP_CLIENT_OUTBOUND_CONNECTIONS_PER_ROUTE = Integer .getInteger("MAX_HTTP_CLIENT_OUTBOUND_CONNECTIONS_PER_ROUTE", MAX_HTTP_CLIENT_OUTBOUND_CONNECTIONS_TOTAL); public static final PoolingHttpClientConnectionManager HTTP_CLIENT_CONNECTION_MANAGER = PoolingHttpClientConnectionManagerBuilder .create().setMaxConnTotal(MAX_HTTP_CLIENT_OUTBOUND_CONNECTIONS_TOTAL) .setMaxConnPerRoute(MAX_HTTP_CLIENT_OUTBOUND_CONNECTIONS_PER_ROUTE).build(); public static void main(String[] args) throws Throwable { try (CloseableHttpClient httpClient = HttpClients.custom() .setConnectionManager(HTTP_CLIENT_CONNECTION_MANAGER) .setConnectionManagerShared(true) .build()) { try (CloseableHttpResponse response = httpClient.execute(new HttpGet("https://example.org/"))) { System.out.println(response.getCode() + " " + EntityUtils.toString(response.getEntity())); } } } }
Debugging HttpClient
Try:
-Dorg.apache.commons.logging.Log=org.apache.commons.logging.impl.SimpleLog
-Dorg.apache.commons.logging.simplelog.showdatetime=true
-Dorg.apache.commons.logging.simplelog.log.org.apache.http=DEBUG
-Dorg.apache.commons.logging.simplelog.log.org.apache.http.wire=ERROR
-Dorg.apache.commons.logging.simplelog.log.org.apache.http.headers=ERRORRational Application Developer
Rational Application Developer (RAD) is an Eclipse-based development environment.
Tuning the workspace
Review the many ways to tune RAD performance: http://www-01.ibm.com/support/knowledgecenter/SSRTLW_9.0.0/com.ibm.performance.doc/topics/cperformancetips.html
The configuration changes listed below can be done to improve RAD's performance depending on individual needs. Some of these tips have been integrated to the product into the Workspace performance tuning feature, available by clicking Help > Performance > Workspace performance tuning.
- If you already have some projects in the workspace, published or not into WebSphere Application Server v7.0 to 8.5.5, you could start by using the Workspace performance tuning tool.
- The table in the Performance Tips at the Knowledge Center summarizes the tips, points out the type of improvement and how frequently any of these configuration changes are considered. The table below suggests which configurations might be useful for a few typical conditions you could have in your workspace. This does not mean the tip is exclusive for that condition though.
- Most of these tips can be used also in WDT. Look below the table for a brief description of each task. A special note is done on those that are only for RAD.
| Condition | Tip |
|---|---|
| Many projects and/or files in the workspace | Convert projects to binary form; Closing Projects; Validation; Automatically build and refresh the workspace; Links; Plug-ins activated on startup |
| Workspace is old / has had many changes | Fresh workspaces |
| Limited resources | Do not install features that are not required; Remote test server; Restarting Rational Application Developer; JVM tuning; JVM tuning - shared classes; Capabilities; Reducing memory; Quick Diff; Label decorations |
| Constantly modifying projects published to WAS 7.0 to 8.5.5 traditional profile | Publishing and annotations; Server configuration options; Server Startup Options (Admin Console); Restarting projects |
| General tips | Defragmenting; Antivirus software; Task Manager |
Automatically build and refresh the workspace
When "Build Automatically" is enabled, each time files are saved, a build is triggered, which makes the save operation itself take longer.
"Refresh Automatically" is only useful if constantly working with external editors to modify files in the workspace. If not, this will only spend resources in monitoring for changes caused by external processes.
RAD: Make sure that "Build Automatically" and "Refresh Automatically" options are disabled in Window > Preferences > General > Workspace.
WDT: "Build Automatically" exists in the same wizard, but there are two options instead of "Refresh Automatically": "Refresh using native hooks or polling" and "Refresh on access" (http://help.eclipse.org/kepler/topic/org.eclipse.platform.doc.user/tasks/tasks-52.htm?cp=0_3_3_8). "Refresh on access" gets activated only when a file is opened. Make sure to have at least "Build Automatically" and "Refresh using native hooks or polling" disabled.
Convert projects to binary form
If a workspace is large and has a lot of projects that are not frequently updated, convert those to binary form. This will reduce memory footprint and speed up development tasks: http://www.ibm.com/developerworks/rational/library/07/0619_karasiuk_sholl/
Capabilities
By disabling capabilities, you can prevent invoking an unneeded function and save time and memory resources by not having a plugin you don't need loaded. You can enable/disable capabilities at Window > Preferences > General > Capabilities.
Closing Projects
Any projects in the workspace that are not being modified or needed as dependencies of other projects should be deleted or closed. While they remain open, time and memory are consumed in constantly building and validating their source code.
To close it: right click the project and select Close Project.
Defragmenting
Defragmenting helps with the startup of the product, and also with some I/O intensive, like build and validation. Only available in Windows.
Do not install features that are not required
This will reduce memory footprint and also save time that could be consumed during activation of plugins.
Plug-ins activated on startup
There are plug-ins in RAD that need to always be activated on startup in order to enable some functions. One of these plug-ins is the IBM Common Migration UI, which, when migrating resources into the workspace, detects and suggest changes to those projects if needed. If you have already performed the migration and are working with a large workspace, you can opt to disable the IBM Common Migration UI by clearing its option in Window > Preferences > General > Startup and Shutdown
Fresh workspaces
In some cases, where a workspace is old, the workspace metadata can accumulate and impact performance. Creating a new workspace can help with this, but is important to note that if you've set preferences in your workspace, you will need to set them again on the new workspace. You may also export the preferences and import them into the new workspace.
JVM tuning
The location of the JVM tuning parameters is the eclipse.ini file in the installation directory.
RAD Comes tuned for what's been considered the average workspace.
JVM tuning - shared classes
Can improve product's startup time. Note: Only applies to IBM JVM. RAD on the MAC ships the Oracle JVM.
Label decorations
Label Decorations allow additional information to be displayed in an
item's label and icon. Disabling all or some decorations can have a
little improvement in performance.
http://help.eclipse.org/kepler/topic/org.eclipse.platform.doc.user/reference/ref-decorations.htm?cp=0_4_1_33
Links (The Link Indexer)
The Link Indexer monitors hyperlinks. It can be disabled by clearing Supply link results to Java search in Window > Preferences > Web > Links. Or you can just exclude some resources from indexing. Some activities like link refactoring depend on this function to work appropriately. As a possible rule of thumb: if there's a lot of hyperlinks in the workspace and you won't be refactoring, you can disable this.
Publishing and annotations
RAD: This task can also be done automatically using the Workspace performance tuning tool.
For Web 2.5 applications that do not contain annotations, you can reduce the time to publish by setting the metadata-complete property on the WebContent/WEB-INF/web.xml file to true.
If a project contains annotations, you can use the directives com.ibm.ws.amm.scan.context.filter.archives and com.ibm.ws.amm.scan.context.filter.packages to prevent the server to scan certain JAR files or packages (http://www.ibm.com/support/knowledgecenter/SSAW57_8.5.5/com.ibm.websphere.nd.multiplatform.doc/ae/xrun_jvm.html).
Quick Diff
You can get a small performance improvement by disabling Quick Diff: Window > Preferences > General > Editors > Text Editors > Quick Diff. Quick Diff displays a marker on the editor indicating changes done since last file save.
Remote test server
You can run the test server on the second system to free up resources on your development machine.
Reference: http://www-01.ibm.com/support/knowledgecenter/SSRTLW_9.0.0/com.ibm.servertools.doc/topics/twcrtins_v6.html for how to create a server and http://www.ibm.com/support/knowledgecenter/SSHR6W_8.5.5/com.ibm.websphere.wdt.doc/topics/tremote_start.htm for how to enable a server to be started remotely.
Restarting projects
Server configuration options
Server Startup Options (Admin Console)
To improve server startup performance, ensure that the Run in development mode and Parallel start are selected. Also remove applications that are not required from the installed applications list. http://www-01.ibm.com/support/knowledgecenter/SSRTLW_9.0.0/com.ibm.performance.doc/topics/cserverstartupadmin.html
Reducing memory
RAD only: Click Help > Performance > Reduce Memory
Restarting Rational Application Developer
As with other applications, some memory can be freed up by restarting it, but some considerations should be taken if the workspace is really large:
- Consider disabling automatic builds.
- Suspend all validators.
- Consider disabling link indexer.
Validation
You can reduce the build time by disabling some or all validators at Window > Preferences > Validation. When disabling a validator, error messages, warnings are not shown. http://www-01.ibm.com/support/knowledgecenter/SSRTLW_9.0.0/com.ibm.performance.doc/topics/cprefvalidation.html
Workspace performance tuning
The Workspace performance tuning tool implements a series of tasks that examine the workspace and make recommendations for changes (or in some cases, do the actual changes) to have a better performance.
HTML
Example HTML5 Page
<!DOCTYPE html>
<html lang="en">
<head>
<title>Title</title>
<meta charset="UTF-8">
<meta name="theme-color" content="#ffffff">
<meta name="viewport" content="width=device-width, initial-scale=1">
<meta name="description" content="Page description">
<style type="text/css">
body {
margin: 40px auto;
max-width: 650px;
line-height: 1.6;
font-size: 18px;
color: #444;
padding:0 10px;
}
h1, h2, h3 {
line-height:1.2;
}
</style>
</head>
<body>
<h1>Heading</h1>
<p>Paragraph</p>
</body>
</html>Transport Layer Security
Transport Layer Security (TLS) is a standard used to encrypt network communication. The predecessor is Secure Sockets Layer (SSL).
TLS uses public-private key cryptography during a handshake in which everyone sees the public key and can encrypt messages using this public key, but only the owner of the private key (the server) may decrypt such messages. This key exchange process is called asymmetric encryption and is relatively slow. The encrypted handshake is used to agree on a shared, secret key which each side then uses to encrypt and decrypt the messages after the handshake. This is called symmetric encryption which is relatively faster. The combination of the asymmetric handshake algorithm and symmetric data encryption algorithm is called the cipher suite and the suite used must be agreed upon during the handshake.
RSA Key Exchange
One side, the server, generates a private and public key certificate pair. When the user starts a handshake with the server (e.g. a user's browser going to a website), the user sends a randomly generated number ("client random") and the server responds with the public key and its own randomly generated number ("server random"). The user encrypts a randomly generated number ("premaster secret") with the public key and sends it to the server. The server uses its matching private key to decrypt the premaster secret. The user and server independently use the premaster secret, the "client random," and "server random" numbers to generate a shared key ("session key") which is then used during symmetric encryption.
Ephemeral Diffie-Hellman Key Exchange
One side, the server, generates a private and public key certificate pair. When the user starts a handshake with the server (e.g. a user's browser going to a website), the user sends a randomly generated number ("client random") and the server responds with its own randomly generated number ("server random") along with a message encrypted using its private key that contains the Diffie-Hellman (DH) parameter, the client random, and the server random. The user decrypts the message using the public key and sends back its own DH parameter. The user and server independently calculate the premaster secret using the DH parameters. The user and server independently use the premaster secret, the "client random," and "server random" numbers to generate a shared key ("session key") which is then used during symmetric encryption.
Certificates
TLS certificates are represented using the X.509 ASN.1 DER format. Common file formats are:
.pem(RFC 1422): Base-64 encoded PEM format with public and/or private keys..cer,.crt,.cert,.key, and.der: Same as.pemalthough it may be binary encoded instead of Base-64.- Convert into PEM:
openssl x509 -inform der -in in.der -out out.pem
- Convert into PEM:
.p12(RFC 7292): Encrypted, binary encoded PKCS#12 format with public and/or private keys.- Convert public key into PEM:
openssl pkcs12 -in in.p12 -nokeys -clcerts -out out.pem - Convert private key into PEM:
openssl pkcs12 -in in.p12 -nocerts -out out.pem
- Convert public key into PEM:
.jks: Java format for public and/or private keys.- Convert into PKCS#12:
$JAVA/bin/keytool -importkeystore -srckeystore in.jks -destkeystore out.p12 -deststoretype PKCS12 - Convert into PEM
- Convert into PKCS#12:
There are also .pub files which are public keys but not
in an X.509 ASN.1 DER certificate form.
Keystores and Truststores
A keystore is a file that stores one or more certificates (keys). Formats for keystores include PKCS12, JKS, etc.
A truststore is also a keystore but it's an informal name for a keystore that a client uses to signify which certificates are trusted, such as when making outbound TLS calls.
keytool
The keytool command is part of the JDK, so if it's not
on your PATH, you can find the tool inside the JDK and
execute it directly. keytool is generally used to
manipulate JKS keystore. Note that starting with Java 9,
the JDK can read PKCS12 keystores directly in addition to JKS
keystores.
Create JKS keystore from a host and port
- Download the certificate of your of the host and port into a
temporary file. Replace
localhost:443with the host and port.keytool -printcert -sslserver localhost:443 -rfc >tempfile - Create a JKS keystore based on this
tempfilecertificate.keytoolrequires a password.keytool -import -alias truststore -keystore truststore.jks -file tempfile - Delete the
tempfile:rm tempfile
If this is a truststore with public keys and the security of the truststore is not important, this may be combined in a single line with the password:
keytool -printcert -sslserver localhost:443 -rfc | keytool -import -noprompt -alias truststore -keystore truststore.jks -storepass passwordList JKS keystore certificates
keytool -list -keystore truststore.jksUse a global JKS truststore in a Java program
java -Djavax.net.ssl.trustStore=truststore.jks -Djavax.net.ssl.trustStorePassword=PasswordContainers
Sub-chapters
- Docker
- Podman
- Kubernetes
- Red Hat
- OpenShift
- IBM Cloud
- Amazon Web Services (AWS)
- Java J9 in Containers
- HotSpot Java in Containers
- Liberty in Containers
- WebSphere Application Server traditional in Containers
Open Container Initiative
The Open Container Initiative (OCI) is a standardization of container formats and runtimes. This includes runc for spawning and running containers, an image specification, a distribution specification, and a runtime specification.
Terms
- Image: An application "binary"
- Container: A running application
Continuous Integration
Continuous Integration (CI) includes:
- Verifies build integrity by constantly pulling, compiling, packaging, and configuring source code.
- Runs tests after each commit.
- Run integration tests to check interoperation with other systems.
Continuous Delivery
Continuous Delivery (CD) includes:
- Building software such that it may be released at any time.
- Every commit goes through a CI pipeline.
CD may also stand for Continuous Deployment which takes the output of Continuous Delivery and deploys it automatically, although this is too aggressive for some customers.
DevOps
DevOps is Continuous Integration (CI) + Continuous Delivery (CD).
Docker
Managing Containers
Use the -d flag to start the container in the background and then access its output with docker logs.
docker run -d -p 80:9080 -p 443:9443 websphere-liberty:webProfile8General Commands
Print the container IDs of all running containers that are based on a particular tag such as websphere-liberty:webProfile8:
docker ps -f "ancestor=websphere-liberty:webProfile8" --format "{% raw %}{{.ID}}{% endraw %}"The output of the above command may be sub-shelled into other docker commands. For example, to "log in" to a container based on a particular tag (if there's only one running):
docker exec -it $(docker ps -f "ancestor=websphere-liberty:webProfile8" --format "{% raw %}{{.ID}}{% endraw %}") bashSome images do not have sudo installed and you don't know the root password. If root is needed, log in as the root user:
docker exec -u root -it ${CONTAINERID} bashPrint messages.log:
docker exec -it $(docker ps -f "ancestor=websphere-liberty:webProfile8" --format "{% raw %}{{.ID}}{% endraw %}") cat /logs/messages.logTail messages.log:
docker exec -it $(docker ps -f "ancestor=websphere-liberty:webProfile8" --format "{% raw %}{{.ID}}{% endraw %}") tail -f /logs/messages.logSeeing Host Processes
Start the container with --pid=host.
For an example,
see running htop in a container but looking at the
host.
Seeing Another Container
Start the container with --pid=container:<name|id>.
Export Filesystem
Export filesystem of a container:
docker export $CONTAINER > export.tarImage Size
Show the uncompressed image size of an image and all its parent
images with docker images. For example:
$ docker images
REPOSITORY TAG IMAGE ID CREATED SIZE
containerdiag latest 3c38d16cc5e5 45 seconds ago 9.17GBDebugging
Rooting a Running Container
For debugging purposes, one can "root" into any Docker image which is useful for quickly installing something. Example:
docker run -d -p 80:9080 -p 443:9443 websphere-liberty:webProfile8
docker exec -u root -it ${CONTAINERID} sh
apt-get update
apt-get install vim
vi /config/server.xmlStatistics
docker stats
shows periodic information on each container:
CONTAINER ID NAME CPU % MEM USAGE / LIMIT MEM % NET I/O BLOCK I/O PIDS
fca32e320852 serene_hodgkin 3.84% 1.868GiB / 7.78GiB 24.01% 41MB / 629kB 0B / 0B 626Dockerfile
A Dockerfile is a file that describes how to build a Docker image: https://docs.docker.com/develop/develop-images/dockerfile_best-practices/
A Dockerfile starts with a FROM directive that specifies the parent image to inherit from. Subsequent directives are essentially a script of actions to build the final image on top of the parent image. For example:
FROM fedora:latest
CMD echo "Hello World"A searchable list of public images is here: https://hub.docker.com/search?q=&type=image&image_filter=store%2Cofficial
In the example above, the name before the colon (e.g. fedora) is the repository name and the name after the colon (e.g. latest) is the version of a particular image (the combination of repository name and version is called a tag): https://hub.docker.com/_/fedora
The CMD (or ENTRYPOINT) directive is required and it's the final executable (and any arguments) which runs to start the image as a container. When that executable ends, the container also ends. In the example above, "Hello World" is printed and the container ends.
A Dockerfile is built into an image with a path to the build context path (normally the current directory with "."):
$ docker build .
Sending build context to Docker daemon 6.144kB
Step 1/2 : FROM fedora
---> 8c568f104326
Step 2/2 : CMD echo "Hello World"
---> Using cache
---> e7f19ddca071
Successfully built e7f19ddca071The image may be run by specifying the container name:
$ docker run e7f19ddca071
Hello WorldAn image is normally built with a tag:
$ docker build -t testimage:20190304 .
Sending build context to Docker daemon 6.144kB
Step 1/2 : FROM fedora:latest
---> 8c568f104326
Step 2/2 : CMD echo "Hello World"
---> Using cache
---> e7f19ddca071
Successfully built e7f19ddca071
Successfully tagged testimage:20190304Then the human-readable tag may be used to run the image:
$ docker run testimage:20190304
Hello WorldThe $(docker ps) command will not show stopped containers. Instead use the -a flag:
$ docker ps -a
CONTAINER ID IMAGE COMMAND CREATED STATUS PORTS NAMES
ec4942671282 testimage:20190304 "/bin/sh -c 'echo \"H..." 3 seconds ago Exited (0) 1 second ago eloquent_kapitsaIf a container naturally stops because the CMD finishes (as opposed to a still-running container stopped with $(docker stop)), then the only way to "log in" and review the container is to commit the container's disk contents to a new image and then start that image with an alternative CMD that logs you in (this new container should only be used for investigation and grabbing logs because it does not contain important aspects of the previous container such as environment entries):
$ docker commit ec4942671282 testimage:20190304_run1
sha256:9e7d092f7686e126e94f03f6f6df32fe9292bdb4ee0018cdaa1cb0deaaf5c0d7
$ docker run -it --entrypoint=sh testimage:20190304_run1
sh-4.4#A test image may run forever with a CMD such as:
CMD exec /bin/bash -c "trap : TERM INT; sleep infinity & wait"Another way to start a container and log in is to use:
CMD shAnd then run and allocate an interactive tty:
$ docker run -it testimage:20190304
sh-4.4#Caching
If a Dockerfile command references a remote resource (e.g. RUN git clone or wget), Docker has no way to know when that remote resource has changed so it will gladly re-use a cached layer if available. Either delete that particular cached layer, or, during development, consider adding something trivial that changes the command such as incrementing a numeric value in an echo statement:
RUN echo "Cloning somerepo V1"; git clone somerepoSecrets
Run-time secrets may be mounted through volumes: https://github.com/moby/moby/issues/13490
Build-time secrets using ARG, ENV, and multi-stage builds are generally not secure because they are difficult to completely purge from things like the docker layers, cache, etc. The alternative is tmpfs mounted secrets:
- https://docs.docker.com/develop/develop-images/build_enhancements/
- https://medium.com/@tonistiigi/build-secrets-and-ssh-forwarding-in-docker-18-09-ae8161d066
Kubernetes secrets: https://kubernetes.io/docs/concepts/configuration/secret/
Show Dockerfile from Image
There's no way to build a Dockerfile from an image, but you can see all the commands that were executed to build the image in order. For example:
$ docker history -H openliberty/open-liberty
IMAGE CREATED CREATED BY SIZE COMMENT
086d92162c64 43 hours ago /bin/sh -c #(nop) CMD ["/opt/ol/wlp/bin/ser... 0B
[...]For the full commands, add the --no-trunc option.
Major Linux Flavors

Docker Registries
The default registry is Docker Hub: https://hub.docker.com/
After creating an account, pushing to a registry involves logging in, tagging images, and pushing images:
Login: https://docs.docker.com/engine/reference/commandline/login/
$ docker login
Login with your Docker ID to push and pull images from Docker Hub. If you don't have a Docker ID, head over to https://hub.docker.com to create one.
Username: [...]
Password:
Login SucceededList available local images:
$ docker images
REPOSITORY TAG IMAGE ID CREATED SIZE
fedoradebug 20190325 2c9cb6ffea7c 5 minutes ago 7.71GBTag an image one or more times:
$ docker tag 2c9cb6ffea7c kgibm/fedoradebug:20190325
$ docker tag 2c9cb6ffea7c kgibm/fedoradebug:latest
$ docker images
REPOSITORY TAG IMAGE ID CREATED SIZE
fedoradebug 20190325 2c9cb6ffea7c 10 minutes ago 7.71GB
kgibm/fedoradebug 20190325 2c9cb6ffea7c 10 minutes ago 7.71GB
kgibm/fedoradebug latest 2c9cb6ffea7c 10 minutes ago 7.71GBAlternatively, tagging can be done at build time with one or more -t flags:
DOCKER_BUILDKIT=1 docker build --secret id=remotepassword,src=remotepassword.txt -t kgibm/fedoradebug:20190325 -t kgibm/fedoradebug:latest .Push to the registry: https://docs.docker.com/engine/reference/commandline/push/
docker push kgibm/fedoradebugDocker Compose
Docker compose is a simple way to build multiple containers together: https://docs.docker.com/compose/compose-file/
Example WAS-based compositions: https://github.com/kgibm/websphere_docker_examples
docker-compose.yml
The docker-compose.yml file describes how to build and wire together multiple containers. In the following example, there is a container that's logically called "app" with a Dockerfile in the "./was" sub-folder and this type of container will expose port 9443 to other containers, and there is a container that's logically called "proxy" with a Dockerfile in the "./nginx" sub-folder and this type of container will expose port 80 to the host, and it "depends_on" the "app" container(s) so that proxy is only started after app:
version: "3"
services:
app:
build:
context: was
dockerfile: Dockerfile
expose:
- "9443"
environment:
- ENABLE_BASIC_LOGGING=true
proxy:
build:
context: nginx
dockerfile: Dockerfile
ports:
- "80:80"
depends_on:
- appdocker-compose build
The docker-compose build command builds all of the
container Dockerfiles in the docker-compose.yml file. This should be run
any time any of the Dockerfiles are changed.
docker-compose up
The docker-compose up command starts all of the
containers in the docker-compose.yml file. Multiple instances of a
particular service may be started. For example:
docker-compose up --scale app=2Use the -d parameter to start everything in the
background. For example:
docker-compose up --scale app=2 -ddocker-compose logs
If starting in the background, tail the logs after starting:
docker-compose logs -t -fdocker-compose down
The docker-compose down command stop all of the
containers in the docker-compose.yml file. This is normally run after
typing Ctrl^C in the $(docker-compose up) window.
docker-compose rm
The docker-compose rm command deletes stopped
containers.
Containerfile
A Containerfile
is a generic form of a Dockerfile and is largely the
same.
Podman
Podman is a daemonless container engine. Most of the command syntax is the same as docker.
Podman Compose is similar to Docker Compose.
Prune Containers
podman stop --all
podman image rm --all
podman system prune --all --force --externalInstalling on macOS/Windows
- Example specifying number of CPUs, available memory, and disk:
podman machine init --cpus 4 --memory 10240 --disk-size 100 - Example also mounting a host filesystem for later volume mounts:
Thenpodman machine init --cpus 4 --memory 10240 --disk-size 100 -v /tmp:/tmp/hostrunwith-v /tmp/host:/tmp/host- On Windows+WSL,
-von themachine initis not needed as/mnt/$DRIVEare automatically mounted (e.g./mnt/c)
- On Windows+WSL,
- On recent versions of podman on macOS on ARM, if there is a hang on
podman machine start, try re-creating the machine with:export CONTAINERS_MACHINE_PROVIDER=applehv - To use a different version of CoreOS, find a build on the build
browser, download the "QEMU" file and point to the downloaded image
with
--image-path. Cached images are stored in~/.local/share/containers/podman/machine/qemu/
Running on macOS/Windows
podman machine startOn Windows+WSL, you can enter the machine with
wsl -d podman-machine-default
Status on macOS/Windows
$ podman machine ls
NAME VM TYPE CREATED LAST UP CPUS MEMORY DISK SIZE
podman-machine-default* qemu About a minute ago Currently running 4 8.59GB 53.69GB
$ podman version
Client:
Version: 3.4.0
API Version: 3.4.0
Go Version: go1.17.1
Built: Thu Sep 30 11:44:31 2021
OS/Arch: darwin/amd64
Server:
Version: 3.3.1
API Version: 3.3.1
Go Version: go1.16.6
Built: Mon Aug 30 13:46:36 2021
OS/Arch: linux/amd64SSH on macOS/Windows
$ podman machine ssh
[...]
[core@localhost ~]$ uname -a
Linux localhost 5.14.9-200.fc34.x86_64 #1 SMP Thu Sep 30 11:55:35 UTC 2021 x86_64 x86_64 x86_64 GNU/LinuxRoot podman on macOS/Windows
By default, the podman connection is a non-root
connection:
$ podman system connection list
Name Identity URI
podman-machine-default* /Users/kevin/.ssh/podman-machine-default ssh://core@localhost:59679/run/user/1000/podman/podman.sock
podman-machine-default-root /Users/kevin/.ssh/podman-machine-default ssh://root@localhost:59679/run/podman/podman.sockTo switch to a root podman, update the default
connection:
podman system connection default podman-machine-default-rootTo switch back to a non-root podman, update the default
connection:
podman system connection default podman-machine-defaultCapabilities
- List capabilities of a container:
podman exec -it $CONTAINER capsh --print
Cross-compile on macOS
- Install
qemu-user-static(CoreOS usesrpm-ostreeinstead ofdnf/yum):podman machine ssh "sudo rpm-ostree install qemu-user-static" - Stop the machine (do not use
systemctl rebootas suggested in the output of the above command):podman machine stop - Start the machine:
podman machine start - Try to run some other
architecture; for examples, Fedora supports various
architectures:
In one command:$ podman run --rm --platform linux/amd64 -it fedora uname -m x86_64 $ podman run --rm --platform linux/arm64/v8 -it fedora uname -m aarch64 $ podman run --rm --platform linux/ppc64le -it fedora uname -m ppc64le $ podman run --rm --platform linux/s390x -it fedora uname -m s390xfor p in linux/amd64 linux/arm64/v8 linux/ppc64le linux/s390x; do podman run --rm --platform $p -it fedora uname -m; done
Kubernetes
Kubernetes (also known as k8s or kube) is an open-source system for automating deployment, scaling, and management of containerized applications.
Basic terms:
- Pod: Collection of one or more containers running on the same node with shared resources such as storage and IP addresses.
- Deployment: One or more pods.
- Service: Wire together pods by exposing deployments to each other. A
service is basically a load balancer/reverse proxy to a set of pods
using a selector and access policy. A service is normally named
service-name.namespace:port. A service provides a permanent, internal host name for applications to use. - Operator: Manage application state and exposes interfaces to manage the application.
Architecture
A Kubernetes cluster is a set of nodes. Each node runs the kubelet agent to monitor pods, kube-proxy to maintain network rules, and a container runtime such as Docker, containerd, CRI-O, or any other Container Runtime Interface (CRI)-compliant runtime. Worker nodes run applications and master nodes manage the cluster.
Master Nodes
Master nodes collectively called the control plane administer the worker nodes. Each master node runs etcd for a highly-available key-value store of cluster data, cloud-controller-manager to interact with any underlying cloud infrastructure, kube-apiserver to expose APIs for the control plane, kube-scheduler for assigning pods to nodes, and kube-controller-manager to manage controllers (the last three may be called Master Services).
kubectl
kubectl
is a command line interface to manage a Kubernetes cluster.
Links:
Cluster Context
kubectl may use multiple clusters. The available
clusters may be shown with the following command and the current cluster
is denoted with *:
$ kubectl config get-contexts
CURRENT NAME CLUSTER AUTHINFO NAMESPACE
default/c103-:30595/IAM#email c103-:30595 IAM#email/c103-:30595 testodo4
* docker-desktop docker-desktop docker-desktopThe API endpoints may be displayed with:
$ kubectl config view -o jsonpath='{"Cluster name\tServer\n"}{range .clusters[*]}{.name}{"\t"}{.cluster.server}{"\n"}{end}'
Cluster name Server
c103-:30595 https://c103-.com:30595
docker-desktop https://kubernetes.docker.internal:6443Change Cluster Context
$ kubectl config use-context docker-desktop
Switched to context "docker-desktop".Delete Cluster Context
$ kubectl config delete-context docker-desktop
deleted context docker-desktop from ~/.kube/configetcd
etcd stores the current and desired states of the cluster, role-based access control (RBAC) rules, application environment information, and non-application user data.
High Availability
Run at least 3 master nodes for high availability and size each appropriately.
Objects
Kubernetes Objects
represent the intended state of system resources. Controllers act
through resources to try to achieve the desired state. The
spec property is the desired state and the
status property is the object's current status.
Labels
Objects may have metadata key/value pair labels and objects may be grouped by label(s) using selectors.
Resources
Kubernetes Resources are API endpoints that store and control a collection of Kubernetes objects (e.g. pods). Common resources:
- Deployment: Collections of pods. API
- ReplicaSet: Ensure that a specified number of replicas of a pod are running but generally Deployments (that include a ReplicaSet) are directly used instead. API
- StatefulSets: Deployment with stateful state. API
- Service: Provides internal network access to a logical set of pods (Deployments or StatefulSets). API
- Ingress: Provides external network access to a Service. Ingress is also called a Route. API
- ConfigMap: Non-confidential key-value configuration pairs. API
- Secret: Confidential key-value configuration pairs. API
- PersistentVolume: Persistent storage. API
- StorageClass: Groups storage by different classes of qualities-of-service and characteristics. API
List resource kinds
$ kubectl api-resources
NAME SHORTNAMES APIGROUP NAMESPACED KIND
pods po true Pod
[...]Namespace
A namespace is a logical isolatuion unit or "project" to group objects/resources, policies to restrict users, constraints to enforce quotas through ResourceQuotas, and service accounts to automatically manage resources.
List namespaces
$ kubectl get namespaces --show-labels
NAME STATUS AGE LABELS
default Active 8d <none>
kube-node-lease Active 8d <none>
kube-public Active 8d <none>
kube-system Active 8d <none>
kubernetes-dashboard Active 6d22h <none>Create namespace
kubectl create namespace testns1Show current namespace (if any)
kubectl config view --minify | grep namespaceChange current namespace
kubectl config set-context --current --namespace=${NAMESPACE}Reset to no namespace:
kubectl config set-context --current --namespace=Nodes
List Nodes
$ kubectl get nodes -o wide
NAME STATUS ROLES AGE VERSION INTERNAL-IP EXTERNAL-IP OS-IMAGE KERNEL-VERSION CONTAINER-RUNTIME
docker-desktop Ready master 8d v1.19.7 192.168.65.4 <none> Docker Desktop 5.10.25-linuxkit docker://20.10.5Controllers
Kubernetes Controllers run a reconciliation loop indefinitely while enabled and continuously attempt to control a set of resources to reach a desired state (e.g. minimum number of pods).
Deployments
Deployments define a collection of one or more pods and configure container templates with a name, image, resources, storage volumes, and health checks, as well as a deployment strategy for how to create/recreate a deployment, and triggers for when to do so.
List Deployments
$ kubectl get deployments --all-namespaces
NAMESPACE NAME READY UP-TO-DATE AVAILABLE AGE
kube-system coredns 2/2 2 2 8d
kube-system metrics-server 1/1 1 1 6d22h
kubernetes-dashboard dashboard-metrics-scraper 1/1 1 1 6d22h
kubernetes-dashboard kubernetes-dashboard 1/1 1 1 6d22hCreate Deployment
kubectl create deployment ${DEPLOYMENT} --image=${FROM} --namespace=${NAMESPACE}For example:
kubectl create deployment liberty1 --image=openliberty/open-liberty --namespace=testns1List pods for a Deployment
kubectl get pods -l=app=${DEPLOYMENT} --namespace=${NAMESPACE}For example:
kubectl get pods -l=app=liberty1 --namespace=testns1With custom columns:
$ kubectl get pods -l=app=liberty1 -o=custom-columns=NAME:.metadata.name,NAMESPACE:.metadata.namespace,STATUS:.status.phase,NODE:.spec.nodeName,STARTED:.status.startTime --namespace=testns1
NAME NAMESPACE STATUS NODE STARTED
liberty1-585d8dfd6-2vb6c testns1 Running worker2 2022-04-25T18:34:58ZDelete Deployment
kubectl delete deployment.apps/${DEPLOYMENT} --namespace=${NAMESPACE}Scale Deployment
kubectl scale deployment ${DEPLOYMENT} --replicas=${PODS} --namespace=${NAMESPACE}Print logs for all pods in a deployment
kubectl logs "--selector=app=${DEPLOYMENT}" --prefix=true --all-containers=true --namespace=${NAMESPACE}Pods
Create, run, and remote into a new pod
kubectl run -i --tty fedora --image=fedora -- shOperators
Kubernetes Operators are Kubernetes native applications which are controller pods for custom resources (CRs) (normally a logical application) that interact with the API server to automate actions. Operators are based on a Custom Resource Definition (CRD).
OperatorHub is a public registry of operators.
Operator SDK is one way to build operators.
Operator logs
Find the operator's API resource:
$ kubectl api-resources | awk 'NR==1 || /containerdiagnostic/'
NAME SHORTNAMES APIGROUP NAMESPACED KIND
containerdiagnostics diagnostic.ibm.com true ContainerDiagnosticThen find the pods for them:
$ kubectl get pods --all-namespaces | awk 'NR==1 || /containerdiag/'
NAMESPACE NAME READY STATUS RESTARTS AGE
containerdiagoperator-system containerdiagoperator-controller-manager-5976b5bb4c-2szb7 2/2 Running 0 19mPrint logs for the manager container:
$ kubectl logs containerdiagoperator-controller-manager-5976b5bb4c-2szb7 --namespace=containerdiagoperator-system --container=manager
[...]
2021-06-23T16:04:56.624Z INFO setup starting managerOperator Lifecycle Manager
The Operator Lifecycle Manager (OLM) may be used to install and manager operators in a Kubernetes cluster.
List operator catalogs
$ kubectl get catalogsource --all-namespaces
NAMESPACE NAME DISPLAY TYPE PUBLISHER AGE
openshift-marketplace community-operators Community Operators grpc Red Hat 69d
openshift-marketplace certified-operators Certified Operators grpc Red Hat 69d
openshift-marketplace redhat-marketplace Red Hat Marketplace grpc Red Hat 69d
openshift-marketplace redhat-operators Red Hat Operators grpc Red Hat 69d
openshift-marketplace ibm-operator-catalog IBM Operator Catalog grpc IBM 61dList all operators
$ kubectl get packagemanifest --all-namespaces
NAMESPACE NAME CATALOG AGE
openshift-marketplace ibm-spectrum-scale-csi-operator Community Operators 69d
openshift-marketplace syndesis Community Operators 69d
openshift-marketplace openshift-nfd-operator Community Operators 69d
[...]Operator Catalogs
The most common operator catalogs are:
- Kubernetes Community Operators: Hosted at https://operatorhub.io/ and submitted via GitHub k8s-operatorhub/community-operators. Must only use API objects supported by the Kubernetes API.
- OpenShift Community Operators: Shown in OpenShift and OKD and submitted via GitHub redhat-openshift-ecosystem/community-operators-prod. May use OCP-specific resources like Routes, ImageStreams, etc. Certified operators are generally built in RHEL or UBI.
CPU and Memory Resource Limits
A container may be configured with CPU and/or memory resource requests and limits. A request is the minimum amount of a resource that is required by (and reserved for) a container and is used to decide if a node has sufficient capacity to start a new container. A limit puts a cap on a container's usage of that resource. If there are sufficient available resources, a container may use more than the requested amount of resource, up to the limit. If only a limit is specified, the request is set equal to the limit.
Therefore, if request is less than the limit, then the system may
become overcommitted. For resources such as memory, this may lead to the
Linux OOM Killer activating and killing
processes with Killed in application logs and
kernel: Memory cgroup out of memory: Killed process in node
logs (e.g. oc debug node/$NODE -t followed by
chroot /host journalctl).
CPU Resources
CPU resources are gauged in
terms of a vCPU/core in cloud or a CPU hyperthread on bare metal.
The m suffix means millicpu (or millicore), so 0.5 (or
half) of one CPU is equivalent to 500m (or 500 millicpu), and CPU
resources may be specified in either form (i.e. 0.5 or 500m) although
the general recommendation is to use millicpu. CPU limits are evaluated
every quota period per CPU and this defaults
to 100ms.
For example, a CPU limit of 500m means that a container may use no more than half of 1 CPU in any 100ms period. Values larger than 1000m may be specified if there is more than one CPU. For details, review the Linux kernel CFS bandwidth control documentation.
Many
recommend using CPU limits. If containers exhaust node CPU, the
kubelet process may become resource starved and cause the
node to enter the NotReady state. The
throttling metric counts the number of times the CPU limit
is exceeded. However, there have been cases of throttling occurring even
when the limit is not hit, generally fixed in Linux kernel >=
4.14.154, 4.19.84, and 5.3.9 (see 1,
2,
3,
and 4). One
solution is to increase CPU requests and limits although this may reduce
density on nodes. Some specify a CPU request but without a limit. Review
additional OpenShift
guidance on overcommit.
Memory Resources
Memory resources are gauged in terms of bytes. The suffixes K, M, G, etc. may be used for multiples of 1000, and the suffixes Ki, Mi, Gi, etc. may be used for multiples of 1024.
Events
View Latest Events
$ kubectl get events --all-namespaces
NAMESPACE LAST SEEN TYPE REASON OBJECT MESSAGE
kube-system 7m8s Normal Scheduled pod/metrics-server-6b5c979cf8-t8496 Successfully assigned kube-system/metrics-server-6b5c979cf8-t8496 to docker-desktop
kube-system 7m6s Normal Pulling pod/metrics-server-6b5c979cf8-t8496 Pulling image "k8s.gcr.io/metrics-server/metrics-server:v0.4.3"
[...]Horizontal Pod Autoscaler
The Horizontal Pod Autoscaler (HPA) scales the number of Pods in a replication controller, deployment, replica set or stateful set based on metrics such as CPU utilization.
Day X
Day 1 activities generally include installation and configuration activities.
Day 2 activities generally include scaling up and down, reconfiguration, updates, backups, failovers, restores, etc.
In general, operators are used to implement day 1 and day 2 activities.
Pod Affinity
Example ensuring that not all pods run on the same node:
affinity:
podAntiAffinity:
requiredDuringSchedulingIgnoredDuringExecution:
- labelSelector:
matchExpressions:
- key: "app"
operator: In
values:
- myappname
topologyKey: "kubernetes.io/hostname"NodePorts
Set externalTrafficPolicy: Local on a kubernetes service
so that NodePort won't open on every Node but only on the nodes where
the pods are actually running.
Clustering
- Cluster size limitations: https://kubernetes.io/docs/setup/best-practices/cluster-large/#support
- Without Cluster Federation (Ubernetes), clusters should not span dispersed data centers and "stretching an OpenShift Cluster Platform across multiple data centers is not recommended".
Jobs
A Job may be used to run one or more pods until a specified number have successfully completed. A CronJob is a Job on a repeating schedule. Note:
A Replication Controller manages Pods which are not expected to terminate (e.g. web servers), and a Job manages Pods that are expected to terminate (e.g. batch tasks).
List jobs
# kubectl get jobs -o wide
NAME COMPLETIONS DURATION AGE CONTAINERS IMAGES SELECTOR
myjobname 1/1 5s 34s myjobcontainername kgibm/containerdiagsmall controller-uid=5078824a-fad1-4961-af97-62d387ef2fc7Create job
printf '{"apiVersion": "batch/v1","kind": "Job", "metadata": {"name": "%s"}, "spec": {"template": {"spec": {"restartPolicy": "Never", "containers": [{"name": "%s", "image": "%s", "command": %s}]}}}}' myjobname myjobcontainername kgibm/containerdiagsmall '["ls", "-l"]' | kubectl create -f -Describe job
$ kubectl describe job myjobname
[...]
Start Time: Wed, 23 Jun 2021 08:20:59 -0700
Completed At: Wed, 23 Jun 2021 08:21:04 -0700
Duration: 5s
Pods Statuses: 0 Running / 1 Succeeded / 0 Failed
[...]
Events:
Type Reason Age From Message
---- ------ ---- ---- -------
Normal SuccessfulCreate 73s job-controller Created pod: myjobname-d9rr5
Normal Completed 68s job-controller Job completedPrint job logs
$ kubectl logs myjobname-d9rr5
total 60
lrwxrwxrwx 1 root root 7 Jan 26 06:05 bin -> usr/bin
[...]DaemonSets
A DaemonSet may be used to run persistent pods on all or a subset of nodes. Note:
DaemonSets are similar to Deployments in that they both create Pods, and those Pods have processes which are not expected to terminate (e.g. web servers, storage servers). Use a Deployment for stateless services, like frontends, where scaling up and down the number of replicas and rolling out updates are more important than controlling exactly which host the Pod runs on. Use a DaemonSet when it is important that a copy of a Pod always run on all or certain hosts, and when it needs to start before other Pods.
Services
List Services
$ kubectl get services --all-namespaces
NAMESPACE NAME TYPE CLUSTER-IP EXTERNAL-IP PORT(S) AGE
default kubernetes ClusterIP 10.96.0.1 <none> 443/TCP 8d
kube-system kube-dns ClusterIP 10.96.0.10 <none> 53/UDP,53/TCP,9153/TCP 8d
kube-system metrics-server ClusterIP 10.102.139.243 <none> 443/TCP 6d23h
kubernetes-dashboard dashboard-metrics-scraper ClusterIP 10.107.135.44 <none> 8000/TCP 7d
kubernetes-dashboard kubernetes-dashboard ClusterIP 10.97.139.73 <none> 443/TCP 7dCreate Service
By
default, services are exposed on ClusterIP which is
internal to the cluster.
kubectl expose deployment ${DEPLOYMENT} --port=${EXTERNALPORT} --target-port=${PODPORT} --namespace=${NAMESPACE}For example:
kubectl expose deployment liberty1 --port=80 --target-port=9080 --namespace=testns1To expose a service on a NodePort (i.e. a random port between 30000-32767 on each node):
kubectl expose deployment liberty1 --port=80 --target-port=9080 --type=NodePort --namespace=testns1Then, access the service at the LoadBalancer Ingress
host on port NodePort:
$ kubectl describe services liberty1 --namespace=testns1
Name: liberty1
Namespace: testns1
Labels: app=liberty1
Annotations: <none>
Selector: app=liberty1
Type: NodePort
IP: 10.107.0.163
LoadBalancer Ingress: localhost
Port: <unset> 80/TCP
TargetPort: 9080/TCP
NodePort: <unset> 30187/TCP
Endpoints: 10.1.0.36:9080,10.1.0.37:9080
Session Affinity: None
External Traffic Policy: Cluster
Events: <none>For example:
$ curl -I http://localhost:30187/
HTTP/1.1 200 OK
[...]Delete Service
kubectl delete service/${DEPLOYMENT} --namespace=${NAMESPACE}Ingresses
An Ingress exposes services outside of the cluster network. Before creating an ingress, you must create at least one Ingress Controller to manage the ingress. By default, no ingress controller is installed. A commonly used ingress controller which is supported by Kubernetes is the nginx ingress controller.
Create nginx Ingress controller
kubectl apply -f https://raw.githubusercontent.com/kubernetes/ingress-nginx/controller-v0.46.0/deploy/static/provider/cloud/deploy.yamlkubectl wait --namespace ingress-nginx --for=condition=ready pod --selector=app.kubernetes.io/component=controller --timeout=120s
See https://kubernetes.github.io/ingress-nginx/deploy/
Create Ingress
printf '{"apiVersion":"networking.k8s.io/v1","kind":"Ingress","metadata":{"name":"%s","annotations":{"nginx.ingress.kubernetes.io/rewrite-target":"/"}},"spec":{"rules":[{"http":{"paths":[{"path":"%s","pathType":"Prefix","backend":{"service":{"name":"%s","port":{"number":80}}}}]}}]}}' "${INGRESS}" "${PATH}" "${SERVICE}" | kubectl create -f - --namespace=${NAMESPACE}For example:
printf '{"apiVersion":"networking.k8s.io/v1","kind":"Ingress","metadata":{"name":"%s","annotations":{"nginx.ingress.kubernetes.io/rewrite-target":"/"}},"spec":{"rules":[{"http":{"paths":[{"path":"%s","pathType":"Prefix","backend":{"service":{"name":"%s","port":{"number":80}}}}]}}]}}' "ingress1" "/" "liberty1" | kubectl create -f - --namespace=testns1List Ingresses
$ kubectl get ingresses --all-namespaces
NAMESPACE NAME CLASS HOSTS ADDRESS PORTS AGE
testns1 ingress1 <none> * localhost 80 63sDescribe Ingress
$ kubectl describe ingress ${INGRESS} --namespace=${NAMESPACE}
Name: ingress1
Namespace: testns1
Address: localhost
Default backend: default-http-backend:80 (<error: endpoints "default-http-backend" not found>)
Rules:
Host Path Backends
---- ---- --------
*
/ liberty1:80 (10.1.0.44:9080,10.1.0.47:9080)
Annotations: nginx.ingress.kubernetes.io/rewrite-target: /
Events:
Type Reason Age From Message
---- ------ ---- ---- -------
Normal Sync 51s (x2 over 93s) nginx-ingress-controller Scheduled for syncDelete Ingress
kubectl delete ingress/${INGRESS} --namespace=${NAMESPACE}Authentication
Kubernetes authentication supports service accounts and normal users. Normal users are managed through external mechanisms rather than by Kubernetes itself:
It is assumed that a cluster-independent service manages normal users [...]
Kubernetes does not have objects which represent normal user accounts. Normal users cannot be added to a cluster through an API call.
[...] any user that presents a valid certificate signed by the cluster's certificate authority (CA) is considered authenticated.
[...] Kubernetes determines the username from the common name field in the 'subject' of the cert.
[...] client certificates can also indicate a user's group memberships using the certificate's organization fields. To include multiple group memberships for a user, include multiple organization fields in the certificate.
List Service Accounts
$ kubectl get serviceaccounts
NAME SECRETS AGE
default 1 136mRetrieve Default Service Account Token
The default
service account token may be retrieved:
$ TOKEN=$(kubectl get secrets -o jsonpath="{.items[?(@.metadata.annotations['kubernetes\.io/service-account\.name']=='default')].data.token}" | base64 --decode)
$ echo ${TOKEN}This may be then used in an API request. For example:
$ curl -X GET https://kubernetes.docker.internal:6443/api --header "Authorization: Bearer ${TOKEN}" --insecure
{
"kind": "APIVersions",
"versions": [
"v1"
],
[...]Role-Based Access Control
Role-Based Access Control (RBAC) implements authorization in Kubernetes. Roles are namespace-scoped and ClusterRoles are cluster-scoped. RoleBindings and ClusterRoleBindings attach users and/or groups to a set of Roles or ClusterRoles, respectively.
List Roles
$ kubectl get roles --all-namespaces
NAMESPACE NAME CREATED AT
kube-public system:controller:bootstrap-signer 2021-04-27T15:24:35Z
[...]List Role Bindings
$ kubectl get rolebindings --all-namespaces
NAMESPACE NAME ROLE AGE
kube-public system:controller:bootstrap-signer Role/system:controller:bootstrap-signer 138m
[...]List Cluster Roles
$ kubectl get clusterroles
NAME CREATED AT
admin 2021-04-27T15:24:34Z
cluster-admin 2021-04-27T15:24:34Z
edit 2021-04-27T15:24:34Z
system:basic-user 2021-04-27T15:24:34Z
[...]List Cluster Role Bindings
$ kubectl get clusterrolebindings
NAME ROLE AGE
cluster-admin ClusterRole/cluster-admin 135m
[...]Monitoring
Show CPU and memory usage:
kubectl top pods --all-namespaces
kubectl top pods --containers --all-namespaces
kubectl top nodesTekton Pipelines
Tekton pipelines describes CI/CD pipelines as code using Kubernetes custom resources. Terms:
- Task: set of sequential steps
- Pipeline: set of sequential tasks
Technologies such as OpenShift Pipelines, Jenkins, JenkinsX, etc. use Tekton to implement their CI/CD workflow on top of Kubernetes.
Appsody
Appsody was a way to create application stacks using predefined templates. It has been superceded by OpenShift do (odo).
Helm
Helm groups together YAML templates that define a logical application release and its required Kubernetes resources using helm charts.
Common commands
- Show Helm CLI version:
helm version - Show available options:
helm show values . - Install a chart:
helm install $NAME . - List installed charts:
helm ls - Upgrade a chart:
helm upgrade $NAME . - Rollback an upgrade:
helm rollback $NAME 1
Kubernetes Dashboard
Kubernetes Dashboard is a simple web interface for Kubernetes. Example installation:
kubectl apply -f https://raw.githubusercontent.com/kubernetes/dashboard/v2.2.0/aio/deploy/recommended.yamlkubectl proxy- Open http://localhost:8001/api/v1/namespaces/kubernetes-dashboard/services/https:kubernetes-dashboard:/proxy/
- Use a login token such as the
defaultservice account token - Change the namespace at the top as needed and explore.
To delete the dashboard, use the same YAML as above:
kubectl delete -f https://raw.githubusercontent.com/kubernetes/dashboard/v2.2.0/aio/deploy/recommended.yaml
Kubernetes Metrics Server
Kubernetes Metrics Server provides basic container resource metrics for consumers such as Kubernetes Dashboard. Example installation:
kubectl apply -f https://github.com/kubernetes-sigs/metrics-server/releases/latest/download/components.yaml- For a development installation, allow insecure certificates:
kubectl patch deployment metrics-server -n kube-system --type 'json' -p '[{"op": "add", "path": "/spec/template/spec/containers/0/args/-", "value": "--kubelet-insecure-tls"}]' - If using Kubernetes Dashboard, refresh the Pods view after a few minutes to see an overall CPU usage graph if it works.
To delete the metrics-server, use the same YAML as above:
kubectl delete -f https://github.com/kubernetes-sigs/metrics-server/releases/latest/download/components.yaml
Knative
Knative helps deploy and manage serverless workloads.
Red Hat
Red Hat Container image search
Red Hat Universal Base Image
A Red Hat Universal Base Image (UBI) is a type of OCI-compliant base operating system image built from a subset of RHEL, free to use and distribute with optional support and with yum repository access to a subset of RHEL packages.
Images available from DockerHub, a RedHat public registry (registry.access.redhat.com), or a Red Hat-authenticated registry:
- ubi ("Standard"): OpenSSL, microdnf, and utilities like gzip and vi
- ubi-minimal ("Minimal"): Minimized binaries and minimal yum stack.
- ubi-init ("Multi-service"): Less than standard but more than minimal, plus systemd.
- ubi-micro ("Micro"): Most minimal image without even a package manager.
FROM specifications:
- Red Hat public registry:
registry.access.redhat.com/ubi8/ubiregistry.access.redhat.com/ubi8/ubi-minimalregistry.access.redhat.com/ubi8/ubi-initregistry.access.redhat.com/ubi8/ubi-micro
- DockerHub:
redhat/ubi8redhat/ubi8-minimalredhat/ubi8-initredhat/ubi8-micro
Run Examples
Run a simple program on ubi-minimal:
$ docker run --rm registry.access.redhat.com/ubi8/ubi-minimal sh -c 'exec 5<>/dev/tcp/example.com/80; echo -e "GET / HTTP/1.0\nHost: example.com\n" >&5; cat <&5'Quay.io
Quay.io is a container registry run by Red Hat. It includes "unlimited storage and serving of public repositories".
OpenShift
OpenShift is a set of open-source projects and Red Hat products based on those projects:
- OKD (formerly OpenShift Origin) is the open source, foundational project of OpenShift and it is a pseudo-acronym for the Origin Community Distribution of Kubernetes: https://www.okd.io/
- Red Hat OpenShift Container Platform (OCP) (formerly OpenShift Enterprise) is a public and/or private cloud OKD: https://www.openshift.com/products/container-platform
- Red Hat OpenShift Online is public cloud, self-managed OKD (running on AWS): https://www.openshift.com/products/online/
- Red Hat OpenShift Dedicated is a public cloud, Red Hat-managed OKD (running on AWS or GCP): https://www.openshift.com/products/dedicated/
- Red Hat CodeReady Containers for local OpenShift development.
Architecture
An OpenShift node runs Red Hat Enterprise Linux CoreOS (RHCOS) or Red Hat Enterprise Linux (RHEL) along with OpenShift installed.
In addition to Kubernetes master node components, an OpenShift master node also runs OpenShift Master Services which are the major value-add over Kubernetes (OpenShift API server, Operator Lifecycle Management, and the OpenShift Container Platform Web Console) and Infrastructure Services (a curated set of pods including Kubernetes master pods, monitoring, logging, OS tuning, etc.).
MachineSets are normally scoped to logical boundaries such as availability zones and provide templates to create and add hardware to the cluster. MachineSets are based on the Kubernetes Cluster API.
Operator Lifecycle Manager
Operator Lifecycle Manager (OLM) automates keeping the Operator-based workloads and middleware deployed on the cluster up-to-date (including over-the-air updates).
OpenShift Container Platform Web Console
The OpenShift Container Platform Web Console is the main OpenShift administrative web interface.
Topology View
- Statuses: Running, Not Ready, Warning, Failed, Pending, Succeeded, Terminating, and Unknown
- To add a service to an existing application group, hold
Shiftand drag on top of that group. This adds the required labels.
OpenShift Resources
- A ReplicationController is functionally equivalent to a ReplicaSet. These control/monitor the number of pods running in a deployment.
- A BuildConfig defines triggers to start a new build and deployment.
DeploymentConfigs
A DeploymentConfig is similar to a Kubernetes Deployment with some differences:
- As per the CAP
theorem, DeploymentConfigs prefer consistency whereas Deployments
prefer availability. With DeploymentConfigs, if a node running a
deployer pod crashes, you must manually delete the node. With
Deployments, the controller manager uses leader election so if a
deployer pod crashes, other masters can act on the same Deployment at
the same time with reconciliation. Deployments and ReplicaSets are
recommended although
oc new-appuses DeploymentConfigs and ReplicationControllers. Changing the number of replicas creates a new ReplicaSet. - DeploymentConfigs support automatic rollback on a failure, lifecycle hooks, and custom deployment strategies.
- Deployments support faster rollouts, proportional scaling, and pausing mid-rollout.
In sum:
[...] it is recommended to use Deployments unless you need a specific feature or behavior provided by DeploymentConfigs.
Continuous Integration
OpenShift implements CI with Jenkins. Jenkins can integrate with
source code repositories such as Git by using a commit hook to pull new
source code and build it automatically. OpenShift Pipelines is built on
top of the open source Tekton
pipelines project to define an application lifecycle which is used
by Jenkins. After building with Jenkins, the pipeline invokes
OpenShift's Source-to-Image build (S2I) using compiled source and a
builder image, builds a container using podman build, and
pushes it to the registry.
OpenShift Service Mesh
Combines Istio, Kiali (UI), and Jaeger (tracing) projects to provide security and network segmentation for microservices applications.
Istio uses side-car containers to enhance service-to-service communication. This includes service discovery, load balancing, failure recovery, metrics,monitoring, A/B testing, canary rollouts, rate limiting, access control, and end-to-end authentication.
Kiali visualizes an entire graph of services scheduled within an instance of the mesh.
OpenShift Image Registry
The built-in registry's default address is
image-registry.openshift-image-registry.svc at port 5000
and default images are located in the openshift project;
for example,
image-registry.openshift-image-registry.svc:5000/openshift/httpd.
Health Checks
Types of health checks:
- Liveness check to see if the container is running
- Readiness check to see if a pod is ready to serve requests
To perform a health check:
- HTTP check is good if response is between 200 - 399
- TCP Socket check is good if a socket can be opened to the container
- Container Execution Check is good if a command executed in the container returns 0
OpenShift Serverless
OpenShift Serverless uses Knative to develop serverless applications. It's integrated with Apache Camel K with event sources such as HTTP, Kafka, and AMQP with three main components:
- Configuration to separate code and configuration following the Twelve-Factor methodology.
- Revision is a version of an application that is immutable
- Route that maps a URL to one or more revisions
- Service that creates a Route, Configuration, and Revision
Eventing in Knative supports brokers, triggers, and subscriptions. A broker represents an event mesh in which events can be sent to multiple subscribers interested in that event and in which durability, persistence, performance, and other semantics can be adjusted.
Autoscaling
Autoscaling configures targeted concurrency for the applications in the revision template:
targetannotation and/orcontainerConcurrency: Number of concurrent requests handled by each revision container.minScale/maxScale: Minimum and maximum pods.
OpenShift do (odo)
OpenShift do (odo) is a
successor to Appsody and provides templates for building cloud-native
applications.
A devfile
describes a development environment (specified in
devfile.yaml). This devfile instructs how to push an
application into a cloud.
Links:
Listing devfiles
$ odo catalog list components
Odo Devfile Components:
NAME DESCRIPTION REGISTRY
java-maven Upstream Maven and OpenJDK 11 DefaultDevfileRegistry
java-openliberty Open Liberty microservice in Java DefaultDevfileRegistry
[...]Links:
Create application
- Ensure you're logged in with oc
- Create a project (this creates a new namespace in the target
cluster; nothing local):
odo project create testodo - Convert
an existing application (not covered below), clone a sample
application, or use
a skeleton sample application using a starter:
- Clone sample:
git clone https://github.com/OpenLiberty/application-stack-introcd application-stack-introodo create java-openliberty testodoserviceintro
- Use a skeleton starter:
mkdir testodoservice1 && cd testodoservice1odo create java-openliberty testodoservice1 --starter
- Clone sample:
- Push the service to the cloud:
odo push - Once the push is complete, the URL will be displayed (or available
later with
odo url list). - For the
application-stack-introsample (but not the skeleton starter), test the application at/api/resource:curl $(odo url list | awk 'NR == 3 {print $3;}')/api/resource - After making a change, use
odo pushagain, or useodo watchto automatically push when changes are detected. - If you want to print the container logs:
Or tail them:odo logodo log -f - Once the project/application is no longer needed, delete it (this
will delete the namespace, stop running pods, etc.):
odo delete testodo
CodeReady Workspaces
CodeReady Workspaces are based on Eclipse Che to provide collaborative development and integrated Continuous Integration and Continuous Deployment.
Red Hat Ansible Automation Platform
Ansible provides simple, powerful, and agentless automation of tasks using playbooks written in YAML pushed to servers over SSH.
Networking
Container networking is based on integrated Open vSwitch with support for integration with a third-party software-defined network (SDN).
For external traffic, DNS resolves to a Router container (not to be confused with an Ingress/Route resource) which then uses the openshift-sdn overlay network to route to internal IPs.
Logging
Cluster logging is managed through an EFK stack: ElasticSearch (log store), Fluentd (send logs from node to ElasticSearch), and Kibana (web UI to search logs).
Application Configuration
Application configuration should be read from the environment (e.g. storage, envars, etc.) to allow for dynamic updating and using the same image across environments.
Environment Variables
Envars may be set with secrets, ConfigMaps, and/or the Downward API. These may be set at different scopes including a deployment configuration, replication controller, or build configuration.
Secrets
Secrets are a standardized, base-64 encoded (non-encrypted) mechanism
for mounting data (either as an envar or secret filesystem
volume) for an application such as a password. Stored on tmpfs.
ConfigMaps
ConfigMaps populate configuration data in a container from a directory, file, or literal value. ConfigMaps cannot be shared across projects, must be created before creating a pod, and updating a ConfigMap does not update the pod.
Downward API
The Downward API allows pods to access information about Kubernetes resources through environment variables and/or volumes.
Persistent Storage
Storage volumes are exposed as PersistentVolumes created by administrators. PersistentVolumes are consumed by pods through PersistentVolumeClaims using an access mode:
- ReadWriteOnce: Mountable read-write by only a single node at one time.
- ReadOnlyMany: Mountable read-only by many nodes at one time.
- ReadWriteMany: Mountable read-write by many nodes at one time.
Dynamically provisioned storage provides access to underlying storage infrastructure through plugins.
Volume types:
- emptyDir: Empty directory created at pod initialization and lost at
the end of the pod's life (i.e. non-persistent). Useful for scratch data
shared across containers in the same pod. Set
emptyDir.mediumtoMemoryto usetmpfs.
PersistentVolumeClaim
First, create the PVC with a name:
apiVersion: "v1"
kind: "PersistentVolumeClaim"
metadata:
name: "pvol"
spec:
accessModes:
- "ReadWriteOnce"
resources:
requests:
[...]Then associate the PVC with a pod:
apiVersion: "v1"
kind: "Pod"
metadata:
name: "mypod"
labels:
name: "frontendhttp"
spec:
containers:
-
name: "myfrontend"
image: "nginx"
ports:
-
containerPort: 80
name: "http-server"
volumeMounts:
-
mountPath: "/var/www/html"
name: "pvol"
volumes:
-
name: "pvol"Templates
A template describes how to create a set of resources with optional customization and labels to produce a configuration.
Prometheus
The node-exporter collects metrics from each node and
sends to Prometheus.
The HPA may use any Prometheus metrics.
Resources:
Alert Rule
- Operators } Installed Operators } Prometheus Operator } Prometheus Rule
- New
PrometheusRuleinstance. - Under
spec.groups, add YAML with PromQL:spec: groups: - name: ./example.rules rules: - alert: ExampleAlert expr: vector(1) - name: libertyexample rules: - alert: heapUsageTooHigh expr: base_memory_usedHeap_bytes / base_memory_maxHeap_bytes > 0.9 for: 1m labels: severity: warning annotations: summary: "Heap usage is too high" description: "{{ $labels.instance }} heap usage is too high" - Change
labelsto match the ruleSelector in the Prometheus YAML; for example:labels: prometheus: k8s role: prometheus-rulefiles - Check status under Status } Rules
- Check if alert has popped under Alerts
See https://openliberty.io/blog/2020/04/15/prometheus-alertmanager-rhocp-open-liberty.html
YAML Examples
Custom Resource Definition
apiVersion: apiextensions.k8s.io/v1
kind: CustomResourceDefinition
metadata:
name: mycrd.example.com
spec:
group: example.com
names:
kind: MyCRD
listKind: MyCRDList
plural: mycrds
singular: mycrd
shortNames:
- m
scope: Namespaced
version: v1Followed by:
oc create -f mycrd.yamlCreate a custom resource from a CRD:
apiVersion: example.com/v1
kind: MyCRD
metadata:
name: mycr
spec:
replicaCount: 2Followed by:
oc create -f mycr.yamlList CRs:
oc get mycrdsDescribe a CR:
oc describe mycrd mycrIncrease number of repliaces of a CR:
oc scale mycrds --replicas=2Delete a CR:
oc delete mycrd mycrJenkins BuildConfig Pipeline
kind: "BuildConfig"
apiVersion: build.openshift.io/v1
metadata:
name: "pipeline1"
spec:
triggers:
- github:
secret: $GHSECRET
type: GitHub
- generic:
secret: $OTSECRET
type: Generic
strategy:
type: "JenkinsPipeline"
jenkinsPipelineStrategy:
jenkinsfile: |
pipeline {
agent any
stages{
stage("Build") {
steps{
script{
openshift.withCluster() {
openshift.withProject() {
echo '*** Build Starting ***'
openshift.selector('bc', '$APP').startBuild("--wait").logs('-f')
echo '*** Build Complete ***'
}
}
}
}
}
stage("Deploy and Verify in Development Env"){
steps{
script{
openshift.withCluster() {
openshift.withProject() {
echo '*** Deployment Starting ***'
openshift.selector('dc', '$APP').rollout().latest()
echo '*** Deployment Complete ***'
}
}
}
}
}
}
}OKD
OKD (formerly OpenShift Origin) is the open source, foundational project of OpenShift and it is a pseudo-acronym for the Origin Community Distribution of Kubernetes.
CodeReady Containers
CodeReady Containers (crc) is a simple, local, single-node OpenShift cluster that supports OKD. Installation requires a free Red Hat account.
minishift
minishift is a simple, local, single-node OpenShift cluster:
- Linux:
wget https://github.com/minishift/minishift/releases/latest/download/minishift-$(curl -s -L -H "Accept: application/json" https://github.com/minishift/minishift/releases/latest | sed 's/.*tag_name":"v//g' | sed 's/".*//g')-linux-amd64.tgz - macOS:
brew cask install minishift
YAML Manifest
A YAML Manifest is a YAML file used to manipulate Kubernetes and it has four required parts:
- apiVersion
- kind
- metadata
- spec
oc
The OpenShift client (oc) is the OpenShift command line interface available for download publicly or from a cluster:
- https://downloads-openshift-console.${CLUSTER_DOMAIN_NAME}/
- Most common downloads under:
Version
- Print oc version:
oc versionClient Version: openshift-clients-4.4.0-202006211643.p0-9-g9cd748327 Kubernetes Version: v1.17.1+45f8ddb
Tips
- Source tab-completion scripts with each new installed version of
oc:- bash: https://docs.openshift.com/container-platform/latest/cli_reference/openshift_cli/configuring-cli.html
- zsh:
source <(oc completion zsh)in~/.zshrc
Login
- To get the login token, go to the OpenShift console, click on your name in the top right and then Copy Login Command.
- Login:
oc login -u $USER https://api.${CLUSTER_DOMAIN_NAME}:6443- The file pointed to by the
KUBECONFIGenvar or specified withoc --config=(normally~/.kube/config) contains session authentication information. - You may login multiple times concurrently by specifying different
KUBECONFIGenvar or--config=files and switch between the two.
- The file pointed to by the
- Show logged-in server version:
oc versionand search for "Server Version" - Show logged-in name:
oc whoami - Show API address:
oc whoami --show-server - Show web console address:
oc whoami --show-console - Show login token:
oc whoami --show-token - Show current project, cluster, and user:
oc whoami --show-context - Show general status:
oc status --suggest - Logout:
oc logout
APIs
- List available APIs and versions:
oc api-versions - List available resource kinds:
oc api-resourcesNAME SHORTNAMES APIGROUP NAMESPACED KIND bindings true Binding componentstatuses cs false ComponentStatus configmaps cm true ConfigMap [...] - Describe a resource kind:
oc explain $KIND$ oc explain pod KIND: Pod VERSION: v1 DESCRIPTION: Pod is a collection of containers that can run on a host. This resource is created by clients and scheduled onto hosts. [...]- Add
--api-version=for a specific API version.
- Add
- Describe sub-components of a resource kind:
oc explain $NAME.$COMPONENT$ oc explain pod.spec KIND: Pod VERSION: v1 RESOURCE: spec <Object> DESCRIPTION: Specification of the desired behavior of the pod. [...]
Projects
- New Project (and set to the current project):
oc new-project $NAME- For details, add
--display-name="$DISPLAY" --description="$DESCRIPTION"
- For details, add
- Show current project:
oc project - List projects:
oc get projectsNAME DISPLAY NAME STATUS default Active kube-node-lease Active kube-public Active kube-system Active openshift Active openshift-apiserver Active [...] - Change current project:
oc project $PROJECT - Delete a project and all its resources:
oc delete project $NAME - An explicit project may be specified with
-n $PROJECT - Show deployed applications for a project:
oc status$ oc status In project OpenShift Tools (af1f-openshift-tools) on server https://api.shared-na4.na4.openshift.opentlc.com:6443 http://cakephp-mysql-example-af1f-openshift-tools.apps.shared-na4.na4.openshift.opentlc.com (svc/cakephp-mysql-example) dc/cakephp-mysql-example deploys istag/cakephp-mysql-example:latest <- bc/cakephp-mysql-example source builds https://github.com/sclorg/cakephp-ex.git on openshift/php:7.3 build #1 running for 51 seconds - 377fe8f: Merge pull request #117 from multi-arch/master (Honza Horak <hhorak@redhat.com>) deployment #1 waiting on image or update svc/mysql - 172.30.12.249:3306 dc/mysql deploys openshift/mysql:5.7 deployment #1 deployed 50 seconds ago - 1 pod View details with 'oc describe <resource>/<name>' or list everything with 'oc get all'. - Create an application from YAML:
- Create the YAML. For example, the following requires 2 replicas of
httpd:
apiVersion: apps/v1 kind: Deployment metadata: name: httpd-deployment spec: selector: matchLabels: app: httpd replicas: 2 template: metadata: labels: app: httpd spec: containers: - name: httpd image: image-registry.openshift-image-registry.svc:5000/openshift/httpd ports: - containerPort: 8080 - Execute the YAML:
oc create -f httpd.yaml - Monitor app deployment:
oc get all - Create service YAML. For example, using the
app=httpdselector:apiVersion: v1 kind: Service metadata: name: httpd-deployment spec: ports: - port: 8080 protocol: TCP targetPort: 8080 selector: app: httpd type: ClusterIP - Execute the YAML:
oc create -f httpd-service.yaml - Monitor app deployment:
oc get all - Create a route YAML. For example, pointing to the service:
apiVersion: route.openshift.io/v1 kind: Route metadata: name: httpd-deployment spec: port: targetPort: 8080 to: kind: Service name: httpd-deployment - Execute the YAML:
oc create -f httpd-route.yaml - Monitor app deployment:
oc get all - Test the route using the public host port shown in
oc get all
- Create the YAML. For example, the following requires 2 replicas of
httpd:
Applications
- Deploy application to a project:
oc new-app $LANGUAGE~$URL -n $PROJECT- This creates a DeploymentConfig and ReplicationController
- Deploy application from a particular image:
oc new-app --docker-image=$REGISTRY/$REPO/$IMAGE:$TAG --name=$NAME - Describe an application's DeploymentConfig:
oc describe dc $APP - Update an application's DeploymentConfig:
oc edit dc $APP - Search for application images:
oc new-app --search ${IMAGE} - Tail build logs:
oc logs -f build/$APP-1 -n $PROJECT - Tag a built image:
oc tag $APP:latest -n $PROJECT - List app tags:
oc describe imagestream $APP -n $PROJECT - Deploy built app from one project to another:
oc new-app $PROJECT1/$APP:$TAG --name=$APP -n $PROJECT2 - Create a route:
oc expose service $APP -n $PROJECT - Disable automatic deployment:
oc get dc $APP -o yaml -n $PROJECT | sed 's/automatic: true/automatic: false/g' | oc replace -f -
DeploymentConfigs
- Show DeploymentConfigs' statuses:
oc get dc
Deployments
- Show deployment including events/actions that it took such as
rollout:
oc describe deployment $NAME -n $PROJECT - Show deployment logs:
oc logs -f deployment/$NAME -n $PROJECT - Show all deployments:
oc statusoroc get all - Scale the pods of a deployment:
oc scale deployment $NAME --replicas=N - Show replica rollout status:
oc rollout status deployment $NAME - After an image is updated, edit the deployment's container image
tag:
oc set image deployment $NAME CONTAINER=NEW_IMAGEoroc edit deployment $NAME - Deployment strategies:
- Rolling (default): This creates a new ReplicaSet, scales it up with the new image, and scales down the ReplicaSet with the old image. If the rollout doesn't succeed within 10 minutes, it's rolled back. This is also called a Canary approach.
- Recreate: Terminate existing pods, perform actions like DB
migrations, start new pods.
- Lifecycle hooks may be done before (pre) stopping the old pods, after stopping old pods but before starting new pods (mid), or after starting the new pods (post).
- Blue/Green: Create a separate deployment/service, change the route to point to the new service when ready, and delete the old deployment/service.
- A/B: Split traffic (e.g. 50/50).
Resources
- List all resources in a project:
oc get all - Describe a resource:
oc describe ${RESOURCE}
Nodes
- List nodes:
oc get nodesNAME STATUS ROLES AGE VERSION ip-10-0-129-77.us-west-1.compute.internal Ready master 52m v1.17.1 ip-10-0-130-47.us-west-1.compute.internal Ready worker 43m v1.17.1 ip-10-0-135-81.us-west-1.compute.internal Ready worker 43m v1.17.1 ip-10-0-143-178.us-west-1.compute.internal Ready master 52m v1.17.1 ip-10-0-147-232.us-west-1.compute.internal Ready worker 43m v1.17.1 ip-10-0-153-32.us-west-1.compute.internal Ready master 52m v1.17.1 - List more details of nodes:
oc get nodes -o wideNAME STATUS ROLES AGE VERSION INTERNAL-IP EXTERNAL-IP OS-IMAGE KERNEL-VERSION CONTAINER-RUNTIME ip-10-0- Ready master 73m v1.17.1 10.0.129.77 <none> Red Hat E 4.18.0-147.8.1. cri-o://1.17.4-8.d ip-10-0- Ready worker 64m v1.17.1 10.0.130.47 <none> Red Hat E 4.18.0-147.8.1. cri-o://1.17.4-8.d ip-10-0- Ready worker 64m v1.17.1 10.0.135.81 <none> Red Hat E 4.18.0-147.8.1. cri-o://1.17.4-8.d ip-10-0- Ready master 73m v1.17.1 10.0.143.178 <none> Red Hat E 4.18.0-147.8.1. cri-o://1.17.4-8.d ip-10-0- Ready worker 64m v1.17.1 10.0.147.232 <none> Red Hat E 4.18.0-147.8.1. cri-o://1.17.4-8.d ip-10-0- Ready master 73m v1.17.1 10.0.153.32 <none> Red Hat E 4.18.0-147.8.1. cri-o://1.17.4-8.d
Machine Sets
- List machine sets:
oc get machinesets -n openshift-machine-apiNAME DESIRED CURRENT READY AVAILABLE AGE cluster-f1bd-4fp56-worker-us-west-1a 2 2 2 2 58m cluster-f1bd-4fp56-worker-us-west-1c 1 1 1 1 58m - Describe a machineset:
oc describe machineset $NAME -n openshift-machine-api - Change the type of instances of a machine set:
- Scale down a machine set to 0:
oc scale machineset $NAME --replicas=0 -n openshift-machine-api - Wait until replicas is 0:
oc get machinesets -n openshift-machine-api - Wait until the node disappears:
oc get nodes - Change the instance type:
oc patch machineset $NAME --type='merge' --patch='{"spec": { "template": { "spec": { "providerSpec": { "value": { "instanceType": "m5.2xlarge"}}}}}}' -n openshift-machine-api - Scale back up:
oc scale machineset $NAME --replicas=1 -n openshift-machine-api
- Scale down a machine set to 0:
Machines
- List machines:
oc get machines -n openshift-machine-apiNAME PHASE TYPE REGION ZONE AGE cluster-f1bd-4fp56-master-0 Running m4.xlarge us-west-1 us-west-1a 52m cluster-f1bd-4fp56-master-1 Running m4.xlarge us-west-1 us-west-1c 52m cluster-f1bd-4fp56-master-2 Running m4.xlarge us-west-1 us-west-1a 52m cluster-f1bd-4fp56-worker-us-west-1a-smf2q Running m4.large us-west-1 us-west-1a 46m cluster-f1bd-4fp56-worker-us-west-1a-x2qqz Running m4.large us-west-1 us-west-1a 46m cluster-f1bd-4fp56-worker-us-west-1c-gz2lc Running m4.large us-west-1 us-west-1c 46m - Describe a machine:
oc describe machine $NAME -n openshift-machine-apiName: cluster-f1bd-4fp56-master-0 Namespace: openshift-machine-api Labels: machine.openshift.io/cluster-api-cluster=cluster-f1bd-4fp56 machine.openshift.io/cluster-api-machine-role=master machine.openshift.io/cluster-api-machine-type=master machine.openshift.io/instance-type=m4.xlarge machine.openshift.io/region=us-west-1 machine.openshift.io/zone=us-west-1a Annotations: machine.openshift.io/instance-state: running [...] Ami: Id: ami-02b6556210798d665 API Version: awsproviderconfig.openshift.io/v1beta1 Block Devices: [...] Addresses: Address: 10.0.129.77 Type: InternalIP Address: ip-10-0-129-77.us-west-1.compute.internal Type: InternalDNS Address: ip-10-0-129-77.us-west-1.compute.internal Type: Hostname [...] Events: Type Reason Age From Message ---- ------ ---- ---- ------- Normal Updated 2m35s (x12 over 55m) aws-controller Updated machine cluster-f1bd-4fp56-master-0 - List control plane machines:
oc get machines -l machine.openshift.io/cluster-api-machine-type=master -n openshift-machine-api - List worker machines:
oc get machines -l machine.openshift.io/cluster-api-machine-type=worker -n openshift-machine-api - List machines with a custom query such as instance type:
oc get machines -n openshift-machine-api -o jsonpath='{range .items[*]}{"\n"}{.metadata.name}{"\t"}{.spec.providerSpec.value.instanceType}{end}{"\n"}'or region:oc get machines -n openshift-machine-api -o jsonpath='{range .items[*]}{"\n"}{.metadata.name}{"\t"}{.spec.providerSpec.value.placement.region}{end}{"\n"}'
Pods
- List pods for the current project:
oc get pods - List all pods:
oc get pods --all-namespaces - List pods for a particular project:
$ oc get pods -n openshift-apiserver NAME READY STATUS RESTARTS AGE apiserver-77c9656b9f-c5mlr 1/1 Running 0 45m apiserver-77c9656b9f-ddll4 1/1 Running 0 46m apiserver-77c9656b9f-lfxvb 1/1 Running 0 45m - List running pods:
oc get pods --field-selector status.phase=Running - Open a shell on a pod:
oc rsh $POD - Execute a remote command on a pod:
oc exec $POD -- uptime - Copy a file or directory from a pod:
oc cp $POD:/etc/hostname hostname - List all pods:
oc get pods -ANAMESPACE NAME READY STATUS RESTARTS AGE openshift-apiserver-operator openshift-apiserver-operator-7f87667d89-rd9tz 1/1 Running 1 56m openshift-apiserver apiserver-77c9656b9f-c5mlr 1/1 Running 0 45m [...] - Tail pod updates until you hit Ctrl+C:
oc get pods -w - Show details of a pod:
oc get pods $POD -o yaml
Scaling
- Set number of pods:
oc scale --replicas=$N - Configure auto-scaling:
oc autoscale
Services
List services:
oc get svcDefault service name:
_service-name.project_.svc.cluster.localShow details of a service:
oc get svc $SERVICE -o yaml$ oc get svc mysql -o yaml [...] spec: clusterIP: 172.30.12.249 ports: - name: mysql port: 3306 protocol: TCP targetPort: 3306 selector: name: mysql sessionAffinity: None type: ClusterIP status: loadBalancer: {}
Routes
- Expose an application publicly with a route:
oc expose service/${APP}- Add
--name=$NAMEto specify the name
- Add
- Create a secured route:
oc create route - Display all application routes:
oc get route - Display routes for an application:
oc get route/${APP} - Display route details:
oc get route $ROUTE -o yaml - Edit a route to change its service:
oc patch route/$ROUTE -p '{"spec":{"to":{"name":"$NEWSERVICE"}}}' - Display route URL:
oc get route $ROUTE --template='{{ .spec.host }}'- This can be combined with curl:
curl http://$(oc get route $ROUTE --template='{{ .spec.host }}')/
- This can be combined with curl:
Ports
- Expose a port for an existing pod:
oc port-forward $POD $PORT:$PORT
Jenkins
- Create Jenkins pipeline:
oc new-app jenkins-persistent --param MEMORY_LIMIT=2Gi --param ENABLE_OAUTH=true -e JENKINS_PASSWORD=$JENKINSPASSWORD -n $PROJECT- Set pipeline maximum resource usage if needed:
oc set resources dc jenkins --limits=cpu=2 --requests=cpu=1,memory=2Gi
- Set pipeline maximum resource usage if needed:
- Find the route for Jenkins:
oc get route jenkins -n $PROJECT - Allow a Jenkins app to access other projects:
oc policy add-role-to-user edit system:serviceaccount:$JENKINSPROJECT:jenkins -n $PROJECT - Allow another project to pull from a pipeline:
oc policy add-role-to-group system:image-puller system:serviceaccounts:$JENKINSPROJECT -n $PROJECT - If you want to disable automatic deployment of newly built
application images:
oc set triggers dc openshift-tasks --manual
Jenkins Web Console
Retrieve the route from above and log-in with OpenShift OAuth credentials. Common tasks:
- New pipeline: New Item } Tasks } Pipeline } OK } Add pipeline code } Save } Build Now } Open Blue Ocean
- Example pipeline:
node { stage('Build Tasks') { openshift.withCluster() { openshift.withProject("$PROJECT") { openshift.selector("bc", "openshift-tasks").startBuild("--wait=true") } } } stage('Tag Image') { openshift.withCluster() { openshift.withProject("$PROJECT") { openshift.tag("openshift-tasks:latest", "openshift-tasks:${BUILD_NUMBER}") } } } stage('Deploy new image') { openshift.withCluster() { openshift.withProject("$PROJECT") { openshift.selector("dc", "openshift-tasks").rollout().latest(); } } } }
Quotas
- List quotas for a project:
oc get quota -n $PROJECT - Get details of a quota:
oc describe quota $QUOTA -n $PROJECT - List cluster resource quotes:
oc get appliedclusterresourcequotasNAME LABELS SELECTOR ANNOTATIONS SELECTOR clusterquota-shared-10c1 <none> map[openshift.io/requester:...] - Show details of a cluster resource quota:
oc describe appliedclusterresourcequota $NAMEName: clusterquota-shared-10c1 [...] Resource Used Hard -------- ---- ---- configmaps 3 100 limits.cpu 500m 16 limits.memory 512Mi 45Gi persistentvolumeclaims 0 15 pods 1 30 requests.cpu 50m 16 requests.memory 512Mi 20Gi requests.storage 0 50Gi secrets 13 150 services 2 150 - Query drivers of the resource usage:
oc get pods --field-selector=status.phase=Running -o json | jq '.items[] | {name: .metadata.name, res: .spec.containers[].resources}' - Change container memory limits:
oc set resources dc $NAME --limits=memory=1Gi
Environment Variables
- List envars for a resource:
oc set env $KIND/$RESOURCE --list - Set envar on a resource:
oc set env $KIND/$RESOURCE NAME=value - Set envar on all resources of a kind:
oc set env $KIND --all NAME=value - Set envar on a resource from a secret:
oc set env $KIND/$RESOURCE --from=secret/$NAME - Delete an envar with a dash (
-):oc set env $KIND/$RESOURCE NAME- - Automatically created envars:
${SERVICE}_SERVICE_HOST${SERVICE}_SERVICE_PORT
Secrets
- Create secret:
oc create secret generic $NAME - Describe secret:
oc describe secrets $NAMEoroc get secret $NAME -o yaml - Mount a secret as a filesystem:
oc set volume $KIND/$RESOURCE --add --overwrite --name=$VOLUME --mount-path $PATH --secret-name=$SECRET
ConfigMaps
- Create a ConfigMap:
oc create configmap $NAME - Create a ConfigMap from a literal value:
oc create configmap $NAME --from-literal=KEY=value - Create a ConfigMap from a file of key/value pairs on each line:
oc create configmap $NAME --from-file=$FILE.properties - Create a ConfigMap from a directory of files with key=filename and
value=file contents:
oc create configmap $NAME --from-file=$DIRECTORY - Describe a ConfigMap:
oc describe configmaps $NAMEoroc get configmaps $NAME -o yaml - Consume ConfigMap as an envar in a pod:
spec: containers: - name: $PODNAME image: $IMAGE command: [ "/bin/sh", "-c", "env" ] env: - name: $LOCALKEY valueFrom: configMapKeyRef: name: $CONFIGMAP key: $KEY - Consume ConfigMap as a file in a pod:
spec: containers: - name: $PODNAME image: $IMAGE command: [ "/bin/sh", "cat", "/etc/config/$KEYFILE" ] volumeMounts: - name: config-volume mountPath: /etc/config volumes: - name: config-volume configMap: name: $CONFIGMAP - Consume ConfigMap as a file in a pod at a specific sub-directory:
spec: containers: - name: $PODNAME image: $IMAGE command: [ "/bin/sh", "cat", "/etc/config/subdir/$KEYFILE" ] volumeMounts: - name: config-volume mountPath: /etc/config volumes: - name: config-volume configMap: name: $CONFIGMAP items: - key: $KEY path: subdir/special-key
Downward API
- Mount Downward API data in a pod as envars:
spec: containers: - name: $PODNAME image: $IMAGE command: [ "/bin/sh", "-c", "env" ] env: - name: MY_POD_NAME valueFrom: fieldRef: fieldPath: metadata.name - name: MY_POD_NAMESPACE valueFrom: fieldRef: fieldPath: metadata.namespace - name: MY_CPU_REQUEST valueFrom: resourceFieldRef: resource: requests.cpu - name: MY_CPU_LIMIT valueFrom: resourceFieldRef: resource: limits.cpu - name: MY_MEM_REQUEST valueFrom: resourceFieldRef: resource: requests.memory - name: MY_MEM_LIMIT valueFrom: resourceFieldRef: resource: limits.memory - Mount Downward API data in a pod as volumes:
spec: containers: - name: $PODNAME image: $IMAGE command: [ "/bin/sh", "cat", "/downward/pod_labels" ] volumeMounts: - name: podinfo mountPath: /downward readOnly: false volumes: - name: podinfo downwardAPI: items: - path: "pod_labels" fieldRef: fieldPath: metadata.label - path: "cpu_limit" resourceFieldRef: containerName: client-container resource: limits.cpu - path: "cpu_request" resourceFieldRef: containerName: client-container resource: requests.cpu - path: "mem_limit" resourceFieldRef: containerName: client-container resource: limits.memory - path: "mem_request" resourceFieldRef: containerName: client-container resource: requests.memor
BuildConfig
- Show deployment process:
oc logs -f bc/$APP
Common Troubleshooting
- Get status:
oc statusandoc get all - List pods:
oc get pods - SSH into a pod:
oc rsh $POD - Execute a remote command on a pod:
oc exec $POD -- uptime - Copy a file or directory from a pod:
oc cp $POD:/etc/hostname hostname - List services:
oc get svc - List all events sorted by timestamp:
oc get events --sort-by='.lastTimestamp' - Use
--loglevel=10on any command for detailed tracing. - Access a particular resource:
oc debug $NAMEsuch asdc/$DCornode/$NODE - Show output in different formats with
-o wide,-o yaml,-o json,-o jsonpath='{.spec.host}{"\n"}'(for XPath-like selection), and more.
Create Template
Export template for existing object:
oc export all --as-template=$NEWTEMPLATECreate a new configuration from a template:
oc process -f template.json -v KEY1=value1,KEY2=value2 | oc create -f -Create a stored template:
oc create -f template.jsonDescribe a stored template:
oc describe template $NAME(many are stored in-n openshift)Create application from stored template:
oc new-app --template=$TEMPLATE --param=KEY1=value1- A
prefix/is not needed for the template if it's in theopenshiftproject
- A
Create application from template file:
oc new-app --file=template.json --param=KEY1=value1Generating random passwords:
parameters: - name: PASSWORD description: "The random user password" generate: expression from: "[a-zA-Z0-9]{12}"
Users
- List users:
oc get users - List roles and users for a project:
oc get rolebindings - List roles and users for a cluster:
oc get clusterrolebindings - Add project role to a user:
oc adm policy add-role-to-user $ROLE $USER - Add cluster role to a user:
oc adm policy add-cluster-role-to-user $ROLE $USER
Registry
- Show registry pods:
oc get pods -n openshift-image-registry - Show registry services:
oc get services -n openshift-image-registry - Show registry deployments:
oc get deployments -n openshift-image-registry - Show registry logs:
oc logs deployments/image-registry -n openshift-image-registry - By default, a registry does not have a public route. If this is
required, the
registry must be exposed.
oc patch configs.imageregistry.operator.openshift.io/cluster --patch '{"spec":{"defaultRoute":true}}' --type=merge - Show registry routes:
oc get routes -n openshift-image-registry - Allow a user to push to the registry:
oc policy add-role-to-user registry-editor $USER - Allow a user to pull from the registry:
oc policy add-role-to-user registry-viewer $USER - docker login:
echo $(oc whoami --show-token) | docker login -u $(oc whoami) --password-stdin default-route-openshift-image-registry.${CLUSTER_DOMAIN_NAME} - Build image for the registry (or tag an image):
docker build -t $ROUTE/$PROJECT/$IMAGE .(where$ROUTEcomes fromHOST/PORTofoc get routes -n openshift-image-registryand$PROJECTcomes fromoc) - Push image to the registry:
docker push $ROUTE/$PROJECT/$IMAGE - List image in the registry:
docker image ls $ROUTE/$PROJECT/$IMAGE - List images in the registry:
oc get images - List image streams:
oc get imagestreams
Volumes
- Add emptyDir volume to a deployment config and create new
deployment:
oc set volume dc/$DC --add --mount-path=$LOCALPATH
Security
Debug a node
oc get nodesoc debug nodes/$NAMEchroot /hostoc login [...]
Debug a pod
oc get podsoc debug pod/$NAME --image registry.access.redhat.com/ubi8/ubi:8.0
Cluster management
- List nodes:
oc get nodes - Describe a node:
oc describe node $NAME - Show max pods of a node:
oc describe node $NAME | awk '/^Allocatable/ { alloctable=1; } alloctable && /pods:/ { print; exit; }' - Show cluster CPU usage:
oc adm top node - Prepare debugging:
oc adm inspect - Run MustGather:
oc adm must-gather - Dump cluster administration details and logs:
kubectl cluster-info dump > clusterdump.txt
Other commands
- oc get all -o name --selector app=${APP}: List all resources for an application.
- oc delete all --selector app=${APP}: Schedule deletion of all resources related to an application.
- oc rsync: Retrieve/update files in a running container: <>
OpenShift Container Platform
Recipe
- Using the web console:
- Review cluster utilization
- Review high severity alerts
- Review USE method cluster utilization for overall utlization
- Review the Cluster Compute Resources Dashboard for high utilization projects
- For high utilization projects, review the Project Compute Resources Dashboard
- Review OpenShift Container Platform best practices
Links
Best practices
Web Console
Cluster Utilization
Administrator } Overview (/dashboards) shows CPU, memory, filesystem, and network utilization for the cluster. For example:
Alerts
Administrator } Monitoring } Alerting shows various alerts of different severities. Sort by severity in descending order.

Monitoring
Grafana USE Method Cluster Dashbaord
Administrator } Monitoring } Dashboards } Dashboard = USE Method / Cluster (/monitoring/dashboards/grafana-dashboard-node-cluster-rsrc-use) shows detailed cluster utilization with the USE method.

Grafana USE Method Node Dashbaord
Administrator } Monitoring } Dashboards } Dashboard = USE Method / Node (/monitoring/dashboards/grafana-dashboard-node-cluster-rsrc-use) shows detailed cluster utilization with the USE method.
Cluster Compute Resources Dashboard
Administrator } Monitoring } Dashboards } Dashboard = Kubernetes / Compute Resources / Cluster (/monitoring/dashboards/grafana-dashboard-k8s-resources-cluster) shows detailed cluster utilization by project.

Project Compute Resources Dashboard
Administrator } Monitoring } Dashboards } Dashboard = Kubernetes / Compute Resources / Namespaces (Pods) (/monitoring/dashboards/grafana-dashboard-k8s-resources-namespace) shows detailed utilization by project.

Images
- Show images in the local registry: Builds } Image Streams
Applications
- Deploy application from image in the local registry:
- Developer } Topology
- Project=$PROJECT
- Container Image
- Image stream tag from internal registry
- Create
Installation
Installer Provisioned Infrastructure
Installer Provisioned Infrastructure (IPI) performs automated infrastructure and product deployment on Amazon Web Services, Microsoft Azure, Google Cloud Platform, Red Hat OpenStack Platform, and Red Hat Virtualization.
User Provisioned Infrastructure
User Provisioned Infrastructure (UPI) is an installation on pre-existing infrastructure with pre-arranged networking, compute, and storage on Amazon Web Services, Microsoft Azure, Google Cloud Platform, VMware vSphere, RedHat Open Stack Platform, IBM z, IBM Power Systems, and bare metal.
Secrets
To perform installation, pull secrets are required from https://www.openshift.com/try.
Amazon Web Services
The OpenShift
Installer uses Terraform on AWS with a default machine type of
m4.large. The AWS credentials must have administrator
privileges.
Pre-requisites:
- Create a Route 53 public domain.
- Create an SSH key pair without a password:
ssh-keygen -f ~/.ssh/cluster-key
Then run:
curl "https://s3.amazonaws.com/aws-cli/awscli-bundle.zip" -o "awscli-bundle.zip"unzip awscli-bundle.zip./awscli-bundle/install -i /usr/local/aws -b /bin/awswget https://mirror.openshift.com/pub/openshift-v4/clients/ocp/4.4.3/openshift-install-linux-4.4.3.tar.gztar zxvf openshift-install-linux-*.tar.gz -C /usr/binwget https://mirror.openshift.com/pub/openshift-v4/clients/ocp/4.4.3/openshift-client-linux-4.4.3.tar.gztar zxvf openshift-client-linux-*.tar.gz -C /usr/binoc completion bash >/etc/bash_completion.d/openshift- Create AWS credentials
$ mkdir $HOME/.aws/ $ cat << EOF >> $HOME/.aws/credentials > [default] > aws_access_key_id = ... access key ... > aws_secret_access_key = ... secret ... > region = ... region ... > EOF - Check AWS works:
aws sts get-caller-identity - Download Pull Secret from https://cloud.redhat.com/openshift/install/aws/installer-provisioned
openshift-install create cluster --dir $HOME/cluster-$NAME- Use separate steps to customize, e.g.
install-config.yaml
- Use separate steps to customize, e.g.
- In another window,
tail -f ${HOME}/cluster-$NAME/.openshift_install.log export KUBECONFIG=$HOME/cluster-$NAME/auth/kubeconfigoc whoamiopenshift-install graphaws ec2 describe-instances --output table
Persistent Storage
Persistent storage includes:
- Raw devices such as iSCSI and Fibre Channel
- Enterprise storage such as NFS
- Cloud-type storage such as Ceph, AWS EBS, pDisk, etc.
OpenShift Online
Documentation: https://docs.openshift.com/online/pro/welcome/index.html
OpenShift Dedicated
Documentation: https://docs.openshift.com/dedicated/latest/welcome/index.html
IBM Cloud
IBM Cloud RedHat OpenShift Kubernetes Service (ROKS)
IBM WebSphere Automation
IBM WebSphere Automation (WSA) provides a unified dashboard for all registered WebSphere Application Server and Liberty installations and their security patch status as well as automated memory leak detection with Instana.
IBM Cloud Transformation Advisor (TA)
IBM Cloud Transformation Advisor analyzes existing applications for modernization.
Additional links:
- Command line options
- https://www.ibm.com/support/pages/node/318851#ta
- https://community.ibm.com/community/user/imwuc/blogs/scott-johnston/2019/04/10/liberty-advisor
- https://www.youtube.com/watch?v=B9_DeUcL_KU
- https://github.com/IBM/transformation-advisor-sdk
- https://ibm.biz/cloudta
Generate reports from traditional admin console
Starting with tWAS 9.0.5.7 and 8.5.5.19 which include at least
version 20.0.0.4 of the binary scanner, then Liberty's
server.xml is generated as part of the report.
Starting with tWAS 9.0.5.14 and 8.5.5.23, wsadmin commands
such as AdminTask.createTADataCollection are
available.
Mono2Micro
IBM Mono2Micro uses IBM research to help transform traditional monolithic applications into microServices applications.
Links:
Architectures
Resource Groups
Resource groups help organize production installations and environments.
Hazelcast
The Hazelcast Helm chart may be used for functions such as HTTP session caching: https://github.com/IBM/charts/tree/master/community/hazelcast-enterprise
StockTrader Sample Application
- https://developer.ibm.com/code/2018/07/23/introducing-stocktrader/
- https://hub.docker.com/u/ibmstocktrader
IBM Cloud Container Registry
IBM container registry located at icr.io (like DockerHub): https://cloud.ibm.com/docs/Registry?topic=Registry-getting-started
Managed through the IBM Cloud at https://cloud.ibm.com/kubernetes/registry/main/namespaces
Amazon Web Services (AWS)
Running Liberty on AWS: https://aws.amazon.com/quickstart/architecture/ibm-websphere-liberty/
Amazon Elastic File System (EFS)
Review the differences between General Purpose and Max I/O and monitor PercentIOLimit to ensure that it does not reach 100%.
Java J9 in Containers
IBM and Semeru Java in Containers
Recipe
- In general, tune
-XX:MaxRAMPercentageand-XX:InitialRAMPercentageinstead of-Xmxand-Xms, respectively, to allow for more flexibility with sizing of containers at the host level. Default values depend on any container memory limit. - Consider using
-XX:+ClassRelationshipVerifierto improve start-up time. - If using Semeru Java >= 11 and memory in the pod is limited, consider using the remote JITServer on available platforms to avoid potential throughput issues.
Container Images
- IBM Container Registry:
- IBM Semeru Runtimes Java 8 Open Edition on UBI:
FROM icr.io/appcafe/ibm-semeru-runtimes:open-8-jre-ubiorFROM icr.io/appcafe/ibm-semeru-runtimes:open-8-jdk-ubi - IBM Semeru Runtimes Java 8 Open Edition on Ubuntu:
FROM icr.io/appcafe/ibm-semeru-runtimes:open-8-jre-focalorFROM icr.io/appcafe/ibm-semeru-runtimes:open-8-jdk-focal - IBM Semeru Runtimes Java 11 Certified Edition on UBI:
FROM icr.io/appcafe/ibm-semeru-runtimes:certified-11-jre-ubiorFROM icr.io/appcafe/ibm-semeru-runtimes:certified-11-jdk-ubi - IBM Semeru Runtimes Java 11 Certified Edition on Ubuntu:
FROM icr.io/appcafe/ibm-semeru-runtimes:certified-11-jre-focalorFROM icr.io/appcafe/ibm-semeru-runtimes:certified-11-jdk-focal - IBM Semeru Runtimes Java 17 Certified Edition on UBI:
FROM icr.io/appcafe/ibm-semeru-runtimes:certified-17-jre-ubiorFROM icr.io/appcafe/ibm-semeru-runtimes:certified-17-jdk-ubi - IBM Semeru Runtimes Java 17 Certified Edition on Ubuntu:
FROM icr.io/appcafe/ibm-semeru-runtimes:certified-17-jre-focalorFROM icr.io/appcafe/ibm-semeru-runtimes:certified-17-jdk-focal - See all tags:
curl -s https://icr.io/v2/appcafe/ibm-semeru-runtimes/tags/list | jq .tags
- IBM Semeru Runtimes Java 8 Open Edition on UBI:
- DockerHub
- IBM Semeru Runtimes:
- IBM Semeru
Runtimes Java 8 Open Edition on CentOS:
FROM docker.io/ibm-semeru-runtimes:open-8-jre-centos7orFROM docker.io/ibm-semeru-runtimes:open-8-jdk-centos7 - IBM Semeru
Runtimes Java 8 Open Edition on Ubuntu:
FROM docker.io/ibm-semeru-runtimes:open-8-jre-focalorFROM docker.io/ibm-semeru-runtimes:open-8-jdk-focal - IBM Semeru
Runtimes Java 11 Open Edition on CentOS:
FROM docker.io/ibm-semeru-runtimes:open-11-jre-centos7orFROM docker.io/ibm-semeru-runtimes:open-11-jdk-centos7 - IBM Semeru
Runtimes Java 11 Open Edition on Ubuntu:
FROM docker.io/ibm-semeru-runtimes:open-11-jre-focalorFROM docker.io/ibm-semeru-runtimes:open-11-jdk-focal - IBM Semeru
Runtimes Java 17 Open Edition on CentOS:
FROM docker.io/ibm-semeru-runtimes:open-17-jre-centos7orFROM docker.io/ibm-semeru-runtimes:open-17-jdk-centos7 - IBM Semeru
Runtimes Java 17 Open Edition on Ubuntu:
FROM docker.io/ibm-semeru-runtimes:open-17-jre-focalorFROM docker.io/ibm-semeru-runtimes:open-17-jdk-focal - See all IBM Semeru Runtimes tags:
curl -L -s "https://registry.hub.docker.com/v2/repositories/library/ibm-semeru-runtimes/tags?page=1&page_size=100" | jq '.results[].name'
- IBM Semeru
Runtimes Java 8 Open Edition on CentOS:
- IBM Java:
- IBM Java 8 on Ubuntu:
FROM docker.io/ibmjava:8-jreorFROM docker.io/ibmjava:8-sdk - IBM Java 8 on Alpine:
FROM docker.io/ibmjava:8-jre-alpineorFROM docker.io/ibmjava:8-sdk-alpine - See all IBM Java 8 tags:
curl -L -s "https://registry.hub.docker.com/v2/repositories/library/ibmjava/tags?page=1&page_size=100" | jq '.results[].name'
- IBM Java 8 on Ubuntu:
- IBM Semeru Runtimes:
Run Examples
Compile and run a simple Java program:
podman run --rm icr.io/appcafe/ibm-semeru-runtimes:certified-17-jdk-ubi sh -c "cd /tmp; printf 'public class main { public static void main(String... args) throws Throwable { System.out.println(\"Hello World\"); } }' > main.java && javac main.java && java -showversion main"Run a program in the background and do something on it:
podman run --rm icr.io/appcafe/ibm-semeru-runtimes:certified-17-jdk-ubi sh -c "cd /tmp; printf 'public class main { public static void main(String... args) throws Throwable { System.out.println(\"Hello World\"); Object o = new Object(); synchronized (o) { o.wait(); } } }' > main.java && javac main.java && (java main &); sleep 1; jcmd \$(jps | grep -v Jps | sed 's/ main//g') Dump.java; sleep 1; head javacore*txt"To start an interactive session, add -it after
--rm. For example:
podman run --rm -it icr.io/appcafe/ibm-semeru-runtimes:certified-17-jdk-ubi bashContainerfiles
HotSpot Java in Containers
HotSpot Java
Eclipse Temurin HotSpot Java DockerHub images
Run Examples
Compile and run a simple Java program:
- HotSpot Java 17:
podman run --rm eclipse-temurin:17 sh -c "printf 'public class main { public static void main(String... args) throws Throwable { System.out.println(\"Hello World\"); } }' > main.java && javac main.java && java -showversion main" - HotSpot Java 11:
podman run --rm eclipse-temurin:11 sh -c "printf 'public class main { public static void main(String... args) throws Throwable { System.out.println(\"Hello World\"); } }' > main.java && javac main.java && java -showversion main" - HotSpot Java 8:
podman run --rm eclipse-temurin:8 sh -c "printf 'public class main { public static void main(String... args) throws Throwable { System.out.println(\"Hello World\"); } }' > main.java && javac main.java && java -showversion main"
To start an interactive version of one of the above containers, add
-it after --rm. For example:
podman run --rm -it eclipse-temurin:17 bashLiberty in Containers
Recipe
- Review the Java in Containers recipes
- Execute
configure.shas the last step in your Containerfile to make it fit-for-purpose and initialize the shared class cache. - Review the Configuring Security best practices
- If using IBM or Semeru Java, mount a shared volume for the shared
class cache in
${WLP_OUTPUT_DIR}/.classCache - Consider logging in JSON format for consumption by centralized logging.
- If using IBM or Semeru Java and startup time is highly variable, review the potential impact of the maximum heap size on the shared class cache.
- OpenShift:
- Review the Application Monitoring options.
- Review the Liberty recipe
- Review the Java recipes
- Review the Operating System Recipes
Container Images
- IBM Container Registry:
- OpenLiberty on UBI:
FROM icr.io/appcafe/open-liberty - WebSphere Liberty on UBI:
FROM icr.io/appcafe/websphere-liberty - See all OpenLiberty tags with:
curl -s https://icr.io/v2/appcafe/open-liberty/tags/list | jq .tags - See all WebSphere Liberty tags with:
curl -s https://icr.io/v2/appcafe/websphere-liberty/tags/list | jq .tags
- OpenLiberty on UBI:
- DockerHub
- OpenLiberty on
UBI:
FROM docker.io/openliberty/open-liberty - OpenLiberty on
Ubuntu:
FROM docker.io/open-liberty - WebSphere
Liberty on UBI:
FROM docker.io/ibmcom/websphere-liberty - WebSphere
Liberty on Ubuntu:
FROM docker.io/websphere-liberty - See all OpenLiberty on UBI tags with:
curl -L -s "https://registry.hub.docker.com/v2/repositories/openliberty/open-liberty/tags?page=1&page_size=100" | jq '.results[].name' - See all OpenLiberty on Ubuntu tags with:
curl -L -s "https://registry.hub.docker.com/v2/repositories/library/open-liberty/tags?page=1&page_size=100" | jq '.results[].name' - See all WebSphere Liberty on UBI tags with:
curl -L -s "https://registry.hub.docker.com/v2/repositories/ibmcom/websphere-liberty/tags?page=1&page_size=100" | jq '.results[].name' - See all WebSphere Liberty on Ubuntu tags with:
curl -L -s "https://registry.hub.docker.com/v2/repositories/library/websphere-liberty/tags?page=1&page_size=100" | jq '.results[].name'
- OpenLiberty on
UBI:
Resources
- https://github.com/WASdev/ci.docker.tutorials
- https://openliberty.io/guides/containerize.html
- https://openliberty.io/guides/kubernetes-microprofile-config.html
- https://github.com/IBM/openshift-workshop-was
- https://docs.microsoft.com/en-us/azure/aks/howto-deploy-java-liberty-app
Background
Environment
Liberty on Docker changes the directory of messages.log and FFDC to /logs using the LOG_DIR envar: https://github.com/WASdev/ci.docker/blob/46b7c0a/ga/latest/kernel/Dockerfile#L54
Liberty on Docker changes the current working directory of the Liberty process to /opt/ibm/wlp/output using the WLP_OUTPUT_DIR envar so this is where javacores, etc. will go: https://github.com/WASdev/ci.docker/blob/46b7c0a/ga/latest/kernel/Dockerfile#L55
To use externally configured JVM parameters (since jvm.options doesn't support variable substitution), consider using the JVM_ARGS envar or mount the jvm.options file using a ConfigMap.
Shared Class Cache in Containers
If using the J9 JVM, mount a shared volume for the shared class cache
in ${WLP_OUTPUT_DIR}/.classCache. For WebSphere Liberty,
that's /opt/ibm/wlp/output/${SERVER_NAME}/.classCache and
for OpenLiberty,
that's /opt/ol/wlp/output/${SERVER_NAME}/.classCache. If
using the default server name of defaultServer and default
${WLP_OUTPUT_DIR}, these resolve to:
- WebSphere Liberty:
/opt/ibm/wlp/output/defaultServer/.classCache - OpenLiberty:
/opt/ol/wlp/output/defaultServer/.classCache
Run Examples
Examples:
podman run --rm icr.io/appcafe/open-liberty:full-java8-ibmjava-ubi sh -c "printf '<server><featureManager><feature>jakartaee-9.1</feature><feature>microProfile-5.0</feature></featureManager></server>' > /config/configDropins/overrides/override.xml && sed -i '/<feature>.*<\/feature>/d' /config/server.xml && curl -L https://github.com/IBM/helloworldjsp/releases/download/0.1.20240212/helloworldjsp.war -so /config/dropins/helloworldjsp.war && (/opt/ol/wlp/bin/server run defaultServer &> /logs/console.log &) && sleep 2 && tail -99999f /logs/messages.log | grep -q CWWKF0011I && cat /logs/messages.log && /opt/ol/wlp/bin/server stop defaultServer"podman run --rm icr.io/appcafe/open-liberty:full-java8-ibmjava-ubi sh -c "curl -L https://github.com/IBM/helloworldjsp/releases/download/0.1.20240212/helloworldjsp.war -so /config/dropins/helloworldjsp.war && echo '<?xml version=\"1.0\" encoding=\"UTF-8\"?><server><httpEndpoint id=\"defaultHttpEndpoint\" host=\"*\" httpPort=\"9080\" httpsPort=\"9443\"><accessLogging filepath=\"\${server.output.dir}/logs/access.log\" logFormat=\"%h %u %t "%r" %s %b %D %{R}W\" /></httpEndpoint></server>' > /config/configDropins/overrides/server.xml && (/opt/ol/wlp/bin/server run defaultServer &> /logs/console.log &) && sleep 2 && tail -99999f /logs/messages.log | grep -q CWWKF0011I && curl -sv --trace-time http://localhost:9080/helloworldjsp/helloworld && cat /opt/ol/wlp/output/defaultServer/logs/access.log && /opt/ol/wlp/bin/server stop defaultServer"podman run --rm icr.io/appcafe/open-liberty:full-java8-ibmjava-ubi sh -c "curl -L https://github.com/IBM/helloworldjsp/releases/download/0.1.20240212/helloworldjsp.war -so /config/dropins/helloworldjsp.war && echo '<?xml version=\"1.0\" encoding=\"UTF-8\"?><server><httpEndpoint id=\"defaultHttpEndpoint\" host=\"*\" httpPort=\"9080\" httpsPort=\"9443\"><accessLogging filepath=\"\${server.output.dir}/logs/access.log\" logFormat=\"%h %u %t "%r" %s %b %D %{R}W "%{Host}i" "%{User-Agent}i"\" /></httpEndpoint></server>' > /config/configDropins/overrides/server.xml && printf 'com.ibm.ws.logging.console.format=json\ncom.ibm.ws.logging.console.log.level=info\ncom.ibm.ws.logging.console.source=message,trace,accessLog,ffdc,audit\ncom.ibm.ws.logging.json.access.log.fields=logFormat\n' > /config/bootstrap.properties && (/opt/ol/wlp/bin/server run defaultServer &> /logs/console.log &) && sleep 2 && tail -99999f /logs/messages.log | grep -q CWWKF0011I && curl -sv --trace-time http://localhost:9080/helloworldjsp/helloworld &>/dev/null && cat /opt/ol/wlp/output/defaultServer/logs/access.log && /opt/ol/wlp/bin/server stop defaultServer &>/dev/null && echo '* Access log:' && cat /opt/ol/wlp/output/defaultServer/logs/access.log && echo '* JSON access log:' && grep liberty_accesslog /logs/console.log"
Log Analysis Dashboards
Liberty provides a Grafana dashboard example for mpMetrics (source), Kibana dashboard example, Splunk OCP dashboard example, and mpFaultTolerance dashboard.
WebSphere Liberty Operator
- Background: https://www.ibm.com/docs/en/was-liberty/nd?topic=container-running-websphere-liberty-operator
Open Liberty Operator
Containers
Examples
Splash-Only
Running a simple WebSphere Liberty container:
docker run --rm -p 80:9080 -p 443:9443 open-liberty:latestStartup is complete when you see:
[AUDIT ] CWWKF0011I: The server defaultServer is ready to run a smarter planet.Access the default splash page at http://localhost/ or https://localhost/
Simple Web Application File
Mount the absolute path to a .war or .ear file from the host to /config/dropins/. For example, download https://raw.githubusercontent.com/kgibm/java_web_hello_world/master/builds/java_web_hello_world.ear and run:
docker run --rm -p 80:9080 -p 443:9443 -v $(pwd)/java_web_hello_world.ear:/config/dropins/java_web_hello_world.ear open-liberty:latestThe default context root is the basename of the .war or .ear file unless a specific context root has been configured. In this example, the context root is explicitly configured within the ear to / so access this example at http://localhost/
Adding server.xml Configuration
The base server.xml configuration may be specified with .xml files in /config/configDropins/defaults/
Overriding server.xml configuration may be specific with .xml files in /config/configDropins/overrides/
"The configuration that is specified in the configDropins/overrides directory takes precedence over the configuration in the server.xml file. Configuration specified in server.xml file takes precedence over configuration that is specified in the configDropins/defaults directory." https://www.ibm.com/support/knowledgecenter/en/SSEQTP_liberty/com.ibm.websphere.wlp.doc/ae/twlp_setup_dropins.html
Security
See https://github.com/OpenLiberty/ci.docker/blob/master/SECURITY.md
Kubernetes
Configuration Secrets
See https://aguibert.github.io/openliberty-cheat-sheet/#_configuration_secrets
Installing Fixes
How to apply fixes to a container: https://github.com/WASdev/ci.docker/tree/master/ga/applying-ifixes
Containerfiles
WebSphere Application Server traditional in Containers
Recipe
- Review the Java in Containers recipes
- Execute
/work/configure.shas the last step in your Containerfile - Review the WAS traditional recipes
- Review the Java recipe
- Review the Operating System Recipes
Container Images
- IBM Container Registry:
- WebSphere Application Server traditional:
FROM icr.io/appcafe/websphere-traditional - See all tags with:
curl -s https://icr.io/v2/appcafe/websphere-traditional/tags/list | jq .tags
- WebSphere Application Server traditional:
- DockerHub
- WebSphere
Application Server traditional:
FROM docker.io/ibmcom/websphere-traditional - See all WebSphere Application Server traditional tags with:
curl -L -s "https://registry.hub.docker.com/v2/repositories/ibmcom/websphere-traditional/tags?page=1&page_size=100" | jq '.results[].name'
- WebSphere
Application Server traditional:
Resources
- https://github.com/WASdev/ci.docker.tutorials
- https://github.com/IBM/openshift-workshop-was
- https://github.com/WASdev/ci.docker.websphere-traditional/blob/master/docker-build/9.0.5.x/Dockerfile
- https://github.com/WASdev/ci.docker.ibm-http-server/blob/master/production/Dockerfile.install
Migrating from tWAS
- Download the Migration Toolkit for Application Binaries
- Install:
java -jar binaryAppScannerInstaller.jar - Run
java -jar binaryAppScanner.jar $WAS/config/cells/$CELL/applications/$APP.ear --targetAppServer=$SERVER --generateConfigand use the resulting wsadmin script in place of the install_app.py script
Log Analysis Dashboards
WAS traditional provides a Kibana dashboard example.
Docker
Examples
WAS traditional on Docker
Create a file in the current directory named PASSWORD with an administrative password as its contents. For example:
wsadminThen run:
docker run -p 9043:9043 -p 9443:9443 -v $(pwd)/PASSWORD:/tmp/PASSWORD -e ENABLE_BASIC_LOGGING=true ibmcom/websphere-traditional:latestAfter you see "open for e-business", access the administrative console with the user name wsadmin and the password from the PASSWORD file at https://localhost:9043/ibm/console/login.do?action=secure
Access the WebContainer port at 9443: https://localhost:9443/snoop
Virtualization
Virtualization Recipe
- Do not overcommit memory.
- Use hypervisor utilities to monitor resource utilizations in addition to guest utilities.
- When overcommitting CPU, take care just as you would when running multiple processes on the same physical CPU.
- If using geographically separated data centers, measure cross-data center latencies.
Key Concepts
Virtualization is an abstraction or a masking of underlying physical resources (such as a server) from operating system images or instances running on the physical resource. By abstracting the operating system from the underlying hardware, you can create multiple independent or isolated OS environments on a given set of hardware and, depending on the virtualization technology in use, the OS environments can either be homogenous or heterogeneous. This capability enables the consolidation of multiple environments on a single server that are dedicated and isolated from other environments.
Application virtualization... addresses application level workload, response time, and application isolation within a shared environment. A prominent example of an application virtualization technology is WebSphere Virtual Enterprise [(Intelligent Management)].
Server virtualization enables the consolidation of physical multiple servers into virtual servers all running on a single physical server, improving the resource utilization while still not exceeding capacity. Additional benefits of server virtualization include savings in power, cooling, and floor space, and probably lower administrative costs as well.
http://www.ibm.com/developerworks/websphere/techjournal/0805_webcon/0805_webcon.html
The virtualization system is called the hypervisor or host, and the virtualized system running on top of the hypervisor is called the guest. "A hypervisor can be classified into two types: Type 1, also known as "native" or "bare metal," where the hypervisor is the operating system or it's integral to the operating system. Examples of type 1 hypervisors would be VMware ESX and IBM PowerVM to name but two. Type 2 refers to "hosted" or "software applications," where the hypervisor is an application running on the operating system. Some examples include VMware Server, VMware Workstation, and Microsoft Virtual Server." (http://www.ibm.com/developerworks/websphere/techjournal/1102_webcon/1102_webcon.html)
On recent versions of the IBM JVM, if you have very short-lived applications in a dynamic, cloud-like environment and you're experiencing performance problems, consider using the option -Xtune:virtualized (http://www.ibm.com/support/knowledgecenter/SSYKE2_8.0.0/com.ibm.java.lnx.80.doc/diag/appendixes/cmdline/Xtunevirtualized.html).
Sometimes it is difficult to prove whether or not a guest is affected by other guests. If possible, move or duplicate the guest to a similarly sized host with little or no other guest activity to test this hypothesis.
In general, hypervisor resource statistics (e.g. CPUs, memory, etc.) are more accurate than guest statistics.
While CPU over-provisioning may be tolerable, memory over-provisioning, particularly with Java applications, is not recommended.
Consider dedicating memory for virtual machines and, in general, avoid spanning CPU sockets.
Ensure sufficient physical resources for the hypervisor itself (e.g. CPUs).
Another quote from a senior architect:
The lure of improved resource utilization is what leads to pitfalls in server virtualization. More specifically, over-committing the available physical resources -- CPU and memory -- in an attempt to maximize server utilization is what leads to ineffective virtualization! In order to effectively utilize server virtualization, it's paramount to recognize that underlying the virtual machines is a set of finite physical resources, and once the limits of these underlying resources are reached, performance can quickly degrade. While it's important to avoid over-committing any physical resource, two resources in particular are key to effective virtualization: CPU and physical memory (RAM). As a result, it is essential to avoid over-committing these two resources. This is actually no different than in a "non-virtualized" environment or, stated another way: virtualization doesn't provide additional resources.
Guest Mobility
Technologies such as Power's Live Partition Mobility and VMWare's vMotion can dynamically move guests between hosts while running and performing work . This isn't magic and it involves pausing the guest completely during the move. In addition, workloads with a high rate of memory references may have continuing effects after the pause due to memory cache hit rates. Other variables may also come into play such as the distance of host-to-host communications increasing due to the change (e.g. if the network distance increases, or if two hosts shared a CPU chip or NUMA interconnects and then one moved away, etc.).
Depending on the duration of the pause, guest mobility may be acceptable similar to a full garbage collection, or it may be unacceptable similar to memory thrashing or excessive CPU overcommit. In general, the use of these technologies should be minimized for production workloads and tested extensively to make sure the pauses and response time degradation are acceptable in the context of service level requirements. Internal IBM tests have shown that there may be workload pauses and throughput decreases associated with a guest move, which vary based on the factors mentioned above and may or may not be acceptable for workloads with high service levels.
VMWare
Consider for a moment the number of idle or under-utilized servers that might exist in a typical lab or data center. Each of these systems consumes power, rack space, and time in the form of maintenance and administration overhead. While it is costly to allow servers to remain idle, it's also unreasonable in most cases to power a system down. Consolidation through virtualization provides a solution by pooling hardware resources and scheduling them according to demand. If a VM has idle resources, they can be redirected to other systems where they are needed. Under this model the cost of idle servers can be minimized, while allowing their function to continue.
Various scenarios were measured to demonstrate the performance and scalability of WebSphere Application Server V8.5.5.1 within VMware ESXi 5.5 VMs as compared to on-the-metal (OTM) results on state-of-the-art multi-core hardware. ESXi performance of a typical WebSphere Application Server application was generally within ~15% of OTM when running on an unsaturated system.
Do not over commit memory for WebSphere Application Server V8.5.5.1 VM deployments. It is critical for the host to have enough physical memory for all the VMs. Over committing memory in this scenario can result in drastic performance problems.
Over committing CPU can improve both density and performance if the ESXi host is not saturated. However, if the host is saturated then this could result in an incremental performance loss. Response times steadily increase when all CPUs are heavily loaded
OS level performance statistics within a VM are not accurate. Do not rely on these statistics for tuning/management. ESX provides accurate statistics at the hypervisor level.
To achieve the optimal configuration, single Instance VMs should not span socket boundaries... If a single VM has more vCPUs than can fit within a single socket, consider vertical scaling the VMs for better performance. If a VM needs more vCPUs than can fit inside a single socket, then it is recommended to configure the VM with virtual sockets that match the underlying physical sockets architecture.
ftp://public.dhe.ibm.com/software/webservers/appserv/was/WASV8551_VMware_performance_2_17.pdf
esxtop
esxtop shows CPU utilization by guest:

http://www.vmware.com/pdf/esx2_using_esxtop.pdf
vMotion
VMware has the ability to perform "live migrations" which "allows you to move an entire running virtual machine from one physical server to another, with no downtime." (see https://www.vmware.com/products/vsphere/vmotion.html) However, the actual movement of the running virtual machine can affect the virtual machine's performance especially if the virtual machine is moved frequently.
Performance Best Practices for VMware: http://www.vmware.com/pdf/Perf_Best_Practices_vSphere5.5.pdf
Consider changing the latency sensitivity network parameter. In one benchmark, the latency-sensitive option decreased response times by 31% (http://www.vmware.com/files/pdf/techpaper/latency-sensitive-perf-vsphere55.pdf).
Review the virtual CPU to physical CPU mapping. In some cases, a virtual CPU may be a CPU core thread rather than a CPU core. Review the Operating Systems chapter for background on CPU allocation.
Networking
Consider network drivers such as VMXNET3 instead of, e.g. E1000, as VMXNET3 spreads soft interrupts across all CPUs instead of just one as in E1000. A symptom of this being an issue is high "si" (softirq) CPU.
Large Pages
Using large pages improves overall SPECjbb2005 performance by 8-10 percent... [which] comes from a significant reduction in L1 DTLB misses... ESX Server 3.5 and ESX Server 3i v3.5 enable large page support by default. When a virtual machine requests a large page, the ESX Server kernel tries to find a free machine large page.
When free machine memory is low and before swapping happens, the ESX Server kernel attempts to share identical small pages even if they are parts of large pages. As a result, the candidate large pages on the host machine are broken into small pages. In rare cases, you might experience performance issues with large pages. If this happens, you can disable large page support for the entire ESX Server host or for the individual virtual machine.
https://www.vmware.com/content/dam/digitalmarketing/vmware/en/pdf/techpaper/large_pg_performance.pdf
Ballooning
The memory balloon driver (vmmemctl) collaborates with the server to reclaim pages that are considered least valuable by the guest operating system. The driver uses a proprietary ballooning technique that provides predictable performance that closely matches the behavior of a native system under similar memory constraints. This technique increases or decreases memory pressure on the guest operating system, causing the guest to use its own native memory management algorithms. When memory is tight, the guest operating system determines which pages to reclaim and, if necessary, swaps them to its own virtual disk.
If necessary, you can limit the amount of memory vmmemctl reclaims by setting the sched.mem.maxmemctl parameter for a specific virtual machine. This option specifies the maximum amount of memory that can be reclaimed from a virtual machine in megabytes (MB).
This has some known issues on Linux: http://kb.vmware.com/selfservice/microsites/search.do?language=en_US&cmd=displayKC&externalId=1003586
On Linux, if the sum of processes' resident memory is significantly less than the total memory used (whether from free, top, or meminfo) - i.e. memory used minus filecache, minus buffers, minus slab - then this may be ballooning. There have been cases where ballooning can cause runaway paging and spark the OOM killer.
How to find out what amount of memory a VMWare balloon driver has consumed from a virtualized server: https://access.redhat.com/site/solutions/445113
Hyper-V
Review common Hyper-V bottlenecks
Guest Operating Systems
Virtualized Linux
The vmstat command includes an "st" column that reports CPU time "stolen" from the guest: "st: Time stolen from a virtual machine. Prior to Linux 2.6.11, unknown." (http://man7.org/linux/man-pages/man8/vmstat.8.html). This is also available in the top command.
Cloud
Key Concepts
- Virtualization by itself does not increase capacity. You still have
a finite amount of resources; i.e. CPU, memory, network, disks, etc.
- Virtualization may allow you to better, and more effectively, use those resources.
- You will incur some overhead for the hypervisor.
- The consequences of over committing memory are significantly more
dramatic than that of CPU resources
- For example, in the PureApplication Server environment, over committing memory is not allowed
- Other tuning concepts outlined in this Cookbook should also be
adhered to when running in a virtual environment including
- Operating System
- Java
- Linux
- Database
- etc
- Depending on your runtime environment, virtualization may provide
you with the ability to auto scale your workload(s) based on policy(s)
and demand, for example:
- PureApplication Server
- SoftLayer
- Disk drive capacity has been increasing substantially over the past several years. It is not unusual to see disk drives with storage capacity from 500 Megabytes to 3 Terabytes or more. However, while storage capacity has certainly increased, IOPS (Input-output Operations Per Second) has not come close to keeping pace, particularly for Hard Disk Drives (HDD's). The nature of virtualization is to try to pack as many VM's (density) as possible on a physical compute node. Particular attention should be given to the IOPS requirements of these VM's, and not just their disk storage requirements. Newer disk technology's, like Solid State Drives (SSD's) and Flash drives, offer significant IOPS improvements, but may, or may not, be available in your environment. Some environments are connected to SANs (a network of drives) which can introduce latency to a virtual machine and must be monitored to ensure that disk I/O time is acceptable for the virtual machine. Any lag in the disk I/O latency can affect applications running in the virtual machine. Applications that tend to log a lot of data (error, info, audit, etc) can suffer performance issues if the latency is too high.
Trends
- The cost of memory outweighs the cost of CPU, disk, and network resources in cloud environments. This is pushing many customers to reduce memory usage and increase CPU usage.
- Various services are starting to be provided as pay-per-use API calls. This is pushing many customers to cache the results of expensive API calls.
Scalability and Elasticity
Scalability and elasticity for virtual application patterns in IBM PureApplication System: http://www.ibm.com/developerworks/websphere/techjournal/1309_tost/1309_tost.html
Databases
Here is a list of databases that are fully tested & supported with WAS: http://pic.dhe.ibm.com/infocenter/prodguid/v1r0/clarity-reports/report/html/prereqsForProduct?deliverableId=1318522073603
Terms:
- Cardinality: with respect to tables, the number of rows in the table. With respect to indexed columns, the number of distinct values of that column in a table.
- Normalization is the process of restructuring a data model by reducing its relations to their simplest forms. It is a key step in the task of building a logical relational database design. Normalization reduces redundancy from your data and can improve the performance of update and delete statements, since you only have to do it in one place. By normalizing your data, you try to ensure that all columns in the table depend on the primary key. The disadvantage of a fully normalized data structure is in data retrieval operations, specifically when a query is accessing a large number of related pieces of data from different tables via join operations. For more information about Normalization, author C.J. Date is one of the better resources.
- Denormalization is the intentional duplication of columns in multiple tables whose consequence is increased data redundancy. Denormalization is sometimes necessary to minimize performance problems and is a key step in designing a physical relational database design.
Sub-chapters
IBM DB2
IBM DB2 Recipe
- Create a pressure valve with WLM
- Ensure that the version of the DB2 driver matches the DB2 backend version. Note that higher level JDBC drivers are compatible with lower level DB2 servers.
- Before DB2 driver version 4.26.17, set
-Ddb2.jcc.override.timerLevelForQueryTimeOut=2 - On AIX, use MALLOCOPTIONS=buckets,multiheap
- Gather
db2pd -stack allduring issue times.
DB2 JCC Driver
General JCC Recommendations
Ensure that the version of the DB2 driver matches the DB2 backend version. Note that higher level JDBC drivers are compatible with lower level DB2 servers.
Read Timeout
Set a read timeout with blockingReadConnectionTimeout
(defaults to unlimited):
blockingReadConnectionTimeout: The amount of time in seconds before a connection socket read times out. This property applies only to IBM Data Server Driver for JDBC and SQLJ type 4 connectivity, and affects all requests that are sent to the data source after a connection is successfully established. The default is 0. A value of 0 means that there is no timeout.
timerLevelForQueryTimeOut
For both type 2 and type 4 drivers, before version 4.26.17, the
default timerLevelForQueryTimeOut
of QUERYTIMEOUT_STATEMENT_LEVEL (1) creates a timer object
for each statement execution when there is a non-zero timeout and this
may have a large performance impact. The alternative is to create a
single timer object for each connection with
-Ddb2.jcc.override.timerLevelForQueryTimeOut=2. In one
case, this improved performance by 65%. Changing the default means
holding the timer and related memory for longer for each connection in a
connection pool, but this is an acceptable cost for most customers for
the improved performance.
The main symptom of this is that thread dumps will show many threads
with stack tops in java/lang/Thread.startImpl called from
com/ibm/db2 code. For example:
3XMTHREADINFO "WebContainer : 433" J9VMThread:0x000000003765AA00, j9thread_t:0x000001004F74D8C0, java/lang/Thread:0x0000000591475000, state:R, prio=5
3XMJAVALTHREAD (java/lang/Thread getId:0x4FC, isDaemon:true)
3XMTHREADINFO1 (native thread ID:0x62E0445, native priority:0x5, native policy:UNKNOWN, vmstate:CW, vm thread flags:0x00000001)
3XMCPUTIME CPU usage total: 221.008744000 secs, user: 205.519645000 secs, system: 15.489099000 secs, current category="Application"
3XMHEAPALLOC Heap bytes allocated since last GC cycle=131072 (0x20000)
3XMTHREADINFO3 Java callstack:
4XESTACKTRACE at java/lang/Thread.startImpl(Native Method)
4XESTACKTRACE at java/lang/Thread.start(Thread.java:948(Compiled Code))
5XESTACKTRACE (entered lock: java/lang/Thread$ThreadLock@0x0000000692FA3730, entry count: 1)
5XESTACKTRACE (entered lock: java/util/TimerThread@0x0000000692FA3698, entry count: 1)
4XESTACKTRACE at java/util/Timer.<init>(Timer.java:187(Compiled Code))
4XESTACKTRACE at java/util/Timer.<init>(Timer.java:157(Compiled Code))
4XESTACKTRACE at com/ibm/db2/jcc/am/wo.a(wo.java:5151(Compiled Code))
4XESTACKTRACE at com/ibm/db2/jcc/am/wo.ec(wo.java:5275(Compiled Code))
4XESTACKTRACE at com/ibm/db2/jcc/am/xo.b(xo.java:4191(Compiled Code))
4XESTACKTRACE at com/ibm/db2/jcc/am/xo.jc(xo.java:760(Compiled Code))
4XESTACKTRACE at com/ibm/db2/jcc/t4/j.jc(j.java:134(Compiled Code))
4XESTACKTRACE at com/ibm/db2/jcc/am/xo.executeQuery(xo.java:725(Compiled Code))
5XESTACKTRACE (entered lock: com/ibm/db2/jcc/t4/b@0x000000063157C588, entry count: 1)Starting with DB2 driver version 4.26.17, the default has been
changed to -Ddb2.jcc.override.timerLevelForQueryTimeOut=2
Keep-alive
It seems that the DB2 JDBC driver does enable keepalive: https://www-01.ibm.com/support/docview.wss?uid=swg21231084
DB2 sets the TCP/IP keepalive setting on both the client and server by default.
DB2 on z/OS
Collect and archive SMF 100-102 records. During a sustained issue, gather a console dump of the 4 Db2 address spaces (DBM1, DIST, MSTR, IRLM).
Type 2 vs Type 4
Type 2 is native (with an "inability to offload [most] Type 2 work to zAAP" although some may be offloaded after APAR OA29015) and type 4 is mostly Java, therefore, type 4 may use zIIPs/zAAPs; however, type 2 may outperform type 4 with similar GCP usage (or lower in the case of DB2 on a remote LPAR) because of its use of cross-memory technology and because type 4's usage of TCP drives GCP. Additional details:
[Type 4] TCP communications may be done all within the same LPAR (as done in this study) [...] Summary of Results:
- The use of Type 4 resulted in more total processor usage than Type 2.
- The overall general processor (CP) usage showed Type 2 and Type 4 to be approximately equal.
- Performance enhancements in the JDBC Type 2 driver now make it equal or better than the Type 4.
Native Memory Usage
The type 2 DB2 driver mostly uses native memory below the 2GB bar (except LBF) and this usage may compete for JVM under-the-2GB-bar storage required for some data structures when using compressed references. Alternatively, the type 4 driver is pure Java and does not directly use native memory below the bar. Note that some DB2 client-side application functions may require the type 2 driver, although these functions are generally more obscure and not used by applications. In some cases, the type 4 driver may perform worse as it does more processing as part of the DRDA communication protocol and TCP/IP whereas a type 2 driver can use cross-memory calls if it's on the same LPAR as DB2.
Server
Display configuration: db2 get db cfg
DB2 Self-tuning: db2 autoconfigure apply db and dbm
Review the DB2 tuning (software & hardware) in the latest SPECjEnterprise results submitted by IBM: http://www.spec.org/jEnterprise2010/results/res2013q2/jEnterprise2010-20130402-00042.html
Located in the DB2 Control Center, [the DB2 configuration] advisor calculates and displays recommended values for the DB2 buffer pool size, the database, and the database manager configuration parameters, with the option of applying these values. See more information about the advisor in the online help facility within the Control Center.
When configuring the data source settings for the databases, confirm the DB2 MaxAppls setting is greater than the maximum number of connections for the data source. If you are planning to establish clones, set the MaxAppls value as the maximum number of connections multiplied by the number of clones. The same relationship applies to the session manager number of connections. The MaxAppls setting must be equal to or greater than the number of connections. If you are using the same database for session and data sources, set the MaxAppls value as the sum of the number of connection settings for the session manager and the data sources.
For example, MaxAppls = (number of connections set for the data source + number of connections in the session manager) multiplied by the number of clones.
After calculating the MaxAppls settings for the WebSphere Application Server database and each of the application databases, verify that the MaxAgents setting for DB2 is equal to or greater than the sum of all of the MaxAppls values. For example, MaxAgents = sum of MaxAppls for all databases.
For systems with multiple hard disk drives, you can gain large performance improvements by setting the log files for each database on a different hard drive from the database files.
How to view or set: At a DB2 command prompt, issue the command: db2 update db cfg for [database_name] using newlogpath [fully_qualified_path].
Recommended value: Use a separate high-speed drive, preferably performance enhanced through a redundant array of independent disk (RAID) configuration.
If lock escalations are causing performance concerns, you might need to increase the value of [maxlocks] or the locklist parameter... You can use the database system monitor to determine if lock escalations are occurring.
- Maintain current indexes on tables: utilize the DB2 Design Advisor (available from the DB2 Control Center, or command line) to help determine indexes that could improve performance.
- Update catalog statistics: DB2 uses these to optimize access to key tables. The easiest way to maintain statistics is via the DB2 Automatic Table Maintenance feature, which runs the RUNSTATS command in the background as required to ensure that the correct statistics are collected and maintained. By default, this feature is not enabled. It may be turned on from the DB2 Control Center.
- Set buffer pool size correctly: a buffer pool is an area of memory into which database pages are read, modified, and held during processing; accessing pages from the buffer pool is much faster than accessing pages from physical devices. To choose appropriate buffer pool size settings, monitor database container I/O activity, by using system tools or by using DB2 buffer pool snapshots. Be careful to avoid configuring large buffer pool size settings which lead to paging activity on the system.
Put frequently updated columns together and at the end of the row. This has an effect on update performance due to the following logging considerations: For fixed length row updates, DB2 logs from the first changed column to the last changed column. For variable length row updates, DB2 logs from the first changed byte to the end of the row. If the length of a variable length column changes, this will result in a change to the row header (which includes the row length), and thus the entire row will be logged.
Query Execution Times
To get per-query execution times, create a DB2 event monitor (note on the create event monitor command, single quotes around the path are required):
$ mkdir $PATH
$ chmod 777 $PATH
$ db2 connect to <db_name> user <inst_user> using <password>
$ db2 "create event monitor $NAME for statements write to file '$PATH'"
$ db2 "set event monitor $NAME state 1"To disable an event monitor:
$ db2 "set event monitor $NAME state 0"To process event monitor data to a human readable form:
$ db2evmon -path $PATH > commands.outTo list all event monitors:
$ db2 "select * from SYSCAT.EVENTMONITORS"To completely delete an event monitor:
$ db2 "drop event monitor $NAME"Example of a single query execution from db2evmon output:
Statement Event ...
Text : select id,symbol from MYTABLE
Start Time: 02-09-2010 18:21:46.159875
Stop Time: 02-09-2010 18:21:46.164743
Exec Time: 0.004868 seconds...Tablespaces
A tablespace is a physical storage object that provides a level of indirection between a database and the tables stored within the database. It is made up of a collection of containers into which database objects are stored. A container is an allocation of space to a table space. Depending on the table space type, the container can be a directory, device, or file.
System Managed Space (SMS): stores data in operating system files. They are an excellent choice for general purposes use. They provide good performance with little administration cost.
Database Managed Space (DMS): with database-managed space (DMS) table spaces, the database manager controls the storage space.
DMS tablespaces usually perform better than SMS tablespaces because they are pre-allocated and do not have to spend time extending files when new rows are added. DMS tablespaces can be either raw devices or file system files. DMS tablespaces in raw device containers provide the best performance because double buffering does not occur. Double buffering, which occurs when data is buffered first at the database manager level and then at the file system level, might be an additional cost for file containers or SMS table spaces.
If you use SMS tablespaces, consider using the db2empfa command on your database. The db2empfa (Enable Multipage File Allocation) tool enables the use of multipage file allocation for a database. With multipage file allocation enabled for SMS table spaces, disk space is allocated one extent rather than one page at a time, improving INSERT throughput.
$ db2 "LIST TABLESPACES SHOW DETAIL"Buffer Pools
There is no definitive answer to the question of how much memory you should dedicate to the buffer pool. Generally, more is better. A good rule of thumb would be to start with about 75% of your system's main memory devoted to buffer pool(s), but this rule is applicable only if the machine is a dedicated database server.
If your tablespaces have multiple page sizes, then you should create one buffer pool for each page size.
Buffpage is a database configuration parameter. A buffer pool is a memory storage area where database pages containing table rows or index entries are temporarily read and changed. Data is accessed much faster from memory than from disk.
How to view or set: To view the current value of buffpage for database x, issue the DB2 command get db cfg for x and look for the value BUFFPAGE. To set BUFFPAGE to a value of n, issue the DB2 command update db cfg for x using BUFFPAGE n and set NPAGES to -1 as follows: db2 \<-- go to DB2 command mode, otherwise the following "select" does not work as is connect to x \<-- (where x is the particular DB2 database name) select \* from syscat.bufferpools (and note the name of the default, perhaps: IBMDEFAULTBP) (if NPAGES is already -1, there is no need to issue following command) alter bufferpool IBMDEFAULTBP size -1 (re-issue the above "select" and NPAGES now equals -1) You can collect a snapshot of the database while the application is running and calculate the buffer pool hit ratio as follows: Collect the snapshot: Issue the update monitor switches using bufferpool on command. Make sure that bufferpool monitoring is on by issuing the get monitor switches command. Clear the monitor counters with the reset monitor all command. Run the application. Issue the get snapshot for all databases command prior to all applications disconnect from the database, otherwise statistics are lost. Issue the update monitor switches using bufferpool off command. Calculate the hit ratio by looking at the following database snapshot statistics: Buffer pool data logical reads Buffer pool data physical reads Buffer pool index logical reads Buffer pool index physical reads Default value: 250 Recommended value: Continue increasing the value until the snapshot shows a satisfactory hit rate.The buffer pool hit ratio indicates the percentage of time that the database manager did not need to load a page from disk to service a page request. That is, the page is already in the buffer pool. The greater the buffer pool hit ratio, the lower the frequency of disk input and output. Calculate the buffer pool hit ratio as follows:
P = buffer pool data physical reads + buffer pool index physical reads L = buffer pool data logical reads + buffer pool index logical reads Hit ratio = (1-(P/L)) \* 100%
Indexing
An index is a set of keys, each pointing to a row, or rows in a table. An index serves to ensure uniqueness, as in the case of Primary Key, and to allow more efficient access to rows in a table by creating a direct path to the data through pointers. The SQL optimizer automatically chooses the most efficient way to access data in tables. The optimizer takes indexes into consideration when determining the fastest access path to data.
An index will impact disk storage usage, insert and delete processing, and database maintenance.
The intent of a clustering index is so that the sequence of key values closely corresponds to the sequence of rows stored in a table.
Create as few indexes as possible. Consider creating the INDEXES with the "ALLOW REVERSE SCANS" option. Pay close attention to the order of the columns in the index. Don't create redundant indexes. Use DB2 "Explain" facilities to determine the actual usage of the indexes.
Logging
One of the main purposes of all database systems is to maintain the integrity of your data. All databases maintain log files that keep records of database changes. DB2 logging consists of a set of primary and secondary log files that contain log records that record all changes to a database. The database log is used to roll back changes for units of work that are not committed and to recover a database to a consistent state. DB2 provides two logging strategy choices.
Circular logging is the default log mode. With circular logging, the log records fill the log files and then overwrite the initial log records in the initial log file. The overwritten log records are not recoverable. This type of logging is typically not suited for a production application.
Log Retain logging is a setting where a log is archived when it fills with log records. New log files are made available for log records. Retaining log files enables roll-forward recovery. Roll-forward recovery reapplies changes to the database based on completed units of work (transactions) that are recorded in the log. You can specify that roll-forward recovery is to the end of the logs, or to a particular point in time before the end of the logs. Archived log files are never directly deleted by DB2, therefore, it is the applications' responsibility to maintain them; i.e. archive, purge, etc.
Placement of the log files needs to be optimized, not only for write performance, but also for read performance, because the database manager will need to read the log files during database recovery.
Increase the size of the database configuration Log Buffer parameter (logbufsz). This parameter specifies the amount of the database heap to use as a buffer for log records before writing these records to disk.
Buffering the log records will result in more efficient logging file I/O because the log records will be written to disk less frequently, and more log records will be written at each time.
Reorg
SQL statement performance can deteriorate after many updates, deletes or inserts.
Use the DB2 reorgchk update statistics on table all command to perform the runstats operation on all user and system tables for the database to which you are currently connected. Rebind packages using the bind command. If statistics are available, issue the db2 -v "select tbname, nleaf, nlevels, stats_time from sysibm.sysindexes" command on DB2 CLP. If no statistic updates exist, nleaf and nlevels are -1, and stats_time has an empty entry (for example: "-"). If the runstats command was previously run, the real-time stamp from completion of the runstats operation also displays under stats_time. If you think the time shown for the previous runstats operation is too old, run the runstats command again.
Runstats
The DB2 optimizer uses information and statistics in the DB2 catalog in order to determine the best access to the database based on the query provided. Statistical information is collected for specific tables and indexes in the local database when you execute the RUNSTATS utility. When significant numbers of table rows are added or removed, or if data in columns for which you collect statistics is updated, execute RUNSTATS again to update the statistics.
After running RUNSTATS on your database tables, you need to rebind your applications to take advantage of those new statistics. This is done to ensure the best access plan is being used for your SQL statements. To clear the contents of the SQL cache, use the FLUSH PACKAGE CACHE sql statement.
Explain
Explain allows you to capture information about the access plan chosen by the optimizer as well as performance information that helps you tune queries. Before you can capture explain information, you need to create the relational tables in which the optimizer stores the explain information and you set the special registers that determine what kind of explain information is captured.
- db2 ttf EXPLAIN.DDL (located in sqllib/misc directory)
- db2exfmt" this command line tool is used to display explain information in preformatted output.
db2expln and dynexpln: these command line tools are used to see the access plan information available for one or more packages of static SQL statements. Db2expln shows the actual implementation of the chosen access plan. It does not show optimizer information. The dynexpln tool, which uses db2expln within it, provides a quick way to explain dynamic SQL statements that contain no parameter markers. This use of db2expln from within dynexpln is done by transforming the input SQL statement into a static statement within a pseudo-package. When this occurs, the information may not always be completely accurate. If complete accuracy is desired, use the explain facility. The db2expln tool does provide a relatively compact and English-like overview of what operations will occur at run-time by examining the actual access plan generated.
Isolation Levels
An isolation level determines how data is locked or isolated from other processes while the data is being accessed. The isolation level will be in effect for the duration of the unit of work. DB2 supports the following isolation levels, listed in order of most restrictive to least restrictive:
- Repeatable Read - An isolation level that locks all the rows in an application that are referenced within a transaction. When a program uses repeatable read protection, rows referenced by the program cannot be changed by other programs until the program ends the current transaction.
- Read Stability - An isolation level that locks only the rows that an application retrieves within a transaction. Read stability ensures that any qualifying row that is read during a transaction is not changed by other application processes until the transaction is completed, and that any row changed by another application process is not read until the change is committed by that process.
- Cursor Stability - An isolation level that locks any row accessed by a transaction of an application while the cursor is positioned on the row. The lock remains in effect until the next row is fetched or the transaction is terminated. If any data is changed in a row, the lock is held until the change is committed to the database
- Uncommitted Read - An isolation level that allows an application to access uncommitted changes of other transactions. The application does not lock other applications out of the row that it is reading, unless the other application attempts to drop or alter the table. Sometimes referred to as "Dirty Reads"
Lock Timeouts
To view the current value of the lock timeout property for database xxxxxx, issue the DB2 get db cfg for xxxxxx command and look for the value LOCKTIMEOUT. To set LOCKTIMEOUT to a value of n, issue the DB2 update db cfg for xxxxxx command using LOCKTIMEOUT n, where xxxxxx is the name of the application database and n is a value between 0 and 30 000 inclusive.
Default value: -1, meaning lock timeout detection is turned off. In this situation, an application waits for a lock if one is not available at the time of the request, until either the lock is granted or a deadlock occurs.
Recommended value: If your database access pattern tends toward a majority of writes, set this value so that it gives you early warning when a timeout occurs. A setting of 30 seconds suits this purpose. If your pattern tends toward a majority of reads, either accept the default lock timeout value, or set the property to a value greater than 30 seconds.
If lock escalations occur frequently, increase the value of either locklist or maxlocks, or both.
Query Tuning
Use the OPTIMIZE FOR n ROWS clause to give priority to retrieving the first n rows in the full result set.
Use the FETCH FIRST n ROWS ONLY clause to retrieve only a specified number of rows. Take advantage of row blocking, by specifying the FOR READ ONLY, FOR FETCH ONLY, OPTIMIZE FOR n ROWS clause, or if you declare your cursor as SCROLLing. This will improve performance, and, in addition, improve concurrency because exclusive locks are never held on the rows retrieved.
Consider the use of APPEND MODE
Insert multiple rows with one INSERT statement
Disk
A database that would have taken 36 * 1 GB drives a number of years ago can now be placed on one disk. This highlights the database I/O problems. For example, if each 1 GB disk drive can do 80 I/O operations a second, this means the system can do a combined 36 * 80 = 2880 I/O operations per second. But a single 36 GB drive with a seek time of 7 ms can do only 140 I/O operations per second. While increased disk drive capacity is good news, the lower numbers of disks cannot deliver the same I/O throughput.
WLM Pressure Valve
Enable WLM for the correct USER and application name (replace
$initialconcurrency):CREATE SERVICE CLASS SC1; CREATE WORKLOAD wl1 SESSION_USER('MYUSER') APPLNAME('db2jcc_application') SERVICE CLASS SC1; GRANT USAGE ON WORKLOAD wl1 TO PUBLIC; CREATE THRESHOLD "MYDB_ABNORMAL_WORKLOAD_CONCURRENCY" FOR SERVICE CLASS SC1 ENFORCEMENT DATABASE WHEN CONCURRENTDBCOORDACTIVITIES > $initialconcurrency COLLECT ACTIVITY DATA CONTINUE;When needed, dynamically increase or reduce pressure by changing
CONCURRENTDBCOORDACTIVITIES(replace$newvalue):ALTER THRESHOLD "MYDB_ABNORMAL_WORKLOAD_CONCURRENCY" WHEN CONCURRENTDBCOORDACTIVITIES > $newvalue CONTINUE;
DB2 Configuration
Number of asynchronous page cleaners (NUM_IOCLEANERS) - This parameter controls the number of page cleaners that write changed pages from the buffer pool to disk. You may want to increase this to the number of physical disk drive devices you have. The default is 1.
Enable intra-partition parallelism (INTRA_PARALLEL) - if you have a multi-processor SMP system, setting this parameter to YES may improve performance. The default is NO
To optimize for INSERT speed at the possible expense of faster table growth, set the DB2MAXFSCRSEARCH registry variable to a small number. To optimize for space reuse at the possible expense of INSERT speed, set DB2MAXFSCRSEARCH to a larger number.
Snapshots
Collecting performance data introduces overhead on the operation of the database. DB2 provides monitor switches to control which information is collected. You can turn these switches on by using the following DB2 commands:
- UPDATE MONITOR SWITCHES USING BUFFERPOOL ON ;
- UPDATE MONITOR SWITCHES USING LOCK ON ;
- UPDATE MONITOR SWITCHES USING SORT ON ;
- UPDATE MONITOR SWITCHES USING STATEMENT ON ;
- UPDATE MONITOR SWITCHES USING TABLE ON ;
- UPDATE MONITOR SWITCHES USING UOW ON ;
You can access the data that the database manager maintains either by taking a snapshot or by using an event monitor.
Use the GET SNAPSHOT command to collect status information and format the output for your use. Some of the most useful options are:
- GET SNAPSHOT FOR DATABASE - Provides general statistics for one or more active databases on the current database partition.
- GET SNAPSHOT FOR APPLICATIONS - Provides information about one or more active applications that are connected to a database on the current database partition.
- GET SNAPSHOT FOR DATABASE MANAGER - Provides statistics for the active database manager instance.
- GET SNAPSHOT FOR LOCKS - Provides information about every lock held by one or more applications connected to a specified database.
- GET SNAPSHOT FOR BUFFERPOOLS - Provides information about buffer pool activity for the specified database.
- GET SNAPSHOT FOR DYNAMIC SQL - Returns a point-in-time picture of the contents of the SQL statement cache for the database.
db2batch
A benchmark tool called db2batch is provided in the sqllib/bin subdirectory of your DB2 installation. This tool can read SQL statements from either a flat file or standard input, dynamically describe and prepare the statements, and return an answer set.
IBM DB2 for z/OS
"First, ensure that your DB2 logs are large enough, are allocated on the fastest volumes you have, and make sure they have optimal CI sizes.
Next, ensure that you have tuned your bufferpools so that the most often-read data is in memory as much as possible. Use ESTOR and hyperpools.
You many want to consider pre-formatting tables that are going to be heavily used. This avoids formatting at runtime.
Ensuring DB2 Tracing Under the DB2 for z/OS Universal Driver is Turned Off:
If the db2.jcc.propertiesFile jvm property has been defined to specify a DB2 jcc properties file to the WebSphere Application Server for z/OS, ensure that the following trace statements in the file are commented out if they are specified:# jcc.override.traceFile=<file name>
# jcc.override.traceFile=<file name>If any of the DB2 Universal JDBC Driver datasources your applications are using are defined with a nonzero traceLevel custom property, use the WebSphere Application Server for z/OS Administrative console to set the traceLevel to zero.
Be sure to define indexes on all your object primary keys. Failure to do so will result in costly tablespace scans.
Ensure that, once your tables are sufficiently populated, you do a re-org to compact the tables. Running RUNSTATS will ensure that the DB2 catalog statistics about table and column sizes and accesses are most current so that the best access patterns are chosen by the optimizer.
Enable dynamic statement caching in DB2. To do this, modify your ZPARMS to say CACHEDYN(YES) MAXKEEPD(16K). Depending on the application, this can make a very significant improvement in DB2 performance. Specifically, it can help JDBC and LDAP query.
Increase DB2 checkpoint interval settings to a large value. To do this, modify your ZPARMS to include CHKFREQ=xxxxx, where xxxxx is set at a high value when doing benchmarks (e.g. CHKFREQ=16000000). On production systems there are other valid reasons to keep checkpoint frequencies lower, however."
DB2 on Linux on Power
Write I/O to the Transaction Log
Before a transaction is committed, it must be written to the transaction log. This can become a primary bottleneck. This can be lessened by isolating transaction logs.
Data Compression
If there is available CPU and I/O is the bottleneck, consider data compression with the DB2 Storage Optimization feature.
alter table <table_name> compress yes
alter index <index_name> compress yes
reorg table <table_name> RESETDICTIONARY
reorg indexes all for table <table_name>
runstats on table <table_name> with distribution and detailed indexes all allow read accessdb2pd
db2pd -stack all gathers stack traces of DB2: https://www.ibm.com/support/knowledgecenter/SSEPGG_11.5.0/com.ibm.db2.luw.admin.trb.doc/doc/c0054595.html
The files are written to DIAGPATH
(db2 get dbm cfg|grep DIAGPATH).
Alternatively, specify homedir and timeout options to change the output directory:
db2pd -stack all dumpdir=~/db2stacks/ timeout=30
Oracle Database
Client
Read Timeout
Set a read timeout with oracle.jdbc.ReadTimeout:
Pass
oracle.jdbc.ReadTimeoutas connection property to enable read timeout on socket. The timeout value is in milliseconds.
Server
Review the Oracle Database (software and hardware) tuning in the latest SPECjEnterprise results submitted by Oracle:
- SPARC T5: http://www.spec.org/jEnterprise2010/results/res2013q3/jEnterprise2010-20130904-00045.html
- Sun Server: http://www.spec.org/jEnterprise2010/results/res2013q3/jEnterprise2010-20130904-00046.html
Update Database Statistics: statistics are maintained on tables and indexes. Updating statistics allows the query optimizer to create better performing access plans for evaluating queries. One approach to manually updating statistics on all tables in a schema is to use the dbms_stats utility:
execute dbms_stats.gather_schema_stats( -
ownname => 'your_schema_name', -
options => 'GATHER AUTO', -
estimate_percent => DBMS_STATS.AUTO_SAMPLE_SIZE, -
cascade => TRUE, -
method_opt => 'FOR ALL COLUMNS SIZE AUTO', -
degree => 15);Set Buffer Cache sizes correctly: this reference discusses this issue in detail: https://docs.oracle.com/cd/B19306_01/server.102/b14211/memory.htm#g77696
Set Log Files Appropriately: Unlike DB2, Oracle performs an expensive checkpoint operation when switching logs. The checkpoint involves writing all dirty pages in the buffer cache to disk. Therefore, it is important to make the log files large enough that switching occurs infrequently. Also, applications which generate a high volume of log traffic need larger log files to achieve this goal.
Maintain proper table indexing: a database environment that requires additional indexes will often exhibit performance degradation over time; in some cases the performance degradation can be profound. Environments that need additional indexes often exhibit heavy read I/O on devices holding the tablespace datafiles. To assist in determining which additional indexes could improve performance, Oracle 10g provides the Automatic Database Diagnostic Monitor. It has the capability to help define and design indexes suitable for a particular workload.
When using the Oracle RAC product, configure the database nodes as Active-Passive. This generally provides optimal system performance while also maintaining high availability via failover support.
The following references are useful:
- Oracle 10g Release 2 documentation (includes a Performance Tuning Guide) http://www.oracle.com/pls/db102/homepage
The PROCESSES parameter is effectively equivalent to the maximum number of concurrent users plus the number of background processes.
The OPEN_CURSORS parameter value should be set high enough to prevent the application from running out of open cursors (handles to private SQL areas). For example, 3000.
The SESSION_CACHED_CURSORS parameter sets the number of cached closed cursors each session can have. For example, 1000.
The DB_FILES parameter specifies the maximum number of database files that can be opened for the database. For example, 3000.
The PRE_PAGE_SGA parameter determines whether Oracle reads the entire SGA into memory at instance startup. This setting can increase the amount of time necessary for instance startup, but it is likely to decrease the amount of time necessary for Oracle to reach its full performance capacity after startup.
The DB_WRITER_PROCESSES parameter can be set to take advantage of a multi-cpu system that modifies data heavily by enabling multiple DB writer processes. For example, use the formula DB_WRITER_PROCESSES = CPU_COUNT / 8
Basic Commands
List connected clients:
SELECT * FROM v$sessionAutomatic Workload Repository Reports
Automatic Workload Repository (AWR) reports are commonly used to investigate Oracle database performance.
Common things to review:
SQL ordered by Elapsed Time (Global): Usually, review the per execution "Elapsed (s)" times of queries and consider the Execs column which is how many times those queries were executed.
Automatic Memory Management
Automatic Memory Management (AMM) was introduced in Oracle 11g and allows most memory usage (SGA, PGA, buffer pools, shared pools, large pools, etc.) to be automatically sized (excluding the log buffer). For example:
- Set a value for MEMORY_MAX_TARGET. Sufficient OS memory is required to support the value set. MEMORY_MAX_TARGET=14464M.
- Set SGA_TARGET and PGA_AGGREGATE_TARGET to 0. If these values are nonzero then it defines the minimum size for the specified region.
- Set MEMORY_TARGET to the total amount of memory you want to share between SGA and PGA. e.g. MEMORY_TARGET=14464M.
Apache Derby
Apache Derby is a simple, Java-based database: http://db.apache.org/derby/
ij
Use the ij tool to connect to a Derby database from the command line:
$ cd ${PARENT_DIRECTORY_OF_DIRBY_DATABASE}
$ java -jar ${DERBY}/lib/derbytools.jar:${DERBY}/lib/derby.jar org.apache.derby.tools.ij
ij> connect 'jdbc:derby:dbName';
ij> show tables;
ij> describe schema.table;The database name (in the example above, dbName) may be prefixed with a filesystem path.
Tips:
- Add "create=true" to the connect command to create the database if it doesn't exist. For example: connect 'jdbc:derby:dbName;create=true';
- Use -Dij.database=${CONNECT} on the java command to immediately connect using the connection string ${CONNECT}.
- Type "exit;" to exit.
Example running a SQL file:
$ java -Dij.database=jdbc:derby:dbName -jar ${DERBY}/lib/derbytools.jar:${DERBY}/lib/derby.jar org.apache.derby.tools.ij ${FILE}.sqlExporting a table: https://db.apache.org/derby/docs/10.4/tools/derbytools.pdf
CALL SYSCS_UTIL.SYSCS_EXPORT_TABLE ('SCHEMA','TABLE','exported.delimited',';','%',null);Other Databases
Tibero Database
Tibero is not tested with WAS. Presumably they are using a generic JDBC type 4 driver and so as long as they've written to the specification of JDBC/JCA, then WAS will support any connection pool issues; however, any issues with the database driver or the database are not supported.
Caching and WebSphere eXtreme Scale
Caching Recipes
- If available, enable the Java shared class and ahead-of-time compilation caches. WAS enables this by default, but you can increase the size if you have available memory. See the Java chapter.
- Pre-compile Java Server Pages (JSPs). See the WAS chapter.
- If possible, utilize the WAS Dynacache feature to cache servlet responses. See the HTTP section in the WAS chapter.
- The application should set standardized response headers that
indicate caching (e.g. Cache-Control in HTTP).
- An alternative is to use a web server such as IHS to apply cache headers to responses based on rules. See the Web Servers chapter.
- If possible, use the WebSphere eXtreme Scale (WXS) product to maximize data caching (see below).
- Consider using an edge cache such as the WebSphere Caching Proxy. See the Web Servers chapter.
- If using WebSphere Commerce, set Dynacache caches' sharing modes to NOT_SHARED.
General Caching Topics
Caching (or lack thereof) can have dramatic performance impacts; however, caching must be carefully implemented to avoid inconsistent data:
Most Java EE application workloads have more read operations than write operations. Read operations require passing a request through several topology levels that consist of a front-end web server, the web container of an application server, the EJB container of an application server, and a database. WebSphere Application Server provides the ability to cache results at all levels of the network topology and Java EE programming model that include web services.
Application designers must consider caching when the application architecture is designed because caching integrates at most levels of the programming model. Caching is another reason to enforce the MVC pattern in applications. Combining caching and MVC can provide caching independent of the presentation technology and in cases where there is no presentation to the clients of the application. (https://www.ibm.com/support/knowledgecenter/SSAW57_8.5.5/com.ibm.websphere.nd.doc/ae/cprf_appdesign.html)
In general, caches are held in memory or disk which must be properly sized for the additional cache usage. Caches may also introduce additional administration. Example caches (detailed in later chapters):
- Avoid your infrastructure altogether by telling the client (e.g. browser) to cache as much as possible with response headers.
- Cache whole or parts of responses (e.g. servlet caching).
- Use dedicated caching proxy servers between the end-user and application.
- Place static content as close to the user as possible (e.g. in a web server instead of the application server, content delivery networks, etc.).
WebSphere eXtreme Scale (WXS)
Caching is used to reduce execution path length at any layer to reduce the cost of each execution. This may lower the response time and/or lower the transaction cost. A grid is a set of maps that store data. Within a grid, partitions split maps across multiple container server JVMs using shards. A catalog server coordinates shard placement and monitors container servers. There may be multiple catalog servers in a catalog service domain (which itself is a mini grid) for high availability. A partition has 1 primary shard and 0 or more replica shards. The primary shard receives the actual data (insert, update, remove). A replica shard may be either synchronous or asynchronous. If minSyncReplica is > 0, a transaction in a primary shard is only committed with the agreement of those replicas.
Catalog Servers
A catalog server references an objectGridServer.properties file. On WAS, this is often in <WAS>/properties and may be copied from <WAS>/optionalLibraries/ObjectGrid/properties/sampleServer.properties.
Container Servers
A container server references both an objectGrid.xml file and an objectGridDeployment.xml file. For a WAR, place both into WebContent/META-INF. A container server also must have access to the objectGridServer.properties file. Full objectGridDeployment.xsd: http://www.ibm.com/support/knowledgecenter/en/SSTVLU_8.6.1/com.ibm.websphere.extremescale.doc/rxsdepschema.html
Example development objectGridDeployment.xml
<?xml version="1.0" encoding="UTF-8"?>
<deploymentPolicy xmlns:xsi="http://www.w3.org/2001/XMLSchema-instance"
xsi:schemaLocation="http://ibm.com/ws/objectgrid/deploymentPolicy ../deploymentPolicy.xsd"
xmlns="http://ibm.com/ws/objectgrid/deploymentPolicy">
<objectgridDeployment objectgridName="grid1">
<mapSet name="mapSet" numberOfPartitions="1" developmentMode="true">
<map ref="map1"/>
</mapSet>
</objectgridDeployment>
</deploymentPolicy>Example non-development objectGridDeployment.xml
<?xml version="1.0" encoding="UTF-8"?>
<deploymentPolicy xmlns:xsi="http://www.w3.org/2001/XMLSchema-instance"
xsi:schemaLocation="http://ibm.com/ws/objectgrid/deploymentPolicy ../deploymentPolicy.xsd"
xmlns="http://ibm.com/ws/objectgrid/deploymentPolicy">
<objectgridDeployment objectgridName="grid1">
<mapSet name="mapSet" numberOfPartitions="17" minSyncReplicas="1" developmentMode="false">
<map ref="map1"/>
</mapSet>
</objectgridDeployment>
</deploymentPolicy>WXS Client
A client references an objectGrid.xml file. For a WAR, place into WebContent/META-INF. Full objectGrid.xsd: http://www.ibm.com/support/knowledgecenter/en/SSTVLU_8.6.1/com.ibm.websphere.extremescale.doc/rxslclschema.html
Example objectGrid.xml
<?xml version="1.0" encoding="UTF-8"?>
<objectGridConfig xmlns:xsi="http://www.w3.org/2001/XMLSchema-instance"
xsi:schemaLocation="http://ibm.com/ws/objectgrid/config ../objectGrid.xsd"
xmlns="http://ibm.com/ws/objectgrid/config">
<objectGrids>
<objectGrid name="grid1" txTimeout="120">
<backingMap name="map1" copyMode="COPY_TO_BYTES" lockStrategy="OPTIMISTIC" lockTimeout="15" />
</objectGrid>
</objectGrids>
</objectGridConfig>Example code to put and get from a grid
import com.ibm.websphere.objectgrid.ClientClusterContext;
import com.ibm.websphere.objectgrid.ConnectException;
import com.ibm.websphere.objectgrid.ObjectGrid;
import com.ibm.websphere.objectgrid.ObjectGridException;
import com.ibm.websphere.objectgrid.ObjectGridManagerFactory;
import com.ibm.websphere.objectgrid.ObjectMap;
import com.ibm.websphere.objectgrid.Session;
import com.ibm.websphere.objectgrid.plugins.TransactionCallbackException;
try {
long key = 42;
String value = "Hello World";
ClientClusterContext ccc = ObjectGridManagerFactory.getObjectGridManager().connect("localhost:4809", null, null);
ObjectGrid grid = ObjectGridManagerFactory.getObjectGridManager().getObjectGrid(ccc, "grid1");
Session session = grid.getSession();
ObjectMap map1 = session.getMap("map1");
map1.setPutMode(ObjectMap.PutMode.UPSERT);
map1.put(key, value);
String fromGrid = (String) map1.get(key);
System.out.println(fromGrid.equals(value));
} catch (ConnectException e) {
throw new RuntimeException(e);
} catch (TransactionCallbackException e) {
throw new RuntimeException(e);
} catch (ObjectGridException e) {
throw new RuntimeException(e);
}When using a catalog service domain (e.g. "csd01") in WAS, use the following instead:
ObjectGridManager objectGridManager = ObjectGridManagerFactory.getObjectGridManager();
CatalogDomainManager catalogDomainManager = objectGridManager.getCatalogDomainManager();
CatalogDomainInfo catalogDomainInfo = catalogDomainManager.getDomainInfo("csd01");
String cep = catalogDomainInfo.getClientCatalogServerEndpoints();
ClientClusterContext ccc = objectGridManager.connect(cep, (ClientSecurityConfiguration) null, (URL) null);
ObjectGrid objectGrid = objectGridManager.getObjectGrid(ccc, "grid1");Best Practices
Have approximately 10 shards per container. So if you plan to have 50 containers for instance and you have one replica configured in your policy, we would recommend about 250 partitions. This allows for having extra shards available for adding containers in the future when you need to expand without taking a grid outage to change the number of partitions. With having extra partitions per container, elasticity can be achieved. The general formula is (number of containers * 10) / (1 + number of replicas)). That gives you the number of partitions to start with. That usually gives a whole number that is not prime. We recommend choosing a prime number that is close to the number that the formula returns.
When it comes to starting a lot of containers, we recommend making use of the xscmd commands of suspendBalancing and resumeBalancing. You invoke suspendBalancing before staring the containers and resumeBalancing when you are complete. This approach allows eXtreme Scale to make one placement decision instead of multiple ones. If it was making a placement decision for each container as they start, the result can be a lot of unnecessary data movement.
Similarly when you are stopping containers and catalog servers, we recommend making use of the xscmd command of teardown to specify the servers you want to stop if you are stopping more than one. Again this approach allows you to limit the amount of data movement to be more efficient. There are filter options like host or zone to allow you to just say stop all containers on this host or in this zone for instance, or you can just give the complete list of the servers you want to stop. If you want to stop all containers, just run xscmd -c teardown without filters or a list of servers and it will stop all containers. If you want to stop all containers for a specific grid you can use the -g option to specify the grid to filter on.
Thread Pools
Containers:
XIOPrimaryPool: Used for WXS CRUD operations.WXS: Used for replication and DataGridAgents.xioNetworkThreadPool: Reads the request and sends response.
Near Cache
A near cache is a client side subset of the grid: http://www-01.ibm.com/support/knowledgecenter/SSTVLU_8.6.0/com.ibm.websphere.extremescale.doc/txsclinearcacheconfig.html?lang=en
The near cache is enabled by default for any map with a non-PESSIMISTIC lockStrategy (default OPTIMISTIC) (see the Spring section for an exception). It is also unbounded by default which may cause OutOfMemoryErrors if an evictor is not specified either through ttlEvictorType/timeToLive or a plugin evictor such as LRU through pluginCollectionRef. Alternatively, nearCacheInvalidationEnabled may be set to true to propagate invalidations from the grid to each nearCache: http://www-01.ibm.com/support/knowledgecenter/SSTVLU_8.6.0/com.ibm.websphere.extremescale.doc/txsnearcacheinv.html?lang=en
The increase in Java heap usage should be monitored to ensure the nearCache is not increasing the proportion of time in garbage collection too much (or its eviction/size should be tuned, or the heap increased).
If the map's copyMode is COPY_TO_BYTES or COPY_TO_BYTES_RAW, then nearCacheCopyMode should be set to NO_COPY, because any copying is unnecessary.
The near cache hit rate is a critical performance metric. A near cache occupancy may be limited by size (e.g. LRU/LFU evictor) or expired over time (e.g. TTL evictor).
Enable near cache statistics through the ObjectGrid Maps PMI module:

Then check the hit rate by analyzing hits / gets:

Spring Integration
WXS provides Spring integration for Spring >= 3.1: http://www-01.ibm.com/support/knowledgecenter/SSTVLU_8.6.0/com.ibm.websphere.extremescale.doc/txsspringprovide.html?cp=SSTVLU_8.6.0&lang=en
Older documentation states that, generally, the nearCache is automatically enabled when the lockStrategy is NONE or OPTIMISTIC (default). This is true, except for the Spring provider which explicitly disables the nearCache even when it would have been enabled, unless a client override XML is provided (see CLIENT_OVERRIDE_XML in the link above).
Example Spring XML specifying the client override XML:
<?xml version="1.0" encoding="UTF-8"?>
<beans xmlns="http://www.springframework.org/schema/beans"
xmlns:p="http://www.springframework.org/schema/p" xmlns:xsi="http://www.w3.org/2001/XMLSchema-instance"
xmlns:tx="http://www.springframework.org/schema/tx"
xsi:schemaLocation="http://www.springframework.org/schema/beans http://www.springframework.org/schema/beans/spring-beans.xsd
http://www.springframework.org/schema/tx http://www.springframework.org/schema/tx/spring-tx.xsd">
<bean id="domain"
class="com.ibm.websphere.objectgrid.spring.ObjectGridCatalogServiceDomainBean"
p:client-override-xml="file:/objectgrid.xml"
p:catalog-service-endpoints="${catalogServiceUrl}" />
...Example client override XML which enables a nearCache (see the Near Cache section for more details):
<?xml version="1.0" encoding="UTF-8"?>
<objectGridConfig
xmlns:xsi="http://www.w3.org/2001/XMLSchema-instance"
xsi:schemaLocation="http://ibm.com/ws/objectgrid/config ../objectGrid.xsd"
xmlns="http://ibm.com/ws/objectgrid/config">
<objectGrids>
<objectGrid name="CACHE_REMOTE" txTimeout="60">
<!-- NOEXP caches' nearCaches use LRU to limit number of nearCache entries per map -->
<backingMap name="CACHE_NOEXP_.*" template="true"
lockStrategy="NONE" ttlEvictorType="NONE" timeToLive="0" copyMode="COPY_TO_BYTES"
nearCacheEnabled="true" nearCacheCopyMode="NO_COPY" pluginCollectionRef="LRUevictorPlugins" />
<!-- EXP caches' nearCaches implicitly use backingMap TTL evictor settings -->
<backingMap name="CACHE_EXP_.*" template="true"
lockStrategy="NONE" ttlEvictorType="LAST_UPDATE_TIME" timeToLive="120" copyMode="COPY_TO_BYTES"
nearCacheEnabled="true" />
</objectGrid>
</objectGrids>
<backingMapPluginCollections>
<backingMapPluginCollection id="LRUevictorPlugins">
<bean id="Evictor" className="com.ibm.websphere.objectgrid.plugins.builtins.LRUEvictor">
<!-- max entries per map = numberOfLRUQueues * maxSize -->
<property name="numberOfLRUQueues" type="int" value="5" description="set number of LRU queues" />
<property name="maxSize" type="int" value="5" description="set max size for each LRU queue" />
</bean>
</backingMapPluginCollection>
</backingMapPluginCollections>
</objectGridConfig>When a client override XML is successfully loaded, messages such as the following will be printed:
[2/10/16 23:50:03:190 EST] 00000000 ObjectGridMan I CWOBJ2433I:
Client-side ObjectGrid settings are going to be overridden for domain
DefaultDomain using the URL file:/override-objectgrid.xml.
[2/10/16 23:50:03:758 EST] 00000000 ObjectGridImp I CWOBJ1128I: The
client cache is enabled for maps [IBM_SPRING_PARTITIONED_.*] on the
SPRING_REMOTE ObjectGrid.
In the above example, the maps using the first template have the LRU evictor specified at the bottom of the XML. The maps using the second template do not specify a pluginCollectionRef but they will implicitly use the TTL evictor because the backingMap specifies a TTL evictor type and time.
The WXS Spring provider enables a "fast fail" mechanism by default. This mechanism exists to allow an application to not hang if a temporary network brownout occurs. Without fastfail, if network connectivity is lost between the client and the WXS server, each request will time out before returning. Fastfail quickly identifies that the network is down and allows all cache requests to return null immediately and reconnect once network connectivity has been restored. This is accomplished with one WXSSpringFastFail[${MAP_NAME}] thread created per map (and if maps are used in different applications with the default classloading policy, one per classloader. This fast fail function may be disabled with -Dcom.ibm.websphere.objectgrid.spring.disable.fastfail=true, in which case TargetNotAvailableExceptions and related exceptions will print FFDCs and a null value will be returned from the cache.
Monitoring
There are many ways to monitor WXS: http://www.ibm.com/support/knowledgecenter/en/SSTVLU_8.6.1/com.ibm.websphere.extremescale.doc/txsadmdeployenv.html
Performance Tracing
See below for additional tracing specific to XIO.
For the overall transaction, use the diagnostic trace com.ibm.ws.objectgrid.SessionImpl=all and calculate the time between the "begin" entry and "commit " exit trace points. That's the lifetime of the transaction on the client. We don't necessarily go to the server immediately after begin() so it's possible if you did the same thing on both the client and the server for the same transaction, you'd get different numbers.
On the client side instrumenting com.ibm.ws.objectgrid.client.RemoteCacheLoader.get() will give you information on the client side for how long a client get operation is taking.
On the container side instrumenting com.ibm.ws.objectgrid.ServerCoreEventProcessor.getFromMap() will give you information on the server side for how long we take to get a value on the server side.
Offload Caching
WXS is frequently used for HTTP Session persistence instead of a database or Dynacache: ftp://ftp.software.ibm.com/software/iea/content/com.ibm.iea.wxs/wxs/7.0/Administration/Labs/XS70_HTTPSession_Lab.pdf. Keep in mind that the Extreme Scale JVMs will also need to be tuned.
eXtreme IO (XIO)
eXtreme Memory (XM)
WebSphere eXtreme Scale v8.6 provides the ability to store cache data outside of the Java heap space. This feature is termed Extreme Memory or XM. Using XM requires the eXtreme IO feature (XIO) introduced in v8.6.
XM leads to more performant and consistent relative response times: http://www.ibm.com/support/knowledgecenter/en/SSTVLU_8.6.1/com.ibm.websphere.extremescale.doc/cxsxm.html
Data Serialization
COPY_TO_BYTES
To optimize serialization with any of these options, you can use the COPY_TO_BYTES mode to improve performance up to 70 percent. With COPY_TO_BYTES mode, the data is serialized when transactions commit, which means that serialization happens only one time. The serialized data is sent unchanged from the client to the server or from the server to replicated server. By using the COPY_TO_BYTES mode, you can reduce the memory footprint that a large graph of objects can use. (http://www.ibm.com/support/knowledgecenter/en/SSTVLU_8.6.1/com.ibm.websphere.extremescale.doc/cxsserializer.html)
ORB
If using IBM Java ORB communication, tune the ORBs in all WXS processes (catalogs, containers, and clients): http://www-01.ibm.com/support/knowledgecenter/SSTVLU_8.6.0/com.ibm.websphere.extremescale.doc/rxsorbproperties.html
eXtreme Data Format (XDF)
WebSphere eXtreme Scale v8.6 introduced eXtreme Data Format (XDF) which allows sharing between Java and .NET applications, additional indexing options, automatic versioning, and partitioning through annotations. XDF is the default serialization mode when XIO is enabled and copy mode is COPY_TO_BYTES: http://www.ibm.com/support/knowledgecenter/en/SSTVLU_8.6.1/com.ibm.websphere.extremescale.doc/txsconfigxdf.html
XDF supports serialization of Java objects which do not implement the Serializable interface.
XDF does not compress entries, so data placed in the cache may be larger than other serialization modes and may increase the overhead of network transportation.
CAP Theorem
- Consistency - all clients see the same view, even in the presence of updates
- High Availability - all clients can find some replica of the data, even in the presence of failures
- Partition Tolerance - the system properties are held even when the system is partitioned.
CAP theorem states that a grid can only have two of the three. In WXS version prior to WXS v7.1, grids provide CP services. That is to say that the grid provided consistency (only one place to write the data - the primary shard), and partition tolerance (the grid is capable of providing service even if parts of the grid are network partitioned and unavailable). As of WXS v7.1 we can now have AP grids (Availability and Partition Tolerance).
Queries
WXS provides its own SQL-like query language: http://www.ibm.com/support/knowledgecenter/en/SSTVLU_8.6.1/com.ibm.websphere.extremescale.doc/rxsquerylang.html
Setting eXtreme Scale tuning options
For standalone client JVM
Create the file objectGridClient.properties in the server's root directory, and add a JVM parameter:
-Dobjectgrid.client.props=objectGridClient.propertiesFor standalone container JVM:
Create the file objectGridServer.properties and add the JVM command line argument:
-serverProps objectGridServer.propertiesxscmd
xscmd is the fully supported replacement for the older xsadmin. General:
- Help: xscmd -help
- List available commands: xscmd -lc
The key thing to specify to xscmd is -cep which specifies the list of catalog service endpoints. For example:
$ ./xscmd.sh -c listObjectGridNames -cep localhost:4809
...
Grid Name
---------
GridWhen the catalog service is running inside WebSphere Application Server (by default, in the deployment manager), and XIO is enabled, the -cep port is the XIO_ADDRESS port.
Suspend and Resume Status
The suspendStatus command displays the suspend and
resume status (ignore the heartbeat option as it only applies to WXS
stand alone):
$ xscmd.sh -c suspendStatus
...
*** Printing the results of the balance status command for all data grids.
Type ObjectGrid name Map Set Name Status Details
---- --------------- ------------ ------ -------
placement Grid mapSet Resumed
*** Printing the results of the transport communication failure detection status command for
DefaultDomain catalog service domain. The type requested was failoverAll.
Type Domain name Status Details
---- ----------- ------ -------
failoverAll DefaultDomain ResumedWhen you suspend or resume, the primary catalog logs will contain:
- Placement: CWOBJ1237 for both suspend and resume request attempt, CWOBJ1214 for both suspend and resume when it completes successfully ... the logs will differ with the word "suspend" or "resume" accordingly.
- FailoverAll: CWOBJ1262 for the supsend and resume request attempt, CWOBJ1260 for both suspend and resume when it completes successfully ... the logs will differ with the word "suspend" or "resume" accordingly.
Performing Maintenance
- Use the WXS
teardown command on all the containers which will be undergoing
maintenance. For example:
xscmd -c teardown -sl cachesvr1 - Wait 5 minutes
- Use the WXS teardown command on all the catalogs which will be
undergoing maintenance one at a time and waiting 5 minutes between each.
For example:
xscmd -c teardown -sl catlgsrvr1 - Wait 5 minutes
- Stop underlying JVMs (e.g. if running on WAS)
- Apply maintenance
- Start catalog servers
- Wait 5 minutes
- Start container servers
- Wait 5 minutes
If there are many servers being started at once, you may first suspend balancing:
- xscmd -c suspend
Then resume balancing once the JVMs are started:
- xscmd -c resume -t placement
- Run $(xscmd -c showPlacement) until all partitions show as placed.
- xscmd -c resume -t heartbeat
Application Considerations
FIFO Queue
WXS maps may be used as a FIFO queue with the getNextKey method: http://www.ibm.com/support/knowledgecenter/en/SSTVLU_8.6.1/com.ibm.websphere.extremescale.doc/rxsmapsfifo.html
Transactions
Twophase transactions will ensure that all changes made to all maps in the transactions are either rolled back or committed: http://www.ibm.com/support/knowledgecenter/en/SSTVLU_8.6.1/com.ibm.websphere.extremescale.doc/txsprogobjgridtxn.html
You can have two maps involved in a transaction without using the Twophase logic. If the two maps are in the same partition, everything will commit or rollback as part of the transaction. WXS will not partially commit a change by having only one map commit and then not doing the other map due to an error; it is always going to be an atomic operation even with a Onephase transaction.
Transaction Callbacks
The TransactionCallback interface may be used to execute code before a Session.commit completes: http://www.ibm.com/support/knowledgecenter/en/SSTVLU_8.6.1/com.ibm.websphere.extremescale.javadoc.doc/topics/com/ibm/websphere/objectgrid/plugins/TransactionCallback.html
IBM MQ
IBM MQ Recipe
- Test with SHARECNV(1) to potentially increase throughput per socket: https://www.ibm.com/support/knowledgecenter/en/SSFKSJ_9.1.0/com.ibm.mq.mon.doc/q036143_.htm
MQ versus WAS SIB
As of Sep. 2011, performance of WebSphere MQ persistent messages is approximately twice as fast as SIBus persistent messages. There is little difference for non-persistent messages.
WebSphere MQ supports clustering of queue managers for enhanced throughput and scalability of administration. There are many examples of production clusters containing thousands of queue managers. WebSphere MQ clustering is extremely flexible, supporting selective parallelism of cluster queues, enabling you to independently tailor the number of instances of each cluster queue. SIBus messaging engines can be clustered within a WebSphere Application Server cluster for throughput and administrative scalability. However, a WebSphere Application Server cluster has a much lower scalability limit than a WebSphere MQ cluster, and if a queue is assigned to a WebSphere Application Server cluster bus member, it is partitioned across all messaging engines in the cluster -- you cannot selectively locate partitions. (http://www.ibm.com/developerworks/websphere/library/techarticles/1109_wallis/1109_wallis.html)
WAS Considerations
Listener ports are "stabilized" (no more investment from IBM) and activation specifications are the recommended approach to integrate with WMQ.
Consider various queue properties: https://www.ibm.com/support/knowledgecenter/SSAW57_8.5.5/com.ibm.websphere.nd.doc/ae/tmj_wmqmp_tuned.html
For z/OS, consider this tuning: https://www.ibm.com/support/knowledgecenter/SSAW57_8.5.5/com.ibm.websphere.nd.multiplatform.doc/ae/tprf_tunezmdb.html
If using listener ports, monitor the session pool size: https://www.ibm.com/support/knowledgecenter/SSAW57_8.5.5/com.ibm.websphere.nd.doc/ae/tmb_adm15.html
For the JMS WASMQ Message Provider Resource Adapter Properties (http://www.ibm.com/developerworks/websphere/library/techarticles/1308_broadhurst/1308_broadhurst.html)
- Max Connections. Practice is to set this to 2147483647 (maximum possible). This must be set at the same scope as the activation specification. Since activation specifications are generally set at Node scope, Max Connections should be set at Node scope too.
- Connection Concurrency. Practice is to have this property equal 1. Note for WebSphere 8.5, the connectionConcurrency property has been set to 1 as default and made a no-op, so it is not required to explicitly set it. For WebSphere versions earlier than 8.5, this should be set at cell scope.
WAS MQ Resource Adapter
Versions: http://www-01.ibm.com/support/docview.wss?uid=swg21248089
Connection Pools and Session Pools: https://www.ibm.com/support/pages/understanding-jms-connection-pools-and-session-pools-better-tuning
Best Practices
http://www.ibm.com/developerworks/websphere/library/techarticles/0807_hsieh/0807_hsieh.html
- Message size and length can affect the performance of the application that processes the message, and the network time of data transmission. Send only essential data in the message.
- Use persistent messages for critical or essential data only. Persistent messages are logged to disk and can reduce the performance of your application.
- Retrieving messages from a queue by message or correlation identifiers will reduce application performance. It causes the queue manager to search all messages in the queue until it finds the desired message. If applications have high-performance requirements, applications should be designed to process messages sequentially.
- The MaxMsgLength parameter stores the value for the maximum size of a message allowed on the queue. The 4 MB default can be changed to better align with your application processing needs, which will have the benefit of using system resources in the most efficient manner.
- Ensure that messaging applications are designed to work in parallel with each other and with multiple instances of applications. The queue manager executes one service request within a queue at a given time to maintain integrity. Avoid programs that use numerous MQPUT calls in a sync point without committing them. Affected queues can fill up with messages that are currently inaccessible while other applications or tasks might be waiting to get these messages.
- When applications have intermittent message transmission needs, use the MQPUT1 call to put only one message on the queue. For higher volume applications, where multiple messages are being put, consider an alternative to the traditional usage of an MQOPEN call followed by a series of MQPUT calls and an MQCLOSE call.
- Keep connections and queues open if you are going to reuse them instead of repeatedly opening and closing, connecting and disconnecting.
- The maximum number of threads an application can run on a system can affect the performance of the solution, especially on Windows.
- Configure channels with a disconnect interval so that they can go inactive when there is no activity on the channel after a period of time. This will reduce overhead and help improve overall performance.
- MQ performance is commonly bound by disk I/O writes. Ensure that the storage team is involved with disk layouts to ensure the fastest reliable disk writes possible.
- When using clusters: "Adding more than two full repositories often degrades overall performance, because the cluster will need to send additional traffic and spend more time maintaining all of the repositories... [I]t is usually better to create one queue manager with 100 queues as opposed to 100 queue managers with one queue apiece."
Large message depths on your WebSphere MQ queues could cause performance issues. Storing thousands of messages on a single queue is not a best practice.
MQ Documentation
The WebSphere MQ library has links to documentation for all versions of MQ: http://www-01.ibm.com/software/integration/wmq/library/index.html
Basic MQ Display Commands
dspmqinst lists the MQ installations on the machine
dspmqver shows the MQ version and patch level
dspmq lists queue managers on the local machine, and the status of each one
DISPLAY QSTATUS
Documentation: https://www.ibm.com/support/knowledgecenter/en/SSFKSJ_9.1.0/com.ibm.mq.ref.adm.doc/q086260_.htm
Example output:
1 : DISPLAY QSTATUS(MDM.MESSAGING.REQUEST) TYPE(QUEUE) ALL
AMQ8450: Display queue status details.
QUEUE(MDM.MESSAGING.REQUEST) TYPE(QUEUE)
CURDEPTH(0) IPPROCS(177)
LGETDATE(2020-04-22) LGETTIME(06.47.13)
LPUTDATE(2020-04-22) LPUTTIME(06.47.13)
MEDIALOG( ) MONQ(HIGH)
MSGAGE(0) OPPROCS(5)
QTIME(2323, 2042) UNCOM(NO)Key outputs:
CURDEPTH: The current depth of the queue, that is, the number of messages on the queue, including both committed messages and uncommitted messages.
LGETDATE/LGETTIME: The date [and time] on which the last message was retrieved from the queue since the queue manager started. A message being browsed does not count as a message being retrieved.
LPUTDATE/LPUTTIME: The date [and time] on which the last message was put to the queue since the queue manager started.
MSGAGE: Age, in seconds, of the oldest message on the queue. The maximum displayable value is 999999999
IPPROCS: Number of concurrent getters (e.g. WAS MDBs), although the actual number is potentially up to IPPROCS * SHARECNV. The size of the Server Session Pool for the Activation Specification determines how many messages are processed concurrently by message-driven beans that use this activation specification. This defaults to 10 and you can configure this via "Maximum Server Sessions' under the 'Advanced Properties' tab for the Activation Spec in the Admin Console.
OPPROCS: Number of concurrent putters.
QTIME: Interval, in microseconds, between messages being put on the queue and then being destructively read. The interval is measured from the time that the message is placed on the queue until it is destructively retrieved by an application and, therefore, includes any interval caused by a delay in committing by the putting application. Two values are displayed and these are recalculated only when messages are processed: A value based on the last few messages processed and A value based on a larger sample of the recently processed messages. These values depend on the configuration and behavior of your system, as well as the levels of activity within it, and serve as an indicator that your system is performing normally. A significant variation in these values might indicate a problem with your system.
UNCOM: Indicates whether there are any uncommitted changes (puts and gets) pending for the queue.
Extracting periodic file output to a CSV:
#!/bin/awk -f
BEGIN { print "LGETDATE,LGETTIME,CURDEPTH,IPPROCS,MSGAGE,OPPROCS,QTIME1,QTIME2,UNCOM"; }
/CURDEPTH/ {
curdepth=$1;
curdepth=substr(curdepth, 10);
gsub(/\)/, "", curdepth);
curdepth=getASCII(curdepth);
ipprocs=substr($2, 9);
gsub(/\)/, "", ipprocs);
ipprocs=getASCII(ipprocs);
}
/LGETDATE/ {
lgetdate=substr($1, 10, 10);
lgetdate=getASCII(lgetdate);
lgettime=substr($2, 10, 8);
gsub(/\./, ":", lgettime);
lgettime=getASCII(lgettime);
}
/LPUTDATE/ {
lputdate=substr($1, 10, 10);
lputdate=getASCII(lputdate);
lputtime=substr($2, 10, 8);
gsub(/\./, ":", lputtime);
lputtime=getASCII(lputtime);
}
/MSGAGE/ {
msgage=substr($1, 8);
gsub(/\)/, "", msgage);
msgage=getASCII(msgage);
opprocs=substr($2, 9);
gsub(/\)/, "", opprocs);
opprocs=getASCII(opprocs);
}
/QTIME/ {
qtime1=substr($1, 7);
gsub(/,/, "", qtime1);
qtime1=getASCII(qtime1);
qtime2=$2;
gsub(/\)/, "", qtime2);
qtime2=getASCII(qtime2);
uncom=substr($3, 7);
gsub(/\)/, "", uncom);
uncom=getASCII(uncom);
printf("%s,%s,%s,%s,%s,%s,%s,%s,%s\n", lgetdate, lgettime, curdepth, ipprocs, msgage, opprocs, qtime1, qtime2, uncom);
}
function getASCII(str) {
gsub(/[^\40-\176]/, "", str);
return str;
}If you want to know which PIDs are reading/writing messages to a particular queue, use the following command:
DISPLAY QSTATUS(QName) TYPE(HANDLE) ALL
Then look for the PID and grep for that PID to know which application is using that queue. You need to look for the APPLTYPE(USER) and not the APPLTYPE(SYSTEM).
Performance differences across MQ versions
Official WebSphere MQ Performance Reports are available via the MQ SupportPac site here.
Windows and UNIX Performance Tuning
Configuring and tuning WebSphere MQ for performance on Windows and UNIX: http://www.ibm.com/developerworks/websphere/library/techarticles/0712_dunn/0712_dunn.html
- Queue manager log configuration (applicable only when using persistent messages)
- More tips related to persistent messages:
- "When processing persistent messages it is recommended to run many instances of the application concurrently in order to optimise the efficiency of the queue manager log."
- "When processing persistent messages in an application you should ensure that all MQPUT and MQGET activity takes place within a unit of work, or syncpoint as it is sometime referred to, for efficiency purposes."
- Fastpath channels, fastpath listeners
- Queue buffer sizes
WMQ JMS Client
If possible:
- Use non-persistent messages
- Use bindings mode
- Use correlation ID when using selectors
- Use the async put feature
- Use read-ahead when you can, with non-persistent messages
- Use conversation sharing / multiplexed sockets
- Use non-transacted sessions
Resources
MQ Performance Reports: http://www-01.ibm.com/support/docview.wss?uid=swg27007150
- MP01: WebSphere MQ - Tuning Queue limits
- MP06: WebSphere MQ with JMS: Get the Best from WMQ and MB Pub/Sub Processing
- MP7A: WebSphere MQ for Windows V5.3 - Performance tuning for large clusters
- There is also a performance monitoring Support Pac, MP08
MQ v7 JMS performance evaluations (vastly improved in V7): http://www-01.ibm.com/support/docview.wss?uid=swg24022778
Authentication
Lightweight Directory Access Protocol (LDAP)
With WAS com.ibm.ws.security.*=all diagnostic trace, search for "LdapRegistryI > search Entry" to see if a JVM is making LDAP calls
Consider preFetchData to speed up some LDAP operations: http://www-01.ibm.com/support/docview.wss?uid=swg1PI09171
Recent versions of WAS include a basic LDAP search under AdminTask.ldapSearch: http://www-01.ibm.com/support/docview.wss?uid=swg1PI47190
LdapQuery.ear
Web application to test LDAP queries: http://www-01.ibm.com/support/docview.wss?uid=swg21648889
IBM Tivoli Directory Server (TDS)
IBM Tivoli Directory Server (TDS) is a common commerical LDAP product: http://www-01.ibm.com/support/knowledgecenter/SSVJJU/welcome
Use cn=monitor to get a snapshot of activity:
$ ldapsearch -h ldap_host -s base -b cn=monitor objectclass=*Key items:
currentconnections: The number of active connections.
Shows how many established TCP sockets are connected to LDAP; however, WAS has a cache for LDAP connections, so generally this number may not change even if there are a lot of operations over the connections.
opscompleted: The number of completed requests since the server was started.
Cumulative, so you can take multiple snapshots, and take the difference to find the number of LDAP transactions completed in that time period
current_workqueue_size: The current depth of the work queue.
The workqueue size is zero if the are no threads waiting for an available worker thread. If all workers are busy, the operations wait in the work queue. Should always be zero; otherwise, there is some contention, either in the LDAP box itself (e.g. CPU), or in the number of threads configured for LDAP, or too much load coming in.
available_workers: The number of worker threads available for work.
if it's at 0 for a long period of time, that's a sign of a busy server, and will usually result in "hangs" from the perspective of the client-side.
The idsmonitor.ksh script can be used to monitor TDS, which includes the cn=monitor output along with time stamps and other information and can be run on an interval: http://www-01.ibm.com/support/docview.wss?uid=swg21282708
Here's a Linux command that converts the idsmonitor.out files to CSV for spreadsheets (and then just adds a column that calculates the difference between rows):
- opscompleted:
grep -B 15 ^opscompleted idsmonitor.out.20131010.txt | grep -e ^opscompleted -e Date | awk '{printf "%s", substr($0, 7);getline;printf ",%s", substr($0, 15);printf "\n"}' - currentconnections:
grep -B 9 ^currentconnections idsmonitor.out.20131010.txt | grep -e ^currentconnections -e Date | awk '{printf "%s", substr($0, 7);getline;printf ",%s", substr($0, 21);printf "\n"}' - current_workqueue_size:
grep -B 101 ^current_workqueue_size idsmonitor.out.20131010.txt | grep -e ^current_workqueue_size -e Date | awk '{printf "%s", substr($0, 7);getline;printf ",%s", substr($0, 25);printf "\n"}'
OpenLDAP
See the OpenLDAP chapter in the appendix for non-performance related background.
Monitoring
See available monitors with:
$ ldapsearch -LLL -W -D cn=Manager,dc=example,dc=com -b cn=monitor objectclass=*Competition and Migration
Comparing Products
Here are some things to compare when two products are performing differently. Look at the configuration, but also gather evidence on each one (e.g. tracing) to actually confirm or deny whether the feature is in use and the relative cost.
- Compare "underlying" configurations (at least at a high level) such as the operating system (e.g. CPU, RAM usage, etc.), Java (e.g. maximum heap size, garbage collection overhead, -D parameters, etc.), etc.
- Ensure the types and volumes of messages are the same. For example, are there more exceptions in the logs of the worse-performing product?
- Security configuration (e.g. authentication provider)
- Ensure that application logging levels and volume are the same. For example, in one case the default classloading policy of a competitor product picked up a different logging configuration file causing less logging to occur versus WAS.
- If a different temporary directory is used between products (-Djava.io.tmpdir), make sure this will not have any impact (e.g. if it's on a slower file system). For example, Tomcat changes the default temporary directory.
- If the time of a product component (e.g. web service call) is in question, there may be no easy way to compare, so instead consider asking the application to write a log entry at the start and end of each call.
- If there is a small difference, try to magnify the difference (for example, adding more concurrent users) and then gather data.
- Use a monitoring product such as ITCAM that works on both products.
- If you know some aspects of the competition, such as the maximum heap size, then you can test with this same value. If, for example, garbage collection overhead is too high with the same heap size, and there are no other application differences, this may be a sign that some fundamental configuration such as thread pool sizes, data source caching, etc. may be leading to a difference in heap usage and may be the fundamental cause of the difference in performance.
- Profile your application using tools such as the IBM Java Health Center or more simply by taking multiple thread dumps.
- If changing JVMs from HotSpot to J9:
- Review the J9 chapter for common tuning.
- Profile the application and if you see classloading is very heavy, try to eliminate/cache if possible because there have been some observed performance difference in some parts of classloading.
- Test with reduced JIT compilation threads.
- Note that it is possible that two CPUs with identical specifications (e.g. clock speed) may perform differently due to manufacturing defects/differences, physical placement, and other factors which may cause different thermal characteristics and affect behavior such as clock speed (for examples, see Marathe, Aniruddha, et al. "An empirical survey of performance and energy efficiency variation on Intel processors." Proceedings of the 5th International Workshop on Energy Efficient Supercomputing. ACM, 2017.). Consider varying which systems the test are run on to see if there is any difference.
WAS Migration Performance Differences
If a customer reports that performance is worse after migrating WAS versions, consider the following ideas. In some ways, comparing two versions of the same product (e.g. migration) can also be treated as a "competition" between those two versions using the tips in the previous section.
- See the general comparison checklist above.
- What changed? Often times, the hardware, network, and/or application has changed and this could affect the difference. If possible, try installing both versions and applications in the same operating system instance for comparison.
- If the migration is from WAS < 8 to WAS >= 8, and on a platform that runs IBM Java and -Xgcpolicy is not specified on WAS >= 8, and -Xgcpolicy was not specified on the previous version or a non-gencon policy was specified, then the default gcpolicy changed to gencon with WAS V8.0. With gencon, part of the young generation (-Xmn, which defaults to 25% of -Xmx) is unavailable for the application (amount changes dynamically based on the tilt ratio), so there would be relatively less Java heap than previously which can cause performance changes.
- Compare the configurations between versions, first checking the basics such as generic JVM arguments, thread pool configurations, and then more thoroughly. Note that comparing configuration across major product versions may show some known differences in the product that may be unrelated.
- WAS traditional V8.5 includes Intelligent Management (formerly WVE) enabled by default, which includes additional PMI activity amongst other things (ODC rebuilds in the DMGR, etc.), which some customers (particularly on z/OS) may notice during idle periods compared to previous versions. IM may also introduce additionally memory overhead, particularly as the size of the cell increases. If you are not using IM features, then consider disabling it with LargeTopologyOptimization=false.
- Java EE5 modules introduced annotation scanning which can increase startup time and decrease application performance. See the Annotation Scanning section in the WAS chapter.
- Use the migration tools to review the application. The toolkit includes a "Performance" section.
- If the migration is from WAS < 8 to WAS >= 8, and the
application uses Spring, calls to
ApplicationContext.getBean()on beans using the@Asyncannotation cause higher CPU utilization. - On z/OS, ensure that WLM service classes and other classifications are the same.
- If you're migrating from IBM Java <= 8 to IBM Java >= 11 or Semeru Java (OpenJ9+OpenJDK), the JVM is largely the same, but the JCL may have significant changes (e.g. the performance characteristics of the JAXP XSLT compiler may change positively or negatively depending on the use case).
- Review the Java migration notes.
- When installing a fixpack, the Java shared class cache and OSGi caches are cleared.
Competitive Notes
IBM App Connect Enterprise
IBM App Connect Enterprise (ACE) is formerly known as IBM Integration Bus (IIB), and before that, WebSphere Message Broker (WMB). It is a combination of a C/C++ program and a JVM.
Terms
- Integration Server (also known as a DataFlowEngine [DFE] or an Execution Group): Where message flows and resources are deployed and executed. This process includes the JVM.
- Integration Node: An optional process that manages a set of integration servers (not applicable to containers).
- "Additional instances" are basically the available number of worker threads.
Set JVM options
Java arguments may be specified with environment
variables (e.g. IBM_JAVA_OPTIONS) or with mqsichangeproperties [...] jvmSystemProperty.
The downside of using environment variables is that multiple execution
groups may use a single profile script, thus, per-execution group
settings cannot be specified.
jvmSystemProperty
To set JVM options using the mqsichangeproperties
jvmSystemProperty
sub-command, first list the existing system properties:
mqsireportproperties $NODE -e $SERVER -o ComIbmJVMManager -n jvmSystemPropertyThen, prepend the results of the above command (if any) with the updated arguments into the last argument of the following command. Wrap the entire JVM options string with single quotes and each argument inside with double quotes; for example:
mqsichangeproperties $NODE -e $SERVER -o ComIbmJVMManager -n jvmSystemProperty -v '"-Xverbosegclog:verbosegc.%seq.log,20,50000" "-Doption1=true"'Using environment variables
Java arguments may be specified with the environment variable IBM_JAVA_OPTIONS
for IBM Java. Environment
variables are generally set in the profile. First,
check if IBM_JAVA_OPTIONS is already in the
profile. If it is, append the arguments; otherwise, add the
export; for example:
export IBM_JAVA_OPTIONS="-Xverbosegclog:verbosegc.%seq.log,20,50000 -Doption1=true"Verbose garbage collection
Verbose garbage collection is generally recommended for production with benchmarks showing an overhead of ~0.1%. Verbosegc helps investigate OutOfMemoryErrors and garbage collection overhead.
ACE/IIB JVMs may share the same current working directory (e.g.
$WORKPATH/common/errors); therefore, to allow sets of
rotating verbosegc files for each JVM, add a unique name to each JVM's
added
options; for example, replace both instances of $SERVER
with each JVM's unique name in the following example (combining with
pre-existing mqsireportproperties, if any):
mqsichangeproperties $NODE -e $SERVER -o ComIbmJVMManager -n jvmSystemProperty -v '"-Xverbosegclog:verbosegc.$SERVER.%seq.log,20,50000"'Request Thread Dump
By default, ACE/IIB set
-Xdump:heap:events=user -Xdump:snap:events=user so
kill -3 $PID will produce a heapdump (*.phd)
and snapdumps (Snap*.trc) in addition to a thread dump
(javacore*txt). There is no way to disable this.
To produce a thread dump without a heapdump and snapdump, on ACE
>= 11.0.0.9 and IIB >= 10.0.0.9, you may use
mqsichangeproperties [...] core:
mqsichangeproperties $NODE -e $SERVER -o ComIbmInternalSupportManager/Java/JVM -n dump -v coreThread dumps are generally written to
$WORKPATH/common/errors/
Request Heap Dump
To produce a heap dump, on ACE >= 11.0.0.9 and IIB >= 10.0.0.9,
you may use
mqsichangeproperties [...] heap:
mqsichangeproperties $NODE -e $SERVER -o ComIbmInternalSupportManager/Java/JVM -n dump -v heapHeap dumps are generally written to
$WORKPATH/common/errors/
Request System Dump
To produce a system dump, on ACE >= 11.0.0.9 and IIB >=
10.0.0.9, you may use
mqsichangeproperties [...] system:
mqsichangeproperties $NODE -e $SERVER -o ComIbmInternalSupportManager/Java/JVM -n dump -v systemHowever, currently, this mechanism does not use
request=exclusive+prepwalk so it is not recommended.
Instead, see J9 System Dump
Recipe.
JDBC
The JDBC connection pool idle timeout is set with the environment
variable MQSI_JDBC_POOL_EXPIRY (in seconds) which defaults
to 900 seconds (15 minutes). The maximum value is 100000000 (~3
years).
The JDBC query timeout is set with the environment variable
MQSI_POOL_DBCALL_TIMEOUT (in seconds) which defaults to 15 or 60 seconds
depending on APAR IT34228. The maximum value is 600 or 18000
seconds depending on APAR IT34228.
The JDBC monitoring statistics include connection pool utilization but do not include average drive response time.
Diagnostic Trace
- User trace: https://www.ibm.com/support/pages/collecting-user-level-trace-iib-integration-server
- Service trace:
- JDBC trace:
- ODBC trace: https://www.ibm.com/support/pages/node/78037
IBM Business Automation Workflow
IBM Business Automation Workflow (BAW) is formerly known as IBM Business Process Manager (BPM).
Resources:
BAW Recipe
- Review the tuning documentation
- Ensure that business object parsing mode is set to Lazy Parsing (recently the default).
Business Object Parsing Mode
The latest default business
object parsing mode is Lazy Parsing (XCI). The older mode is Eager
Parsing (EMF). In general, Lazy Parsing is more performant than Eager
Parsing. This may manifest in symptoms such as lock contention with
org/eclipse/emf/ecore/impl/EPackageRegistryImpl,
org/eclipse/emf/ecore/impl/EPackageRegistryImpl.getEPackage,
and/or com/ibm/ws/bo/BOExtendedMetaData.containsPackage.
Switching from Eager to Lazy does require changing each application and
recompiling.
IBM InfoSphere Master Data Management
IBM InfoSphere Master Data Management (MDM) helps manage the master data in an organization.
General MDM Best Practices
Highlights of general MDM best practices:
"General interaction run times for an enterprise deployment are expected to be along the following lines:
MemPut < .5 sec
MemSearch < 1 sec - varies if you define large FBB
MemGet < .3 sec
EM < 1 sec - varies if you define large FBB"
Database Response Times
MDMSE transactions use ODBC connections with minimal use of JDBC, so most database response time data for MDMSE transactions will not be in PMI and other similar monitoring.
Instead, investigate such database response times using MDMSE performance logs with the instructions in "Section 5: MDM Standard Edition (SE) performance logs".
In particular, use the additional diagnostic trace specifier
com.ibm.mdm.mds.log.PerformanceLog=all. This may be enabled
at startup or dynamically at runtime. For example:
*=info:com.dwl.*=warning:com.ibm.mdm.*=warning:com.ibm.mdm.mds.log.PerformanceLog=all:com.ibm.mdm.server.config.*=info:com.ibm.mdm.common.brokers.*=info:com.ibm.mdm.mds.*=info:com.dwl.base.report.mbean.TransactionDataListener=fine:com.ibm.mdm.mds.log.AuditLog=all:com.ibm.mdm.mds.log.TimerLog=allUnlike other MDM traces that go to trace.log, the PerformanceLog data
goes to perfmsgs.dat.* files (by default, in
$WAS/installedApps/$CELL/MDM-native-E001.ear/native.war/log/perfmsgs.dat.*).
You may set -Dmad.log.dir=${SERVER_LOG_ROOT}/ to write
the perfmsgs.dat.* files to the normal server log
directory.
The response times are captured in column 10 in milliseconds.
IBM Maximo
MBO PhantomReferences
Maximo may use PhantomReferences for cleaning up MBO-related objects which are indirectly created by application database requests. PhantomReferences are basically like finalizers that allow cleanup code to run for an object that is about to be garbage collected. However, the Java specification states that PhantomReference processing is non-deterministic:
If the garbage collector determines at a certain point in time that the referent of a phantom reference is phantom reachable, then at that time or at some later time it will enqueue the reference.
Therefore, it is possible that the rate of PhantomReference generation exceeds the rate at which they can be marked, queued, and cleared, and thus the PhantomReferences themselves can build up and put pressure on the memory and garbage collection. There are no IBM Java tuning options to control the aggressiveness of PhantomReference marking, queuing, and clearing; however, since OpenJ9 0.35 (IBM Java 8.0.7.20), phantom reference processing is more aggressive.
If you are experiencing long GC times due to this issue, here are some ideas:
- Review if the application activity is expected. For example, are there excessively large or unbounded database queries that will drive creation of large/complex MBO object graphs that will indirectly drive lots of PhantomReferences?
- Run a test with
-Xgc:concurrentSlack=macrofragto see if it helps - Run a test with
-Xgc:concurrentSlack=macrofrag -Xgc:concurrentSlackFragmentationAdjustmentWeight=50to see if it helps - Horizontally scale to more nodes+JVMs to distribute the PhantomReference processing
- Test reducing
-Xmxto induce cleaning up PhantomReferences more often so that the worst case pause time of cleaning up a lot of queued PhantomReferences is not too high - If the above steps do not help or are not feasible in the short term, then customer could periodically restart JVMs to clean up the PhantomReferences
- Test increasing
-Xmx(if there is available RAM) if the JVM needs to run for longer before restarting
Notes for identifying this issue:
- Verbosegc will show spikes in PhantomReference count some time before GC spikes and PhantomReferences cleared during GC spikes
- In a core dump, the class histogram will show large retained sets
for
java.util.Hashtable. Running merge shortest paths to GC roots on these objects and excluding weak references will show a lot of memory through phantom references in thephantomListstatic object in the classpsdi.mbo.Mbo. ThisphantomListmay have a lot of objects. - In a core dump, if we look at the static field
Mbo.phantomList, for example, that has strong references to phantom references, but the actual referents are not strongly reachable. Therefore, the phantom reference should be put onto theMbo.phantomQueue(which will then drive the Maximo code to remove the phantom reference from thephantomList) but Java may be slow to mark the referents as only phantomly reachable (as evidenced by the reference queue being empty). This then may drive the accumulation of phantom references and referents in the heap and drives high GC pause times. As an example, if we look at one phantom referencepsdi.mbo.MboCounter, its referent may be some object, but if we check whether this is strongly referenced, then it is not strongly reachable (disregarding WeakReference paths).
Ideally, PhantomReference usage should be minimized or eliminated.
IBM Operational Decision Manager
IBM Operational Decision Manager (ODM) uses rules for automated decision making.
Tuning Guide
See the Tuning Guide.
Rule Execution Server
The Rule Execution Server (RES) runs RuleApps. It is also known as Decision Server Rules.
There are two rules engine for executing rules: Classic Rule Engine and Decision Engine. The Classic Rule Engine has known scalability issues and it is deprecated in favor of the Decision Engine.
Performance Tuning
Review the checklist to improve the performance of Rule Execution Server.
Decision Engine
On IBM and Semeru Java, test the relative performance of
-Xjit:exclude={com/ibm/rules/generated/*}
Classic Rule Engine
Older versions of the checklist included the following options:
-Xgcpolicy:gencon
-Xgcthreads6
-Xjit:codeTotal=261072
-Xjit:compilationThreads=1
-Xjit:{ilog/rules/engine/Sequential/generated/*}(disableInlining)The first gencon option is the default in recent
versions of Java.
Only the last -Xjit option was active as that is the way
-Xjit options are processed; only the most recent option
takes precedence over all previously specified options. In addition, the
disableInlining was incorrect because it is case-sensitive
and the package is sequential rather than
Sequential. A common alternative is:
-Xjit:exclude={ilog/rules/engine/sequential/generated/*}The codeTotal option of 256MB is already the default in
recent versions of Java.
A single JIT compilation thread is generally only used when CPU is tight or startup performance is very important, so test removing that option.
Limiting GC threads is generally only used when vertically scaling multiple JVMs on the same node, so test removing that option.
Troubleshooting
Sub-chapters
- Troubleshooting Operating Systems
- Troubleshooting Java
- Troubleshooting WebSphere Application Server
- Troubleshooting Web Servers
- Troubleshooting Containers
- Troubleshooting IBM MQ
- Troubleshooting WXS
Troubleshooting Recipe
- Review the Troubleshoot WebSphere Application Server (The Basics) presentation.
- For troubleshooting tools and performance analysis, review the Self-paced WebSphere Application Server Troubleshooting and Performance Lab presentation.
- While investigating a problem, try to eliminate or reduce any uncontrolled changes to variables such as configuration or application changes. Introduce changes methodically.
- Try to find the smallest, reproducible set of steps that causes the problem.
- If a problem cannot be reproduced in a test environment, consider disallowing real traffic from coming into a particular production node, and then debugging on that node.
The Scientific Method
Troubleshooting is the act of understanding problems and then changing systems to resolve those problems. The best approach to troubleshooting is the scientific method which is basically as follows:
- Observe and measure evidence of the problem. For example: "Users are receiving HTTP 500 errors when visiting the website."
- Create prioritized hypotheses about the causes of the problem. For example: "I found exceptions in the logs. I hypothesize that the exceptions are creating the HTTP 500 errors."
- Research ways to test the hypotheses using experiments. For example: "I searched the documentation and previous problem reports and the exceptions may be caused by a default setting configuration. I predict that changing this setting will resolve the problem if this hypothesis is true."
- Run experiments to test hypotheses. For example: "Please change this setting and see if the user errors are resolved."
- Observe and measure experimental evidence. If the problem is not resolved, repeat the steps above; otherwise, create a theory about the cause of the problem.
Tips
Keep the following in mind, especially if a situation becomes hot:
- Empathize with the stakeholders' situation.
- Be confident and optimistic. You have the scientific method behind you. Except for rare chaotic effects and machine learning systems, computers are basically deterministic and it's simply a matter of time, effort, a sprinkle of creativity, and finding the right people for the problems to be solved. Do your best.
- Ask the stakeholders about the resolution criteria. In some cases, the criteria are obvious, and in other cases, there needs to be some negotiation about reasonable success criteria (which may change over time). In any case, the criteria should be agreed upon in writing and modified in writing when the situation changes. This avoids any misaligned expectations.
- Seek the truths related to the resolution criteria. Deliver the truths sensitively.
- Keep detailed notes about meetings, investigations, tests, etc., and continuously share a summary of those notes with the team and management.
- Save lessons learned in a separate document (e.g. document file, wiki, version control, a copy of this document, etc.) to save time in the future and to share knowledge with others.
- Establish some basic human relationship with the people you're working with by not sounding too much like a lawyer. Be precise and professional, but also be personable and, when appropriate, use inoffensive questions and humor beyond the narrow facts of the situation.
- If you don't know an answer, be honest and say you don't know, and also say that you will do anything in your power to find the answer. Follow-up on any such promises you make.
- Prioritize. There may not be enough time or need to understand every detail or question.
- Be nice.
Initial Engagement
When you're first engaged in a situation, whether in person, by phone, or by email, don't ask too many questions. There are many interesting questions such as "how long has this been happening?" and "what changed?" which are sometimes useful, but often too general, time consuming and inconclusive. This is not to discount experiences people have of asking simple questions and finding simple solutions, but you should optimize for the average case. Use the minimum set of questions that will allow you to gather evidence, create hypotheses, and test those hypotheses.
In addition to understanding the situation, use the first set of questions to make an initial judgement about the skill level and time availability of the people involved. If you perceive high skill level or time availability, then ask more questions and explore the knowledge of the people; otherwise, gather evidence and let the data speak for itself.
Example question list for a first engagement:
- What are the problems and when did they occur?
- What are the impacts on the business?
- Do you observe any specific symptoms of the problems in the WAS logs, application logs, or the operating system or other monitoring tools?
- What versions of software are being used (e.g. WAS, Java, IHS, etc.)? Is the operating system virtualized?
- Are there any workarounds?
- If the problem is in a production environment, can you reproduce it in your test environment?
Based on the answers to these questions, if there are no obvious hypotheses, then the next step is to ask for all available logs.
Analyzing Logs
The most important thing is to always try to analyze all logs as thoroughly as possible on every incident. Make no assumptions. There have been many embarrassing cases where only the logs with the known symptoms were analyzed, and the actual cause was another symptom in other logs the whole time (e.g. FFDC, etc.). Analyzing all logs is also useful to get a fuller understanding of everything happening in the system which may help with creating hypotheses about the problem.
If you find a symptom before or during the problem that may be related, then do the following:
- Prioritize symptoms based on relevance, timing, and frequency.
- Search IBM documentation for the symptom.
- Search internal problem ticket systems, wikis, etc. for the symptom.
- Discuss with other people familiar with the issue or component.
- Use popular search engines to search for the symptom. Use double quotes around the search term for exact matches.
Organizing an Investigation
Keep track of a summary of the situation, a list of problems, hypotheses, and experiments/tests. Use numbered items so that people can easily reference things in phone calls or emails. The summary should be restricted to a single sentence for problems, resolution criteria, statuses, and next steps. Any details are in the subsequent tables. The summary is a difficult skill to learn, so you must constrain yourself to a single (short!) sentence. For example:
Summary
- Problems: 1) Average website response time of 5000ms and 2) website error rate > 10%.
- Resolution criteria: 1) Average response time of 300ms and 2) error rate of <= 1%.
- Statuses: 1) Reduced average response time to 2000ms and 2) error rate to 5%.
- Next steps: 1) Investigate database response times and 2) gather diagnostic trace.
Problems
| # | Problem | Case | Status | Next Steps |
|---|---|---|---|---|
| 1 | Average response time greater than 300ms | TS001234567 | Reduced average response time to 2000ms by increasing heap size | Investigate database response times |
| 2 | Website error rate greater than 1% | TS001234568 | Reduced website error rate to 5% by fixing an application bug | Run diagnostic trace for remaining errors |
Hypotheses for Problem #1
| # | Hypothesis | Evidence | Status |
|---|---|---|---|
| 1 | High proportion of time in garbage collection leading to reduced performance | Verbosegc showed proportion of time in GC of 20% | Increased Java maximum heap size to -Xmx1g and proportion of time in GC went down to 5%; Further fine-tuning can be done, but at this point 5% is a reasonable number |
| 2 | Slow database response times | Thread stacks showed many threads waiting on the database | Gather database response times |
Hypotheses for Problem #2
| # | Hypothesis | Evidence | Status |
|---|---|---|---|
| 1 | NullPointerException in com.application.foo is causing errors | NullPointerExceptions in the logs correlate with HTTP 500 response codes | Application fixed the NullPointerException and error rates were halved |
| 2 | ConcurrentModificationException in com.websphere.bar is causing errors | ConcurrentModificationExceptions correlate with HTTP 500 response codes | Gather WAS diagnostic trace capturing some exceptions |
Experiments/Tests
| # | Experiment/Test | Date/Time | Environment | Changes | Results |
|---|---|---|---|---|---|
| 1 | Baseline | 2020-01-01 09:00:00 UTC - 2020-01-01 17:00:00 UTC | Production server1 | None | Average response time 5000ms |
| 2 | Reproduce in a test environment | 2020-01-02 11:00:00 UTC - 2020-01-02 12:00:00 UTC | Test server1 | None | Average response time 8000ms |
| 3 | Test problem #1 - hypothesis #1 | 2020-01-03 12:30:00 UTC - 2020-01-03 14:00:00 UTC | Test server1 | Increase Java heap size to 1g | Average response time 4000ms |
| 4 | Test problem #1 - hypothesis #1 | 2020-01-04 09:00:00 UTC - 2020-01-04 11:30:00 UTC | Production server1 | Increase Java heap size to 1g | Average response time 2000ms |
| 5 | Test problem #2 - hypothesis #1 | 2020-01-05 UTC | Production server1 | Application bugfix | Average response time 2000ms |
| 6 | Test problem #2 - hypothesis #2 | TBD | Test server1 | Gather WAS JDBC PMI | TBD |
| 7 | Test problem #2 - hypothesis #2 | TBD | Test server1 | Enable WAS diagnostic trace com.ibm.foo=all | TBD |
Site Reliability Engineering
Site Reliability Engineering (SRE) is an approach to computer operations with a focus on continuous delivery, software engineering, automation, a hypothesis and data-driven approach, reducing risk, incident management, performance tuning, capacity planning, and balancing velocity, quality, serviceability, reliability, and availability.
Root Cause Analysis (RCA)
Root cause analysis (RCA) is the search for the primary, sufficient
condition that causes a problem. The first danger of "root" cause
analysis is that you may think you're done when you're not. The word
"root" suggests final, but how do you know you're done? For example,
there was a problem of high user response times. The proximate cause was
that the processors were saturated. The processors were being driven so
heavily because System.gc was being called frequently,
forcing garbage collections. This was thought to be the "root cause" so
somebody suggested using the option -Xdisableexplicitgc to
make calls to System.gc do nothing. Everyone sighed relief;
root cause was found! Not so. The System.gcs were being
called due to native OutOfMemoryErrors (NOOMs) when trying
to load classes (and -Xdisableexplicitgc doesn't affect
forced GCs from the JVM handling certain NOOMs). After much more
investigation, we arrived at a very complex causal chain in which there
wasn't even a single cause:

The second danger of root "cause" analysis is that it suggests a single cause, which obviously isn't always the case.
Properly understood and with all the right caveats, RCA is fine, but it is rarely properly understood and rarely comes with caveats. Once someone declares that "root cause" has been found, most people are satisfied, especially if removing that cause seems to avoid the problem. It is interesting that the term "root" has gained such a strong hold, when it is clearly too strong of a term. It's possible that "root" was added to "cause analysis," because without "root," some people might stop at the first cause, but perversely, the phrase has caused the exact same sloppiness, laziness and false sense of accomplishment that it was probably designed to avoid. However, given that both suffer from the same problem, "root cause analysis" is worse than "cause analysis" because at least the latter is more open ended.
Instead, the term "causal chain" is preferred because it seems to define the investigation in terms of a chain of causes and effects and is more suggestive of the open-endedness of this chain graph.
Some popular troubleshooting patterns are the Apollo methodology, Kepner-Tregoe (KT), Five Whys, and others.
Analysis versus Isolation
A common aspect to a problem is that an application worked and then the environment (WAS, etc.) was upgraded and the application stopped working. Many customers then say, "therefore, the product is the root cause." It is easy to show that this is a logical fallacy (neither necessary nor sufficient) with a real world example: A customer upgraded from WAS 6.1 to WAS 7 without changing the application and it started to throw various exceptions. It turned out that the performance improvements in WAS 7 and Java 6 exposed existing concurrency bugs in the application.
It is not wrong to bring up the fact that a migration occurred. In fact, it's critical that you do. This is important information, and sometimes helps to quickly isolate a problem. However, people often make the argument that the fact of the migration is the key aspect to the problem. This may or may not be true, but what it does do is elevate the technique of isolation above analysis, which is often a time-consuming mistake.
Analysis is the technique of creating hypotheses based on observed symptoms, such as exceptions, traces, or dumps. In the above example, the customer experienced java.util.ConcurrentModificationExceptions in their application, but they did not analyze why.
Isolation is the technique of looking at the end-to-end system instead of particular symptoms, and simplifying or eliminating components until the problem is isolated, either by the process of elimination, or by finding the right symptoms to analyze. Saying that the migration is the key aspect to the problem is really saying that the first step is to understand what changed in the migration and then use that to isolate which changed component caused the problem. As the above example demonstrates, changes such as performance improvements may have unknown and unpredictable effects, so isolation may not help.
In general, start with analysis instead of isolation. You should certainly bring up any changes that occurred right before the problem (migration, etc.), but be careful where this leads everyone. If analysis leads to a dead end, then consider using isolation, including comparing changes, but even in this case, comparing product versions is difficult; many things change.
IBM Support
For problems that fall within the scope of your IBM Support Contract (note that some performance issues do not), but cannot be resolved within a reasonable time, we recommend you open a support case through My https://www.ibm.com/mysupport/s/) at the appropriate severity level. What is reasonable will depend on how important the application is to the business and the Service Level Agreements (SLAs) the application is expected to deliver. Note that a support case was previously known as a Problem Management Record (PMR).
After opening a case with IBM Support, we will need data about your specific issue. In order to expedite analysis, WAS provides instructions on the data collection steps for various problem scenarios in a list of MustGathers. Once you have collected the relevant data, upload it to the case. Once IBM has received the data, we will try to provide a response within the designated time criteria depending on the severity level.
If you feel the case needs more attention, call the local toll free number and ask the person who answers the phone to speak with the "duty manager". Provide the duty manager with your case number and the specific issue you feel needs to be addressed.
If you are evaluating WAS software and have not purchased licenses, you cannot open a support case; however, your IBM sales representative, IBM client team, or a business partner may be able to open support cases while working with you.
How to Upload Data to a Case
- Create a single archive per machine with a descriptive name and the
case number and a
README.txtfile that describes relevant events or time periods, replacing commas with periods (e.g.TS001234567.test1.node1.zip). - Follow upload
instructions:
- If the files are less than 20MB in total, and there is no sensitive information, send an email to ecurep@ecurep.ibm.com with the files attached and the subject, "Case TS001234567: Subject of the update"
- If the files are less than 200MB, use the secure browser upload
- Otherwise, use SFTP:
- Prepend file(s) with the case number. For example,
TS001234567_somefile.zip. You may also prepend with "Case"; For example,Case_TS001234567_somefile.zip sftp anonymous@sftp.ecurep.ibm.com- Press
Enterat the password prompt - cd
toibm/websphere - put
TS001234567_somefile.zip
- Prepend file(s) with the case number. For example,
WebSphere Application Server Troubleshooting and Performance Lab
The WebSphere Application Server Troubleshooting and Performance Lab provides a Linux VM with various tools installed as well as WAS itself and a self-paced lab.
Problem Diagnostics Lab Tookit (PDTK)
The Problem Diagnostics Lab Toolkit is an EAR file that can be installed inside WebSphere Application Server and used to simulate various problems such as OutOfMemoryErrors: https://www.ibm.com/support/pages/problem-diagnostics-lab-toolkit
No modes: An exception?
In computing history, there was a famous crusade by Larry Tesler -- a titan of the industry; he worked at Xerox PARC (Smalltalk), Apple, Amazon, and Yahoo -- which he called "no modes." He said, for example, that you shouldn't have to enter a "mode" just to type text. You should be able to click and type. It was a revolutionary idea back then. There are still some popular modal programs today such as vi and Emacs, and the mode combinations make their users look like wizards, but in general, modes are dead.
However, perhaps there should be modes with the rm` (remove) command. Here is an output of the history from a problem situation:
cd /usr/IBM/WebSphere/AppServer/profiles/dmgr
rm -rf heap*
rm -rf javacore *Do you see the mistake? The user wanted to delete all javacore files in the current directory, but accidentally put a space before the wildcard. This resolves to: delete any single file named javacore, and then delete everything else in this directory, recursively! In this case, the -r (recursive) flag was superfluous (since you don't need it when you're just removing files) and did the real damage, as it recursively deleted everything under that directory.
It's hard to blame the person. We've all done similar things. The problem is that after a while you become too comfortable flying through a machine, copying this, deleting that.
There's something about rm that is different. It's hard to slow down sometimes or not to use -f or -r gratuitously. Therefore, perhaps there should be a mode to run rm, and it should be difficult to disable (kernel compile flag?). Your brain needs to do a context switch and give itself time to answer a few questions: What am I deleting? What would I like to delete? Is there a difference between the two?
Troubleshooting Operating Systems
Sub-chapters
- Troubleshooting Linux
- Troubleshooting AIX
- Troubleshooting z/OS
- Troubleshooting IBM i
- Troubleshooting Windows
- Troubleshooting macOS
- Troubleshooting Solaris
- Troubleshooting HP-UX
Debug Symbols
Some applications use native libraries (e.g. JNI; .so, .dll, etc.) to perform functions in native code (e.g. C/C++) rather than through Java code. This may involve allocating native memory outside of the Java heap (e.g. malloc, mmap). These libraries have to do their own garbage collection and application errors can cause native memory leaks, which can ultimately cause crashes, paging, etc. These problems are one of the most difficult classes of problems, and they are made even more difficult by the fact that native libraries are often "stripped" of symbol information.
Symbols are artifacts produced by the compiler and linker to describe the mapping between executable code and source code. For example, a library may have a function in the source code named "foo" and in the binary, this function code resides in the address range 0x10000000 - 0x10001000. This function may be executing, in which case the instruction register is in this address range, or if foo calls another function, foo's return address will be on the call stack. In both cases, a debugger or leak-tracker only has access to raw addresses (e.g. 0x100000a1). If there is nothing to tell it the mapping between foo and the code address ranges, then you'll just get a stack full of numbers, which usually isn't very interesting.
Historically, symbols have been stripped from executables for the following reasons: 1) to reduce the size of libraries, 2) because performance could suffer, and 3) to complicate reverse-engineering efforts. First, it's important to note that all three of these reasons do not apply to privately held symbol files. With most modern compilers, you can produce the symbol files and save them off. If there is a problem, you can download the core dump, find the matching symbols locally, and off you go.
Therefore, the first best practice is to always generate and save off symbols, even if you don't ship them with your binaries. When debugging, you should match the symbol files with the exact build that produced the problem. This also means that you need to save the symbols for every build, including one-off or debug builds that customers may be running, and track these symbols with some unique identifier to map to the running build.
The second best practice is to consider shipping symbol files with your binaries if your requirements allow it. Some answers to the objections above include: 1) although the size of the distribution will be larger, this greatly reduces the time to resolve complex problems, 2) most modern compilers can create fully optimized code with symbols [A], and 3) reverse engineering requires insider or hacker access to the binaries and deep product knowledge; also, Java code is just as easy to reverse engineer as native code with symbols, so this is an aspect of modern programming and debugging. Benefits of shipping symbols include: 1) not having to store, manage, and query a symbol store or database each time you need symbols, 2) allow "on site" debugging without having to ship large core dumps, since oftentimes running a simple back trace or post-processing program on the same machine where the problem happened, with symbols, can immediately produce the desired information.
As always, your mileage may vary and you should fully test such a change, including a performance test.
Eye Catcher
Eye-catchers are generally used to aid in tracking native memory usage or corruption. An eye-catcher, as its name suggests, is some sequence of bytes that has a low probability of randomly appearing in memory. If you see one of your eye-catchers, it's likely that you've found one of your allocations.
For example, below is a simple C program which leaks 10 MyStruct
instances into the native heap with the eye catcher
0xDEADFAD0 and then waits indefinitely so that a coredump
may be produced:
#include <stdio.h>
#include <signal.h>
#include <stdlib.h>
#include <string.h>
#define EYECATCHER_MYSTRUCT 0xDEADFAD0
typedef struct {
int eyeCatcher;
int myData;
} MyStruct;
void main(int argc, char** argv) {
sigset_t sigmask;
MyStruct *p;
int i;
for (i = 0; i < 10; i++) {
p = (MyStruct*)malloc(sizeof(MyStruct));
printf("Alloced struct @ 0x%0X\n", p);
p->eyeCatcher = EYECATCHER_MYSTRUCT;
p->myData = 123*i;
}
printf("Hello World. Waiting indefinitely...\n");
sigemptyset(&sigmask);
sigaddset(&sigmask,SIGCHLD);
sigsuspend(&sigmask);
}Now, we can find all of these structures in a hexdump. In this example, integers are stored in little endian format, so search for D0FAADDE instead of DEADFAD0:
$ hexdump -C core.680 | grep "d0 fa ad de"
00002cb0 00 00 00 00 d0 fa ad de 00 00 00 00 00 00 00 00 |................|
00002cd0 00 00 00 00 d0 fa ad de 7b 00 00 00 00 00 00 00 |........{.......|
00002cf0 00 00 00 00 d0 fa ad de f6 00 00 00 00 00 00 00 |................|
00002d10 00 00 00 00 d0 fa ad de 71 01 00 00 00 00 00 00 |........q.......|
00002d30 00 00 00 00 d0 fa ad de ec 01 00 00 00 00 00 00 |................|
00002d50 00 00 00 00 d0 fa ad de 67 02 00 00 00 00 00 00 |........g.......|
00002d70 00 00 00 00 d0 fa ad de e2 02 00 00 00 00 00 00 |................|
00002d90 00 00 00 00 d0 fa ad de 5d 03 00 00 00 00 00 00 |........].......|
00002db0 00 00 00 00 d0 fa ad de d8 03 00 00 00 00 00 00 |................|
00002dd0 00 00 00 00 d0 fa ad de 53 04 00 00 00 00 00 00 |........S.......|We can see the ten allocations there. Note: the eye catcher just happened to be on a word boundary. It's possible that it spanned multiple lines or across the 8 byte boundary. The best way to search for eye catchers is through some type of automation such as gdb extensions.
Strings are often preferable to integers. This solves the problem of big- and little-endianness and it's normally easier to spot these strings:
#define EYECATCHER_MYSTRUCT2 "DEADFAD0"
typedef struct {
char eyeCatcher[9]; // Add 1 to the length of the eye catcher, because strcpy will copy in the null terminator
int myData;
} MyStruct2;
...
for (i = 0; i < 10; i++) {
p2 = (MyStruct2*)malloc(sizeof(MyStruct2));
printf("Alloced struct @ 0x%0X\n", p2);
strcpy(p2->eyeCatcher, EYECATCHER_MYSTRUCT2);
p2->myData = 123*i;
}
...
$ hexdump -C core.6940 | grep DEADFAD0 | tail -10
00002df0 00 00 00 00 44 45 41 44 46 41 44 30 00 00 00 00 |....DEADFAD0....|
00002e10 00 00 00 00 44 45 41 44 46 41 44 30 7b 00 00 00 |....DEADFAD0{...|
00002e30 00 00 00 00 44 45 41 44 46 41 44 30 f6 00 00 00 |....DEADFAD0....|
00002e50 00 00 00 00 44 45 41 44 46 41 44 30 71 01 00 00 |....DEADFAD0q...|
00002e70 00 00 00 00 44 45 41 44 46 41 44 30 ec 01 00 00 |....DEADFAD0....|
00002e90 00 00 00 00 44 45 41 44 46 41 44 30 67 02 00 00 |....DEADFAD0g...|
00002eb0 00 00 00 00 44 45 41 44 46 41 44 30 e2 02 00 00 |....DEADFAD0....|
00002ed0 00 00 00 00 44 45 41 44 46 41 44 30 5d 03 00 00 |....DEADFAD0]...|
00002ef0 00 00 00 00 44 45 41 44 46 41 44 30 d8 03 00 00 |....DEADFAD0....|
00002f10 00 00 00 00 44 45 41 44 46 41 44 30 53 04 00 00 |....DEADFAD0S...|Here are some other considerations:
- If you're writing native code that is making dynamic allocations, consider always using eye catchers. Yes, they have a small overhead. It's generally worth it. The evidence for this recommendation is that most large, native products use them.
- You can put an "int size" field after the eye catcher which stores the size of the allocation (sizeof(struct)), which makes it easier to quickly tell how much storage your allocations are using.
- You can wrap all allocations (and deallocations) in common routines so that this is more standard (and foolproof) in your code. This is usually done by having an eye catcher struct and wrapping malloc. In the wrapped malloc, add the sizeof(eyecatcherstruct) to the bytes requested, then put the eye catcher struct at the top of the allocation, and then return a pointer to the first byte after sizeof(eyecatcherstruct) to the user.
Troubleshooting Linux
General Troubleshooting Commands
Print system page size: getconf PAGESIZE
The
ausyscallcommand converts a syscall number to the syscall name. Example:$ ausyscall 221 fadvise64
Kernel symbol table
Gather the kernel symbol table:
$ sudo su -
$ cat /proc/kallsyms &> kallsyms_$(hostname)_$(date +"%Y%m%d_%H%M%S").txt
$ cat /boot/System.map-$(uname -r) &> systemmap_$(hostname)_$(date +"%Y%m%d_%H%M%S").txtUpload kallsyms_*txt and systemmap_*txt
pgrep/pkill
pgrep finds process IDs based on various search options. It is a more
formalized alternative to common commands like
ps -elf | grep something: https://www.kernel.org/doc/man-pages/online/pages/man1/pgrep.1.html
Examples:
- Search by simple program name: pgrep java
- Search by something in the full program name or full command line: pgrep -f server1
pidof is a similar program to pgrep: https://www.kernel.org/doc/man-pages/online/pages/man1/pidof.1.html
pkill combines pgrep and kill into one command: https://www.kernel.org/doc/man-pages/online/pages/man1/pkill.1.html
Examples:
- Send SIGQUIT to all Java programs: pkill -3 java
- Send SIGQUIT to all Java programs with server1 in the command line: pkill -3 -f server1
kill
The kill command is used to send a signal to a processes or to terminate it:
kill $PIDWithout arguments, the SIGTERM (15) signal is sent which
is equivalent to kill -15 $PID.
To specify a signal, use the number or name of the signal. For
example, to send the equivalent of Ctrl+C to a process, use
either one of the following commands:
$ kill -2 $PID
$ kill -INT $PIDTo list all available signals:
$ kill -l
1) SIGHUP 2) SIGINT 3) SIGQUIT 4) SIGILL 5) SIGTRAP
6) SIGABRT 7) SIGBUS 8) SIGFPE 9) SIGKILL 10) SIGUSR1
11) SIGSEGV 12) SIGUSR2 13) SIGPIPE 14) SIGALRM 15) SIGTERM
16) SIGSTKFLT 17) SIGCHLD 18) SIGCONT 19) SIGSTOP 20) SIGTSTP
21) SIGTTIN 22) SIGTTOU 23) SIGURG 24) SIGXCPU 25) SIGXFSZ
26) SIGVTALRM 27) SIGPROF 28) SIGWINCH 29) SIGIO 30) SIGPWR
31) SIGSYS 34) SIGRTMIN 35) SIGRTMIN+1 36) SIGRTMIN+2 37) SIGRTMIN+3
38) SIGRTMIN+4 39) SIGRTMIN+5 40) SIGRTMIN+6 41) SIGRTMIN+7 42) SIGRTMIN+8
43) SIGRTMIN+9 44) SIGRTMIN+10 45) SIGRTMIN+11 46) SIGRTMIN+12 47) SIGRTMIN+13
48) SIGRTMIN+14 49) SIGRTMIN+15 50) SIGRTMAX-14 51) SIGRTMAX-13 52) SIGRTMAX-12
53) SIGRTMAX-11 54) SIGRTMAX-10 55) SIGRTMAX-9 56) SIGRTMAX-8 57) SIGRTMAX-7
58) SIGRTMAX-6 59) SIGRTMAX-5 60) SIGRTMAX-4 61) SIGRTMAX-3 62) SIGRTMAX-2
63) SIGRTMAX-1 64) SIGRTMAX SIGSTOP may be used to completely pause a process so
that the operating system does not schedule it. SIGCONT may
be used to continue a stopped process. This can be useful for things
such as simulating a hung database.
Find who killed a process
There are two main ways a process is killed:
- It kills itself using a call to
java/lang/System.exit,java/lang/Runtime.halt,exit,raise, etc. - It is killed by the kernel or another process using the kill system call, the kill command, etc.
These are diagnosed differently with their own section below.
Find why a process killed itself
- If using IBM Java or Semeru/OpenJ9, restart the process with the
following Java options and review the resulting javacore:
-Xdump:java:events=vmstop,request=exclusive+preempt - If using HotSpot Java, some builds have User
Statically-Defined Tracing (USDT) probes which then SystemTap or
eBPF (on newer kernels) can use to trace calls to
System.exit.
Find who killed another process
Check the native stdout and stderr logs of the process for any suspicious activity
Check the kernel log around the time of the
killfor things like the OOM Killer and other potentially related messages (e.g. SSH login by some user)Consider using
bcc-toolsandkillsnoop.pyIf an auditing or keylogging system is in place, review if anyone used the
killcommand.For systems that support it, use
auditdwith a rule to watch forkillsystem calls, although test the performance overhead.For kernels that support SystemTap, combine scripts such as https://github.com/jav/systemtap/blob/master/testsuite/systemtap.examples/process/sigmon.stp and https://github.com/jav/systemtap/blob/master/testsuite/systemtap.examples/process/proc_snoop.stp to capture the signal and map to the source PID with details.
For some signals like
SIGTERM(but notSIGKILL), attachstraceto the process and watch for signal notifications although the overhead may be massive even with the-efilter:$ nohup strace -f -tt -e signal -o strace_trace.txt -p $PID &>> strace_stdouterr.txt & $ tail -f strace_trace.txt | grep " SIG" 2406 18:50:39.769367 --- SIGTERM {si_signo=SIGTERM, si_code=SI_USER, si_pid=678, si_uid=0} ---The
si_pidinteger is the sending PID. A script in the background that periodically writespsoutput may capture this process. Createpsbg.sh:#!/bin/sh outputfile="diag_ps_$(hostname)_$(date +"%Y%m%d_%H%M%S").log" while true; do echo "diag: $(date +"%Y%m%d %H%M%S %N %Z") iteration" &>> "${outputfile}" ps -elf 2>&1 &>> "${outputfile}" sleep 15 doneThen start before the
strace:$ chmod a+x psbg.sh $ nohup ./psbg.sh &For some signals, attach to the process using
gdband immediatelycontinue. When the signal hits the process, gdb will break execution and leave you at a prompt. Then, handle the particular signal you want and print$_siginfo._sifields._kill.si_pidand detach. Use the samepsscript as above to track potential source PIDs.$ java HelloWorld Hello World. Waiting indefinitely... $ ps -elf | grep HelloWorld | grep -v grep 0 S kevin 23947 ... $ gdb java 23947 ... (gdb) handle all nostop noprint noignore (gdb) handle SIGABRT stop print noignore (gdb) continue # ... Reproduce the problem ... Program received signal SIGABRT, Aborted. [Switching to Thread 0x7f232df12700 (LWP 23949)] 0x00000033a400d720 in sem_wait () from /lib64/libpthread.so.0 (gdb) ptype $_siginfo type = struct { int si_signo; int si_errno; int si_code; union { int _pad[28]; struct {...} _kill; struct {...} _timer; struct {...} _rt; struct {...} _sigchld; struct {...} _sigfault; struct {...} _sigpoll; } _sifields; } (gdb) ptype $_siginfo._sifields._kill type = struct { __pid_t si_pid; __uid_t si_uid; } (gdb) p $_siginfo._sifields._kill.si_pid $1 = 22691 (gdb) continueIn the above example, we print
_sifields._killbecause we know we sent a kill, but strictly speaking, that assumption cannot always be made._sifieldsis a union, so only one of the fields of the union will have correct values. You must first consult the signal number to know which union member to print:The rest of the struct may be a union, so that one should read only the fields that are meaningful for the given signal
File I/O
fsync
fsync
is a system call used to attempt to flush pending I/O writes to disk;
however, there are various potential issues with fsync (Rebello et al., 2021). One
way to reduce such risks is to use a copy-on-write file system such as
Btrfs instead of journaling file systems such as ext4 and XFS.
sosreport
sosreport is a utility to gather system-wide diagnostics on Fedora, RedHat, and CentOS distributions:
sudo dnf install -y sossudo sosreport --batch- This will take a few minutes to run.
- A compressed file will be produced such as
/var/tmp/sosreport-7ce62b94e928-2020-09-01-itqojtr.tar.xz. To use an alternative directory, specify--tmp-dir $dir.
Analysis tips:
- Uncompress with
tar -xf sosreport*tar.xz
systemd
Killing nohup processes
Recent versions of systemd terminate user processes part of the user
session scope unit (session-XX.scope) when the user logs out even
if they were nohupped. Either systemd-run may be used
instead of nohup, or KillUserProcesses may be set to
no in logind.conf.
Signal handlers
Show signal handlers registered for a process:
grep Sig /proc/$pid/statusProcess core dumps
Core dumps are normally written in the ELF file format. Therefore, use the readelf program to find all of the LOAD sections to review the virtual memory regions that were dumped to the core:
$ readelf --program-headers core
Program Headers:
Type Offset VirtAddr PhysAddr
FileSiz MemSiz Flags Align
NOTE 0x00000000000003f8 0x0000000000000000 0x0000000000000000
0x00000000000008ac 0x0000000000000000 R 1
LOAD 0x0000000000000ca4 0x0000000000400000 0x0000000000000000
0x0000000000001000 0x0000000000001000 R E 1
LOAD 0x0000000000001ca4 0x0000000000600000 0x0000000000000000
0x0000000000001000 0x0000000000001000 RW 1...Request core dump (also known as a "system dump" for IBM Java)
Additional methods of requesting system dumps for IBM Java are documented in the Troubleshooting IBM Java and Troubleshooting WAS chapters.
The gcore command pauses the process while the core is generated and then the process should continue. Replace ${PID} in the following example with the process ID. You must have permissions to the process (i.e. either run as the owner of the process or as root). The size of the core file will be the size of the virtual size of the process (ps VSZ). If there is sufficient free space in physical RAM and the filecache, the core file will be written to RAM and then asynchronously written out to the filesystem which can dramatically improve the speed of generating a core and reduce the time the process is paused. In general, core dumps compress very well (often up to 75%) for transfer. Normally, the gcore command is provided as part of the gdb package. In fact, the gcore command is actually a shell script which attaches gdb to the process and runs the gdb gcore command and then detaches.
gcore ${PID} core.$(date +%Y%m%d.%H%M%S).dmpThere is some evidence that the gcore command in gdb writes less information than the kernel would write in the case of a crash (this probably has to do with the two implementations being different code bases).
The process may be crashed using
kill -6 ${PID}orkill -11 ${PID}which will usually produe a core dump.On OutOfMemoryError using the J9 option:
"-Xdump:tool:events=systhrow,filter=java/lang/OutOfMemoryError,range=1..1,request=exclusive+prepwalk,exec=gcore %p"
IBM proposed a kernel API to create a core dump but it was rejected for security reasons and it was proposed to do it in user space.
Core dumps from crashes
When a crash occurs, the kernel may create a core dump of the process. How much is written is controlled by coredump_filter:
Since kernel 2.6.23, the Linux-specific /proc/PID/coredump_filter file can be used to control which memory segments are written to the core dump file in the event that a core dump is performed for the process with the corresponding process ID. The value in the file is a bit mask of memory mapping types (see mmap(2)). (https://www.kernel.org/doc/man-pages/online/pages/man5/core.5.html)
When a process is dumped, all anonymous memory is written to a core file as long as the size of the core file isn't limited. But sometimes we don't want to dump some memory segments, for example, huge shared memory. Conversely, sometimes we want to save file-backed memory segments into a core file, not only the individual files. /proc/PID/coredump_filter allows you to customize which memory segments will be dumped when the PID process is dumped. coredump_filter is a bitmask of memory types. If a bit of the bitmask is set, memory segments of the corresponding memory type are dumped, otherwise they are not dumped. The following 7 memory types are supported:
- (bit 0) anonymous private memory
- (bit 1) anonymous shared memory
- (bit 2) file-backed private memory
- (bit 3) file-backed shared memory
- (bit 4) ELF header pages in file-backed private memory areas (it is effective only if the bit 2 is cleared)
- (bit 5) hugetlb private memory
- (bit 6) hugetlb shared memory
Note that MMIO pages such as frame buffer are never dumped and vDSO pages are always dumped regardless of the bitmask status. When a new process is created, the process inherits the bitmask status from its parent. It is useful to set up coredump_filter before the program runs.
For example:
$ echo 0x7 > /proc/self/coredump_filter
$ ./some_program
https://www.kernel.org/doc/Documentation/filesystems/proc.txt
systemd-coredump
This section has been moved to Java best practices for core piping.
Process Virtual Address Space
The total virtual and resident address space sizes of a process may be queried with ps:
$ ps -o pid,vsz,rss -p 14062
PID VSZ RSS
14062 44648 42508Details of the virtual address space of a process may be queried with (https://www.kernel.org/doc/Documentation/filesystems/proc.txt):
$ cat /proc/${PID}/mapsThis will produce a line of output for each virtual memory area (VMA):
$ cat /proc/self/maps
00400000-0040b000 r-xp 00000000 fd:02 22151273 /bin/cat...The first column is the address range of the VMA. The second column is the set of permissions (read, write, execute, private). The third column is the offset if the VMA is a file, device, etc. The fourth column is the device (major:minor) if the VMA is a file, device, etc. The fifth column is the inode if the VMA is a file, device, etc. The final column is the pathname if the VMA is a file, etc.
The sum of these address ranges will equal the ps VSZ
number.
In recent versions of Linux, smaps is a superset of maps and additionally includes details for each VMA:
$ cat /proc/self/smaps
00400000-0040b000 r-xp 00000000 fd:02 22151273 /bin/cat
Size: 44 kB
Rss: 20 kB
Pss: 12 kB...The Rss and Pss values are particularly interesting, showing how much of the VMA is resident in memory (some pages may be shared with other processes) and the proportional set size of a shared VMA where the size is divided by the number of processes sharing it, respectively.
smaps
The total virtual size of the process (VSZ):
$ grep ^Size smaps | awk '{print $2}' | paste -sd+ | bc | sed 's/$/*1024/' | bc
3597316096The total resident size of the process (RSS):
$ grep Rss smaps | awk '{print $2}' | paste -sd+ | bc | sed 's/$/*1024/' | bc
897622016The total proportional resident set size of the process (PSS):
$ grep Pss smaps | awk '{print $2}' | paste -sd+ | bc | sed 's/$/*1024/' | bc
891611136In general, PSS is used for sizing physical memory.
Print sum VMA sizes greater than 60MB:
$ grep -v -E "^[a-zA-Z_]+:" smaps | awk '{print $1}' | sed 's/\-/,/g' | perl -F, -lane 'print hex($F[1])-hex($F[0]);' | sort -n | grep "^[6].......$" | paste -sd+ | bc
840073216Sort VMAs by RSS:
$ cat smaps | while read line; do read line2; read line3; read line4; read line5; read lin6; read line7; read line8; read line9; read line10; read line11; read line12; read line13; read line14; echo $line, $line3; done | awk '{print $(NF-1)*1024, $1}' | sort -npmap
The pmap command prints the same information as smaps but in a column-based format: https://www.kernel.org/doc/man-pages/online/pages/man1/pmap.1.html
$ pmap -XX $(pgrep -f defaultServer)
22: java -javaagent:/opt/ibm/wlp/bin/tools/ws-javaagent.jar -Djava.awt.headless=true -Djdk.attach.allowAttachSelf=true -Xshareclasses:name=liberty,nonfatal,cacheDir=/output/.classCache/ -XX:+UseContainerSupport -jar /opt/ibm/wlp/bin/tools/ws-server.jar defaultServer
Address Perm Offset Device Inode Size KernelPageSize MMUPageSize Rss Pss Shared_Clean Shared_Dirty Private_Clean Private\_Dirty Referenced Anonymous LazyFree AnonHugePages ShmemPmdMapped Shared_Hugetlb Private_Hugetlb Swap SwapPss Locked VmFlags Mapping
00400000 r-xp 00000000 08:01 5384796 4 4 4 4 4 0 0 0 4 4 4 0 0 0 0 0 0 0 0 rd ex mr mw me dw java
00600000 r--p 00000000 08:01 5384796 4 4 4 4 4 0 0 0 4 4 4 0 0 0 0 0 0 0 0 rd mr mw me dw ac java
00601000 rw-p 00001000 08:01 5384796 4 4 4 4 4 0 0 0 4 0 4 0 0 0 0 0 0 0 0 rd wr mr mw me dw ac java
00d96000 rw-p 00000000 00:00 0 132 4 4 124 124 0 0 0 124 124 124 0 0 0 0 0 0 0 0 rd wr mr mw me ac \[heap\]
00db7000 rw-p 00000000 00:00 0 51200 4 4 39124 39124 0 0 0 39124 39124 39124 0 38912 0 0 0 0 0 0 rd wr mr mw me nr hg \[heap\]
03fb7000 ---p 00000000 00:00 0 153600 4 4 0 0 0 0 0 0 0 0 0 0 0 0 0 0 0 0 mr mw me nr hg
dfff1000 ---p 00000000 00:00 0 60 4 4 0 0 0 0 0 0 0 0 0 0 0 0 0 0 0 0 mr mw me nr hg
e0000000 rw-p 00000000 00:00 0 69184 4 4 47856 47856 0 0 0 47856 47856 47856 0 24576 0 0 0 0 0 0 rd wr mr mw me nr hggdb
Loading a core dump
A core dump is loaded by passing the paths to the executable and the core dump to gdb:
$ gdb ${PATH_TO_EXECUTABLE} ${PATH_TO_CORE}To load matching symbols from particular paths (e.g. if the core is from another machine):
- Run gdb without any parameters
set solib-absolute-prefix ${ABS_PATH_TO_SO_LIBS}- This is the simulated root; for example, if the
.sowas originally loaded from/lib64/libc.so.6, and you have it on your host in/tmp/dump/lib64/libc.so.6, then${ABS_PATH_TO_SO_LIBS}would be/tmp/dump
- This is the simulated root; for example, if the
- Optional if you have
*.debugfiles:set debug-file-directory ${ABS_PATHS_TO_DIR_WITH_DEBUG_FILES} file ${PATH_TO_JAVA_EXECUTABLE_THAT_CREATED_THE_CORE}core-file ${PATH_TO_CORE}
Batch execute some gdb comments:
$ gdb --batch --quiet -ex "thread apply all bt" -ex "quit" $EXE $CORECommon Commands
- Print current thread stack:
bt - Print thread stacks:
thread apply all bt - Review what's loaded in memory:
info proc mappingsmaintenance info sectionsinfo files
- List all threads:
info threads - Switch to a different thread:
thread N - Print loaded shared libraries:
info sharedlibrary - Print register:
p $rax - Print current instruction:
x/i $pc - If available, print source of current function:
list - Disassemble function at address:
disas 0xff - Print structure definition:
ptype struct malloc_state - Print output to a file:
set logging on - Print data type of variable:
ptype var - Print symbol information:
info symbol 0xff - Add a source directory to the source
path:
directory $DIR
Print Virtual Memory
Virtual memory may be printed with the x command:
(gdb) x/32xc 0x00007f3498000000
0x7f3498000000: 32 ' ' 0 '\000' 0 '\000' 28 '\034' 54 '6' 127 '\177' 0 '\000' 0 '\000'
0x7f3498000008: 0 '\000' 0 '\000' 0 '\000' -92 '\244' 52 '4' 127 '\177' 0 '\000' 0 '\000'
0x7f3498000010: 0 '\000' 0 '\000' 0 '\000' 4 '\004' 0 '\000' 0 '\000' 0 '\000' 0 '\000'
0x7f3498000018: 0 '\000' 0 '\000' 0 '\000' 4 '\004' 0 '\000' 0 '\000' 0 '\000' 0 '\000'Another option is to dump memory to a file and then spawn an xxd process from within gdb to dump that file which is easier to read:
(gdb) define xxd
Type commands for definition of "xxd".
End with a line saying just "end".
>dump binary memory dump.bin $arg0 $arg0+$arg1
>shell xxd dump.bin
>shell rm -f dump.bin
>end
(gdb) xxd 0x00007f3498000000 32
0000000: 2000 001c 367f 0000 0000 00a4 347f 0000 ...6.......4...
0000010: 0000 0004 0000 0000 0000 0004 0000 0000 ................For large areas, these may be dumped to a file directly:
(gdb) dump binary memory dump.bin 0x00007f3498000000 0x00007f34a0000000Large VMAs often have a lot of zero'd memory. A simple trick to filter those out is to remove all zero lines:
$ xxd dump.bin | grep -v "0000 0000 0000 0000 0000 0000 0000 0000" | lessProcess Virtual Address Space
Gdb can query a core file and produce output about the virtual address space which is similar to /proc/${PID}/smaps, although it is normally a subset of all of the VMAs:
(gdb) info files
Local core dump file:
`core.16721.dmp', file type elf64-x86-64.
...
0x00007f3498000000 - 0x00007f34a0000000 is load51...The "Local core dump file" stanza of gdb "info files" seems like the best place to look to approximate the virtual address size of the process at the time of the dump. This will not account for everything, especially if coredump_filter is the default value (and even if it has all flags set).
A GDB python script may be used to sum all of these address ranges: https://raw.githubusercontent.com/kgibm/problemdetermination/master/scripts/gdb/gdbinfofiles.py
Debug a Running Process
You may attach gdb to a running process:
$ gdb ${PATH_TO_EXECUTABLE} ${PID}This may be useful to set breakpoints. For example, to break on a SIGABRT signal:
(gdb) handle all nostop noprint noignore
(gdb) handle SIGABRT stop print noignore
(gdb) continue
# ... Reproduce the problem ...
Program received signal SIGABRT, Aborted.
[Switching to Thread 0x7f232df12700 (LWP 23949)]
0x00000033a400d720 in sem_wait () from /lib64/libpthread.so.0
(gdb) ptype $_siginfo
type = struct {
int si_signo;
int si_errno;
int si_code;
union {
int _pad[28];
struct {...} _kill;...
} _sifields;
}
(gdb) ptype $_siginfo._sifields._kill
type = struct {
__pid_t si_pid;
__uid_t si_uid;
}
(gdb) p $_siginfo._sifields._kill.si_pid
$1 = 22691
(gdb) continueNext we can search for this PID 22691 and we'll find out who it is (in the following example, we see bash and the user name). If the PID is gone, then it is presumably some sort of script that already finished (you could create a background process that writes ps output to a file periodically to capture this):
$ ps -elf | grep 22691 | grep -v grep
0 S kevin 22691 20866 0 80 0 - 27657 wait 08:16 pts/2 00:00:00 bashStrictly speaking, you must first consult the signal number to know which union member to print above in $_siginfo._sifields._kill: https://www.kernel.org/doc/man-pages/online/pages/man2/sigaction.2.html
Process glibc malloc free lists
Use the following Python script to sum the total size of free malloc chunks on glibc malloc free lists in a core dump:
# glibc_malloc_info.py is a gdb automation script to count the total size of free malloc chunks in all arenas.
# It requires gdb compiled with Python scripting support, a core dump, the process from which the core dump came,
# and glibc symbols (e.g. glibc-debuginfo) that match those used by that process.
# Background: https://sourceware.org/glibc/wiki/MallocInternals
#
# usage:
# Basic: CORE=path_to_core EXE=path_to_process gdb --batch --command glibc_malloc_info.py
# J9 jextract: JEXTRACTED=true gdb --batch --command glibc_malloc_info.py
# glibc symbols extracted into current directory: JEXTRACTED=true CWDSYMBOLS=true gdb --batch --command glibc_malloc_info.py
#
# Example output:
#
# Total malloced: 25948160
# Total malloced not through mmap: 6696960
# Total malloced through mmap: 19251200
# mmap threshold: 2170880
# Number of arenas: 32
# Processing arena 1 @ 0x155190f4b9e0
# [0]: binaddr: 0x155190f4ba50
# [0]: chunkaddr: 0x155157cfe050
# [0,0]: size: 39952
# [0]: total free in bin: 160784, num: 10, max: 39952, avg: 16078
# [...]
# Total malloced: 25948160
# Total free: 12915264
import os
import sys
if os.environ.get("JEXTRACTED") == "true":
gdb.execute("set solib-absolute-prefix " + os.getcwd() + "/")
gdb.execute("set solib-search-path " + os.getcwd() + "/")
if os.environ.get("CWDSYMBOLS") == "true":
print("Setting debug-file-directory to " + os.getcwd() + "/usr/lib/debug/")
gdb.execute("set debug-file-directory " + os.getcwd() + "/usr/lib/debug/")
exe = os.environ.get("EXE")
core = os.environ.get("CORE")
for root, dirnames, filenames in os.walk('.'):
for filename in filenames:
fullpath = root + "/" + filename
if core is None and filename.startswith("core") and not filename.endswith("zip") and not filename.endswith(".gz") and not filename.endswith(".tar"):
print("Found core file: " + fullpath)
core = fullpath
elif exe is None and filename == "java":
print("Found executable: " + fullpath)
exe = fullpath
if exe is None:
raise Exception("Could not find executable in current working directory");
if core is None:
raise Exception("Could not find corefile in current working directory");
gdb.execute("file " + exe)
gdb.execute("core-file " + core)
gdb.execute("set pagination off")
OPTION_DEBUG = os.environ.get("DEBUG") == "true"
OPTION_BIN_ADDR_OFFSET = 16 # see offsetof in bin_at in malloc.c
OPTION_BIN_ADDR_OFFSET2 = 24
OPTION_BIN_COUNT = 253 # see struct malloc_state in malloc.c or `ptype struct malloc_state`-1
OPTION_FASTBIN_COUNT = 9 # see struct malloc_state in malloc.c or `ptype struct malloc_state`-1
OPTION_START = 0 # For debug
def value_to_addr(v):
return clean_addr(v.address)
def clean_addr(addr):
addr = str(addr)
x = addr.find(" ")
if x != -1:
addr = addr[0:x]
return addr
def process_bins(bins, count):
total_free = 0
for i in range(OPTION_START, count):
iteration_free = 0
binaddr = value_to_addr(bins[i])
binaddrHexstring = hex(int(binaddr, 16))
print("[" + str(i) + "]: binaddr: " + binaddr)
chunkaddr = value_to_addr(bins[i].dereference())
print("[" + str(i) + "]: chunkaddr: " + str(chunkaddr))
if chunkaddr == "0x0":
continue
fwd = gdb.parse_and_eval("((struct malloc_chunk *)" + chunkaddr + ")->fd")
if OPTION_DEBUG:
print("[" + str(i) + "]: fwd: " + str(fwd))
x = 0
max = 0
# If the address of the first chunk equals the fd pointer, then it's an unused bin. See malloc_init_state
if binaddr != str(fwd):
firstaddr = chunkaddr
firstiteration = True
while chunkaddr != "0x0" and (firstiteration or (str(chunkaddr) != str(firstaddr))):
if OPTION_DEBUG:
print("[" + str(i) + "," + str(x) + "]: chunkaddr: " + chunkaddr)
checkchunk = hex(int(chunkaddr, 16) + OPTION_BIN_ADDR_OFFSET)
checkchunk2 = hex(int(chunkaddr, 16) + OPTION_BIN_ADDR_OFFSET2)
if OPTION_DEBUG:
print("[" + str(i) + "," + str(x) + "]: checkchunk : " + checkchunk)
print("[" + str(i) + "," + str(x) + "]: checkchunk2: " + checkchunk2)
if checkchunk == binaddrHexstring or checkchunk2 == binaddrHexstring:
break
try:
size = gdb.parse_and_eval("((struct malloc_chunk *)" + chunkaddr + ")->size & ~0x7")
except gdb.error:
size = gdb.parse_and_eval("((struct malloc_chunk *)" + chunkaddr + ")->mchunk_size & ~0x7")
if size > max:
max = size
if OPTION_DEBUG or firstiteration:
print("[" + str(i) + "," + str(x) + "]: size: " + str(size))
total_free = total_free + size
iteration_free = iteration_free + size
chunkaddr = value_to_addr(gdb.parse_and_eval("((struct malloc_chunk *)" + chunkaddr + ")->fd").dereference())
x = x + 1
firstiteration = False
if x > 0:
print("[" + str(i) + "]: total free in bin: " + str(iteration_free) + ", num: " + str(x) + ", max: " + str(max) + ", avg: " + str(iteration_free / x))
else:
print("[" + str(i) + "]: total free in bin: " + str(iteration_free))
return total_free
total_malloced = gdb.parse_and_eval("mp_.mmapped_mem") + gdb.parse_and_eval("main_arena.system_mem")
print("Total malloced: " + str(total_malloced))
print("Total malloced not through mmap: " + str(gdb.parse_and_eval("main_arena.system_mem")))
print("Total malloced through mmap: " + str(gdb.parse_and_eval("mp_.mmapped_mem")))
print("mmap threshold: " + str(gdb.parse_and_eval("mp_.mmap_threshold")))
print("Number of arenas: " + str(gdb.parse_and_eval("narenas")))
total_free = 0
arena = value_to_addr(gdb.parse_and_eval("main_arena"))
main_arena = arena
process_arena = True
arena_count = 1
while process_arena:
print("Processing arena " + str(arena_count) + " @ " + str(arena))
total_free = total_free + process_bins(gdb.parse_and_eval("((struct malloc_state *)" + str(arena) + ")->bins"), OPTION_BIN_COUNT)
total_free = total_free + process_bins(gdb.parse_and_eval("((struct malloc_state *)" + str(arena) + ")->fastbinsY"), OPTION_FASTBIN_COUNT)
arena = clean_addr(gdb.parse_and_eval("((struct malloc_state *)" + str(arena) + ")->next"))
print("Next arena: " + str(arena))
process_arena = str(arena) != str(main_arena)
arena_count = arena_count + 1
print("")
print("Total malloced: " + str(total_malloced))
print("Total free: " + str(total_free))
# Example manual analysis:
#
# There was a question about how to determine glibc malloc free chunks:
# Install glibc-debuginfo and load the core dump in gdb. First, we see that the total outstanding malloc'ed at the time of the dump is about 4GB:
# (gdb) print main_arena.system_mem + mp_.mmapped_mem
# $1 = 4338761728
# Start with the starting chunk for a bin:
# (gdb) print main_arena.bins[250]
# $2 = (mchunkptr) 0x7f24c6232000
# Cast to a malloc_chunk, get the size (or mchunk_size, depending on version) and mask with 0x7 to see that it's 1MB (see https://sourceware.org/glibc/wiki/MallocInternals):
# (gdb) print ((struct malloc_chunk *)0x7f24c6232000)->size & ~0x7
# $3 = 1048545
# Then follow the linked list through the fd (forward) pointer:
# (gdb) print ((struct malloc_chunk *)0x7f24c6232000)->fd
# $4 = (struct malloc_chunk *) 0x7f24a7632000
# Continuing:
# (gdb) print ((struct malloc_chunk *)0x7f24a7632000)->fd
# $5 = (struct malloc_chunk *) 0x7f24a3cfb000
# You know you're at the end of the list when the forward pointer is the address of the first chunk plus either 16 or 24:
# (gdb) print &(main_arena.bins[250])
# $6 = (mchunkptr *) 0x7f2525c97f98 <main_arena+2104>
# After about 3,345 of these chunks, you'll see:
# (gdb) print ((struct malloc_chunk *)0x7f24bcb723d0)->fd
# $7 = (struct malloc_chunk *) 0x7f2525c97f88 <main_arena+2088>
# (gdb) print/x 0x7f2525c97f88 + 16
# $8 = 0x7f2525c97f98
# Therefore, 3,345 * ~1MB = ~3.3GB.
# In this case, the workaround is export MALLOC_MMAP_THRESHOLD_=1000000. This fixes the glibc malloc mmap threshold so
# that when someone calls malloc requesting more than that many bytes, malloc actually calls mmap to allocate and then
# when free is called, it calls munmmap so that the memory goes back to the OS instead of getting added to the malloc
# free lists.gcore
Although it's preferable to use Java's built-in methods of requesting a core dump, gcore may be used which attaches gdb and dumps most of the memory segments into a core file and allows the process to continue:
usage: gcore [-o filename] pid
Here is a shells cript to help capture more details:
#!/bin/sh
# This script automates taking a core dump using gcore.
# It also updates coredump_filter to maximize core dump contents.
# Usage: ./ibmgcore.sh PID [SEQ] [PREFIX]
# PID - The process ID. You must have permissions (owner or sudo/root).
# SEQ - Optional sequence number. Defaults to 1.
# PREFIX - Optional prefix (e.g. directory and file name). Defaults to ./
PID=$1
SEQ=$2
PREFIX=$3
if [ -z "$PREFIX" ]; then
PREFIX="./"
fi
if [ -z "$SEQ" ]; then
SEQ=1
fi
DT=`date +%Y%m%d.%H%M%S`
LOG="${PREFIX}core.${DT}.$PID.000$SEQ.dmp.log.txt"
COREFILE="${PREFIX}core.${DT}.$PID.000$SEQ.dmp"
echo 0x7f > /proc/$PID/coredump_filter
date > ${LOG}
echo $PID >> ${LOG} 2>&1
cat /proc/$PID/coredump_filter >> ${LOG} 2>&1
echo "maps" >> ${LOG} 2>&1
cat /proc/$PID/maps >> ${LOG} 2>&1
echo "smaps" >> ${LOG} 2>&1
cat /proc/$PID/smaps >> ${LOG} 2>&1
echo "limits" >> ${LOG} 2>&1
cat /proc/$PID/limits >> ${LOG} 2>&1
echo "gcore start" >> ${LOG} 2>&1
date >> ${LOG}
gcore -o $COREFILE $PID >> ${LOG} 2>&1
echo "gcore finish" >> ${LOG} 2>&1
date >> ${LOG}
echo "Gcore complete. Now renaming. This may take a few moments, but your process has now continued running."
# gcore adds the PID to the end of the file, so just remove that
mv $COREFILE.$PID $COREFILE
date >> ${LOG}
echo "Completely finished." >> ${LOG} 2>&1Shared Libraries
Check if a shared library is stripped of symbols:
$ file $LIBRARY.soCheck the output for "stripped" or "non-stripped."
glibc
malloc
The default Linux native memory allocator on most distributions is Glibc malloc (which is based on ptmalloc and dlmalloc). Glibc malloc either allocates like a classic heap allocator (from sbrk or mmap'ed arenas) or directly using mmap, depending on a sliding threshold (M_MMAP_THRESHOLD). In the former case, the basic idea of a heap allocator is to request a large block of memory from the operating system and dole out chunks of it to the program. When the program frees these chunks, the memory is not returned to the operating system, but instead is saved for future allocations. This generally improves the performance by avoiding operating system overhead, including system call time. Techniques such as binning allows the allocator to quickly find a "right sized" chunk for a new memory request.
The major downside of all heap allocators is fragmentation (compaction is not possible because pointer addresses in the program could not be changed). While heap allocators can coallesce adjacent free chunks, program allocation patterns, malloc configuration, and malloc heap allocator design limitations mean that there are likely to be free chunks of memory that are unlikely to be used in the future. These free chunks are essentially "wasted" space, yet from the operating system point of view, they are still active virtual memory requests ("held" by glibc malloc instead of by the program directly). If no free chunk is available for a new allocation, then the heap must grow to satisfy it.
In the worst case, with certain allocation patterns and enough time, resident memory will grow unbounded. Unlike certain Java garbage collectors, glibc malloc does not have a feature of heap compaction. Glibc malloc does have a feature of trimming (M_TRIM_THRESHOLD); however, this only occurs with contiguous free space at the top of a heap, which is unlikely when a heap is fragmented.
Starting with glibc 2.10 (for example, RHEL 6), the default behavior was changed to be less memory efficient but more performant by creating per-thread arenas to reduce cross-thread malloc contention:
Red Hat Enterprise Linux 6 features version 2.11 of glibc, providing many features and enhancements, including... An enhanced dynamic memory allocation (malloc) behaviour enabling higher scalability across many sockets and cores. This is achieved by assigning threads their own memory pools and by avoiding locking in some situations. The amount of additional memory used for the memory pools (if any) can be controlled using the environment variables MALLOC_ARENA_TEST and MALLOC_ARENA_MAX. MALLOC_ARENA_TEST specifies that a test for the number of cores is performed once the number of memory pools reaches this value. MALLOC_ARENA_MAX sets the maximum number of memory pools used, regardless of the number of cores. (https://access.redhat.com/knowledge/docs/en-US/Red_Hat_Enterprise_Linux/6/html/6.0_Release_Notes/compiler.html)
After a certain number of arenas have already been created (2 on 32-bit and 8 on 64-bit, or the value explicitly set through the environment variable MALLOC_ARENA_TEST), the maximum number of arenas will be set to NUMBER_OF_CPU_CORES multiplied by 2 for 32-bit and 8 for 64-bit. A thread will be assigned to a particular arena. These arenas will also increase virtual memory usage compared to a single heap; however, virtual memory increase by itself is not an issue. There is some evidence that certain workloads combined with these per-thread arenas may cause additional fragmentation, which could be an issue. This behavior may be reverted with the environment variable MALLOC_ARENA_MAX=1.
Glibc malloc does not make it easy to tell if fragmentation is the cause of process size growth, versus program demands or a leak. The malloc_stats function can be called in the running process to print free statistics to stderr. It wouldn't be too hard to write a JVMTI shared library which called this function through a static method or MBean (and this could even be loaded dynamically through Java Surgery). More commonly, you'll have a core dump (whether manually taken or from a crash), and the malloc structures don't track total free space in each arena, so the only way would be to write a gdb python script that walks the arenas and memory chunks and calculates free space (in the same way as malloc_stats). Both of these techniques, while not terribly difficult, are not currently available. In general, native heap fragmentation in Java program is much less likely than native memory program demands or a leak, so I always investigate those first (using techniques described elsewhere).
If you have determined that native heap fragmentation is causing unbounded process size growth, then you have a few options. First, you can change the application by reducing its native memory demands. Second, you can tune glibc malloc to immediately free certain sized allocations back to the operating system. As discussed above, if the requested size of a malloc is greater than M_MMAP_THRESHOLD, then the allocation skips the heaps and is directly allocated from the operating system using mmap. When the program frees this allocation, the chunk is un-mmap'ed and thus given back to the operating system. Beyond the additional cost of system calls and the operating system needing to allocate and free these chunks, mmap has additional costs because it must be zero-filled by the operating system, and it must be sized to the boundary of the page size (e.g. 4KB). This can cause worse performance and more memory waste (ceteris paribus).
If you decide to change the mmap threshold, the first step is to determine the allocation pattern. This can be done through tools such as ltrace (on malloc) or SystemTap, or if you know what is causing most of the allocations (e.g. Java DirectByteBuffers), then you can trace just those allocations. Next, create a histogram of these sizes and choose a threshold just under the smallest yet most frequent allocation. For example, let's say you've found that most allocations are larger than 8KB. In this case, you can set the threshold to 8192:
MALLOC_MMAP_THRESHOLD_=8192Additionally, glibc malloc has a limit on the number of direct mmaps that it will make, which is 65536 by default. With a smaller threshold and many allocations, this may need to be increased. You can set this to something like 5 million:
MALLOC_MMAP_MAX_=5000000These are set as environment variables in each Java process. Note that there is a trailing underscore on these variable names.
You can verify these settings and the number and total size of mmaps using a core dump, gdb, and glibc symbols:
(gdb) p mp_
$1 = {trim_threshold = 131072, top_pad = 131072, mmap_threshold = 4096,
arena_test = 0, arena_max = 1, n_mmaps = 1907812, n_mmaps_max = 5000000,
max_n_mmaps = 2093622, no_dyn_threshold = 1, pagesize = 4096,
mmapped_mem = 15744507904, max_mmapped_mem = 17279684608, max_total_mem = 0,
sbrk_base = 0x1e1a000 ""}In this example, the threshold was set to 4KB (mmap_threshold), there are about 1.9 million active mmaps (n_mmaps), the maximum number is 5 million (n_mmaps_max), and the total amount of memory currently mmap'ped is about 14GB (mmapped_mem).
There is also some evidence that the number of arenas can contribute to fragmentation.
Investigating core dumps
Notes:
- The kernel does not dump everything from the running process (even if 0x7f is set in coredump_filter).
- Testing has shown that gcore dumps less memory content than when the kernel dumps a core during crash processing.
Ideas for dealing with fragmentation:
- Reduce the number and/or frequency of direct or indirect mallocs.
- Create thread local caches of whatever is using the mallocs (e.g. DirectByteBuffers). Set the minimum size of the thread pool doing this equal to the maximum size to avoid thread local destruction.
- Experiment with a limited MALLOC_ARENA_MAX (try 1 to see if there's any effect at first).
- Experiment with MALLOC_MMAP_THRESHOLD and MALLOC_MMAP_MAX, carefully monitoring the performance difference.
- Batch the frees together (e.g. with a stop-the-world type of mechanism) to increase the probability of free chunks coalescing.
- Experiment with M_MXFAST
- malloc_trim is rarely useful outside of academic scenarios. It only trims from the top of the main arena. First, most fragmentation is within an arena not at the top, and second, most programs heavily (and even predominantly) use the non-main arenas.
How much is malloc'ed?
Add mp_.mmapped_mem plus system_mem for each arena starting at main_arena and following the next pointer until next==&main_arena
(gdb) p mp_.mmapped_mem
$1 = 0
(gdb) p &main_arena
$2 = (struct malloc_state *) 0x3c95b8ee80
(gdb) p main_arena.system_mem
$3 = 413696
(gdb) p main_arena.next
$4 = (struct malloc_state *) 0x3c95b8ee80Exploring Arenas
glibc provides malloc statistics at runtime through a few methods: mallinfo, malloc_info, and malloc_stats. mallinfo is old and not designed for 64-bit and malloc_info is the new version which returns an XML blob of information. malloc_stats doesn't return anything, but instead prints out total statistics to stderr (http://udrepper.livejournal.com/20948.html).
- malloc_info: https://www.kernel.org/doc/man-pages/online/pages/man3/malloc_info.3.html
- malloc_stats: https://www.kernel.org/doc/man-pages/online/pages/man3/malloc_stats.3.html
- mallinfo: https://www.kernel.org/doc/man-pages/online/pages/man3/mallinfo.3.html
malloc trace
Malloc supports rudimentary allocation tracing: http://www.gnu.org/software/libc/manual/html_node/Tracing-malloc.html
strace
On how to use strace and ltrace to investigate mmap and malloc calls with callstacks, see the main Linux chapter.
Native Memory Leaks
eBPF
On Linux kernel versions >= 4.1, eBPF is an in-kernel virtual machine that runs programs that access kernel information. eBPF is fully supported starting with, for example, RHEL 8.
Install
- Modern Fedora/RHEL/CentOS/ubi/ubi-init:
Then add todnf install -y kernel-devel bcc-tools bpftoolPATH:export PATH=/usr/share/bcc/tools/:${PATH}
Alternatively, manually install:
- Install dependencies: https://github.com/iovisor/bcc/blob/master/INSTALL.md#packages
- Clone bcc tools:
git clone https://github.com/iovisor/bcc
bpftool
List running eBPF programs
bpftool prog listTracking native memory leaks
Periodically dump any stacks that do not have matching frees:
- Run the memleak script, specifying the process to watch, the
interval in seconds, and, optionally, the number of iterations:
memleak.py -p $PID 30 10 > memleak_$PID.txt - Analyze the stack output. For example:
[19:41:11] Top 10 stacks with outstanding allocations: 225144 bytes in 159 allocations from stack func1+0x16 [process] main+0x81 [process]
LinuxNativeTracker
Recent versions of IBM Java include an optional feature to enable advanced native memory tracking: https://www.ibm.com/support/pages/ibm-java-linux-howto-tracking-native-memory-java-8-linux
HotSpot Java has -XX:NativeMemoryTracking
Debug Symbols
In general, it is recommended
to compile all executables and libraries with debug symbols
(-g):
GCC, the GNU C/C++ compiler, supports '-g' with or without '-O', making it possible to debug optimized code. We recommend that you always use '-g' whenever you compile a program.
Alternatively, symbols may be output into separate files and made available for download to support engineers: http://www.sourceware.org/gdb/current/onlinedocs/gdb/Separate-Debug-Files.html
See instructions for each distribution.
Frame pointer omission
Frame pointer
omission (FPO) is a common compiler optimization that makes it more
difficult for diagnostic tools to walk stack traces. When compiling with
GCC, test the relative performance of
-fno-omit-frame-pointer to ensure that frame pointers are
not omitted so that backtraces are in tact.
To check if an executable uses FPO, dump its assembly and check if
there are instructions to copy the address of the stack pointer into the
frame pointer. If there are no such instructions, then FPO is active.
For example, on x86 (with objdump using AT&T syntax by
default), you might search as follows:
$ objdump -d libzip.so | grep -e "mov.*%esp,.*%ebp" -e "mov.*%rsp,.*%rbp"Note that some executables have a mix of FPO and no-FPO so the presence alone may not be sufficient to check.
SystemTap (stap)
SystemTap is largerly superceded by eBPF on newer kernels. However, it does still work. Examples:
ltrace equivalent: https://sourceware.org/git/?p=systemtap.git;a=blob;f=testsuite/systemtap.examples/process/ltrace.stp;h=151cdb545432b9001bf2416f098b097418d2ccff;hb=refs/heads/master
Network
On Linux, once a socket is listening, there are two queues: a SYN queue and an accept queue (controlled by the backlog passed to listen). Once the handshake is complete, a connection is put on the accept queue, if the current number of connections on the accept queue is less than the backlog. The backlog does not affect the SYN queue because if a SYN gets to the server when the accept queue is full, it is still possible that by the time the full handshake completes, the accept queue will have space. If the handshake completes and the accept queue is full, then the server's socket information is dropped but nothing sent to the client; when the client tries to send data, the server would send a RST. If syn cookies are enabled and the SYN queue reaches a high watermark, after the SYN/ACK is sent, the SYN is removed from the queue. When the ACK comes back, the SYN is rebuilt from the information in the ACK and then the handshake is completed.
Process CPU Deep Dive
- Create linuxstat.sh:
#!/bin/sh outputfile="linuxstat_$(date +"%Y%m%d_%H%M%S").log" echo "linuxstat: $(date +"%Y%m%d %H%M%S %N %Z") : PIDs: ${*}" | tee -a ${outputfile} while true; do cat /proc/stat &>> ${outputfile} for PID in ${*}; do echo "linuxstat: $(date +"%Y%m%d %H%M%S %N %Z") : iteration for PID: ${PID}" | tee -a ${outputfile} cat /proc/${PID}/stat &>> ${outputfile} (for i in /proc/${PID}/task/*; do echo -en "$i="; cat $i/stat; done) &>> ${outputfile} done sleep 15 done chmod +x linuxstat.sh- Start:
nohup ./linuxstat.sh PID1 PID2... - Reproduce the problem
Ctrl^Cto stpo linuxstat.sh and gatherlinuxstat*log
Hung Processes
Gather and review (particularly the output of each kernel stack in /stack):
PID=$1
outputfile="linuxhang_$(date +"%Y%m%d_%H%M%S").log"
echo "linuxhang: $(date +"%Y%m%d %H%M%S %N %Z") : status" | tee -a ${outputfile}
cat /proc/${PID}/status &>> ${outputfile}
echo "linuxhang: $(date +"%Y%m%d %H%M%S %N %Z") : sched" | tee -a ${outputfile}
cat /proc/${PID}/sched &>> ${outputfile}
echo "linuxhang: $(date +"%Y%m%d %H%M%S %N %Z") : schedstat" | tee -a ${outputfile}
cat /proc/${PID}/schedstat &>> ${outputfile}
echo "linuxhang: $(date +"%Y%m%d %H%M%S %N %Z") : syscall" | tee -a ${outputfile}
cat /proc/${PID}/syscall &>> ${outputfile}
echo "linuxhang: $(date +"%Y%m%d %H%M%S %N %Z") : wchan" | tee -a ${outputfile}
echo -en "/proc/${PID}/wchan=" &>> ${outputfile}
cat /proc/${PID}/wchan &>> ${outputfile}
echo "linuxhang: $(date +"%Y%m%d %H%M%S %N %Z") : task wchan" | tee -a ${outputfile}
(for i in /proc/${PID}/task/*; do echo -en "$i="; cat $i/wchan; echo ""; done) &>> ${outputfile}
echo "linuxhang: $(date +"%Y%m%d %H%M%S %N %Z") : stack" | tee -a ${outputfile}
echo -en "/proc/${PID}/stack=" &>> ${outputfile}
cat /proc/${PID}/stack &>> ${outputfile}
echo "linuxhang: $(date +"%Y%m%d %H%M%S %N %Z") : task stack" | tee -a ${outputfile}
(for i in /proc/${PID}/task/*; do echo -en "$i="; cat $i/stack; echo ""; done) &>> ${outputfile}
echo "linuxhang: $(date +"%Y%m%d %H%M%S %N %Z") : syscall" | tee -a ${outputfile}
echo -en "/proc/${PID}/syscall=" &>> ${outputfile}
cat /proc/${PID}/syscall &>> ${outputfile}
echo "linuxhang: $(date +"%Y%m%d %H%M%S %N %Z") : task syscall" | tee -a ${outputfile}
(for i in /proc/${PID}/task/*; do echo -en "$i="; cat $i/syscall; echo ""; done) &>> ${outputfile}
echo "linuxhang: $(date +"%Y%m%d %H%M%S %N %Z") : task sched" | tee -a ${outputfile}
(for i in /proc/${PID}/task/*; do echo -en "$i="; cat $i/sched; done) &>> ${outputfile}
echo "linuxhang: $(date +"%Y%m%d %H%M%S %N %Z") : task status" | tee -a ${outputfile}
(for i in /proc/${PID}/task/*; do echo -en "$i="; cat $i/status; done) &>> ${outputfile}
echo "Wrote to ${outputfile}"Review if number of switches is increasing:
PID=8939; PROC=sched; for i in /proc/${PID} /proc/${PID}/task/*; do echo -en "$i/${PROC}="; echo ""; cat $i/${PROC}; echo ""; done | grep -e ${PROC}= -e nr_switchesA simpler script:
PID=...
date >> kernelstacks.txt
for i in /proc/${PID}/task/*; do
echo -en "$i stack=" &>> kernelstacks.txt
cat $i/stack &>> kernelstacks.txt
echo "" &>> kernelstacks.txt
echo -en "$i wchan=" &>> kernelstacks.txt
cat $i/wchan &>> kernelstacks.txt
echo "" &>> kernelstacks.txt
echo -en "$i syscall=" &>> kernelstacks.txt
cat $i/syscall &>> kernelstacks.txt
echo "" &>> kernelstacks.txt
echo -en "$i sched=" &>> kernelstacks.txt
cat $i/sched &>> kernelstacks.txt
echo "" &>> kernelstacks.txt
echo -en "$i status=" &>> kernelstacks.txt
cat $i/status &>> kernelstacks.txt
echo "" &>> kernelstacks.txt
doneKernel Dumps
crash /var/crash/<timestamp>/vmcore /usr/lib/debug /lib/modules/<kernel>/vmlinux
Note that the <kernel> version should be the same that was captured by kdump. To find out which kernel you are currently running, use the uname -r command.
To display the kernel message buffer, type the log command at the interactive prompt.
To display the kernel stack trace, type the bt command at the interactive prompt. You can use bt <pid> to display the backtrace of a single process.
To display status of processes in the system, type the ps command at the interactive prompt. You can use ps <pid> to display the status of a single process.
To display basic virtual memory information, type the vm command at the interactive prompt. You can use vm <pid> to display information on a single process.
To display information about open files, type the files command at the interactive prompt. You can use files <pid> to display files opened by only one selected process.
kernel object file: A vmlinux kernel object file, often referred to as the namelist in this document, which must have been built with the -g C flag so that it will contain the debug data required for symbolic debugging.
When using the fbt provider, it helps to run through the syscall once with all to see what the call stack is and then hone in.
Change root password
- Type
eon the boot menu. - Add
rd.break enforcing=0to the line that starts withlinux(another option issystemd.debug-shelland hitCtrl+Alt+F9) - Continue booting:
Ctrl+X - Make the filesystem writable:
mount -o remount,rw /sysroot - Enter root filesystem:
chroot /sysroot - Change root password:
passwd - Continue booting:
Ctrl+D
Fix non-working disk
- Type
eon the boot menu. - Add
systemd.unit=emergency.targetto the line that starts withlinux - Make all filesystems writeable:
mount -o remount,rw / - Try re-mount:
mount -a - Fix any errors in
/etc/fstab - Run
systemctl daemon-reload - Try re-mount:
mount -a - Continue booting:
Ctrl+D
journald
Persist all logs
- Set
Storage=persistentin/etc/systemd/journald.conf - Run
systemctl reload systemd-journald - Logs in
/var/log/journal
Battery Status
Example:
$ sudo acpi -V | grep ^Battery
Battery 0: Unknown, 79%
Battery 0: design capacity 1886 mAh, last full capacity 1002 mAh = 53%
Battery 1: Charging, 46%, 01:01:20 until charged
Battery 1: design capacity 6166 mAh, last full capacity 5567 mAh = 90%Administration
Create New Superuser
- Create a user with a home directory:
adduser -m $user - Set the password for the new user:
passwd $user - Add the user to the superuser wheel group:
usermod -a -G wheel $user
Basic Diagnostics
outputfile="linuxdiag_$(date +"%Y%m%d_%H%M%S").log"
echo "diag: $(date +"%Y%m%d %H%M%S %N %Z") : uptime" | tee -a ${outputfile}
uptime &>> ${outputfile}
echo "diag: $(date +"%Y%m%d %H%M%S %N %Z") : hostname" | tee -a ${outputfile}
hostname &>> ${outputfile}
echo "diag: $(date +"%Y%m%d %H%M%S %N %Z") : w" | tee -a ${outputfile}
w &>> ${outputfile}
echo "diag: $(date +"%Y%m%d %H%M%S %N %Z") : lscpu" | tee -a ${outputfile}
lscpu &>> ${outputfile}
echo "diag: $(date +"%Y%m%d %H%M%S %N %Z") : dmesg" | tee -a ${outputfile}
(dmesg | tail -50) &>> ${outputfile}
echo "diag: $(date +"%Y%m%d %H%M%S %N %Z") : df" | tee -a ${outputfile}
df -h &>> ${outputfile}
echo "diag: $(date +"%Y%m%d %H%M%S %N %Z") : free" | tee -a ${outputfile}
free -m &>> ${outputfile}
echo "diag: $(date +"%Y%m%d %H%M%S %N %Z") : ps memory" | tee -a ${outputfile}
ps -o pid,vsz,rss,cmd &>> ${outputfile}
echo "diag: $(date +"%Y%m%d %H%M%S %N %Z") : vmstat" | tee -a ${outputfile}
vmstat 1 5 &>> ${outputfile}
echo "diag: $(date +"%Y%m%d %H%M%S %N %Z") : top all" | tee -a ${outputfile}
top -b -d 2 -n 2 &>> ${outputfile}
echo "diag: $(date +"%Y%m%d %H%M%S %N %Z") : top threads" | tee -a ${outputfile}
top -b -H -d 2 -n 2 &>> ${outputfile}
echo "diag: $(date +"%Y%m%d %H%M%S %N %Z") : pidstat" | tee -a ${outputfile}
pidstat -d -h --human -l -r -u -v -w 2 2 &>> ${outputfile}
echo "diag: $(date +"%Y%m%d %H%M%S %N %Z") : iostat" | tee -a ${outputfile}
iostat -xm 1 5 &>> ${outputfile}
echo "diag: $(date +"%Y%m%d %H%M%S %N %Z") : ss summary" | tee -a ${outputfile}
ss --summary &>> ${outputfile}
echo "diag: $(date +"%Y%m%d %H%M%S %N %Z") : ss all" | tee -a ${outputfile}
ss -amponet &>> ${outputfile}
echo "diag: $(date +"%Y%m%d %H%M%S %N %Z") : nstat" | tee -a ${outputfile}
nstat -asz &>> ${outputfile}
echo "diag: $(date +"%Y%m%d %H%M%S %N %Z") : sar network" | tee -a ${outputfile}
sar -n DEV 1 5 &>> ${outputfile}
echo "diag: $(date +"%Y%m%d %H%M%S %N %Z") : sar tcp" | tee -a ${outputfile}
sar -n TCP,ETCP 1 5 &>> ${outputfile}
echo "diag: $(date +"%Y%m%d %H%M%S %N %Z") : lnstat" | tee -a ${outputfile}
lnstat -c 1 &>> ${outputfile}
echo "diag: $(date +"%Y%m%d %H%M%S %N %Z") : sysctl" | tee -a ${outputfile}
sysctl -a &>> ${outputfile}
echo "Wrote to ${outputfile}"Sending a kernel patch
Review the documentation on submitting patches
Find the repository of your target subsystem in the
MAINTAINERSfile. For example, forperf, the repository is:SCM: git git://git.kernel.org/pub/scm/linux/kernel/git/tip/tip.git perf/core
Clone this repository. For example, for
perf, from above:git clone git://git.kernel.org/pub/scm/linux/kernel/git/tip/tip.gitCheckout the appropriate branch from the SCM line in the
MAINTAINERSfile. For example, forperf, from above:git checkout perf/coreMake your changes and commit them with a prefix of the subsystem. For example, for
perf:git commit -sam "perf: DESCRIPTION OF CHANGES"Subscribe to the mailing list in the
MAINTAINERSfile. For example, forperf, it'slinux-perf-users@vger.kernel.organd subscription instructions may be found at http://vger.kernel.org/vger-lists.html#linux-perf-usersSend the patch to the mailing list. For example, for
perf:git send-email --from "First Last <email@example.com>" --to linux-perf-users@vger.kernel.org --suppress-cc all -1After some time, validate the email was successfully sent to the mailing list by reviewing the archives. For example, for
perf, see https://lore.kernel.org/linux-perf-users/
Error Codes (errno.h)
An errno
code is used throughout Linux to detail errors when calling functions.
Names and numeric values for a particular instance of Linux may be
listed with errno -l from the moreutils
package. Additional definitions are available in asm-generic/errno-base.h,
asm-generic/errno.h,
and linux/errno.h.
Example list:
# errno -l | sort -n -k 2 | awk '{printf("%-16s %3s ", $1, $2); for (i=3;i<=NF;i++) printf(" %s", $i); printf("\n");}'
EPERM 1 Operation not permitted
ENOENT 2 No such file or directory
ESRCH 3 No such process
EINTR 4 Interrupted system call
EIO 5 Input/output error
ENXIO 6 No such device or address
E2BIG 7 Argument list too long
ENOEXEC 8 Exec format error
EBADF 9 Bad file descriptor
ECHILD 10 No child processes
EAGAIN 11 Resource temporarily unavailable
EWOULDBLOCK 11 Resource temporarily unavailable
ENOMEM 12 Cannot allocate memory
EACCES 13 Permission denied
EFAULT 14 Bad address
ENOTBLK 15 Block device required
EBUSY 16 Device or resource busy
EEXIST 17 File exists
EXDEV 18 Invalid cross-device link
ENODEV 19 No such device
ENOTDIR 20 Not a directory
EISDIR 21 Is a directory
EINVAL 22 Invalid argument
ENFILE 23 Too many open files in system
EMFILE 24 Too many open files
ENOTTY 25 Inappropriate ioctl for device
ETXTBSY 26 Text file busy
EFBIG 27 File too large
ENOSPC 28 No space left on device
ESPIPE 29 Illegal seek
EROFS 30 Read-only file system
EMLINK 31 Too many links
EPIPE 32 Broken pipe
EDOM 33 Numerical argument out of domain
ERANGE 34 Numerical result out of range
EDEADLK 35 Resource deadlock avoided
EDEADLOCK 35 Resource deadlock avoided
ENAMETOOLONG 36 File name too long
ENOLCK 37 No locks available
ENOSYS 38 Function not implemented
ENOTEMPTY 39 Directory not empty
ELOOP 40 Too many levels of symbolic links
ENOMSG 42 No message of desired type
EIDRM 43 Identifier removed
ECHRNG 44 Channel number out of range
EL2NSYNC 45 Level 2 not synchronized
EL3HLT 46 Level 3 halted
EL3RST 47 Level 3 reset
ELNRNG 48 Link number out of range
EUNATCH 49 Protocol driver not attached
ENOCSI 50 No CSI structure available
EL2HLT 51 Level 2 halted
EBADE 52 Invalid exchange
EBADR 53 Invalid request descriptor
EXFULL 54 Exchange full
ENOANO 55 No anode
EBADRQC 56 Invalid request code
EBADSLT 57 Invalid slot
EBFONT 59 Bad font file format
ENOSTR 60 Device not a stream
ENODATA 61 No data available
ETIME 62 Timer expired
ENOSR 63 Out of streams resources
ENONET 64 Machine is not on the network
ENOPKG 65 Package not installed
EREMOTE 66 Object is remote
ENOLINK 67 Link has been severed
EADV 68 Advertise error
ESRMNT 69 Srmount error
ECOMM 70 Communication error on send
EPROTO 71 Protocol error
EMULTIHOP 72 Multihop attempted
EDOTDOT 73 RFS specific error
EBADMSG 74 Bad message
EOVERFLOW 75 Value too large for defined data type
ENOTUNIQ 76 Name not unique on network
EBADFD 77 File descriptor in bad state
EREMCHG 78 Remote address changed
ELIBACC 79 Can not access a needed shared library
ELIBBAD 80 Accessing a corrupted shared library
ELIBSCN 81 .lib section in a.out corrupted
ELIBMAX 82 Attempting to link in too many shared libraries
ELIBEXEC 83 Cannot exec a shared library directly
EILSEQ 84 Invalid or incomplete multibyte or wide character
ERESTART 85 Interrupted system call should be restarted
ESTRPIPE 86 Streams pipe error
EUSERS 87 Too many users
ENOTSOCK 88 Socket operation on non-socket
EDESTADDRREQ 89 Destination address required
EMSGSIZE 90 Message too long
EPROTOTYPE 91 Protocol wrong type for socket
ENOPROTOOPT 92 Protocol not available
EPROTONOSUPPORT 93 Protocol not supported
ESOCKTNOSUPPORT 94 Socket type not supported
ENOTSUP 95 Operation not supported
EOPNOTSUPP 95 Operation not supported
EPFNOSUPPORT 96 Protocol family not supported
EAFNOSUPPORT 97 Address family not supported by protocol
EADDRINUSE 98 Address already in use
EADDRNOTAVAIL 99 Cannot assign requested address
ENETDOWN 100 Network is down
ENETUNREACH 101 Network is unreachable
ENETRESET 102 Network dropped connection on reset
ECONNABORTED 103 Software caused connection abort
ECONNRESET 104 Connection reset by peer
ENOBUFS 105 No buffer space available
EISCONN 106 Transport endpoint is already connected
ENOTCONN 107 Transport endpoint is not connected
ESHUTDOWN 108 Cannot send after transport endpoint shutdown
ETOOMANYREFS 109 Too many references: cannot splice
ETIMEDOUT 110 Connection timed out
ECONNREFUSED 111 Connection refused
EHOSTDOWN 112 Host is down
EHOSTUNREACH 113 No route to host
EALREADY 114 Operation already in progress
EINPROGRESS 115 Operation now in progress
ESTALE 116 Stale file handle
EUCLEAN 117 Structure needs cleaning
ENOTNAM 118 Not a XENIX named type file
ENAVAIL 119 No XENIX semaphores available
EISNAM 120 Is a named type file
EREMOTEIO 121 Remote I/O error
EDQUOT 122 Disk quota exceeded
ENOMEDIUM 123 No medium found
EMEDIUMTYPE 124 Wrong medium type
ECANCELED 125 Operation canceled
ENOKEY 126 Required key not available
EKEYEXPIRED 127 Key has expired
EKEYREVOKED 128 Key has been revoked
EKEYREJECTED 129 Key was rejected by service
EOWNERDEAD 130 Owner died
ENOTRECOVERABLE 131 State not recoverable
ERFKILL 132 Operation not possible due to RF-kill
EHWPOISON 133 Memory page has hardware errorSysrq Keys
Check if sysrq enabled
Show if sysrq is enabled (1):
$ sysctl kernel.sysrq
kernel.sysrq = 1Enable sysrq
Enable:
- Method 1 (temporary):
sysctl -w kernel.sysrq=1 - Method 2 (permanent):
- Add
kernel.sysrq=1to/etc/sysctl.conf - Apply with
sysctl -p
- Add
sysrq characters
Commonly used characters:
- f: Run the OOM Killer. This will kill the process using the most RAM (even if it's not using much).
- r: Take control of keyboard from X.
- e: Send SIGTERM to all processes. Wait for graceful termination.
- i: Send SIGKILL to all processes for forceful termination.
- s: Sync disks.
- u: Remount all filesystems as read-only.
- b: Reboot.
- g: Switch to the kernel console. Otherwise, switch to a console with, e.g. Ctrl+Alt+F3
- l: Show backtrace of all CPUs.
- 0-9: Change the kernel log level.
- d: Display kernel locks.
- m: Show memory information.
- t: Show a list of all processes.
- w: Show a list of blocked processes.
- c: Perform a kernel crash.
A "controlled" reboot is often done with reisub
Execute sysrq
Execute:
- Method 1 (using keyboard):
- Ctrl + Alt + SysRq (usually PrintScreen) +
$CHARACTER - All of these keys must be held down at the same time and then released
- On some keyboards, this only works with the right-side Ctrl/Alt keys
- On some keyboards, a function (
Fn) key must be held for PrintScreen
- Ctrl + Alt + SysRq (usually PrintScreen) +
- Method 2 (as root):
echo $CHARACTER > /proc/sysrq-trigger - Method 3 (with sudo):
echo $CHARACTER | sudo tee /proc/sysrq-trigger
Troubleshooting AIX
Java interaction
If Java uses shmget to allocate the Java heap, then it
will immediately mark the shared memory region for deletion, so that if
the JVM crashes, the memory will be released. Therefore, if you find
large shared memory regions marked for deletion
(ipcs -Smqsa -1 | egrep "^m" | egrep " D"), this is most
likely the reason and expected.
Request core dump (also known as a "system dump" for IBM Java)
Additional methods of requesting system dumps for IBM Java are documented in the Troubleshooting IBM Java and Troubleshooting WAS chapters.
The gencore command pauses the process while the core is generated and then the process should continue. Replace PIDinthefollowingexamplewiththeprocessID.Youmusthavepermissionstotheprocess(i.e.eitherrunastheowneroftheprocessorasroot)andthecoreulimitmustbeunlimited((ulimit -c unlimited) before starting the process). The size of the core file will be the size of the virtual size of the process (ps VSZ). If there is sufficient free space in physical RAM and the filecache, the core file will be written to RAM and then asynchronously written out to the filesystem which can dramatically improve the speed of generating a core and reduce the time the process is paused. In general, core dumps compress very well (often up to 75%) for transfer.
gencore PIDcore.(date +%Y%m%d.%H%M%S).dmp
Signals
Signal mappings and detailed error codes may be found in /usr/include/sys/signal.h.
A simpler listing may be performed with kill -l:
$ kill -l
1) HUP 14) ALRM 27) MSG 40) bad trap 53) bad trap
2) INT 15) TERM 28) WINCH 41) bad trap 54) bad trap
3) QUIT 16) URG 29) PWR 42) bad trap 55) bad trap
4) ILL 17) STOP 30) USR1 43) bad trap 56) bad trap
5) TRAP 18) TSTP 31) USR2 44) bad trap 57) bad trap
6) ABRT 19) CONT 32) PROF 45) bad trap 58) RECONFIG
7) EMT 20) CHLD 33) DANGER 46) bad trap 59) CPUFAIL
8) FPE 21) TTIN 34) VTALRM 47) bad trap 60) GRANT
9) KILL 22) TTOU 35) MIGRATE 48) bad trap 61) RETRACT
10) BUS 23) IO 36) PRE 49) bad trap 62) SOUND
11) SEGV 24) XCPU 37) VIRT 50) bad trap 63) SAK
12) SYS 25) XFSZ 38) ALRM1 51) bad trap
13) PIPE 26) bad trap 39) WAITING 52) bad trapFind PID that owns a socket
Method 1
Install the optional lsof tool.
Method 2
$ netstat -Aan | grep "*.2[2,5].*LISTEN"
f1000e000531a3b8 tcp4 0 0 *.22 *.* LISTEN
f1000e00040babb8 tcp4 0 0 *.25 *.* LISTEN$ rmsock f1000e000531a3b8 tcpcb
The socket 0xf1000e000531a008 is being held by proccess 9830644
(sshd).
$ rmsock f1000e00040babb8 tcpcb
The socket 0xf1000e00040ba808 is being held by proccess 6684754
(sendmail).
Method 3
Find the socket of interest with netstat -A and copy the first hexadecimal address which is the socket ID:
# netstat -Aan | grep 32793 **f1000e00032203b8** tcp4 0 0 127.0.0.1.32793 *.* LISTENSend this socket ID into kdb:
# echo "sockinfo f1000e00032203b8 tcpcb" | kdb | grep proc F1000F0A00000000 F1000F0A10000000 pvproc+000000 proc/fd: 65/8 proc/fd: fd: 8 pvproc+010400 65*kuxagent ACTIVE **0410058** 0000001 00000008A84D5590 0 0030Take the first hexadecimal address after ACTIVE and convert it to decimal:
# echo "hcal 0410058" | kdb | grep Value Value hexa: 00410058 Value decimal: 4259928Search for this PID in
ps:# ps -elf | grep 4259928
Kernel Trace
Trace source of kill signal
It may be useful to understand what PID is sending a kill signal to a process on AIX. You can use this kernel trace:
Login as root
# rm -rf /tmp/aixtrace; mkdir /tmp/aixtrace/; cd /tmp/aixtrace/
# trace -C all -a -T 10M -L 20M -n -j 134,139,465,14e,46c -o ./trc
... Reproduce the problem ... e.g. kill -3 7667754
# trcstop
# cp /etc/trcfmt .
# trcnm -a > trace.nm
# LDR_CNTRL=MAXDATA=0x80000000 gensyms > trace.syms
# LDR_CNTRL=MAXDATA=0x80000000 gennames -f > gennames.out
# pstat -i > trace.inode
# ls -al /dev > trace.maj_min2lvEither zip and send these files to a PMR or analysis machine, or run these commands directly to process the trace:
# trcrpt -C all -r -o trc.tr trc
# trcrpt -C all -t trcfmt -n trace.nm -x -O pid=on,tid=on,svc=on,exec=on,cpuid=on,PURR=on -o trc.txt trc.trMake sure the trace buffers did not wrap:
# grep WRAP trc.txtIf there are no results, then you're good; otherwise, if you see lines such as:
006 --1- -1 -1 -1 963.205627656 0.002912 963.205627656 TRACEBUFFER WRAPAROUND 0003
005 -4916246- -1 4916246 113967573 963.205627656* 963.205627656 LOGFILE WRAPAROUND 0002Then, either try increasing buffer sizes or reducing your test case or system load (or the tracepoints in -j).
Finally, search for the signal:
# grep -Ei "^14e|46c" trc.txt | grep -E "signal 3|SIGQUIT"
14E ksh 0 10879036 62128373 28.157542500 0.128249 28.157542500 kill: signal SIGQUIT to process ? javaThe time of the signal is the ELAPSED_SEC column added to the date at the top of trc.txt:
# head -2 trc.txtWed Aug 21 05:10:28 2013
Thus the kill was sent at 05:10:56 by PID 10879036 (ksh). If this is a long running process, then you can reference ps.out for more details. The entry may not print the PID the signal was sent to (notice the question mark), but you should be able to figure that out based on other artifacts produced at that time such as javacores.
Useful Commands
genkld: List all shared objects loaded on the system.genld: List all shared objects loaded by a process.slibclean: Remove shared libraries from memory that have 0 use and load counts.
Querying Queue Depth with Netstat
Example AIX netstat output:
$ netstat -an
Active Internet connections (including servers)
Proto Recv-Q Send-Q Local Address Foreign Address (state)
tcp4 0 0 10.30.30.36.80 10.30.30.113.38378 ESTABLISHED [...]AIX has a somewhat strange format with the IP address followed by a period (instead of a colon) and the port number.
To find the queue depth of a server, first search for the local IP followed by the listening port of the server (it doesn't matter which column it's in because it's impossible for a server to both listen on a port and use that same port as a client port for some other socket), and filter the output for sockets in ESTABLISHED or SYN_RECEIVED states. Sockets may also be in various closing states such as CLOSE_WAIT, TIME_WAIT, FIN_WAIT_1, and FIN_WAIT_2 (depending on which side closed its half of the socket first): these states can cause other types of bottlenecks but they are not related to queue depth.
For example, let's say the web server above is listening on port 80:
$ netstat -an | grep -F 10.30.30.36.80 | grep -e ESTABLISHED -e SYN_RECEIVED | wc -l
14Then, to get the queue depth, subtract this number from the maximum number of servers (e.g. MaxClients, WebContainer maximum size, etc.).
Debug Symbols
AIX: "Specifying -g will turn off all inlining unless you explicitly request it with an optimization option." (http://www.ibm.com/support/knowledgecenter/en/SSGH2K_13.1.3/com.ibm.xlc1313.aix.doc/compiler_ref/opt_g_lower.html)
Use stabsplit to create separate symbol files: http://www.ibm.com/support/knowledgecenter/en/ssw_aix_72/com.ibm.aix.cmds3/ld.htm
Analyzing Native Memory with svmon
AIX, like all other modern operating systems, aggressively uses RAM as a file cache; therefore, it's very common for the "free" RAM in AIX to show as very low. However, in general, this file cache can be pushed out of RAM to make space for program demands. Therefore, to understand "effective RAM usage", you must subtract non-pinned filecache from used RAM.
aixmem.sh:
#!/bin/sh
PID=$1
INTERVAL=3600
echo "PID=$PID, INTERVAL=$INTERVAL"
while ([ -d /proc/$PID ]); do
date
svmon -G
svmon -r -m -P $PID
kill -3 $PID
sleep $INTERVAL
doneRun the following to make the script executable:
chmod a+x aixmem.shStart the script (and replace $PID with the target Java process ID):
nohup ./aixmem.sh $PID > nativemem.txt 2>&1 &This runs at an interval of 30 minutes and has a very low overhead
(assuming you have not changed the default behavior of
kill -3 to only produce a javacore).
After enough data has been captured, kill the script:
kill $(ps -ef | grep nativemem.sh | grep -v grep | awk '{print $2}')The following command line snippet on Linux (should be easy to convert to ksh) may be used to analyze the output of the AIX memory script above and display the effectively used RAM (i.e. RAM usage - file cache):
grep -e TZ -e "^memory" -e "^in use" nativemem.txt | \
while read line; do \
read line2;
read line3;
echo $line;
rambytesused="$(echo "${line2}" | awk '{print $3}' | echo "$(cat -)*4096" | bc)";
rambytesfilecache="$(echo "${line3}" | awk '{print $5}' | echo "$(cat -)*4096" | bc)";
printf "Total RAM usage (bytes): %s\n" "${rambytesused}";
printf "File cache RAM usage (bytes): %s\n" "${rambytesfilecache}";
printf "Effectively used RAM (bytes): %s\n\n" "$(echo "${rambytesused}-${rambytesfilecache}" | bc)";
doneNative Memory Leaks
Restart the process with the MALLOCDEBUG envar to track un-freed mallocs. This may have a significant performance overhead:
export MALLOCDEBUG=report_allocations,stack_depth:3Reproduce the problem and stop the process gracefully. A report is produced in stderr with each un-freed allocation:
Allocation #0: 0x3002FD60
Allocation size: 0x2A0
Allocated from heap: 0
Allocation traceback:
0xD01DC934 malloc
0xD01288AC init_malloc
0xD012A1F4 malloc
0xD04DFF34 __pth_initSnapshots of this data may also be captured with a core dump (see above) and the dbx $(malloc) command (see below).
With Java, careful of using stack depths greater than 3:
"The stack depth of 3 provides only a limited stack trace. However, the use of larger stack depths with a Java application can cause crashes because the debug malloc facility does not understand the stack frames used for JIT compiled code."
Run format_mallocdebug_op.sh to aggregate and summarize the stacks: https://www.ibm.com/developerworks/aix/library/au-mallocdebug.html
Example output:
ZIP_Put_In_Cache
readCEN
calloc_common
malloc
################################
533676 bytes leaked in 127 Blocks
################################dbx
Analyze a core file:
$ dbx ${PATH_TO_EXECUTABLE} ${PATH_TO_CORE}To load shared libraries from a particular folder, user -p:
$ dbx -p /=./ ${PATH_TO_EXECUTABLE} ${PATH_TO_CORE}If you see the following warning:
warning: The core file is not a fullcore. Some info may not be available.Then the core is probably truncated. As recommended in the Java documentation, enable fullcore and reproduce the issue (http://www.ibm.com/support/knowledgecenter/SSYKE2_8.0.0/com.ibm.java.aix.80.doc/diag/problem_determination/aix_setup_full_core.html):
# chdev -l sys0 -a fullcore='true' -a pre430core='false'Tips
Type help $COMMAND to print the summary and options of a
command. For example:
(dbx) help proc
proc [raw] [cred | cru | rlimit | ru | sigflags | signal]
Display process information. "raw" displays in raw hex format.
"cred" shows credentials, "cru", "ru" and "rlimit" resource info,
"sigflags" and "signal" information about signals and handlers.Command output may be redirected to files in the same directory. For example:
(dbx) coremap > coremap.txtproc
proc prints general process information. For
example:
(dbx) proc
pi_pid: 9306144 pi_sid: 10354784
pi_ppid: 9961578 pi_pgrp: 204
pi_uid: 204 pi_suid: 204
pi_thcount: 342 pi_cpu: 0
pi_start: Tue Dec 9 06:09:20 2014
pi_tsize: 0x0000000000013eeb pi_dsize: 0x000000003ba99c00...thread
thread prints a list of all native threads. The thread
preceded with ">" is the current thread:
(dbx) thread
thread state-k wchan state-u k-tid mode held scope function
$t1 run 0xf1000f0a1015c140 blocked 96535077 k no sys _event_sleep
$t190 run running 123339089 k no sys pollset_poll
>$t286 run running 96272413 k no sys genSystemCoreUsingGencore...Native Stacks
On AIX, to calculate the total native memory used by native stacks:
(dbx) thread infoFor example, under "stack storage," the native stack size is next to size=:
thread state-k wchan state-u k-tid mode held scope function
$t1 run blocked 28999789 u no sys _event_sleep...
stack storage:
base = 0x2df23000 size = 0x1ffc830where
where prints a native stack of the current thread. For
example:
(dbx) where
genSystemCoreUsingGencore() at 0x9000000177a6ef4
j9dump_create() at 0x9000000177a6370
doSystemDump() at 0x9000000177ed2cc
protectedDumpFunction() at 0x9000000177f2b54
j9sig_protect() at 0x90000001777dc9c
runDumpFunction() at 0x9000000177f2aa4
runDumpAgent() at 0x9000000177f26cc
createAndRunOneOffDumpAgent() at 0x9000000177f22a0
triggerOneOffDump() at 0x900000017814598
Java_com_ibm_jvm_Dump_SystemDumpImpl() at 0x9000000186cb198To print the stack of a particular thread, reference the number with $t#:
(dbx) where $t190
Thread $t190
warning: Thread is in kernel mode, not all registers can be accessed.
pollset_poll(??, ??, ??, ??) at 0x90000000014e56c
pollStatus() at 0x900000005e8ca30map
map prints a list of all loaded modules. For
example:
(dbx) map
Entry 1:
Object name: ./opt/BPM/8.5/WebSphere/AppServer/java/jre/bin/java
Text origin: 0x10000000000
Text length: 0x17236
Data origin: 0x1001000012b
Data length: 0x194d
File descriptor: 0x5
...
Entry 64:
Object name: ./usr/lib/libc.a
Member name: shr_64.o
Text origin: 0x900000000000c80
Text length: 0x43b3bf
Data origin: 0x9001000a00007e0
Data length: 0x11d8a0
File descriptor: 0x83coremap
coremap prints a list of all memory mappings. For
example:
Mapping: Shared Memory (size=0x280000000)
from (address): 0xa00000000000000 - 0xa00000280000000
to (offset) : 0x421680be - 0x2c21680be
in file : core.20141209.175356.9306144.0002.dmpIn the above example, the virtual address range is from 0xa00000000000000 to 0xa00000280000000 (which is of length 0x280000000 reported in the first line), and the raw data may be found in the file core.20141209.175356.9306144.0002.dmp in the range 0x421680be to 0x2c21680be. We can verify this by dumping the first 2 words of the virtual address:
(dbx) 0xa00000000000000/2X
0x0a00000000000000: 00000100 13737f3cThis matches dumping the same bytes from the core file at the offset:
$ od -N 8 -x core.20141209.175356.9306144.0002.dmp +0x421680be
421680be 0000 0100 1373 7f3cPrint memory
An address followed by a slash, a number, and a format character may be used to print raw memory. For example:
(dbx) 0x10000000000/8X
0x0000010000000000: 01f70005 51c013e3 00000000 0003a516
0x0000010000000010: 00781182 000015af 010b0001 00000000The help command for this is help display.
For null-terminated strings, simply type the address followed by /s.
For character bytes, use /c. For example:
(dbx) 0x20000000000/8c
0x0000020000000000: 'A' 'B' 'C' 'D' 'E' 'F' '1' '2'malloc
malloc prints a summary of the malloc subsystem. For
example:
(dbx) malloc
The following options are enabled:
Implementation Algorithm........ Default Allocator (Yorktown)
Statistical Report on the Malloc Subsystem:
Heap 0
heap lock held by................ pthread ID 0x1001000ee90
bytes acquired from sbrk()....... 1000964480
bytes in the freespace tree...... 125697184
bytes held by the user........... 875267296
allocations currently active..... 56012
allocations since process start.. 65224401
The Process Heap
Initial process brk value........ 0x0000010010001a80
current process brk value........ 0x000001004ba99c00
sbrk()s called by malloc......... 7180corefile
corefile prints information about a loaded core file.
For example:
(dbx) corefile
Process Name: /opt/IBM/WebSphere/AppServer/java/jre/bin/java
Version: 500
Flags: FULL_CORE | CORE_VERSION_1 | MSTS_VALID | UBLOCK_VALID | USTACK_VALID | LE_VALID
Signal:
Process Mode: 64 bitfd
fd prints information about open file handles.
Related Commands
- Print all printable strings and their hex offsets (at least N
printable characters followed by a null, default N is 4):
$ strings -t x $CORE_FILE - Print all bytes in both hexadecimal and character from the core file
starting at offset 0x988 and only show 100 bytes:
$ od -N 100 -xc $CORE_FILE +0x988 - Alternatively:
$ od -v -A x -N 100 -j 0x2B521000 -t xc $CORE_FILE
Compressing Files
compress
The compress command is a built-in command to compress files. If you're okay with replacing the file, then you can run it in place like this:
compress -f core.dmpThis will replace the file with a core.dmp.Z file which is compressed.
If you want to create a separately compressed file instead of replacing in-place, then you just pipe the file into compress and write to the desired file:
cat core.dmp | compress -f > core.dmp.ZTo package multiple files, se tar
to package multiple files, pipe that to stdout, then use compress to
take that tar data from stdin and then write that to a .Z
file:
tar -cvf - $FILES_OR_DIRS | compress -f > $NAME.ZThe reason for always using the -f flag is both to
overwrite existing files and also to avoid the issue of "This file is
not changed; compression does not save space." not writing the file.
tar.gz
If gzip
is available, use tar
to package multiple files, pipe that to stdout, then use gzip to take
that tar data from stdin and then write that to a .tar.gz
file:
tar -cvf - $FILES_OR_DIRS | gzip > $NAME.tar.gzSplitting Files
The split command splits a file into smaller files.
For example, let's say you have a core.dmp file. You can split it into 100MB files like this:
split -b 100m core.dmp core.dmp.split.This will produce files like this, each of which is no larger than 100MB:
core.dmp.split.aa
core.dmp.split.ab
core.dmp.split.acNetwork
DNS Cache
DNS caching is enabled with netcd. See if
netcd is enabled by running
lssrc -s netcd.
The netcdctrl -t all -a outputfile command dumps out the
DNS cache.
The netcdctrl -f -t $TYPE command flushes the cache.
Specify $TYPE as local, dns, nis, yp, ulm, or all.
ARP
- List ARP entries:
arp -a - There isn't an option to clear the entire ARGP cache but you may
delete an individual entry with
arp -d $HOST_OR_IP. This could be automated witharp -a | grep "stored"and then a script to delete
Example Script to Deny/Allow Packets on a port
#!/bin/ksh
WAS_PORT=9443
sample_intvl=20
curl_id=2172797
curl_msg="200 ok"
do_v6=0 # set to 1 if enabling firewall for IP V6 also
#------------------
# FUNCTIONS
show_usage()
{
echo "Usage: $0 [-p port] [-s sample_intvl][-F on|off]
echo "-p port\tspecifies the WAS port; default is 9443"
echo "-s sec\tspecifies how often in seconds to sample the port state"
echo "-F on/off\tManually turn on the firewall or turn off the firewall"
exit
}
create_filter()
{
genfilt -v4 -P $WAS_PORT -O eq -w I -a D -s 0 -m 0 -M 0 -D "Deny packets to port $WAS_PORT from all but loopback"
if [ "$do_v6" = 1 ]; then
genfilt -v6 -P $WAS_PORT -O eq -w I -a D -s 0 -m 0 -M 0 -D "Deny packets to port $WAS_PORT from all but loopback"
fi
}
chk_MFP_up()
{
while :; do
/usr/bin/netstat -an | /usr/bin/grep "\.$WAS_PORT .*LISTEN" >/dev/null
if [ $? != 0 ]; then
return
fi
sleep $sample_intvl
done
}
chk_url_ok()
{
while :; do
curl https://localhost:$WAS_PORT/api/adapter/is_okay?id=$curl_id | grep -i "$curl_msg" >/dev/null
if [ $? = 0 ]; then # 200_ok was returned
return
fi
sleep $sample_intvl
done
}
enable_firewall()
{
mkdev -l ipsec_v4 # enable IPsec kernel extension for IP V4
mkfilt -v4 -u # activate the filters
if [ "$do_v6" = 1 ]; then
mkdev -l ipsec_v6 # enable IPsec kernel extension for IP V4
mkfilt -v6 -u # activate the filters for IP V4
fi
}
disable_firewall()
{
rmfilt -v4 -d # disable the filter
rmdev -l ipsec_v4 # disable IPsec kernel extension
if [ "$do_v6" = 1 ]; then
rmfilt -v6 -d # disable the filter for IP V6
rmdev -l ipsec_v6 # disabl3 IPsec kernel extension for IP V6
fi
}
#--------------------------------------------------------
# MAIN PROGRAM
#
fw_state=""
while getopts p:s:F: flag; do
case $flag in
p) WAS_PORT=$OPTARG;;
s) sample_intvl=$OPTARG;;
F) fw_state=$OPTARG;;
\?) show_usage;;
esac
done
create_filter # create the filter at the beginning; okay if duplicate filter errmsg is returned
#
if [ "$fw_state" = "on" ]; then
enable_firewall
exit
elif [ "$fw_state" = "off" ]; then
disable_firewall
exit
fi
while :; do
chk_MFP_up
enable_firewall
chk_url_ok
disable_firewall
doneerror.h and errno.h
#define EPERM 1 /* Operation not permitted */
#define ENOENT 2 /* No such file or directory */
#define ESRCH 3 /* No such process */
#define EINTR 4 /* interrupted system call */
#define EIO 5 /* I/O error */
#define ENXIO 6 /* No such device or address */
#define E2BIG 7 /* Arg list too long */
#define ENOEXEC 8 /* Exec format error */
#define EBADF 9 /* Bad file descriptor */
#define ECHILD 10 /* No child processes */
#define EAGAIN 11 /* Resource temporarily unavailable */
#define ENOMEM 12 /* Not enough space */
#define EACCES 13 /* Permission denied */
#define EFAULT 14 /* Bad address */
#define ENOTBLK 15 /* Block device required */
#define EBUSY 16 /* Resource busy */
#define EEXIST 17 /* File exists */
#define EXDEV 18 /* Improper link */
#define ENODEV 19 /* No such device */
#define ENOTDIR 20 /* Not a directory */
#define EISDIR 21 /* Is a directory */
#define EINVAL 22 /* Invalid argument */
#define ENFILE 23 /* Too many open files in system */
#define EMFILE 24 /* Too many open files */
#define ENOTTY 25 /* Inappropriate I/O control operation */
#define ETXTBSY 26 /* Text file busy */
#define EFBIG 27 /* File too large */
#define ENOSPC 28 /* No space left on device */
#define ESPIPE 29 /* Invalid seek */
#define EROFS 30 /* Read only file system */
#define EMLINK 31 /* Too many links */
#define EPIPE 32 /* Broken pipe */
#define EDOM 33 /* Domain error within math function */
#define ERANGE 34 /* Result too large */
#define ENOMSG 35 /* No message of desired type */
#define EIDRM 36 /* Identifier removed */
#define ECHRNG 37 /* Channel number out of range */
#define EL2NSYNC 38 /* Level 2 not synchronized */
#define EL3HLT 39 /* Level 3 halted */
#define EL3RST 40 /* Level 3 reset */
#define ELNRNG 41 /* Link number out of range */
#define EUNATCH 42 /* Protocol driver not attached */
#define ENOCSI 43 /* No CSI structure available */
#define EL2HLT 44 /* Level 2 halted */
#define EDEADLK 45 /* Resource deadlock avoided */
#define ENOTREADY 46 /* Device not ready */
#define EWRPROTECT 47 /* Write-protected media */
#define EFORMAT 48 /* Unformatted media */
#define ENOLCK 49 /* No locks available */
#define ENOCONNECT 50 /* no connection */
#define ESTALE 52 /* no filesystem */
#define EDIST 53 /* old, currently unused AIX errno*/
/* non-blocking and interrupt i/o */
/*
* AIX returns EAGAIN where 4.3BSD used EWOULDBLOCK;
* but, the standards insist on unique errno values for each errno.
* A unique value is reserved for users that want to code case
* statements for systems that return either EAGAIN or EWOULDBLOCK.
*/
#if _XOPEN_SOURCE_EXTENDED==1
#define EWOULDBLOCK EAGAIN /* Operation would block */
#else /* _XOPEN_SOURCE_EXTENDED */
#define EWOULDBLOCK 54
#endif /* _XOPEN_SOURCE_EXTENDED */
#define EINPROGRESS 55 /* Operation now in progress */
#define EALREADY 56 /* Operation already in progress */
/* ipc/network software */
/* argument errors */
#define ENOTSOCK 57 /* Socket operation on non-socket */
#define EDESTADDRREQ 58 /* Destination address required */
#define EDESTADDREQ EDESTADDRREQ /* Destination address required */
#define EMSGSIZE 59 /* Message too long */
#define EPROTOTYPE 60 /* Protocol wrong type for socket */
#define ENOPROTOOPT 61 /* Protocol not available */
#define EPROTONOSUPPORT 62 /* Protocol not supported */
#define ESOCKTNOSUPPORT 63 /* Socket type not supported */
#define EOPNOTSUPP 64 /* Operation not supported on socket */
#define EPFNOSUPPORT 65 /* Protocol family not supported */
#define EAFNOSUPPORT 66 /* Address family not supported by protocol family */
#define EADDRINUSE 67 /* Address already in use */
#define EADDRNOTAVAIL 68 /* Can't assign requested address */
/* operational errors */
#define ENETDOWN 69 /* Network is down */
#define ENETUNREACH 70 /* Network is unreachable */
#define ENETRESET 71 /* Network dropped connection on reset */
#define ECONNABORTED 72 /* Software caused connection abort */
#define ECONNRESET 73 /* Connection reset by peer */
#define ENOBUFS 74 /* No buffer space available */
#define EISCONN 75 /* Socket is already connected */
#define ENOTCONN 76 /* Socket is not connected */
#define ESHUTDOWN 77 /* Can't send after socket shutdown */
#define ETIMEDOUT 78 /* Connection timed out */
#define ECONNREFUSED 79 /* Connection refused */
#define EHOSTDOWN 80 /* Host is down */
#define EHOSTUNREACH 81 /* No route to host */
/* ERESTART is used to determine if the system call is restartable */
#define ERESTART 82 /* restart the system call */
/* quotas and limits */
#define EPROCLIM 83 /* Too many processes */
#define EUSERS 84 /* Too many users */
#define ELOOP 85 /* Too many levels of symbolic links */
#define ENAMETOOLONG 86 /* File name too long */
/*
* AIX returns EEXIST where 4.3BSD used ENOTEMPTY;
* but, the standards insist on unique errno values for each errno.
* A unique value is reserved for users that want to code case
* statements for systems that return either EEXIST or ENOTEMPTY.
*/
#if defined(_ALL_SOURCE) && !defined(_LINUX_SOURCE_COMPAT)
#define ENOTEMPTY EEXIST /* Directory not empty */
#else /* not _ALL_SOURCE */
#define ENOTEMPTY 87
#endif /* _ALL_SOURCE */
/* disk quotas */
#define EDQUOT 88 /* Disc quota exceeded */
#define ECORRUPT 89 /* Invalid file system control data */
#define ECORRUPT 89 /* Invalid file system control data */
/* errnos 90-92 reserved for future use compatible with AIX PS/2 */
/* network file system */
#define EREMOTE 93 /* Item is not local to host */
/* errnos 94-108 reserved for future use compatible with AIX PS/2 */
#define ENOSYS 109 /* Function not implemented POSIX */
/* disk device driver */
#define EMEDIA 110 /* media surface error */
#define ESOFT 111 /* I/O completed, but needs relocation */
/* security */
#define ENOATTR 112 /* no attribute found */
#define ESAD 113 /* security authentication denied */
#define ENOTRUST 114 /* not a trusted program */
/* BSD 4.3 RENO */
#define ETOOMANYREFS 115 /* Too many references: can't splice */
#define EILSEQ 116 /* Invalid wide character */
#define ECANCELED 117 /* asynchronous i/o cancelled */
/* SVR4 STREAMS */
#define ENOSR 118 /* temp out of streams resources */
#define ETIME 119 /* I_STR ioctl timed out */
#define EBADMSG 120 /* wrong message type at stream head */
#define EPROTO 121 /* STREAMS protocol error */
#define ENODATA 122 /* no message ready at stream head */
#define ENOSTR 123 /* fd is not a stream */
#define ECLONEME ERESTART /* this is the way we clone a stream ... */
#define ENOTSUP 124 /* POSIX threads unsupported value */
#define EMULTIHOP 125 /* multihop is not allowed */
#define ENOLINK 126 /* the link has been severed */
#define EOVERFLOW 127 /* value too large to be stored in data type */Troubleshooting z/OS
z/OS often refers to a date in the form: 09.210. In this case, 09 are the last two digits of the year. 210 means it is the 210th day of year 2009; in this example, July 29, 2009.
Signals
Available signals may be listed with kill -l:
$ kill -l
1) SIGHUP 2) SIGINT 3) SIGABRT 4) SIGILL 5) SIGPOLL
6) SIGURG 7) SIGSTOP 8) SIGFPE 9) SIGKILL 10) SIGBUS
11) SIGSEGV 12) SIGSYS 13) SIGPIPE 14) SIGALRM 15) SIGTERM
16) SIGUSR1 17) SIGUSR2 19) SIGCONT 20) SIGCHLD 21) SIGTTIN
22) SIGTTOU 23) SIGIO 24) SIGQUIT 25) SIGTSTP 26) SIGTRAP
28) SIGWINCH 29) SIGXCPU 30) SIGXFSZ 31) SIGVTALRM 32) SIGPROF
33) SIGDANGERConsole Dump
A console dumps is a dump of one or more address spaces. Console dumps generally also contain a system trace for the entire LPAR. The simplest console dump is just of the root address space (1):
DUMP COMM=ASID1DMP- Reply with dump options:
R xx,ASID=1,SDATA=(ALLNUC,CSA,LPA,PSA,RGN,SQA,LSQA,TRT),END
High CPU
Review https://www.ibm.com/support/pages/mustgather-high-cpu-causing-hang-or-loop-running-zos
Sending messages to the MVS log and slip trapping on them
Messages may be sent to the joblog, MVS log, or both. If messages are sent to the MVS log, then you can use them for slip traps for dumps; however, be careful about overloading the MVS log with too many messages.
System Dumps
It's best to ensure a dump is produced with maximum memory for dbx (and IPCS) analysis. For example:
/CHNGDUMP SET,SYSMDUMP=(ALL,ALLNUC)
/CHNGDUMP SET,SDUMP,MAXSPACE=5000M
/DD ALLOC=ACTIVETo display current dump options:
/DISPLAY DUMP,OPTIONS
IEE857I 13.12.22 DUMP OPTION 813
SYSABEND- ADD PARMLIB OPTIONS SDATA=(LSQA,TRT,CB,ENQ,DM,IO,ERR,SUM),
PDATA=(SA,REGS,LPA,JPA,PSW,SPLS)
SYSUDUMP- ADD PARMLIB OPTIONS SDATA=(SUM), NO PDATA OPTIONS
SYSMDUMP- ADD OPTIONS (NUC,SQA,LSQA,SWA,TRT,RGN,LPA,CSA,SUM,ALLNUC,
GRSQ)
SDUMP- ADD NO OPTIONS,BUFFERS=00000000K,MAXSPACE=00005000M,
MSGTIME=99999 MINUTES,MAXSNDSP=015 SECONDS,
AUXMGMT=ON ,DEFERTND=NO ,OPTIMIZE=NO ,
MAXTNDSP=(,,) SECONDS
ABDUMP- TIMEENQ=0240 SECONDS IPCS
IPCS is the z/OS debugger used to analyze system dumps (similar to gdb or dbx on other operating systems). z/OS also has the dbx USS utility to investigate system dumps produced by C/C++ programs in a similar way to dbx/gdb on other platforms.
In IPCS, first, go to 0 DEFAULTS and set a source
dataset and press Enter. For example:
Source ==> DSNAME('ASSR1.JVM.BBOS001S.D210125.T211001.X001')Then press F3, and go to 6 COMMAND, type
ip st and press Enter. It may ask you if you want to use
summary data and type Y and press Enter. The dump should
now be initialized. F8 page down to get details about the dump and then
F3 to go back and enter various commands:
- General status report:
IP ST- Local time of the dump at the top
Program Producing Dump: ...- LPAR name follows
SNAME (NN)
- Dump request information:
IP LIST TITLE - If produced by a SLIP, list SLIP info:
IP LIST SLIPTRAP - z/OS version:
IP CBF CVT- Search for
PRODI.... HBB77C0
- Search for
- ASIDs dump:
IP CBF RTCT- ASIDs dumped in the
SDAScolumn underASTB
- ASIDs dumped in the
- ASID to JOBNAME translation:
IP SELECT ALL - Switch ASIDs:
IP SELECT ASID(x'nn')orIP SELECT JOB(jobname) - Potential abend information:
IP ST FAILDATA - History of abends:
IP VERBX LOGDATA - Show MVS console log:
IP VERBX MTRACE - Show native TCB thread stacks:
ip verbx ledata 'nthreads(*)' - Traceback for the specified TCB:
ip verbx ledata 'ceedump asid(188) tcb(0098CA48)' - List thread TCBs:
IP SUMM FORMATf "T C B S U M M A R Y"- Non-zero code in the CMP column is the abend code
- USS thread status (requires USS kernel address space):
ip omvsdata process detail - Display memory:
IP L 07208CE0 ASID(X'65') L(X'60') - Display memory as instructions:
IP L 07208CE0 ASID(X'65') L(X'60') I - Show system trace:
IP SYSTRACE ALL TIME(LOCAL)- Search for
RCVYfor processing error
- Search for
- Show system trace for a particular ASID:
IP SYSTRACE ASID(x'nn') TIME(LOCAL) - Show system trace for a particular ASID and TCB:
IP SYSTRACE ASID(x'0188') TCB(x'0098CA48') TIME(LOCAL) - Memory usage report:
ip verbx vsmdata 'summary noglobal' - Review captured CPU information by ASID:
SYSTRACE PERFDATA
VSMDATA
The VSMDATA
command IP VERBX VSMDATA 'ASID(NN) NOG SUM' (specifying the
ASID in decimal) displays a summary of LE native memory usage below the
2GB bar. The "User Region" is effectively the native heap (actually,
it's the LE heap which may be used by other components within the
process other than just JVM native heap usage). Subtracting "Ext. User
Region Start" from "Ext. User Region Top" provides roughly how much
native heap is being used under the 2GB bar. If "Ext. User Region Top"
is very close to the 2GB bar, then below-the-bar native memory
exhaustion is the likely cause of any native OutOfMemoryErrors. In the
following example, about 0x71346000 - 0x1F300000 = 0x52046000 (1.28GB)
of native memory is used below the bar and the top is very close to the
2GB bar and therefore this was a compressed references below-the-bar
exhaustion NOOM.
LOCAL STORAGE MAP
___________________________
| |80000000 <- Top of Ext. Private
| Extended |
| LSQA/SWA/229/230 |7F600000 <- Max Ext. User Region Address
|___________________________|71367000 <- ELSQA Bottom
| |
| (Free Extended Storage) |
|___________________________|71346000 <- Ext. User Region Top
| |
| Extended User Region |
|___________________________|1F300000 <- Ext. User Region Start
: :
: Extended Global Storage :
=======================================<- 16M Line
: Global Storage :
:___________________________: A00000 <- Top of Private
| |
| LSQA/SWA/229/230 | 986000 <- Max User Region Address
|___________________________| 931000 <- LSQA Bottom C/C++
The C/C++ compilers on z/OS are provided by the XLC package. The USS
utility c89
is often used to compile C programs and the USS utility c++
is often used to compile C++ programs. Note that for
XLC c++:
Except for the -W, -D, and -U flag options, all flag options that are supported by the c89 utility are supported by the xlc utility with the same semantics.
As with other operating systems, it's generally advised to compile
C/C++ programs with symbol information for serviceability purposes when
diagnosing crashes. In general, most compiler optimizations are still
performed when using the -g1 option and this is generally
recommended. The -g
c89 options map to the DEBUG
options. If -g1 provides insufficient information, try
-g9 although optimizations will be more affected.
Whether the compiler is run from USS or TSO impacts the default options used:
invoking the compiler with the c89 and xlc utilities overrides the default values for many options, compared to running the compiler in MVS batch or TSO
There is an example C++ program to test compilation: https://www.ibm.com/support/knowledgecenter/SSLTBW_2.4.0/com.ibm.zos.v2r4.cbcux01/cppshell.htm
If your C++ files use the .cpp extension, then run
export _CXX_CXXSUFFIX=cpp.
dbx
The dbx
USS utility is an alternative to using IPCS for C/C++ programs. Load the
dump with the -C option and pass the data set name. For
example:
$ dbx -C "//'SF.T00468.S3609.BOSS0030.DUMP1'"Then use the where command to show the backtrace.
Common commands:
- List address spaces:
asid - List all threads:
thread - Change the current thread:
thread current N - List loaded shared libraries:
map - List known processes:
pid - Display registers:
registers - Generate copy/paste commands for all threads:
for i in $(seq 1 164); do echo "thread current ${i}"; echo where; echo "TRASH: THREAD ${i}"; done
LE Native Memory
Environment variables may be used to control memory pools and print memory statistics; for example:
export _CEE_RUNOPTS="$_CEE_RUNOPTS HEAPPOOLS(ON) HEAPPOOLS64(ON) RPTOPTS(ON) RPTSTG(ON)"Troubleshooting IBM i
Gathering Javacores using WRKJVMJOB
Gathering Javacores is covered in the IBM i Operating System chapter.
Signals
Available signals may be listed with kill -l:
$ kill -l
1) SIGHUP 2) SIGINT 3) SIGQUIT 4) SIGILL 5) SIGTRAP
6) SIGABRT 7) SIGEMT 8) SIGFPE 9) SIGKILL 10) SIGBUS
11) SIGSEGV 12) SIGSYS 13) SIGPIPE 14) SIGALRM 15) SIGTERM
16) SIGURG 17) SIGSTOP 18) SIGTSTP 19) SIGCONT 20) SIGCHLD
21) SIGTTIN 22) SIGTTOU 23) SIGIO 24) SIGXCPU 25) SIGXFSZ
27) SIGMSG 28) SIGWINCH 29) SIGPWR 30) SIGUSR1 31) SIGUSR2
32) SIGPROF 33) SIGDANGER 34) SIGVTALRM 35) SIGMIGRATE 36) SIGPRE
37) SIGVIRT 38) SIGALRM1 39) SIGWAITING 50) SIGRTMIN 51) SIGRTMIN+1
52) SIGRTMIN+2 53) SIGRTMIN+3 54) SIGRTMAX-3 55) SIGRTMAX-2 56) SIGRTMAX-1
57) SIGRTMAX 59) SIGCPUFAIL 60) SIGKAP 61) SIGRETRACT 62) SIGSOUND
63) SIGSAKTroubleshooting Windows
Common Commands
- Query Windows Version: ver
- Query host name: hostname
- Show all processes: tasklist /svc
- Kill process: taskkill /PID %PID%
- Run a process as a system account: psexec -i -s ... (https://docs.microsoft.com/en-us/sysinternals/downloads/psexec)
Batch Scripts
Batch scripts execute a sequence of commands. They are files that
usually end in the .bat or .cmd
extensions.
Example Batch Script
:: Launcher script
:: Comments start with ::
@echo off
set TITLE=Tool Launcher
title %TITLE%
echo %TITLE%
set PATH=C:\Java\bin;%PATH%
echo Launching the tool. This may take a few minutes depending on available resources.
C:\Eclipse\eclipsec.exe -consoleLog
echo(
echo Tool completed. Press any key to end this prompt.
echo(
pauseDelayed variable expansion
Delayed environment variable expansion is disabled by default which
means that variable evaluation only occurs once. From
help set:
Delayed environment variable expansion is useful for getting around the limitations of the current expansion which happens when a line of text is read, not when it is executed.
To always evaluate the latest value, use
SETLOCAL ENABLEDELAYEDEXPANSION and then reference
environment variables with ! instead of %. For
example:
SETLOCAL ENABLEDELAYEDEXPANSION
set "workdir=!APPDATA!"
if "!USERDOMAIN!" == "MYDOMAIN" (
set "workdir=E:\!USERNAME!"
if not exist "!workdir!" mkdir "!workdir!"
)
pushd !workdir!
echo [!date! !time!] Current working directory is !workdir!
popdPowerShell
Start
PowerShell from a command prompt: > PowerShell
Run a single command with -command and exit
examples:
powershell -command "gcim Win32_OperatingSystem"powershell -command "Get-WmiObject -Query \"Select PoolNonpagedAllocs, PoolNonpagedBytes, PoolPagedAllocs, PoolPagedBytes, PoolPagedResidentBytes from Win32_PerfRawData_PerfOS_Memory\""
gcim
Kernel Information
PS C:\Windows\system32> gcim Win32_OperatingSystem | fl *
Status : OK
Name : Microsoft Windows Server 2016 Datacenter|C:\Windows|\Device\Harddisk1\Partition2
FreePhysicalMemory : 29066692
FreeSpaceInPagingFiles : 2097152
FreeVirtualMemory : 30955508
[...]
LastBootUpTime : 10/18/2020 3:15:34 AM
LocalDateTime : 10/19/2020 12:13:26 PM
MaxNumberOfProcesses : 4294967295
MaxProcessMemorySize : 137438953344
[...]
TotalSwapSpaceSize :
TotalVirtualMemorySize : 35651016
TotalVisibleMemorySize : 33553864
Version : 10.0.14393
BootDevice : \Device\HarddiskVolume2
BuildNumber : 14393
[...]
OSArchitecture : 64-bitMemory Information
PS C:\Windows\system32> Get-WmiObject -Query "Select * from Win32_PerfRawData_PerfOS_Memory"
[...]
AvailableBytes : 29771300864
AvailableKBytes : 29073536
AvailableMBytes : 28392
CacheBytes : 94912512
CacheBytesPeak : 99270656
CacheFaultsPersec : 2821370
CommitLimit : 36506640384
CommittedBytes : 4798459904
DemandZeroFaultsPersec : 27014186
Description :
FreeAndZeroPageListBytes : 24855367680
FreeSystemPageTableEntries : 12296228
Frequency_Object : 0
Frequency_PerfTime : 2045851
Frequency_Sys100NS : 10000000
LongTermAverageStandbyCacheLifetimes : 14400
ModifiedPageListBytes : 89337856
PageFaultsPersec : 43331932
PageReadsPersec : 266395
PagesInputPersec : 1596682
PagesOutputPersec : 0
PagesPersec : 1596682
PageWritesPersec : 0
PercentCommittedBytesInUse : 564533688
PercentCommittedBytesInUse_Base : 4294967295
PoolNonpagedAllocs : 512164
PoolNonpagedBytes : 278237184
PoolPagedAllocs : 656935
PoolPagedBytes : 466354176
PoolPagedResidentBytes : 458170368
StandbyCacheCoreBytes : 0
StandbyCacheNormalPriorityBytes : 2499997696
StandbyCacheReserveBytes : 2415935488
SystemCacheResidentBytes : 0
SystemCodeResidentBytes : 0
SystemCodeTotalBytes : 0
SystemDriverResidentBytes : 15638528
SystemDriverTotalBytes : 18214912
Timestamp_Object : 0
Timestamp_PerfTime : 244291819761
Timestamp_Sys100NS : 132476163452030000
TransitionFaultsPersec : 14197071
TransitionPagesRePurposedPersec : 0
WriteCopiesPersec : 411112Windows Management Instrumentation (WMI)
Windows Management Instrumentation (WMI) is an interface to access administrative information.
wmic
wmic is a command line interface to WMI.
wmic get free RAM
>wmic os get freePhysicalMemory
FreePhysicalMemory
29227280Update the hosts file
- Start an editor such as Notepad as Administrator
- Open the file
%WinDir%\System32\Drivers\Etc\hosts(supercedes the holderlmhostsfile) - Edit and save
Request thread dump
See Troubleshooting IBM Java - in particular, you may use Java Surgery to take thread dumps on IBM Java.
Request core dump (also known as a "system dump" for IBM Java)
Additional methods of requesting system dumps for IBM Java are documented in the Troubleshooting IBM Java and Troubleshooting WAS chapters.
- On Windows, start Task Manager, right click on the process, click Create Dump File. You can find the right process by adding the PID column, and finding the PID from SystemOut.log or the %SERVER%.pid file in the logs directory.
- procdump: https://docs.microsoft.com/en-us/sysinternals/downloads/procdump
- On Windows, userdump.exe %PID%: http://www-01.ibm.com/support/docview.wss?uid=swg21138203#userdump
Minidump versus Full User Mode Dump
The name "minidump" is misleading, because the largest minidump files actually contain more information than the "full" user-mode dump. (https://msdn.microsoft.com/en-us/library/windows/hardware/ff552212(v=vs.85).aspx)
Request core dump from Task Manager
- Find the right process, e.g. by process ID (PID)
- Right click } Create dump file:

- Navigate to the dump file directory:

EXE has stopped working
If you receive the following popup with the message, "A problem caused the program to stop working correctly. Please close the program.":

Then before clicking "Close the program," you may create a dump of the process:
- Open Task Manager
- Find the process } Right Click } Create dump file

Determine the Current Working Directory of a Process
- Download Microsoft's free Process Explorer tool: https://technet.microsoft.com/en-us/sysinternals/processexplorer.aspx
- Unzip and start procexp.exe
- Find the java process, right click and click Properties:

- Find the value of "Current directory":

Determine the File Locations of stdout and stderr
- Install Microsoft's free handle tool: https://technet.microsoft.com/en-us/sysinternals/handle.aspx
- Unzip and open a command prompt to the directory with the unzipped
files and run the tool to list all open handles for all processes:
> cd "C:\Downloads\Handle\"
> handle.exe - Search the output for the java.exe section for the target process
ID. For example:
java.exe pid: 4852 [...]
C: File (R--) C:\work\stderr.txt
[...] - The left-most value is a hexadecimal number representing the file handle. Stdin is A, Stdout is B, and Stderr is C (https://msdn.microsoft.com/en-us/library/windows/desktop/ms683231(v=vs.85).aspx); however, we have observed that sometimes stdout is not B, but instead there are multiple handles in the D to FF range (unclear why).
Find who killed a process
- Install gflags.exe from Microsoft
- Enable Silent process exit monitoring: https://docs.microsoft.com/en-us/windows-hardware/drivers/debugger/registry-entries-for-silent-process-exit
- Reproduce the issue
- Review the silent process exit monitoring entry in the Windows Event Log
Error: No buffer space available (maximum connections reached?)
This error can occur particularly around socket operations. The error is translated from the Winsock error code WSAENOBUFS, 10055. The most common cause of this error is that Windows is configured for the default maximum of 5,000 in-use ports. This can be monitored by watching netstat or Perfmon and can be changed with the MaxUserPort registry parameter.
A more advanced cause for this error is non-paged pool exhaustion. The paged and nonpaged pools are areas of memory for certain Windows kernel-mode allocations such as the Windows kernel itself (e.g. sockets, socket buffers, etc.), device drivers, etc. The nonpaged pool is particularly important as "it is the availability of nonpaged pool that determines how many processes, threads, and other such objects can be created" (MS link defunct). If these pools are exhausted, this can lead to crashes, poor performance, application problems, and paging.
If the system is using the /3GB mode, this comes at a cost of taking memory away from the kernel, including paged and non-paged pools.
To determine if this is the proximate cause, use Perfmon to monitor the Memory\Pool Nonpaged Bytes counter. If this is hitting the server's nonpaged pool limit (within a few MB since Perfmon is sampling on an interval), then this is the cause of the problem. However, this proximate cause may not be the root cause since the nonpaged pool exhaustion may be due to a nonpaged pool leak. A nonpaged pool leak can be determined using Microsoft's PoolMon.
To increase kernel memory, lower the user-mode address space limit (/USERVA=X). The /3GB switch is effectively the same as /USERVA=3072; for example, /USERVA=2800. This parameter would be used instead of /3GB. The documentation is not clear on how the additional space is allocated to the nonpaged pool and to what limits -- monitor your current and maximum nonpaged pool sizes with process explorer and work with Microsoft support to properly tune this value.
Query using PowerShell:
PS C:\Windows\system32> Get-WmiObject -Query "Select PoolNonpagedAllocs, PoolNonpagedBytes, PoolPagedAllocs, PoolPagedBytes, PoolPagedResidentBytes from Win32_PerfRawData_PerfOS_Memory"
[...]
PoolNonpagedAllocs : 500237
PoolNonpagedBytes : 276725760
PoolPagedAllocs : 635578
PoolPagedBytes : 461209600
PoolPagedResidentBytes : 453271552windbg
Useful commands:
- Command help: .hh %COMMAND%
- Interrupt a long running command: Ctrl+Break
- Clear output: .cls
- Write output to file: .logopen %SOMEFILE%
- Show modules the process has in memory: lmf
- Confirm if symbols are loaded for MODULE.dll: ld MODULE
- If you see "Defaulted to export symbols for MODULE.dll," then symbols were not found or did not match.
- List all virtual memory regions: !address
- Virtual memory info: !address -summary
- List all native heaps: !heap -s
- List details of a heap (ID from first column in !heap -s): !heap -stat -h <Heap ID>
- Given a UserPtr and EXE has gflags +ust, dump stack: !heap -p -a <UserPtr>
- Was gflags set: !gflag
- Dump memory at an arbitrary address: db 0x123...
- Show where symbols are found: lm
- Show checksum: !lmi MODULE
- Module information: !dh MODULE
- Show why symbols can't be found: !sym noisy; .reload /f
- Try to load symbols for a particular module (take the name from lmf): ld %MODULE%
- See if DLL and PDB match: !chksym MODULE
- NOTE: If a DLL is compiled in "Release" mode (which most are), then you will not see line numbers or parameters even if the PDB has private symbols.
Symbols
The symbol path is a semicolon delimited list of directories containing symbol (PDB) files. A special case path is of the form srv*%DIR%*%WEBSERVER% which specifies an HTTP(S) symbol server. This is most often used to download Windows symbols from Microsoft. If the %DIR% does not exist, it is created.
Simple symbol path with just kernel symbols:
0:000> .sympath srv*C:\symbols\*http://msdl.microsoft.com/download/symbols
0:000> .reload /fFor example, a common path which includes WebSphere and Java symbols:
0:000> .sympath C:\Program
Files\IBM\WebSphere\AppServer\lib\native\win\x86_64\;C:\Program
Files\IBM\WebSphere\AppServer\java\8.0\jre\bin\compressedrefs\;C:\Program
Files\IBM\WebSphere\AppServer\java\8.0\jre\bin\j9vm\;C:\Program
Files\IBM\WebSphere\AppServer\bin\;srv*C:\symbols\*http://msdl.microsoft.com/download/symbols
0:000> .reload /f
It is common to see a checksum warning when loading modules:
*** WARNING: Unable to verify checksum for ...In general, this warning can be safely disregarded. If you would like
to resolve the warning, run editbin /release module.dll: https://msdn.microsoft.com/en-us/library/tst6zb25.aspx
To display detail symbol loading information:
0:000> !sym noisy
noisy mode - symbol prompts on
0:000> .reload /fCheck if symbols were correctly loaded for a module by searching for MATCH:
0:000> !chksym module
module.dll...
pdb: ...\module.pdb
pdb sig: EDD67653-11E7-483C-8D6D-E629DC820CC1
age: 2
Loaded pdb is ...\module.pdb
module.pdb
pdb sig: EDD67653-11E7-483C-8D6D-E629DC820CC1
age: 2
MATCH: module.pdb and module.dllIf symbols were not loaded, you may various errors such as "sig MISMATCH." In the following example, the PDB file has a signature of E98..., whereas the DLL has a signature of 0.
0:000> !chksym mymodule
mymodule.dll
Timestamp: 54415058
SizeOfImage: 7000
pdb sig: 0
age: 0
Loaded pdb is ...\mymodule.pdb
getClasses.pdb
pdb sig: E98AF532-F9C8-4205-9E83-0512360C6C93
age: 0
sig MISMATCH: mymodule.pdb and mymodule.dllSymbol loading options may be displayed:
0:000> .symopt
Symbol options are 0x30237:Symbol loading options may be updated. For example, to use SYMOPT_LOAD_ANYTHING:
0:000> .symopt +0x40
Symbol options are 0x30277:After changing symbol loading options, you may need to reload symbols
with .reload /f or reload a particular module with
.reload /f module.dll
Process and Thread Info
Show process information:
0:000> |List threads:
0:000> ~Current thread:
0:000> ~.Crashing thread:
0:000> ~#Display when a thread was created and how much user and kernel time it has used:
0:000> .ttime
Created: Fri Oct 6 05:13:34.194 2017 (UTC - 4:00)
Kernel: 0 days 0:00:00.046
User: 0 days 0:00:00.062Current thread stack:
0:000> knStacks for all threads:
0:000> ~*knTo find the crashing thread from an IBM Java core dump, use jdmpview or IDDE:
> !gpinfo | grep Failing
Failing Thread: !j9vmthread 0x409e000
Failing Thread ID: 0xa048 (41032)Take the hexadecimal thread ID (without 0x) and change
the current thread in windbg and then print the stack:
0:000> ~~[a048]s
0:000> knTo switch to a particular frame and show its registers:
0:000> .frame /r 11To display locals:
0:000> dvTo dump details about a variable:
0:000> dt somevariableTo disassemble a function:
0:000> uf MODULE!SYMBOLNote that the registers on the frame that crashed might be strange because they may have been hijacked by the signal handler to create the core dump, so you'll have to check what the registers were on that frame in the javacore::
1XHREGISTERS Registers:
2XHREGISTER RDI: 0000D07C00000000
2XHREGISTER RSI: 00000000000079D0
2XHREGISTER RAX: 0000000000000000[...]If needed, replace "2XHREGISTER" with "r" and ":" with "=" for all register lines except XMM* and apply them in windbg on the .frame:
0:000> r RDI= 0000D07C00000000
0:000> r RSI= 00000000000079D0
0:000> r RAX= 0000000000000000 [...]Crash Dump Analysis
0:000> !analyze -vVirtual Address Space (!address)
Use !address to print all virtual memory allocations. Only Windows symbols are required to execute this:
windbg.exe > File > Open Crash Dump... > Select .dmp file > Save Information for Workspace? = No
0:000> .sympath srv*C:\symbols\*http://msdl.microsoft.com/download/symbols
0:000> .reload /f
0:000> .logopen c:\windbg.txt
0:000> !address
BaseAddress EndAddress+1 RegionSize Type State Protect Usage
----------------------------------------------------------------------------------------------------------------------
* 0`00000000 0`00010000 0`00010000 MEM_FREE PAGE_NOACCESS Free
* 0`00010000 0`00020000 0`00010000 MEM_MAPPED MEM_COMMIT PAGE_READWRITE Heap [Handle: 10000]...The following script may be used to analyze the output of !address: https://raw.githubusercontent.com/kgibm/problemdetermination/master/scripts/windows/windbgaddress.pl
Native memory heaps (!heap)
Use !heap -s to print statistics on all native memory
heaps. Only Windows symbols are required to execute this:
windbg.exe > File > Open Crash Dump... > Select .dmp file > Save Information for Workspace? = No
0:000> .sympath srv*C:\symbols\*http://msdl.microsoft.com/download/symbols
0:000> .reload /f
0:000> !heap -s
LFH Key : 0x000000911bae555a
Termination on corruption : ENABLED
Heap Flags Reserv Commit Virt Free List UCR Virt Lock Fast
(k) (k) (k) (k) length blocks cont. heap
-------------------------------------------------------------------------------------
0000000000260000 00000002 3593912 1920496 3593912 855294 6524 1953 66 72ea LFH
External fragmentation 44 % (6524 free blocks)
Virtual address fragmentation 46 % (1953 uncommited ranges)
0000000000010000 00008000 64 4 64 2 1 1 0 0...In general, "External fragmentation" is the most interesting fragmentation number and calculates how much free space is available between active allocations. In this example, 0.44 * 3,593,912 = 1.5GB.
Printing all heap segments for a particular heap identifier will show the address ranges of virtual allocations:
0:000> !heap -m -h 260000
Index Address Name Debugging options enabled
1: 00260000
Segment at 0000000000260000 to 000000000035f000 (000ff000 bytes committed)
Segment at 0000000001e70000 to 0000000001f6f000 (000ff000 bytes committed)...Printing detailed heap statistics will show a histogram of free block sizes:
0:000> !heap -f -stat -h 260000
0: Heap 0000000000260000
Flags 00000002 - HEAP_GROWABLE
Reserved memory in segments 5342216 (k)
Commited memory in segments 1609368 (k)
Virtual bytes (correction for large UCR) 1653528 (k)
Free space 576170 (k) (5196 blocks)
Default heap Front heap Unused bytes
Range (bytes) Busy Free Busy Free Total Average
------------------------------------------------------------------
0 - 1024 2253 2599 3610 24459 154847577 26410
1024 - 2048 2192 8 74 1265 1685388810 743772
2048 - 3072 132 40 48 4882 150789 837...The output of !address will also print the heap for each of the virtual allocations. If investigating exhaustion of some space (e.g. underneath 4GB), then review the heaps used in that space.
Dump virtual memory
The db command accepts a start and end address:
0:000> db 0xffb1d000 0xffb24000
00000000`ffb1d000 00 00 00 00 00 00 00 00-36 dd f3 85 a6 da fc 00 ........6.......
00000000`ffb1d010 10 70 ac 57 00 00 00 00-30 20 65 1d 00 00 00 00 .p.W....0 e.....Native Stack Sizes
It appears that Windows will allocate 1MB of virtual stack space for every thread even if a program requests less: "The default stack reservation size used by the linker is 1 MB." (https://msdn.microsoft.com/en-ca/library/windows/desktop/ms686774(v=vs.85).aspx).
For example, on recent versions of IBM Java, the default maximum stack size (-Xss) is 256KB or 512KB (http://www.ibm.com/support/knowledgecenter/SSYKE2_8.0.0/com.ibm.java.win.80.doc/diag/appendixes/cmdline/Xss.html); however, a userdump in windbg showed:
0:000> !address
BaseAddress EndAddress+1 RegionSize Usage...
* 0`f0560000 0`f05a0000 0`00040000 Stack [338.55e0; ~1450]
* 0`f0660000 0`f06a0000 0`00040000 Stack [338.5be8; ~1448]...For example, the stack @ 0xf0560000 has a region size of 256KB; however, the next stack doesn't start until 756KB later.
Thread stacks may also be printed with the !threads command:
0:000> !threads
Index TID TEB StackBase StackLimit DeAlloc StackSize ThreadProc...
1637 0000000000004c24 0x000007fff0736000 0x00000000f15c0000 0x00000000f15bc000 0x00000000f14c0000 0x0000000000004000 0x0
Total VM consumed by thread stacks 0x1997f000In this example, we can also see that StackBase-DeAlloc = 1MB.
Module
List all loaded modules:
0:000> lmf
start end module name
00000000`00400000 00000000`0042f000 java C:\...\java\bin\java.exe
00000000`77750000 00000000`7786f000 kernel32 C:\Windows\System32\kernel32.dll...Dump flags
The information in a dump is controlled with the MINIDUMP_TYPE enumeration: https://msdn.microsoft.com/en-us/library/windows/desktop/ms680519(v=vs.85).aspx
This may be queried on an existing dump with .dumpdebug (see the "Flags" line):
0:000> .dumpdebug
----- User Mini Dump Analysis
MINIDUMP_HEADER:
Version A793 (6804)
NumberOfStreams 7
Flags 2
0002 MiniDumpWithFullMemoryFrame Pointer Omission (FPO)
There is a compiler optimization called Frame Pointer Omission (/Oy) which speeds up function calls: https://msdn.microsoft.com/en-us/library/2kxx5t2c.aspx
However, this breaks stack walker. Microsoft Visual C++ 2005 enabled this optimization by default but it was later disabled by default in Visual C++ 2005 SP1, therefore, it is a best practice to avoid FPO.
Check if FPO is used by an EXE or DLL:
dumpbin.exe /fpo %MODULE%If there are "FPO Data" lines, then it is used.
Debug and Release Modules
In general, Microsoft compilers provide two compilation configurations: Debug and Release. These supply different compiler and linker parameters such as optimization levels and linking to different libraries. These are simply default sets of configurations, and it is possible to change all of the flags of a "release" build to make it a "debug" build. The salient point here is that a module such as a DLL or EXE may perform worse with Debug optimization flags (whether due to using the Debug configuration or by explicitly using /Od, /MTd, etc.). It is not easy to check a final DLL or EXE to understand its optimization level. One technique is to see if it links with debug versions of commonly used libraries such as VC, MFC, or ATL. For example, use a dependency walker to see if the module depends on MSVCRTD.DLL. However, this is not proof as it is possible to create a fully optimized module that links to a debug version of one of these libraries. Another technique is to search the module for references to functions only called with _DEBUG or NDEBUG #defined, such as assert.
Symbols
Symbols match hexadecimal addresses to human readable descriptions from the original source code, such as 0x12345678 is the function foo. Symbols are required when analyzing native artifacts such as process core dumps (userdumps). Windows EXEs and DLLs do not contain symbol information, but instead the symbols are placed into PDB files, normally with the same name and in the same directory as the EXE or DLL. PDBs should always be built, even for release-optimized modules:
"Generating PDB files for release executables does not affect any optimizations, or significantly alter the size of the generated files... For this reason, you should always produce PDB files, even if you don't want to ship them with the executable." (https://msdn.microsoft.com/en-us/library/ee416588(v=vs.85).aspx)
To generate symbols, add the /Zi compiler flag: https://msdn.microsoft.com/en-us/library/958x11bc.aspx
While not generally recommended, if you would like to name the PDB file something other than MODULE.pdb, use /Fd: https://msdn.microsoft.com/en-us/library/9wst99a9.aspx
If you have separate compile and link steps, in addition to the compiler /Zi flag, you must also add the linker /DEBUG flag: https://msdn.microsoft.com/en-us/library/xe4t6fc1.aspx. Note that the term "DEBUG" in this context has nothing to do with /D _DEBUG, /Od, /MTd or other "Debug" compiler configurations, but instead simply "puts the debugging information into a program database (PDB)." In fact, the linker will update the PDB file created by the compiler through the /Zi flag, so both are required.
Often, symbols will not be distributed with EXEs and DLLs simply to reduce the size of installer packages. Windows itself does not ship with PDBs. However, if the additional size of PDBs of EXEs and DLLs is marginal, then we recommend that you ship the PDBs with the EXEs and DLLs. IBM Java ships PDBs with each build (http://www-01.ibm.com/support/docview.wss?uid=swg1IV50063), and WAS is working on adding PDBs to all of its DLLs (http://www-01.ibm.com/support/docview.wss?uid=swg1PM85208).
While Windows symbols can be downloaded for a particular build (see retail symbols in https://msdn.microsoft.com/en-us/windows/hardware/gg463028), in general, it is better to use the Microsoft Symbol Server which will download any matching symbols on demand. If you are debugging a core dump from a machine other than your own that is running a different version of Windows, then using the Microsoft Symbol Server is the best approach:
The common Microsoft debugging tools use the SymSrv technology if you provide the correct symsrv syntax in the _NT_SYMBOL_PATH environment variable. These tools automatically include whatever you provide in the variable as the symbol path.
You can set this variable as a system variable or as a user environment variable. To do this from the desktop, right-click My Computer, and then click Properties. On the Advanced tab, click Environment Variables.
You can also set this variable temporarily at a command prompt. In this way, all applications that you start through the command prompt inherit this setting.
https://support.microsoft.com/kb/311503 and https://msdn.microsoft.com/en-us/library/windows/hardware/ff558829(v=vs.85).aspx
Example:
> set _NT_SYMBOL_PATH = SRV*c:\symbols\*http://msdl.microsoft.com/download/symbols
> windbgIn the above example, symbols downloaded from the symbol server will be cached locally in the c:\symbols\ folder for future use.
For WAS, assuming WAS in C:\Program Files\IBM\WebSphere\AppServer, an example sympath would be:
C:\Program Files\IBM\WebSphere\AppServer\bin;C:\Program Files\IBM\WebSphere\AppServer\java\jre\bin\;C:\Program Files\IBM\WebSphere\AppServer\java\jre\bin\j9vm\;C:\Program Files\IBM\WebSphere\AppServer\bin\;srv*C:\symbols\*http://msdl.microsoft.com/download/symbols
If the machine does not have internet access, you can run "symchk /om" to get a list of symbols that are needed, then download that set of symbols from a machine that does have internet access using "symchk /im" and then copy the symbols over.
If you do not want to ship PDB symbols, then you should still save PDBs for each build and make them available to support engineers. Ideally, these can be offered through a custom symbol server:
"Setting up a symbol server on your own local network is as simple as creating a file share on a server... To add, delete or edit files on a symbol server share, use the symstore.exe tool." (https://msdn.microsoft.com/en-us/library/ee416588(v=vs.85).aspx)
For external use, an HTTP symbol server can be setup using IIS on top of the symbol directory.
You can find all the PDBs in a directory using *.pdb in explorer.exe search or from a command line (https://technet.microsoft.com/pt-pt/library/cc754900(v=ws.10).aspx):
for /r %i in (*) do @echo %ftzai | findstr pdbAnother way to see if a PDB file is corrupt (https://msdn.microsoft.com/en-us/library/windows/hardware/ff560157(v=vs.85).aspx and https://msdn.microsoft.com/en-us/library/windows/desktop/ee416588(v=vs.85).aspx):
> "C:\Program Files (x86)\Windows Kits\8.0\Debuggers\x64\symchk.exe" /v module.dll /s DIRECTORYWITHPDB
Success: DBGHELP: private symbol & lines
Failure: FAILED - built without debugging informationSee if a PDB file is corrupt:
> "C:\Program Files (x86)\Windows Kits\8.0\Debuggers\x66\pdbcopy.exe" somefile.pdb test.pdb -p
Can't open pdb file...Error: EC_CORRUPTDesktop Heap
Windows Desktop Heaps are limited areas of virtual memory allocated for programs that use functions in user32.dll: "The desktop heap stores certain user interface objects, such as windows, menus, and hooks. When an application requires a user interface object, functions within user32.dll are called to allocate those objects. If an application does not depend on user32.dll, it does not consume desktop heap." (https://blogs.msdn.microsoft.com/b/ntdebugging/archive/2007/01/04/desktop-heap-overview.aspx, https://support.microsoft.com/kb/184802).
BIOS and UEFI
BIOS and UEFI are firmware for launching the operating system. BIOS is often accessed through a hotkey during boot. In some cases, UEFI cannot be access through a hotkey during boot and instead is accessed with:
- Windows 8: Start } Settings } Change PC Settings } General } Advanced startup } Restart Now } Troubleshoot } Advanced options } UEFI Firmware Settings } Restart
- Windows 10/11: Start } Settings } Update & Security } Recovery } Advanced startup } Restart now } Troubleshoot } Advanced options } UEFI Firmware Settings } Restart
Hosts file
The hosts
file is located at
%WinDir%\System32\drivers\etc\hosts
A non-comment line is an IP address followed by whitespace followed by the hostname.
Signals
Windows supports a subset of POSIX C signals:
- SIGINT (2)
- SIGILL (4)
- SIGABRT (6)
- SIGFPE (8)
- SIGSEGV (11)
- SIGTERM (15)
- SIGBREAK (21)
Troubleshooting macOS
Signals
Available signals may be listed with kill -l:
$ kill -l
1) SIGHUP 2) SIGINT 3) SIGQUIT 4) SIGILL 5) SIGTRAP
6) SIGABRT 7) SIGEMT 8) SIGFPE 9) SIGKILL 10) SIGBUS
11) SIGSEGV 12) SIGSYS 13) SIGPIPE 14) SIGALRM 15) SIGTERM
16) SIGURG 17) SIGSTOP 18) SIGTSTP 19) SIGCONT 20) SIGCHLD
21) SIGTTIN 22) SIGTTOU 23) SIGIO 24) SIGXCPU 25) SIGXFSZ
26) SIGVTALRM 27) SIGPROF 28) SIGWINCH 29) SIGINFO 30) SIGUSR1
31) SIGUSR2xattr
Files downloaded from the internet have a quarantine flag automatically added that may cause security issues. Open a terminal and run:
xattr -d com.apple.quarantine *
xattr -d com.apple.metadata:kMDItemWhereFroms *Core Dumps
By default, crashes are summarized in *.crash files in
~/Library/Logs/DiagnosticReports (or
/Library/Logs/DiagnosticReports) and they may be read with
a text editor or opened with the Console application.
To create full core dumps, ensure the /cores/ directory
exists and is writable by the user creating the dump. By default,
/cores/ is only writable by the root or wheel users:
drwxr-xr-x 2 root wheel 64 Aug 24 2019 coresTo make it writable:
sudo chmod a+rwx /cores/The location of core dumps is controlled with
kern.corefile:
% sudo sysctl -a | grep kern.corefile
kern.corefile: /cores/core.%PIn addition, ensure that the core ulimit is unlimited. By default, the soft limit is 0 which means cores are not created (unless it's a program that increases the limit from hard to soft at runtime):
% ulimit -a
-c: core file size (blocks) 0
% ulimit -aH
-c: core file size (blocks) unlimitedTo set the core dump soft and hard ulimits to unlimited by default, apply the following and restart:
sudo /usr/libexec/PlistBuddy /Library/LaunchDaemons/corelimit.plist -c "add Label string com.launchd.corelimit" -c "add ProgramArguments array" -c "add ProgramArguments: string launchctl" -c "add ProgramArguments: string limit" -c "add ProgramArguments: string core" -c "add ProgramArguments: string unlimited" -c "add RunAtLoad bool true" -c "add ServiceIPC bool false"You may also need to add the user creating the dump to the
wheel group. First check whether your user is a member of
wheel:
groupsIf not, add to wheel:
sudo dseditgroup -o edit -a $USER -t user wheellldb
Process Thread dump
The equivalent of pstack is to use lldb to
print all thread stacks. For example:
% echo "thread backtrace all" | lldb -p $PID
* thread #1, queue = 'com.apple.main-thread', stop reason = signal SIGSTOP
* frame #0: 0x00007fff20569e7e libsystem_kernel.dylib`mach_msg_trap + 10
[...]Core dumps
lldb may be used to analyze macOS core dumps. For example:
% lldb -c /cores/core.11243
(lldb) btCommon commands:
- Cause of core dump and current thread/instruction:
process status - List threads:
thread list - List loaded libraries:
image list - Variables for the current stack frame:
var - Print a specific stack frame variable:
frame variable $NAME - Read a block of memory in some
format (e.g. with bytes and ASCII):
memory read -fY -c$BYTES 0x$ADDRESS --force - Print a specific stack frame variable in some
format (e.g. with bytes and ASCII):
frame variable $NAME -f Y - Print current registers:
register read - Current assembly:
dis - Current code:
list - Find type structure:
type lookup $NAME - Write a block of memory to a file:
memory read -o mem.bin -c$BYTES 0x$ADDRESS
Tips
- Long click on the maximize button to do split-screen tiling
- Finder
- Show all files:
defaults write com.apple.finder AppleShowAllFiles TRUE
- Show all files:
Open Application from Terminal
Open a well known application (in /Applications/):
open -a Wireshark.appOpen an application in the current directory:
open Eclipse.appOpen multiple instances of an application with the -n
flag.
Common alias:
alias code="open -a '/Applications/Visual Studio Code.app'"Network
mtr
mtr is available through
Brew:
brew install mtrHowever, it must be run as root and it's on the sbin
path. For example:
sudo /opt/homebrew/sbin/mtr --report-wide --show-ips --aslookup --report-cycles 30 example.comSecurity
Some security error codes above 10000 may be 10000 + an errno-style code.
Print the entitlements of an application:
% codesign -d --ent :- $EXECUTABLETermination Reason: CODESIGNING
For crashes due to Termination Reason: CODESIGNING, a
workaround may be to force re-sign:
find Eclipse.app -name "*" -execdir sudo codesign --force --deep --sign - {} \;System Integrity Protection
System Integrity Protection (SIP) is a security feature that includes restricting runtime attachment to system processes.
SIP Status
Show the SIP status with:
% csrutil status
System Integrity Protection status: enabled.Disable System Integrity Protection
To disable
SIP, boot into the Recovery Partition
and run csrutil disable.
Enable Kernel Symbolication
- May require disabling SIP first.
sudo nvram boot-args="keepsyms=1" - Reboot
- Without Activity Monitor running, get a spindump:
sudo spindump -reveal -noProcessingWhileSampling - Review
/tmp/spindump.txt
Recovery Partition
Booting to the recovery partition:
- Turn off Mac, then:
- ARM:
- Press and hold the power key
- Intel:
- Hold the
⌘Rkeys - Turn on Mac
- When you see the "macOS Recovery" window, release the
⌘Rkeys
- Hold the
- ARM:
- Log in with a user
- At the top of the screen, click Utilities } Terminal
- Run desired commands; for example:
% csrutil disable System Integrity Protection is off. Restart the machine for the changes to take effect. - At the top of the screen, click the Apple icon } Restart
- After restarting, ensure SIP has been disabled:
% csrutil status System Integrity Protection status: disabled.
Enable Non-Maskable Interrupt
From the recovery partition, enabling Non-Maskable Interrupt (NMI) allows for creating kernel dumps for a hung system.
Add debug=0x4 to the current settings:
% sudo nvram boot-args="$(nvram boot-args) debug=0x4"Add User to a Group
For example, to add $USER to the group
wheel:
sudo dseditgroup -o edit -a $USER -t user wheelComparing and Merging Files
- Eclipse has a good compare
and merge functionality
- Create a project (any kind)
- Right click on the project } Import... } General } File System
- Select the two files under the project
- Right click } Compare With } Each Other
- FileMerge is a visual diff tool available with
open /Applications/Xcode.app/Contents/Applications/FileMerge.app
Kernel core dumps
It appears that kernel core dumps may only be configured to be sent over a network to another machine (although this may be a virtual machine) rather than produced locally, and the types of network interfaces that may be used are limited (e.g. not over WiFi).
Generate kernel core dump:
sudo dtrace -w -n "BEGIN{ panic();}"
See https://developer.apple.com/library/archive/technotes/tn2004/tn2118.html
Troubleshooting Solaris
Mapping LWP ID to Java thread
It's often useful to map an LWP ID (for example, reported in prstat -L) to a Java thread. The pstack command may be used to print all native stack traces along with the LWP ID:
# prstat -mvLp 5598 5 2
PID USERNAME USR SYS TRP TFL DFL LCK SLP LAT VCX ICX SCL SIG PROCESS/LWPID
5598 root 78 2.8 0.1 0.0 1.7 1.3 7.0 8.7 135 502 3K 2 java/2
5598 root 12 0.0 0.0 0.1 0.0 85 0.0 2.7 54 59 124 0 java/10...
# pstack 5598
5598: /opt/IBM/WAS855/AppServer/java_1.7_32/bin/java Play
----------------- lwp# 2 / thread# 2 --------------------
fbc895a0 * *java/util/StringTokenizer.nextToken()Ljava/lang/String; [compiled] +74 (line 691)
fbc895a0 * *javax/crypto/Cipher.a(Ljava/lang/String;)[Ljava/lang/String;+55
fbca2d10 * *javax/crypto/Cipher.b(Ljava/lang/String;)Ljava/util/List; [compiled] +2
fbc99494 * *javax/crypto/Cipher.getInstance(Ljava/lang/String;)Ljavax/crypto/Cipher; [compiled] +2
fbcbc29c * *Play.main([Ljava/lang/String;)V [compiled] +61 (line 39)
fbc0021c * StubRoutines (1)
fe5b035c __1cJJavaCallsLcall_helper6FpnJJavaValue_pnMmethodHandle_pnRJavaCallArguments_pnGThread__v_ (fe07fed8, fe07fe70, e, 27800, f5cb0, d79a4fc8) + 3a0
fe65be7c jni_CallStaticVoidMethod (27928, d79a4fc8, 21240, e, 27800, ff117e5c) + 678
ff361bd8 JavaMain (fe66537c, 28e6c, 27928, ff387370, ff0f261c, fe65b804) + 740
ff2c5238 _lwp_start (0, 0, 0, 0, 0, 0)...Request core dump
The gcore command pauses the process while the core is generated and then the process should continue. Replace ${PID} in the following example with the process ID. You must have permissions to the process (i.e. either run as the owner of the process or as root). The size of the core file will be the size of the virtual size of the process (ps VSZ). If there is sufficient free space in physical RAM and the filecache, the core file will be written to RAM and then asynchronously written out to the filesystem which can dramatically improve the speed of generating a core and reduce the time the process is paused. In general, core dumps compress very well (often up to 75%) for transfer. (http://docs.oracle.com/cd/E36784_01/html/E36870/gcore-1.html)
$ gcore ${PID}If gcore does not start to write the core dump immediately, it may be hung waiting to acquire control of the process. If this does not succeed for some time, try instead with the -F option.
If none of the other options work, you may crash the process which should process a core dump using one of:
$ kill -6 ${PID}
$ kill -11 ${PID}
Debug Symbols
"To compile optimized code for use with dbx, compile the source code with both the -O (uppercase letter O) and the -g options... The -g0 (zero) option turns on debugging and does not affect inlining of functions." (http://docs.oracle.com/cd/E19205-01/819-5257/gevhr/index.html)
Create separate debug files: http://docs.oracle.com/cd/E19205-01/819-5257/gevia/index.html
Troubleshooting HP-UX
32-bit Native OutOfMemoryErrors
You may increase the user virtual address space from 2GB to 3GB (at the cost of less space to the kernel for things like network buffers) with:
chatr +q3p enable ${PATH_TO_JAVA}You can check if this is enable with:
chatr ${PATH_TO_JAVA}
...
third quadrant private data space enabledgdb/wdb
When the process is hung, attach to the PID, for example:
/opt/langtools/bin/gdb /opt/IBM/WebSphere/AppServer/java/bin/IA64W/java 24072
Then run thread apply all bt
Print full command line of running program
HP-UX does not provide a tool (such as "ps") to print the full command line of a running program (no equivalent of Solaris /usr/ucb/ps). The -x parameter of ps only prints the first 1024 characters, which is often insufficient for Java programs:
Only a subset of the command line is saved by the kernel; as much of the command line will be displayed as is available... The value of DEFAULT_CMD_LINE_WIDTH should be between 64 and 1020.
You can attach to a process using gdb/wdb and print argc/argv. First, we attach to a process by passing in the location of java (which you can get from ps -elfx) followed by the PID (note that the process will be completely paused until you detach gdb):
$ /opt/langtools/bin/gdb /opt/IBM/WebSphere/AppServer/java/bin/IA64W/java 24072__argc and __argv are global variables that we can access, so let's first see how many arguments there are:
(gdb) print __argc
$1 = 3In this example, we have 3 arguments. Next, we know that argv is a pointer to a list of pointers, each with one of the program arguments, so we print that many addresses at the location of argv (i.e. replace 3 with your value of argc):
(gdb) x/3a __argv
0x9ffffffffffff950: 0x9ffffffffffff9e8 0x9ffffffffffffa19
0x9ffffffffffff960: 0x9ffffffffffffa24Each of these addresses is a pointer to a null-terminated string, so we print each using the s option:
(gdb) x/s 0x9ffffffffffff9e8
0x9ffffffffffff9e8: "/opt/IBM/WebSphere/AppServer/java/bin/IA64W/java"
(gdb) x/s 0x9ffffffffffffa19
0x9ffffffffffffa19: "HelloWorld"
(gdb) x/s 0x9ffffffffffffa24
0x9ffffffffffffa24: "testarg"Don't forget to "detach" to continue the process.
Although the Java jps command with the -v parameter is no better, at least you can use jps -m to map PID to WAS server name.
If you are using an Itanium system, the following caliper command prints the full command line. This will have some overhead as it is gathering a flat profile of sampled process instructions for 1 second, but it is presumably more lightweight (and more user-friendly) than gdb:
/opt/caliper/bin/caliper fprof --process=root --attach $PID --duration 1 | grep Invocation:And here's a one-line command that runs the above on all java PIDs:
for i in `ps -elfx | grep java | grep -v grep | awk '{print $4}'`; do echo $i; /opt/caliper/bin/caliper fprof --process=root --attach $i --duration 1 | grep Invocation: ;done;Troubleshooting Java
Sub-chapters
Request Heap Dump
There are many ways to request a heap dump depending on your Java vendor (and further depending on your operating system and WAS profile, detailed within each Java vendor's section):
Excessive Direct Byte Buffers
There are two main types of problems with Direct Byte Buffers:
- Excessive native memory usage
- Excessive performance overhead due to
System.gccalls by the DBB code
This section primarily discusses issue 1. For issue 2, note that IBM
Java starts
with a soft limit of 64MB and increases by 32MB chunks with a
System.gc each time, so consider setting
-XX:MaxDirectMemorySize=$BYTES (e.g.
-XX:MaxDirectMemorySize=1024m) to avoid this upfront cost
(although read on for how to size this).
For issue 1, excessive native memory usage by
java.nio.DirectByteBuffers is a classic problem with any
generational garbage collector such as gencon (which is the default
starting in IBM Java 6.26/WAS 8), particularly on 64-bit. DirectByteBuffers
(DBBs) are Java objects that allocate and free native memory. DBBs use a
PhantomReference which is essentially a more flexible finalizer and they
allow the native memory of the DBB to be freed once there are no longer
any live Java references. Finalizers and their ilk are generally not
recommended because their cleanup time by the garbage collector is
non-deterministic.
This type of problem is particularly bad with generational collectors because the whole purpose of a generational collector is to minimize the collection of the tenured space (ideally never needing to collect it). If a DBB is tenured, because the size of the Java object is very small, it puts little pressure on the tenured heap. Even if the DBB is ready to be garbage collected, the PhantomReference can only become ready during a tenured collection. Here is a description of this problem (which also talks about native classloader objects, but the principle is the same):
If an application relies heavily on short-lived class loaders, and nursery collections can keep up with any other allocated objects, then tenure collections might not happen very frequently. This means that the number of classes and class loaders will continue increasing, which can increase the pressure on native memory... A similar issue can arise with reference objects (for example, subclasses of java.lang.ref.Reference) and objects with finalize() methods. If one of these objects survives long enough to be moved into tenure space before becoming unreachable, it could be a long time before a tenure collection runs and "realizes" that the object is dead. This can become a problem if these objects are holding on to large or scarce native resources. We've dubbed this an "iceberg" object: it takes up a small amount of Java heap, but below the surface lurks a large native resource invisible to the garbage collector. As with real icebergs, the best tactic is to steer clear of the problem wherever possible. Even with one of the other GC policies, there is no guarantee that a finalizable object will be detected as unreachable and have its finalizer run in a timely fashion. If scarce resources are being managed, manually releasing them wherever possible is always the best strategy.
Essentially the problem boils down to either:
- There are too many DBBs being allocated (or they are too large), and/or
- The DBBs are not being cleared up quickly enough.
It is very important to verify that the volume and rate of DBB allocations are expected or optimal. If you would like to determine who is allocating DBBs (problem #1), of what size, and when, you can run a DirectByteBuffer trace. Test the overhead of this trace in a test environment before running in production.
If you would like to clear up DBBs more often (problem #2), there are a few options:
- Use
-XX:MaxDirectMemorySize=$BYTES
Specifying-XX:MaxDirectMemorySizewill force the DBB code to runSystem.gc()when the sum of outstanding DBB native memory would be more than$BYTES. This option may have performance implications. When using this option with IBM Java, ensure that-Xdisableexplicitgcis not used. The optimal value of$BYTESshould be determined through testing. The larger the value, the more infrequent theSystem.gcswill be but the longer each tenured collection will be. For example, start with-XX:MaxDirectMemorySize=1024mand gather throughput, response time, and verbosegc garbage collection overhead numbers and compare to a baseline. Double and halve this value and determine which direction is better and then do a binary search for the optimal value. - Explicitly call
System.gc. This is generally not recommended. When DBB native memory is freed, the resident process size may not be reduced immediately because small allocations may go onto amallocfree list rather than back to the operating system. So while you may not see an immediate drop in RSS, the free blocks of memory would be available for future allocations so it could help to "stall" the problem. For example, Java Surgery can inject a call to System.gc into a running process. - One common cause of excessive DBB allocations with WebSphere
Application Server is the default WAS WebContainer
channelwritetypevalue ofasync. See the WAS HTTP section for more details.
In most cases, something like
-XX:MaxDirectMemorySize=1024m (and ensuring
-Xdisableexplicitgc is not set) is a reasonable solution to the
problem.
A system dump or HPROF dump may be loaded in the IBM Memory Analyzer Tool & the IBM Extensions for Memory Analyzer DirectByteBuffer plugin may be run to show how much of the DBB native memory is available for garbage collection. For example:
=> Sum DirectByteBuffer capacity available for GC: 1875748912 (1.74 GB)
=> Sum DirectByteBuffer capacity not available for GC: 72416640 (69.06 MB)Java Surgery
There is a technique called Java surgery which uses the Java Late Attach AP to inject a JAR into a running process and then execute various diagnostics.
This was designed initially for Windows because it does not usually
have a simple way of requesting a thread dump like kill -3
on Linux. Java Surgery has an option with IBM Java to run the
com.ibm.jvm.Dump.JavaDump() API to request a thread dump (HotSpot Java
does not have an equivalent API, although Java Surgery does generally
work on HotSpot Java):
$ java -jar surgery.jar -pid 16715 -command JavaDumpCore Dumps
More problems could be solved if customers took more operating system core dumps (or they weren't truncated with ulimits). It's amazing how much information can be extracted from a full address space dump. It is probably the most underutilized diagnostic artifact, particularly in situations where one wouldn't expect a memory dump to help.
However, core dumps are expensive. They take dozens of seconds to dump (during which time the process is frozen). They are often massive and take a long time to compress and upload. Finally, they take a long time to download, decompress and analyze. For these reasons, core dumps are underutilized (along with the security implications of capturing and transferring all raw memory in the process).
So, in the case that you don't know ahead of time that you need a core dump, when should you take operating system core dumps?
If the security, disk and performance risks are acceptable, an operating system core dump should be a step in every diagnostic procedure. For example, server hung? Do the normal performance MustGather, and then take a core dump.
But wait, didn't you just read that core dumps might be overkill? Yes. So what you should do is compress and save off the core dump into a special location. Only upload it if someone asks for it, or if you're otherwise stuck.
This is also a good way to deal with the security implications. With this approach, the data won't be lost, and in the case where the core dump is required, a secure way of handling or analyzing the core dump (perhaps even remotely) can be figured out.
Ensure core soft and hard ulimits are set to unlimited
It is a general best practice to set the core soft and hard ulimits to unlimited for Java processes.
It is critical that a system dump is not truncated so that the cause of crashes and other issues may be investigated. Review the documentation for your operating system to correctly configure ulimits:
- Linux: https://www.ibm.com/support/knowledgecenter/en/SSYKE2_8.0.0/com.ibm.java.80.doc/diag/problem_determination/linux_setup.html
- AIX: https://www.ibm.com/support/knowledgecenter/en/SSYKE2_8.0.0/com.ibm.java.80.doc/diag/problem_determination/aix_setup_full_core.html
- z/OS: https://www.ibm.com/support/knowledgecenter/en/SSYKE2_8.0.0/com.ibm.java.80.doc/diag/problem_determination/zos_setup_dumps.html
On J9 JVMs, the JVMJ9VM133W message is enabled with -Xcheck:dump and is a warning that system cores may be truncated if taken during a problem or for diagnostics if the core hard ulimit is not set to unlimited. For example:
JVMJ9VM133W The system core size hard ulimit is set to 2048, system dumps may be truncated.
When the J9 JVM produces the core dump itself (as with crashes and JVM-requested system dumps), it will increase the core soft limit to the hard limit automatically, so at the simplest level, it's only important to set the core hard ulimit to unlimited: https://github.com/eclipse/openj9-omr/blob/v0.15.0-release/port/unix/omrosdump.c#L307
However, if the core dump is produced in some other way, or if the JVM fails to fork itself to produce the core dump and instead the OS produces the core dump, then the soft limit will be used. Therefore, it's best to set both soft and hard core ulimits to unlimited.
Ensure core piping is configured properly or disabled on Linux
On Linux, the /proc/sys/kernel/core_pattern may be set
to a pipe (|) followed by a program to which a core dump is
streamed if a crash occurs. By default, this is not set on vanilla
Linux; however, most modern Linux distributions do set this by default,
often to |/usr/lib/systemd/systemd-coredump (the general
purpose is to avoid core dumps filling up all disk space). If such a
configuration is set, ensure such core
handling is configured properly using the instructions below so that
core dumps are produced and are not truncated, or completely disable
core piping.
Note that core_pattern cannot be set within a container so containers will generally send cores to the worker node rather than inside the container.
Properly configuring core piping
systemd-coredump
If /proc/sys/kernel/core_pattern is set to
|/usr/lib/systemd/systemd-coredump, then systemd-coredump
is configured.
systemd-coredump before and including version v250, by
default, truncates core dumps greater
than 2GB.
systemd-coredump after version v250, by default,
truncates core dumps greater
than 32GB on 64-bit and greater than 1GB on 32-bit.
The defaults show up as commented defaults in /etc/systemd/coredump.conf.
For example:
#ProcessSizeMax=2G
#ExternalSizeMax=2GThus, edit /etc/systemd/coredump.conf and update the
defaults; for example, start with something like the following but
change based on your available disk space:
ProcessSizeMax=100G
ExternalSizeMax=100G
MaxUse=500G
Compress=noThen run:
sudo systemctl daemon-reloadJava processes do not need to be restarted for this change to take
effect. As of this writing, there is no way to specify
an unlimited value for ProcessSizeMax,
ExternalSizeMax or MaxUse which is why large
values like 100G are used above. Compression is also disabled to reduce
core dump production times.
By default, cores will go to /var/lib/systemd/coredump/.
The name
of a core dump, by default, is period-separated with
core, the process or thread name, user ID,
/proc/sys/kernel/random/boot_id, PID, and the time when the
core was created in microseconds since the Unix Epoch. However, in the
case of J9-forked core dumps, the process ID will not match the original
process (instead, use jdmpview's
info proc).
The command coredumpctl
provides various utility commands for working with core dumps.
apport
If /proc/sys/kernel/core_pattern is set to
|/usr/share/apport/apport, then apport is
configured.
By default, cores should not be truncated by apport and they go to
/var/crash/ or /var/lib/apport/coredump.
rdp
If /proc/sys/kernel/core_pattern is set to
|/opt/dynatrace/oneagent/agent/rdp, then the Dynatrace
core dump processing program is configured.
The Dynatrace program does some basic processing of the core dump and
then pipes the core dump to the underlying core_pattern
that was configured at the time the Dynatrace program was installed.
This is located in the file
/opt/dynatrace/oneagent/agent/conf/original_core_pattern.
Since Eclipse OpenJ9 0.41 (IBM Java 8.0.8.15, and IBM Semeru Runtimes
v8.0.392, v11.0.21, and v17.0.9), if core_pattern includes
/oneagent/agent/rdp, then the JVM will attempt to
read the relative file
/oneagent/agent/conf/original_core_pattern and write its
contents in a javacore.txt file (though this will not work
in containers as the file is on the worker node); for example:
2CISYSINFO /proc/sys/kernel/core_pattern = |/opt/dynatrace/oneagent/agent/rdp
2CISYSINFO .../oneagent/agent/conf/original_core_pattern = |/usr/lib/systemd/systemd-coredump %P %u %g %s %t %c %habrt
If /proc/sys/kernel/core_pattern is set to
|/usr/libexec/abrt-hook-ccpp, then abrt
is configured.
Modify /etc/abrt/abrt.conf
- Set
MaxCrashReportsSize=0to avoid truncation. - By default, cores will go to
/var/spool/abrt. SetDumpLocation=/var/spool/abrtto another directory if/var/spool/is mounted on a small filesystem
Disabling core piping
You may completely disable the core piping and revert to the Linux
default of core which produces the core dump in the process
current working directory, but you must then manually monitor disk space
to ensure core dumps do not fill important disk partitions
(alternatively, create a dedicated partition for diagnostics and, on J9
JVMs, set -Xdump:directory=$DIR):
After core piping is disabled using the instructions below, the JVM does not need to be restarted for the changes to take effect.
On J9 JVMs, the JVMJ9VM135W message is enabled with
-Xcheck:dump and is a warning that system cores will be
piped. For example:
JVMJ9VM135W /proc/sys/kernel/core_pattern setting "|/usr/libexec/abrt-hook-ccpp %s %c %p %u %g %t e" specifies that core dumps are to be piped to an external program. The JVM may be unable to locate core dumps and rename them."It is often preferable to completely disable piping when running J9 JVMs because when the J9 JVM produces a core dump or handles a crash, it will post-process the core dump to rename it with additional information and also add some additional details into the core dump. The J9 JVM is not able to do this post-processing if a pipe program processes the core dump first. However, disabling piping will disable piping for all processes, so keep that in mind.
Disabling systemd-coredump core piping
If /proc/sys/kernel/core_pattern is set to
|/usr/lib/systemd/systemd-coredump, disable
systemd-coredump with:
sudo sh -c "ln -sf /dev/null /etc/sysctl.d/50-coredump.conf && sysctl -w kernel.core_pattern=core"Disabling apport core piping
If /proc/sys/kernel/core_pattern is set to
|/usr/share/apport/apport, disable with:
sudo systemctl stop apport
sudo systemctl disable apport
sudo systemctl mask apportDisabling abrt core piping
If /proc/sys/kernel/core_pattern is set to
|/usr/libexec/abrt-hook-ccpp, disable with:
sudo systemctl stop abrtd
sudo systemctl disable abrtd
sudo systemctl mask abrtdNative Java Agents
JVMTI is the latest and is available in Java 5 and replaces JVMDI and
JVMPI. JVMDI and JVMPI are fully deprecated in Java 6. When JVMPI is
enabled, the JVM looks for the exported method JVM_OnLoad
in the binary. When JVMTI is enabled, the JVM looks for the exported
method Agent_OnLoad in the binary.
JVMPI is specified using the -Xrun... command line
option
JVMTI is specified using the -agentlib... or
-agentpath... command line options
Java Serialization
Java serialization stream protocol: http://docs.oracle.com/javase/7/docs/platform/serialization/spec/protocol.html
The eye catcher for a serialized Java object in a byte stream is 0xAC 0xED (STREAM_MAGIC).
Verbose Garbage Collection
Verbose garbage collection may be dynamically enabled with the Memory MBean:
Killing Threads
The java/lang/Thread methods destroy, stop, and suspend are all deprecated and considered unsafe. The alternative is:
[...] code that simply modifies some variable to indicate that the target thread should stop running. The target thread should check this variable regularly, and return from its run method in an orderly fashion if the variable indicates that it is to stop running.
The java/lang/Thread interrupt method may be used for a "thread that waits for long periods (e.g., for input)". If the thread is in some well known methods like Object.wait, Thread.sleep, etc., or if the I/O channel is interruptible, then this will "inject" an exception into the thread which will be safely thrown. However, this will not work if the thread is in an infinite loop that is just using CPU and uses no interruptible APIs.
Liberty requestTiming has an optional interruptHungRequests="true"
option that attemps to interrupt a thread when it exceeds the
hungRequestThreshold on J9-based JVMs using its Interruptible
features; however, this may not work for run-away looping
threads.
Liberty has "hang resolution" for the entire thread pool when there are tasks in the queue and no tasks are being completed; however, this does not help with run-away threads.
WAS traditional on z/OS has the ability to recognize when a request has exceeded a configured amount of CPU usage and quiesce the associated WLM enclave which puts it in WLM's discretionary class. This is called the Interruptible Thread Infrastructure and also uses J9's Interruptible features.
There is a discussion about using jdb to inject a RuntimeException into a thread; however, the kill command is undocumented and is likely unsafe under all conditions. jdb also requires that the process has debugging enabled which has various implications.
WebSphere Application Server traditional has
Thread.interrupt capabilities as part of its memory
leak detection feature.
Patching
Notes for creating a patch:
- Every iteration of a diagnostic patch should include a log
entry of some kind to confirm the patch has been loaded correctly. Also
update the version number on each iteration so that the specific version
of a patch is being used may be confirmed. For example, add a static
initiailizer to one of the classes in the patch that is expected to be
used at runtime:
static { System.err.println("MyPatch V1"); }
Options to run a patch:
- For Java <=
8, create a jar with the classes and default manifest using
jar cvf mypatchV1.jar package1 package2and prepend it to the boot classpath:-Xbootclasspath/p:$PATH/mypatchV1.jar - For Java > 8, create a jar as above and patch
the the module at runtime with the option:
--patch-module $MOD=$PATH/mypatchV1.jar
Troubleshooting OpenJ9 and IBM J9 JVMs
IBM Java Versions
Each Java release has service releases which are fixpack upgrades, normally with APARs, but sometimes with feature enhancements, for example SR1. Finally, service releases themselves may have fix packs, for example FP1. An example IBM Java version commonly seen is: IBM Java Version 7R1 SR1 FP1
Debug symbols
Click "Show all X assets" under a release to find
*debugimage* packages that have *.debuginfo,
*.pdb/*.map, and *.dSYM
files:
Thread Dump (javacore.txt)
IBM Java can produce a javacore.txt file, also called a javadump. An example file name is javacore.20140930.025436.9920.0003.txt.
In general, javacores are very low overhead. They usually take no more than a few hundred milliseconds to produce. However, there are known defects in IBM Java that cause the entire JVM to freeze when requesting a javacore. These are usually caused by race conditions and are more likely the more javacores that are taken. Therefore, there is some risk in taking javacores in production, and this risk is proportional to the number of javacores taken. Before taking a lot of javacores, ensure that you have fixes installed for the most common of these hangs:
Staring with IBM Java 5, you may see threads in a javacore which are in Conditional Wait (CW) state that you would expect to be Runnable (R). This is by design; however, starting with Java 7.1 SR2, Java 7.0 SR8, and Java 6.1 SR8 FP2, such threads are reported as Runnable and the internal state is reported in the vmstate field.
Request Thread Dump
Additional methods of requesting thread dumps are documented in the Troubleshooting WAS chapter.
- On non-Windows operating systems, by default, the command
kill -3 ${PID}will request a thread dump. - For Semeru Java, use jcmd:
jcmd $PID Dump.java - For IBM Java >= 8.0.6.0:
java -Xbootclasspath/a:%JAVA_HOME%\lib\tools.jar openj9.tools.attach.diagnostics.tools.Jcmd %PID% Dump.java - For IBM Java >= 8.0.7.20 and Semeru >= 11.0.17.0 on
non-Windows platforms, restart with:
Then request the system dump with:-Xdump:java:events=user2,request=exclusive+preemptkill -USR2 $PID - Programmatically with
com.ibm.jvm.Dump.JavaDump() - On recent versions of IBM Java, use Java
Surgery:
$ java -jar surgery.jar -pid ${PID} -command JavaDump - The trace
engine may be used to request a thread dump on method entry and/or
exit. The following example JVM argument requests a thread dump when the
Example.trigger() method is called:
-Xtrace:maximal=mt,trigger=method{com/ibm/example/Example.trigger,javadump}
By default, a user requested javacore has the request=exclusive option which asks for exclusive access before executing the javacore. However, unlike other agents, if exclusive access cannot be granted, the javacore creation will still proceed with some data excluded for safety. There is a known APAR IV68447/PI32843 where heap corruption may occur if a javacore runs during a garbage collection cycle.
Process Limits (ulimits)
On recent versions of IBM Java and applicable operating systems, a javacore includes a section with the current ulimit values of the process:
1CIUSERLIMITS User Limits (in bytes except for NOFILE and NPROC)
NULL ------------------------------------------------------------------------
NULL type soft limit hard limit
2CIUSERLIMIT RLIMIT_AS unlimited unlimited
2CIUSERLIMIT RLIMIT_CORE unlimited unlimited
2CIUSERLIMIT RLIMIT_CPU unlimited unlimited
2CIUSERLIMIT RLIMIT_DATA unlimited unlimited
2CIUSERLIMIT RLIMIT_FSIZE unlimited unlimited
2CIUSERLIMIT RLIMIT_LOCKS unlimited unlimited
2CIUSERLIMIT RLIMIT_MEMLOCK 65536 65536
2CIUSERLIMIT RLIMIT_NOFILE 8192 8192
2CIUSERLIMIT RLIMIT_NPROC 213234 213234
2CIUSERLIMIT RLIMIT_RSS unlimited unlimited
2CIUSERLIMIT RLIMIT_STACK 8388608 unlimited
2CIUSERLIMIT RLIMIT_MSGQUEUE 819200 819200
2CIUSERLIMIT RLIMIT_NICE 0 0
2CIUSERLIMIT RLIMIT_RTPRIO 0 0
2CIUSERLIMIT RLIMIT_SIGPENDING 213234 213234When requesting a system dump using the IBM system dump mechanism, the JVM will ensure that the RLIMIT_CORE hard limit is used.
NATIVEMEMINFO
In recent versions of IBM Java, the NATIVEMEMINFO section summarizes native memory allocations that the JVM has made.
0SECTION NATIVEMEMINFO subcomponent dump routine
1MEMUSER JRE: 4,786,464,960 bytes / 14237 allocations
2MEMUSER +--VM: 4,734,576,408 bytes / 11959 allocations
3MEMUSER | +--Classes: 130,832,328 bytes / 5225 allocations
3MEMUSER | +--Memory Manager (GC): 4,388,855,680 bytes / 1502 allocations
4MEMUSER | | +--Java Heap: 4,294,967,296 bytes / 1 allocation...On 64-bit Java, the "Unused <32bit allocation regions: 6,708,704 bytes" line summarizes how much native memory is free in the pooled region allocations underneath 4GB.
If -Dcom.ibm.dbgmalloc=true is specified, then additional information will be added to NATIVEMEMINFO including native memory used by the Zip/Jar SDK code:
4MEMUSER | | +--Zip: 5,913,128 bytes / 2271 allocations
4MEMUSER | | +--Wrappers: 64,320 bytes / 193 allocations
5MEMUSER | | | +--Malloc: 64,320 bytes / 193 allocationsAs an alternative, or in addition to, NATIVEMEMINFO analysis, Andrew
Hall wrote a wonderful little Perl script named get_memory_use.pl
that takes an IBM javacore.txt file and prints the number of reserved
bytes for each IBM Java native memory segment (the many pages of hex
addresses towards the top of the javacore). Native memory segments are
all of the (pooled) native memory allocations that IBM Java makes, such
as the Java heap itself, classes, JIT, etc. This script has been enhanced
to: 1) print the NATIVEMEMINFO section if available, and 2) summarize
the virtual memory layout of the sections based on 256MB sized
segments:
$ perl get_memory_use.pl javacore.20140507.195651.17236140.0001.txtVirtual Memory Layout
A virtual memory layout of native memory allocations made by IBM Java may be created by simply listing the start and end addresses of all IBM Java native memory segments:
$ grep 1STSEGMENT javacore*.txt | awk '{print $3,$5}' | sortThis list may be useful to correlate to an operating system virtual memory layout to figure out what is allocated by IBM Java versus native allocations oustide of IBM Java.
First, determine whether most of the native memory is accounted for
by Java or not. If RSS is much larger than expected, then gather either
1) the output of /proc/${PID}/smaps, or 2) a core file
(you'll also need the java executable to load in gdb). #1 will look
something like this:
...
7f3498000000-7f34a0000000 rw-p 00000000 00:00 0
Size: 131072 kB
Rss: 131072 kB
Pss: 131072 kB...In the case of #2, you can get an output that's a subset of #1
through gdb by running "info files" and reviewing the core dump section
(you can also get this info without gdb by running
readelf --program-headers core.dmp):
$ gdb ${PATH_TO_JAVA_EXE} ${PATH_TO_CORE}
(gdb) info files
Symbols from "java".
Local core dump file:
`core.16721.dmp', file type elf64-x86-64.
...
0x00007f3498000000 - 0x00007f34a0000000 is load51...Create a list of the sizes of these virtual memory areas (VMAs) and then cross-reference their ranges with the memory segment ranges in the javacore ($3 for the start and $5 for the end):
$ grep "1STSEGMENT " javacore.20140703.171909.16721.0002.txt | awk '{print $3}' | sortIf you've found large VMAs that aren't accounted for by IBM Java,
then it may be worth exploring their raw memory to figure out whodunnit.
GDB has the x command to print raw memory, but it's not
easy on the eye:
(gdb) x/32xc 0x00007f3498000000
0x7f3498000000: 32 ' ' 0 '\000' 0 '\000' 28 '\034' 54 '6' 127 '\177' 0 '\000' 0 '\000'
0x7f3498000008: 0 '\000' 0 '\000' 0 '\000' -92 '\244' 52 '4' 127 '\177' 0 '\000' 0 '\000'
0x7f3498000010: 0 '\000' 0 '\000' 0 '\000' 4 '\004' 0 '\000' 0 '\000' 0 '\000' 0 '\000'
0x7f3498000018: 0 '\000' 0 '\000' 0 '\000' 4 '\004' 0 '\000' 0 '\000' 0 '\000' 0 '\000'Another option is to dump memory to a file and then spawn an xxd process from within gdb to dump that file:
(gdb) define xxd
Type commands for definition of "xxd".
End with a line saying just "end".
>dump binary memory dump.bin $arg0 $arg0+$arg1
>shell xxd dump.bin
>shell rm -f dump.bin
>end
(gdb) xxd 0x00007f3498000000 32
0000000: 2000 001c 367f 0000 0000 00a4 347f 0000 ...6.......4...
0000010: 0000 0004 0000 0000 0000 0004 0000 0000 ................In this example, we found out later that this was a Glibc malloc
arena. Unfortunately, Glibc doesn't put an eye catcher at the top of
each arena, so the only way to know for sure would be to point to the
debuginfo packages and walk the arena chain (first,
p main_arena.next, cast to malloc_state and
dereference,
p *((struct malloc_state *(0x00007f3498000000), and so on
until next == p &main_arena).
For large VMAs, it's probably best to just dump the VMA to a file:
dump binary memory dump.bin 0x00007f3498000000 0x00007f34a0000000And then just xxd the file and pipe to less. If you have smaps output, then review the Rss line to see how much of the VMA was resident in RAM at the time.
If the VMA was mmap'ped (like a malloc arena), then remember that mmap will zero the chunk of memory first, so unused parts will be zeros. A simple trick to filter those out is to remove all zero lines:
$ xxd dump.bin | grep -v "0000 0000 0000 0000 0000 0000 0000 0000" | lessJVM-Allocated Native Memory
Every JVM-allocated native memory chunk is allocated
with a header and a footer of type J9MemTag.
The first 32 bytes is an eye catcher, the second 32 bytes is a checksum,
the third word is the allocation size, the fourth word is a pointer to a
string describing the type of allocation, and the fifth word is a
pointer to the allocation category. The header
eyecatcher is 0xB1234567 for an active allocation and
0xBADBAD67 for a freed allocation. The footer
eyecatcher is 0xB7654321 for an active allocation and
0xBADBAD21 for a freed allocation. Note that malloc
libraries such as Linux glibc will overwrite the first two words of a
freed chunk as housekeeping pointers. On 64-bit, this means that the
eyecatcher, checksum, and allocation size will be overwritten in the
header tag; however, the same data is available in the footer tag, so
it's best to use that.
Accumulated CPU Time
Compare accumulated CPU time between threads across two javacores (replace the first two lines with the javacore file names):
JAVACORE1=javacore.20171117.145059.26621.0001.txt; \
JAVACORE2=javacore.20171117.145108.26621.0003.txt; \
join -a 1 -a 2 \
<(\
grep -e '3XMTHREADINFO ' -e 3XMCPUTIME "${JAVACORE1}" | \
grep -v 'Anonymous native thread' | \
sed '$!N;s/\n/ /' | \
sed 's/3XMTHREADINFO.*J9VMThread://g' | \
sed 's/,.*CPU usage total://g' | \
sed 's/ secs.*//g' | \
sort
)\
<(\
grep -e '3XMTHREADINFO ' -e 3XMCPUTIME "${JAVACORE2}" | \
grep -v 'Anonymous native thread' | \
sed '$!N;s/\n/ /' | \
sed 's/3XMTHREADINFO.*J9VMThread://g' | \
sed 's/,.*CPU usage total://g' | \
sed 's/ secs.*//g' | \
sort
) | \
awk '{ printf "%s %.9f\n", $0, $3-$2 }' | sort -nr -k 4Thread States
The Javacore.txt thread dump shows the state of each thread at the time of the dump; most commonly, R for runnable, CW for conditional wait, B for blocked, and P for parked. It has been a common confusion since IBM Java version 5 that threads which are effectively running (R) are actually reported as waiting (CW). This is because the JVM uses a cooperative mechanism to try to quiesce running threads for the duration of the Javacore to reduce the chances of problems creating the javacore itself. Tools such as IBM TMDA naïvely report the thread dump state without taking this into account:

2LKREGMON Thread public flags mutex lock (0x00000000015E0438): <unowned>
3LKNOTIFYQ Waiting to be notified:
3LKWAITNOTIFY "main" (0x00000000015F6000)However, starting with Java 8, Java 7, Java 6.1, and Java 6 SR16 FP4,
the javacore.txt file reports
these thread states as runnable, and moves the "true" state into the
vmstate field: "Threads that were running Java code
when the javacore was triggered have a Java thread state of R (Runnable)
and an internal VM thread state of CW (Condition Wait)." (<>)
3XMTHREADINFO "main" J9VMThread:0x00000000210E3100, j9thread_t:0x00007F0FB4007C30, java/lang/Thread:0x0000000020FE1D98, state:R, prio=5
3XMJAVALTHREAD (java/lang/Thread getId:0x1, isDaemon:false)
3XMTHREADINFO1 (native thread ID:0x13DA, native priority:0x5, native policy:UNKNOWN, vmstate:CW, vm thread flags:0x00000001)
3XMTHREADINFO2 (native stack address range from:0x00007F0FBA12B000, to:0x00007F0FBAB2C000, size:0xA01000)Check which thread has exclusive access in a javacore
- Find all threads whose
vm thread flagsbit flags have J9_PUBLIC_FLAGS_VM_ACCESS (0x20). Ensure that only one thread has this and that all other threads have the big flag J9_PUBLIC_FLAGS_HALT_THREAD_EXCLUSIVE (0x1). For example,WebContainer : 7has 0x20 and the others have 0x1:$ grep -e "XMTHREADINFO " -e "vm thread flags" javacore*.txt 3XMTHREADINFO "WebContainer : 7" J9VMThread:0x0000000004C82700, omrthread_t:0x0000153A040C9248, java/lang/Thread:0x00000000F3FBB0D8, state:R, prio=5 3XMTHREADINFO1 (native thread ID:0x106E, native priority:0x5, native policy:UNKNOWN, vmstate:R, vm thread flags:0x00001020) 3XMTHREADINFO "WebContainer : 10" J9VMThread:0x0000000004EB9400, omrthread_t:0x00001539A401C7F8, java/lang/Thread:0x00000000F3CE9BC8, state:R, prio=5 3XMTHREADINFO1 (native thread ID:0x1078, native priority:0x5, native policy:UNKNOWN, vmstate:CW, vm thread flags:0x00000081) [...]
For a more complete picture, perform this on a core dump using jdmpview.
Heapdumps and system dumps
A heapdump contains information on the Java heap. This is used for investigating OutOfMemoryErrors, tuning Java heap usage, etc. On IBM Java, historically, a heapdump was equivalent to an IBM Portable Heapdump (PHD) file. A PHD heapdump is written by code in IBM Java and is generally limited to object reference analysis. Recently, IBM Java has pushed a new strategic direction to use system dumps instead of PHD heapdumps. A system dump is equivalent to the operating system process memory dump (Unix=core, Windows=dump, z/OS=DUMP, etc.). System dumps are written by the operating system. In essence, system dumps are a superset of PHD heapdumps. Not only do they include the Java heap, but they also include object memory (for example, the actual value of a String, etc.), which brings them to parity with HotSpot HPROF heapdumps. Additionally, system dumps include more detailed thread information (including some of the Java stack frame locals on each stack frame, which can be incredibly useful, such as finding out which database SQL query is executing), more accurate garbage collection root information, native memory information, and more.
Starting in IBM Java 626 (WAS 8.0.0.2), a system dump has been added for the first OutOfMemoryError. Thus, the default has changed to produce a PHD heapdump, javacore, snap file, and a system dump on OOM.
In older versions of IBM Java, the jextract tool was required to post-process a system dump. This was cumbersome and time consuming. Starting with Java 5 >= SR12 (WAS >= 6.1.0.33), Java 6 >= SR9 (WAS >= 7.0.0.15), Java 626 (WAS 8), DTFJ-based tools such as the Eclipse Memory Analyzer Tool (MAT) with IBM DTFJ plugin can read a system dump directly, just like a PHD heapdump. Jextract may still be useful for investigating native memory information (because jextract will also gather native libraries from the filesystem), but in general, a system dump is now as easy to use as a PHD heapdump.
Unfortunately, most customers on Unix operating systems are still configured with constrained ulimits which truncate system dumps, making them usually useless. It is critical that you properly configure Unix systems for full core dumps:
System dumps usually compress to 25% of original size using zip, gzip, etc.
For the best system dump performance, ensure significant free physical memory so that the operating system can write it to RAM and then asynchronously flush to disk.
To analyze both heapdumps and system dumps, see the Eclipse Memory Analyzer Tool chapter.
To disable heapdumps and core dumps on OOM but keep core dumps on crashes:
-Xdump:heap:none -Xdump:system:none:events=systhrow,filter=java/lang/OutOfMemoryErrorPortable Heap Dump (PHD)
In general, IBM Java uses two formats for heapdumps: IBM Portable Heapdump (PHD) and an operating system dump. The latter is a superset of the former.
The operating system dump is simply a core dump of the virtual address space (Unix=core, Windows=userdump, z/OS=SYSDUMP) of the process. In older versions of IBM Java, the JVM's jextract tool was required to be run on an operating system dump before it could be analyzed. Starting with Java 5 >= SR12, Java 6 >= SR9, and later Java releases, jextract is not necessary because IBM has created file readers for operating system dumps for all operating systems on which IBM Java runs. Tools such as the IBM Memory Analyzer Tool use the IBM Diagnostic Tool Framework for Java API to read the heapdump from jextracted ZIPs or operating system dumps.
An IBM PHD file contains basic information about the Java heap such as the graph of relationships between objects and their size. An operating system dump is a superset of a PHD heap dump and includes everything about the process; thus, in general, it will be larger and take longer to produce than an IBM PHD file. An operating system dump is usually compressable down to 25% of its original size for transportation.
Request heap dump
Additional methods of requesting heap dumps are documented in the Troubleshooting WAS chapter.
- For Semeru Java, use jcmd:
jcmd $PID Dump.heap - For IBM Java >= 8.0.6.0:
java -Xbootclasspath/a:%JAVA_HOME%\lib\tools.jar openj9.tools.attach.diagnostics.tools.Jcmd %PID% Dump.heap - For IBM Java >= 8.0.7.20 and Semeru >= 11.0.17.0 on
non-Windows platforms, restart with:
Then request the system dump with:-Xdump:heap:events=user2,request=exclusive+prepwalkkill -USR2 $PID - Use Java
Surgery:
java -jar surgery.jar -pid ${PID} -command HeapDump - Extract a PHD heapdump from a system
dump using the
heapdump command injdmpview - Restart with
-Xdump:heap:events=userto take one on kill -3/Ctrl+Break. Note that we do not recommend running with this option permanently because the default handler only produces javacores which are often used for performance investigations whereas a heap dump causes its own significant performance overhead. - Programmatically with
com.ibm.jvm.Dump.HeapDump() - From within the IBM Memory Analyzer Tool: File } Acquire Heap Dump
- The trace
engine may be used to request a heap dump on method entry and/or
exit. The following example JVM argument produces a heap dump when the
Example.trigger() method is called:
-Xtrace:maximal=mt,trigger=method{com/ibm/example/Example.trigger,heapdump}
System Dumps (core.dmp)
System dumps on Linux
On Linux, when IBM Java requests the system dump, it forks itself and then kills the forked child process:
Linux does not provide an operating system API for generating a system dump from a running process. The JVM produces system dumps on Linux by using the fork() API to start an identical process to the parent JVM process. The JVM then generates a SIGSEGV signal in the child process. The SIGSEGV signal causes Linux to create a system dump for the child process. The parent JVM processes and renames the system dump, as required, by the -Xdump options, and might add additional data into the dump file. The system dump for the child process contains an exact copy of the memory areas used in the parent. The SDK dump viewer can obtain information about the Java threads, classes, and heap from the system dump. However, the dump viewer, and other system dump debuggers show only the single native thread that was running in the child process.
IBM Java then looks at /proc/PID/maps and tries to append information to the core dump that wouldn't otherwise be there (in some cases this is not possible because the VMA does not have read permission): "The Linux operating system core dump might not contain all the information included in a core dump produced by the JVM dump agents".
In general, it is recommended to get the output of /proc/${PID}/smaps at the same time as getting a system dump if you will be interested in virtual memory.
System dumps on Windows
If core dumps are truncated, test setting DumpType to a value such as 2 or 0 and custom bitflags. For example:
HKEY_LOCAL_MACHINE\SOFTWARE\Microsoft\Windows\Windows Error Reporting\LocalDumps- DWORD Decimal = 2
Request system dump
Additional methods of requesting system dumps are documented in the Troubleshooting Operating Systems and Troubleshooting WAS chapter.
- For Semeru Java, use jcmd:
jcmd $PID Dump.system - For IBM Java >= 8.0.6.0:
java -Xbootclasspath/a:%JAVA_HOME%\lib\tools.jar openj9.tools.attach.diagnostics.tools.Jcmd %PID% Dump.system - For IBM Java >= 8.0.7.20 and Semeru >= 11.0.17.0 on
non-Windows platforms, restart with:
Then request the system dump with:-Xdump:system:events=user2,request=exclusive+prepwalkkill -USR2 $PID - Use Java
Surgery:
java -jar surgery.jar -pid $PID -command SystemDump - Use
-Xdump:java+system:events=user,request=exclusive+prepwalkto take one onkill -3/Ctrl+Break. Note that we do not recommend running with this option permanently because the default handler only produces javacores which are often used for performance investigations whereas a system dump causes its own significant performance overhead. - Use
-Xdump:system:defaults:request=exclusive+prepwalkto change the system dump default to requestexclusive+prepwalkand then use some mechanism that requests a system dump within the JVM. Note that we do not recommend running with this option permanently because then investigating JVM crashes may be problematic. - Use
-Xdump:tool:events=user,request=exclusive+prepwalk,exec="gcore %pid"to execute a program that requests the core dump onkill -3/Ctrl+Break. Note that we do not recommend running with this option permanently because the default handler only produces javacores which are often used for performance investigations whereas a system dump causes its own significant performance overhead. - Automatically produced on a crash
- Starting with Java 6.26 SR1, a system dump is produced on the first OutOfMemoryError
- In earlier versions of Java, a system dump may be produced on OOM
with:
-Xdump:heap:none -Xdump:java+system:events=systhrow,filter=java/lang/OutOfMemoryError,range=1..4,request=exclusive+prepwalk - Programmatically with
com.ibm.jvm.Dump.triggerDump("system:request=exclusive+prepwalk") - IBM Health Center can acquire a dump: Monitored JVM } Request a dump } System Dump
- The IBM Java
systemDump Agent can take a system dump on various events. See Table 2 in Debugging from Dumps. For example, the following will create a core dump when the Example.bad method throws a NullPointerException:-Xdump:system:events=throw,range=1..1,request=exclusive+prepwalk,filter=java/lang/NullPointerException#com/ibm/example/Example.bad - The trace
engine may be used to request a system dump on method entry and/or
exit. The following example JVM argument produces a system dump when the
Example.trigger() method is called:
-Xtrace:maximal=mt,trigger=method{com/ibm/example/Example.trigger,sysdump} - From within the Eclipse Memory Analyzer Tool: File } Acquire Heap Dump
Exclusive-access for System Dumps
One of the main issues with requesting system dumps is that the default dump agent for system dumps does not request exclusive access.
This is required because some GPFs, aborts, and other conditions need to take system dumps without requesting exclusive access (for example, if there is a bug within the GC itself that causes a crash).
The problem is that if a system dump is requested while a garbage collection is running, this normally means that the system dump will be unusable by tools such as Memory Analyzer Tool. The garbage collector is modifying core data structures and moving pointers and references which will utterly confuse memory analysis tools. The API com.ibm.jvm.Dump.SystemDump which is used by most mechanisms to request system dumps (e.g. wsadmin, Liberty server dump, etc.) uses the default dump agent which means it does not request exclusive access.
On IBM Java >= 7.1, the exclusive option may be passed to the triggerDump API call:
com.ibm.jvm.Dump.triggerDump("system:request=exclusive+prepwalk");The Java Surgery tool's SystemDump command uses this API if it is available.
On IBM Java < 7.1, there aren't many good options to ensure that requesting a system dump requests exclusive access to avoid such a situation. The most obvious option would be to create a system dump on the user event (kill -3) and request exclusive access there; but, in general, the user event should be used for lightweight diagnostics such as thread dumps and it should not be used for heapdumps or system dumps.
The best option is to create a dump agent which requests a system dump with the exclusive option when a diagnostic exception is thrown and then use a tool such as Java surgery to inject a small JAR into the JVM that throws such an exception. First, set the following JVM option:
-Xdump:system:events=throw,filter=com/ibm/rdci/surgery/builtin/commands/CustomException1,request=exclusive+prepwalkThen use Java Surgery to attach and throw the exception:
java -jar surgery.jar -command ThrowException -pid ${PID}In addition, as part of J9's post-processing of system dumps, additional information is added to the dump that is not added by the operating system. For example, on Linux, from older documentation: "The Linux operating system core dump might not contain all the information included in a core dump produced by the JVM dump agents."
Late attach
On z/OS, late attach is disabled by default and may be enabled with
-Dcom.ibm.tools.attach.enable=yes
A diagnostic log may be enabled for J9's late attach mechanism with the logging option:
-Dcom.ibm.tools.attach.logging=yesBy default, this creates a file named $PID.log in the
current working directory of the process (the file prefix may be changed
with -Dcom.ibm.tools.attach.log.name).
Example output:
1617637336015(Mon Apr 05 15:42:16 UTC 2021) 2458: 19 [Attach API initializer]: AttachHandler initialized
[...]
1617637364670(Mon Apr 05 15:42:44 UTC 2021) 2458: 23 [Attachment 32835]: connectToAttacher localPort=43314 remotePort=32835
1617637364671(Mon Apr 05 15:42:44 UTC 2021) 2458: 23 [Attachment 32835]: streamSend ATTACH_CONNECTED e4404c99752ab0ec
1617637364672(Mon Apr 05 15:42:44 UTC 2021) 2458: 22 [Attach API wait loop]: Blocking lock succeeded
1617637364673(Mon Apr 05 15:42:44 UTC 2021) 2458: 22 [Attach API wait loop]: iteration 0 checkReplyAndCreateAttachment releaseLock
1617637364673(Mon Apr 05 15:42:44 UTC 2021) 2458: 22 [Attach API wait loop]: unlocking file /tmp/.com_ibm_tools_attach/2458/attachNotificationSync
1617637364673(Mon Apr 05 15:42:44 UTC 2021) 2458: 22 [Attach API wait loop]: closing /tmp/.com_ibm_tools_attach/2458/attachNotificationSync
1617637365177(Mon Apr 05 15:42:45 UTC 2021) 2458: 23 [Attachment 32835]: doCommand ATTACH_LOADAGENT(instrument,/opt/surgery/surgery.jar=[...])
1617637365178(Mon Apr 05 15:42:45 UTC 2021) 2458: 23 [Attachment 32835]: loadAgentLibrary instrument:/opt/surgery/surgery.jar=[...] decorate=true
1617637365621(Mon Apr 05 15:42:45 UTC 2021) 2458: 23 [Attachment 32835]: streamSend ATTACH_ACK
1617637365624(Mon Apr 05 15:42:45 UTC 2021) 2458: 23 [Attachment 32835]: doCommand ATTACH_DETACH
1617637365624(Mon Apr 05 15:42:45 UTC 2021) 2458: 23 [Attachment 32835]: streamSend ATTACH_DETACHEDjextract
Recent versions of IBM Java do not require running jextract on the core dump for memory analysis (Java 5 >= SR12, Java 6 >= SR9, etc.). The reason is that the dump readers (DTFJ) are able to read operating system core dump files directly using DirectDumpReader (DDR) technology.
However, jextract is useful for investigating native memory issues because jextract will gather the java executable and native libraries which may be loaded into a debugger along with the core dump.
Jextract -interactive runs on the core file itself, not the jextracted ZIP. Example output:
# jextract -interactive core.20100624.110917.7576.0001.dmp
Loading dump file...
Read memory image from core.20100624.110917.7576.0001.dmp
Jextract interactive mode.
Type '!j9help' for help.
Type 'quit' to quit.
(Commands must be prefixed with '!')
>
!findallcallsites (or !dumpallsegments)
Searching for all memory block callsites...
Finished search. Bytes scanned: 4294958661
total alloc | largest
blocks| bytes | bytes | callsite
-------+-------+-------+-------+-------+-------+-------+-------+-------+-------
1 11 11 common/j9nls.c:427
1 176 176 ParallelGlobalGC.cpp:162...jcmd
OpenJ9 provides the jcmd tool:
Pass the PID followed by the command. List available commands:
$ jcmd 2440 help
Dump.heap
Dump.java
Dump.snap
Dump.system
GC.class_histogram
GC.heap_dump
GC.run
Thread.print
helpList the help contents for a particular command:
$ jcmd 2440 help Dump.java
Dump.java: Create a javacore file.
Format: Dump.java <file path>
<file path> is optional, otherwise a default path/name is used.
Relative paths are resolved to the target's working directory.
The dump agent may choose a different file path if the requested file exists.Example requesting a javacore:
$ jcmd 2440 Dump.java
Dump written to /home/was/javacore.20200302.213647.2440.1.txtHelp for the commands above:
$ for i in $(jcmd 2440 help); do jcmd 2440 help $i; done
Dump.heap: Create a heap dump.
Format: Dump.heap <file path>
<file path> is optional, otherwise a default path/name is used.
Relative paths are resolved to the target's working directory.
The dump agent may choose a different file path if the requested file exists.
GC.heap_dump is an alias for Dump.heap
Dump.java: Create a javacore file.
Format: Dump.java <file path>
<file path> is optional, otherwise a default path/name is used.
Relative paths are resolved to the target's working directory.
The dump agent may choose a different file path if the requested file exists.
Dump.snap: Dump the snap trace buffer.
Format: Dump.snap <file path>
<file path> is optional, otherwise a default path/name is used.
Relative paths are resolved to the target's working directory.
The dump agent may choose a different file path if the requested file exists.
Dump.system: Create a native core file.
Format: Dump.system <file path>
<file path> is optional, otherwise a default path/name is used.
Relative paths are resolved to the target's working directory.
The dump agent may choose a different file path if the requested file exists.
GC.class_histogram: Obtain heap information about a Java process
Format: GC.class_histogram [options]
Options:
all : include all objects, including dead objects (this is the default option)
live : include all objects after a global GC collection
NOTE: this utility may significantly affect the performance of the target VM.
GC.heap_dump: Create a heap dump.
Format: Dump.heap <file path>
<file path> is optional, otherwise a default path/name is used.
Relative paths are resolved to the target's working directory.
The dump agent may choose a different file path if the requested file exists.
GC.heap_dump is an alias for Dump.heap
GC.run: Run the garbage collector.
Format: GC.run
NOTE: this utility may significantly affect the performance of the target VM.
Thread.print: List thread information.
Format: Thread.print [options]
Options: -l : print information about ownable synchronizers
help: Show help for a command
Format: help <command>
If no command is supplied, print the list of available commands on the target JVM.-Xdump
Changing the Default Directory of Dump Artifacts
On recent versions of Java, change the default directory of dump artifacts with the generic JVM argument:
-Xdump:directory=$DIRFor particular dump types:
-Xdump:java:defaults:file=/var/dumps/javacore.%Y%m%d.%H%M%S.%pid.%seq.txtStack Traces of Large Object Allocations
The filter is the number of megabytes:
-Xdump:stack:events=allocation,filter=#5mExample output in stderr:
JVMDUMP039I Processing dump event "allocation", detail "5242880 bytes, type java.util.concurrent.ConcurrentHashMap$HashEntry[]" at 2015/09/14 07:36:49 - please wait.
Thread=main (00007F8830007C30) Status=Running
at java/util/concurrent/ConcurrentHashMap$HashEntry.newArray(I)[Ljava/util/concurrent/ConcurrentHashMap$HashEntry; (ConcurrentHashMap.java:311) (Compiled Code)
...To get a core dump instead, for example:
-Xdump:system:events=allocation,filter=#20m,range=1..1,request=exclusive+prepwalkThrown Exceptions
-Xdump may be used to execute agents when an exception
is thrown, including from a particular method. For example:
-Xdump:system:events=throw,range=1..1,request=exclusive+prepwalk,filter=java/lang/NullPointerException#com/ibm/SomeClass.fooStarting with Java 8, exceptions may be further filtered by the exception message. For example, to trigger a javacore on a java/lang/VerifyError exception that contains the text string "wrong initializer"
-Xdump:java:events=throw,filter=java/lang/VerifyError,msg_filter=*wrong initializer*Tool Agent
The tool agent may be used to execute arbitrary process commands. For example, to print /proc/meminfo on Linux when there is an OOM:
-Xdump:tool:events=systhrow,filter=java/lang/OutOfMemoryError,request=exclusive+prepwalk,range=1..0,priority=999,exec="cat /proc/%pid/smaps > smaps.%Y%m%d.%H%M%S.%pid.%seq.txt; cat /proc/meminfo > meminfo.%Y%m%d.%H%M%S.%pid.%seq.txt"Running a command on the last artifact produced:
-Xdump:tool:events=user,exec="bin/jextract %last"Caught Exceptions
-Xdump may be used to execute agents when an exception
is caught, including from a particular method. For example:
-Xdump:system:events=catch,request=exclusive,range=1..1,filter=*#Play.fooUse the second number in the range option to control the maximum number of core dumps produced. In the above example, no more than 1 cores will be produced.
The system dump agent is often useful because the system dump can be loaded in a tool such as the Memory Analyzer Tool and various stack frame locals may be reviewed that may help understand the exception.

In general, it's a malpractice to catch an exception and suppress its detailed information (the best practice is to re-throw it or log the details). For example:
public class Play {
public void foo() {
try {
// Work
} catch (Throwable t) {
}
}
}The TechNote above goes over how to correctly deal with this situation, but sometimes it's difficult to quickly update code when there's a problem. If we know which method is catching the exception, then we can just use the above technique to find the cause.
-Xtrace
Until Java 7.1, enabling certain -Xtrace options may affect the performance of the entire JVM (see the -Xtrace section in the IBM Java chapter).
If you want to dump the default Xtrace to stderr, use
-Xtrace:print=all{level1},exception=j9mm{gclogger}
Tracing Methods
The simplest usage of -Xtrace is to trace entry and exit of some method(s). For example (this uses a wildcard to match all methods of a class):
-Xtrace:print=mt,methods={com/ibm/ws/kernel/launch/internal/FrameworkManager.*}Example output (goes to stderr):
20:45:41.867 0x1b34700 mt.0 > com/ibm/ws/kernel/launch/internal/FrameworkManager.addShutdownHook(Z)V bytecode method, this = 0xe014d508
20:45:41.868 0x1b34700 mt.6 < com/ibm/ws/kernel/launch/internal/FrameworkManager.addShutdownHook(Z)V bytecode methodThe text () may be added after the method name(s) to add
additional lines of output showing passed-in arguments and returned
results (if the method has not been JIT-compiled yet):
-Xtrace:print=mt,methods={java/nio/HeapByteBuffer.getShort()}Example output:
17:23:43.134 0x11b06400 mt.0 > java/nio/HeapByteBuffer.getShort()S bytecode method, this = 0x7fff903c8
17:23:43.134 0x11b06400 mt.18 - this: java/nio/HeapByteBuffer@00000007FFF903C8 method arguments: ()
17:23:43.134 0x11b06400 mt.6 < java/nio/HeapByteBuffer.getShort()S bytecode method
17:23:43.134 0x11b06400 mt.28 - return value: (short)0The method may be JIT-excluded to always print the additional information although this may have a large performance impact. For example:
-Xjit:exclude={java/nio/HeapByteBuffer.getShort()*}A stack trace may be dumped with the trigger option to show which method is calling the traced method:
-Xtrace:iprint=mt,methods={com/ibm/ws/kernel/launch/internal/FrameworkManager.launchFramework()},trigger=method{com/ibm/ws/kernel/launch/internal/FrameworkManager.launchFramework,jstacktrace}Example output:
20:45:41.034 0x1b34700 mt.0 > com/ibm/ws/kernel/launch/internal/FrameworkManager.launchFramework(Lcom/ibm/ws/kernel/boot/BootstrapConfig;Lcom/ibm/wsspi/logprovider/LogProvider;)V bytecode method, this = 0xffe89298
20:45:41.034 0x1b34700 mt.18 - this: com/ibm/ws/kernel/launch/internal/FrameworkManager@00000000FFE89298 method arguments: (com/ibm/ws/kernel/boot/BootstrapConfig@00000000E0030150,com/ibm/ws/logging/internal/impl/LogProviderImpl@00000000E00ACEE8)
20:45:41.035 0x1b34700 j9trc_aux.0 - jstacktrace:
20:45:41.035 0x1b34700 j9trc_aux.1 - [1] com.ibm.ws.kernel.launch.internal.FrameworkManager.launchFramework (FrameworkManager.java:198)
20:45:41.035 0x1b34700 j9trc_aux.1 - [2] com.ibm.ws.kernel.launch.internal.LauncherDelegateImpl.doFrameworkLaunch (LauncherDelegateImpl.java:114)
20:45:41.035 0x1b34700 j9trc_aux.1 - [3] com.ibm.ws.kernel.launch.internal.LauncherDelegateImpl.launchFramework (LauncherDelegateImpl.java:100)
20:45:41.035 0x1b34700 j9trc_aux.1 - [4] com.ibm.ws.kernel.boot.internal.KernelBootstrap.go (KernelBootstrap.java:213)
20:45:41.035 0x1b34700 j9trc_aux.1 - [5] com.ibm.ws.kernel.boot.Launcher.handleActions (Launcher.java:241)
20:45:41.035 0x1b34700 j9trc_aux.1 - [6] com.ibm.ws.kernel.boot.Launcher.createPlatform (Launcher.java:117)
20:45:41.035 0x1b34700 j9trc_aux.1 - [7] com.ibm.ws.kernel.boot.cmdline.EnvCheck.main (EnvCheck.java:59)
20:45:41.035 0x1b34700 j9trc_aux.1 - [8] com.ibm.ws.kernel.boot.cmdline.EnvCheck.main (EnvCheck.java:35)Instead of printing to stderr, you may print to binary files and then post-process them (ideally using the same version of Java that produced them) to dump human-readable output. For example:
-Xtrace:methods={com/ibm/ws/kernel/launch/internal/FrameworkManager.*},output={jvmtrace#.trc,100M,10},maximal=mtThen on each jvmtrace*.trc file, run the trace
formatter; for example:
$ java com.ibm.jvm.TraceFormat jvmtrace0.trcForced Garbage Collections
Forced garbage collections (System.gc() or Runtime.gc()) can be investigated by printing stack traces whenever they're called using the generic JVM argument:
-Xtrace:trigger=method{java/lang/Runtime.gc,jstacktrace},print=mtOutput goes to native_stderr.log. There may be some
performance overhead to this option so before running in production (see
the -Xtrace
section in the IBM Java chapter), so test the overhead in a test
environment. Example output:
12:02:55.436*0x191de00 mt.2 > java/lang/Runtime.gc()V Native method, This = 1b24188
12:02:55.463 0x191de00 mt.18 - Instance method receiver: java/lang/Runtime@00002B8F6249AA70 arguments: ()
12:02:55.463 0x191de00j9trc_aux.0 - jstacktrace:
12:02:55.464 0x191de00j9trc_aux.1 - [1] java.lang.Runtime.gc (Native Method)
12:02:55.464 0x191de00j9trc_aux.1 - [2] java.lang.System.gc (System.java:278)
12:02:55.464 0x191de00j9trc_aux.1 - [3] Test.main (Test.java:3)If you are on IBM Java >=6 and < 7.1, then you may instead use -Xdump:stack:events=fullgc
This will print a stack trace to stderr every time a full garbage collection occurs:
Thread=WebContainer : 263509055 (F6C04688) Status=Running
at java/lang/Runtime.gc()V (Native Method)
at java/lang/System.gc()V (System.java:312)
at Test.main([Ljava/lang/String;)V (Test.java:6)
JVMDUMP013I Processed dump event "fullgc", detail "".However, it will also print a stack any time a full GC occurs for non-explicit reasons. You can simply look for any stacks that begin with Runtime.gc to figure out which ones are explicit.
Requesting Full GCs
If it is required to request full GCs, here are some options (assuming -Xdisableexplicitgc is not set):
- MBean: MemoryMXBean.gc
- Create a JSP/Servlet or other type of application that executes System.gc based on some HTTP request or other input
- Use the Java Surgery tool with -command CollectGarbage (this one is probably the closest to jcmd, although see the caveats on the page)
- Use -Xdump or -Xtrace to trigger on certain method invocations (hard to configure)
- Request a heapdump: this will force a GC as part of taking the heapdump
Stack Traces of the Sources of Threads
The sources of threads may be tracked by dumping where those threads are instantiated, which is likely the code that will subsequently spawn those threads. For example, if there is a thread with the following stack:
3XMTHREADINFO3 Java callstack:
4XESTACKTRACE at java/lang/Object.wait(Native Method)
4XESTACKTRACE at java/lang/Object.wait(Object.java:196(Compiled Code))
4XESTACKTRACE at java/lang/ref/ReferenceQueue.remove(ReferenceQueue.java:102(Compiled Code))
4XESTACKTRACE at sun/rmi/transport/DGCClient$EndpointEntry$RenewCleanThread.run(DGCClient.java:492(Compiled Code))
4XESTACKTRACE at java/lang/Thread.run(Thread.java:736(Compiled Code))Then the thread class is
sun/rmi/transport/DGCClient$EndpointEntry$RenewCleanThread.
Next, construct an -Xtrace option which prints the stack
trace of the constructor call to stderr. For example:
-Xtrace:print=mt,methods={sun/rmi/transport/DGCClient$EndpointEntry$RenewCleanThread.<init>*},trigger=method{sun/rmi/transport/DGCClient$EndpointEntry$RenewCleanThread.<init>*,jstacktrace}As another example, for Timers with stacks such as:
3XMTHREADINFO "Thread-2572" ...
3XMTHREADINFO3 Java callstack:
4XESTACKTRACE at java/lang/Object.wait(Native Method)
4XESTACKTRACE at java/lang/Object.wait(Object.java:196(Compiled Code))
4XESTACKTRACE at java/util/Timer$TimerImpl.run(Timer.java:246(Compiled Code))
5XESTACKTRACE (entered lock: java/util/Timer$TimerImpl@0x0000000720737468, entry count: 1)Add the following generic JVM argument:
-Xtrace:print=mt,methods={java/util/Timer$TimerImpl.<init>*},trigger=method{java/util/Timer$TimerImpl.<init>*,jstacktrace}Example output:
20:05:02.535*0x23b3f500 mt.0 > java/util/Timer$TimerImpl.<init>(Ljava/lang/String;Z)V Bytecode method, This = 20884938
20:05:02.535 0x23b3f500 j9trc_aux.0 - jstacktrace:
20:05:02.535 0x23b3f500 j9trc_aux.1 - [1] java.util.Timer$TimerImpl.<init> (Timer.java:201)
20:05:02.535 0x23b3f500 j9trc_aux.1 - [2] java.util.Timer.<init> (Timer.java:364)
20:05:02.535 0x23b3f500 j9trc_aux.1 - [3] com.ibm.TimerTestServlet.service (TimerTestServlet.java:22)...
20:05:02.535 0x23b3f500 mt.6 < java/util/Timer$TimerImpl.<init>(Ljava/lang/String;Z)V Bytecode methodEnabling certain -Xtrace options may affect the performance of the entire JVM on older versions of Java (see the -Xtrace section).
I/O Tracing
-Xtrace:none,maximal=j9scar.136,trigger=tpnid{j9scar.136,jstacktrace},output={"trace_%p.bin",100m}Network Tracing
To enable tracing for the SDK's java/net classes, you may use:
-Xtrace:methods={java/net/*},print=mtThis writes to native_stderr.log. For example:
20:32:41.615 0x13d86800 mt.0 > java/net/InetAddress.getCanonicalHostName()Ljava/lang/String; Bytecode method, This = 4125660
20:32:41.615 0x13d86800 mt.18 - Instance method receiver: java/net/Inet4Address@0000000004125660 arguments: ()
20:32:41.855 0x13d86800 mt.6 < java/net/InetAddress.getCanonicalHostName()Ljava/lang/String; Bytecode methodEquivalently, the trace may be sent to files. For example:
-Xtrace:methods={java/net/*},output={jvmtrace#.trc,100M,10},maximal=mtThen on each jvmtrace*.trc file, run the trace
formatter; for example:
$ java com.ibm.jvm.TraceFormat jvmtrace0.trcIn the following example, we can see the first call doesn't find the host name in the cache, then puts it in the cache:
21:07:36.564789000 0x0000000013c6ba00 mt.0 Entry >java/net/InetAddress.getCanonicalHostName()Ljava/lang/String; Bytecode method, This = 0x435f2b0
21:07:36.564790000 0x0000000013c6ba00 mt.18 Event Instance method receiver: java/net/Inet4Address@0x435f2b0 arguments: ()
...
21:07:36.783388000 0x0000000013c6ba00 mt.3 Entry >java/net/InetAddress.cacheAddress(Ljava/lang/String;Ljava/lang/Object;Z)V Bytecode static method
...
21:07:36.783425000 0x0000000013c6ba00 mt.0 Entry >java/net/InetAddress$Cache.put...
s = 0x1f0e930
21:07:36.783428000 0x0000000013c6ba00 mt.18 Event Instance method receiver: java/net/InetAddress$Cache@0x1f0e930 arguments: (java/lang/String@00000000043A9D60...
000043AA260)
...
21:07:36.783656000 0x0000000013c6ba00 mt.6 Exit <java/net/InetAddress.getCanonicalHostName()Ljava/lang/String; Bytecode methodIn the next call, there is no put; therefore, it found it in the cache:
21:07:41.373200000 0x0000000013c6ba00 mt.0 Entry >java/net/InetAddress.getCanonicalHostName()Ljava/lang/String; Bytecode method, This = 0x43ba250
21:07:41.373201000 0x0000000013c6ba00 mt.18 Event Instance method receiver: java/net/Inet4Address@0x43ba250 arguments: ()
...
21:07:41.493092000 0x0000000013c6ba00 mt.3 Entry >java/net/InetAddress.getCachedAddress(Ljava/lang/String;)Ljava/lang/Object; Bytecode static method
...
21:07:41.493165000 0x0000000013c6ba00 mt.6 Exit <java/net/InetAddress.getCanonicalHostName()Ljava/lang/String; Bytecode methodEnabling certain -Xtrace options may affect the performance of the entire JVM on older versions of Java (see the -Xtrace section).
Debugging File Leaks
If core dump analysis does not discover the cause of file leaks (this may be particularly difficult on Windows when a particular leaked file must be found, because the file descriptor identifiers in Java objects do not directly map to Windows HANDLE addresses), then IO trace points may be used. IO trace points differ by operating system, so you may start with all IO trace points (print=IO), but in this example we show Windows trace points:
-Xtrace:print=IO.100-105,trigger=tpnid{IO.103,jstacktrace}This also adds jstacktrace on IO.103 which is a file open.
21:40:27.491 0x2479c200 IO.103 > IO_CreateFileW(filename=C:\WAS\profiles\...\.metadata\.plugins\...\properties.version...
21:40:27.491 0x2479c200 j9trc_aux.0 - jstacktrace:
21:40:27.491 0x2479c200 j9trc_aux.1 - [1] java.io.FileOutputStream.open (Native Method)
21:40:27.491 0x2479c200 j9trc_aux.1 - [2] java.io.FileOutputStream.<init> (FileOutputStream.java:233) (Compiled Code)
21:40:27.491 0x2479c200 j9trc_aux.1 - [3] java.io.FileOutputStream.<init> (FileOutputStream.java:183) (Compiled Code)
21:40:27.491 0x2479c200 j9trc_aux.1 - [4] org.eclipse.core.internal.localstore.BucketTree.saveVersion (BucketTree.java:145)
21:40:27.491 0x2479c200 j9trc_aux.1 - [5] org.eclipse.core.internal.localstore.BucketTree.close (BucketTree.java:80)
21:40:27.491 0x2479c200 j9trc_aux.1 - [6] org.eclipse.core.internal.properties.PropertyManager2.shutdown (PropertyManager2.java:169)
21:40:27.491 0x2479c200 j9trc_aux.1 - [7] org.eclipse.core.internal.resources.Workspace.shutdown (Workspace.java:1829)
21:40:27.491 0x2479c200 j9trc_aux.1 - [8] org.eclipse.core.internal.resources.Workspace.close (Workspace.java:369)
21:40:27.491 0x2479c200 j9trc_aux.1 - [9] org.eclipse.core.resources.ResourcesPlugin.shutdown (ResourcesPlugin.java:344)
21:40:27.491 0x2479c200 j9trc_aux.1 - [10] org.eclipse.core.internal.compatibility.PluginActivator.stop (PluginActivator.java:46)
21:40:27.491 0x2479c200 j9trc_aux.1 - [11] org.eclipse.osgi.framework.internal.core.BundleContextImpl$2.run (BundleContextImpl.java:843)
21:40:27.491 0x2479c200 j9trc_aux.1 - [12] java.security.AccessController.doPrivileged (AccessController.java:341) (Compiled Code)
21:40:27.491 0x2479c200 j9trc_aux.1 - [13] org.eclipse.osgi.framework.internal.core.BundleContextImpl.stop (BundleContextImpl.java:836)
21:40:27.491 0x2479c200 j9trc_aux.1 - [14] org.eclipse.osgi.framework.internal.core.BundleHost.stopWorker (BundleHost.java:501)
21:40:27.491 0x2479c200 j9trc_aux.1 - [15] org.eclipse.osgi.framework.internal.core.AbstractBundle.suspend (AbstractBundle.java:550)
21:40:27.491 0x2479c200 j9trc_aux.1 - [16] org.eclipse.osgi.framework.internal.core.Framework.suspendBundle (Framework.java:1101)
21:40:27.491 0x2479c200 j9trc_aux.1 - [17] org.eclipse.osgi.framework.internal.core.StartLevelManager.decFWSL (StartLevelManager.java:597)
21:40:27.491 0x2479c200 j9trc_aux.1 - [18] org.eclipse.osgi.framework.internal.core.StartLevelManager.doSetStartLevel (StartLevelManager.java:257)
21:40:27.491 0x2479c200 j9trc_aux.1 - [19] org.eclipse.osgi.framework.internal.core.StartLevelManager.shutdown (StartLevelManager.java:215)
21:40:27.491 0x2479c200 j9trc_aux.1 - [20] org.eclipse.osgi.framework.internal.core.InternalSystemBundle.suspend (InternalSystemBundle.java:266)
21:40:27.491 0x2479c200 j9trc_aux.1 - [21] org.eclipse.osgi.framework.internal.core.Framework.shutdown (Framework.java:694)
21:40:27.491 0x2479c200 j9trc_aux.1 - [22] org.eclipse.osgi.framework.internal.core.Framework.close (Framework.java:592)
21:40:27.491 0x2479c200 j9trc_aux.1 - [23] org.eclipse.osgi.framework.internal.core.InternalSystemBundle$1.run (InternalSystemBundle.java:243)
21:40:27.491 0x2479c200 j9trc_aux.1 - [24] java.lang.Thread.run (Thread.java:863)
21:40:27.492 0x2479c200 IO.105 < IO_CreateFileW - return code=5072
21:40:27.492 0x2479c200 IO.100 > IO_CloseHandle(Handle=5072)
21:40:27.492 0x2479c200 IO.102 < IO_CloseHandle - return code=1In the above example, an open returns the file handle 5072 (the result in the method exit of CreateFileW), and that is immediately followed by a CloseHandle on 5072, which succeeds. Finding an open without a close will discover the leak.
Tracing Profiler
See https://www-01.ibm.com/support/docview.wss?uid=swg21657391
jdmpview
List all instances of a class
> x/j java/lang/StringShow details of a class
> info class java/lang/StringJava object information
> x/j 0xfcdd4b58
heap #1 - name: Generational@145a9013c6c0
java/lang/String @ 0xfcdd4b58
declared fields:
private final char[] value = <object> @ 0xfcdd4bd8
private final int count = 14 (0xe)
private int hashCode = 0 (0x0)
references:
0xfcdd4bd8Detailed information:
> !j9object 0xfcdd4b58
J9VMJavaLangString at 0x00000000FCDD4B58 {
struct J9Class* clazz = !j9class 0x1294B00 // java/lang/String
Object flags = 0x00000030;
[C value = !fj9object 0xfcdd4bd8 (offset = 0) (java/lang/String)
I count = 0x0000000E (offset = 4) (java/lang/String)
I hashCode = 0x00000000 (offset = 8) (java/lang/String)
"/daytrader/app"
}Static fields of a class with pointer
> !j9statics 0x1294B00
Static fields in java/lang/String:
0x0000000001294F00 serialVersionUID J (!j9romstaticfieldshape 0x0000145A4F06B218) = 0xA0F0A4387A3BB342 (-6849794470754667710)
[...]Dump arbitrary memory
Dump arbitrary memory:
> xx 0xf1afdc10,10,4
0xf1afdc10 : 4C6DB928 00000000 E1A88FD0 00000000 [ (.mL............]In the above example, 4C6DB928 was a Java object.
Extracting Xtrace
Use the !snapformat command to extract the Xtrace
buffers.
The second column is the thread ID which may be inspected with
!j9vmthread. For example:
15:45:48.434563585 *0x58AE400 j9vm.361 Entry >Attempting to acquire exclusive VM access.
> !j9vmthread 0x58AE400
0xa0: j9object_t threadObject = !j9object 0x0000000048BA4D50 // com/Test/MyThreadWhat caused a core dump
- Run
!snapformatto format the Xtrace and search for the core dump file name:> !snapformat | grep core.20200804.025942.3576.0001.dmp 02:59:42.174160000 *0x1981C00 j9dmp.9 Event Preparing for dump, filename=/opt/ibm/wlp/output/defaultServer/core.20200804.025942.3576.0001.dmp - Take the thread ID of that message and search the Xtrace for that
thread and look at the end of the output:
> !snapformat | grep 0x1981C00 02:59:42.016594000 *0x1981C00 j9vm.294 Entry >setCurrentException index=11 constructorIndex=0 detailMessage=0xf0001ad0 02:59:42.016612000 0x1981C00 j9vm.10 Entry >internalSendExceptionConstructor 02:59:42.016620000 *0x1981C00 j9vm.246 Entry >dispatchAsyncEvents asyncEventFlags=0x4 02:59:42.016627000 0x1981C00 j9vm.247 Event call event handler: handlerKey=2 eventHandler=0x145a8df844e0 userData=0x0 02:59:42.016642000 *0x1981C00 j9vm.248 Exit <dispatchAsyncEvents 02:59:42.172975000 *0x1981C00 j9vm.11 Exit <internalSendExceptionConstructor 02:59:42.174160000 *0x1981C00 j9dmp.9 Event Preparing for dump, filename=/opt/ibm/wlp/output/defaultServer/core.20200804.025942.3576.0001.dmp - Take the address of the
detailMessageobject in thesetCurrentExceptionmessage and print that object:> !j9object 0xf0001ad0 J9VMJavaLangString at 0x00000000F0001AD0 { struct J9Class* clazz = !j9class 0x1294B00 // java/lang/String Object flags = 0x00000000; [C value = !fj9object 0xf0001ae0 (offset = 0) (java/lang/String) I count = 0x0000000F (offset = 4) (java/lang/String) I hashCode = 0x00000000 (offset = 8) (java/lang/String) "Java heap space" - In this example, the
detailMessage"Java heap space" means it was due to a Java OutOfMemoryError.
There may also be messages like the following showing a fatal allocation failure and its size:
15:45:48.464090000 *0x0 j9mm.101 Event J9AllocateIndexableObject() returning NULL! 277962536 bytes requested for object of class 0x87f00 from memory space 'Generational' id=0x3ff900852b0Strong paths to GC roots
NOTE: These queries also provide paths through phantom, weak, soft, and finalizable references which should be ignored if searching for a strong path to GC roots.
!strongrootpathfindall 0x...This command is the same as !rootpathfindall.
Or just the first one:
!strongrootpath 0x...This command is the same as !rootpathfind.
Find details about an object and its heap generation
whatis 0x...Search for object references
!findall pointer 0x...Accumulated CPU time of threads
Accumulated CPU time in javacores are queried when producing a javacore but no such standardized information is in core dumps; however, z/OS and Windows can get such information from the OS structures.
- On Windows
using
info thread:
Multiply each by 100 to get nanoseconds.KernelTime=200625000 UserTime=207656250
Advanced Commands
Object size histogram
Show class histogram of object sizes, excluding static memory usage (the final line under the "Space used" column shows total heap usage [reachable and unreachable]):
> !objectsizeinfo
Object field size summary
=========================
Class Total size Data size Space used Instances char byte short int long float double boolean object hidden
----------------------- ---------- --------- ---------- --------- ---- ------- ------ ----- ---- ----- ------ ------- ------- ------
boolean[] N/A N/A 32400 916 0 0 0 0 0 0 0 0 0 0
boolean[][] N/A N/A 128 3 0 0 0 0 0 0 0 0 0 0
byte[] N/A N/A 61279440 8180 0 0 0 0 0 0 0 0 0 0
byte[][] N/A N/A 4440 41 0 0 0 0 0 0 0 0 0 0
char[] N/A N/A 16388632 153884 0 0 0 0 0 0 0 0 0 0
char[][] N/A N/A 343224 21126 0 0 0 0 0 0 0 0 0 0
char[][][] N/A N/A 456 2 0 0 0 0 0 0 0 0 0 0
com/ibm/AllocateObject 16 12* 16 1 0 0 0 0 0 0 0 0 0 0
[...]
Class Total size Data size Space used Instances char byte short int long float double boolean object hidden
Heap summary 34832704 22956148 123317456 1529720 719 1763123 155493 41343 0 0 0 0 2651309 5199 Native memory usage
!nativememinfo dumps out the same structure that's
commonly used in javacores:
> !nativememinfo
JRE: 14,115,609,464 bytes / 65049 allocations
+--VM: 13,622,156,544 bytes / 55708 allocations
| +--Classes: 245,835,968 bytes / 32251 allocationsJava heap segments
To find out the size of the Java heap:
> !dumpallregions
+----------------+----------------+----------------+----------------+--------+----------------+----------------------
| region | start | end | subspace | flags | size | region type
+----------------+----------------+----------------+----------------+--------+----------------+----------------------
000000500867eb00 0000000080000000 000000009acc0000 000000500862add0 00000009 1acc0000 ADDRESS_ORDERED
000000500867ee30 000000009acc0000 000000009f7a0000 000000500862f2e0 0000000a 4ae0000 ADDRESS_ORDERED
000000500867ed20 000000009f7a0000 00000000a0000000 00000050118d5530 0000000a 860000 ADDRESS_ORDERED
+----------------+----------------+----------------+----------------+--------+----------------+----------------------All native memory segments
Dump all segments:
> !dumpallsegments
memorySegments - !j9memorysegmentlist 0x66b5a0
+----------------+----------------+----------------+----------------+--------+--------+
| segment | start | alloc | end | type | size |
+----------------+----------------+----------------+----------------+--------+--------+
00007f24ddc07968 00007f23f151f030 00007f23f15725b0 00007f23f161f030 00800040 100000
00007f24ddc07c88 00007f23f5ecc030 00007f23f5fcc010 00007f23f5fcc030 00800040 100000 [...]Loaded native libraries
List loaded native libraries at the time of the dump:
> !dclibs
Showing library list for /opt/dockerdebug/fedorawasdebug/supplemental/exampledata/liberty/verbosegc_and_oom/core.20191106.195108.1845.0001.dmp
exe = java
Lib : java
Library is not appended to the core file, it may be present on the local disk
Lib : java
Library is not appended to the core file, it may be present on the local disk
Lib : /lib64/ld-linux-x86-64.so.2
Library is not appended to the core file, it may be present on the local disk
Lib : /lib64/libpthread.so.0
Library is not appended to the core file, it may be present on the local disk [...]Show dump agents
Show registered dump agents:
> !showdumpagents
Registered dump agents
----------------------
-Xdump: [...]Native allocations by callsite
List known native allocations by callsite:
> !findallcallsites
total alloc | largest
blocks| bytes | bytes | callsite
-------+-------+-------+-------+-------+-------+-------+-------+-------+-------
3043 65892984 74168 segment.c:233Native allocations by one callsite
List native allocations by a particular callsite:
> !findcallsite dmpagent.c:1713
!j9x 0x00002B248403AA90,0x0000000000000078 dmpagent.c:1713
!j9x 0x00002B248403AB50,0x0000000000000078 dmpagent.c:1713
!j9x 0x00002B248403AC10,0x0000000000000078 dmpagent.c:1713
!j9x 0x00002B248403ACD0,0x0000000000000078 dmpagent.c:1713
!j9x 0x00002B248403AD90,0x0000000000000078 dmpagent.c:1713
!j9x 0x00002B248403AE50,0x0000000000000078 dmpagent.c:1713
!j9x 0x00002B248403AF10,0x0000000000000078 dmpagent.c:1713
!j9x 0x00002B248403AFD0,0x0000000000000078 dmpagent.c:1713
!j9x 0x00002B24EC083520,0x0000000000000078 dmpagent.c:1713
Call site count = 9If investigating a triggerDump API call, the last callsite can be cast to the expected struct:
> !J9RASdumpAgent 0x00002B24EC083520
J9RASdumpAgent at 0x2b24ec083520 {
Fields for J9RASdumpAgent:
0x0: struct J9RASdumpAgent * nextPtr = !j9rasdumpagent 0x0000000000000000
0x8: void * shutdownFn = !j9x 0x00002B2483DA2240
0x10: UDATA eventMask = 0x00000000004A2000 (4857856)
0x18: char * detailFilter = !j9x 0x0000000000000000
0x20: UDATA startOnCount = 0x0000000000000001 (1)
0x28: UDATA stopOnCount = 0x0000000000000000 (0)
0x30: UDATA count = 0x0000000000000000 (0)
0x38: char * labelTemplate = !j9x 0x00002B2484034BF0 // "/opt/IBM/WebSphere/AppServer/profiles/AppSrv01/cor..."
0x40: void * dumpFn = !j9x 0x00002B2483DA5660
0x48: char * dumpOptions = !j9x 0x0000000000000000
0x50: void * userData = !j9x 0x0000000000000000
0x58: UDATA priority = 0x00000000000003E7 (999)
0x60: UDATA requestMask = 0x0000000000000008 (8)
0x68: UDATA prepState = 0x0000000000000101 (257)
0x70: char * subFilter = !j9x 0x0000000000000000
}The requestMask lists the request options
Check if core dump is in an exclusively locked state
- Find the
j9javampointer:> !context *0 : PID: 4374; !j9javavm 0x153a38026560 - Print it and search for
exclusiveAccessState:> !j9javavm 0x153a38026560 | grep exclusiveAccessState 0x1968: UDATA exclusiveAccessState = 0x0000000000000002 (2) - Review the bit
flag value:
#define J9_XACCESS_NONE 0 #define J9_XACCESS_PENDING 1 #define J9_XACCESS_EXCLUSIVE 2 #define J9_XACCESS_HANDING_OFF 3 #define J9_XACCESS_HANDED_OFF 4 #define J9_XACCESS_HANDING_OFF_FROM_EXTERNAL_THREAD 5
Check which thread has exclusive access in a core dump
- Find all threads whose
publicFlagsbit flags have J9_PUBLIC_FLAGS_VM_ACCESS (0x20). Ensure that only one thread has this and that all other threads have the bit flag J9_PUBLIC_FLAGS_HALT_THREAD_EXCLUSIVE (0x1). For example,WebContainer : 7has 0x20 and the others have 0x1:
To quickly search for the exclusive access thread:> !threads flags !j9vmthread 0x29106e00 publicFlags=1020 privateFlags=2 inNative=0 // Default Executor-thread-28408 !j9vmthread 0x294d7d00 publicFlags=a1 privateFlags=2 inNative=1 // Default Executor-thread-27795 [...]> !threads flags | grep "20 privateFlags" !j9vmthread 0x29106e00 publicFlags=1020 privateFlags=2 inNative=0 // Default Executor-thread-28408 - Print the details of that thread and search for
omrthread_t:> !j9vmthread 0x29106e00 | grep omrthread_t 0x138: omrthread_t osThread = !j9thread 0x000000595631C648 - Print the
omrthread_tand search fortid:> !j9thread 0x000000595631C648 | grep tid 0x420: uintptr_t tid = 0x00000000275F2800 (660547584) - Remove any
0-padding after0xand pass that toinfo thread:> info thread 0x275F2800 process id: 84410739 thread id: 0x275f2800 registers: PSW = 0x070c0000817384d6 R0 = 0x0000000000000003 R1 = 0x0000000026c90508 R2 = 0x0000005000a3b0cf R3 = 0x000000001c011720 R4 = 0x0000005400000000 R5 = 0x00000000000201bb R6 = 0x00000000078d0401 R7 = 0x0000000001d9d470 R8 = 0x000000006e366f00 R9 = 0x0000000026c90508 R10 = 0x0000000000000000 R11 = 0x0000005000000000 R12 = 0x00000051bf7fec60 R13 = 0x0000005417efcaa0 R14 = 0x000000000170a6ae R15 = 0x0000000000000000 native stack sections: 0x5417efa000 to 0x5417f00000 (length 0x6000) native stack frames: bp: 0x0000005417efbd80 pc: 0x0000000026c8e0f0 ExtraSymbolsModule::CEEOPCT+0x6a40 bp: 0x0000005417efc340 pc: 0x0000000026feed76 ExtraSymbolsModule::pthread_cond_wait+0x1ee bp: 0x0000005417efc4c0 pc: 0x00000000273f7680 libj9thr29.so::monitor_wait_original+0xcb8 bp: 0x0000005417efc640 pc: 0x00000000273fda6c libj9thr29.so::omrthread_monitor_wait+0x84 bp: 0x0000005417efc740 pc: 0x000000007ad628a2 ExtraSymbolsModule::MM_Scavenger::getNextScanCache(MM_EnvironmentStandard*)+0x1062 [...] - To get the
vmStateof the thread:- Find the
OMR_VMThreadusing the J9VMThread above:> !j9vmthread 0x29106e00 | grep omr_vmthread 0x930: struct OMR_VMThread * omrVMThread = !omr_vmthread 0x0000000006B9F3B8 - Search the
OMR_VMThreadforvmState:> !omr_vmthread 0x0000000006B9F3B8 | grep vmState 0x40: uintptr_t vmState = 0x0000000000000000 (0) - A state of
0is the Java interpreter. A state of0x20xxxmeans the thread is performing garbage collection. Other states may be found withJ9VMSTATE_*.
- Find the
Map method address to method name
> !j9method 0x0000000005674478 --> com/example/ExampleClass.play()VDump byte codes of a class
> !classforname com/example/ExampleClass
Searching for classes named 'com/example/ExampleClass' in VM=7f363402a320
!j9class 0x0000000005C22300 named com/example/ExampleClass
Found 1 class(es) named com/example/ExampleClass
> !j9class 0x0000000005C22300 | grep romClass
0x8: struct J9ROMClass * romClass = !j9romclass 0x00007F342513DEF0
> !dumpromclass 0x00007F342513DEF0Dump byte codes of a method
> !methodforname com/example/ExampleClass.play
Searching for methods named 'com/example/ExampleClass.play' in VM=0x00007F6BB4013720...
!j9method 0x0000000005674478 --> com/example/ExampleClass.play()V
Found 1 method(s) named com/example/ExampleClass.play
> !bytecodes 0x0000000005674478
Name: play
Signature: ()V
[...]
0 ldc2lw 70 (long) 0x0000000000000030
3 lstore 5
5 aconstnull
6 astore 7
8 iconstm1 [...]Query Min and Max Heap
- Find the
j9javampointer:> !context *0 : PID: 4374; !j9javavm 0x153a38026560 - Find the
gcExtensionspointer:!j9javavm 0x153a38026560 | grep gcExtensions | charsfrom -e j9x 0x000000500B5904D0 - Cast the
gcExtensionspointer to get the min and max heap sizes:> !MM_GCExtensions 0x000000500B5904D0 | grep memoryMax 0x20a8: UDATA memoryMax = 0x0000000100000000 (4294967296) > !MM_GCExtensions 0x000000500B5904D0 | grep initialMemorySize 0x20b0: UDATA initialMemorySize = 0x0000000040000000 (1073741824)
Custom DDR Command
- Create a Java project and place
j9ddr.jaron the classpath - Create a class that extends
com.ibm.j9ddr.tools.ddrinteractive.Commandand uses thecom.ibm.j9ddr.tools.ddrinteractive.annotations.DebugExtensionannotation. For example:import com.ibm.j9ddr.CorruptDataException; import com.ibm.j9ddr.tools.ddrinteractive.Command; import com.ibm.j9ddr.tools.ddrinteractive.Context; import com.ibm.j9ddr.tools.ddrinteractive.DDRInteractiveCommandException; import com.ibm.j9ddr.tools.ddrinteractive.annotations.DebugExtension; import com.ibm.j9ddr.vm29.j9.DataType; import com.ibm.j9ddr.vm29.pointer.generated.J9JavaVMPointer; import com.ibm.j9ddr.vm29.pointer.helper.J9RASHelper; @DebugExtension(VMVersion="*") public class CustomCommand extends Command { { @SuppressWarnings("unused") CommandDescription cd = addCommand("customcommand", "", "Help description"); } @Override public void run(String command, String[] args, Context context, PrintStream out) throws DDRInteractiveCommandException { try { out.println("Hello World"); J9JavaVMPointer jvm = J9RASHelper.getVM(DataType.getJ9RASPointer()); out.println("!j9javavm " + jvm.getHexAddress()); } catch (CorruptDataException e) { throw new DDRInteractiveCommandException("Error processing " + e.getClass().getCanonicalName(), e); } } } - Package the class into a
jarfile. - Run
jdmpviewwith the path to thejarfile. For example:jdmpview -J-Dplugins=$HOME/customddrcommands-1.0-SNAPSHOT.jar -core core.20200804.025942.3576.0001.dmp - Execute your command name with
!in front. For example:> !customcommand Hello World !j9javavm 0x000000500886EF70
Debugging jdmpview
Example enabling DTFJ logging:
> log j9ddr.structure_reader FINEST-Xcheck
-Xcheck:memory
may be used to investigate native memory issues within the JVM
itself.
Snap Traces
Snap traces contain tracepoint data held in JVM trace bufffers (-Xtrace). Think of a snap trace as a black box flight recorder. An example file name is Snap.20140930.025436.9920.0004.trc. To process a snap trace, use the same Java version that produced the file to run the trace formatter on the snap file. For example:
$ java com.ibm.jvm.TraceFormat Snap.20140930.025436.9920.0004.trcIf you are formatting a snap dump from another JVM, download their
*.dat files ($WAS/java/jre/lib/) to a local
directory and then use:
java com.ibm.jvm.format.TraceFormat Snap...trc.gz -datdir $DIROn z/OS, FTP the .dat files down in ASC.
The TraceFormatter will produce an output file with the same name plus a .fmt suffix which is a human readable output of the snap file. For example:
09:54:40.168724484 *0x000000002d2e4e00 j9prt.527 Exception * j9vmem_reserve_memory (failure)
09:54:40.168736220 0x000000002d2e4e00 j9prt.468 Exception * allocate_memory32 failed to allocate byteAmount=8388608 callSite=segment.c:211
09:54:40.168740272 0x000000002d2e4e00 j9prt.1049 Exception * vmem allocate normal region failed. Callsite = segment.c:211, regionSize = 8388608
09:54:40.168744813 0x000000002d2e4e00 j9prt.1045 Exception * memory32 allocate returned null pointer. Callsite = segment.c:211, byteAmount = 32832
09:54:40.168747956 0x000000002d2e4e00 j9vm.199 Exception * Failed to allocate memory for segment in list 0x19fa50 (size=32768 type=0x10000)
09:54:40.168768913 0x000000002d2e4e00 j9vm.201 Exit <allocateMemorySegmentInList result=0x0
09:54:40.168776807 0x000000002d2e4e00 j9vm.94 Exception * Unable to allocate 1912 bytes for RAM class. Throw OutOfMemoryErrorExcessive Direct Byte Buffers
In addition to the section on excessive direct byte buffers in the general Troubleshooting Java chapter, IBM Java offers additional potential mitigations to excessive DBBs:
- Use -Xgc:maxScavengeBeforeGlobal=N to force System.gc()s after every N scavenges. This option may have performance implications.
- Use a non-generational garbage collection policy such as -Xgcpolicy:optthruput or -Xgcpolicy:optavgpause. This option may have performance implications. As the article quoted above mentions, this may not completely solve the issue.
A recent IBM javacore shows how much native memory is currently in use by DirectByteBuffers. For example:
5MEMUSER | | | +--Direct Byte Buffers: 1,865,530,448 bytes / 150746 allocationsDirect byte buffer allocations and frees may be tracked with the following -Xtrace:
-Xtrace:print=j9jcl.335-342For additonal detail:
-Xtrace:none,output={directbytebuffers%p_#.trc,100m,5},maximal=j9jcl.335-342,trigger=tpnid{j9jcl.335-342,jstacktrace}Log files named
directbytebuffers${PID_NUMBER}_${FILECOUNT}.trc will be
written to the current working directory of the JVM, which is normally
the profile directory (i.e. where javacores go by default). For each
file, execute the following command:
${WebSphere}/java/bin/java com.ibm.jvm.TraceFormat directbytebuffersPID_NUMBER.trc directbytebuffersPID_NUMBER.trc.txtFor example:
${WebSphere}/java/bin/java com.ibm.jvm.TraceFormat directbytebuffers30799_0.trc directbytebuffers30799_0.trc.txtCreate a ZIP of the directbytebuffers files and formatting data files:
${WebSphere}/java/bin/jar cvf directbytebuffers.jar directbytebuffers*trc* ${WebSphere}/java/jre/lib/J9TraceFormat.dat ${WebSphere}/java/jre/lib/TraceFormat.datUpload directbytebuffers.jar along with WAS and other logs.
JIT
Excluding JIT methods
The JIT exclude option may only be specified once; however, it
supports a regular expression so multiple methods may be specified with
|. For example:
-Xjit:exclude={java/lang/invoke/MutableCallSite.invalidate*|org/eclipse/ui/application/WorkbenchAdvisor.eventLoopException*}Always JITting methods
-Xjit:{method}(count=0)Tracing the JIT sampler
-Xjit:verbose{sampling}OutOfMemoryError
Starting with IBM Java 6.0.1, a system dump is produced on the first OufOfMemoryError in addition to the previous artifacts (PHD, javacore, snap).
Native OutOfMemoryErrors on 64-bit
There are three broad types of native OutOfMemoryErrors on 64-bit:
- With compressed references, insufficient virtual address space below 4GB for native classes, threads, and monitors.
- Ulimit exhaustion on certain operating systems such as Linux and AIX.
- If malloc or mmap return NULL or fail for any reason (e.g. physical
memory and swap are exhausted). For example, on Linux, with
overcommit_memory=2, if the amount of committed bytes (Committed_ASin /proc/meminfo) will exceed (Swap + (RAM*overcommit_ratio)) or (Swap +overcommit_kbytes).
When using IBM Java in 64-bit mode and with a maximum heap size less than 25GB, then Compressed References (-Xcompressedrefs) are enabled by default (defaults may be different on older versions of Java on some operating systems).
Compressed references will "decrease the size of Java objects and make more effective use of the available space. The result is less frequent garbage collection and improved memory cache utilization."
There are important implications to compressed references related to native OutOfMemoryErrors:
When you are using compressed references, the following structures are allocated in the lowest 4 GB of the address space: Classes, Threads, Monitors. Additionally, the operating system and native libraries use some of this address space. Small Java heaps are also allocated in the lowest 4 GB of the address space. Larger Java heaps are allocated higher in the address space.
Native memory OutOfMemoryError exceptions might occur when using compressed references if the lowest 4 GB of address space becomes full, particularly when loading classes, starting threads, or using monitors. You can often resolve these errors with a larger -Xmx option to put the Java heap higher in the address space.
A command-line option can be used with -Xcompressedrefs to allocate the heap you specify with the -Xmx option, in a memory range of your choice. This option is
-Xgc:preferredHeapBase=<address>, where<address>is the base memory address for the heap. In the following example, the heap is located at the 4GB mark, leaving the lowest 4GB of address space for use by other processes.-Xgc:preferredHeapBase=0x100000000
The first key point is that some maximum heap sizes below 4GB may cause the Java heap to be placed in the 0-4GB address space range (when possible). Compressed references technology works by compressing and decompressing pointers at runtime using bit shift arithmetic. However, if the Java heap can be fit under 4GB, then these extra instructions are not required. In one benchmark, when the Java heap moved above the 0-4GB range, there was a relative throughput decrease of ~2.5%. Note that this 2.5% effect was not under ceteris paribus conditions because the heap size was increased rather than using -Xgc:preferredHeapBase. The purpose of using -Xgc:preferredHeapBase (or alternatively, increasing the maximum heap size) is that you are forcing the JVM to take this performance hit in order to give more space to the native class, thread, and monitor data structures to avoid Native OutOfMemoryErrors (NOOMs).
The second key point is that native class, thread, and monitor data structures must all be allocated below 4GB when using compressed references. The operating system and other native allocations may further limit the available space under 4GB, so if you continue to get native OutOfMemoryErrors even with the Java heap allocated above the 0-4GB range, then you must address the number and size of the class, thread, and monitor data structures. In many cases, this is caused by a class, classloader, or thread leak which you can investigate with various tools, but it's easiest to start off by analyzing the javacore from the NOOM. If there are no leaks, then there may be other ways to reduce these data structures such as reducing reflection inflation, using shared classes, etc.
One option to avoid these problems and NOOMs is to disable compressed references entirely; however, one benchmark shows a 10-20% relative throughput decrease when doing so: "Analysis shows that a 64-bit application without CR yields only 80-85% of 32-bit throughput but with CR yields 90-95%. Depending on application requirements, CR can improve performance up to 20% over standard 64-bit". You may be able to recover some of this drop by increasing L2/L3 processor cache sizes or efficiency (using processor sets). Disabling compressed references will also dramatically increase Java heap usage by up to 70% (because the pointers are doubled, the same Java object reference takes more of the Java heap).
Common causes of exhaustion below 4GB even if the heap is above:
- Too many classes, classloaders, threads, or monitors.
- Too many other, non-Class/Thread/Monitor allocations going below
4GB. Starting with Java 6.0.1 SR8 FP3 and Java 7 SR8 FP10, consider
reserving more of this space for Classes/Threads/Monitors with
-Xmcrs#MB. For older releases, an equivalent but undocumented and unsupported option is-Xgc:suballocatorInitialSize=#MB. - On Windows, its default allocation strategy fills up the virtual
memory below 4GB, which is not
necessary. Set
HKLM\System\CurrentControlSet\Control\Session Manager\Memory Management\AllocationPreferenceto(REG_DWORD)=0x100000

In IBM Java <= 5 for Linux, the IBM_MALLOCTRACE
option is available which calls glibc's mtrace. Starting with IBM Java
6, this option was changed to function equivalent to -Xcheck:memory:all
instead of calling mtrace.
Useful jdmpview commands:
info thread *- In recent versions, includes detailed native thread informationinfo mmap -verbose- On some operating systems such as Linux, includes detailed information available in /proc
Native Stack Size (-Xss)
Due to padding, alignment, and other operating system requirements, the actual native thread stack size may be larger than that specified by -Xss.
Known Crashes
org/eclipse/swt/internal/cairo/Cairo._cairo_fill(Native Method):-Dorg.eclipse.swt.internal.gtk.cairoGraphics=false
Debug Mode
In one case, removing the options -Xdebug -Xnoagent
improved debug performance by 300%. In general, the only required
arguments are
-agentlib:jdwp=transport=dt_socket,server=y,suspend=n,address=7777
LaunchAnywhere
If you see the following error launching the installer:
An internal LaunchAnywhere application error has occured and this application cannot proceed. (LAX)
Stack Trace:
java.lang.IllegalArgumentException: Malformed \uxxxx encoding.
at java.util.Properties.loadConvert(Properties.java:618)
at java.util.Properties.load0(Properties.java:435)
at java.util.Properties.load(Properties.java:330)
at com.zerog.common.java.util.PropertiesUtil.loadProperties(Unknown Source)
at com.zerog.lax.LAX.(DashoA8113)
at com.zerog.lax.LAX.main(DashoA8113)Then try first exporting the following environment variables:
export PS1="> "
export TITLEBAR="> "Build OpenJ9
- Choose the desired version of build instructions
- Follow the instructions for your operating system, ultimately
leading to the final make step and you may instead run:
make images - Execute the JVM:
build/*/images/jdk/bin/java -version
Troubleshooting HotSpot JVM
jcmd
jcmd is a tool for executing various diagnostic operations.
jmap
jmap is an unsupported tool for memory operations.
histo
The histo option may be used to print a histogram of
Java objects by class, including number of instances and number of
bytes. The live option only counts reachable objects,
although it does force a full GC first. Example:
$ jmap -histo 15078
num #instances #bytes class name
----------------------------------------------
1: 399 4747704 [I
2: 1565 151240 [C
3: 450 51456 java.lang.Class
4: 194 48144 [B
5: 1229 29496 java.lang.String ...jinfo
jinfo is an unsupported tool which prints Java configuration of a live Java process or from a core dump.
Thread Dump
HotSpot Java can produce a thread dump which details the activity of each thread. For example:
2020-01-01 01:23:45
Full thread dump Java HotSpot(TM) 64-Bit Server VM (23.25-b01 mixed mode):
"pool-1-thread-8402" prio=3 tid=0x000000010956f000 nid=0x3cff waiting on condition [0xfffffff7868fe000]
java.lang.Thread.State: TIMED_WAITING (parking)
at sun.misc.Unsafe.park(Native Method)
- parking to wait for <0xfffffffe90fb54a0> (a java.util.concurrent.SynchronousQueue$TransferStack)
at java.util.concurrent.locks.LockSupport.parkNanos(LockSupport.java:226)
at java.util.concurrent.SynchronousQueue$TransferStack.awaitFulfill(SynchronousQueue.java:460)
at java.util.concurrent.SynchronousQueue$TransferStack.transfer(SynchronousQueue.java:359)
at java.util.concurrent.SynchronousQueue.poll(SynchronousQueue.java:942)
at java.util.concurrent.ThreadPoolExecutor.getTask(ThreadPoolExecutor.java:1068)
at java.util.concurrent.ThreadPoolExecutor.runWorker(ThreadPoolExecutor.java:1130)
at java.util.concurrent.ThreadPoolExecutor$Worker.run(ThreadPoolExecutor.java:615)
at java.lang.Thread.run(Thread.java:724)...The "nid" is the hexadecimal native thread ID.
Request Thread Dump
- On POSIX operating systems, send the
SIGQUITsignal and replace$PIDand a text thread dump will be printed tostderr:kill -3 $PID - Use
jcmdand replace$PIDand a text thread dump is printed to thejcmdconsole:jcmd PID Thread.print
HPROF Heapdumps
An HPROF heapdump contains the full Java heap object graph as well as Java object memory contents (for example, Strings, primitives, etc.). This is used for investigating OutOfMemoryErrors, tuning Java heap usage, etc.
By default, when a Java memory request cannot be fulfilled, an
OutOfMemoryError is thrown, but an HPROF dump is not produced. Use -XX:+HeapDumpOnOutOfMemoryError
to produce an HPROF dump in this condition. Consider tuning
-XX:GCTimeLimit and -XX:GCHeapFreeLimit to
control when an OutOfMemoryError is thrown.
-XX:HeapDumpPath may be used to control where the dumps are
written to. -XX:OnOutOfMemoryError may be used to execute
an operating system command on an OOM.
To analyze heapdumps, see the Eclipse Memory Analyzer Tool chapter.
Generating HPROF heapdumps
Additional methods of requesting heap dumps are documented in the Troubleshooting WAS chapter.
- An HPROF heapdump is automatically produced on OOM after adding
-XX:+HeapDumpOnOutOfMemoryError(this must be explicitly configured and the JVM restarted as it's not enabled by default). Example error output instdout:java.lang.OutOfMemoryError: GC overhead limit exceeded Dumping heap to java_pid28537.hprof ... - Use
jcmdand replace$PID:jcmd $PID GC.heap_dump heapdump.hprof - Use the HotSpotDiagnostic.dumpHeap operation
- Use
jmapand replace$PID:jmap -dump:format=b,file=heapdump.hprof ${PID} - Produce an operating system core dump (see the Troubleshooting Operating
Systems chapter) and then extract the HPROF heapdump using
jmap:jmap -dump:format=b,file=heapdump.hprof ${PATH_TO_JAVA} ${PATH_TO_CORE} - Use -XX:OnOutOfMemoryError (see below)
- From within Eclipse Memory Analyzer Tool: File } Acquire Heap Dump
Use DTrace to Produce Stacks Calling certain Methods
The following DTrace script prints stacks when System.gc is called. The JVM must be started with -XX:+ExtendedDTraceProbes
Attach the DTrace script to a running PID: /usr/sbin/dtrace -qs methodtrace.d -p ${PID}
It is often the case that the overhead of such a DTrace script is very high and may be inappropriate for a production environment.
#pragma D option bufsize=128m
dtrace:::BEGIN
{
/* Java level tracing */
traceJava = 1; /* 1 = enable, 0 = disable */
classFilter = "java/lang/System"; /* e.g. "java/util" */
methodFilter = "gc"; /* e.g. "get" */
/* Initialise the per-thread indentation variable */
self->indent = 0;
}
hotspot$target:::method-entry
/
traceJava
&& (classFilter == "" || strstr(copyinstr(arg1, arg2), classFilter) != NULL)
&& (methodFilter == "" || strstr(copyinstr(arg3, arg4), methodFilter) != NULL)
/
{
self->indent += 2;
wt = walltimestamp;
printf("%Y.%09d: %d/%d:%*s-> %s.%s%s\n",
wt,
wt % 1000000000,
pid,
tid,
self->indent,
"",
copyinstr(arg1, arg2),
copyinstr(arg3, arg4),
copyinstr(arg5, arg6));
jstack(500, 8192);
}Example output:
2018 Jan 10 14:03:24.280004000: 18021/2:
-> java/lang/System.gc()V
libjvm.so`__1cNSharedRuntimeTdtrace_method_entry6FpnKJavaThread_pnNmethodOopDesc__i_+0x1ac
java/lang/System.c
SystemDemo.ai
0xfbc0021c
libjvm.so`__1cJJavaCallsLcall_helper6FpnJJavaValue_pnMmethodHandle_pnRJavaCallArguments_pnGThread__v_+0x318
libjvm.so`jni_CallStaticVoidMethod+0x67c
libjli.so`JavaMain+0x740
libc.so.1`_lwp_startUse -XX:OnOutOfMemoryError to Spawn jmap
#!/bin/sh
# Usage:
# 1. Create oom.sh with the contents of this script
# 2. Change paths in the "Variables" section if needed
# 3. chmod a+x oom.sh
# 4. Run java with the following argument, replacing $PATH with path to oom.sh
# -XX:OnOutOfMemoryError="/$PATH/oom.sh %p"
# Variables
LOCKFILE=/tmp/oomlock
OUT=/tmp/oomout.txt
NOW=`date +"%Y%m%d_%H%M%S"`
CURDIR=`pwd`
JAVA_HOME=/opt/IBM/WebSphere/AppServer/java/
# Execution
echo "OOM handler script started for PID $1 at $NOW in $CURDIR" >> $OUT
if [ ! -f $LOCKFILE ]; then
touch $LOCKFILE >> $OUT 2>&1
NOW=`date +"%Y%m%d_%H%M%S"`
echo "OOM handler requested hprof at $NOW" >> $OUT
FILENAME="heap_${NOW}_${1}.hprof"
$JAVA_HOME/bin/jmap -F -dump:format=b,file=$FILENAME $1 >> $OUT 2>&1
# /usr/bin/gcore -F -o core_$NOW.dmp $1 >> $OUT 2>&1
CODE=$?
echo "OOM handler returned with $CODE at $NOW" >> $OUT
rm -f $LOCKFILE >> $OUT 2>&1
fi
NOW=`date +"%Y%m%d_%H%M%S"`
echo "OOM handler finished at $NOW" >> $OUTUse -XX:OnOutOfMemoryError to Spawn gcore
#!/bin/sh
# Usage:
# 1. Create oom.sh with the contents of this script
# 2. Change paths in the "Variables" section if needed
# 3. chmod a+x oom.sh
# 4. Run java with the following argument, replacing $PATH with path to oom.sh
# -XX:OnOutOfMemoryError="/$PATH/oom.sh %p"
# 5. After an OOM occurs, check /tmp/oomout.txt for output of the command
# 6. Run `jmap -dump:format=b,file=heap.hprof ${PATH_TO_JAVA} ${CORE}`
#
# Notes:
# OnOutOfMemoryError runs /usr/bin/sh -c $CMD synchronously, during which it
# appears it has a lock that prevents jmap to attach. Tried -F, but that
# generated an infinite loop and ran into other issues, so running gcore
# instead.
# Variables
LOCKFILE=/tmp/oomlock
OUT=/tmp/oomout.txt
NOW=`date +"%Y%m%d_%H%M%S"`
CURDIR=`pwd`
GCORE_PATH=/usr/bin/gcore
# Execution
echo "OOM handler script started for PID $1 at $NOW in $CURDIR" >> $OUT
if [ ! -f $LOCKFILE ]; then
touch $LOCKFILE >> $OUT 2>&1
NOW=`date +"%Y%m%d_%H%M%S"`
echo "OOM handler requested hprof at $NOW" >> $OUT
# $JAVA_HOME/bin/jmap -dump:format=b,file=heap_$1.hprof $1 >> $OUT 2>&1
$GCORE_PATH -F -o core_$NOW.dmp $1 >> $OUT 2>&1
CODE=$?
echo "OOM handler returned with $CODE at $NOW" >> $OUT
rm -f $LOCKFILE >> $OUT 2>&1
fi
NOW=`date +"%Y%m%d_%H%M%S"`
echo "OOM handler finished at $NOW" >> $OUTCode to Request Diagnostics from within the JVM
import java.io.BufferedReader;
import java.io.IOException;
import java.io.InputStreamReader;
import java.lang.management.ManagementFactory;
import java.text.SimpleDateFormat;
import java.util.Date;
import java.util.concurrent.atomic.AtomicInteger;
public class Play
{
public static void main(String... args) throws Throwable
{
System.out.println("Requesting core...");
tryGenerateCore();
}
public static void tryGenerateCore()
{
try
{
String requestedFileName = generateCore();
if (requestedFileName != null)
{
System.out.println("Started writing core dump to " + requestedFileName);
}
}
catch (Throwable t)
{
System.out.println("Error generating core: " + t.getLocalizedMessage());
t.printStackTrace();
}
}
private final static boolean ENABLE_REQUESTING_COREDUMPS = Boolean.getBoolean("ENABLE_REQUESTING_COREDUMPS");
private final static SimpleDateFormat DIAG_NAME_FORMAT = new SimpleDateFormat("yyyyMMdd.HHmmss");
private final static String CORE_PROGRAM_PATH = System.getProperty("CORE_PROGRAM_PATH", "/usr/bin/gcore");
private final static int MAX_CORE_DUMPS = Integer.getInteger("MAX_CORE_DUMPS", 1);
private static final AtomicInteger coreDumpsTaken = new AtomicInteger();
private static int coreDumpsRequested;
/**
* Disabled by default. Enable with -DENABLE_REQUESTING_COREDUMPS=true
* <p />
* Request a non-destructive core dump in a separate thread by spawning out
* to the gcore command. gcore will attach to and pause the process, dump
* all virtual memory (so the size will be about the size in ps VSZ) and
* then the process should continue. Unlike an OOM or using jmap to request
* an HPROF dump, requesting a core does not request a Full GC. Jmap can be
* used to extract an HPROF heapdump from the core:
* <p />
* <code>$ jmap -dump:format=b,file=heap.hprof ${PATH_TO_java} ${CORE}</code>
* <p />
* Whereas asking the JVM to generate a heapdump with jmap is a complex
* operation because the JVM has to walk all the data structures, the
* operating system generating a core is very simple: the OS just pauses the
* process and dumps out all of the virtual memory. The overhead of a core
* file is almost completely in writing the large amount of bytes to disk.
* There are some techniques to make this very fast. First, if there is
* sufficient filecache in RAM (i.e. a large amount of free RAM), then the
* OS will write the core to RAM and then asynchronously write to disk, thus
* making the pause quite fast. However, this can have some performance side
* effects. An alternative way to do this is to mount a RAMdisk and write
* the core to a RAMdisk.
* <p />
* Warning: ensure sufficient core, file and other ulimits. Also ensure
* sufficient disk space in the current working directory.
*
* @return null if -DMAX_CORE_DUMPS (default 1) has been reached or
* -DENABLE_REQUESTING_COREDUMPS=false; otherwise, the requested
* core file name.
* @throws IOException
* @throws InterruptedException
*/
public static synchronized String generateCore() throws IOException, InterruptedException
{
if (!ENABLE_REQUESTING_COREDUMPS || coreDumpsRequested++ >= MAX_CORE_DUMPS) { return null; }
CoreDumpThread coreDumpThread = new CoreDumpThread();
coreDumpThread.start();
return coreDumpThread.getRequestedFileName();
}
public static int getPID()
{
String name = ManagementFactory.getRuntimeMXBean().getName();
if (name != null)
{
int x = name.indexOf('@');
if (x != -1)
{
name = name.substring(0, x);
return Integer.parseInt(name);
}
}
throw new RuntimeException("Could not find PID");
}
static class CoreDumpThread extends Thread
{
private final int pid;
private final String requestedFileName;
private Throwable error;
public CoreDumpThread()
{
super("CoreDumpThread : " + coreDumpsTaken.get());
// Writing the core can take a while, so we'll prefer to block the
// JVM
setDaemon(false);
pid = getPID();
requestedFileName = "core." + DIAG_NAME_FORMAT.format(new Date()) + "." + pid + ".dmp";
}
@Override
public void run()
{
try
{
ProcessBuilder processBuilder = new ProcessBuilder(CORE_PROGRAM_PATH, "-o", requestedFileName, "" + pid);
processBuilder.redirectErrorStream(true);
Process process = processBuilder.start();
BufferedReader br = new BufferedReader(new InputStreamReader(process.getInputStream()));
String line;
StringBuilder sb = new StringBuilder();
while ((line = br.readLine()) != null)
{
sb.append(line);
}
int exitValue = process.waitFor();
if (exitValue == 0)
{
coreDumpsTaken.incrementAndGet();
}
else
{
System.out.println("Error requesting core. Exit value " + exitValue + ". Output " + sb.toString());
}
}
catch (Throwable t)
{
error = t;
System.out.println("Error generating core: " + t.getLocalizedMessage());
t.printStackTrace();
}
}
public String getRequestedFileName()
{
return requestedFileName;
}
public Throwable getError()
{
return error;
}
}
}Troubleshooting IBM Java
This chapter has been renamed to Troubleshooting OpenJ9 and IBM J9 JVMs.
Troubleshooting Oracle Java
This chapter has been renamed to Troubleshooting HotSpot JVM.
Troubleshooting WebSphere Application Server
Sub-chapters
Education
- Troubleshoot WebSphere Application Server (The Basics)
- Self-paced WebSphere Application Server Troubleshooting and Performance Lab
Preparing for Tracing
WAS supports a diagnostic trace facility:
WAS traditional: https://www.ibm.com/support/pages/setting-trace-websphere-application-server
WebSphere Liberty: https://www.ibm.com/support/pages/set-trace-and-get-full-dump-websphere-liberty
When enabling trace, always notify the customer that the performance impact of trace is highly variable across components, proportional to trace load and the detail of the trace; therefore, there is no way to predict the impact of diagnostic trace. The best thing to do is for the customer to run a benchmark test in a test environment without trace as a baseline, and then run the same test with trace enabled and compare the relative performance difference. Alternatively, diagnostic trace may be enabled on only a single member of a production cluster to reduce the impact on users.
It is critical that the customer follows the instructions in the link above to configure a large number and size of historical trace files when enabling a heavy trace file so that the chances are higher that the trace captures the problem before it rolls over.
Notes
Any class packages that start with com.ibm.websphere are public. Those that start with com.ibm.ws are internal.
Increasing Resiliency for IBM WebSphere Application Server Deployments
The top practices that we have observed in customer situations which cause problems are (http://www.redbooks.ibm.com/redpapers/pdfs/redp5033.pdf):
- No test environment is equal to the production environment
- Communication breakdown
- No plan for education
- No load or stress testing
- Not managing the entire application lifecycle
- No capacity or scalability plan
- No production traffic diagram
- Changes are put directly into production
- No migration plan
- No record of changes
- No current architecture plan
Malpractice: Broadly Disabling Core Logging
By default, WebSphere Application Server has a global log level of *=info. This means the following messages are logged: info, audit, warning, severe, and fatal. It is almost always a malpractice to use *=severe, *=fatal, or *=off, because warnings and errors generally occur infrequently and are critical to understanding why problems occurred. It is often a malpractice to use *=warning, because there are many informational messages that are very useful to understanding why problems occurred. If there are repeating messages flooding your logs, then the last resort should be to broadly disable core logging; instead, consider:
- Open a support ticket with the owner of the message to understand why the message occurs so frequently.
- Change the log level of the particular logger for those messages
(after understanding what they mean in #1). Any log levels specified
after the global log level override the log level for that particular
logger. For example, if the log configuration is
*=info:com.test.Logger=warning, then the threshold is only changed for com.test.Logger messages. - On Liberty, use <logging hideMessage="..." />
Command line HTTP client with a keep-alive socket
You may use a command line HTTP/HTTPS client to test keep-alive
sockets. Note that the Host header is required. Press enter
twice after entering the Host header to send the request.
If keep-alive connections are supported by the server, after the
response is shown, you may send another request.
For HTTP, example using telnet. Type Ctrl+]
and then type quit to quit instead of
Ctrl^C:
$ telnet localhost 80
Trying 127.0.0.1...
Connected to localhost.
Escape character is '^]'.
GET / HTTP/1.1
Host: localhost
HTTP/1.1 200 OK
X-Powered-By: Servlet/3.1
Content-Type: text/plain
Content-Language: en-US
Date: Mon, 05 Apr 2021 17:23:31 GMT
Hello World
GET / HTTP/1.1
[...]For HTTPS, example using openssl:
$ openssl s_client -connect localhost:443
CONNECTED(00000003)
[...]
---
GET / HTTP/1.1
Host: localhost
HTTP/1.1 200 OK
X-Powered-By: Servlet/3.1
Content-Type: text/plain
Content-Language: en-US
Date: Mon, 05 Apr 2021 17:25:01 GMT
Hello World
GET / HTTP/1.1
[...]Troubleshooting WAS traditional
Troubleshooting WAS traditional Recipe
Review all warnings and errors in
System*.log(or using logViewer if HPEL is enabled) before and during the problem. A regular expression search is" [W|E] ". One common type of warning is an FFDC warning which points to a matching file in the FFDC logs directory.If you're on Linux or use cygwin, use the following command:
find . -name "*System*" -exec grep " [W|E] " {} \; | grep -v -e known_error
Review all
JVM*messages innative_stderr.logbefore and during the problem. This may include things such as OutOfMemoryErrors. The filename of such artifacts includes a timestamp of the formYYYYMMDD.Review any strange messages in
native_stdout.logbefore and during the problem.If verbose garbage collection is enabled, review verbosegc in native_stderr.log (IBM Java), native_stdout.log (HotSpot Java), or any verbosegc.log files (if using -Xverbosegclog or -Xloggc) in the IBM Garbage Collection and Memory Visualizer Tool and ensure that the proportion of time in garbage collection for a relevant period before and during the problem is less than 10%
Review any
javacore*.txtfiles in the IBM Thread and Monitor Dump Analyzer tool. Review the causes of the thread dump (e.g. user-generated, OutOfMemoryError, etc.) and review threads with large stacks and any monitor contention.Review any
heapdump*.phdandcore*.dmpfiles in the IBM Memory Analyzer Tool
Server Start
When the server is started or a log file is rolled, the following messages will be written to SystemOut and trace logs. For example:
************ Start Display Current Environment ************
WebSphere Platform 9.0.5.1 [BASE 9.0.5.1 f5011934.01] [JAVA8 8.0.6.0 pxa6480sr6-20191107_01] running with process name DefaultCell01\DefaultNode01\server1 and process id 1522
Full server name is DefaultCell01\DefaultNode01\server1-1522
Host Operating System is Linux, version 4.19.76-linuxkit
[...]
************* End Display Current Environment *************Initial Trace Setting
When the server is started or a log file is rolled, unless the message has been disabled, the following message is written to SystemOut and trace logs. For example:
[4/15/20 10:47:01:227 EST] 00000001 ManagerAdmin I TRAS0017I: The startup trace state is *=info.Open for e-business
When the server has fully started, unless the message has been disabled, the following message will be written to SystemOut and trace logs. For example:
[4/15/20 10:47:02:577 EST] 00000001 WsServerImpl A WSVR0001I: Server SERVER_NAME open for e-businessOr
[11/4/23 22:20:14:149 EST] 00000001 WsServerImpl A WSVR0002I: Server SERVER_NAME open for e-business, problems occurred during startupSearch for start and stop:
grep -e WSVR0001I -e WSVR0002I -e TRAS0017ITrace State Changed
When the state of diagnostic trace changes, unless the message has been disabled, the following message will be written to SystemOut and trace logs. For example:
[4/15/20 10:45:02:005 EST] 00000159 ManagerAdmin I TRAS0018I: The trace state has changed. The new trace state is *=info:com.ibm.ws.cache.*=all.WAS and Java
When upgrading WAS fixpacks, the Java fixpack should also be upgraded: https://www-304.ibm.com/support/docview.wss?uid=swg27005002
The Java SDK can be upgraded to any version available for that WAS major version. For example, if you are on WAS 6.1.0.21 but you want to run the 6.1.0.29 Java SDK, that is supported, although this is obviously a less tested configuration. You cannot use a WAS 7 SDK on WAS 6.1, for example.
Diagnostic plans: https://www.ibm.com/support/knowledgecenter/en/SSAW57_9.0.5/com.ibm.websphere.nd.multiplatform.doc/ae/ttrb_diagplan.html
PID File
It is possible to automate finding the process ID of particular application server through scripts. Each application server writes a file named ${SERVER}.pid into its log folder on startup. For example, on POSIX systems:
$ someScript.sh `cat /opt/IBM/WebSphere/AppServer/profiles/profile1/logs/server1/*.pid`Stopping Servers
There are four ways to stop a WAS server (http://www-01.ibm.com/support/knowledgecenter/SSAW57_8.5.5/com.ibm.websphere.nd.multiplatform.doc/ae/urun_rsvr.html?lang=en):
- WAS Stop: Quiesce the server so that no new work is allowed in, allow existing work tracked by WAS to finish, then gracefully stop all applications, shutdown WAS components, and attempt to gracefully exit the Java process. By default, WAS will wait up to 3 minutes for the quiesce to complete. This can be changed with com.ibm.ejs.sm.server.quiesceTimeout: http://www-01.ibm.com/support/knowledgecenter/SSAW57_8.5.5/com.ibm.websphere.nd.multiplatform.doc/ae/xrun_jvm.html?cp=SSAW57_8.5.5%2F3-18-6-481&lang=en
- WAS Immediate Stop: This is the same as a WAS Stop, except that it does not wait for existing work to finish. Based on tests on V9, ImmediateStop still waits for in-flight requests to finish just like the Stop function.
- WAS Terminate: Unlike the stop and immediate stop methods, this method does not attempt to gracefully exit the Java process, but instead uses operating system commands to kill the process.
- Operating system signal: Depending on the type of signal, either the process will end without any handling within WAS (destructive signal, e.g. SIGKILL) or as a WAS Immediate Stop (e.g. SIGTERM). WAS accomplishes the latter through a shutdown hook (http://docs.oracle.com/javase/7/docs/api/java/lang/Runtime.html#addShutdownHook%28java.lang.Thread%29).
It is recommended to first try a WAS Stop, wait 3 minutes, then try a WAS Immediate Stop, and finally try a WAS Terminate.
In the case of a WAS Terminate or a destructive operating system signal, the following are examples of some possible effects:
- Transaction log: If an application uses transactions and the process ended during an in-flight transaction, the transaction log may need to be processed.
- OSGi cache: If the process ended during OSGi activity, the OSGi cache may need to be reset with osgiCfgInit and clearClassCache.
- IBM Java shared class cache: If the process ended during IBM Java shared class cache activity, the cache may need to be reset with Java commands.
- HTTP sessions: If HTTP sessions are configured for distribution or persistence, some sessions may not have been committed and their states will be lost.
Request Thread Dump
Additional methods of requesting thread dumps are documented in the Troubleshooting Java chapters.
- On IBM Java, use
wsadmin -lang jythonand run the following command, replacing server1 with the server name:AdminControl.invoke(AdminControl.completeObjectName("type=JVM,process=server1,*"), "dumpThreads") - On Windows, use the windows_hang.py script which essentially does the same as #1 with much more flexibility: http://www-01.ibm.com/support/docview.wss?rs=180&uid=swg21111364
- On IBM Java and WAS >= 8, Administrative Console }
Troubleshooting } Java dumps and cores } Check the server(s) } Java
core:

- On Windows, generate an attached start server script with
startServer.bat -script, start the server using the generated script, and now since you have an attached console, you can typeCtrl+Breakto request a thread dump.
JVM.dumpThreads
The dumpThreads functionality is different depending on the operating system:
- POSIX (AIX, Linux, Solaris, etc.): kill(pid, SIGQUIT)
- Windows: raise(SIGBREAK)
- z/OS: In recent versions, produces a javacore, heapdump, and SYSTDUMP by default
For any customers that have changed the behavior of the JVM (-Xdump)
in how it responds to SIGQUIT/SIGBREAK (i.e. kill -3), then dumpThreads
will respond accordingly (unless running z/OS, in which case use
wsadmin_dumpthreads* properties).
Request Heap Dump
Additional methods of requesting heap dumps are documented in the Troubleshooting Java chapters.
- On IBM Java, use
wsadmin -lang jythonand run the following command, replacing server1 with the server name:AdminControl.invoke(AdminControl.completeObjectName("type=JVM,process=server1,*"), "generateHeapDump") - On IBM Java and WAS >= 8, Administrative Console }
Troubleshooting } Java dumps and cores } Check the server(s) } Heap
dump:

Request System Dump
Additional methods of requesting system dumps are documented in the Troubleshooting Operating Systems and Troubleshooting Java chapters.
Starting with WAS 8.5.5.17 and
9.0.5.2, the following methods request
exclusive+prepwalk.
- On IBM Java and WAS >= 8, use
wsadmin -lang jythonand run the following command, replacing server1 with the server name:AdminControl.invoke(AdminControl.completeObjectName("type=JVM,process=server1,*"), "generateSystemDump") - On IBM Java and WAS >= 8, Administrative Console }
Troubleshooting } Java dumps and cores } Check the server(s) } System
dump:

ClassLoader Leaks
ClassLoader leaks become most evident when an application is restarted and its old classes are not available for garbage collection. This may induce longer garbage collection times, Java OutOfMemoryErrors, and native OutOfMemoryErrors.
- The IBM Extensions for Memory Analyzer in the Eclipse Memory Analyzer Tool provide two classloader leak detection queries.
- WAS 8.5 introduces some basic classloader leak detection (disabled by default): http://www-01.ibm.com/support/knowledgecenter/SSAW57_8.5.5/com.ibm.websphere.nd.multiplatform.doc/ae/ctrb_memleakdetection.html?lang=en
Thread IDs in Logs
Before WAS 8.5, the "thread ID" printed in WAS logs (the hexadecimal number after the timestamp) comes from the java/util/logging/LogRecord.getThreadID method. This number was not in javacores, so there was no easy way to correlate javacores with log and trace messages. Moreover, this thread ID was different from java/lang/Thread.getID which might be printed in other components, and that thread ID also wasn't in javacores. There were some complex techniques of correlating IDs: http://www-304.ibm.com/support/docview.wss?uid=swg21418557
WAS 8.5 has changed the ID printed in logs to the value from java/lang/Thread.getID. This can be changed back to the previous behavior using com.ibm.websphere.logging.useJULThreadID=true. See: http://www14.software.ibm.com/webapp/wsbroker/redirect?version=phil&product=was-nd-mp&topic=rtrb_readmsglogs. This was also backported to WAS 8.0.0.4 (PM60913); however, it must be explicitly enabled in WAS 8.0.
With IBM Java 6 SR12 (WAS 7.0.0.27), IBM Java 626 SR4 (WAS 8.0.0.6, 8.5.0.2, 8.5.5.0), and IBM Java 7 SR3 (WAS 8.5.0.2, 8.5.5.0), javacores will have the value of Thread.getID printed with each stack. Given the above change, this allows you to correlate WAS log messages with javacores (note the bold and underlined parts):
[8/22/12 10:00:05:049 PDT] 0000005b SystemOut O swat.ear: Calling com.ibm.jvm.Dump.JavaDump()... Thread.getId=0x5b
3XMTHREADINFO "WebContainer : 1" J9VMThread:0x0000000012593E00, j9thread_t:0x00007F7F542C6FF0, java/lang/Thread:0x00000000104FEE78, state:R, prio=5
3XMJAVALTHREAD (java/lang/Thread getId:0x5B, isDaemon:true)
3XMTHREADINFO1 (native thread ID:0x5859, native priority:0x5, native policy:UNKNOWN)
3XMTHREADINFO2 (native stack address range from:0x00007F8031226000, to:0x00007F8031267000, size:0x41000)
3XMHEAPALLOC Heap bytes allocated since last GC cycle=2132320 (0x208960)
3XMTHREADINFO3 Java callstack:
4XESTACKTRACE at com/ibm/jvm/Dump.JavaDumpImpl(Native Method)TrapIt.ear
TrapIt.ear is a free enterprise application which may be installed to watch for particular log messages and generate diagnostics such as thread dumps, as well as time-based triggers to do the same: http://www-01.ibm.com/support/docview.wss?uid=swg21644180
High Availability Manager
JVM Panic
Under some conditions, the High Availability Manager will "panic," print some diagnostics, and then force the WAS process to stop itself. The symptoms of this will include:
A stack trace in RuntimeProviderImpl.panicJVM in SystemErr.log. For example:
[1/1/15 00:00:00:000 UTC] 00000001 SystemErr R java.lang.Throwable [1/1/15 00:00:00:000 UTC] 00000001 SystemErr R at java.lang.Thread.dumpStack(Thread.java:434) [1/1/15 00:00:00:000 UTC] 00000001 SystemErr R at com.ibm.ws.hamanager.runtime.RuntimeProviderImpl.panicJVM(RuntimeProviderImpl.java:91) [1/1/15 00:00:00:000 UTC] 00000001 SystemErr R at com.ibm.ws.hamanager.coordinator.impl.JVMControllerImpl.panicJVM(JVMControllerImpl.java:56) [1/1/15 00:00:00:000 UTC] 00000001 SystemErr R at com.ibm.ws.hamanager.impl.HAGroupImpl.doIsAlive(HAGroupImpl.java:882) [1/1/15 00:00:00:000 UTC] 00000001 SystemErr R at com.ibm.ws.hamanager.impl.HAGroupImplHAGroupUserCallback.doCallback(HAGroupImpl.java : 1388)[1/1/1500 : 00 : 00 : 000UTC]00000001SystemErrRatcom.ibm.ws.hamanager.impl.Worker.run(Worker.java : 64)[1/1/1500 : 00 : 00 : 000UTC]00000001SystemErrRatcom.ibm.ws.util.ThreadPoolWorker.run(ThreadPool.java:1691)
A "Panic" line in SystemOut.log with a detailed description of the reason for the panic. For example:
Panic:component requested panic from isAlive
A stack trace in ServerImpl.emergencyShutdown in SystemOut.log. For example:
[1/1/15 00:00:00:000 UTC] 00000001 SystemOut O java.lang.RuntimeException: emergencyShutdown called: [1/1/15 00:00:00:000 UTC] 00000001 SystemOut O at com.ibm.ws.runtime.component.ServerImpl.emergencyShutdown(ServerImpl.java:633) [1/1/15 00:00:00:000 UTC] 00000001 SystemOut O at com.ibm.ws.hamanager.runtime.RuntimeProviderImpl.panicJVM(RuntimeProviderImpl.java:92) [1/1/15 00:00:00:000 UTC] 00000001 SystemOut O at com.ibm.ws.hamanager.coordinator.impl.JVMControllerImpl.panicJVM(JVMControllerImpl.java:56) [1/1/15 00:00:00:000 UTC] 00000001 SystemOut O at com.ibm.ws.hamanager.impl.HAGroupImpl.doIsAlive(HAGroupImpl.java:866) [1/1/15 00:00:00:000 UTC] 00000001 SystemOut O at com.ibm.ws.hamanager.impl.HAGroupImplHAGroupUserCallback.doCallback(HAGroupImpl.java : 1364)[1/1/1500 : 00 : 00 : 000UTC]00000001SystemOutOatcom.ibm.ws.hamanager.impl.Worker.run(Worker.java : 64)[1/1/1500 : 00 : 00 : 000UTC]00000001SystemOutOatcom.ibm.ws.util.ThreadPoolWorker.run(ThreadPool.java:1604)
One common cause of these panics is that the SIB messaging engine cannot communicate with its data store due to a database error. For example, messages such as the following precede the panic:
[1/1/15 00:00:00:000 UTC] 00000001 ConnectionEve A J2CA0056I: The Connection Manager received a fatal connection error from the Resource Adapter
for resource jdbc/sibdb. The exception is: com.ibm.db2.jcc.am.zn: [jcc] [t4][2030][11211][3.57.110] A communication error occurred during operations
on the connection's underlying socket, socket input stream, or socket output stream. Error location: Reply.fill(). Message: Insufficient data.
ERRORCODE=-4499, SQLSTATE=08001
[1/1/15 00:00:00:000 UTC] 00000001 SibMessage I ... CWSIS1519E: Messaging engine ${ME} cannot obtain the lock on its data store,
which ensures it has exclusive access to the data.
[1/1/15 00:00:00:000 UTC] 00000001 SibMessage E ... CWSID0046E: Messaging engine ${ME} detected an error and cannot continue to run in this server.
[1/1/15 00:00:00:000 UTC] 00000001 HAGroupImpl I HMGR0130I: The local member of group ...,WSAF_SIB_MESSAGING_ENGINE=...,type=WSAF_SIB has
indicated that is it not alive. The JVM will be terminated.This is expected behavior and the database needs to be investigated or the data source configuration needs to be tuned: "Behavior when the data store connection is lost... default: The high availability manager stops the messaging engine and its hosting application server when the next core group service Is alive check takes place (the default value is 120 seconds)." (http://www-01.ibm.com/support/knowledgecenter/SSAW57_8.5.5/com.ibm.websphere.nd.multiplatform.doc/ae/tjm_dsconnloss.html)
Messaging
Light weight ME-to-ME tracing: http://www-01.ibm.com/support/docview.wss?uid=swg1PI34044
Users Seeing other Users' Data
The call center is getting reports and screenshots from users who see not their own data but another user's data. Depending on the number of reports received it may necessitate shutting down the web site until the problem can be diagnosed and fixed. This is one of the most difficult problems troubleshoot and identify root cause. Try to recreate the problem in one of the application test environments. Hopefully it is easily recreateable, however, the symptom may not exhibit itself in a test environment.
Strategy 1: Open a PMR with IBM Support
It is imperative to open a PMR with IBM Support immediately and verify with the support specialist that there is no known issue for which a known APAR is available. If there is an APAR then download and install the APAR and restart the application server environment.
Monitor
Monitor reports from the user community and if reports continue to come in that users see other user's data then pursue one of the other strategies.
Caveat
Applying the APAR does not guarantee it will fix the problem if the issue resides within the application code itself. The APAR is only applicable if it is a bug in the WebSphere Application Server.
Strategy 2: Application code review
Review the application code and look for one of the following anti-patterns that may be causing users to see another user's data. In no particular order:
- Not clearing thread local variables. [note: was this a feature we added to WAS and no longer a problem since some version?]
- Storing data within the Servlet in an instance variable defined at the Servlet class.
Monitor
Fix the code, rebuild the application, redeploy and test the application. Once it passes the testing process deploy to production. Monitor reports from the user community.
Caveat
Because this type of application bug is so difficult to diagnose and resolve the application "fix" may not actually fix the problem. Because of there being multiple bugs there may be several iterations of of this strategy.
DRS or HA Manager Errors
Distributed Replication Server or HA Manager errors appear in the logs of either the DMgr or the nodeagents or application server logs themselves.
Strategy 1: Check version/fixpack level of DMgr and JVMs putting out errors
Sometimes a fixpack may be inadvertently missed on a particular JVM or node. Apply the fixpack, restart and see if that fixes the problem.
Monitor
Logs for recurrence of the error
Caveats
Sometimes applying a fixpack may negatively affect an application. Make sure to test all fixpacks before applying them in production.
Strategy 2: Application code is using DistributedMap class
An application that aggressively uses DistributedMap may negatively increase the amount of communication between the application servers. This typically exhibits itself when either the number of application server JVMs is increased or the thread pool for the application is increased inside the JVM. This also inhibits the ability to grow the environment as the user base grows. Therefore, reconsider the use of DistributedMap in an application particularly for high volume, business critical applications.
Monitor
Logs for recurrence of the error.
Caveats
Re-architecting/desgining and re-coding the application to eliminate the use of DistributedMap can take weeks to months depending on how extensively DistributedMap was used.
Application Works in some Nodes
The same EAR file is deployed to two nodes. It works on one node but not another.
Strategy 1: NoClassDefFoundError thrown
Collect the data for class loader mustgather http://www-01.ibm.com/support/docview.wss?uid=swg21196187
Analyze the data. Following things should be checked very carefully.
In the trace.log find the full "Local Classpath" for the application. Compare the working node to the non-working node. Very often the administrator is somehow not deploying the application correctly and puts in a classpath that is either missing items or rearranging the order which picks up a different version of the same jar file.
In the one case I worked today: Application worked on AIX/Windows but NoClassDefFoundError on Linux. It is a JSF application but not supposed to use JSF2. But the jsf2 lib was included in the EAR file. On the working nodes the non-JSF2 impl lib was preceding the JSF2 lib. On the non-working Linux node they were reversed and of course the JSF2 class had a dependency they must not have included.
Patching Java
- Stop all the WAS JVMs on the node (including the node agent, application servers, deployment manager if on this node, etc.).
- Log in as the user that owns the WAS installation (e.g. root, wsadmin, etc.).
- Change directory to the WAS home directory. For example:
cd /opt/IBM/WebSphere/AppServer - Move the
javadirectory to a backup folder:mv java java_backup - Make a new
javadirectory:mkdir java - Change directory to this new
javadirectory:cd java - Copy in the Java test build and extract it. For example:
cp /tmp/ibm-java-sdk-8.0-6.30-linux-x86_64.tgz . tar xzf ibm-java-sdk-8.0-6.30-linux-x86_64.tgz - If this extracts a sub-directory such as
java,ibm-java-x86_64-80, etc., then move all the files from within that directory into the currentjavadirectory. For example:mv ibm-java-x86_64-80/* . - If using WAS traditional 9, no further changes are needed. If using
WAS traditional 8.5.5, overlay the following files from the Java backup
directory:
cp ../java_backup/jre/lib/orb.properties jre/lib/orb.properties cp ../java_backup/jre/lib/security/java.policy jre/lib/security/java.policy cp ../java_backup/jre/lib/security/java.security jre/lib/security/java.security cp ../java_backup/jre/lib/security/cacerts jre/lib/security/cacerts cp ../java_backup/jre/lib/ext/iwsorbutil.jar jre/lib/ext/iwsorbutil.jar - If you or a stack product have previously made any customizations to the Java directory then further changes may be needed.
- Clear the Java shared class cache by running this from the WebSphere
bindirectory:./clearClassCache.sh - Start the JVMs and verify the logs look okay.
Troubleshooting WebSphere Liberty
Troubleshooting WebSphere Liberty Recipe
Review all warnings and errors in messages.log (or using binaryLog if binary logging is enabled) before and during the problem. A regular expression search is
" [W|E] ". One common type of warning is an FFDC warning which points to a matching file in the FFDC logs directory.If you're on Linux or use cygwin, use the following command:
find . -name "*messages*" -exec grep " [W|E] " {} \; | grep -v -e known_error
Review all JVM* messages in console.log before and during the problem. This may include things such as OutOfMemoryErrors. The filename of such artifacts includes a timestamp of the form YYYYMMDD. Review any other strange messages in console.log before and during the problem.
If verbose garbage collection is enabled, review verbosegc in console.log, or any verbosegc.log files (if using -Xverbosegclog or -Xloggc) in the IBM Garbage Collection and Memory Visualizer Tool and ensure that the proportion of time in garbage collection for a relevant period before and during the problem is less than 10%.
Review any javacore*.txt files in the IBM Thread and Monitor Dump Analyzer tool. Review the causes of the thread dump (e.g. user-generated, OutOfMemoryError, etc.) and review threads with large stacks and any monitor contention.
Review any heapdump*.phd and core*.dmp files in the IBM Memory Analyzer Tool.
Application Start and Stop
The CWWKZ0001I message is printed when an application starts. For example:
[10/27/20 16:56:31:644 UTC] 0000002b com.ibm.ws.app.manager.AppMessageHelper A CWWKZ0001I: Application daytrader started in 8.215 seconds.The CWWKZ0003I message is printed when an application is dynamically updated:
[10/27/20 18:13:04:882 UTC] 0000007f com.ibm.ws.app.manager.AppMessageHelper A CWWKZ0003I: The application daytrader updated in 1.305 seconds.The CWWKZ0009I message is printed when an application stops:
[10/27/20 18:11:54:519 UTC] 0000008a com.ibm.ws.app.manager.AppMessageHelper A CWWKZ0009I: The application daytrader has stopped successfully.Server Dumps
The server dump command requests various types of status information of a running server: http://www-01.ibm.com/support/knowledgecenter/SSAW57_8.5.5/com.ibm.websphere.wlp.nd.multiplatform.doc/ae/twlp_setup_dump_server.html
$LIBERTY/bin/server dump $SERVERBy default, the produced files will go to
$LIBERTY/usr/servers/$SERVER
Request Thread Dump
Additional methods of requesting thread dumps are documented in the Troubleshooting Java chapters.
$LIBERTY/bin/server javadump $SERVERRequest Heap Dump
Additional methods of requesting heap dumps are documented in the Troubleshooting Java chapters.
$LIBERTY/bin/server javadump $SERVER --include=heapRequest System Dump
Additional methods of requesting system dumps are documented in the Troubleshooting Operating Systems and Troubleshooting Java chapters.
Starting with Liberty 20.0.0.2,
this request exclusive+prepwalk.
$LIBERTY/bin/server javadump $SERVER --include=systemClient fails to Connect to Liberty Messaging Engine
The Liberty logs show the application has started normally and bound to the correct ports. However, the client application is getting the error.
1. Telnet to the IP port# fails.
2. netstat -an | grep LIST on the Liberty server shows
the port is bound to 127.0.0.1 (localhost).
com.ibm.ws.sib.jfapchannel.JFapConnectFailedException: CWSIJ0063E: A network connection to host name /192.168.2.234, port 9,126 cannot be established...
Strategy: Fix server.xml endpoints
Make sure the server.xml entries for the endpoints attribute host is set as:
host="*"Sending messages.log and trace.log to stdout on Linux
In some cases, it may be useful to send all WAS logs to stdout (i.e. console.log by default); for example, to intermingle JVM -Xtrace with WAS diagnostic trace for easier trace analysis:
Remove the <logging /> element from server.xml.
Add the following properties to bootstrap.properties (create this file in the same directory as server.xml if it doesn't exist), and replace the diagnostic trace specification with the desired WAS diagnostic trace:
com.ibm.ws.logging.log.directory=/dev/
com.ibm.ws.logging.message.file.name=stdout
com.ibm.ws.logging.max.file.size=0
com.ibm.ws.logging.max.files=0
com.ibm.ws.logging.trace.file.name=stdout
com.ibm.ws.logging.newLogsOnStart=false
com.ibm.ws.logging.trace.specification=*=info:com.ibm.ws.kernel.*=allAdd other configuration such as -Xtrace to jvm.options. For example:
-Xtrace:iprint=mt,methods={com/ibm/ws/kernel/launch/internal/FrameworkManager.launchFramework},trigger=method{com/ibm/ws/kernel/launch/internal/FrameworkManager.launchFramework,jstacktrace}
Start the server and now you should see intermingled trace in console.log; for example, the following shows both -Xtrace and WAS diagnostic trace for com/ibm/ws/kernel/launch/internal/FrameworkManager.launchFramework:
16:47:30.776*0x998700 mt.0 > com/ibm/ws/kernel/launch/internal/FrameworkManager.launchFramework(Lcom/ibm/ws/kernel/boot/BootstrapConfig;Lcom/ibm/wsspi/logprovider/LogProvider;)V bytecode method, this = 0xfffd6b68
16:47:30.777 0x998700 j9trc_aux.0 - jstacktrace:
16:47:30.777 0x998700 j9trc_aux.1 - [1] com.ibm.ws.kernel.launch.internal.FrameworkManager.launchFramework (FrameworkManager.java:198)
16:47:30.777 0x998700 j9trc_aux.1 - [2] com.ibm.ws.kernel.launch.internal.LauncherDelegateImpl.doFrameworkLaunch (LauncherDelegateImpl.java:114)
16:47:30.777 0x998700 j9trc_aux.1 - [3] com.ibm.ws.kernel.launch.internal.LauncherDelegateImpl.launchFramework (LauncherDelegateImpl.java:100)
16:47:30.777 0x998700 j9trc_aux.1 - [4] com.ibm.ws.kernel.boot.internal.KernelBootstrap.go (KernelBootstrap.java:213)
16:47:30.777 0x998700 j9trc_aux.1 - [5] com.ibm.ws.kernel.boot.Launcher.handleActions (Launcher.java:241)
16:47:30.777 0x998700 j9trc_aux.1 - [6] com.ibm.ws.kernel.boot.Launcher.createPlatform (Launcher.java:117)
16:47:30.777 0x998700 j9trc_aux.1 - [7] com.ibm.ws.kernel.boot.cmdline.EnvCheck.main (EnvCheck.java:59)
16:47:30.777 0x998700 j9trc_aux.1 - [8] com.ibm.ws.kernel.boot.cmdline.EnvCheck.main (EnvCheck.java:35)
[11/25/19 16:47:30:777 UTC] 00000001 id=fccc7204 com.ibm.ws.kernel.launch.internal.FrameworkManager > launchFramework Entry
Important notes:
- This configures WAS logging to unlimited size and disables cleaning up old WAS logs on startup, so you must properly manage disk usage of console.log (e.g. truncating with $(truncate -s 0 console.log) or copying off and zipping files or moving files to a different partition while running, if running out of space).
- Some of the file writes will be uncoordinated (e.g. WAS trace and JVM trace), so be careful in using any automated tooling in processing the files as some lines may be spliced together; instead, use human analysis.
- FFDC files may fail to be written because they will try to write to /dev/ffdc/*
- As an alternative to this procedure, consider writing a post-processing tool that combines multiple files together based on timestamp.
Alternatively, you may switch the log format to JSON which supports sending output to stdout (and messages may be disabled since trace contains messages); this has the benefit of not breaking FFDC:
com.ibm.ws.logging.message.format=json
com.ibm.ws.logging.message.source=
com.ibm.ws.logging.trace.file.name=stdout
com.ibm.ws.logging.max.file.size=0
com.ibm.ws.logging.max.files=0
com.ibm.ws.logging.newLogsOnStart=false
com.ibm.ws.logging.trace.specification=*=info:com.ibm.ws.kernel.*=all
Override Context Root
To override the context root of an EAR, use the following and match the module name to the module name in the EAR:
<enterpriseApplication location="my.ear">
<web-ext moduleName="" context-root=""/>
</enterpriseApplication>ws-javaagent.jar
ws-javaagent.jar is a Java
agent included as part of Liberty with the
-javaagent:$LIBERTY/bin/tools/ws-javaagent.jar option. It
implements Liberty's diagnostic trace feature by using byte code
injection (thus avoiding the performance overhead of log guards and
other things when trace is disabled). Thus, it is needed to diagnostic
issues using diagnostic trace.
Troubleshooting Web Servers
Troubleshooting Web Servers Recipe
- IBM HTTP Server:
- Review the error_log for any strange errors before and during the problem, including mpmstats.
- Review the access_log for any status codes >= 400 and long response times before and during the problem.
- Review the http_plugin.log file for any strange errors before and during the problem.
Troubleshooting Containers
Linux Containers
PID 1
Signals
Linux containers often run the main application as PID 1. However,
PID 1 has special
treatment related to sending kill signals:
The only signals that can be sent to process ID 1, the init process, are those for which init has explicitly installed signal handlers. This is done to assure the system is not brought down accidentally.
You may display the signals the process has installed handlers for, blocked, or ignored (SigCgt, SigBlk, and SigIgn, respectively, in hexadecimal):
The /proc/pid/task/tid/status file contains various fields that show the signals that a thread is blocking (SigBlk), catching (SigCgt), or ignoring (SigIgn). (The set of signals that are caught or ignored will be the same across all threads in a process.) Other fields show the set of pending signals that are directed to the thread (SigPnd) as well as the set of pending signals that are directed to the process as a whole (ShdPnd). The corresponding fields in /proc/pid/status show the information for the main thread.
Therefore, print these masks for PID 1:
$ grep -e Sig /proc/1/status
SigQ: 0/39372
SigPnd: 0000000000000000
SigBlk: 0000000000000000
SigIgn: 0000000000001000
SigCgt: 2000000181004cffThen cross-reference the bit mask (hexadecimal) with signal numbers (decimal):
$ kill -l
1) SIGHUP 2) SIGINT 3) SIGQUIT 4) SIGILL 5) SIGTRAP
6) SIGABRT 7) SIGBUS 8) SIGFPE 9) SIGKILL 10) SIGUSR1
11) SIGSEGV 12) SIGUSR2 13) SIGPIPE 14) SIGALRM 15) SIGTERM
16) SIGSTKFLT 17) SIGCHLD 18) SIGCONT 19) SIGSTOP 20) SIGTSTP
21) SIGTTIN 22) SIGTTOU 23) SIGURG 24) SIGXCPU 25) SIGXFSZ
26) SIGVTALRM 27) SIGPROF 28) SIGWINCH 29) SIGIO 30) SIGPWR
31) SIGSYS 34) SIGRTMIN 35) SIGRTMIN+1 36) SIGRTMIN+2 37) SIGRTMIN+3
38) SIGRTMIN+4 39) SIGRTMIN+5 40) SIGRTMIN+6 41) SIGRTMIN+7 42) SIGRTMIN+8
43) SIGRTMIN+9 44) SIGRTMIN+10 45) SIGRTMIN+11 46) SIGRTMIN+12 47) SIGRTMIN+13
48) SIGRTMIN+14 49) SIGRTMIN+15 50) SIGRTMAX-14 51) SIGRTMAX-13 52) SIGRTMAX-12
53) SIGRTMAX-11 54) SIGRTMAX-10 55) SIGRTMAX-9 56) SIGRTMAX-8 57) SIGRTMAX-7
58) SIGRTMAX-6 59) SIGRTMAX-5 60) SIGRTMAX-4 61) SIGRTMAX-3 62) SIGRTMAX-2
63) SIGRTMAX-1 64) SIGRTMAX Troubleshooting IBM MQ
Documentation
The MQ library has links to documentation for all versions of MQ: http://www-01.ibm.com/software/integration/wmq/library/index.html
Basic Display Commands
dspmqinst lists the MQ installations on the machine
dspmqver shows the MQ version and patch level
dspmq lists queue managers on the local machine, and the status of each one
Multiple Installations of MQ on the Same Machine
Starting with MQ v7.1, it is possible to install multiple copies of MQ (of the same or different version) on a single machine. (Prior to this, MQ directory pathnames had been hard-coded so it was not possible to install more than one copy of MQ.) Each separate instance of MQ on a machine is referred to as an "installation," and you can choose where in the filesystem each installation should be based, subject to a few restrictions. All installations still share a common MQ data directory tree -- it is only the MQ binaries which are kept separate for different installations. On Unix-like systems, the /etc/opt/mqm/mqinst.ini command lists the currently-existing installations, and the directory path to each one. The dspmqinst command also lists the installations on a machine.
There is a command named setmqinst which can be used to set all appropriate environment variables to point to a particular installation, as a means of determining which of the multiple MQ installations on a machine will be referenced when you issue other MQ commands. For example, ". /opt/mqm/bin/setmqenv -s" on a Linux machine sets the MQ environment variables to refer to the copy of MQ that lives in /opt/mqm. If you are having problems with "command not found" errors or the like, you may need to issue the setmqenv command. Each queue manager is associated with a particular installation, so you may also need to issue setmqinst if you get errors saying that your queue manager is associated with a different installation.
Log Files
There is a "high-level" errors directory at the top of the MQ tree, and each queue manager also has its own errors directory. The high-level errors directory has messages that do not pertain to a specific queue manager. Note that the high-level MQ directory named "log" contains transaction logs, not error logs.
Unix default locations: /var/mqm/errors and /var/mqm/qmgrs/<QM_NAME>/errors
Windows prior to MQ v8.0: \Program Files\IBM\WebSphere MQ\errors and \Program Files\IBM\WebSphere MQ\qmgrs\<QM_NAME>\errors
Windows v8.0: C:\ProgramData\IBM\MQ\errors and C:\ProgramData\IBM\MQ\qmgrs\<QM_NAME>\errors; note that the C:\ProgramData directory is typically a "hidden" directory
Each "errors" directory always contains exactly 3 log files: AMQERR01.LOG, AMQERR02.LOG, and AMQERR03.LOG
MQ automatically rolls the log files, so AMQERR01.LOG is always most recent
Maximum size can be controlled via ErrorLogSize in the QMErrorLog stanza of qm.ini on Unix, or via MQ Explorer on Windows (queue manager Properties > Extended)
Application event log on Windows also contains MQ events
Location of error logs on all MQ platforms: http://www-01.ibm.com/support/docview.wss?uid=swg21172370
Reason Codes and Error Messages
The mqrc command can decode a 4-digit MQ reason code, for example: mqrc 2035
Understanding common MQ reason codes: http://www-01.ibm.com/support/docview.wss?uid=swg21167821
Common MQ error messages (AMQxxxx codes) and most likely causes: http://www-1.ibm.com/support/docview.wss?uid=swg21265188
2007 MQ Problem Determination presentation: http://www-01.ibm.com/support/docview.wss?uid=swg27009878
First-failure Support Technology (FST), First-failure Data Capture (FDC)
Intended to log enough information about unexpected events (not routine MQ errors) that the problem can be resolved without further recreation and tracing.
Located in the top-level errors directory, plain text format, never purged by MQ.
Named like AMQnnnnn.x.FDC
Probe severity: 1 = Critical, 2 = Error, 3 = Warning, 4 = Informational
Issue the ffstsummary command from the errors directory to get a summary listing
IBM Hursley lab article on FFST files: >https://hursleyonwmq.wordpress.com/2007/05/04/introduction-to-ffsts/
Tech note on FFST files: http://www-01.ibm.com/support/docview.wss?uid=swg21304647
Tracing
MQ tracing can be started and stopped from the command line, and also from MQ Explorer.
Command-line options allow you to choose the desired level of detail
Output goes to the "trace" subdirectory at the top of the MQ tree
One active trace output file per MQ process; suffixes .TRC and .TRS are used for rollover (.TRC is more recent)
Unix requires an additional step, to format the trace output into humanreadable form (.FMT files)
New in MQ v7: strmqtrc -c to start tracing, and automatically stop after an FDC when a specific Probe ID is generated
Detailed tracing instructions for various MQ components on many OS platforms: http://www-1.ibm.com/support/docview.wss?uid=swg21174924
"Open mic:" MQ developers talk about MQ tracing: http://www-01.ibm.com/support/docview.wss?uid=swg27018159
Tracing and debugging 2035 authorization failures:
Commands to Enable and Disable Tracing
Enable tracing: strmqtrc
Reproduce the problem
End tracing: endmqtrc
On Unix: use dspmqtrc to translate binary trace output files to text format
Result: text files with names ending in .TRS and .TRC on Windows; binary .TRS and TRC and human-readable .FMT files on Unix
Real Time Monitoring
Checking queue manager and channel statistics while MQ is running
Must be enabled before MQ will start recording data (default is not to collect most of this information)
Queue manager attributes MONQ, MONCHL
NONE = disabled, no matter what the queues/channels say
OFF= off, but individual queues and channels can override
LOW, MEDIUM, HIGH = enabled, individual queues and channels can override
Queue attribute MONQ and channel attribute MONCHL
QMGR = use the queue manager attribute setting
OFF, LOW, MEDIUM, HIGH (LOW, MEDIUM, and HIGH are equivalent for queues
Defaults are queue manager OFF, queue and channel = QMGR
runmqsc
DISPLAY QSTATUS (queueName)
DISPLAY CHSTATUS (channelName)
MQ Explorer: right-click the queue name, click Status
Fields
MSGAGE: age of oldest message on the queue, in seconds
QTIME: average time in microseconds between put and get (recent average and long-term average)
LGETTIME and LGETDATE: time/date of last get operation
LPUTTIME and LPUTDATE: time/date of last put operation
UNCOM: pending uncommitted puts and gets
Some queue status attributes do not require monitoring to be enabled:
CURDEPTH: current queue depth (number of messages on the queue)
IPPROCS, OPPROCS: number of processes that have the queue open for input (can get messages) and for output (can put messages)
DISPLAY QL (queueName) CURDEPTH IPPROCS OPPROCS
MONCHL=off
STATUS; MCASTAT, SUBSTATE: channel and MCA state information
CURSEQNO: sequence number of last message sent or received
BTYSSENT, BYTSRCVD: number of bytes sent and received since the channel was started
MSGS: number of messages sent or received since the channel was started
LSTMSGTI, LSTMSGDA: time and date of last message sent or received
MONCHL=enabled
NETTIME: recent and long-term average network round-trip times in microseconds for request/response to/from the other end of the channel
- Requires MONCHL = MEDIUM or HIGH
XQTIME: average times in microseconds that messages were on the transmission queue before being retrieved
Requires MONCHL = HIGH
Sender channels only (same with NETTIME)
Event Monitoring
An instrumentation event is a logical combination of events that is detected by a queue manager or channel instance. Such an event causes the queue manager or channel instance to put a special message, called an event message, on an event queue.
Event messages go to one of a small set of system-defined event queues (SYSTEM.ADMIN.*.EVENT), depending on their type. Event message payloads are in binary format, not human-readable text.
Decode
There is a sample program in the InfoCenter to partially decode them, and you could build on that program; OR
Use Support Pac MS0P: an extension to MQ Explorer that decodes event messages into readable text
Windows Perfmon can also be used to visually monitor queue depth
Queue Depth
Queue depth events, a type of performance event, will show up in the SYSTEM.ADMIN.PERFM.EVENT queue
Documented here:
Enable PERFMEV on the queue manager
Enable some or all of QDPMAXEV, QDPHIEV, QDPLOEV on the queue
Set MAXDEPTH, QDEPTHHI, QDEPTHLO (the last two are percentages) on the queue
ALTER QMGR PERFMEV (ENABLED)
DEFINE QLOCAL (MY_Q)
ALTER QL (MY_Q) MAXDEPTH (10) QDPMAXEV (ENABLED) +
QDEPTHHI (50) + QDPHIEV (ENABLED) +
QDEPTHLO(30) QDPLOEV (DISABLED)Now put messages on the queue (I attempted to put 11 messages, using amqsput; the 11th put failed, of course)
CURDEPTH of SYSTEM.ADMIN.PERFM.EVENT is incremented after the 5th and the 11th put
MS0P
MS0P: http://www-01.ibm.com/support/docview.wss?uid=swg24011617
Installation is just a matter of unzipping into the right place, modifying one text file, then strmqcfg -c
After that, you can right-click a queue manager, then do Event Messages > Format Events...
Can watch individual queues, showing number of puts and gets, plus bargraph of queue depth, every N seconds (configurable via Window > Preferences)
Not Authorized Events
"Queue manager events" include six types of "not-authorized" events
Messages appear in SYSTEM.ADMIN.QMGR.EVENT
To enable: ALTER QMGR AUTHOREV (ENABLED)
Put and Get Programs
"Bindings mode" (communicate with queue manager via IPC, works only on the queue manager machine): amqsput, amqsget
"Client mode" (uses TCP and MQ channels, works from remote machines too): amqsputc, amqsgetc
Command-line arguments: queue name and queue manager name; e.g. amqsput ORDERQ QM_1
Need full path (e.g. /opt/mqm/samp/bin/amqsput) on Unix
"Put" programs allow you to type text, sending one message for each line; "get" programs retrieve and display messages
SupportPacs
A few useful SupportPacs:
IH03 (RFHutil): GUI to put and get messages, decode and display message headers, etc
MO04: SSL setup wizard
MQ Health Checker
http://www.ibm.com/support/knowledgecenter/SSFKSJ_7.5.0/com.ibm.mq.mon.doc/q036150_.htm
MQ SupportPacs: http://www-01.ibm.com/support/docview.wss?uid=swg27007205
developerWorks article about SupportPacs: http://www.ibm.com/developerworks/websphere/techjournal/0909_mismes/0909_mismes.html
Message Monitoring
The process of identifying the route a message has taken through a queue manager network
Can be done in two ways:
Setting a flag in any MQ message can cause special "activity report" messages to be generated; or
Special "trace-route" messages can be sent; activity information is accumulated in the message payload
The dspmqrte program uses these techniques to trace message flow through an MQ network
SupportPac MS0P also has trace-route functionality
Setup SOURCE and TARGET queue managers
Right-click Q.ON.TARGET (a remote queue definition on queue manager SOURCE) in MQ Explorer, select Trace Route
Reference: http://www.ibm.com/support/knowledgecenter/SSFKSJ_7.5.0/com.ibm.mq.mon.doc/q036600_.htm
Retry on Server Down
To retry for server going down (e.g. reason code 2162): Application Servers > $SERVER > Message Listener Service > Content > Additional Properties > Custom Properties
MAX.RECOVERY.RETRIES=N
RECOVERY.RETRY.INTERVAL=60
Troubleshooting WXS
Hung Thread Detection
WXS has hung thread detection similar to that available in WAS. For example:
[3/13/15 7:33:09:631 PDT] 00000032 XSThreadPool W CWOBJ7853W: Detected a hung thread named "XIOPrimaryPool : 202" TID:3c14 BLOCKED.
Executing since 3/13/2015 07:32:40:520 -0700.
Stack Trace:
com.ibm.ws.classloader.CompoundClassLoader.loadClass(CompoundClassLoader.java:549)
java.lang.ClassLoader.loadClass(ClassLoader.java:357)
com.ibm.ws.xs.util.XSUtilities.loadClass(XSUtilities.java:77)
com.ibm.ws.xs.io.ObjectStreamPool$ClassForNamePrivilegedAction.run(ObjectStreamPool.java:467)
com.ibm.ws.xs.io.ObjectStreamPool$ReusableInputStream.resolveClass(ObjectStreamPool.java:388)
java.io.ObjectInputStream.readNonProxyDesc(ObjectInputStream.java:1610)
java.io.ObjectInputStream.readClassDesc(ObjectInputStream.java:1515)
java.io.ObjectInputStream.readOrdinaryObject(ObjectInputStream.java:1769)
java.io.ObjectInputStream.readObject0(ObjectInputStream.java:1348)
java.io.ObjectInputStream.readObject(ObjectInputStream.java:370)
java.util.HashMap.readObject(HashMap.java:1155)
sun.reflect.GeneratedMethodAccessor22.invoke(Unknown Source)
sun.reflect.DelegatingMethodAccessorImpl.invoke(DelegatingMethodAccessorImpl.java:43)
java.lang.reflect.Method.invoke(Method.java:606)
java.io.ObjectStreamClass.invokeReadObject(ObjectStreamClass.java:1017)
java.io.ObjectInputStream.readSerialData(ObjectInputStream.java:1891)
java.io.ObjectInputStream.readOrdinaryObject(ObjectInputStream.java:1796)
java.io.ObjectInputStream.readObject0(ObjectInputStream.java:1348)
java.io.ObjectInputStream.defaultReadFields(ObjectInputStream.java:1989)
java.io.ObjectInputStream.readSerialData(ObjectInputStream.java:1913)
java.io.ObjectInputStream.readOrdinaryObject(ObjectInputStream.java:1796)
java.io.ObjectInputStream.readObject0(ObjectInputStream.java:1348)
java.io.ObjectInputStream.readObject(ObjectInputStream.java:370)
com.ibm.ws.objectgrid.datagrid.BaseAgentCommand.inflateAgent(BaseAgentCommand.java:323)
com.ibm.ws.objectgrid.datagrid.BaseAgentCommand.setBaseMap(BaseAgentCommand.java:173)
com.ibm.ws.objectgrid.server.impl.ServerCoreEventProcessor.processCommand(ServerCoreEventProcessor.java:1454)
com.ibm.ws.objectgrid.server.impl.ServerCoreEventProcessor.processClientServerRequest(ServerCoreEventProcessor.java:2596)
com.ibm.ws.objectgrid.server.impl.ShardImpl.processMessage(ShardImpl.java:1469)
com.ibm.ws.objectgrid.server.impl.ShardActor.handleContainerMessage(ShardActor.java:503)
com.ibm.ws.objectgrid.server.impl.ShardActor.receive(ShardActor.java:333)
com.ibm.ws.xs.xio.actor.impl.XIOReferableImpl.dispatch(XIOReferableImpl.java:110)
com.ibm.ws.xsspi.xio.actor.XIORegistry.sendToTarget(XIORegistry.java:977)
com.ibm.ws.xs.xio.transport.channel.XIORegistryRunnable.run(XIORegistryRunnable.java:88)
java.util.concurrent.ThreadPoolExecutor.runWorker(ThreadPoolExecutor.java:1145)
java.util.concurrent.ThreadPoolExecutor$Worker.run(ThreadPoolExecutor.java:615)
com.ibm.ws.objectgrid.thread.XSThreadPool$Worker.run(XSThreadPool.java:309)
[3/13/15 7:34:20:345 PDT] 000035ab XSThreadPool W CWOBJ7854W: Thread named "WXS : 89" TID:35ab RUNNABLE is no longer hung.
Runnable: com.ibm.ws.objectgrid.util.security.SecurityContextRunnable@5fa09130.Unable to Load Data into the Grid
Strategy 1: Object grid failed to start
Execute the command $WXS_HOME/bin/xsadmin.sh -primaries
Two common culprits are:
- Firewall rules blocking something that shouldn't be
- The numInitialContainers value is set higher than the total number of containers being started (in deploy.xml).
Troubleshooting WebSphere MQ
This content has been moved to Troubleshooting IBM MQ.
HCL Commerce
In general, Commerce tuning is similar to WAS tuning because Commerce is basically just a large (though very complicated) web application. However, there are many application-specific and well-known (for Commerce) WAS tuning topics covered in the Commerce performance tuning chapter in the documentation that should be reviewed.
- Performance Tuning Documentation
- General Documentation
- Commerce tuning Redbook
- Mastering DynaCache in WebSphere Commerce
Caching
Dynacache
Review the following topics:
- https://help.hcltechsw.com/commerce/9.1.0/developer/concepts/chclcache.html
- https://help.hcltechsw.com/commerce/9.1.0/admin/concepts/cdc_cacheinv.html
- https://help.hcltechsw.com/commerce/9.1.0/admin/concepts/cdc_productionenv.html
Consider using the NOT_SHARED
sharing mode in Dynacache.
HealthCenter
Commerce recommends running with HealthCenter in production: https://help.hcltechsw.com/commerce/9.1.0/admin/tasks/tighealthcenterprod.html
Note that the above instructions disable the sampling profiler to
reduce overhead (using
com.ibm.diagnostics.healthcenter.data.profiling=off).
Redbooks
Note that these Redbooks are old and you should double check the latest recommendations in the documentation links above.
- WebSphere Commerce High Availability and Performance Solutions
- Mastering DynaCache in WebSphere Commerce
Deployment
Unless deploying Commerce EAR files less than 500 MB in size to production systems, EAR deployment timeout tuning is recommended. This involves several JVM custom properties, especially if you use rollout updates:
- com.ibm.websphere.management.application.updatesync.appExpansionTimeout
- com.ibm.websphere.management.application.updateClusterTask.serverStopWaitTimeout
- com.ibm.websphere.application.updateapponcluster.waitforappsave
- com.ibm.ws.webcontainer.ServletDestroyWaitTime
Troubleshooting
Web server
Tips for using the IHS Access Log feature for WebSphere Commerce sites: http://www.ibm.com/developerworks/library/co-websphere-access-feature/index.html
HCL Portal
Appendix
Sub-Chapters
- Resources
- Opinions
- IBM Installation Manager
- POSIX
- Git
- Internet Domains
- OpenLDAP
- Wily Introscope
- OpenOffice, LibreOffice
- Acronyms
- Firefox
- Other
- Revision History
- Notices
- Full Table of Contents
Resources
- WebSphere Application Server Performance Tuning Documentation:
- IBM Java Performance Tuning Documentation
- OpenJ9 Java Performance Tuning Documentation
- IBM HTTP Server Performance Tuning
- Top 10 Performance and Troubleshooting tips for WebSphere Application Server traditional and Liberty
- Self-paced WebSphere Application Server Troubleshooting and Performance Lab
- Troubleshoot WebSphere Application Server (The Basics)
Opinions
IBM HeapAnalyzer versus the Eclipse Memory Analyzer Tool
IBM HeapAnalyzer (HA) is a fast-loading and simple-to-use heapdump analysis program. However, there are major issues with HeapAnalyzer:
- All IBM development effort has moved to the Eclipse Memory Analyzer Tool (MAT).
- HeapAnalyzer calculates retained heaps using heuristics rather than more accurate graph theory as in MAT. This may sometimes cause object "sizes" to be incorrect (in some cases being larger than the maximum heap size).
- HeapAnalyzer was originally designed for PHDs that do not have memory contents so it is harder to use for system dumps and HPROFs.
- HeapAnalyzer has limited capabilities for accurate GC accounting with system dumps.
- HeapAnalyzer lacks MAT's paths-to-GC roots queries.
If you are new to heapdump analysis, consider using MAT. If you are used to HeapAnalyzer, you can continue to use it for simple problems, but use MAT for problems HA doesn't solve.
IBM Installation Manager (IM)
Documentation: http://www-01.ibm.com/support/knowledgecenter/SSDV2W/im_family_welcome.html
Offline Installations
Use the Packaging Utility in Installation Manager to install packages into machines without internet access: http://www-01.ibm.com/support/knowledgecenter/SSDV2W_1.8.0/com.ibm.im.articles.doc/topics/entdeployment.htm
imcl
imcl is the command line version of the IBM Installation Manager: http://www-01.ibm.com/support/knowledgecenter/SSDV2W_1.8.1/com.ibm.cic.commandline.doc/topics/c_imcl_container.html
Help
Invoke help: $ imcl help
For example to list the parameters and options being accepted by
updateAll: $ imcl help updateAll
List Installed Packages
$ imcl listInstalledPackages
com.ibm.websphere.ND.v80_8.0.9.20140530_2152
com.ibm.websphere.PLG.v80_8.0.3.20120320_0536
com.ibm.websphere.IHS.v80_8.0.3.20120320_0536List Installed Features of a Package
$ imcl listInstalledFeatures com.ibm.websphere.ND.v80_8.0.9.20140530_2152
com.ibm.sdk.6_64bit
ejbdeploy
embeddablecontainer
samples
thinclientOther Examples
List available packages and features in a repository: $ imcl listAvailablePackages -repositories /repository.config -features -long
Installing WAS8 with 64Bit Java: $ imcl install com.ibm.websphere.ND.v80,core.feature,ejbdeploy,com.ibm.sdk.6_64bit -repositories /disk1 -installationDirectory -accessRights nonAdmin -acceptLicense -log /tmp/WAS8_install.log [-sharedResourcesDirectory ]
Installing an iFix (PM48831): $ imcl install
8.0.0.0-WS-WASND-IFPM48831_8.0.0.20111110_1512 -installationDirectory
-acceptLicense -log /tmp/WAS8_iFix_install.log -repositories
[-sharedResourcesDirectory ]
Note: You might need to run imcl listAvailablePackages to determine the
[-sharedResourcesDirectory ] of the iFix
Uninstalling an iFix (PM48831): $ imcl uninstall 8.0.0.0-WS-WASND-IFPM48831_8.0.0.20111110_1512 -installationDirectory -log /tmp/IFPM48831_uninstall.log
Running a fill installation of course works as well - however the properties list is depending on the product being used. As most products provide a sample response file it's the easiest way to determine the properties from there. Look at the "" lines in the respone files. Each "key-name" is converted to a property. Note: As properties are separted by "," you have to double the "," in the "key-name" if the "key-name" contains commas.
Save Credentials
If a repository requires authentication, you must save the password to a local file: http://www-01.ibm.com/support/knowledgecenter/SSDV2W_1.8.1/com.ibm.cic.commandline.doc/topics/t_imcl_store_credentials.html
First, create a master password file with a plain text password:
$ cat > master_password_file.txt
${PASSWORD}
^DNext, create the credential file:
$ imutilsc saveCredential -url ${URL} -userName ${USER} -userPassword ${PASSWORD} -secureStorageFile credential.store -masterPasswordFile master_password_file.txt
Successfully saved the credential to the secure storage file.Use the -secureStorageFile and
-masterPasswordFile imcl options to specify these files.
For example:
$ imcl -acceptLicense -secureStorageFile credential.store -masterPasswordFile master_password_file.txt updateAllIf these passwords and files are sensitive, remove them after the operations are complete and clear your shell history.
Update Package
One way to update a package is to enable only the repositories with
those package updates (this can be done easily under Preferences in
console mode) and then use the updateAll command. For
example:
$ imcl -acceptLicense -secureStorageFile credential.store -masterPasswordFile master_password_file.txt updateAll
Updated to com.ibm.websphere.IHS.v80_8.0.10.20150116_1534 in the /opt/IBM/HTTPServer directory.
Updated to com.ibm.websphere.ND.v80_8.0.10.20150116_1534 in the /opt/IBM/WebSphere/AppServer directory.
Updated to com.ibm.websphere.PLG.v80_8.0.10.20150116_1534 in the /opt/IBM/WebServer/Plugins directory.Console Mode
Console mode is a feature of imcl which lets you
navigate through IM like you would through the GUI but through a
shell:
$ imcl -c
=====> IBM Installation Manager
Select:
1. Install - Install software packages
2. Update - Find and install updates and fixes to installed software packages
3. Modify - Change installed software packages
4. Roll Back - Revert to an earlier version of installed software packages
5. Uninstall - Remove installed software packages
Other Options:
L. View Logs
S. View Installation History
V. View Installed Packages
------------------------
P. Preferences
------------------------
A. About IBM Installation Manager
------------------------
X. Exit Installation ManagerInstalling Fix Packs and i-Fixes
POSIX
Shells
Current Shell
There is a convention that if the logged in user is
root, then the shell prompt character is #,
while non-root users show $.
To print which shell you're currently using, try one of these options:
$ echo $0
bash
$ echo $SHELL
/bin/bash
$ ps -p $$
PID TTY TIME CMD
6549 pts/4 00:00:00 bashCross-Shell Topics
POSIX-compatible shell scripting
POSIX defines a standard for shell scripts.
Variable Expansion
Variable expansion supports the following operations:
- Return the value of a variable or a default value:
${VARIABLE:-DEFAULT} - Return the value of a variable if non-null or a DEFAULT value if
null:
${VARIABLE:-DEFAULT} - Return the length of a variable value:
${#VARIABLE} - Return the value of a variable with the specified suffix removed:
${VARIABLE%SUFFIX} - Return the value of a variable with the specified prefix removed:
${VARIABLE#SUFFIX}
Create a file in one command
Without variable expansion (single or double quotes around the heredoc word):
cat > diag.sh << 'EOF'
#!/bin/sh
OUTPUTFILE="diag_$(hostname)_$(date +%Y%m%d_%H%M%S).txt"
echo "[$(date)] Started command" >> "${OUTPUTFILE}" 2>&1
uname >> "${OUTPUTFILE}" 2>&1
echo "[$(date)] Finished command" >> "${OUTPUTFILE}" 2>&1
EOFIn most shells, a dash at the end of << will strip
leading tabs (but not spaces); for example:
cat > diag.sh <<- 'EOF'
#!/bin/sh
OUTPUTFILE="diag_$(hostname)_$(date +%Y%m%d_%H%M%S).txt"
echo "[$(date)] Started command" >> "${OUTPUTFILE}" 2>&1
uname >> "${OUTPUTFILE}" 2>&1
echo "[$(date)] Finished command" >> "${OUTPUTFILE}" 2>&1
EOFTo use variable expansion, remove the single or double quotes around the heredoc word.
If a wrapper command is needed such as sudo:
sudo sh -c "cat > diag.sh" << 'EOF'
#!/bin/sh
OUTPUTFILE="diag_$(hostname)_$(date +%Y%m%d_%H%M%S).txt"
echo "[$(date)] Started command" >> "${OUTPUTFILE}" 2>&1
uname >> "${OUTPUTFILE}" 2>&1
echo "[$(date)] Finished command" >> "${OUTPUTFILE}" 2>&1
EOFtest
The test
command is often used in boolean expressions and the short-hand is
[]:
- Check if a string is empty (
-zcould be used but this is more readable):if [ "${1}" = "" ]; then echo "First argument missing" exit 1 fi - Check if a string is non-empty (
-ncould be used but this is more readable):if [ "${1}" != "" ]; then echo "First argument missing" exit 1 fi - Check string equality (note that
==is not standard but supported by many modern shells):if [ "${1}" = "somestring" ]; then echo "First argument is somestring" exit 1 fi - Check if file exists:
if [ -f "${1}" ]; then echo "File exists and is a regular file" exit 1 fi - Check if file doesn't exist:
if ! [ -f "${1}" ]; then echo "File does not exist" exit 1 fi - Check if directory exists:
if [ -d "${1}" ]; then echo "Directory exists" exit 1 fi
Globs
When using a glob (*) in a terminal to expand to a list
of files and/or directories, by default, files beginning with a dot
(.), also known as dotfiles or hidden files, are not
included in the list. To include these, first disable this behavior by
running:
set
set is a command to configure options for the current context. One or more flags may be specified at the same time.
set -eexits the script if a command receives an error.set -xprints each command tostderrbefore it is run.
It is common to put set -e at the top of a script to
exit if an error is observed:
#!/bin/sh
set -ecase
The case structured is describe in Case
Conditional Construct. Each case supports wildcards. Example:
case "${somevariable}" in
ta0*)
echo "First branch";
;;
itc*)
echo "Second branch";
;;
*)
echo "Default branch";
;;
esacPOSIX-compliant one-liners
- Generate random character sequence of a-z, A-Z, or 0-9 (replace
-w 22with the count):cat /dev/random | LC_ALL=C tr -dc 'a-zA-Z0-9' | fold -w 22 | head -n 1 - Loop through a list of numbers (replace
MAX=10with the maximum; exclusive):i=1; MAX=11; while [ "$i" -ne $MAX ]; do echo $i; i=$(( $i + 1 )); done
Script template
#!/bin/sh
# Comment about this script
usage() {
printf "Usage: %s [-v] [-d DELAY] COMMAND [ARGUMENTS...]\n" "$(basename "${0}")"
cat <<"EOF"
-d: DELAY between executions in seconds.
-v: verbose output to stderr
EOF
exit 22
}
DELAY="30"
VERBOSE=0
OPTIND=1
while getopts "d:hv?" opt; do
case "$opt" in
d)
DELAY="${OPTARG}"
;;
h|\?)
usage
;;
v)
VERBOSE=1
;;
esac
done
shift $((OPTIND-1))
if [ "${1:-}" = "--" ]; then
shift
fi
if [ "${#}" -eq 0 ]; then
echo "ERROR: Missing COMMAND"
usage
fi
printInfo() {
echo "[$(date '+%Y-%m-%d %H:%M:%S.%N %Z')] $(basename "${0}"): ${@}"
}
printVerbose() {
echo "[$(date '+%Y-%m-%d %H:%M:%S.%N %Z')] $(basename "${0}"): ${@}" >> /dev/stderr
}
printInfo "started with delay ${DELAY}"
[ "${VERBOSE}" -eq "1" ] && printVerbose "Commands: ${@}"
"$@"
printInfo "finished"bash
Change the command prompt to include more information:
$ export PS1="[\u@\t \w]\$ "Search command history using Ctrl+R and typing and recall with ESC or execute with ENTER:
$ less /etc/hosts
$ othercommand1
$ othercommand2
$ # Now type Ctrl+R and type less
(reverse-i-search)`less': less /etc/hostsRecall and execute the last command with !!:
$ /opt/IHS/bin/apachectl restart
$ sudo !!Recall and execute the first previous command containing a search string with !?:
$ /opt/IHS/bin/apachectl restart
$ !?apachectlRecall and execute the last command but replace all instances of one expression with another:
$ !!:gs/stop/start/Use the last argument of the previous command with !!:$, or all arguments of the previous command with !!:*
Search history and re-run a particular command based on its position in history:
$ history | grep startServer.sh
527 /opt/IBM/WebSphere/profiles/node01/bin/startServer.sh server1
543 /opt/IBM/WebSphere/profiles/node01/bin/startServer.sh server2
$ !543Print the name of the current user:
whoamiExtract all .tar.gz files into subdirectories using the name of the file without the extension:
for i in *.tar.gz; do mkdir `basename $i .tar.gz` && mv $i `basename $i .tar.gz` && pushd `basename $i .tar.gz` && tar xzvf $i && rm $i && popd; doneExtract all .tar files into subdirectories using the name of the file without the extension:
for i in *.tar; do mkdir `basename $i .tar` && mv $i `basename $i .tar` && pushd `basename $i .tar` && tar xvf $i && rm $i && popd; doneExtract all .zip files into subdirectories using the name of the file without the extension:
for i in *.zip; do mkdir `basename $i .zip` && mv $i `basename $i .zip` && pushd `basename $i .zip` && unzip $i && rm $i && popd; doneGunzip all .gz files in a directory:
find . -type f -name "*gz" -print | while read line; do pushd `dirname $line`; gunzip `basename $line`; popd; doneChange to a directory by replacing a part of the current directory:
cd ${PWD/Dmgr01/AppSrv01}Recall the last word of the previous command using Alt+.
Command line navigation
^ refers to the Ctrl key. The
⎇ refers to the Alt key.
Move cursor:
- Beginning:
^aor^xx - Beginning of word:
⎇b - End:
^e - End of word:
⎇f - First occurrence of character
Xto the right:^]X - First occurrence of character
Xto the left:^⎇X
Delete content:
- Delete to the beginning:
^u - Delete to the end:
^k - Delete a word to the left:
^w - Delete a word to the right:
⎇d - Paste what was deleted:
^y
Global aliases
For truly global aliases, update the scripts for both interactive shells (/etc/profile.d/*) and non-interactive shells (/etc/bashrc or /etc/bash.bashrc, depending on the distribution).
First, create a shell script with the commands you want to run and place it in a common location such as /etc/globalprofile.sh:
#!/bin/sh
alias x="exit"
alias l="ls -ltrh"
export PS1="[\u@\t \w]\$ "Then add the execute permission:
# chmod +x /etc/globalprofile.shFinally, append the following line to both interactive and non-interactive shell script locations (e.g. /etc/bashrc):
source /etc/globalprofile.shzsh
Completion
Initialize completion by putting the following at the top of
~/.zshrc:
autoload -U compinit; compinitWhen you start a new terminal tab, if you receive the error "zsh
compinit: insecure directories, run compaudit for list.", then run
compaudit and, for each directory, run:
sudo chown -R $(whoami):staff $DIR
sudo chmod -R 755 $DIRScript to watch netstat to create file triggers
watchoutbound.sh:#!/bin/sh SEARCH="10.20.30.100:50000" SOCKETTHRESHOLD="150" SLEEPINTERVAL="30" while true; do currentcount="$(netstat -an | awk '{print $5}' | grep -c "${SEARCH}")" if [ ${currentcount} -ge ${SOCKETTHRESHOLD} ]; then echo "$(date) Threshold exceeded with ${currentcount} outbound connections to ${SEARCH}" >> /tmp/trigger.txt fi sleep ${SLEEPINTERVAL} donechmod +x watchoutbound.shnohup ./watchoutbound.sh &
awk
This section has been moved to awk.
Truncating Logs
While some operating systems have commands specifically for truncation (e.g. "truncate" on Linux), it is simpler and more cross-platform to simply write /dev/null on top of a file to truncate it:
cat /dev/null > file.logThis does not work with sudo because the redirection operator occurs outside of the sudo. In that case, you can use tee:
cat /dev/null | sudo tee file.logDefunct Processes
Use ps -elf | grep defunct to monitor defunct
processes.
"Processes marked <defunct> are dead processes (so-called "zombies") that remain because their parent has not destroyed them properly." (http://man7.org/linux/man-pages/man1/ps.1.html)
"A defunct process, also known as a zombie, is simply a process that is no longer running, but remains in the process table to allow the parent to collect its exit status information before removing it from the process table. Because a zombie is no longer running, it does not use any system resources such as CPU or disk, and it only uses a small amount of memory for storing the exit status and other process related information in the slot where it resides in the process table." (http://www-01.ibm.com/support/docview.wss?uid=isg3T1010692)
Defunct processes are processes that have exited and are waiting for the parent process to read its exit code. Most of the resources of the exited process are released; however, the PID, exit code, and process table entries are still resident and a persistent and large number of defunct processes can limit scalability. Every process will be defunct, but normally it is only for a short period of time. Normally, persistent defunct processes mean that the parent process is hung. In the case of WAS, this is usually the nodeagent process. To remove defunct processes, kill the parent process. Before doing this, gather diagnostics on the parent process such as performing activity on it to see if it is still alive, requesting a thread dump, and finally requesting a core dump. Killing the parent process will cause the parent process of the defunct process to become the init (1) process which will then read the exit code and allow the defunct process to finish.
Example C Program that Crashes
test.c:
#include <stdio.h>
int main(int argc, char** argv) {
char *p = 0;
printf("Hello World\n");
printf("p: %d\n", *p);
return 0;
}Run:
$ gcc -g test.c
$ ./a.outSSH
To bypass any configured private keys:
$ ssh -o PubkeyAuthentication=no user@hostSSH Port Forwarding
Often you can SSH into a box but other ports that you want to access are blocked by firewalls. You can create an SSH tunnel that takes traffic on your machine at some port, forwards it through an SSH connection and sends it to a different port on the target server. For example, let's say hostX has something that is listening on port 8879 which you can't access from outside that box. You can create a tunnel like this:
$ ssh -L 9999:hostX:8879 sshuser@hostXNow you should have a listening port on localhost port 9999. You can access this port through your client program as you would access port 8879 on hostX.
This can also be done with programs such as putty by using the tunnel option:

kill
kill is used to send signals to processes. The general format of the command is:
$ kill -${SIGNAL} ${PID}${SIGNAL} is either a number or the name of the signal.
For example, to send the equivalent of Ctrl+C to a process 123:
$ kill -INT 123less
less is a common command to browse files and input:
$ less inputTips:
- Jump to the beginning of input:
g - Jump to the end of input:
G - Jump to a line number N:
Ng - Go to the next input:
:n - Search for something:
/SEARCH - Find next:
n - If you jump to the end of input and it says "Calculating line numbers," press Ctrl+C if you don't need to do this to stop the calculation.
- Start tailing a log:
Shift+F - Enable any command line option after the file has been loaded:
-OPTION} Enter. Common ones:- Show line numbers:
-N - Show percent progress in file:
-m- If it shows
byte Xthen less doesn't know how many bytes are available in total so it can't calculate a perecentage. Go to the end and then the beginning:G}g
- If it shows
- Show file name:
-M - Don't wrap lines:
-S
- Show line numbers:
tail
tail may be used to skip the first N lines of input using
-n (N+1). For example, to skip the first line of input:
$ tail -n +2 inputsort
Sort by a particular column using -k:
$ sort -k 3 inputSort numerically:
$ sort -k 3 -n inputbc
paste and bc may be used to sum a set of numbers from input:
$ cat input | paste -sd+ | bcsed
sed and bc may be used to do simple math on input:
$ cat input | sed 's/$/*1024/' | bc- Print lines 4-10:
sed -n '4,10p' - Delete first 5 lines:
sed '1,5d' - Delete blank lines:
sed '/^$/d'
Perl
perl is a commonly used scripting language. A perl script normally has the .pl extension and starts with this shebang line:
#!/usr/bin/env perlUseful command line options:
- perldoc perlrun: Man page of executing the perl interpreter.
- -e: Specify perl code on the command line rather than a perl file.
- -p: Run specified perl command on each line of standard input.
- -n: Same as -p except that each line is not also printed.
For example, to convert a POSIX date epoch into a human-readable time:
$ date +%s | perl -ne 's/(\d+)/localtime($1)/e;'The $_ variable will contain each line of the file.
Code may be run at the start and end using BEGIN {} and END {} blocks, respectively:
$ date +%s | perl -ne 'BEGIN { print "Starting\n"; } s/(\d+)/localtime($1)/e; END { print "Finished\n"; }'Useful things to remember in perl:
- $x =\~ /$REGEX/: Return true if $REGEX matches $x
- $x =\~ s/$REGEX//g: Replace all occurrences of $REGEX in $x with nothing.
Commonly used regular expression tokens:
- Match zero or more: *
- Match one or more: +
- Any character: .
- White space character (space, tab, or newline): \s
- Opposite of white space character: \S
- Word character (a-z, A-Z, 0-9, or underscore): \w
- Non-word character: \W
- Digit character (0-9): \d
- Non-digit character: \D
wget
wget may be used to execute an HTTP request:
$ wget http://ibm.com/
Saving to: "index.html"When multiple URLs are passed to wget, if possible, wget will attempt to re-use the same TCP socket. Use Perl to automate generating the same URL many times on the command line. In the following example, 64 requests will be attempted over the same socket:
$ wget -O/dev/null `perl -e 'print "http://ibm.com/ " x 64;'`To review response headers and (short) bodies, a useful one-liner is:
$ wget -qS http://ibm.com/ -O-netcat (nc) / openssl s_client
When you want more control over what goes into the HTTP/HTTPS request, you can use printf and netcat or openssl s_client:
$ printf "GET / HTTP/1.1\r\nHost: example.com\r\n\r\n" | nc 0 80
$ printf "GET / HTTP/1.1\r\nHost: example.com\r\n\r\n" | openssl s_client -connect 0:443 -ign_eofopenssl
Show a remote TLS certificate (replace both instances of
localhost):
echo | openssl s_client -showcerts -servername localhost -connect localhost:8880 2>/dev/null | openssl x509 -inform pem -noout -textfind
The /usr/bin/find command searches for files recursively based on their name or metadata. Check the bottom of the Linux manual for examples.
$ find /opt/IBM/WebSphere -name server.xml
$ find /opt/IBM/WebSphere -size +100M (note: the M suffix is not portable)
$ find . -name server.xml|grep -vi Templates|xargs grep startupTraceSpecificationgpg
File Encryption
Encrypt a file for storage or transit:
$ gpg --s2k-mode 3 --s2k-count 65536 --force-mdc --cipher-algo AES256 --s2k-digest-algo sha512 -o ${OUTPUTFILE}.pgp --symmetric ${INPUTFILE}File Decryption
Decrypt a PGP-encrypted file:
$ gpg --output ${OUTPUTFILE} --decrypt ${INPUTFILE}.pgptouch
changes the timestamp of a file (=access/modification time) to the current date and time:
$ touch inputTip: "touch [non-existing filename]" will create a new empty file (no directories). You can also create several new files using "touch [newfile1 newfile2 newfile3]"
Filenames and special characters
Special characters in the terminal include $ <> & |;"'\
If you'd like to use them, you'll need to precede "escape" them with a \ [back slash]. There is no way you can create a filename with a / [forward slash] or null character.
Auto completion
Use "cd + [first few letters of your filename] + TAB {+ TAB}" to change directory to files starting with the letters you specified using auto completion:
$ cd + inp + TAB {or TAB + TAB to display all options}"ls + TAB + TAB" will open up a list of suggestions which you can use with a given command.
Keyboard shortcuts:
Tips:
- Move to the beginning of a line: CTRL+A
- Move to the end of a line: CTRL+E
- Move one word backwards at a time: ALT+B
- Delete character at cursor location: CTRL+D
- Cut text from the cursor location to the end of the line (beginning of the line): CTRL+K (U) and use CTRL+Y to paste it back; "kill" text and "yank" it.
- Convert the current word [at the beginning of a word] to lowercase (uppercase): ALT+L (U)
tac
Show contents of filename1 and filename2 in a reverse order:
$ tac [filename1][filename2]nl
Add line numbers to input lines.
Types of commands
To list all available built-in shell commands for a particular shell use:
$ compgen -bTo display your command type you can use "type [command name] OR file [absolute path to command]":
$ type cd
OR type ifconfig and file /sbin/ifconfigAlternatively, you can use the "which" command to display an executable location/the absolute command path (not working for shell built-ins):
$ which ifconfigTo check if a command name is already in use or may be used as an alias you may use "type [potential alias name]":
$ type myaliasCombining commands
- To combine 1stcommand and 2ndcommand etc., use "1stcommand;
2ndcommand;...." Correct commands will be executed unless you use exit:
$ date; cal - Alternatively, you can use "&&" to combine commands.
However, this will only execute until it encounters an error ("short
circuit evaluation"):
$ date && cal
Wildcards
- Represents or matches any characters: *
- Represents or matches a single character: ?
- Match a range of characters: [range of characters]
- Not match a range of characters: [!range of characters]
- Any number from numbers of the digit range:[digit-digit]*
- Uppercase: [[:upper:]]
- Lowercase: [[:lower:]]
- Digit: [[:digit:]]
- Alphabetical: [[:alpha:]]
- Alphanumeric: [[:alnum:]]
- NB: To negate this use [![....:]]
htpasswd
- Create 10 users with random passwords:
i=1; MAX=11; OUTPUT=users.htpasswd; while [ "$i" -ne $MAX ]; do PASSWORD="$(cat /dev/random | LC_ALL=C tr -dc 'a-zA-Z0-9' | fold -w 22 | head -n 1)"; htpasswd $(if ! [ -f "${OUTPUT}" ]; then printf "%s" "-c"; fi) -B -b "${OUTPUT}" "user${i}" "${PASSWORD}"; echo "user${i} = ${PASSWORD}"; i=$(( $i + 1 )); done
Makefiles
make
uses a Makefile to automate tasks.
Makefile Basics
A Makefile is a set of rules of the form:
$TARGET: $PREREQUISITES
$TAB$COMMAND
$TAB$COMMAND
[...]Each $COMMAND is run in its own shell.
For example:
a.out: test.c
gcc test.cMake will only run a rule if the last modification time of
$TARGET is older than the last modification times of its
$PREREQUISITES. A target without
$PREREQUISITES always evaluates to needing to be executed;
for example:
clean:
rm a.outComments begin with #.
The first $TARGET is the default target when running
make. Otherwise, specify the targets with
make $TARGET...; for example, make a.out.
To ensure POSIX-compliance, the first non-comment line should be the following:
.POSIX:Makefiles may use macros of the form $(MACRO) and these
may be nested. Default values may be specified with assignment; for
example:
CFLAGS=-gMacros may be overridden with environment variables in the calling
shell or on the command line with MACRO=value; for example,
make CFLAGS="-g -O". The $< macro expands
to the prerequisite.
Makefile Example
.POSIX:
CC=gcc
CFLAGS=-W -O -g -fno-omit-frame-pointer
PREFIX=/usr/local
all: a.out
install: a.out
mkdir -p $(DESTDIR)$(PREFIX)/bin
cp -f a.out $(DESTDIR)$(PREFIX)/bin
a.out: test.c
$(CC) $(LDFLAGS) $<
clean:
rm -f a.outPHONY
The special .PHONY
target specifies a list of targets which will be executed, if requested,
even
if a file name matching the target exists. For example:
When one directory contains multiple programs, it is most convenient to describe all of the programs in one makefile ./Makefile. Since the target remade by default will be the first one in the makefile, it is common to make this a phony target named ‘all’ and give it, as prerequisites, all the individual programs. For example:
all : prog1 prog2 prog3 .PHONY : all prog1 : prog1.o utils.o cc -o prog1 prog1.o utils.o prog2 : prog2.o cc -o prog2 prog2.o prog3 : prog3.o sort.o utils.o cc -o prog3 prog3.o sort.o utils.o
Git
Git is a distributed verson control system.
Squash a Pull Request
Assuming a pull request is from a branch that is X
commits ahead, squash into one commit with:
- Determine the number
Xby looking atgit log - Replace
Xin the following command:git rebase --interactive --gpg-sign=user@domain HEAD~X - This will bring up an editor with a list of commits and options on
how to process them; for example:
pick 7d68f53 Add new options pick fc44c33 Add log if new options are set pick e5b4d1d Fix whitespace pick 9f3740d Fix copyright # Rebase 433de9e..9f3740d onto 433de9e (4 commands) # # Commands: # p, pick <commit> = use commit # r, reword <commit> = use commit, but edit the commit message # e, edit <commit> = use commit, but stop for amending # s, squash <commit> = use commit, but meld into previous commit # f, fixup [-C | -c] <commit> = like "squash" but keep only the previous # commit's log message, unless -C is used, in which case # keep only this commit's message; -c is same as -C but # opens the editor [...] - Do not change the first
pickline but change the second and subsequentpicklines tosquash; for example:pick 7d68f53 Add new options squash fc44c33 Add log if new options are set squash e5b4d1d Fix whitespace squash 9f3740d Fix copyright [...] - Quit and save the editor
- This will bring up the editor again which will have all of the commit messages appended together. Modify/combine the messages into one coherent message, save, and quit.
- Force push to the branch:
git push -f
This procedure is described in detail in the manual on
git rebase:
If you want to fold two or more commits into one, replace the command "pick" for the second and subsequent commits with "squash" or "fixup".
Internet Domains
Reserved Domains
example.com is a commonly used test domain: https://tools.ietf.org/html/rfc2606
OpenLDAP
OpenLDAP Software is an open source implementation of the Lightweight Directory Access Protocol: http://www.openldap.org/
The older slapd.conf file is deprecated, and the newer configuration files under slapd.d should be edited using LDAP utilities rather than manually: http://www.openldap.org/doc/admin/slapdconf2.html
Configuration
Dump all configuration:
$ ldapsearch -Y EXTERNAL -H ldapi:/// -b "cn=config"Configuration is modified by creating an LDAP Data Interchange Format (LDIF) file with the desired changes and running:
$ ldapmodify -Y EXTERNAL -H ldapi:/// -f ${file}.ldifIn recent versions, the main configuration is contained in LDIF files under some directory such as /etc/openldap/slapd.d/cn=config; however, these files should not be edited directly. Instead, create an LDIF file with the changes and run ldapmodify.
For example, in a simple configuration, it is common to change
olcSuffix, olcRootDN, olcRootPW, and olcAccess. Create an
update_configuration.ldif file, replace dc=example,dc=com with your
domain, and run slappasswd to generate the input for
olcRootPW:
dn: olcDatabase={0}config,cn=config
changetype: modify
replace: olcRootPW
olcRootPW: {SSHA}ugwz71gwNPJuw5bQzyqIMATp8wOPu7Io
-
dn: olcDatabase={2}bdb,cn=config
changetype: modify
replace: olcSuffix
olcSuffix: dc=example,dc=com
-
replace: olcRootDN
olcRootDN: cn=Manager,dc=example,dc=com
-
replace: olcRootPW
olcRootPW: {SSHA}ugwz71gwNPJuw5bQzyqIMATp8wOPu7Io
-
dn: olcDatabase={1}monitor,cn=config
changetype: modify
replace: olcAccess
olcAccess: {0}to * by
dn.base="gidNumber=0+uidNumber=0,cn=peercred,cn=external,cn=auth"
read by dn.base="cn=Manager,dc=example,dc=com" read by * none
-Input this file to ldapmodify:
$ ldapmodify -Y EXTERNAL -H ldapi:/// -f update_configuration.ldifLDAP Data Interchange Format (LDIF)
LDIF is specified through RFC 2849: https://tools.ietf.org/html/rfc2849
The general form is:
# Comment
key: value
continuation- A continuation occurs when a line starts with one space. That one space is removed and the rest is concatenated to the previous line. Therefore, it's almost always necessary to use two spaces so that there is a space between the concatentation.
- If a key is followed by two colons, the value is Base-64 encoded.
- When using
ldapmodify, operations are separated by a line with a dash in it, followed by a blank line. This does not apply toldapadd.
ldapadd
Instead of creating an LDIF file beforehand, you may omit
-f, enter the LDIF in the standard input and then type
Ctrl+D. For example:
$ ldapadd -D cn=Manager,dc=example,dc=com -w password
dn: ...
Ctrl+DExample: Create Organization
Here is an example create_organization.ldif with a single user:
dn: dc=example,dc=com
objectClass: dcObject
objectClass: organization
dc: example
o: example
dn: ou=Users,dc=example,dc=com
objectClass: organizationalUnit
ou: Users
dn: cn=User1,ou=Users,dc=example,dc=com
cn: User1 LastName
sn: LastName
objectClass: inetOrgPerson
userPassword: password
uid: 1
dn: ou=Groups,dc=example,dc=com
objectClass: organizationalUnit
ou: Groups
dn: cn=Group1,ou=Users,dc=example,dc=com
cn: Group1
objectClass: groupOfNames
member: cn=User1,ou=Users,dc=example,dc=comThen add all of the items with:
$ ldapadd -f create_organization.ldif -D cn=Manager,dc=example,dc=com -WExample: Add User
$ ldapadd -D cn=Manager,dc=example,dc=com -w password
dn: cn=Admin,ou=Users,dc=example,dc=com
cn: Admin
sn: Admin
objectClass: inetOrgPerson
userPassword: {SSHA}baYn/l/wd41jpw5k0GvSPn99DboceyQZ
uid: 2
^Dldapsearch
Example output:
$ ldapsearch -LLL -x -b 'dc=example,dc=com' '(objectclass=*)'
dn: dc=example,dc=com
objectClass: dcObject
objectClass: organization
dc: example
o: example
dn: ou=Users,dc=example,dc=com
objectClass: organizationalUnit
ou: Users
dn: cn=User1,ou=Users,dc=example,dc=com
cn: User1 LastName
cn: User1
sn: LastName
objectClass: inetOrgPerson
userPassword:: cGFzc3dvcmQ=
uid: 1
dn: ou=Groups,dc=example,dc=com
objectClass: organizationalUnit
ou: Groups
dn: cn=Group1,ou=Users,dc=example,dc=com
cn: Group1
objectClass: groupOfNames
member: cn=User1,ou=Users,dc=example,dc=comExample: Find Users by Attribute
$ ldapsearch -LLL -x -b 'dc=example,dc=com' '(&(sn=LastName)(objectclass=inetOrgPerson))'
dn: cn=User1,ou=Users,dc=example,dc=com
cn: User1 LastName
cn: User1
sn: LastName
objectClass: inetOrgPerson
uid: 1
userPassword:: e1NTSEF9M0FjcXdzMFVPRmlSQ1Z2cGZaR3JQUWczNXRsejhOMng=Example: Find Groups that Contain a User
$ ldapsearch -LLL -x -b "dc=example,dc=com" -D cn=Manager,dc=example,dc=com -w password "(&(objectclass=groupOfNames)(member=cn=User1,ou=Users,dc=example,dc=com))"
dn: cn=Group1,ou=Users,dc=example,dc=com
cn: Group1
objectClass: groupOfNames
member: cn=User1,ou=Users,dc=example,dc=comldapmodify
Instead of creating an LDIF file beforehand, you may omit
-f, enter the LDIF in the standard input and then type
Ctrl+D. For example:
$ ldapmodify -D cn=Manager,dc=example,dc=com -w password
dn: ...
changetype: ...
Ctrl+DExample: Modify User Password
$ ldapmodify -D cn=Manager,dc=example,dc=com -w password
dn: cn=User1,ou=Users,dc=example,dc=com
changetype: modify
replace: userPassword
userPassword: {SSHA}3Acqws0UOFiRCVvpfZGrPQg35tlz8N2x
^DExample: Add Member to Existing Group
$ ldapmodify -D cn=Manager,dc=example,dc=com -w password
dn: cn=Group1,ou=Users,dc=example,dc=com
changetype: modify
add: member
member: cn=Admin,ou=Users,dc=example,dc=com
^Dldapwhoami
Use ldapwhoami to test user credentials.
Example success:
$ ldapwhoami -vvv -D "cn=User1,ou=Users,dc=example,dc=com" -x -w password
ldap_initialize( <DEFAULT> )
dn:cn=User1,ou=Users,dc=example,dc=com
Result: Success (0)Example failure:
$ ldapwhoami -vvv -D "cn=User1,ou=Users,dc=example,dc=com" -x -w test
ldap_initialize( <DEFAULT> )
ldap_bind: Invalid credentials (49)Monitoring
OpenLDAP monitoring: https://www.openldap.org/doc/admin24/monitoringslapd.html
Examples:
Print all statistics:
# ldapsearch -LLL -H ldapi:// -Y EXTERNAL -b 'cn=Monitor' -s sub '(objectClass=*)' '*' '+' 2>/dev/nullNumber of active connections:
# ldapsearch -LLL -H ldapi:// -Y EXTERNAL -b 'cn=Current,cn=Connections,cn=Monitor' -s base '(objectClass=*)' '*' '+' 2>/dev/null | grep monitorCounter:
monitorCounter: 1Number of available connections:
# ldapsearch -LLL -H ldapi:// -Y EXTERNAL -b 'cn=Total,cn=Connections,cn=Monitor' -s base '(objectClass=*)' '*' '+' 2>/dev/null | grep monitorCounter:
monitorCounter: 1057Maximum configured threads:
# ldapsearch -LLL -H ldapi:// -Y EXTERNAL -b 'cn=Max,cn=Threads,cn=Monitor' -s base '(objectClass=*)' '*' '+' 2>/dev/null | grep monitoredInfo:
monitoredInfo: 16Active threads:
# ldapsearch -LLL -H ldapi:// -Y EXTERNAL -b 'cn=Active,cn=Threads,cn=Monitor' -s base '(objectClass=*)' '*' '+' 2>/dev/null | grep monitoredInfo:
monitoredInfo: 1Bytes used:
# ldapsearch -LLL -H ldapi:// -Y EXTERNAL -b 'cn=Bytes,cn=Statistics,cn=Monitor' -s base '(objectClass=*)' '*' '+' 2>/dev/null | grep monitorCounter:
monitorCounter: 23738Number of entries:
# ldapsearch -LLL -H ldapi:// -Y EXTERNAL -b 'cn=Entries,cn=Statistics,cn=Monitor' -s base '(objectClass=*)' '*' '+' 2>/dev/null | grep monitorCounter:
monitorCounter: 225Total number of operations (note that this query itself adds to the operation count):
# ldapsearch -LLL -H ldapi:// -Y EXTERNAL -b 'cn=Operations,cn=Monitor' -s base '(objectClass=*)' '*' '+' 2>/dev/null | grep monitorOp
monitorOpInitiated: 215
monitorOpCompleted: 214Total number of searches (note that this query itself adds to the search count):
# ldapsearch -LLL -H ldapi:// -Y EXTERNAL -b 'cn=Search,cn=Operations,cn=Monitor' -s base '(objectClass=*)' '*' '+' 2>/dev/null | grep monitorOp.*:
monitorOpInitiated: 71
monitorOpCompleted: 70Wily Introscope
- introscope.agent.disableAggregateCPUUtilization=true
- introscope.agent.sqlagent.sql.maxlength=[1-990]
- introscope.autoprobe.dynamicinstrument.enabled=false
- introscope.agent.remotedynamicinstrumention.enabled=false
- introscope.autoprobe.logfile=logs/AutoProbe.log
- log4j.appender.logfile=/dev/null
- log4j.logger.IntroscopeAgent=OFF
- transport.outgoingMessageQueueSize=6000
- transport.override.isengard.high.concurrency.pool.min.size=10
- transport.override.isengard.high.concurrency.pool.max.size=10
OpenOffice/LibreOffice
Calc
Tips
- If cells contain numbers that start with an apostrophe ('), then things such as aggregate functions in pivot tables will not work, even if the cells are formatted as "Number." To remove the apostrophes: Edit > Find & Replace > Search for = ".*", Replace = "&", More Options > Check "Regular Expressions"
Dates/Times
Dates and times are interpreted in terms of days, so if you want to add or a subtract a numeric amount of time to a value, convert the numeric value to days first. For example, let's say A1 holds a time (e.g. 07:34:53.123) and let's say you want to add 100 milliseconds to it. Let's say the 100 is in cell A2. The equation would be =A1+(A2/(1000*60*60*24))
To convert a text value of a date/time in ISO8601 format:
=DATE(MID(A2, 1, 4), MID(A2, 6, 2), MID(A2, 9, 2))+(MID(A2, 12, 2)/24)+(MID(A2, 15, 2)/(60*24))+(MID(A2, 18, 2)/(60*60*24))+(MID(A2, 21, 3)/(1000*60*60*24))Truncate milliseconds from a time: =TIME(HOUR(A1); MINUTE(A2); SECOND(A2))
Acronyms
- RAS: Reliability, Availability, Serviceability
Firefox
Enable Firefox Debug Logging at Runtime
- Go to
about:networking - Click
Start Logging - Copy the file name where it says it is writing to
- Reproduce the problem
- Click
Stop Logging - Review the file mentioned above
Enable Firefox Debug Logging at Startup
- Open terminal
- Set environment variables:
MOZ_LOG=timestamp,sync,rotate:200,nsHttp:5,cache2:5,nsSocketTransport:5,nsHostResolver:5,cookie:5MOZ_LOG_FILE=/tmp/log.txt
- Start Firefox
- Reproduce the problem
- Review the file mentioned above
Source
- Downloadable
source tarballs (under
$RELEASE/source/) - Online browsable sources
Other
VSCode
Tips:
- Quick open file:
⌘P - Comment/uncomment line(s):
^/ - Block select: Shift+Alt or Shift+⌥, and mouse select
HCL Notes
Change Email Format
Preferences } Mail } Internet } Internet Mail Format
Revision History
This version was built on 2024-07-01T11:12:53.580-0500.
1.0.59 (October 2023)
- Due to time constraints, updates are being made without summaries in this revision history; however, the date above is always updated on a new build.
1.0.58 (January 2023)
- Migrate to local CSS and image resources.
1.0.57 (October 2022)
- Clean up the home page and move the full table of contents into the Full Table of Contents page.
1.0.56 (August 2022)
- Move the Recipes chapter to the top and update the introduction.
- Some of the anchors for the General sub-chapters may be broken.
1.0.55 (February 2021)
- Note that Liberty's JAX-RS client has changed to RESTEasy
- Add Linux iotop batch example
- Describe OOM killer task dump RSS to bytes calculation
1.0.54 (January 2021)
- Add Linux perf recipe
- Add Wireshark Time Sequence Graph (tcptrace) section
- Add Windows pktmon recipes for all ports and a single port
- Add Linux perf probe and bpftrace sections
- Add Linux recipe item to check for CPU cgroup throttling
- Add AIX Example Script to Deny/Allow Packets on a port
- Add notes on AIX DNS and ARP caches
- Add example HotSpot JIT code cache compilation exclusion
- Add OpenShift General Troubleshooting Recipe
- Update Health Center download instructions
- Update GCMV download link
1.0.53 (December 2021)
- Add note that IBMJCEPlus is enabled by default since IBM Java 8.0.7.0
- Revamp the Linux
perfsection including discussion of call stack walking with--call-graph dwarfand--call-graph lbr, frame pointer omission with J9, and perf and J9 with assembly annotated profiling of JITted code - Add Linux
eBPFsection - Add Linux
KUTracesection - Add WAS traditional Intelligent Management recipe
- Update Memory Analyzer Tool download link
- Add link to HotSpot
async-profiler - Add section on CPU registers such as the stack pointer and the call stack, the frame pointer, and call stack walking and frame pointer omission (FPO)
- Add note about the difference between Intel and AT&T assembly syntax
- Add section about assembly syntax
- Add IBM Operational Decision Manager (ODM) chapter
- Add IBM Business Automation Workflow (BAW) chapter
1.0.52 (November 2021)
- Clarify that IBM Support Assistant and GCMV are supported as-is.
- Add Java J9 in Containers recipe items for
-XX:+ClassRelationshipVerifierand issues with tight container memory limits. - Add note that the Liberty
mpMetrics-x.xandmicroProfile-x.xfeatures implicitly enablemonitor-1.0that has some overhead and some ways to tune this. - Add Liberty JSF section and
performance note on
-Dorg.apache.myfaces.INITIALIZE_SKIP_JAR_FACES_CONFIG_SCAN=true - Add migration performance note about SCC being cleared on fixpack upgrade.
- Highlight new
%{remote}pHTTP access logging option in Liberty. - Add discussion of Forcing Revalidation of HTTP Cached Responses.
- Add discussion of Apache HttpClient Keep-Alive.
- Add jdmpview example of figuring out what caused a core dump
- Add macOS zprint command for kernel memory.
- Add example to print approximate bytes free on macOS.
1.0.51 (July 2021)
- Note that TCP retransmits may also cause the socket to switch into 'slow start' mode which may affect subsequent packet performance/throughput.
- Note that IBM Java Health Center is currently not shipped with nor supported on OpenJ9 and IBM Java 11.
- Created J9 Native
OutOfMemoryError Recipe including a link to a
!belowthebarjdmpviewquery that helps with NOOMs - Add Wireshark section on how to Visualize TCP Response Times.
- Add Wireshark section on how to Visualize HTTP Response Times.
- Update default J9 JIT compilation thread count.
- Note new J9
-XX:+GlobalLockReservationoption for AIX and Linux on Power. - Add z/OS
netstat -Aexample. - Add Http(s)URLConnection connect and read timeout options.
- Add Windows instructions on getting a core dump on a crash with "EXE has stopped working".
- Add example of how
to create a custom
jdmpviewDDR command. - Updates associated with OL App Stack Intro changes.
1.0.50 (April 2021)
- Add recipe items for WAS traditional and Liberty to avoid client keepalive socket churn for HTTP/1.0 and HTTP/1.1 by setting maximum keepalive requests per connection to unlimited.
- Add recipe items for WAS traditional and Liberty to increase the keepalive idle timeout for servers with incoming LAN HTTP traffic from clients using persistent TCP connection pools with keep alive (e.g. a reverse proxy like IHS/httpd or web service client).
- Add recipe items for WAS traditional and Liberty to minimize the number of application responses with HTTP codes 400, 402-417, or 500-505 to reduce keepalive socket churn.
- Add recipe item to Liberty to consider using local interface
or no-interface equivalents if using non-
@Asynchronousremote EJB interfaces in the application for EJBs available within the same JVM to avoid extra processing and thread usage. - Note virtual and physical memory constraints as another factor for potentially explicitly tuning the Liberty executor thread pool
- Add AIX recipe item on disabling TCP delayed ACKs and monitoring for retransmissions
- Add discussion of AIX network dog threads that may help with network processing bottleneck with the default single-CPU interrupt processing model
- Add discussion of using AIX
netstat -vto ensure that network switches are not sending PAUSE frames. - Add IHS discussion of %X and %k to check incoming connection re-use
- Add Apache HttpClient page and discussions of tuning its connection pool and using a custom user token handler to maximize pool re-use in mutual authentication scenarios.
- Add discussion on determining bottlenecks
- Add WAS traditional Hung Thread Detection Recipe
- Add WebSphere Liberty HTTP Access Log Recipe
- Add AIX nmon recipe
- Add AIX vmstat recipe
- Add AIX perfpmr recipe
- Add AIX iptrace recipe
- Add discussion of the DB2 z/OS type 2 JDBC driver using under-the-2GB-bar native memory which can drive native OutOfMemoryErrors
- Add z/OS IPCS VSMDATA command for reviewing under the 2GB bar native memory usage
- Add Java ODR discussion of its use of the 'Default' thread pool
- Add J9 example of late attach diagnostic logging
- Add note about APAR IJ31667 for J9 -Xgc:classUnloadingKickoffThreshold
- Add discussion of Java Unicode surrogate representation
- Add macOS pstack-equivalent lldb example
- Move POSIX awk section to a dedicated awk page
- Rename IBM MAT page to Eclipse MAT
- Add MAT examples to run in headless mode
- Add odo example on creating an application
- Add discussion of Oracle AWR reports
- Add IBM InfoSphere Master Data Management including discussion of monitoring its ODBC database transaction responses
1.0.49 (March 2021)
- Add Linux instructions
to disable delayed ACKs with
quickack 1and add to the Linux recipe - Add OpenShift Review Logs Recipe
- Add discussion of HotSpot -Xlog:gc option
- Add IHS LogFormat time until first response bytes option with %^FB
- Add Wireshark discussion of sequence and acknoledgment numbers
- Add notes on k8s CPU limits causing throttling
- Add Linux discussion of tmpfs and RAM usage
- Add Linux tcpdump Recipe
- Add Linux tcpdump on a port Recipe
- Add Linux nmon recipe
- Add Linux vmstat Recipe
- Add
%{R}Wto WAS traditional and Liberty HTTP access log examples - Add Add WAS traditional HTTP Access Log Recipe
- Add WAS traditional Dynamic Diagnostic Trace Recipe
- Add WAS traditional Diagnostic Trace from Startup Recipe
- Add WAS traditional Dynamic verbosegc Recipe
- Add WAS traditional verbosegc from Startup Recipe
- Add WAS traditional collector recipe
- Add Liberty Docker one liner
- Add discussion about macOS mds_stores high CPU usage
- Add example Java code using ThreadLocal SimpleDateFormat for debug traces
- Add Java example of running hello world in a container
- Update citation of the potential revenue impacts of performance tuning
1.0.48 (March 2021)
- Update links to performance tuning education topics
- Add more details about TCP congestion control and the congestion window. Add TCP buffer tuning item to Linux, AIX, and z/OS recipes. Add Linux slow start on idle tuning recipe item.
- Add Linux kernel symbol table details
- Add various recipes for OpenShift: Use Image Registry, Remote into a Container, Analyze a Pod, Analyze a Node, etc.
- Add note that Liberty doesn't work with Health Center dynamic enablement if some jndi related features are loaded
- Add discussion of Kubernetes CPU and memory resource requests and limits
- Move Troubleshooting Recipes to the top level
- Add WAS traditional notes on tuning database transaction log concurrency
- Add Linux notes on fio and NVMe SSDs
- Update the Dynacache recipe
- Add example code to take J9 dumps
- Add AIX details about compress and split
- Add z/OS discussion of system dumps, IPCS, XL C/C++ compiler, dbx, EzWAS, MCEVS1, and PLPSC
- Add z/OS uncompress and pax examples
- Add WAS traditional PasswordEncoder examples
1.0.47 (January 2021)
- Add warning about possible native OutOfMemoryErrors to Health Center usage and recipes.
- Add discussion about RAM corruption and ECC RAM.
- Add tWAS enableJDBCTiming for tracking long JDBC queries.
- Add OpenShift web console examples.
- Remove HotSpot Java's no-longer-valid option -XX:+HeapDumpOnCtrlBreak.
- Add details on J9 percolate-collect.
- Add J9 jdmpview commands to find min/max heaps.
- Update Linux Kernel Log description.
- Update the AIX recipe to highlight the importance of tuning Virtual Ethernet Adapter buffers and add an item for watching for network PAUSE frames.
- Add WAS Plugin discussion of IgnoreAffinityRequests.
- Add Dynacache flush to disk on stop details.
- Add Linux Pressure Stall Information discussion for CPU and memory
- Add discussion about AWS EFS PercentIOLimit
1.0.46 (November 2020) (14 major updates)
- Add Java J9 recipe item to check if the JIT code cache is full
- Add Apache CXF note about
-Dorg.apache.cxf.JDKBugHacks.gcRequestLatency=trueto avoid full GCs - Add
-Djava.net.preferIPv4Stack=true -Djava.net.preferIPv6Addresses=falseto the Java recipes - Add Java in Containers recipes
- Add Liberty in Containers recipe
- Add WebSphere Application Server traditional in Containers recipe
- Add awk tip to allow processing a lot
of files from
findusingARGVinstead ofxargs - Add note that WAS servlet
caching adds a
CACHED_RESPONSEheader if served from cache - Add note about the WAS traditional WSVR0652W thread pool size warning
- Add J9 HealthCenter
-Dcom.ibm.diagnostics.healthcenter.data.profiling=offoption to disable profiling. - Add Logging Custom PMI Data with Dynacache recipe
- Add note about getting accumulated CPU time of threads from Windows minidump through jdmpview
- Add Linux recipe item to change the CPU
speed governors to
performanceif power consumption isn't a concern. - Add lots of OpenShift okd examples.
1.0.45 (October 2020) (23 major updates)
- Suggest testing with disabling delayed ACKs to all OSes as generally recommended by John Nagle
- Add Linux EarlyOOM discussion
- Add tips on launching Eclipse
- Add J9 jdmpview examples of finding if a core was taken with exclusive access and which thread has exclusive access
- Note that zWLM with one service class does not overflow into discretionary
- Add Wireshark discussion about TCP streams
- Add details about
-Dcom.ibm.CORBA.SocketWriteTimeoutand-Dcom.ibm.CORBA.FragmentSize - Add details on J9 gencon concurrent marking
- Add Troubleshooting macOS page including instructions on creating core dumps
- Add Example C Program that Crashes
- Add tWAS hung thread detection overhead discussion
- Add java.util.logging configuration section
- Add jdmpview commands for dumping byte codes of a method from a core dump
- Add zWAS WLMStatefulSession discussion
- Add Java patching discussion
- Add Java Swing page
- Add Java Enterprise Edition (JEE) page
- Add AIX tar/compress/gzip instructions
- Add Health Center recipes
- Update Windows perfmon instructions
- Add Windows PowerShell and wmic commands including an example of printing pooled paged- and non-paged bytes
- Add example Linux commands to induce network delay with tc
- Add Java options for connect and read timeouts of HttpURLConnection
- Add HotSpot Mission Control recipe
1.0.44 (September 2020) (41 major updates)
- Refresh Liberty and tWAS recipes.
- Add Liberty Web Response Cache discussion.
- Add MAT Dark Matter issue discussion.
- Fix HCL Commerce links.
- Add lots of Linux CPU, network, and disk tools.
- Add discussion of how peak throughput may drop when response times increase.
- Add Wireshark discussion of calculating packet loss and finding SYNs without SYN/ACKs.
- Update IBM Java ORB tuning discussion.
- Add general guidance on tuning timeouts.
- Add Traditional WAS recipe on logging TPV/PMI data.
- Add Linux section on installing kernel debug symbols for various distributions.
- Add general guidance on investigating Java lock contention.
1.0.43 (August 2020) (57 major updates)
- Update DB2 driver discussion of timerLevelForQueryTimeOut.
- Add discussion about Spring JMS cacheLevel=0.
- Add IHS discussion about mod_event and KeepAlive.
- Add discussion about Wireshark and decrypting TLS traffic with SSLKEYLOGFILE.
- Add undocumented HealthCenter com.ibm.java.diagnostics.healthcenter.headless.filename option.
- Update Linux kernel hang script.
- Add Linux basic troubleshooting script.
- Add Linux Sysrq discussion.
- Add note about Linux systemd killing nohupped processes.
- Add Bash command line movement examples.
- Add HealthCenter instructions on getting an HCD from a running process.
- Add discussion of SIB read ahead.
- Add discussion of Docker --pid=host.
- Add zWAS WLM HTTP request distribution discussion.
- Update discussion of WAS Plugin MaxConnections.
- Add link about JMS max batch size.
- Describe J9's native memory allocation header and footer eye catchers.
- Add advanced SIB ME tuning notes.
- Add discussion of HotSpot -XX:+PreserveFramePointer.
- Add example tshark usage including long DNS lookup times.
- Describe how to fix AIX nmon PoolIdle value of 0.
- Add JEE citation to JDBC shareable discussion.
- Add J9 Linux perf-hottest post-processor script.
- Add DB2 discussion of a WLM pressure valve and MALLOCOPTIONS.
- Add AIX Virtual Ethernet Adapter tuning.
- Add DB2 thread dump example.
- Add POSIX script to watch for some output and send a trigger line to a file.
- Add example JMS producer and MDB consumer.
1.0.42 (July 2020)
- Fix missing links to the Troubleshooting Java pages.
- Add section on tuning the Java XML JAXP ServiceLoader classloading.
- Add Maven sections on listing archetypes and creating a simple Liberty app using an archetype.
- Add examples on how to run Java code on application startup.
- Add tWAS CDI tuning options.
- Add awk tips on printing the current file, current line number, and printing to stderr.
- Add section describing differences between tWAS SIB and Liberty embedded messaging.
- Add Liberty section on JakaraEE.
- Add simple description of z/OS CP, zAAP, zIIP, and IFL processors.
- Add OpenShift command for dynamically forwarding a port to a pod.
- Add example Linux systemd Liberty service.
1.0.41 (June 2020)
- Add information on k8s sizing of clusters, masters, and spanning data centers
- Add discussion of tWAS on z/OS servant contraction
- Add tWAS idle tuning considerations paper
- Add macOS docs on XCode Instruments, log, sysdiagnose, Console, and Activity Monitor
- Add Resiliency page
- Add comment about how to deal with tWAS serialized startup
- Add tWAS Startup order option
- Add information on Java -Djavax.net.debug
- Add Liberty HTTP compression element
- Add Liberty consoleFormat=simple option
- Add Liberty startAfter attribute
- Add openssl dump TLS certificate example
- Add discussion about killing runaway threads
- Add discussion about the 'The server has decided to close this client connection.' warning
- Add OpenJ9 Internals Documentation
- Move cloud paks page to section under IBM Cloud
- Add Liberty section on how to investigate OSGi bundle startup times
- Add Liberty section on how to pass configuration
- Add glibc_malloc_info.py to investigate glibc malloc free lists
- Add discussion of SSLUtils.flushCloseDown and -DtimeoutValueInSSLClosingHandshake=0
- Add section on J9 -Xverify:none deprecation and -XX:+ClassRelationshipVerifier alternative
1.0.40 (June 2020)
- Internal format conversion.
1.0.39 (May 2020)
- Add details about Linux strace and ltrace with stacks.
1.0.38 (March 2020)
- Add details about TIME_WAIT processing in Linux.
1.0.37 (February 2020)
- Add discussion about the OpenJDK JCL HTTP(S) Client implementation.
1.0.36 (February 2020)
- Add sub-chapters on WAS/Java/IHS configuration/log analysis/healthcheck
1.0.35 (January 2020)
- Add Linux network analysis commands: iptraf-ng, nethogs, iftop, jnettop, trafshow, and speedtest-cli.
1.0.34 (November 2019)
- Add Linux ip, ss, and nstat commands.
1.0.34 (November 2019)
- Migrate blog content (since developerWorks blogs is being sunset) to various sections of this cookbook.
1.0.33 (October 2019)
- Remove link to developerWorks forum as that is being sunset.
1.0.32 (September 2019)
- Change chapter order.
1.0.31 (August 2019)
- Break up Java chapters into J9 and HotSpot
- Add details about TCP KeepAlive
1.0.30 (April 2019)
- Fix Java RMI Explicit GC default from 1 minute to 1 hour
1.0.29 (February 2019)
- Add Containers chapter
1.0.28 (January 2019)
- Add AIX native memory debug info
1.0.27 (November 2018)
- Add Linux eBPF example for native memory leaks
1.0.26 (November 2018)
- Add Linux lsof
1.0.25 (November 2018)
- Add Linux perf On-CPU stack sampling with wallclock timestamps
1.0.24 (October 2018)
- Add Traditional WAS page to discuss Startup
1.0.23 (October 2018)
- Update GCMV installation instructions
1.0.22 (October 2018)
- Added information on tuning DirectByteBuffer pool sizes for both editions of WAS
- Describe how to request exclusive access for a system dump on IBM Java to avoid dumps taken during GC
1.0.21 (May 2018)
- Added Mac section
- Added Linux Available memory reference
1.0.20 (March 2018)
- Added pureScale section
1.0.19 (January 2018)
- Add WAS traditional instructions on setting up ODR custom logging
1.0.18 (September 2017)
- Update MAT instructions with DTFJ Java 8 note.
1.0.17 (August 2017)
- Update Memory Analyzer download instructions.
1.0.16 (April 2017)
- Change IBM Java -Xverbosegclog recommendation
1.0.15 (April 2017)
- Add Linux swappiness, OOM killer, and swap recommendations
1.0.14 (January 2017)
- Change major tool instructions to use Eclipse instead of ISA
1.0.13 (June 2016)
- Fix broken Knowledge Center links.
- Change WAS Classic to WAS traditional
1.0.12 (February 2016)
- Various updates based on field work.
1.0.11 (December 2015)
- Fix error referencing META-INF/lib instead of META-INF/resources in WAS > WAS Classic > HTTP, in the section "ServletContext.getResource performance"
1.0.10 (December 2015)
- Change graphs from R to gnuplot
1.0.9 (December 2015)
- Update Solaris KSSL guidance.
1.0.8 (December 2015)
- Add more TPV/PMI screenshots.
- Add more Health Center screenshots.
- Add Liberty request timing and event logging details.
1.0.7 (December 2015)
- Update GCMV page.
1.0.6 (September 2015)
- Add troubleshooting recipes.
1.0.5 (August 2015)
- Rename WAS traditional Profile to WAS Classic
1.0.4 (May 2015)
- Remove unused Liberty idle tuning option.
1.0.3 (April 2015)
- Rename Java chapters.
1.0.2 (April 2015)
- Add example Solaris DTrace scripts and
vmstat -pinformation.
1.0.1 (February 2015)
- Add February SPECj benchmark results.
1.0.0 (January 2015)
- First public version.
Notices
Copyright
Copyright International Business Machines Corporation 2023. All rights reserved. U.S. Government Users Restricted Rights: Use, duplication or disclosure restricted by GSA ADP Schedule Contract with IBM Corporation.
Statement of Support
While IBM welcomes any comments or suggestions, this Cookbook is not supported by IBM and is provided on an "as-is" basis without warranty of any kind. IBM may make updates if needed and as time permits.
The Cookbook contains techniques and tools that may not be supported by IBM's support process. For example, you may gather some form of trace that captures a problem that the support process is not accustomed to analyzing. If you have any question about any content or recommendations, particularly if you are about to do something in a production environment, please first open a support case to ask what is and isn't supported.
Terms of Use
IBM Terms of use: http://www.ibm.com/legal/us/en/
References in this publication to IBM products, programs, or services do not imply that IBM intends to make these available in all countries in which IBM operates. Any reference to an IBM product, program, or service is not intended to state or imply that only IBM's product, program, or service may be used. Any functionally equivalent product, program, or service that does not infringe any of IBM's intellectual property rights may be used instead of the IBM product, program, or service. Evaluation and verification of operation in conjunction with other products, except those expressly designated by IBM, is the user's responsibility.
IBM may have patents or pending patent applications covering subject matter in this document. The furnishing of this document does not give you any license to these patents. You can send license inquiries, in writing, to:
IBM Director of Licensing
IBM Corporation
500 Columbus Avenue
Thornwood, New York 10594 USATrademarks and Service Marks
IBM, the IBM logo and ibm.com are trademarks of International Business Machines Corp., registered in many jurisdictions worldwide. Other product and service names might be trademarks of IBM or other companies. A current list of IBM trademarks is available on the web at "Copyright and trademark information" at http://www.ibm.com/legal/us/en/copytrade.shtml
License
Any examples in this book are licensed under the Apache License 2.0
Authors
- Kevin Grigorenko (kevin.grigorenko@us.ibm.com) [Primary Contact]
- Alexandre Polozoff (polozoff@us.ibm.com) [Secondary Contact]
- Andrea Pichler
- Andy Henderson
- Anuradha Ramamoorthy
- Ashish Deb
- Ed Bernal
- Eric M Covener
- Gary Hunt
- Gary J DeVal
- Hermann Huebler
- Jagdish Komakula
- Keith B Smith
- Marco Fabbri
- Martin Ross
- Mike Andrasak
- Phil Hirsch
- Raquel Maldonado
- Surya V Duggirala
- Vishal A Charegaonkar
- Younes Manton
Contributors
- Andrew Levandoski
- Benedict Fernandes
- Chris Bailey
- Pavel Malyutin
- Rengan Sundararaman
- Stephen A Hellberg
- Tom Alcott
- Walt Adams
Thank you to the IBM managers that helped support this project: Prasad Imandi, Dave Schell, Barry Foster, Melissa Modjeski, Keri Olson, Frank Schembari, Michael Stuy, Mike Morin, Sree Ratnasinghe, and others.
Table of Contents
- Introduction
- Recipes
- General Recipes
- Operating System Recipes
- Java Recipes
- WAS traditional Recipes
- General WAS traditional Performance Problem
- Large Topologies Recipe
- Request Metrics Recipe
- Tune a Thread Pool
- HTTP Sessions Recipe
- Security Recipe
- Connection Pool Hangs in createOrWaitForConnection
- Threads in socketRead0 in JDBC calls
- Slow or Hung Application
- Threads in java.io.FileOutputStream.writeBytes
- Logging PMI Data
- Logging Custom PMI Data with Dynacache
- General WAS traditional Performance Problem
- WebSphere Liberty Recipes
- Web Server Recipes
- Container Recipes
- Caching Recipes
- General Recipes
- Troubleshooting Recipes
- Troubleshooting Operating System Recipes
- Troubleshooting Linux Recipes
- Troubleshooting AIX Recipes
- Troubleshooting Windows Recipes
- Troubleshooting OpenJ9 and IBM J9 Recipes
- Troubleshooting HotSpot Recipes
- Troubleshooting Memory Leaks
- Troubleshooting WAS traditional Recipes
- WAS traditional Dynamic Diagnostic Trace Recipe
- WAS traditional Diagnostic Trace from Startup Recipe
- WAS traditional Hung Thread Detection Recipe
- WAS traditional HTTP Access Log Recipe
- WAS traditional Dynamic verbosegc Recipe
- WAS traditional verbosegc from Startup Recipe
- WAS traditional Common Diagnostic Files Recipe
- WAS traditional collector Recipe
- WAS traditional runtime diagnostic trace script
- WAS traditional Dynamic Diagnostic Trace Recipe
- Troubleshooting WebSphere Liberty Recipes
- Troubleshooting Web Servers Recipes
- Troubleshooting Kubernetes Recipes
- Troubleshooting OpenShift Recipes
- OpenShift Login Recipe
- OpenShift General Troubleshooting Recipe
- OpenShift Use Image Registry Recipe
- OpenShift Remote into Container Recipe
- OpenShift Analyze a Pod Recipe
- OpenShift Analyze a Node Recipe
- OpenShift Investigate ImagePullBackOff Recipe
- OpenShift Review Logs Recipe
- OpenShift Download Container Files Recipe
- OpenShift Investigate Source of Signal
- Liberty in OpenShift Get Javacore Recipe
- Liberty in OpenShift Get Heapdump Recipe
- Liberty in OpenShift Get System Dump Recipe
- Replace Container Directory in OpenShift
- Execute a Script in a Container on Startup in OpenShift
- OpenShift Login Recipe
- Cookbook General
- Operating Systems
- Java
- WebSphere Application Server
- WAS traditional
- Scaling and Large Topologies
- Performance Monitoring
- Logging and Tracing
- Thread Pools
- Java Database Connectivity (JDBC)
- HTTP
- Startup
- Database Persistence
- Dynamic Cache
- EJBs
- Messaging
- Web Services
- Asynchronous Beans
- Intelligent Management
- Security
- Administration
- Session Initiation Protocol (SIP)
- WAS traditional on zOS
- Scaling and Large Topologies
- WebSphere Liberty
- Configuration Analysis
- Log Analysis
- Resiliency
- WAS traditional
- Major Tools
- Web Servers
- Applications
- Containers
- Virtualization
- Databases
- Caching and WebSphere eXtreme Scale
- IBM MQ
- Authentication
- Competition and Migration
- IBM App Connect Enterprise
- IBM Business Automation Workflow
- IBM InfoSphere Master Data Management
- IBM Maximo
- IBM Operational Decision Manager
- Troubleshooting
- HCL Commerce
- HCL Portal
- Appendix
WebSphere Portal
This section has been renamed to HCL Portal.
pureScale
DB2
WAS Workload Balancing and Automatic Client Reroute
Database applications running in a DB2 pureScale environment can use the DB2 transaction-level or connection-level workload balancing (WLB) functionality. WLB balances application requests among all members of the DB2 pureScale cluster. When WLB is enabled the DB2 clients distribute workload or application request based on the capacity (that is, the priority or weight) values in a server list that the DB2 pureScale server returns. These capacity values indicate the current load on a DB2 pureScale member. A member with a capacity value below that of the other members in the server list is busier than other members. [...]
DB2 Java applications with the supported IBM Data Server Driver for JDBC and SQLJ (JCC driver) running in an IBM WebSphere Application Server environment can use the WLB or client affinities features to access databases on a DB2 pureScale cluster. [...]
You must add JCC data source property enableSysplexWLB and set the value to true to enable WLB. [...]
DB2 automatic client reroute (ACR) complements a continuously available DB2 pureScale cluster that offers 24/7 availability for clients connecting to mission-critical production systems. ACR is a feature in DB2 clients that takes application requests that are directed toward an offline DB2 pureScale member and reroutes them to active DB2 pureScale members. ACR is automatically enabled with WLB or client affinities so no additional steps are required to specify which member the application should connect to upon encountering an outage. [...]
To enable WebSphere Application Server to support seamless ACR, from the Purge policy list, select FailingConnectionOnly. (https://public.dhe.ibm.com/software/dw/data/dm-1206purescaleenablement/wlb.pdf)
WebSphere ESB
Processing Large Objects
Ensuring optimum performance is attained on systems processing large objects is an issue commonly faced by users of middle-ware software. In general, objects of 1M or more can be considered to be 'large' and require special attention, please review the following articles for awareness of considerations and tuning / application design advice:
Large Messages dW article: https://www.ibm.com/developerworks/library/ws-largemessaging/
Claim Check Pattern: http://www.ibm.com/developerworks/websphere/library/techarticles/1006_kharlamov/1006_kharlamov.html
Aggregation Design Patterns
There are several application design considerations that should be understood when developing Mediation Flows utilising aggregation design patterns in order to attain optimal performance and avoid unnecessary processing costs. The following article details these design considerations:
Aggregation dW article: http://www.ibm.com/developerworks/websphere/library/techarticles/1111_norris/1111_norris.html
Depending on whether there is a FanIn Mediation Primitive downstream of a FanOut Mediation Primitive alters the logic within the FanOut mediation Primitive. When using a FanOut Mediation Primitive without an associated FanIn Mediation Primitive an array of SMOs is created up-front before the output terminal is first fired. If there is an associated FanIn then each SMO is created as required instead of all ahead of time. If the SMO is large in size or a large number need to be created (for example, iterating on a large array of elements, firing a large number of times, or a large number of branches), then this can have a significant effect on memory overhead. For example, if you have a 1MB input message and you use a FanOut to iterate over an element that repeats 1000 times, transforms the message and passes on to a JMS queue (without a FanIn), then before the first output terminal fire on the FanOut, 1000 SMOs will be created each of ~1MB in size which would mean you would have a 1GB array allocated to the JVM Heap. You need to be aware of this behaviour when creating your application and tuning the size of the JVM Heap and application threadpools.
Asynchronous Invocation of Synchronous Services Design Patterns
In general, synchronous service invocations are recommended, because they have less processing overhead and provide better performance. In some cases however, asynchronous invocations can reduce the overall response time of the application and are preferred, such as in the simultaneous invocation of multiple long-running services. When invoking a synchronous service asynchronously, however, additional processing is incurred in the messaging layer of the product that needs to be understood and tuned appropriately. The following article details these considerations and processing logic:
Parallel Invocation of Synchronous Services dW article: http://www.ibm.com/developerworks/websphere/library/techarticles/1312_ross/1312_ross.html
NB. You do not need to switch to asynchronous invocations for JAX-WS Import Bindings to impose specific time-out settings - this can be done by applying an appropriate HTTP Policy configurable through the Administration Console (and can be exported to be brought into the development environment) which does not incur the overhead in the messaging layer of the product - as with the switch to asynchronous invocations.. There are some small caveats that need to be considered / understood - please see the "Defining a Timeout on Synchronous JAX-WS Imports" section below.
Shared Libraries
The default setting for libraries is share by copy - this means that each Mediation Module referencing a particular library retains its own copy, which can result in bloated and redundant memory usage. You may need to consider shared libraries as detailed in the following technote:
http://www-01.ibm.com/support/docview.wss?rs=2307&uid=swg21322617
Shared libraries can also benefit run-time performance through reduced serialisation in addition to reducing overall memory footprint - for instance in Lazy Parsing applications employing SCA Binding componentisation.
Parsing Modes
Don't mix parsing modes within a deployment. Moving between a Lazy Parsing module an Eager Parsing configured module through SCA Bindings causes increased overhead in processing costs that should be avoided.
Some scenarios will perform better in Eager Parsing mode (lightweight scenarios with small payloads), however, mediation modules which are more complex, or are processing larger payload workloads will typically benefit from Lazy Parsing and can exhibit significant performance improvements (dependant on application design).
Memory Analyzer Plugin
IBM Extensions for Memory Analyzer for WebSphere ESB is an extension for IBM Monitoring and Diagnostic Tools for Java™ -- Memory Analyzer, augmenting data structures and providing reports specific to WebSphere ESB. It significantly improves the effectiveness and efficiency of problem diagnosis and resolution, and provides a deeper understanding of your WebSphere ESB deployment. The following article and WebSphere Technical Exchange show you how to use the IBM Extensions for Memory Analyzer for WebSphere ESB to analyze operating system level dumps or portable heap dumps from a WebSphere Enterprise Service Bus solution:
IBM Extensions for Memory Analyzer for WebSphere ESB: http://www.ibm.com/developerworks/websphere/library/techarticles/1206_ross/1206_ross.html
WebSphere Technical Exchange on Memory Analyzer Plugin and APARs associated with memory management: http://www-01.ibm.com/support/docview.wss?uid=swg27036363
Comparative Transformation Technologies (XSLT vs. Business Object Map)
XSLT Mediation Primitives are designed for applications that have .XSL currently or that want to utilise specific XSLT function.
Business Object Mapper Primitives are designed for improved performance, but may require specific function to be coded manually within the map.
Business Object Maps have some reduced function out of the box, but much can be implemented in simple custom Java utilising the BO API. They provide improved performance, especially for larger message payloads, as they work at the API so do not need to be passed through a transformation engine which will produce bytes causing additional SMO construction and serialization / de-serialization costs.
In IBM Integration Designer V8.0 a new mediation primitive has been introduced to enable the developer to switch between the targeted run-time transformation technologies through a simple combo-box - previously a complete re-write of the transformation would be required within the new primitive if a customer wanted to switch between technologies for improved performance.
First Messing Response Time
The performance, specifically regarding response time, of the first message entering the system is often of high importance. Typically there is a trade off between artefact initialisation costs being associated with server start-up or first message processing. There are several techniques and product features that can be utilised to improve and control the system when response times are critical for first message processing.
Synthetic Messages
First message response times can be improved by priming the Mediation Module with a synthetic message:
Synthetic messages TechNote: http://www-01.ibm.com/support/docview.wss?uid=swg21589355
This may require the Mediation Module / Components to have an additional "no op" operation or flow path to process the synthetic message without affecting downstream systems, but will result in the vast majority of initialisation costs to have been met prior to the first "production" message entering the system.
XPath and XSL Pre-compilation
Pre-compilation of XSL and XPath was introduced in V7.5, these artefacts are now compiled at deploy time rather than on first message for Lazy Parsing Modules (the transformation engine usitilised for Eager Parsing does not have such a concept). This can provide substantial improvements to first message processing time for Lazy Parsing Mediation Flows. The improvement factor is dependent on the number of XSLT Mediation Primitives and XPath statements in the intitial path through the Mediation Flow, and the complexity of the XSL / XPath.
Pre-loading of Mediation Flows
The option to load Mediation Modules and associated artefacts and resources at server start up, opposed to on first message, was introduced in V7.5.1. A property was exposed that enables the user to use wildcards to select appropriate Mediation Modules and Components and define how many instances of the artefacts to load into the runtime:
Test cases used to evaluate this feature show that >50% improvement can be achieved in initial message processing times - although this is dependent on a number of factors, including the number of components in a project and the complexity of the message definitions. This not only builds the Message Flows but also many of the objects required to model the message structures during server start-up and applies to both Eager and Lazy Parsing Modules.
Associated APARS
Several APARs may be required relating to pre-compilation of XSL / XPath and pre-loading of Mediation Flows:
IC96060: EXTRANEOUS OR MISLEADING ERROR MESSAGES DURING MEDIATION
FLOW PRE-LOADING
IC96845: MULTIPLE PROBLEMS CACHING XSL MAPS RESULTING IN SLOW RESPONSE
TIMES AND UPDATES NOT BEING PICKED UP AFTER MODULE RESTART
IC95917: CACHE PRECOMPILED STYLESHEETS PER CONTEXT CLASSLOADER (http://www-01.ibm.com/support/docview.wss?uid=swg1IC95917)
IC96799: NULLPOINTEREXCEPTION DURING SERVER STARTUP WHEN PRELOAD
VARIABLE IS SET (http://www-01.ibm.com/support/docview.wss?uid=swg1IC96799)
IC91519: POOR PERFORMANCE/ EXCESSIVE MEMORY USE OF BO MAPPINGS IN BPEL
PROCESSES, OR WHEN MAPPINGS ARE APPLIED IN CUSTOM CODE (http://www-01.ibm.com/support/docview.wss?uid=swg1IC91519)
Restricting the Instances of Mediation Flows on the JVM Heap
For WebSpere ESB a Mediation Flow object is required for each concurrent thread executing a unique flow / operation in a Mediation Module. Due to product changes introduced in V7.0 the concepts differ depending on the version of the run-time and the version of the development environment used to generate the run-time artefacts.
V6 Run-time / Applications
EAR files generated prior to V7.0 utilise the EJB Container, whether they are deployed to a V6 or V7 run-time. Each Mediation Module "Application" is represented by a stateless session EJB - the number of EJBs created is controlled as follows:
1.Transport threadpool: Controls maximum concurrency in the system
(ie. WebContainer threadpool)
2.Application EJB threadpool (default min=50, max=500): Each Application
will create up to the maximum defined number of EJBs in a
module-specific pool
If the min value for an EJB pool is set lower then we might free up memory as the pool contracts. The following APAR may be required:
http://www-01.ibm.com/support/docview.wss?uid=swg1IC76728.
V7 Run-time / Applications
With the exception of EAR files generated prior to V7.0 (but deployed
to a V7 run-time) the number of Mediation Flows on the JVM Heap is
controlled as follows:
1.Transport threadpool: Controls maximum concurrency in the system (ie.
WebContainer threadpool)
2.JVM Managed: Weak / Soft references will clean up unused resources
The references that keep the Mediation Flow objects alive on the JVM Heap have been modified in V7 onwards to enable clean-up to occur when the JVM Heap is under stress. The following APARs may be required:
IC94803: ALLOW FOR GARBAGE COLLECTION OF CERTAIN REFERENCES (http://www-01.ibm.com/support/docview.wss?uid=swg1IC94803)
IC82189: ENABLE MEDIATION FLOWS TO BE GCD WHEN HEAP IS UNDER STRESS (http://www-01.ibm.com/support/docview.wss?uid=swg1IC82189)
Throttling Individual Applications
Often it is required to "throttle" individual applications that may be having an adverse effect on the system (to limit memory usage, or CPU consumption for instance). The concepts and methods differ depending on the version of the run-time and the version of the development environment used to generate the run-time artefacts.
You can throttle applications by tuning / restricting the appropriate threadpools on which they run. This typically has a global impact as many applications may be running on the same threadpool, however, it is possible to isolate applications (or groups of applications) to specific threadpools by creating new transport chains through which to invoke them.
First create a new threadpool, in the administrative console click "Servers > Server Types > WebSphere application servers > server_name > Thread pools", then click "New" and fill in the required details. Next create a new transport chain as detailed in the following article:
The next step is to configure the transport chain that has just been created. In the administrative console navigate to the newly created transport chain, click TCP inbound channel and modify the Thread Pool setting to use your new threadpool.
NB. If you create a new web container transport chain, the initial value for the writeBufferSize attribute is 8192, which is too small for most web container transport chains. Navigate to the newly create transport chain, click Web container inbound channel, and specify 32768 (or appropriate value) in the Write buffer size field.
You may also need to configure the appropriate virtual host as described in the following article:
For you application to run on the new threadpool you must invoke it through the appropriate transport chain by using the port you specified on its creation.
V6 Generated Applications
EAR files generated prior to V7.0 utilise the EJB Container, whether they are deployed to a V6 or V7 run-time. Every EJB in WebSphere Application Server has an associated pool with default min, max value of 50,100.
These can be overridden globally or modified on a per Application basis by specifying a system property as follows:
-Dcom.ibm.websphere.ejbcontainer.poolSize=<J2EE-bean-name>=min,max
The J2EE-bean-name is formed by concatenating the application name (without the file extension), the module name (without the file extension) and the name of the bean ("ejb-name" as defined in the bean's deployment descriptor), using a # separator. For example, if you have an application called SMApp.ear that includes module PerfModule.jar, and module PerfModule.jar uses a bean named TunerBean, the J2EE name of the bean is specified as SMApp#PerfModule#TunerBean.
If the property is set correctly you should see a line similar to the following output in the system log on first invocation of an operation in the module:
[24/05/11 15:28:02:444 BST] 00000025 EJBMDOrchestr I CNTR0060I: (Min,Max) pool size is (5,100) for bean com.ibm.wsspi.sibx.mediation.flow.ejb.MediationFlowBean
Unfortunately, every WESB module will output a message with the same class name but the pool values will apply to individual beans.
For verification, a trace string of com.ibm.ejs.container.BeanMetaData=all will output the details of every bean on first invocation including the correct J2EE name needed above and the current pool settings for the EJB.
Reducing the min value of an EJB pool will mean that during quiet spells for a particular application (Mediation Module) the pool will be shrunk down to that minimum value and any associated mediation flow objects will be eligible for GC. The EJB pool is shrunk back down (in increments) to the minimum size after the pool has been inactive for a certain period of time. This can be configured from the admin console at "Application servers > server1 > EJB container", the setting is labelled "Inactive pool cleanup interval" and defaults to 30 seconds.
Defining a Timeout on Synchronous JAX-WS Imports
Synchronous JAX-WS Bindings do not offer a simple setting to modify the default time-out options, as is available with the asynchronous invocation. However, switching to asynchronous invocations introduces unnecessary overhead that can affect application performance. If you need to set binding / application specific time-out values for a synchronous JAX-WS invocation then this can be achieved by applying an appropriate policy set, and does not incur any additional overheads. To achieve this follow these steps:
1.Create a new policy set in the Administrative Console. Click
Services > Policy Sets > Application policy sets > New
2.Add an HTTP Transport policy and configure the time-out values
appropriately
3.Save and export the policy set from the Administrative Console
4.Import the policy set into the development environment (Import >
WebServices > WebSphere Policy Sets)
5.Attach the policy set to the Import Binding (Properties > Binding
> Policy Sets > Default policy set)
It should be noted that if a time-out occurs the exception propagated back to WebSphere ESB is not a modelled fault, thus the failure message is propagated to the fail terminal (the timeout terminal is just for handling time-outs for asynchronous invocations). The SMO failinfo section will appear as follows:
<failInfo>
<failureString>javax.xml.ws.WebServiceException:
java.net.SocketTimeoutException: Async operation timed
out</failureString> <origin>External Service</origin>
</failInfo>
The reference to "Async operation timed out" just refers to the fact that it is using the Java Async IO API, nothing to do with the existing asynchronous SCA model.
Best Practices and Tuning Red Papers
- Best Practices and Tuning Red Papers - BPM / WebSphere ESB V7.0: http://www.redbooks.ibm.com/abstracts/redp4664.html?Open
- Best Practices and Tuning Red Papers - BPM / WebSphere ESB V7.5: http://www.redbooks.ibm.com/abstracts/redp4784.html?Open
- Best Practices and Tuning Red Papers - BPM V8.0: http://www.redbooks.ibm.com/abstracts/redp4935.html?Open
WebSphere DataPower
Performance tuning links:
WebSphere MQ
This chapter has been renamed to IBM MQ.
WebSphere Commerce
This section has been renamed to HCL Commerce.